|
|
|
Porsche, and the Porsche crest are registered trademarks of Dr. Ing. h.c. F. Porsche AG.
This site is not affiliated with Porsche in any way. Its only purpose is to provide an online forum for car enthusiasts. All other trademarks are property of their respective owners. |
|
|

  |

| URY914 |
 Jul 16 2007, 08:31 PM Jul 16 2007, 08:31 PM
Post
#21
|
|
I built the lightest 914 in the history of mankind.  Group: Members Posts: 127,329 Joined: 3-February 03 From: Jacksonville, FL Member No.: 222 Region Association: None |
mo
Attached thumbnail(s) 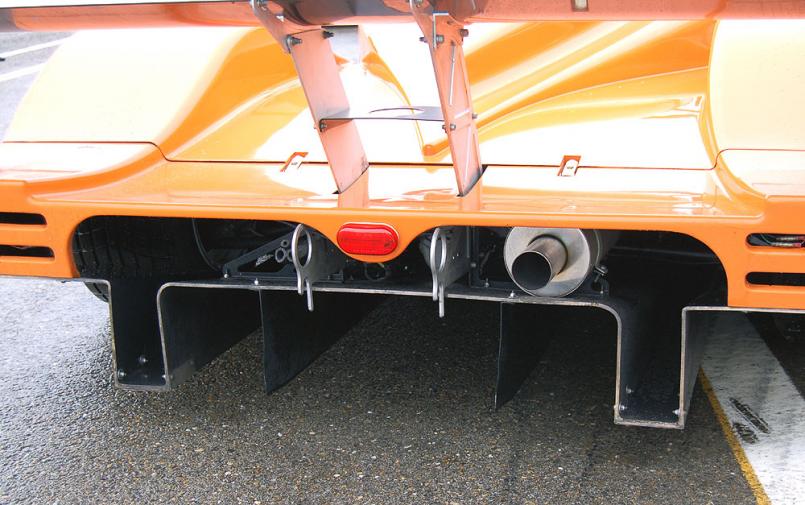
|
   |

 
|
| URY914 |
Jul 16 2007, 08:32 PM
Post
#22
|
|
I built the lightest 914 in the history of mankind. Group: Members Posts: 127,329 Joined: 3-February 03 From: Jacksonville, FL Member No.: 222 Region Association: None |
llll
Attached image(s) 
|
|
|
|
| tdsmoonchild |
Jul 16 2007, 08:34 PM
Post
#23
|
|
Terry Group: Members Posts: 197 Joined: 18-January 06 From: Duncanville,TX Member No.: 5,431 |
just remember that if you make it, and it's cool, everyone will want one!
|
|
|
|
| URY914 |
Jul 16 2007, 08:41 PM
Post
#24
|
|
I built the lightest 914 in the history of mankind. Group: Members Posts: 127,329 Joined: 3-February 03 From: Jacksonville, FL Member No.: 222 Region Association: None |
On some of them the vertical fins are bolt on not molded in. In case of damaged on track and easier to make.
|
|
|
|
| iamchappy |
Jul 16 2007, 08:43 PM
Post
#25
|
|
It all happens so fast! Group: Members Posts: 4,893 Joined: 5-November 03 From: minnetonka, mn Member No.: 1,315 Region Association: Upper MidWest |
These things are way cool. You have a great idea here, I know Patrick Motor Sports has fashioned underbellies but not one of these .
I could have my buddy bend me up one so you could see how it works and looks, then you can take it from there. He builds drag bikes and does all my tig welding for me. He also builds drag snowmobile sleds. He is a master with the sheet metal brake. Some sort of canard fashioned into a spoiler would set it off front to back. Stay tuned... |
|
|
|
| TonyAKAVW |
Jul 16 2007, 08:45 PM
Post
#26
|
|
That's my ride. Group: Members Posts: 2,151 Joined: 17-January 03 From: Redondo Beach, CA Member No.: 166 Region Association: None |
Paul: Nice pics! There's a web site (unfortunately I don't have the URL handy) called Mulsanne's Corner and has a lot of detailed pictures and aerodynamic discussion of LeMans prorotype cars. There seems to be considerable variation among the number of strakes, the width and number of tunnels etc. The one seemingly constant thing though is the angle of the tunnels and from other reading I have found, 10-12 degrees is the magic number. Beyond that, determinung how many strakes to have etc., is probably something learned from wind tunnel testing or CFD simulations, neither of which I have access to. Without a truly flat bottom and the approriate amount of air getting under the car, its hard to say how much downforce this will produce.
tds: If everyone wants one then I might be able to recoup the mold costs (IMG:style_emoticons/default/smile.gif) At this point if I go with 3 layers of carbon fiber, its going to be somewhere in the north of $350 (very rough estimate) range just for materials per copy. -Tony |
|
|
|
| Joe Ricard |
Jul 16 2007, 08:57 PM
Post
#27
|
|
CUMONIWANNARACEU Group: Members Posts: 6,811 Joined: 5-January 03 From: Gautier, MS Member No.: 92 |
Yup I want one for lapping days and commuting back and forth to events. Difussers are not legal for my Autocross class so it need to be removable.
|
|
|
|
| okieflyr |
Jul 16 2007, 09:46 PM
Post
#28
|
|
9fauxteen Group: Members Posts: 816 Joined: 9-January 05 From: Phila PA Member No.: 3,426 Region Association: North East States |
Unless you are using a very specialized resin, you are not going to need alot of heat when working with epoxies. They can be temp sensitive, and do have curing ranges. As far as vacuum, I do composite laminates for a living (prosthetics)and in GENERAL 20-25 inches Vacuum gets the job done, and you'll need to sustain it for 16-20 depending on your resin. You can buy small cheap pumps these days.
Check out www.fibreglast.com for your start for supplies/info. QUOTE(TonyAKAVW @ Jul 16 2007, 08:50 PM)  First of all, thanks for all the tips! I'm going to put this stuff in a progress thread soon. So about heat... I am goig to be curing this inside my garage, which means I can't really take the temeprature up above say 100 degrees for maybe an hour before my propane heater runs out. Its my understanding that there are room temperature curing resins. Are they far inferior to heat cured resins or is it a matter of time? As far as a vacuum pump goes, what are the cheap options? I've seen some people using refigerator compressors.. Can I use my air compressor inlet? How much of a vacuum really needs to be pulled anyway? -Tony |
|
|
|
| GWN7 |
Jul 16 2007, 10:08 PM
Post
#29
|
|
King of Road Trips Group: Members Posts: 6,280 Joined: 31-December 02 From: Winnipeg, MB, Canada Member No.: 56 Region Association: Northstar Region |
QUOTE(TonyAKAVW @ Jul 16 2007, 05:50 PM) First of all, thanks for all the tips! I'm going to put this stuff in a progress thread soon. So about heat... I am goig to be curing this inside my garage, which means I can't really take the temeprature up above say 100 degrees for maybe an hour before my propane heater runs out. Its my understanding that there are room temperature curing resins. Are they far inferior to heat cured resins or is it a matter of time? As far as a vacuum pump goes, what are the cheap options? I've seen some people using refigerator compressors.. Can I use my air compressor inlet? How much of a vacuum really needs to be pulled anyway? -Tony When I first started molding stuff I bought a vacuum pump off Ebay for about $50, it was a refurnished medical unit. They run from that ($50) to very expensive. |
|
|
|
| TonyAKAVW |
Jul 17 2007, 01:23 AM
Post
#30
|
|
That's my ride. Group: Members Posts: 2,151 Joined: 17-January 03 From: Redondo Beach, CA Member No.: 166 Region Association: None |
So tonight I finished stripping the metallization off the foam sheets and got most of the mold blocked out. The foam I used is just polyisocyanurate home insulation that you can get at Home Depot. I used two or three full 1 inch sheets, and a single 2 inch thick sheet. All of that sits on top of a 1/2 inch MDF board. The next steip as mentioned previously is to strengthen that board with 2x4s for structural rigidity. For now, the foam blocks are partially glued together but they are not glued to the MDF.
-Tony Attached thumbnail(s) 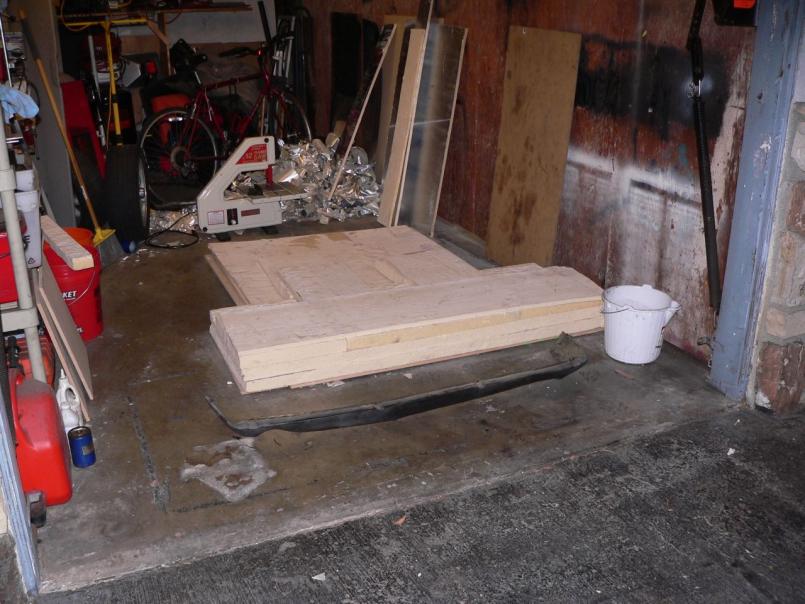
|
|
|
|
| TonyAKAVW |
Jul 17 2007, 01:24 AM
Post
#31
|
|
That's my ride. Group: Members Posts: 2,151 Joined: 17-January 03 From: Redondo Beach, CA Member No.: 166 Region Association: None |
view from the other side.
Attached thumbnail(s) 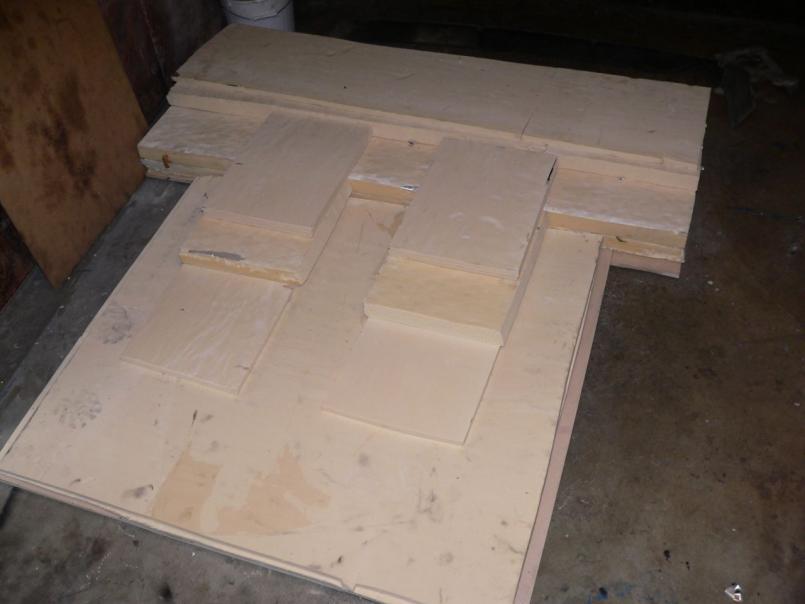
|
|
|
|
| highways |
Jul 17 2007, 02:47 AM
Post
#32
|
|
Senior Member Group: Members Posts: 613 Joined: 18-June 05 From: Los Angeles, CA Member No.: 4,296 |
Oh boy, don't burn that foam. No hot knife allowed. It will produce cyanide gas. We generally work with blue foam... which can be a little hard to come by in Southern California because it's used more up north. But I think Home Depot at least has like the 1" thick sheets of it.
Your MDF vacuum table sounds good. As far as pumps- an 'adequate' setup is more complicated then you would think. You do want to pull 15-25lbs per square inch... for pretty much a 24 hour period. Most pumps if hooked up directly will have a hard time maintaining a steady pressure and they may burn up before the end. The best home setup I've seen/worked with had a good pump, a propane tank vacuum reservoir- to ease the burden on the pump, and vacuum pressure regulator, and a pressure trigged relay to turn the pump on when vacuum was needed. A good system wont be cheap. Don't get an old medical pump. You have no idea what it was used for... it probably hasn't been cleaned well enough, and it will spit out diseased exhaust all over your workshop. Definitely not cool. Mylar will give you a great finish on the top. it comes in different thicknesses. We would use fairly thick stuff (1mm or 2mm?) doing wings... but we didn't go around any tight radiuses. I think a thinner piece that completely pulls down to the shape of the mold would yield good results. The key to good composites (and the reason for using vacuum) is so that you can squeeze the epoxy out of the part... leaving the glass with the minimal amount of excess epoxy, ie un-wanted weight. Without vacuum bagging you just can't make really lite weight stuff. As far as your mold plans- it looks pretty good. The mold, which sorta resembles what you would normally call the plug.. anyway... your bottom part that you're gonna lay the glass up on... the finish is everything. You're gonna want to get that surface so polished and glassy- so that you can actually seperate your big flat stuck part off of there. I don't put much faith in PVA. The mold release wax is where the money's at. Put some on. Then put some more on. Then put some more. Get the idea? At the end of the day you'll probably still have to use some plastic spatulas to pry the part off. As far as fabricating your mold... I would probably fabricate it the same as the top of your part- with mylar. Shape the foam, lay up a few layers of 8 or 10 ounce glass, finish with a layer of 2 ounce, then vacuum bag it with mylar so you get a glassy surface. Shoot... with how flat your part is.... why don't you just mylar both sides? Build your foam mold to shape... then skip the one week of work polishing and waxing... instead just lay the first piece of mylar over your shaped foam... wet out your clothe on top of that... slap the second piece of mylar on top... then into the vacuum bag. Make the mold... mylar... and glass extend about 2 inches past where you want the part to end.. then just jigsaw your final part to the correct dimensions. Prepare for a 2-5 times learning curve. In other words don't waste your money on carbon fiber the first go around. Infact, where do you plan on getting carbon fiber in the first place? When the war started carbon fiber was basically rationed- and if you could even get it for a non military application it would be really really expensive. Maybe it's available again, I don't know. But your part doesn't really call for using carbon fiber anyway. You would be better off using S glass cut on the diagonal. Personally I would do one layer of 2 ounce, one layer of 4 ounce on the 45 degree bias, another layer of 4 ounce straight, a third layer of 4 ounce on the bias, and finish with 2 ounce again. You can even paint the mylar. There are ways to make the part super lite weight... but then the finish on one side of the part would come out textured instead of glassy smooth. It would involve peel-ply and bleeder clothe. Definitely the most hi tech lite weight way to go. I wouldn't worry too much about baking the part. Heat cured epoxies are another ball game entirely.. and they operate at like 250 degrees or something I think. Instead I would just throw a space heater in your garage over night. Epoxy curing in an 85 degree garage does really well since it was designed to work at 70 degrees room temp. Anyway- we used to build model sailplanes as well. And some top secret stuff for the F-22. Now I have to kill you. |
|
|
|
| URY914 |
Jul 17 2007, 08:02 AM
Post
#33
|
|
I built the lightest 914 in the history of mankind. Group: Members Posts: 127,329 Joined: 3-February 03 From: Jacksonville, FL Member No.: 222 Region Association: None |
Tony,
If I were you I would make this as easy as possible and just lay up some fiberglass mat and use some cheap poly resin. You're spending a lot of time on molds, material and vacuuming when you don't know if this is even going to work. Make the first one simple and cheap and once you get it to the shape you what than use that one for your mold and use the carbon. Everyone here has given great advice but you're jumping in with both feet when maybe you should take smaller steps. Just my $.02. |
|
|
|
| andys |
Jul 17 2007, 10:58 AM
Post
#34
|
|
Advanced Member Group: Members Posts: 2,165 Joined: 21-May 03 From: Valencia, CA Member No.: 721 Region Association: None |
QUOTE(URY914 @ Jul 17 2007, 07:02 AM) Tony, If I were you I would make this as easy as possible and just lay up some fiberglass mat and use some cheap poly resin. You're spending a lot of time on molds, material and vacuuming when you don't know if this is even going to work. Make the first one simple and cheap and once you get it to the shape you what than use that one for your mold and use the carbon. Everyone here has given great advice but you're jumping in with both feet when maybe you should take smaller steps. Just my $.02. +1 I've built a number of one-off's for race vehicles with the cheap and in-expnsive method. Saves many hours of labor, and in the end it gets dinged-up anyway. A lot depends on the complexity of the shape, but your's seems relatively simple. So, this is how I'd do your part. Construct the simple shape in MDF (positive or negative). Radius the outside corners, and use bondo for the inside radii (use PVC pipe or steel tube of the right size). Knock down the rough areas with sandpaper. If you can get Mylar to lay down flat to your surfaces, then simply do a wet layup with fiberglass/epoxy (cloth and mat combination). BTW, you can buy a two part laminating epoxy (I think they call it "Boat Epoxy") from Home Depot that is plenty adequate for one-off's (and no need to make special trips to a plastics supplier). Finish the top side using a short knap roller to both compress the layers of fiberglass layers together as well as push excess epoxy off the part and discard it. In the event that the Mylar cannot lay flat against your form, then spray several coats of grey primer, and wet sand with 400. Spray with PVA release agent (two coats minimum), then glass over that. For more complex shapes like ducting, I shape the part from urethane foam and use the same process. Yes, it is un-sophisticated, but produces a part quickly and relatively in-expensively by comparrison. Your alternative of course, is to go with "highways" method. Andys |
|
|
|
| TonyAKAVW |
Jul 17 2007, 12:49 PM
Post
#35
|
|
That's my ride. Group: Members Posts: 2,151 Joined: 17-January 03 From: Redondo Beach, CA Member No.: 166 Region Association: None |
Okay, so it sounds like there are a bunch of different ways to do this. First off, yes carbon fiber is expensive (~$60-$80 a yard depending on patern) and I won't start with that. If however my mold is only good for one shot then I might as well go with it, but thats a big risk....
Eventually I would like to use carbon because it looks cool and can be made thinner (lighter) than a glass counterpart. I am not going for the smooth glass finish like you see on vehicle interiors etc., but rather for the minimum epoxy lightweight construction. So my initial plan was to make my mold as in figure D below. Basically shape the foam as I like, fill in the voids and make a smooth surface with body filler, and then sand some more. On top of that spray a primer, sand, polish and wax. Then coat with PVA and then start making a part. The vacuum bagging would probably not be done on the first article. Instead I would just lay up a few layers of glass, squeegy out extra resin and then let it cure. Then after that is done, pry the part from the mold and repeat, this time with vacuum bagging. And after I get that right, go for carbon. So Paul's option as I see it is to cover the foam portion of the mold with a layer of fiberglass itself, with poly resin, and then use that part as my mold. I think if I ever want to vacuum bag it, that wouldn't be the preferred way to go, as my mold would now be a rather flexible large piece of fiberglass. I think the method closest to D is what andy reccomends. The whole deal with mylar is just that it has a very smooth surface? Last time I remember playing with mylar though, it has a tendency to wrinkle... Am I thinking of a different kind of mylar? Also as I said earlier, surface finish isn't my primary conern, and I really don't actually want a glassy layer of resin, rather I would like minimal weight, which means peel or perf-ply and an abosrbing mat layer during vacuum bagging.. right? -Tony Attached image(s) 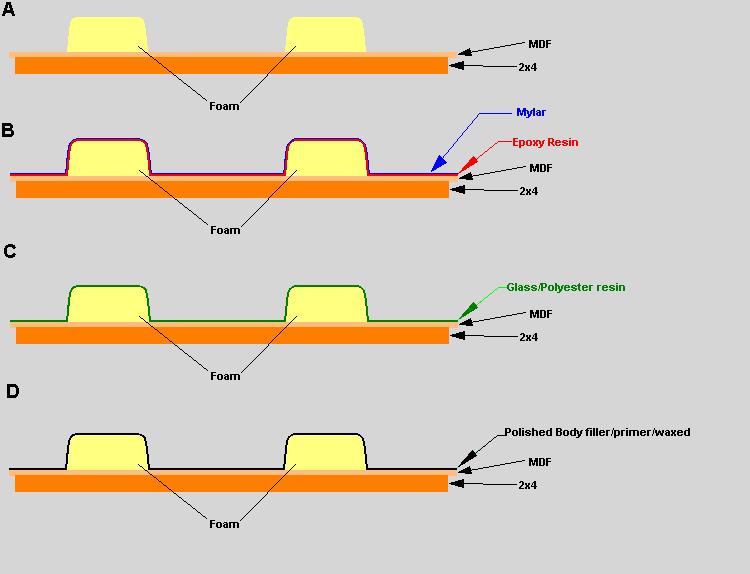
|
|
|
|
| fat73 |
Jul 19 2007, 10:53 PM
Post
#36
|
|
W9R1 Group: Members Posts: 244 Joined: 7-May 05 From: tampa,fl Member No.: 4,043 Region Association: South East States |
QUOTE(TonyAKAVW @ Jul 16 2007, 05:50 PM) First of all, thanks for all the tips! I'm going to put this stuff in a progress thread soon. So about heat... I am goig to be curing this inside my garage, which means I can't really take the temeprature up above say 100 degrees for maybe an hour before my propane heater runs out. Its my understanding that there are room temperature curing resins. Are they far inferior to heat cured resins or is it a matter of time? As far as a vacuum pump goes, what are the cheap options? I've seen some people using refigerator compressors.. Can I use my air compressor inlet? How much of a vacuum really needs to be pulled anyway? -Tony http://www.fibreglast.com/ sells instructional DVDs. Ed aka W9R1 |
|
|
|
| geniusanthony |
Aug 2 2007, 07:35 AM
Post
#37
|
|
Its a brand new "Chrome-sicle" Group: Members Posts: 517 Joined: 12-December 05 From: Alexandria,VA Member No.: 5,266 Region Association: MidAtlantic Region |
I have also done some composite work on R/C pylon airplanes and had good luck with mylar as a face for the mold. The product I used was an adhesive backed mylar film that had a low temp adhesive. This film was applied with a covering iron. Any hobby shop that sells R/C hobby products will be able to give you more information than I can recall from 5+ years ago. I wish you luck in your project however.
Going this route will save you time with sanding, painting, and polishing your part to get that perfect surface. I will advise that if you go this route, please practice on scrap first as I don't want to be the one to have caused a melt in your mold. There may be alot of help gained from a KNOWLEDGEABLE person at the shop. The material comes in 3 ft. wide rolls x 30? and the fact that the adhesive is heat activated will help avoid wrinkles as you iron and stratch the material over your plug. The heated adhesive will seal edges down so you could cover 1 section at a time. |
|
|
|
| TonyAKAVW |
Aug 2 2007, 11:19 AM
Post
#38
|
|
That's my ride. Group: Members Posts: 2,151 Joined: 17-January 03 From: Redondo Beach, CA Member No.: 166 Region Association: None |
Thanks for the tip! I've got to be careful with heating this mold. If I get it to the point that the foam melts it will release cyanide gas... Not something I wish to breathe too much (IMG:style_emoticons/default/smile.gif)
-Tony |
|
|
|
| geniusanthony |
Aug 2 2007, 07:52 PM
Post
#39
|
|
Its a brand new "Chrome-sicle" Group: Members Posts: 517 Joined: 12-December 05 From: Alexandria,VA Member No.: 5,266 Region Association: MidAtlantic Region |
if you do a search and find the sites of Coverite, Monocote, they may have spec sheets listing melt and shrink temps. I'd look for you but where I am our server locks out most sites.
|
|
|
|
|
1 User(s) are reading this topic (1 Guests and 0 Anonymous Users)
0 Members:

|
Lo-Fi Version | Time is now: 5th July 2025 - 12:43 AM |
Invision Power Board
v9.1.4 © 2025 IPS, Inc.