|
|
|
Porsche, and the Porsche crest are registered trademarks of Dr. Ing. h.c. F. Porsche AG.
This site is not affiliated with Porsche in any way. Its only purpose is to provide an online forum for car enthusiasts. All other trademarks are property of their respective owners. |
|
|

  |

| racunniff |
 Aug 5 2007, 11:48 PM Aug 5 2007, 11:48 PM
Post
#1
|
|
volt914  Group: Members Posts: 172 Joined: 21-August 06 From: Fort Collins, CO Member No.: 6,705 Region Association: Rocky Mountains |
Spent the day installing my windshield. Started with new windshield clips from Pelican Parts (you will need 19 of them):
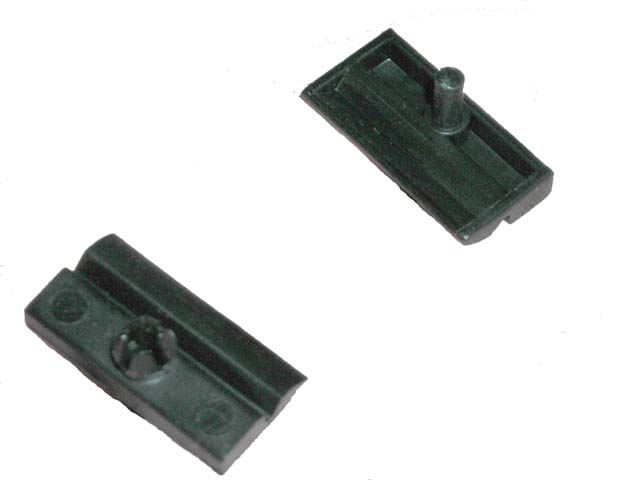 This picture shows the "top" and "bottom" of the clip. The "bottom" of the clip pushes into the windshield frame and also has the notch to capture the trim (see picture below for how this works). The "top" of the clip has the rivet that you'll need to drive in to permanently attach the clip. You'll also need some of this, Butyl Tape (I got mine at NAPA) - 1/4 inch is the recommended size: 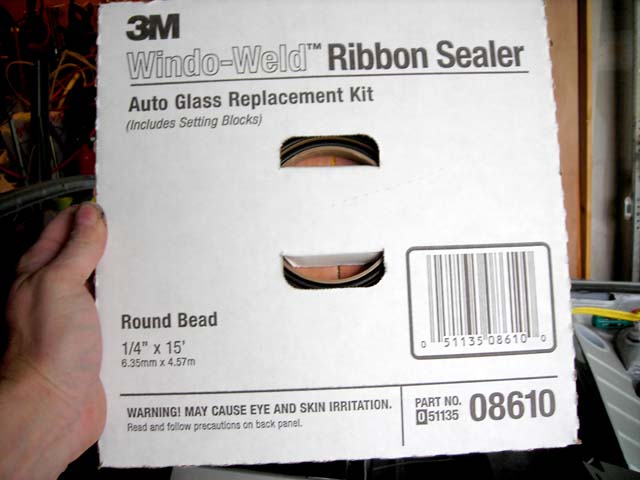 Note the warning about eye and skin irritation. I don't know if it's true, but I did the final cleaning and install wearing gloves, so I would not know. I do know that it is extremely sticky, and would likely be a lot of fun to get off your skin without evil chemicals like acetone. You'll also need these - window spacers (also available from Pelican Parts - you need 2): 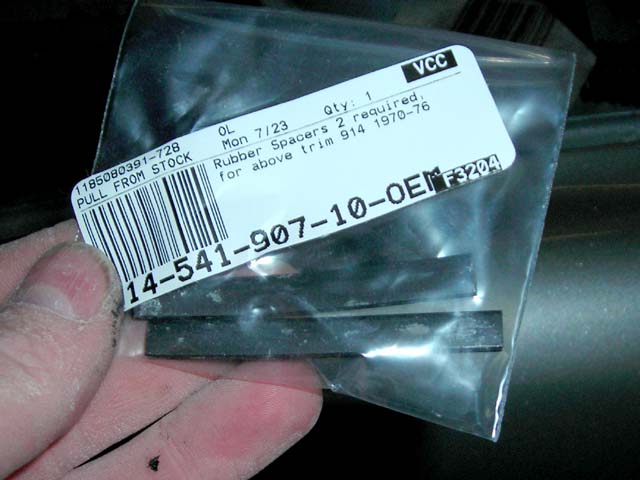 The butyl I bought also came with spacers, but they are not the same shape/size, so I do not trust them. Now for the clips. I dry-fit them on my trim to verify the orientation I wanted when I installed them: 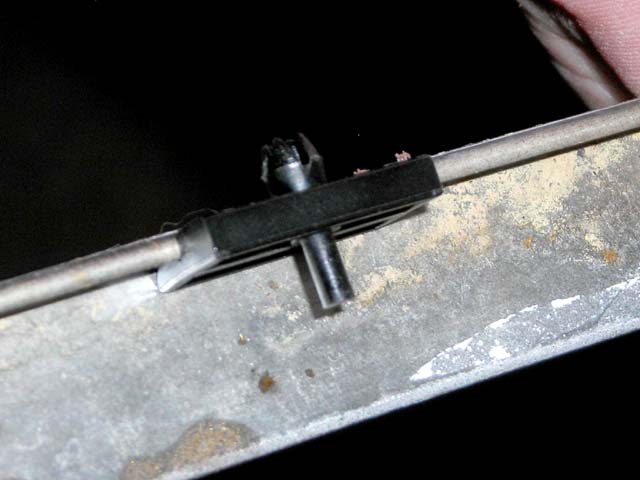 Installing the clips is pretty straightforward. You put a clip in a mounting hole: 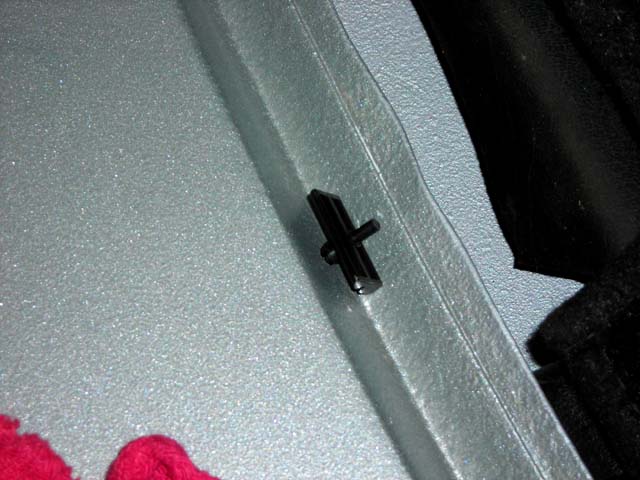 and then you push the clip in with your thumbs as far as you can: 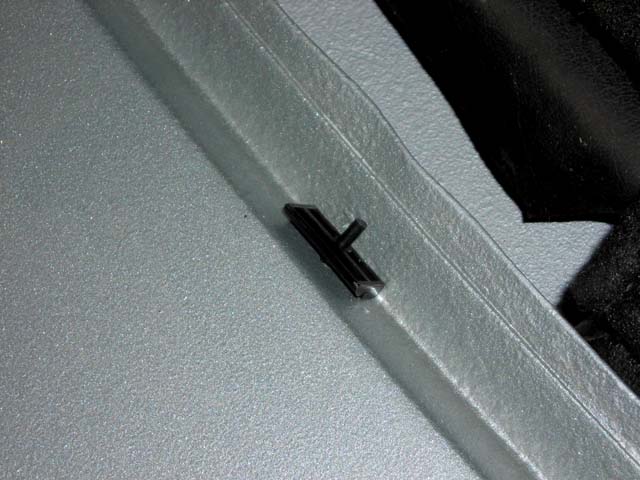 You need to get it very close to flush, because if you don't, when you try to push the rivet in, it will just pop the clip out of the hole (ask me how I know (IMG:style_emoticons/default/dry.gif) ). This is not fatal, though, because you can usually use a pair of pliers to pull the rivet back out and start over (assuming that you have not mashed the rivet as you try to push it in). Part II, coming soon. |
   |

 
|
| racunniff |
Aug 6 2007, 12:08 AM
Post
#2
|
|
volt914 Group: Members Posts: 172 Joined: 21-August 06 From: Fort Collins, CO Member No.: 6,705 Region Association: Rocky Mountains |
Part II.
The final step in installing a clip is to push the rivet in. I placed a bolt against the rivet and then hammered it in: 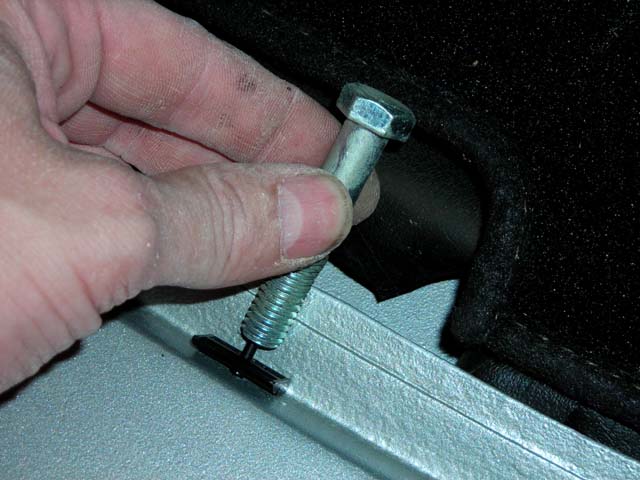 When you are all done, the installed clip will look like this (the rivet head is flush with the clip, so it will not catch the windshield as it gets installed): 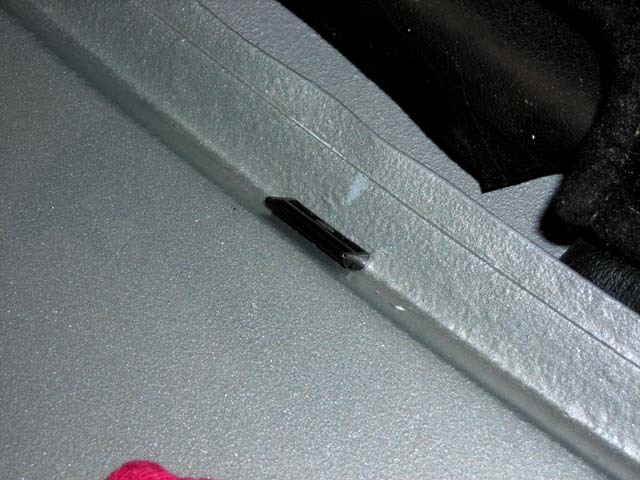 OK, now for the fun part - the butyl tape. Before applying the tape, you need to get your windshield and frame *extremely* clean. On the windshield, I used lacquer thinner to get the remnants of the butyl off the windshield. I then used glass cleaner to make the whole windshield squeaky clean. From this point on, you should always wear gloves whenever you handle your windshield, to keep the oils from your fingers from interfering with the adhesion. Here's the windshield, all prepped and ready to put in: 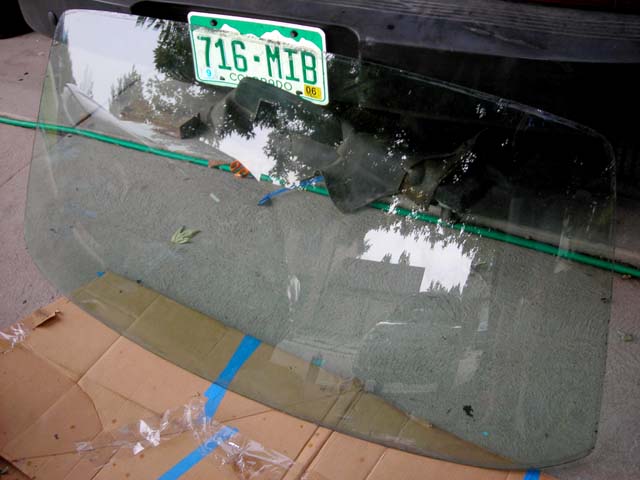 (the smuck you can see near the edge is the remnant of silicone that the PO put under the windshield trim - it is on the outside of the windshield and will not interfere with the butyl...). I installed the tape starting at the passenger's upper corner, and ran it all the way around while keeping the backing on it (makes it easier to handle): 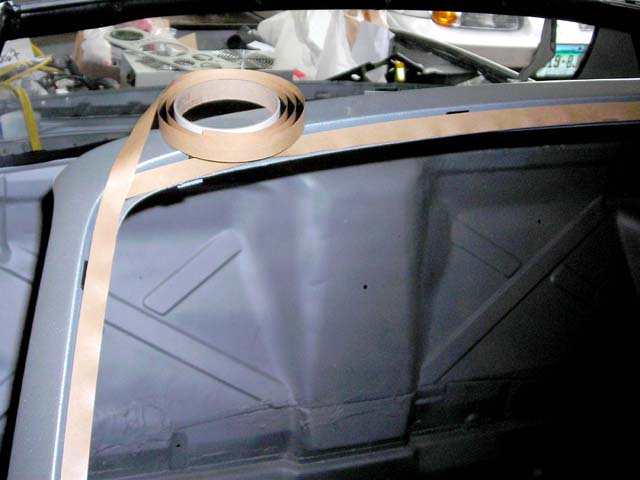 I butted the butyl together rather than overlapping (overlapping can lead to a bump which is very hard to level out, even if you try to taper the butyl). Some people swear by overlapping; it felt simpler to me just to butt it together and make sure there was no gap. Here is the butyl in the driver's lower corner. You want it to be well positioned on the frame - you want the edge of the windshield to be just outside the butyl when you are all done: 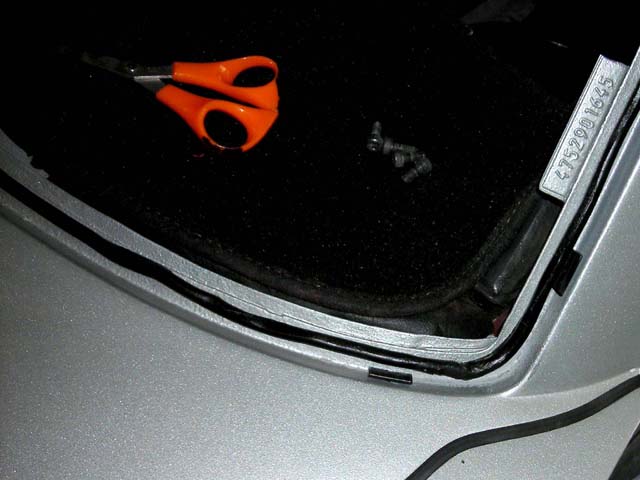 What you want to avoid, if you can, is touching the butyl to the clips or the outside edge of the frame - it is very sticky, and hard to adjust (but not impossible if you are patient). Finally, you install the spacers (the location is not critical - you just want them positioned conveniently to support the windshield while you get ready to press it against the butyl). I forgot to take a picture... Finally, you center the windshield in the frame. This is, by far, the trickiest part of the process. The butyl is sticky, and if you accidentally touch the windshield to it before it is well positioned, you may have to restart all the way back at the cleaning process, since you will thin the tape if you try to pry the windshield off of it. I did it by standing *inside* the cabin (no seats or shifter installed, I could step anywhere), where I could easily reach the entire windshield, and could also easily check to see whether it was well-centered). Because both hands were busy, I did not get any pictures of this part of the process, sorry. Finally, once you have the windshield centered *exactly* where it should go, you lay it against the butyl. The last step is to firmly press the windshield into the butyl so that a seal is formed around the entire window. Be very careful not to stress the window while you do this - I thought I was being careful, but I ended up extending a minor crack several inches (IMG:style_emoticons/default/headbang.gif) I think it will epoxy up, though, so I'm not about to start over. Part II, coming soon. |
|
|
|
| racunniff |
Aug 6 2007, 12:12 AM
Post
#3
|
|
volt914 Group: Members Posts: 172 Joined: 21-August 06 From: Fort Collins, CO Member No.: 6,705 Region Association: Rocky Mountains |
Part III
Not much in this part - I have yet to actually clip the trim in (the PO rattle-canned it black, poorly (IMG:style_emoticons/default/barf.gif), so I'm going to sand it all off and repaint it black with some higher quality rattle-can paint). But, to cap off the first part of the task, here is the car with the window installed: 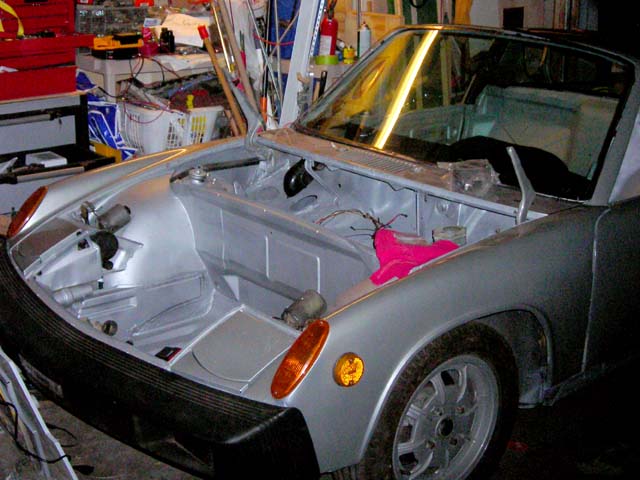 Hopefully, I'll get to the trim in the next week or so and complete the series. And, finally, this series is dedicated to Howard. I did not know or interact with him, but he obviously touched many people, and will be sorely missed. My thoughts are with his friends and family. |
|
|
|
| watsonrx13 |
Aug 6 2007, 05:21 AM
Post
#4
|
|
Advanced Member Group: Members Posts: 2,734 Joined: 18-February 03 From: Plant City, FL Member No.: 312 Region Association: South East States |
Excellent write up, definately a classic how-to once you've installed the trim.... (IMG:style_emoticons/default/smilie_pokal.gif)
A couple of questions: 1. Did you install this by yourself? 2. When you installed the spacers, do they lay with the thickest part separating the windshield from the frame bottom? -- Rob |
|
|
|
| IronHillRestorations |
Aug 6 2007, 08:01 AM
Post
#5
|
|
I. I. R. C. Group: Members Posts: 6,714 Joined: 18-March 03 From: West TN Member No.: 439 Region Association: None |
One thing that I recommend is painting the windshield channel or recess with the black urethane primer before installing the butyl tape. It helps adhesion of the tape. From an appearance standpoint it looks better too, as you don't have the body color showing through.
|
|
|
|
| rhodyguy |
Aug 6 2007, 09:31 AM
Post
#6
|
|
Chimp Sanctuary NW. Check it out. Group: Members Posts: 22,060 Joined: 2-March 03 From: Orion's Bell. The BELL! Member No.: 378 Region Association: Galt's Gulch |
great write up. first ever for a windshield i think. classic status when you do the trim. fyi, your local tool rental store may have the suction cup w/a handle tools that pro glazers use. a pair of them make the job much easier than gripping the edges of the glass and trying to set it. again, great write up.
k |
|
|
|
| racunniff |
Aug 6 2007, 11:22 PM
Post
#7
|
|
volt914 Group: Members Posts: 172 Joined: 21-August 06 From: Fort Collins, CO Member No.: 6,705 Region Association: Rocky Mountains |
QUOTE(watsonrx13 @ Aug 6 2007, 04:21 AM)  Excellent write up, definately a classic how-to once you've installed the trim.... (IMG:style_emoticons/default/smilie_pokal.gif) A couple of questions: 1. Did you install this by yourself? 2. When you installed the spacers, do they lay with the thickest part separating the windshield from the frame bottom? -- Rob 1. Yes. 2. If I understand you correctly, yes. The thin edge points out, toward the trim. You can see in my "dry trim fit" picture how it attaches. |
|
|
|
| racunniff |
Aug 6 2007, 11:23 PM
Post
#8
|
|
volt914 Group: Members Posts: 172 Joined: 21-August 06 From: Fort Collins, CO Member No.: 6,705 Region Association: Rocky Mountains |
QUOTE(9146986 @ Aug 6 2007, 07:01 AM) One thing that I recommend is painting the windshield channel or recess with the black urethane primer before installing the butyl tape. It helps adhesion of the tape. From an appearance standpoint it looks better too, as you don't have the body color showing through. A little late now :-) The previous install was over just paint, and seemed to have no problems. Crossing my fingers... |
|
|
|
| racunniff |
Aug 6 2007, 11:27 PM
Post
#9
|
|
volt914 Group: Members Posts: 172 Joined: 21-August 06 From: Fort Collins, CO Member No.: 6,705 Region Association: Rocky Mountains |
QUOTE(rhodyguy @ Aug 6 2007, 08:31 AM) great write up. first ever for a windshield i think. classic status when you do the trim. fyi, your local tool rental store may have the suction cup w/a handle tools that pro glazers use. a pair of them make the job much easier than gripping the edges of the glass and trying to set it. again, great write up. k Thanks. I'll get to the trim this coming weekend (I'm on the road this week and away from my car (IMG:style_emoticons/default/mad.gif) - I think it's an addiction, I suffer withdrawals...) |
|
|
|
| KELTY360 |
Aug 6 2007, 11:39 PM
Post
#10
|
|
914 Neferati Group: Members Posts: 5,031 Joined: 31-December 05 From: Pt. Townsend, WA Member No.: 5,344 Region Association: Pacific Northwest |
Can't believe you did this alone....very impressive. Nice write-up, I agree with classic status once you show us the trim application. Thanks.
|
|
|
|
| racunniff |
Aug 13 2007, 09:39 PM
Post
#11
|
|
volt914 Group: Members Posts: 172 Joined: 21-August 06 From: Fort Collins, CO Member No.: 6,705 Region Association: Rocky Mountains |
Part IV
Finished it off this weekend. First order of business was refurbishing the old trim. As mentioned before, the PO had rattle-canned it black. Q: What's worse than a rattle-can paint job? A: A poor rattle-can paint job The painter had not even attempted to strip the chrome from the trim; they just sprayed it black:  I sanded it down, getting all the chrome off and leaving a nice "tooth" for the new paint to hold onto. I also evened out the bends and bumps and dings:  and then rattle-canned it with a nice self-priming metal enamel:  Coming soon, Part V |
|
|
|
| racunniff |
Aug 13 2007, 09:48 PM
Post
#12
|
|
volt914 Group: Members Posts: 172 Joined: 21-August 06 From: Fort Collins, CO Member No.: 6,705 Region Association: Rocky Mountains |
Part V
One thing I discovered after I sanded the trim clean is that the left and right sides are marked for reference (the curves are such that it is difficult to tell - but if you get them swapped you will never get the trim to stay). Note that "L" and "R" are as viewed from the front of the car so "R" corresponds to the driver's side and "L" corresponds to the passenger's side: 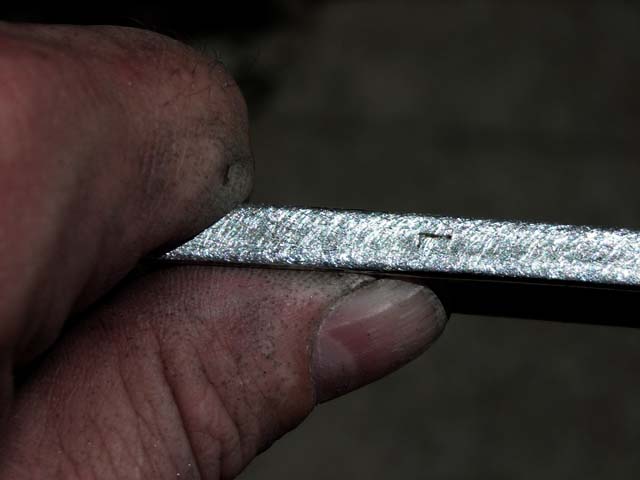 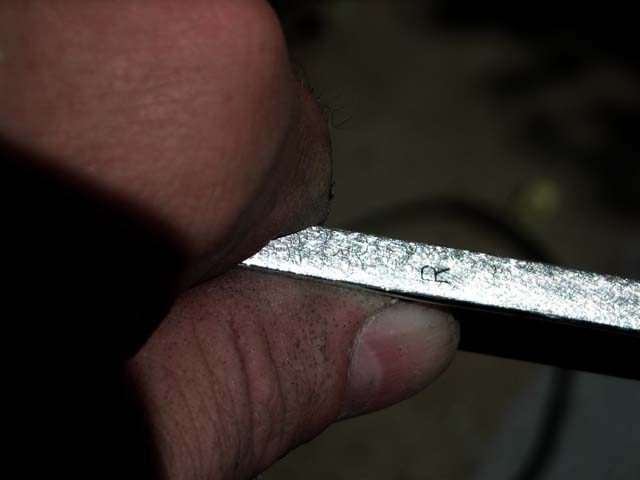 Before clipping anything in you should assemble the frame and place it approximately in position: 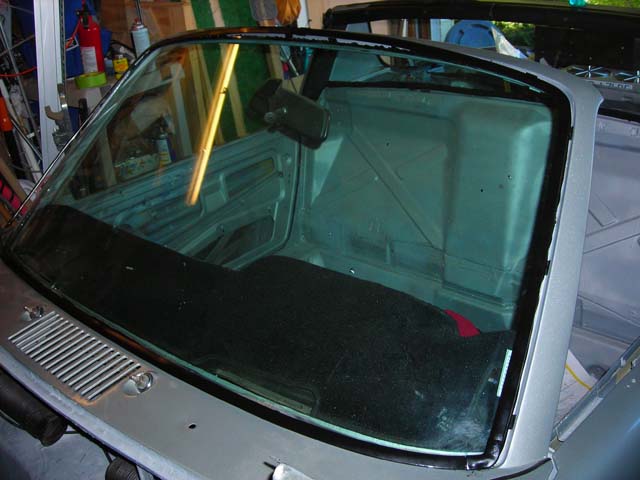 And, for reference, here is how a clip sits relative to the window glass: 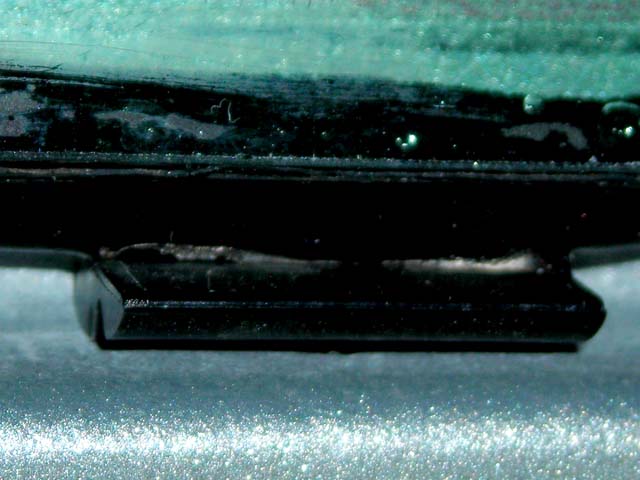 The clip faces away from the glass, as shown earlier. Once you are satisfied everything is in place, you can clip it in. Verify that the lower trim piece is well-centered in the frame, then start in the middle and push the trim into the clips. It will snap in with a satisfying "click." 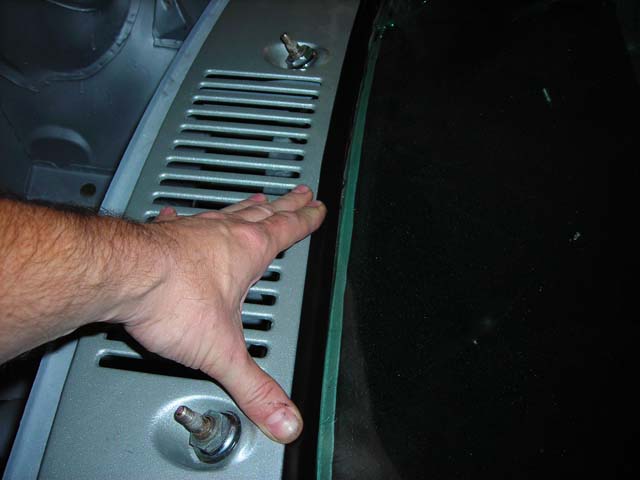 Coming soon, Part VI |
|
|
|
| racunniff |
Aug 13 2007, 09:54 PM
Post
#13
|
|
volt914 Group: Members Posts: 172 Joined: 21-August 06 From: Fort Collins, CO Member No.: 6,705 Region Association: Rocky Mountains |
Part VI
Clip the lower piece in, then work your way up the windshield pillars. Before getting too far on the pillars, make sure the center connector on the top is not connected - this allows some flex. It is easy to slide it to one side until final assembly: 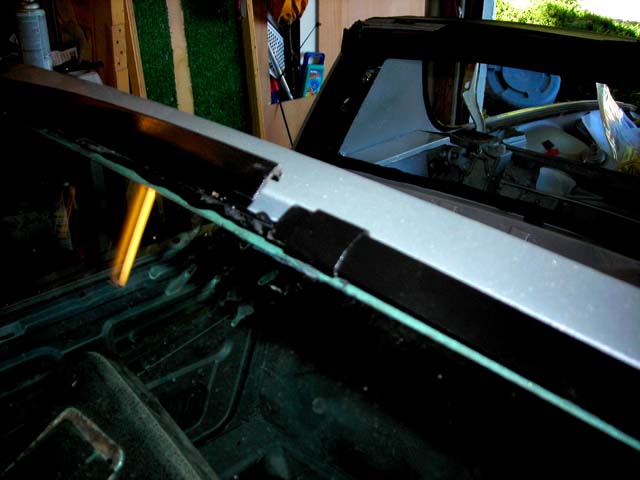 You want to do this, because as you work up the pillars, the trim will want to float free in the middle, like this:  Once you have both pillars snapped in, snap across the top, and, when you have the top snapped, you can slide the center connector back over so it connects both pieces (see this picture again for reference): And that's it! It took longer to blog the final trim attachment than it took to do it - 5 minutes tops. I like the black look against my platinum exterior: 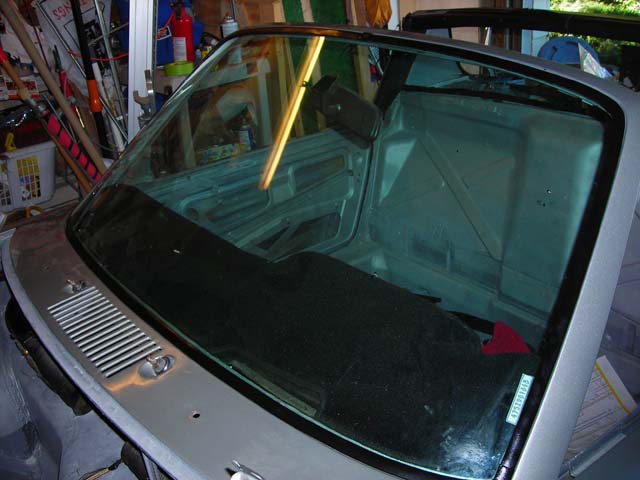 ...and a close-up: 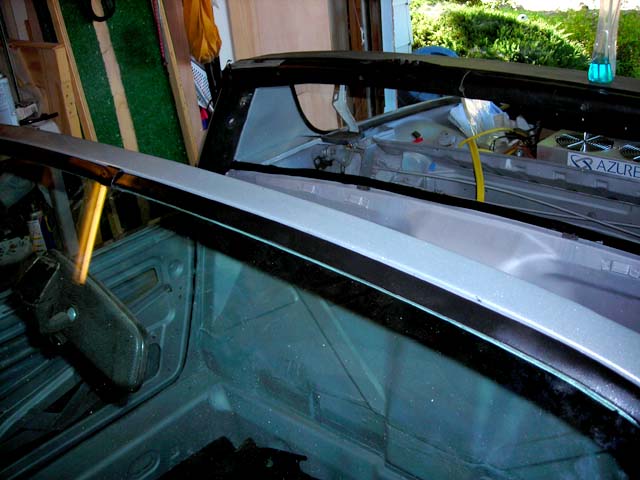 Good luck... |
|
|
|
| Gint |
Aug 13 2007, 10:31 PM
Post
#14
|
|
Mike Ginter Group: Admin Posts: 16,066 Joined: 26-December 02 From: Denver CO. Member No.: 20 Region Association: Rocky Mountains |
We'll move this to the Lapuwali Classic Thread Forum in a few days. A And I'll have to make it a tech article when I get some time. We'll talk more about that later.
BTW , the trim is anodized, not chromed. Couple of questions: What is your name? Are you on our local email list? |
|
|
|
| racunniff |
Aug 13 2007, 10:42 PM
Post
#15
|
|
volt914 Group: Members Posts: 172 Joined: 21-August 06 From: Fort Collins, CO Member No.: 6,705 Region Association: Rocky Mountains |
QUOTE(Gint @ Aug 13 2007, 08:31 PM) We'll move this to the Lapuwali Classic Thread Forum in a few days. A And I'll have to make it a tech article when I get some time. We'll talk more about that later. BTW , the trim is anodized, not chromed. Couple of questions: What is your name? Are you on our local email list? Anodized, chromed - regardless, too smooth to hold a paint coat (IMG:style_emoticons/default/laugh.gif) Thanks for the correction. PM sent with other info. |
|
|
|
| iamchappy |
Aug 14 2007, 08:24 AM
Post
#16
|
|
It all happens so fast! Group: Members Posts: 4,893 Joined: 5-November 03 From: minnetonka, mn Member No.: 1,315 Region Association: Upper MidWest |
I am surprised the left and right are marked opposite than other parts on the car - ie. door handles and signal lights.
|
|
|
|
| racunniff |
Aug 14 2007, 09:44 AM
Post
#17
|
|
volt914 Group: Members Posts: 172 Joined: 21-August 06 From: Fort Collins, CO Member No.: 6,705 Region Association: Rocky Mountains |
QUOTE(iamchappy @ Aug 14 2007, 06:24 AM) I am surprised the left and right are marked opposite than other parts on the car - ie. door handles and signal lights. I was too. In fact, so surprised that I typed it wrong the first time. I just corrected it. "L" goes on the passenger's side, "R" goes on the driver's side. But the curves are such that it would not fit properly if swapped (at least not without excessive (IMG:style_emoticons/default/smash.gif) ) |
|
|
|
| aircooledboy |
Aug 14 2007, 11:21 AM
Post
#18
|
|
Sweet Pea's 1st ride in daddy's "vroom -vroom" Group: Members Posts: 1,672 Joined: 4-February 04 From: Rockford, IL Member No.: 1,629 Region Association: Upper MidWest |
A nice install. Good Work. (IMG:style_emoticons/default/beerchug.gif)
A few details to add (from a former glass installer): 1. The butyl tape in the pictures above is not quite in the right spot. The optimal location for the tape is nearer to the inside edge of the pinch weld. What you are shooting for is to have the tape completely between the glass and the pinch weld when you are done. If it sticks out passed the edge of the glass here and there, it isn't the end of the world, but the maximum seal is gained by having the tape in between the glass and the pinch, as opposed to bulging out around the edges. 2. There is a clear primer that should be put on the glass before installing. You wipe it on with a clean rag in a band about 5/8" wide around the inside surface perimeter of the glass. It increases the the strength of the bond dramatically. This can add meaningful structural rigidity in a rollover. You could get this primer at any local auto glass shop in the past for about $5/can, but that could be more difficult now since reputable installers no longer use butyl to install windshields. Urethane is used exclusively now, due to its superior structural strength. In the past, the role of the windshield in maintaining the integrity of the passenger compartment in a roll over wasn't as well understood as it it today. Since a butyl install is much easier for the DIY'er, given the above it seems like a good idea to at least maximize the strength of a butyl install, and that is why the primer is a good idea. 3. Perry is right. There is a specific 3M product called "window weld primer" for this job. Butyl will stick just fine to clean paint, but sticks better to this primer. Better bond= better rigidity. See above for why that matters. Cost was about the same as glass primer, but might also be harder to come by these days (see above). On the other hand, I just saw it at Pep Boys the other day. 4. When joining the ends of the butyl, it should be done at the bottom, about 6' or so from the center, NEVER on the top, and it best joined by an "end to end butt." The technique here is that before laying down the final 6 inches or so, you should carefully hold the final portion near the begining point, being very careful not to touch the tape to the frame or the other end of the tape (Did I mention being careful?). Cut the tape about 1/4" long, butt the ends together first, then work the last 6" down. Another common method is a slight "side by side" overlap, but the narrow width of the pinch weld on a 914 frame makes that a poor choice here, as it has a fair chance of being visible. NEVER use a stacked overlap. The pressure required to flatten a stack enough to get a good seal dances right on the edge of the pressure requred to break the glass. No good reason to do it. 5. When placing the windshield, you set the bottom lightly on the blocks first. This is a job best done with 2 people for the inexperienced. As long as you handle the glass by the edge only gloves are not necessary. Gloves can actually be more bad than good, because touching the sealing surface with a glove can contaminate it just as much as a bare hand, but you may not know it until too late, because the glove prevented you from feeling it. Center the glass as best you can before setting onto the blocks, then lay the glass back nearly in place, but not allowing it to touch the tape on the sides or top until you are CERTAIN it is properly centered. Perfection in not required, but if you are too far off, it can prevent the trim clips from moving enough to accept the trim later. Now, lightly lay the glass into place. You can actually still make small adjustments at this point by twisting a small wood block between the glass edge and the frame edge to nudge it up to about 1/4". Once you are completely certain you are well centered, THEN you go around the perimeter of the glass applying moderate pressure with your palm around the top, bottom and sides of the glass. USE GENTLE PRESSURE ON THE CORNERS. This is the weak spot of our windshields, and too much pressure will snap the corner. See my description below as to what you are looking for. If the corners look good, leave them alone. 6. You are done when you have a uniform dark black band around the perimeter of the glass. Trust me, you will know what I mean when you are looking at it. If you have a white line crossing the band, or a spot where the band gets narrowed to less than 1/4 ", you are looking a present or future leak. Either of these problems can usually be fixed with a little more pressure to that spot, remembering you are working with glass so don't lose your mind. If more pressure doesn't fix the problem, you need to get a tube of liquid butyl, and squirt it in around the trouble spot until you have broadened the seal or filled the white line. The butt joint is a common place to get this "white line", so pay close attention to that spot. Go slow, and this is about a 4 or 5 on the 1-10 difficullty scale. |
|
|
|
| racunniff |
Aug 14 2007, 11:17 PM
Post
#19
|
|
volt914 Group: Members Posts: 172 Joined: 21-August 06 From: Fort Collins, CO Member No.: 6,705 Region Association: Rocky Mountains |
QUOTE(aircooledboy @ Aug 14 2007, 09:21 AM) A nice install. Good Work. (IMG:style_emoticons/default/beerchug.gif) A few details to add (from a former glass installer): 1. The butyl tape in the pictures above is not quite in the right spot... 2. There is a clear primer that should be put on the glass before installing... 3. Perry is right. There is a specific 3M product called "window weld primer" for this job... 4. When joining the ends of the butyl, it should be done at the bottom, about 6' or so from the center, NEVER on the top... 5. When placing the windshield, you set the bottom lightly on the blocks first... 6. You are done when you have a uniform dark black band around the perimeter of the glass... Go slow, and this is about a 4 or 5 on the 1-10 difficullty scale. Thanks for the tips! I am obviously not a professional glass installer (nor even an amateur one until Last week (IMG:style_emoticons/default/biggrin.gif) ) I agree, the butyl was not positioned ideally. I have not decided if I care enough to rip the whole thing out or not... Is not applying the clear primer a safety hazard of any kind? (other than weakening the bond somewhat, obviously). |
|
|
|
| aircooledboy |
Aug 15 2007, 07:35 PM
Post
#20
|
|
Sweet Pea's 1st ride in daddy's "vroom -vroom" Group: Members Posts: 1,672 Joined: 4-February 04 From: Rockford, IL Member No.: 1,629 Region Association: Upper MidWest |
QUOTE(racunniff @ Aug 15 2007, 12:17 AM) Thanks for the tips! I am obviously not a professional glass installer (nor even an amateur one until Last week (IMG:style_emoticons/default/biggrin.gif) ) I agree, the butyl was not positioned ideally. I have not decided if I care enough to rip the whole thing out or not... Is not applying the clear primer a safety hazard of any kind? (other than weakening the bond somewhat, obviously). No hazard beyond the potential reduction in the bond strength. You have to do the cost/benefit analysis for yourself, but I can say for sure if the car were mine, I wouldn't give it a second thought. As far as removing it to better position the tape, I wouldn't do that either. Removing a butyl set windshield is the easiest removal, but still a bit tricky for the 1st timer. It's properly done with a special heated knife, but can be cut out with "piano wire" and a bit of finesse. I could get it out with no trouble, but I've done it literally hundreds of times. You could probably get it out too, but there are a number of "feel" sort of things the you gave to mindful of to avoid a boo-boo. A small error results in a $200ish good reason to be very pissed off. If I were you, wouldn't pull your glass out unless it leaked or whistled. Every glass installer has had a job where they got too wide with the tape like you did. You just push the tape under the glass where you can, just like it appears you did accross the top. As long as the tape it still clean, it will still seal just fine. If we had to do that across a fairly long stretch, we would then "back it up" by running a bead of urerthane over the area, and smooth it so that it covered from the edge of the glass to the frame. We did this really as a extra measure of assurance that the customer wouldn't have a problem later, and in 99.99% of cases it was probably not necessary. Once again, if I were you I wouldn't take that step unless you develope a problem, but it is an option. (IMG:style_emoticons/default/aktion035.gif) (IMG:style_emoticons/default/monkeydance.gif) |
|
|
|
|
1 User(s) are reading this topic (1 Guests and 0 Anonymous Users)
0 Members:

|
Lo-Fi Version | Time is now: 25th April 2024 - 10:15 AM |
Invision Power Board
v9.1.4 © 2024 IPS, Inc.