|
|

|
Porsche, and the Porsche crest are registered trademarks of Dr. Ing. h.c. F. Porsche AG.
This site is not affiliated with Porsche in any way. Its only purpose is to provide an online forum for car enthusiasts. All other trademarks are property of their respective owners. |
|
|
  |
| rhodyguy |
 Aug 17 2007, 01:15 PM Aug 17 2007, 01:15 PM
Post
#21
|
|
Chimp Sanctuary NW. Check it out.                Group: Members Posts: 22,252 Joined: 2-March 03 From: Orion's Bell. The BELL! Member No.: 378 Region Association: Galt's Gulch |
i'm in the middle of pulling one and this may help a bit if your trim is nice and you don't want to trash it. the trim on this car was not so good and removal went quick.
1. in the clip picture you can see the little curved notch the slight radius of the outside edge of the trim slips into. 2. end view, note previously mentioned outside edge. this edge needs to be released from the clip. slide the covering piece to one side and start in the center top 3. if you were to notch a putty knife so it could go around the clip, you can gently push from the inside edge and release the trim. with the putty knife so thin, you won't (shouldn't) distort the inside edge much. work your way across, sliding the knife. when you come to a stop you'll need to walk around the clip you just bumped into. 4. it was cool this am and the butyl was pretty stiff. i'm leting it sit in the sun to warm up and it's pretty squishy. i could be impatient and do it now, but i'm not. by 1 or 2 it's going to release very easily and i'll have a nice sigla windshield that only has a few pits. if you plan on polishing your trim, you might think about doing it in place prior to removal. not as apt to bend it up. k edit: discovered a few things. too much heat is no good as it softens the butyl so much it stick/rebond upon touching. i grabed a handfull shims and started them narrow end in after releasing a section. as you move forward you have to fall back once in a while, adjust the shims and re-release any sitcky points. have a breath now and then, work slowly. when it's all loosened, put a strip of foil under each side to avoid any butyl to butly contact. i'm not quite ready to store the window and i'll leave it resting on the frame until just before the body leaves. i pulled the tarp back over to let things cool down slowly. i've broken more than one window in the past. k Attached image(s) 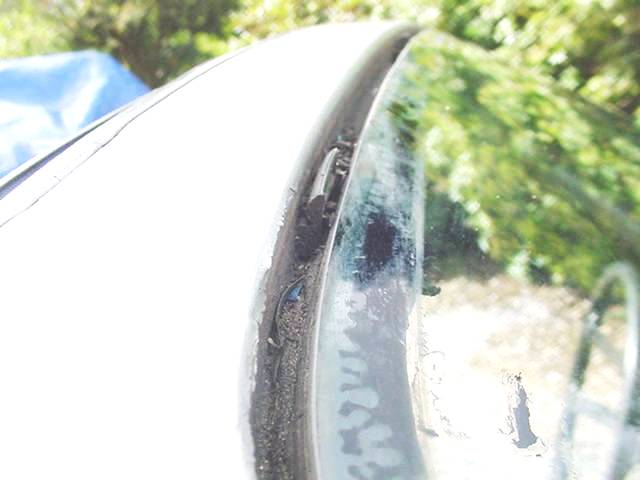 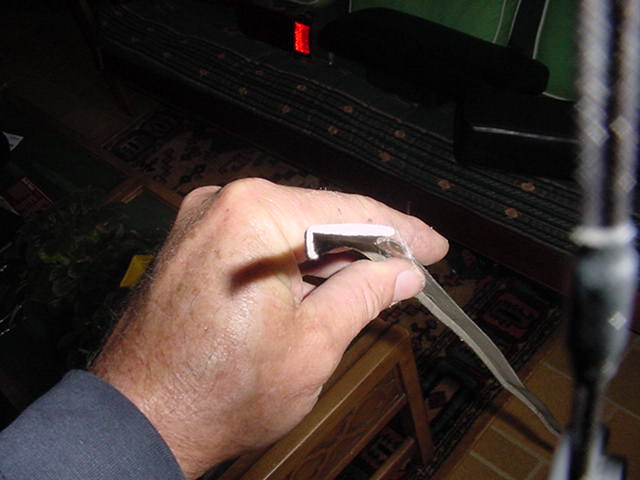 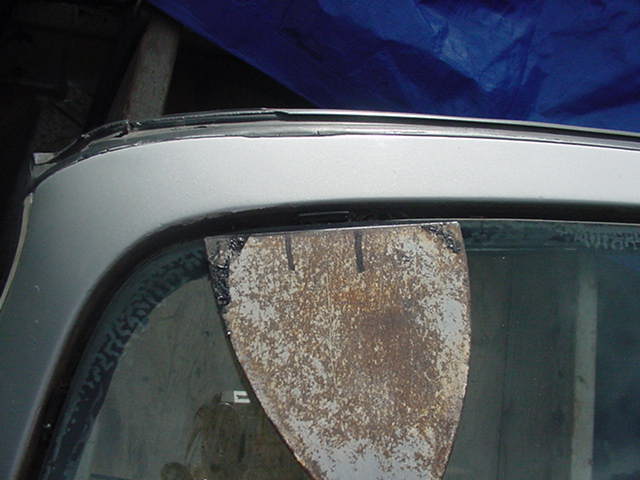
|
| buhs914 |
 Jun 5 2010, 10:58 PM Jun 5 2010, 10:58 PM
Post
#22
|
|
Not So Newbie   Group: Members Posts: 331 Joined: 16-June 09 From: Buckeye, AZ Member No.: 10,478 Region Association: Southwest Region |
No hazard beyond the potential reduction in the bond strength. You have to do the cost/benefit analysis for yourself, but I can say for sure if the car were mine, I wouldn't give it a second thought. As far as removing it to better position the tape, I wouldn't do that either. Removing a butyl set windshield is the easiest removal, but still a bit tricky for the 1st timer. It's properly done with a special heated knife, but can be cut out with "piano wire" and a bit of finesse. I could get it out with no trouble, but I've done it literally hundreds of times. You could probably get it out too, but there are a number of "feel" sort of things the you gave to mindful of to avoid a boo-boo. A small error results in a $200ish good reason to be very pissed off. If I were you, wouldn't pull your glass out unless it leaked or whistled. Every glass installer has had a job where they got too wide with the tape like you did. You just push the tape under the glass where you can, just like it appears you did accross the top. As long as the tape it still clean, it will still seal just fine. If we had to do that across a fairly long stretch, we would then "back it up" by running a bead of urerthane over the area, and smooth it so that it covered from the edge of the glass to the frame. We did this really as a extra measure of assurance that the customer wouldn't have a problem later, and in 99.99% of cases it was probably not necessary. Once again, if I were you I wouldn't take that step unless you develope a problem, but it is an option. (IMG:style_emoticons/default/aktion035.gif) (IMG:style_emoticons/default/monkeydance.gif) Yeah I made that small error and really wish I had read this before removing my windshield... |
| bandjoey |
 Jun 6 2010, 09:23 PM Jun 6 2010, 09:23 PM
Post
#23
|
|
bandjoey     Group: Members Posts: 4,935 Joined: 26-September 07 From: Bedford Tx Member No.: 8,156 Region Association: Southwest Region |
I changed my windshield in the cooler weather at probably 50-60 degrees. The old butyl was so brittle from age, the windshield popped off the butyl without any cutting. Just finger pressure. Try Ice? Also Harbor Freight sells good glass suction cups with handles for a few dollars. They really helped wiith the install.
|
| PRS914-6 |
 Jun 6 2010, 10:02 PM Jun 6 2010, 10:02 PM
Post
#24
|
|
Excellence Magazine Project 914 3.6    Group: Retired Members Posts: 1,278 Joined: 20-May 06 From: Central California Member No.: 6,031 Region Association: None  |
I really admire people who jump in and do their own work. Good Job!
The windshield was the one item I farmed out. Several glass shops I talked to refused to use butyl and at least one said it was now illegal in a front windshield but OK on other glass. Perhaps a Californai BS rule? However most cited the dangers of butyl with a convertible and the danger of it flying off (and claim they have seen it) However I have not heard of any 914 guys having issue with butyl. The way the rear glass leaks may indicate some truth in it though (IMG:style_emoticons/default/confused24.gif) Can the glass experts chime in? |
| mcbrems |
 May 19 2011, 03:50 PM May 19 2011, 03:50 PM
Post
#25
|
|
Ferdinand's first was Electric!  Group: Members Posts: 46 Joined: 26-April 10 From: North San Diego County, CA Member No.: 11,660 Region Association: Southern California |
Pretty amazing that you didn't overspray onto the concrete. ;^)
|
| ConeDodger |
 May 19 2011, 06:16 PM May 19 2011, 06:16 PM
Post
#26
|
|
Apex killer!                Group: Members Posts: 24,257 Joined: 31-December 04 From: Tahoe Area Member No.: 3,380 Region Association: Northern California 
|
For any of you Northern California guys who are doing this, I bought the butyl primer you are supposed to put on the windshield to increase adhesion and by that, front windshield rigidity. It was about $40 and one bottle would be good for 50 windshields or so. I brought it to McMark's shop so you can avoid paying the $40 and just go to McMark's.. (IMG:style_emoticons/default/biggrin.gif)
|
| mcbrems |
 Jun 3 2011, 03:57 PM Jun 3 2011, 03:57 PM
Post
#27
|
|
Ferdinand's first was Electric!  Group: Members Posts: 46 Joined: 26-April 10 From: North San Diego County, CA Member No.: 11,660 Region Association: Southern California |
I humbly offer my windshield install post from my 914 EV Conversion blog:
http://914electric.wordpress.com/2011/06/03/glass-action/ MarkB |
| avidfanjpl |
 Jun 3 2011, 04:23 PM Jun 3 2011, 04:23 PM
Post
#28
|
|
914 Hemophiliac    Group: Members Posts: 720 Joined: 6-April 10 From: Bear, Delaware Member No.: 11,566 Region Association: MidAtlantic Region |
Dumb question
Where do the 2 spacers go? I have all the clips and the spacers, but not the glass. I am not doing it myself, but I am very interested in knowing what will happen. I can't find a Sekurit or Sigla, or even a PPG with tint and the band at the top in SoCal, so I may go with a guy on eBay in Anaheim that seems to have nice product. I get to change out my mirror at the same time. My trim is chrome and in good shape. Until I decide to paint the car, I will not get the new trim that someone on here is making, but I forget who! Thanks! John |
| sfrenck |
 Jun 3 2011, 07:23 PM Jun 3 2011, 07:23 PM
Post
#29
|
|
Member   Group: Members Posts: 492 Joined: 28-February 10 From: Wilmington, DE Member No.: 11,411 Region Association: MidAtlantic Region 
|
Just did an install last week. My 2 cents - my friend and I carefully dry tested how the winshield would fit prior to putting the butyl tape on the frame. Good thing I did, because my windshield had some unexpected tapers (not cut quite right? frame a little different? (IMG:style_emoticons/default/confused24.gif) ) and the butyl tape had to be very placed close to the edge of the frame - not close to the clips.
One thing I wish I had done while the window was dry-fit positioned: mark the location of the window relative to the frame with some masking tape (piece on the frame and matching piece on the window in a couple spots). That way when you go to set it in, you know your close to it's final resting position (don't have worry so much about the window sticking to the butyl in the wrong location). My friend had shorter arms than me and the windshield was almost too close to him when it touched the tape! |
| Mikey914 |
 Jun 4 2011, 01:19 AM Jun 4 2011, 01:19 AM
Post
#30
|
|
The rubber man           Group: Members Posts: 12,772 Joined: 27-December 04 From: Hillsboro, OR Member No.: 3,348 Region Association: None 
|
I came across these while looking at a maintence manual. It appears you need to make some special wooden blocks to use as spacers. At least if you have an OEM windshield. Personally I know you can do it the way discussed, but kind of interesting to see how the factory said it should be installed.
Attached image(s) 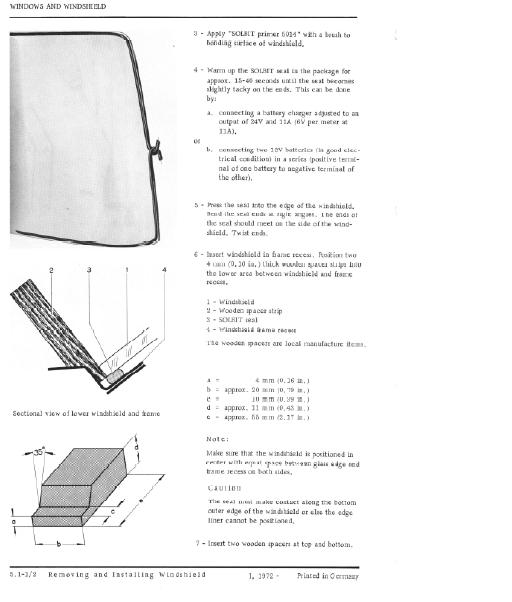 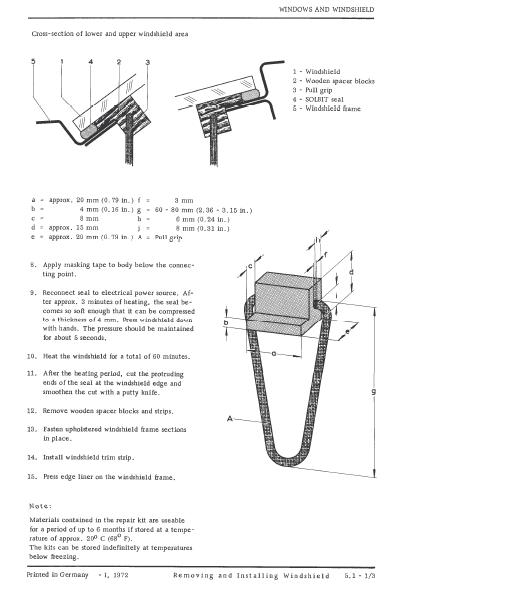
|
| majkos |
 Jun 5 2011, 11:48 AM Jun 5 2011, 11:48 AM
Post
#31
|
|
Senior Member    Group: Members Posts: 1,370 Joined: 29-February 04 From: Mile High 914 Member No.: 1,729 Region Association: Rocky Mountains |
I love it!
I'm gonna try to make a few. I've a windshield to replace and this motivate me to get her done. |
| jaxdream |
 Jun 6 2011, 08:23 AM Jun 6 2011, 08:23 AM
Post
#32
|
|
Senior Member    Group: Members Posts: 974 Joined: 8-July 08 From: North Central Tennessee Member No.: 9,270 Region Association: South East States |
I love it! I'm gonna try to make a few. I've a windshield to replace and this motivate me to get her done. Hey majkos if you do , please post what you accomplished and as well some of the wrongs that you may discover along the way with some pics if possible .Sometimes the wrongs are very helpful to see . TIA ... Jack ( Broke assed CSOB ) |
| mcbrems |
 Jun 6 2011, 06:04 PM Jun 6 2011, 06:04 PM
Post
#33
|
|
Ferdinand's first was Electric!  Group: Members Posts: 46 Joined: 26-April 10 From: North San Diego County, CA Member No.: 11,660 Region Association: Southern California |
...One thing I wish I had done while the window was dry-fit positioned: mark the location of the window relative to the frame with some masking tape (piece on the frame and matching piece on the window in a couple spots)... Just lay a piece of tape across the seams on all 4 sides, draw a line down the center of each tape lengthwise, then slice each along the edge of the glass with a razor blade. It will give you exact placement recall. |
| jmitro |
 Sep 28 2018, 06:36 AM Sep 28 2018, 06:36 AM
Post
#34
|
|
Senior Member    Group: Members Posts: 713 Joined: 23-July 15 From: Oklahoma Member No.: 18,986 Region Association: None 
|
One thing that I recommend is painting the windshield channel or recess with the black urethane primer before installing the butyl tape. It helps adhesion of the tape. From an appearance standpoint it looks better too, as you don't have the body color showing through. is it acceptable to use urethane primer even with butyl tape? all the primer instructions say it is to be used with urethane sealant |
| theer |
 Sep 28 2018, 07:57 AM Sep 28 2018, 07:57 AM
Post
#35
|
|
Senior Member    Group: Members Posts: 692 Joined: 31-July 15 From: Dover, MA Member No.: 19,014 Region Association: North East States 
|
I am surprised the left and right are marked opposite than other parts on the car - ie. door handles and signal lights. I was too. In fact, so surprised that I typed it wrong the first time. I just corrected it. "L" goes on the passenger's side, "R" goes on the driver's side. But the curves are such that it would not fit properly if swapped (at least not without excessive (IMG:style_emoticons/default/smash.gif) ) I looked closely for the "L" and "R" but could not find either. Does anyone know where on the trim those would have been stamped? Thanks! |
| JawjaPorsche |
 Sep 28 2018, 01:47 PM Sep 28 2018, 01:47 PM
Post
#36
|
|
Advanced Member     Group: Members Posts: 3,463 Joined: 23-July 11 From: Clayton, Georgia Member No.: 13,351 Region Association: South East States |
Thanks for an excellent write up.
|
  |
1 User(s) are reading this topic (1 Guests and 0 Anonymous Users)
0 Members:

|
Lo-Fi Version | Time is now: 7th December 2025 - 09:12 PM |
Invision Power Board
v9.1.4 © 2025 IPS, Inc.


