|
|
|
Porsche, and the Porsche crest are registered trademarks of Dr. Ing. h.c. F. Porsche AG.
This site is not affiliated with Porsche in any way. Its only purpose is to provide an online forum for car enthusiasts. All other trademarks are property of their respective owners. |
|
|

  |

| Bogaat |
 Aug 27 2007, 10:30 AM Aug 27 2007, 10:30 AM
Post
#1
|
|
Member  Group: Members Posts: 195 Joined: 8-January 07 From: Charleston, SC Member No.: 7,436 |
Any rebuild how-to's out there? I am about to pull mine apart. I am pretty sure HowVWs had an article a while back, but I have not gone digging just yet. All input is appreciated.
|
   |

 
|
| rigglet |
Aug 27 2007, 01:05 PM
Post
#2
|
|
Member Group: Members Posts: 149 Joined: 28-November 06 From: Westfield, Indiana Member No.: 7,272 Region Association: Upper MidWest |
Here is a write up I used for mine. Wish I could take credit for it, but I'm not near as smart as Rich. Hope this helps.
QUOTE(r_towle @ Apr 19 2007, 08:30 PM)  Take them out and have a look. I agree that the cam followers (plastic) can wear out, and actually need a bit of grease. Here is my suggestion. Trust me, it costs less than five cents. Please pay close attention as you do this so you dont drop anything. Remove the dist cap Look at were the vacuum pot is pointing and memorize the location of the distributor. Now, we are going to remove it. Take the one or two vacuum lines off the distributor, mark them if there are two, its easy to forget. Now unplug the FI trigger point, and unplug the lead that goes to the coil. Loosen the 10 adjuster that allows you to rotate the distributor, and turn the distributor clockwise till you can see the 13mm nut that clamps the distributor down. Now, go get a good light, some rags, screw driver, popsicle stick..whatever you need. Clean the whole area around that nut, and around the base of the distibutor so you can eat off of it. Make sure there is no dirt present. Loosen the nut, and remove it from the engine bay (trust me, just do it) Look for the washer that was under the nut and remove it from the engine bay..(again trust me) Now pull out the distributor, try to remember the current position, or you can twist it back to its permanent location so you only need to remember one visual...then pull it out. Now its out. Take it to a clean bench and clean all the rest of the crud off. Two screws take out the FI trigger points, do that and set them aside. Take out the screw that holds the condensor, set them aside. Remove the set of points. Now if its like mine it has two clamps still screwed in, though I have seen them use one clamp to hold the condensor also..whatever. Take out the two screws that hold the cap clamps, and notice that they are threaded into the advance plates inside the distributor, take a pic if needed so you orient that plate correctly on the way back in. There set the screws and clamps aside. Now there are two plates, hooked to the vacuum advance pot, and they are also joined together, with a very small ball bearing in between. You want to take these two plates out, clean the shit out of them, clean the ball bearing, and re-grease in between the plates. There is a some funky old grease in there that actually makes the plates hard to move when it gets hot. This resistance causes some really odd behaviour, and is a simple fix. Now, put it all back together, blow all the crap out of the lower areas, and in the FI trigger point area... Inspect and test the trigger points, but for not, do not replace them. Put it together, with new grease, not so much that it will splatter when the plates spin, but enough to let them now move freely. Put it back in the car after you are done. Word of caution. Put the distributor back in , it should be the only thing in your hands, and the only thing you focus on for that few seconds, after its in, then and only then reach for the washer and nut that hold it down. That hole is not easy to fish things out of. Rich |
|
|
|
| ThinAir |
Aug 21 2009, 02:24 PM
Post
#3
|
|
Best friends Group: Members Posts: 2,542 Joined: 4-February 03 From: Flagstaff, AZ Member No.: 231 Region Association: Southwest Region |
I've been looking for a long time for a How-to on rebuilding the stock distributor. A search finally found this!
Does anyone know of one with pictures? What kind of grease do you use? |
|
|
|
| Cevan |
Aug 21 2009, 02:42 PM
Post
#4
|
|
Senior Member Group: Members Posts: 1,079 Joined: 11-December 06 From: Western Massachusetts Member No.: 7,351 |
Here is a link to my post. Hope it helps.
|
|
|
|
| ThinAir |
Aug 21 2009, 02:58 PM
Post
#5
|
|
Best friends Group: Members Posts: 2,542 Joined: 4-February 03 From: Flagstaff, AZ Member No.: 231 Region Association: Southwest Region |
QUOTE(Cevan @ Aug 21 2009, 01:42 PM) Thanks! That's exactly the kind of thing I've been searching for. I've got two 2Liter dizzys that each produce a slight "hiccup" once in awhile. I figure they're just due for a good cleaning to make all the parts move smoothly again. |
|
|
|
| aircooledtechguy |
Aug 21 2009, 04:14 PM
Post
#6
|
|
The Aircooledtech Guy Group: Members Posts: 1,966 Joined: 8-November 08 From: Anacortes, WA Member No.: 9,730 Region Association: Pacific Northwest |
If you order Bosch shim kit #059 998 211 you'll get a nice assortment of new shims all the "C" clips and just all the stuff needed to renew the wear parts. If anyone needs a kit, let me know ($17 shipped via USPS)
Attached image(s) 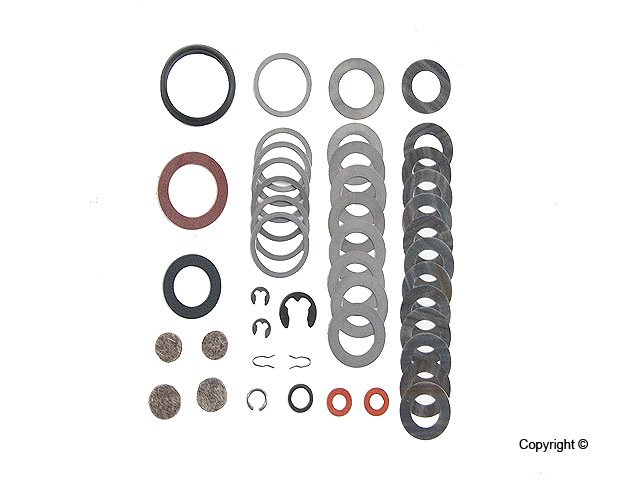
|
|
|
|
| ThinAir |
Aug 21 2009, 04:30 PM
Post
#7
|
|
Best friends Group: Members Posts: 2,542 Joined: 4-February 03 From: Flagstaff, AZ Member No.: 231 Region Association: Southwest Region |
QUOTE(aircooledtechguy @ Aug 21 2009, 03:14 PM) If you order Bosch shim kit #059 998 211 you'll get a nice assortment of new shims all the "C" clips and just all the stuff needed to renew the wear parts. If anyone needs a kit, let me know ($17 shipped via USPS) Thanks, Nate. Hey, you've got a lot of good stuff on your AirCooledTech site! I've bookmarked it so I can go back and read up on stuff. Did you ever get your K-Jetronic conversion finished? |
|
|
|
|
1 User(s) are reading this topic (1 Guests and 0 Anonymous Users)
0 Members:

|
Lo-Fi Version | Time is now: 13th May 2024 - 08:58 AM |
Invision Power Board
v9.1.4 © 2024 IPS, Inc.