|
|
|
Porsche, and the Porsche crest are registered trademarks of Dr. Ing. h.c. F. Porsche AG.
This site is not affiliated with Porsche in any way. Its only purpose is to provide an online forum for car enthusiasts. All other trademarks are property of their respective owners. |
|
|

  |

| BMXerror |
 Mar 29 2009, 10:28 PM Mar 29 2009, 10:28 PM
Post
#81
|
|
Senior Member  Group: Members Posts: 1,705 Joined: 8-April 06 From: Hesperia Ca Member No.: 5,842 |
Well, no pictures on this post because it's nothing really creative. More of an 'open your wallet real wide and bolt the dollars to your car' kinda things. I got my Koni yellows for the rear, and was finally able to mount my coilover kit that I bought last JULY!
Previously I had KYB rears that were on the car when I got it, and they were rather worn out. Also, I think they were close to stock ride height, because the car was kinda 'stinkbug' before. If you were driving on a strait road and gave the wheel a wiggle, it would wag it's tail at you for a little bit after you straitened the wheel out. It took time for it to settle out. I'm pretty sure this was mostly a high roll center problem. When I added the front swaybar, it drastically improved the overall handling of the car by eliminating body roll, but it made the thing very tail happy even with the sways at their softest setting. I figured this would be the case, as I built the swaybar with the rear coilovers and 200 lb springs in mind. I just couldn't afford to do both at once. So anyways, my tax return came just in time for Paragon Products to have a 15% off sale on all Koni products ('till July, if anybody is interested). It was a match made in heaven! So I ordered those, as well as a pistol type pyrometer last week, and left work early to mount the shocks on Friday. I lowered the rear by 5/8" from where it was before, giving me about 5-3/8" at the rear doughnuts. Lowering the roll center did a LOT! It actually sits like a Porsche now, instead of a mid '60s hot rod! I set the shocks right in the middle of their dampening adjustment as a place to work from, but it really ended up being about perfect! I also stiffened my swaybar a full two inches on the arm to balance it out. I was acting as pit crew for an overheating Lister at the speedway yesterday, so I didn't get to really test the 914 till today, and BOY what a difference. The front end is right where you point it, and the back end stays in the back! (IMG:style_emoticons/default/biggrin.gif) I brought out my new temp gun and sorted out tire pressures in a way I've never done before. I found a tad bit of understeer in the canyons which was easily alleviated with a 1/4" swaybar adjustment on the side of the road, and now it seems just right. Of course, I won't know for sure until I can really cut loose on an autocross course, but I think today's little shakedown session got me pretty close to dialed in! I'm very happy that the front and rear projects came together as well as they did. This was something I planned about a year and a half ago, and the results are awesome! Incidentally, you get really funny looks from people when you stop at a turn out and break out the pyrometer, a pressure gauge and a clipboard and do a full write-up on the side of the road! haha... And the cop didn't even want to ask what I was doing! I wish I had a picture of the look on her face when she walked up to my window and saw the aluminum dash, no passenger seat, and me tightening my 5-points! (IMG:style_emoticons/default/WTF.gif) (IMG:style_emoticons/default/lol-2.gif) Priceless! I'm gettin' close to ready for May 3rd! Have a (IMG:style_emoticons/default/beer3.gif) ! Mark D. |
   |

 
|
| BMXerror |
Oct 17 2009, 06:21 PM
Post
#82
|
|
Senior Member Group: Members Posts: 1,705 Joined: 8-April 06 From: Hesperia Ca Member No.: 5,842 |
Well, since the rear suspension is well sorted now, I decided to get into the front. I happened across the pictured upper strut mounts, and decided that it was a good time to take out the stock mounts and reverse engineer them (I'm designing adjustable mounts). However in the process of trying to get the rusty struts out of the rusty mounts, I mushroomed the thread on the right side with my BFH. So the new mounts got new Koni yellows to match the rear. (IMG:style_emoticons/default/aktion035.gif)
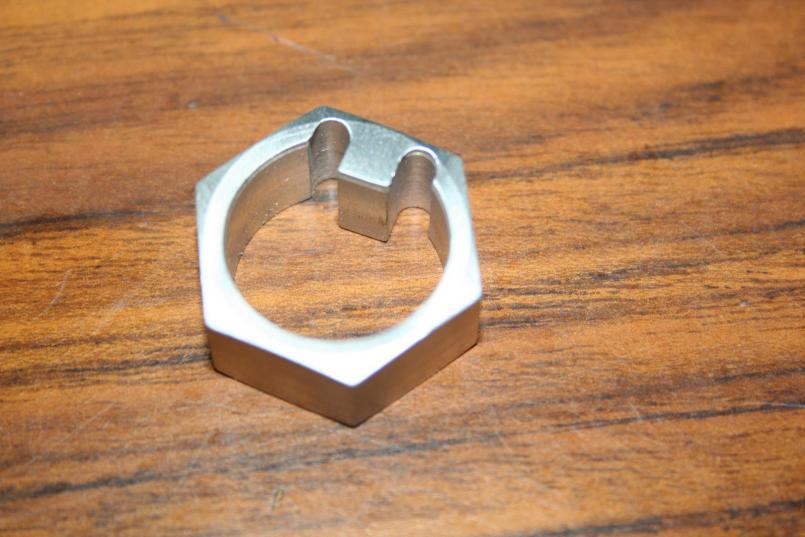
In addition to all that, I got new tires all the way around as the Kumhos that I was running were rather hard and blistered. Dunlop Direzza Sport Z1 Star (Inhale) Specs, all the way around. So yesterday, I figured it'd be a good time to drop the ride height, equalize the camber, and do a four wheel alignment. The took about 8 hours, considering I've never done it before, and the frame is a bit tweaked, and EVERYTHING was out of adjustment. But the results look promising. 2 degrees negative camber in the rear, 1.5 in the front. I'm trying to put a few gentle miles on the tires before really pushing them, but I'm autocrossing next weekend, so we'll see how it works. The only thing unusual about this setup is the custom hardware that I had to machine to work with the new mounts. These 'retainers' are basically a 22mm nut no threads and a key cut in them. I tried making them out of aluminum, but that didn't work so well. So I went back and redesigned them to give them a little more meat, and made them out of steel. New mounts. Attached thumbnail(s) 
|
|
|
|
| BMXerror |
Oct 17 2009, 06:23 PM
Post
#83
|
|
Senior Member Group: Members Posts: 1,705 Joined: 8-April 06 From: Hesperia Ca Member No.: 5,842 |
First retainer.
 Second retainer. 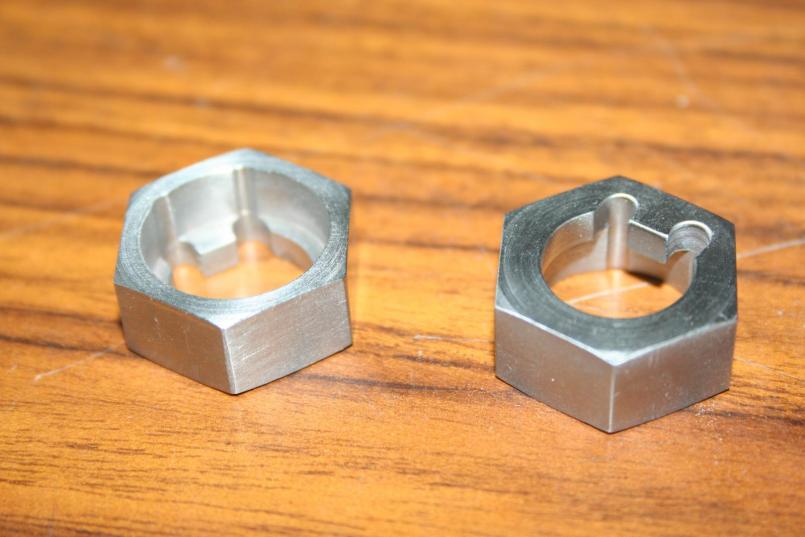 Mark D. |
|
|
|
| BMXerror |
Oct 17 2009, 06:26 PM
Post
#84
|
|
Senior Member Group: Members Posts: 1,705 Joined: 8-April 06 From: Hesperia Ca Member No.: 5,842 |
This was my original plan for hardware. I only ended up using about half of that.
 Mounted and adjusted. You can see how far over and back it's adjusted, but the other side is pretty much centered for the same amount of camber. A little frame tweaking, me thinks. Note the adjustment key on top of the shock. Please ignore the dirty ass sheet metal with 4 different paint jobs on it. 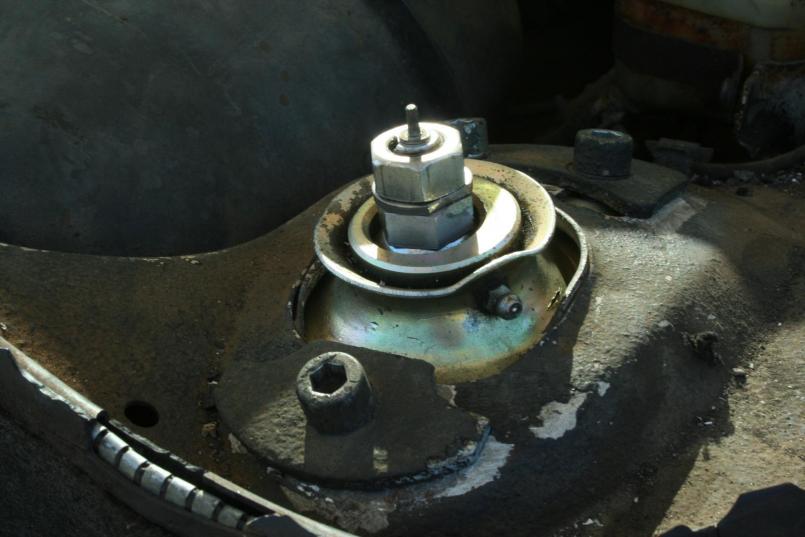 Mark D. |
|
|
|
| BMXerror |
Jan 26 2011, 11:07 PM
Post
#85
|
|
Senior Member Group: Members Posts: 1,705 Joined: 8-April 06 From: Hesperia Ca Member No.: 5,842 |
*If you don't want to read my lame story, skip the next 4 paragraphs*
Good lord! I can't believe it's been a year and a half since I posted any progress... haven't really made much, is why. Where to start?.... Well, I started autocrossing with SCCA in may of '09 and quickly learned how slow my car and myself really are amidst a competitive group. As discouraged as I was, I realized that that's where I needed to be to improve my skills, both on the driving and preparation side. However, I ended up focusing a lot of my money and efforts into track time, and little got done with the car. About May of 2010, the D-jet system really started getting bad. It was never really great with the modified engine, but the system started deteriorating rapidly to where it barely wanted to run. I decided to park it before it cost me an engine. I quickly realized I was faced with two options. Either spend to rebuild the ignition and injection systems and live with D-jet for even longer, or bite the bullet and go to SDS as I've wanted to do for years. Well, there was no cash for that. I was trying to buy a house, and my commuter car blew an engine shortly thereafter. However, in August I was able to find a brand new SDS EM4-4F system (exactly what I wanted) on eBay for cheap. It was a guy in Australia who bought it for a project that never got that far. With shipping back to the US I paid $1140. Plus I had to ship it to SDS and have some rework done for some of the options I wanted, as well as a V17 chip upgrade. That was another $388. All in all, I figure I saved about $500 on a fully loaded system. Of course, as life goes, I got my house the very next month, and for a while it was very hard to find time and money to put into the install. However, I was try to spend one extra night a week in the machine shop building the brackets and stuff I need for the sensors and injectors. So anyways, in the past 4 or so months, this is what I've come up with. The first custom part I machined is a mount for the TPS. Luckily, the 'D' pattern on the TPS is the same as the stock shaft. The shaft did need to be cut shorter, which took me about two minutes with an angle grinder and a cutoff wheel. The hard part was that the TPS plug is turned 90 degrees from the stock location towards the back of the engine. With the bell housing there, it gets a little tight to plug the loom in. So careful measurement had to be made to make sure everything would fit. What I came up with was a two piece design that consisted of a machined block that mates to the TPS, and a sheet metal 't' that flips it 90 degrees and mounts the assembly to the stock TB. 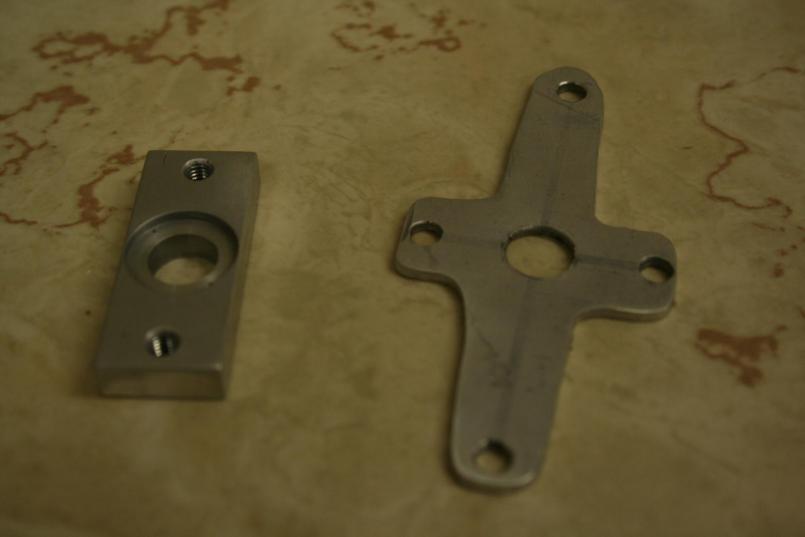 TPS brackets. You can see that the sheet metal part was all done by hand. It's functional. 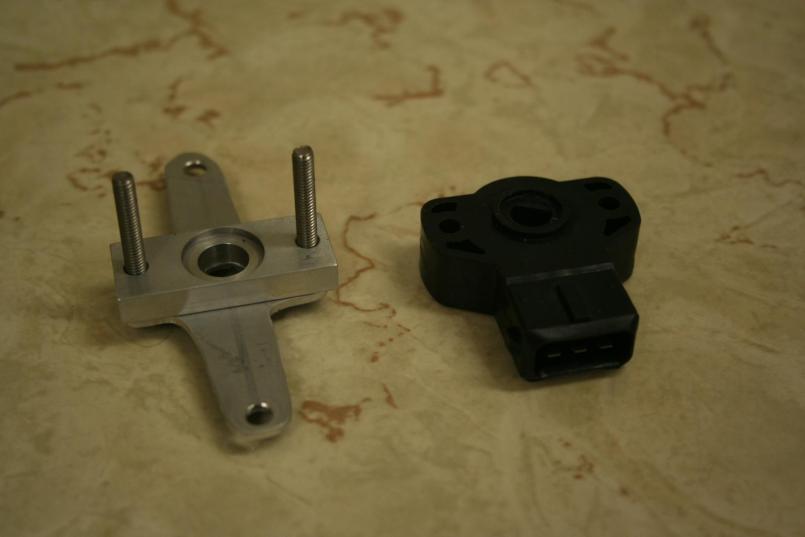 Assembled TPS mount alongside new TPS. You SDS guys will be familiar with that part. 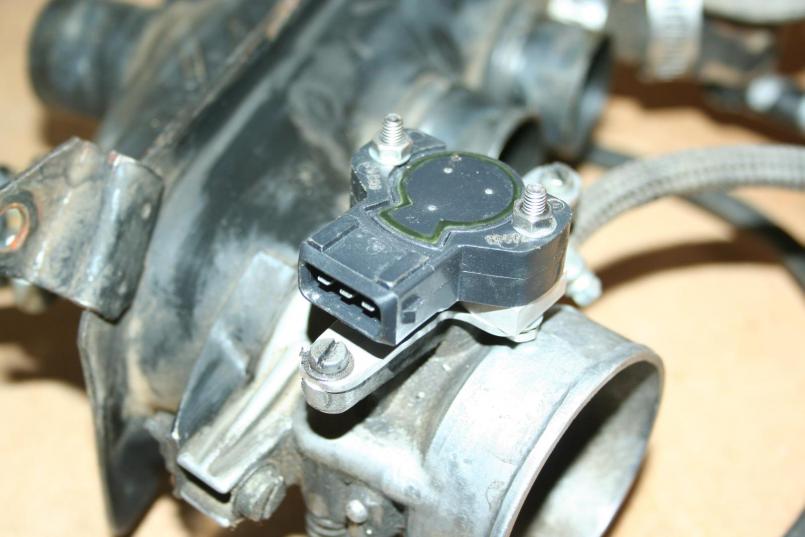 Installed. Mark D. |
|
|
|
| BMXerror |
Jan 26 2011, 11:08 PM
Post
#86
|
|
Senior Member Group: Members Posts: 1,705 Joined: 8-April 06 From: Hesperia Ca Member No.: 5,842 |
One more.
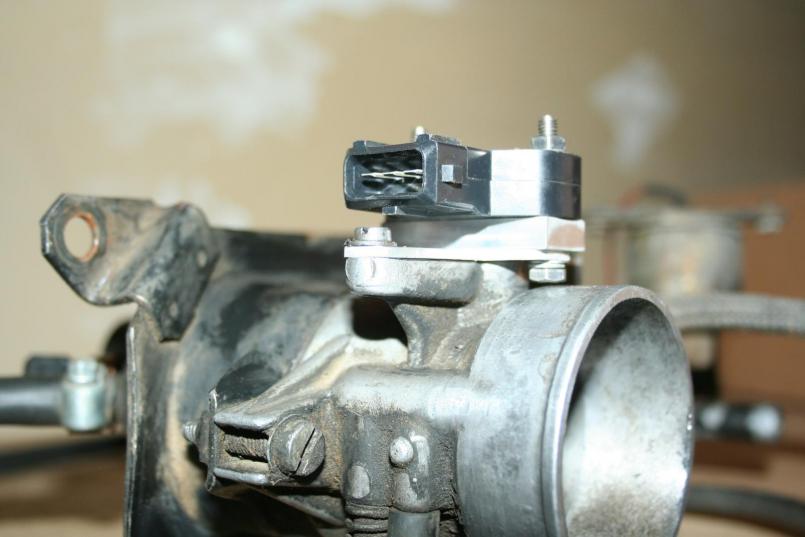 Just enough clearance between that screw and the plug that goes below it. Mark D. |
|
|
|
| BMXerror |
Jan 26 2011, 11:15 PM
Post
#87
|
|
Senior Member Group: Members Posts: 1,705 Joined: 8-April 06 From: Hesperia Ca Member No.: 5,842 |
Since I'm going to crank fired ignition, another thing I had to make was a blockoff plug for the distributor bore. This was just time spent in the machine shop. I found the o-rings at McMaster Carr. I got a compound of rubber that's supposedly rated up to 400 degrees fahrenheit and oil resistant.
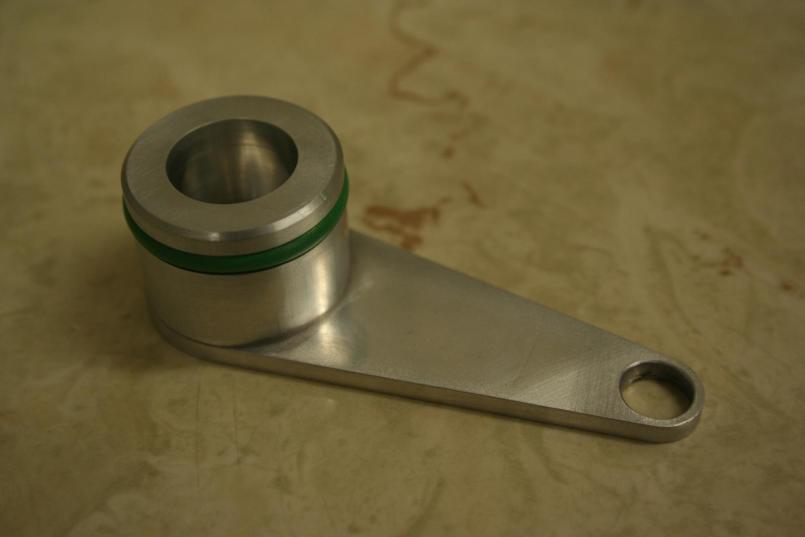 Not much to say about this part except if I do another I'm gonna leave more material around the bolt hole if I have to do another. That was a reverse engineering mistake. I.E. I don't know how to measure a stud. (IMG:style_emoticons/default/blink.gif) (IMG:style_emoticons/default/slap.gif) 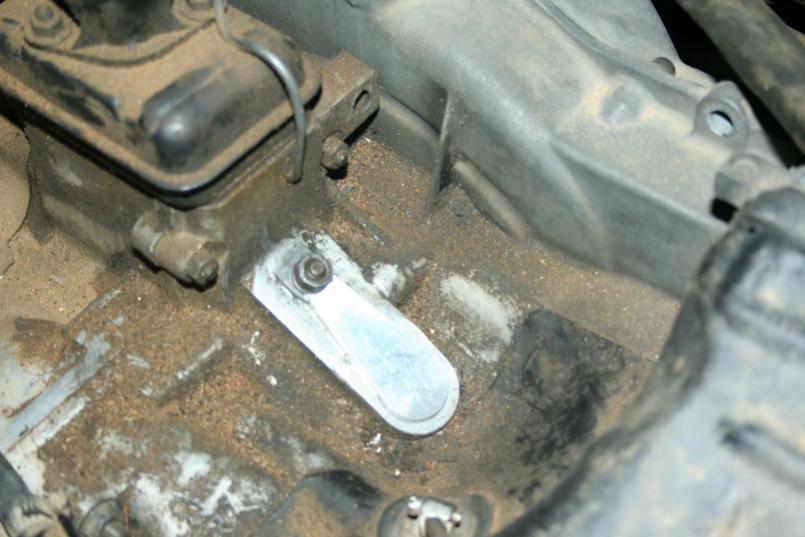 Installed. Don't worry. The engine will get cleaned up before I put it back in. The fit in the bore is almost orgasmic, BTW. (IMG:style_emoticons/default/smile.gif) Mark D. |
|
|
|
| BMXerror |
Jan 26 2011, 11:28 PM
Post
#88
|
|
Senior Member Group: Members Posts: 1,705 Joined: 8-April 06 From: Hesperia Ca Member No.: 5,842 |
Originally, when I decided that I wanted to go to SDS, I was just planning on using the stock D-jet injectors. However, since I bought a system from a private party, he had ordered injectors with it. He bought the Ford style 440cc 'Green Top' injectors, like so.
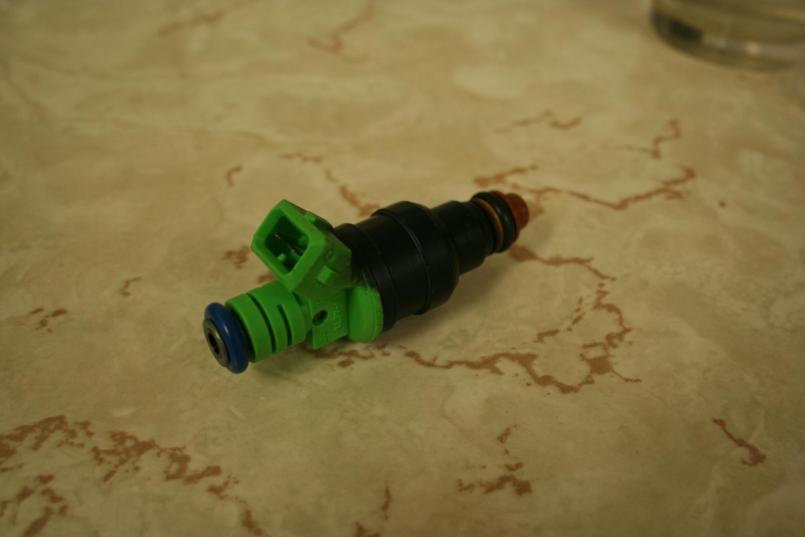 Even though it's overkill for the engine that's in the car right now, I decided to go ahead and install these. Two main reasons: I didn't want to change the injector plugs on the loom, and then have to change them back when I had enough engine that required bigger injectors. These are a standard size, and I can get them in many different flow rates. Also, they're new, and it's always best to use good components, even though there was no known problems with the old injectors. The way I decided to accomplish this is to bore and sleeve the manifolds to accept the new injectors, use the existing clamp, and machine port adapters for the backside (still in process). 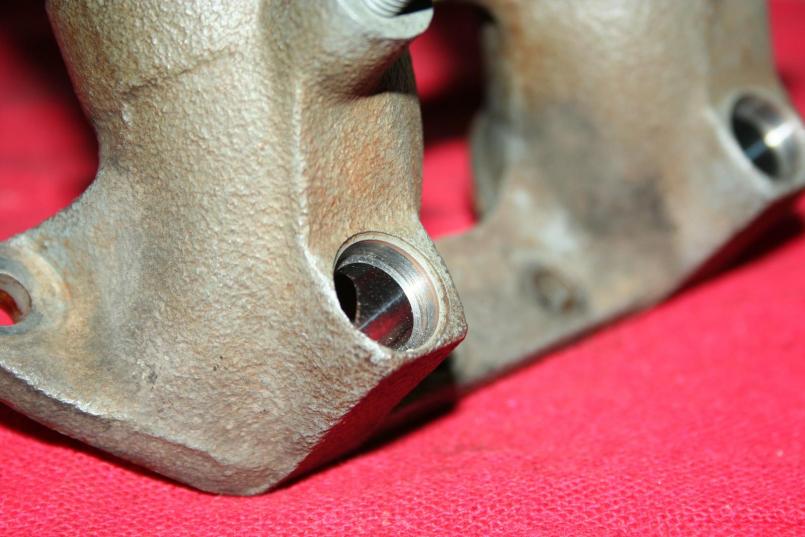 Manifold bored and counterbored to accept the sleeves. The fixturing on this part was a little interesting because the injectors rest at a 80 degree angle from the gasket face. Bore tolerance was .0005 for the press fit. Mark D. |
|
|
|
| BMXerror |
Jan 26 2011, 11:34 PM
Post
#89
|
|
Senior Member Group: Members Posts: 1,705 Joined: 8-April 06 From: Hesperia Ca Member No.: 5,842 |
Sleeves. The small end was held to +/-.0001" for the press fit. The bore on the larger side was held +/- .002 for the o-ring to seal.
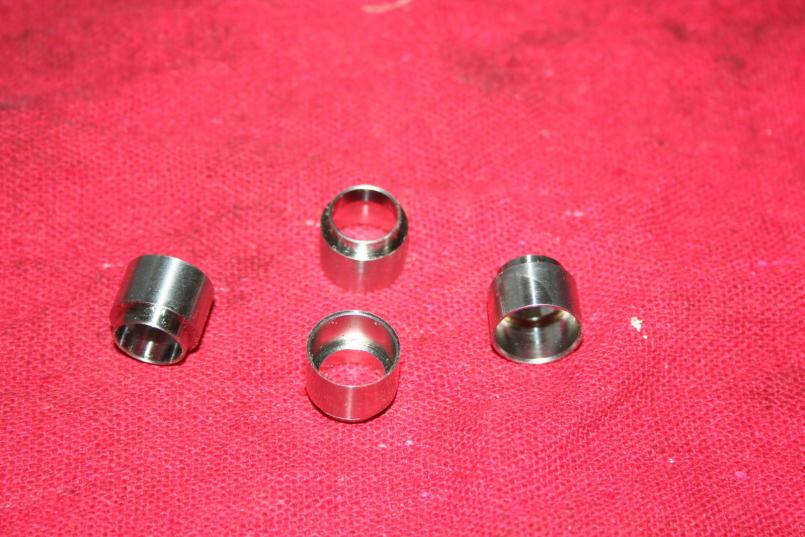 Oh yeah. They were machined from some 316 that I had lying around. 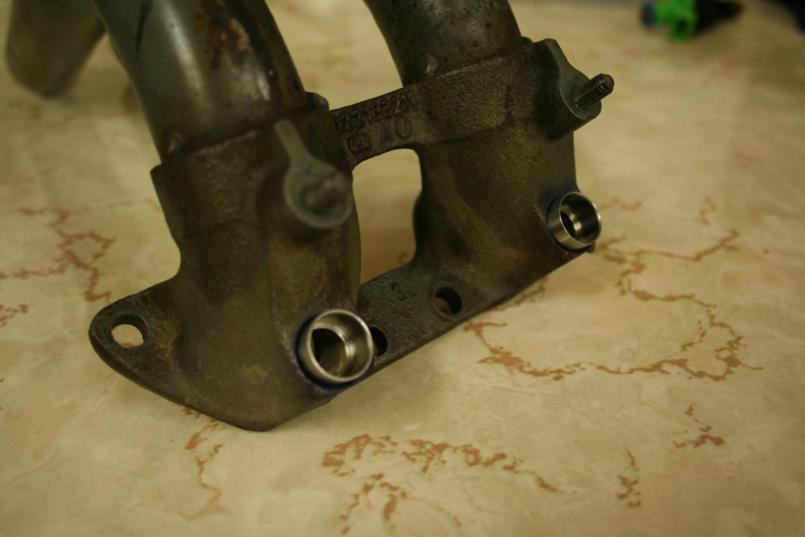 Sleeves pressed in. The press fit was perfect. Not too tight. Not too loose. 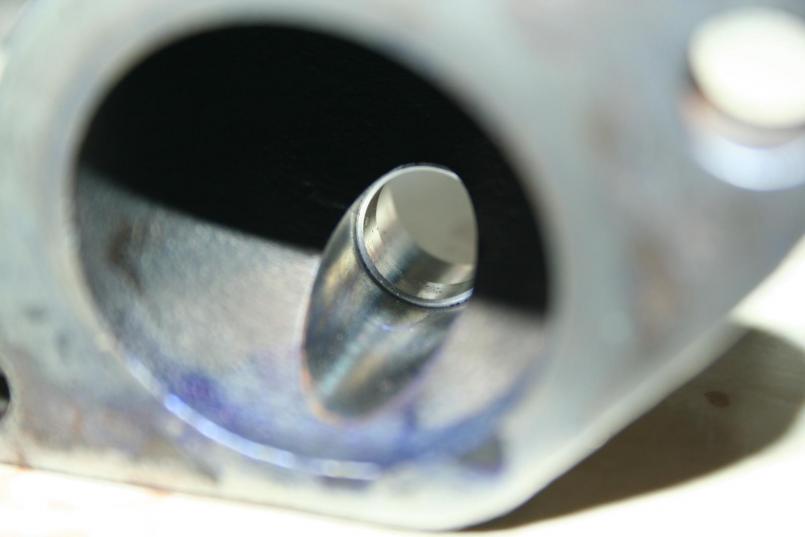 Port side. Mark D. |
|
|
|
| BMXerror |
Jan 26 2011, 11:39 PM
Post
#90
|
|
Senior Member Group: Members Posts: 1,705 Joined: 8-April 06 From: Hesperia Ca Member No.: 5,842 |
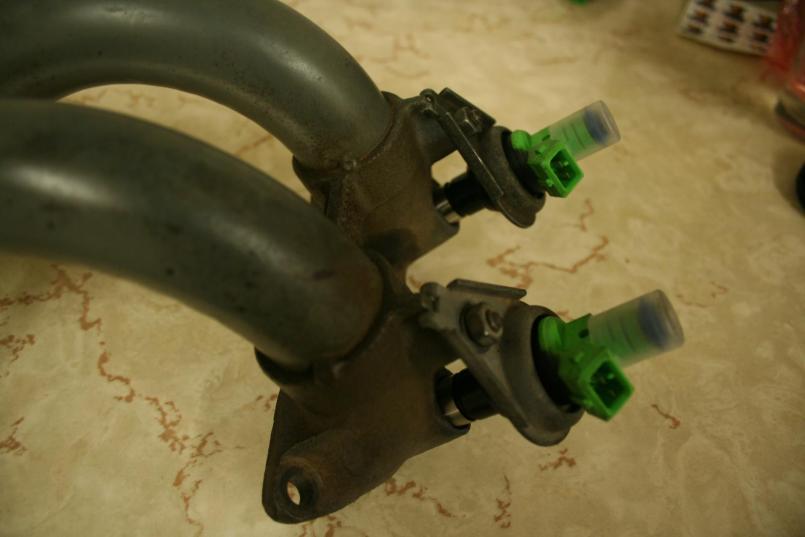 Injectors installed. Feels good to start putting stuff together. 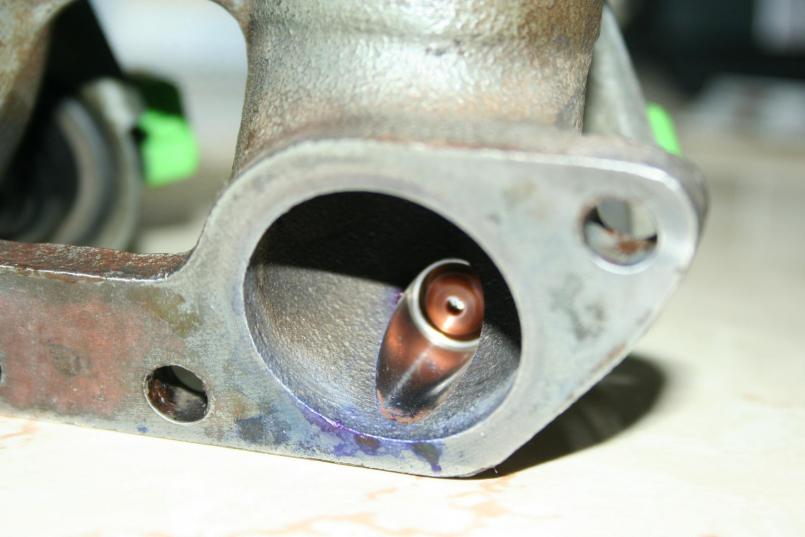 It took some careful calculation to get the depth of the injector approximately as the stock ones were. I think I did okay. That's it for tonight. There is more done that I still need to get pictures of. I'm hoping to be back on the road in a month or so. Then the fun part begins... Mapping! (IMG:style_emoticons/default/piratenanner.gif) Mark D. |
|
|
|
| yeahmag |
Jan 27 2011, 12:40 AM
Post
#91
|
|
Advanced Member Group: Members Posts: 2,455 Joined: 18-April 05 From: Pasadena, CA Member No.: 3,946 Region Association: Southern California |
Mark,
I'd love to see a parts list for your monoball top hats. I have a set of worn out ones that I'd like to refurb courtesy of McMaster-Carr or the like... Sure would save me some R&D time. The first PCA event of the year is 2/12 at El Toro. Would be good to have another 914 out there! |
|
|
|
| BMXerror |
Jan 27 2011, 01:39 PM
Post
#92
|
|
Senior Member Group: Members Posts: 1,705 Joined: 8-April 06 From: Hesperia Ca Member No.: 5,842 |
I'm actually supposed to be running with SCCA at Cal Speedway that weekend, but I doubt I'll have the 914 together by then. The plan right now is to bring out my new commuter car ('04 Cooper S) to run in SK2 instead. But I would definitely love to run with you guys sometime. In the summer we're always running just across from you on the next runway. I'll put it on my 'to-do' list for this year, to run at least one PCA event. (IMG:style_emoticons/default/biggrin.gif)
I didn't make the hats OR rebuild them, so I'm not sure I'll have what you need. I mostly just machined the hardware to adapt them to the car. However, I did do some research here and there for the adjustable ones that I never built. (IMG:style_emoticons/default/confused24.gif) PM me a tell me exactly what info you're looking for and I'll dig around and see if I have it. (IMG:style_emoticons/default/beerchug.gif) Mark D. |
|
|
|
| yeahmag |
Jan 27 2011, 05:05 PM
Post
#93
|
|
Advanced Member Group: Members Posts: 2,455 Joined: 18-April 05 From: Pasadena, CA Member No.: 3,946 Region Association: Southern California |
I ran, not walked away from SCCA. I got tired of the constant BS and lack of runs. For $65 at PCA I get:
3 run groups of 4 run (Total of 12 runs) Larger, well designed courses Free Starbucks Coffee and Donuts Great atmosphere and laid back people Sometimes a catered lunch Come to the dark side... |
|
|
|
| J P Stein |
Jan 27 2011, 06:47 PM
Post
#94
|
|
Irrelevant old fart Group: Members Posts: 8,797 Joined: 30-December 02 From: Vancouver, WA Member No.: 45 Region Association: None |
QUOTE(yeahmag @ Jan 27 2011, 03:05 PM)  I ran, not walked away from SCCA. I got tired of the constant BS and lack of runs. For $65 at PCA I get: 3 run groups of 4 run (Total of 12 runs) Larger, well designed courses Free Starbucks Coffee and Donuts Great atmosphere and laid back people Sometimes a catered lunch Come to the dark side... You forgot, less competition......... |
|
|
|
| yeahmag |
Jan 27 2011, 06:49 PM
Post
#95
|
|
Advanced Member Group: Members Posts: 2,455 Joined: 18-April 05 From: Pasadena, CA Member No.: 3,946 Region Association: Southern California |
Depends on what class you are in, but for a 914 - absolutely. But seriously, its the same price for 1/2 the runs and 2X the attitude in SCCA. All the "nice" SCCA guys come over to PCA to practice for events and nationals.
|
|
|
|
| BMXerror |
Feb 6 2011, 11:54 AM
Post
#96
|
|
Senior Member Group: Members Posts: 1,705 Joined: 8-April 06 From: Hesperia Ca Member No.: 5,842 |
Quick update here. I'm not sure if I mentioned that I'm doing a battery relocation while I'm at it. So I decided that instead of running power cables through the tunnel to power all the switched features, I'd run a switched line to a master relay that turns those functions on, and pull power off the starter. (I'll get some pics of the battery work that I've done later today)
Anyways, there are some switched circuits and some non-switched circuits that all need to be fused, so I decided to do a completely separate relay board in the engine compartment. 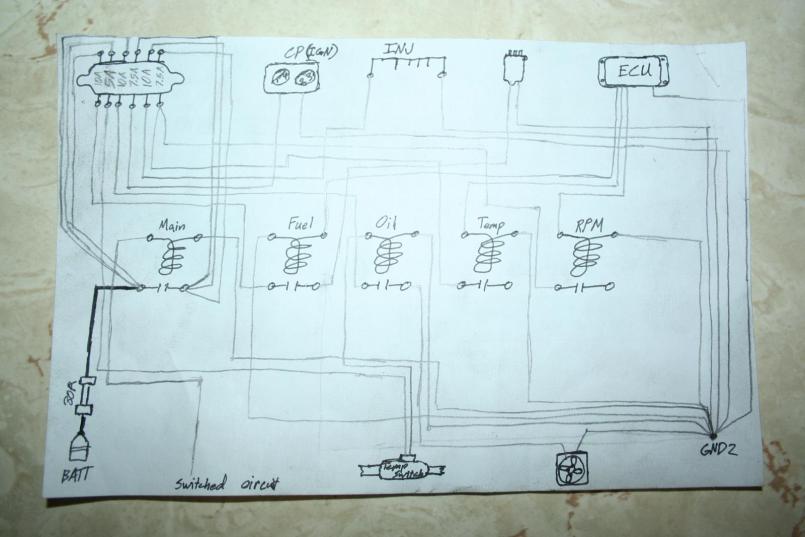 This is what a wiring diagram looks like as drawn by someone who doesn't know how to draw wiring diagrams. I drew this up at work while my machine was running on Friday. (IMG:style_emoticons/default/biggrin.gif) Some of the capacities on the fuses are subject to change. I need to do some more research on that. 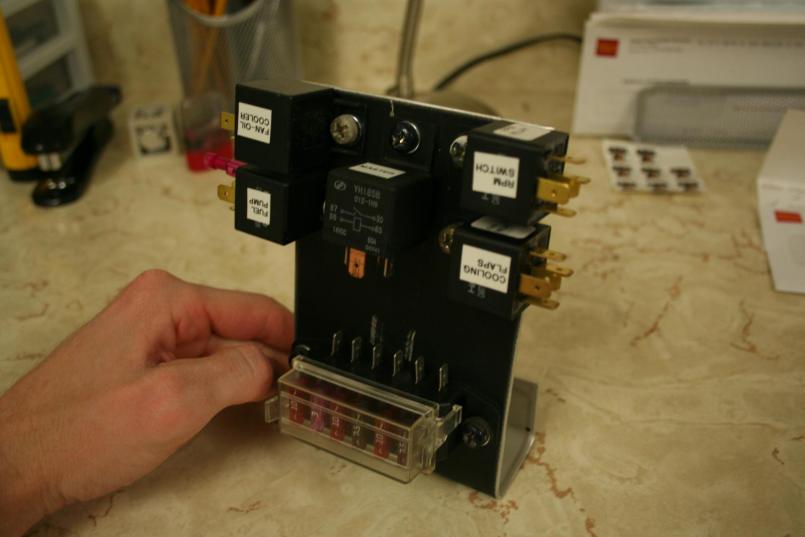 I fabbed this up in about an hour and a half yesterday, and I'm quite pleased with how it came out. Yes, the labels are upside down, but I did it that way because my head will be upside down in the engine compartment when I'm looking at them. 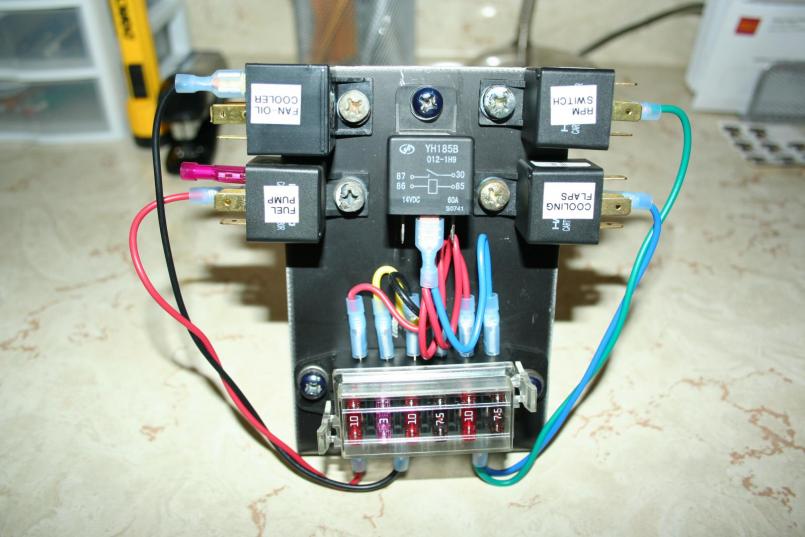 Stayed up until late last night wiring this up. This is all the wiring I can do without installing it in the car. I need to add the main power from the fuse to the master relay (60A), all the control wires to the ECU, all the grounds, and a couple intermediate control wires. Mark D. |
|
|
|
| BMXerror |
Feb 6 2011, 02:00 PM
Post
#97
|
|
Senior Member Group: Members Posts: 1,705 Joined: 8-April 06 From: Hesperia Ca Member No.: 5,842 |
A couple more things that I did a while ago. When planning the SDS install, I decided that now would be a good time to move the battery up front. I just used a $10 plastic battery tray and attached it with rivet-in T-nuts through the trunk floor. That way you don't have to hold a nut on the underside of the floor while screwing a bolt in the top. It also makes a flush mount on the bottom side. The battery clamp was done the same way. I just used M8 X 170mm bolts (which were a bit too long) from McMaster Carr and screwed those into T-nuts in the floor.
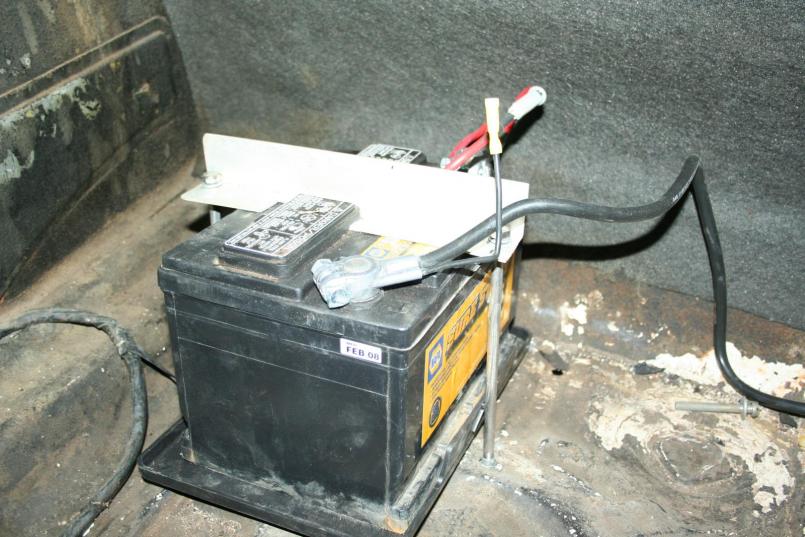 Installed. Mark D. |
|
|
|
| BMXerror |
Feb 6 2011, 02:08 PM
Post
#98
|
|
Senior Member Group: Members Posts: 1,705 Joined: 8-April 06 From: Hesperia Ca Member No.: 5,842 |
The cables were just purchased from O'Reilly. I don't remember if they're 4 or 6 gauge, but I had to run the hot lead through the tunnel all the way to the starter. The ground needed to go to the battery switch at it's new location on the left front fender.
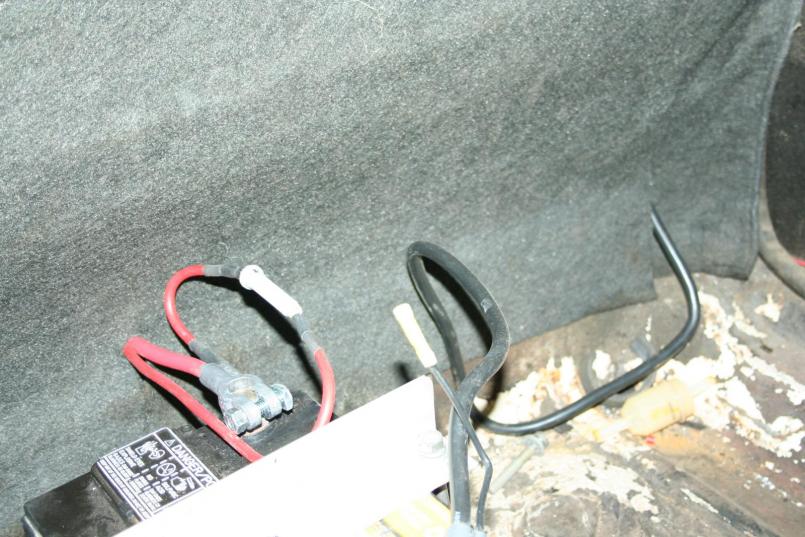 Note the 30A inline fuse on the hot lead. Grommets are epoxied in anywhere the lines pass through a firewall. 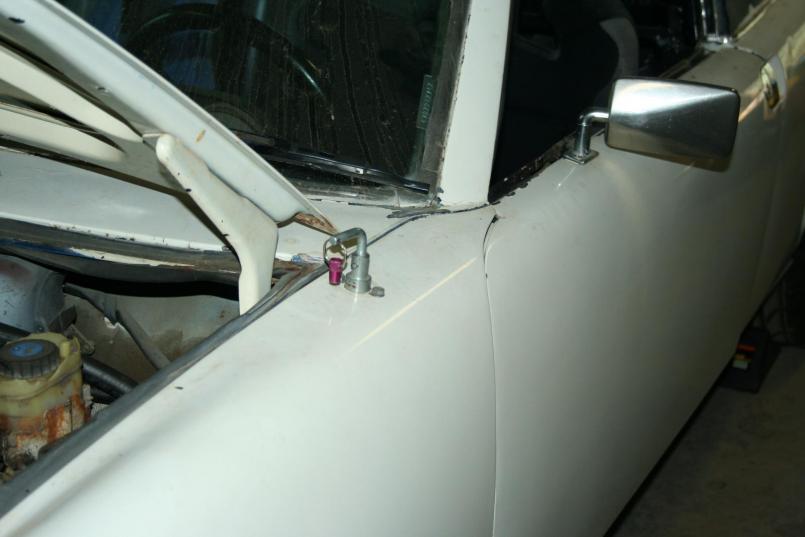 Battery switch's new spot. This is actually the old radio antenna hole. I'm going to make a plate to cover the uncleanliness sometime and paint it bright orange so that it's easy for course works to spot. This mod is actually in response to an SCCA GT-3 rule that requires a main battery shutoff on the outside of the car that is accessible with the car either rightside up or upside down. It's also pretty convenient, because you can just drop the key in just before getting in the car. Mark D. |
|
|
|
| BMXerror |
Feb 6 2011, 02:19 PM
Post
#99
|
|
Senior Member Group: Members Posts: 1,705 Joined: 8-April 06 From: Hesperia Ca Member No.: 5,842 |
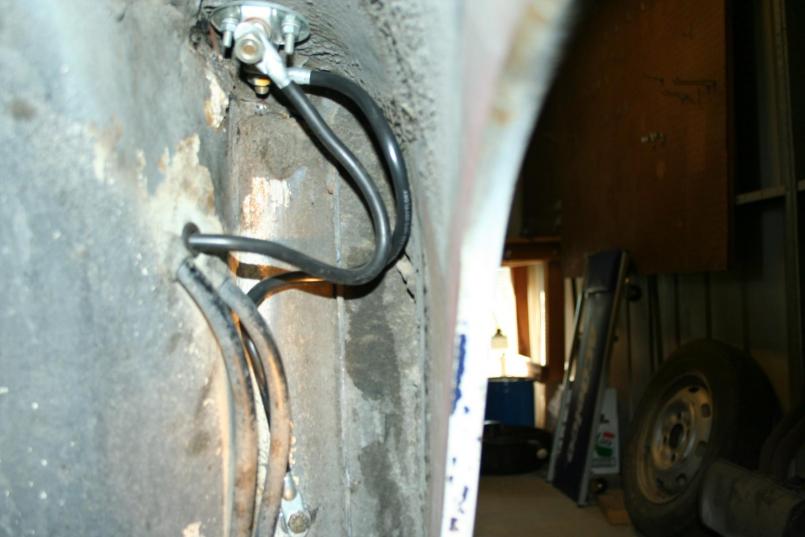 Wiring in the inner fender to the battery switch. It's pretty tight in there and tough to photograph. Note the ground on the backside of the fender well. This is also bolted to a rivet-in T-nut. I've been doing that a lot more lately to make the thing easier for only one person to work on. I live alone, and I can't just go grab an extra set of hands. Also, even if I did have an extra set of hands, you don't want to know where the other end of that bolt pokes through. It'd be a bitch to hold a nut on it. 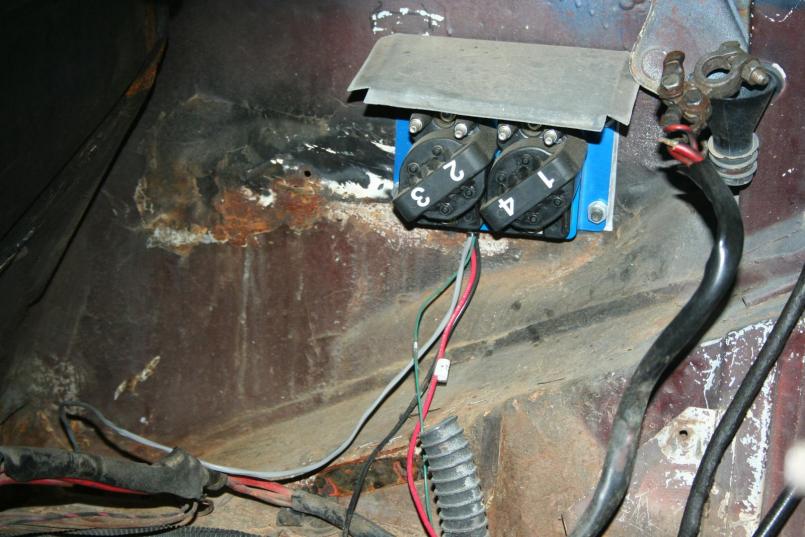 This is what I did with the space left by the stock battery tray. This is the -4F coil pack. Pretty self explanatory. I'm also going to put that new relay board and a ground point in that area. As a side point, I'm really longing to tear the thing down completely and repaint it recently. I'm feeling like an abusive parent letting the paint look so bad. Upside: I may have a ride with another team for this whole year, so I should be able to afford the time to tackle such a job. Downside: pulling my own weight on that team will take away from the financial resources that I can put towards development of the 914. If I'm going to repaint it, I'm going to do a cage and go to 5-lug and flares while I'm at it. That all costs pretty substantial money. To be continued... Mark D. |
|
|
|
| messix |
Feb 6 2011, 04:04 PM
Post
#100
|
|
AKA "CLUTCH KILLER"! Group: Members Posts: 6,995 Joined: 14-April 05 From: between shit kickers and pinky lifters/ puget sound wa.north of Seattle south of Canada Member No.: 3,931 Region Association: Pacific Northwest |
your master off switch needs to cut all the power on the + of the cars electrical system not the ground to the batt.
just cutting the ground to the batt will not shut off the electrical system and shut down the car, run the alternator wire to the batt, then run main batt wire to switch, then on the other side of switch run to the car electrical system. cutting the ground will still allow the car to run off the alternator and the spike from the loss load from the batt will surge you electronics all the while the car will still be running. when i was tech inspecting at the local stock car track i shut a cars main power off and the car stayed running but the tach stopped, the driver accused me of "blowing up" his tach! i explained to him that i did not impropely wire his emergency shut off and that his car has failed tech inspection becaused it failed to shut off the engine from the emergency off. he stomped off to complain to the track steweard.... i heard laughing from that direction. or this is better http://www.ssdiv.com/master.html |
|
|
|
|
1 User(s) are reading this topic (1 Guests and 0 Anonymous Users)
0 Members:

|
Lo-Fi Version | Time is now: 8th July 2025 - 04:40 PM |
Invision Power Board
v9.1.4 © 2025 IPS, Inc.