|
|
|
Porsche, and the Porsche crest are registered trademarks of Dr. Ing. h.c. F. Porsche AG.
This site is not affiliated with Porsche in any way. Its only purpose is to provide an online forum for car enthusiasts. All other trademarks are property of their respective owners. |
|
|


| stateofidleness |
 Sep 23 2007, 02:14 PM Sep 23 2007, 02:14 PM
Post
#1
|
|
Senior Member  Group: Members Posts: 810 Joined: 1-September 07 From: Canyon Lake, Texas! Member No.: 8,065 Region Association: None |
***EDITED TO BE MY BUILD THREAD*** I left in the important paragraph (IMG:style_emoticons/default/KMA.gif)
The journey begins! (IMG:style_emoticons/default/driving.gif) "im sorry it was without your consent, but you are ALL now my new mentors, educators, and general eFriends/maybe some day REAL friends. Look forward to that noob-to-educated resource transition! " here's kind of where i basically started:  Thanks Everyone! |
   |

 
|
  |
Replies(20 - 39)
| jd74914 |
Sep 23 2007, 08:02 PM
Post
#21
|
|
Its alive Group: Members Posts: 4,850 Joined: 16-February 04 From: CT Member No.: 1,659 Region Association: North East States |
QUOTE(stateofidleness @ Sep 23 2007, 09:40 PM)  how is that back pad affixed to at the top? i dont want to damage the rear window or its "seal" thing... it looks like double sided tape or something.. is it seated in tabs or something or should i just be able to yank it off without hurting the window? Its just glued on . . . no big deal to take it off. The rust isn't too bad either; my car was much worse and I fixed it all (I didn't know how to weld before I started). Its a great learning experience. (IMG:style_emoticons/default/smile.gif) James (who's 19 and just getting to the driving portion of a 5 year total rebuild) |
|
|
|
| DerekKim |
Sep 24 2007, 02:35 AM
Post
#22
|
|
Member Group: Members Posts: 387 Joined: 27-August 04 From: Gulfport, MS Member No.: 2,635 |
Well the molded backpads? That the seats fit into? It should be screws on the bottom and metal tabs on top... it was on mine although my tabs were broken... doh! They may have put double sided tape also.
|
|
|
|
| pete914 |
Sep 24 2007, 05:37 AM
Post
#23
|
|
Member Group: Members Posts: 178 Joined: 21-August 07 From: east coast Member No.: 8,025 |
i guess there's only one way to learn how to weld in new floor pans. (IMG:style_emoticons/default/sawzall-smiley.gif)
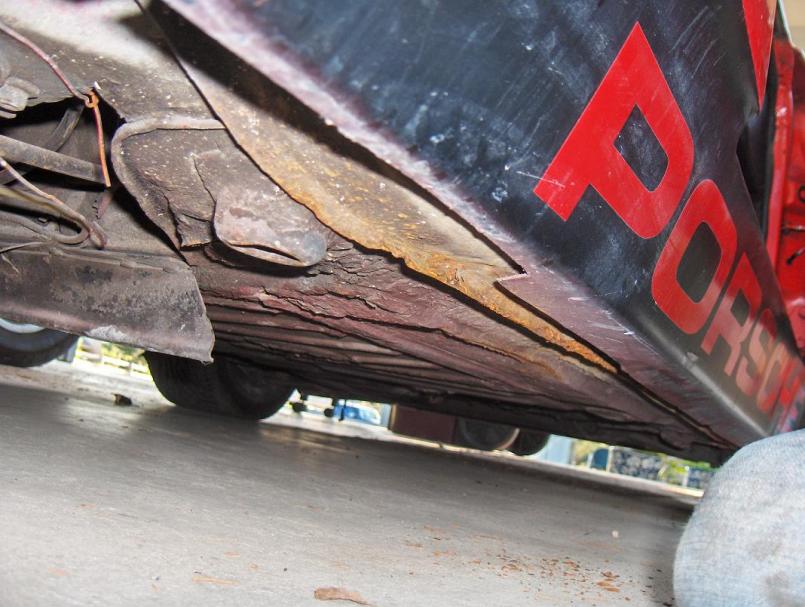
let's see some shots of the rest of the car...what's the engine, etc like? |
|
|
|
| Bartlett 914 |
Sep 24 2007, 08:06 AM
Post
#24
|
|
Advanced Member Group: Members Posts: 2,218 Joined: 30-August 05 From: South Elgin IL Member No.: 4,707 Region Association: Upper MidWest |
You have a couple of holes to patch up. Not too bad. Weld in new patched BEFORE any painting. The stuff can be hard to get off and clean metal is needed for welding.
|
|
|
|
| stateofidleness |
Sep 26 2007, 05:11 PM
Post
#25
|
|
Senior Member Group: Members Posts: 810 Joined: 1-September 07 From: Canyon Lake, Texas! Member No.: 8,065 Region Association: None |
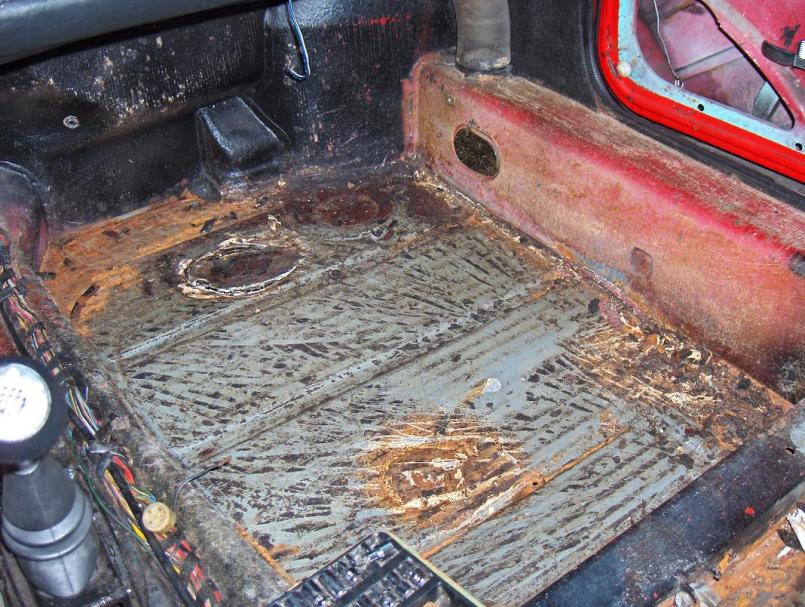
ok so today i really started tryin to get the factory tar off the interior. took off the targa top.. waited 10 minutes.. the Texas sun acted as my heat gun lol.. most of it came off like butter! except near the far foot area where it was shaded. i got a couple of questions:
1. wise to remove the tar on top of the center consoler and it's sides or leave that? 2. remove the big wire cluster going down the center console? also related, are ALL these wires JUST for the seat sensor?? seems they all come out RIGHT THERE into that little under-seat adaptor? can all this be removed?? 3. i dont know the difference between teh jack spots and the "donut" things that are removable in the floor.. i know both are covered with caulk or sealant and it's hard to remove lol.. should i just take those out and patch over em completely? 4. does the caulk need to be removed completely? 5. dumb question, but i need to remove the pedalboard thing right? is there tar behind it? IM MAKING PROGRESS!! and keeping ya'll words of advice in mind every step of the way! i really do catch myself saying "one small part at a time" thanks! |
|
|
|
| SirAndy |
Sep 26 2007, 05:20 PM
Post
#26
|
|
Resident German Group: Admin Posts: 42,245 Joined: 21-January 03 From: Oakland, Kalifornia Member No.: 179 Region Association: Northern California |
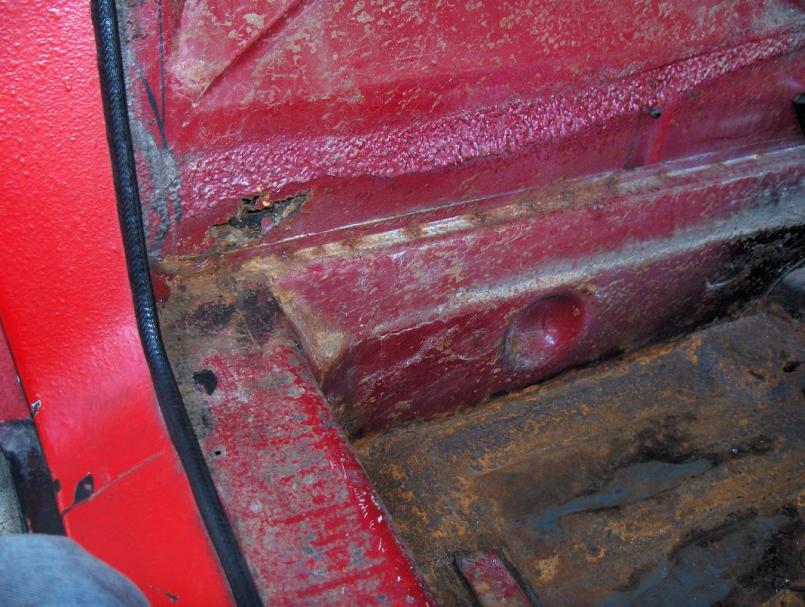
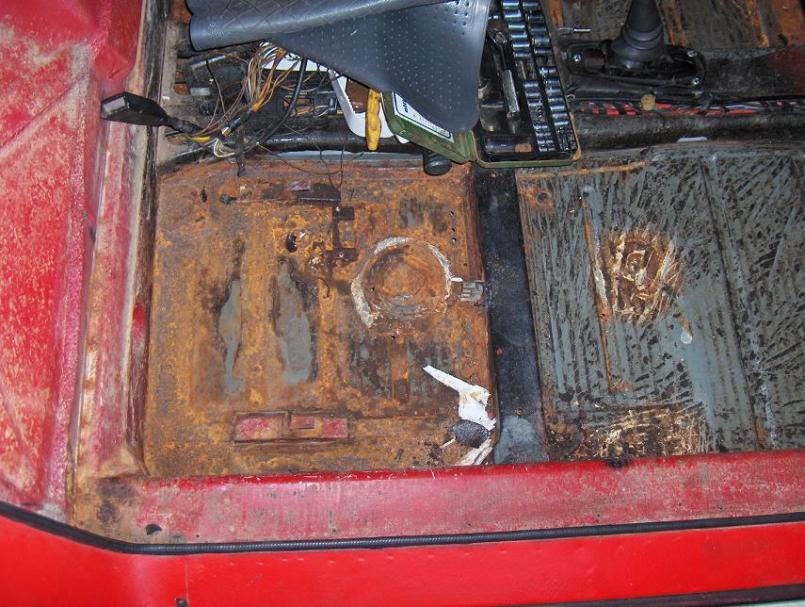
QUOTE(stateofidleness @ Sep 23 2007, 12:18 PM) Pictures I found when scouring the Classics: Is mine comparable to this? or was his surface rust? hey, that's my car! (IMG:style_emoticons/default/biggrin.gif) the pictures of my car look worse than it actually was because of the orange paint and the brownish carpet glue. i only had surface rust on the floorpans, no through holes ... in your case, i'd say do it right and replace the pans and that lower firewall piece. you'll also have to take of the rocker panels and dig into the longitudenal. after seeing that gaping hole in the "hellhole" area, i bet the long is rusted right through around the jackpost area ... get yourself familiar with a good automotive welder! (IMG:style_emoticons/default/welder.gif) Andy |
|
|
|
| stateofidleness |
Sep 26 2007, 05:24 PM
Post
#27
|
|
Senior Member Group: Members Posts: 810 Joined: 1-September 07 From: Canyon Lake, Texas! Member No.: 8,065 Region Association: None |
it actually looks patchable right now.
how do i take the rocker panels off?? the longs seem VERY clean and sturdy both in and out from what i can see. ill check again on the outside. replace the entire lower firewall?? theres a small hole in the interior where the hell hole is but it looks minor, the actual hell hole is real bad though. ill go take some pics of where i stopped for the day |
|
|
|
| SirAndy |
Sep 26 2007, 05:31 PM
Post
#28
|
|
Resident German Group: Admin Posts: 42,245 Joined: 21-January 03 From: Oakland, Kalifornia Member No.: 179 Region Association: Northern California |
do a search here. McMark posted some good pics of how to patch that lower firewall ...
the rockers are either screwed or riveted. there's a few on the bottom and on the top. if riveted, just drill them out. once the panel is off, you can start poking around with a screwdriver. take pics! (IMG:style_emoticons/default/smash.gif) Andy |
|
|
|
| flipity |
Sep 26 2007, 05:34 PM
Post
#29
|
|
Newbie Group: Members Posts: 32 Joined: 21-May 07 From: New Jersey Member No.: 7,750 |
I wish my car was in that condition! My floors look like swiss cheese, I know my inner longs are rusted out, and my hell hole is shot, and no real idea on how to weld. Its gonna be a fun project!
Hope yours goes well. |
|
|
|
| stateofidleness |
Sep 26 2007, 05:56 PM
Post
#30
|
|
Senior Member Group: Members Posts: 810 Joined: 1-September 07 From: Canyon Lake, Texas! Member No.: 8,065 Region Association: None |
 |
|
|
|
| stateofidleness |
Sep 26 2007, 05:57 PM
Post
#31
|
|
Senior Member Group: Members Posts: 810 Joined: 1-September 07 From: Canyon Lake, Texas! Member No.: 8,065 Region Association: None |
 |
|
|
|
| stateofidleness |
Sep 26 2007, 05:58 PM
Post
#32
|
|
Senior Member Group: Members Posts: 810 Joined: 1-September 07 From: Canyon Lake, Texas! Member No.: 8,065 Region Association: None |
 |
|
|
|
| stateofidleness |
Sep 26 2007, 05:58 PM
Post
#33
|
|
Senior Member Group: Members Posts: 810 Joined: 1-September 07 From: Canyon Lake, Texas! Member No.: 8,065 Region Association: None |
 |
|
|
|
| stateofidleness |
Sep 26 2007, 05:59 PM
Post
#34
|
|
Senior Member Group: Members Posts: 810 Joined: 1-September 07 From: Canyon Lake, Texas! Member No.: 8,065 Region Association: None |
 |
|
|
|
| McMark |
Sep 26 2007, 06:49 PM
Post
#35
|
|
914 Freak! Group: Retired Admin Posts: 20,180 Joined: 13-March 03 From: Grand Rapids, MI Member No.: 419 Region Association: None |
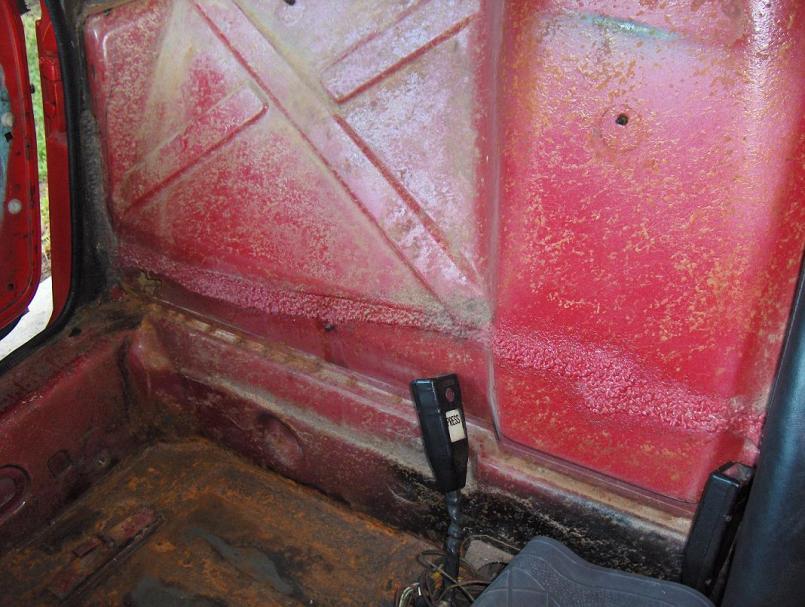
Lots more cleaning to do. Grab some rust converter to spray on there as well. You should be able to bring it back to the point that it's not rusty and has nice clean metal. I don't see anything that warrants new stampings of sheet metal, assuming that most of that rust is just surface rust. You absolutely need an angle grinder with a wire brush on it (wear safety glasses!). Clean, clean, clean, and don't get to focused in on welding on huge pieces of metal. If there are only a few small holes, then a whole floorpan isn't necessary.
|
|
|
|
| stateofidleness |
Sep 26 2007, 07:21 PM
Post
#36
|
|
Senior Member Group: Members Posts: 810 Joined: 1-September 07 From: Canyon Lake, Texas! Member No.: 8,065 Region Association: None |
i was wondering about that.. the order of events in spraying things
do i get all the tar off and the "sticky" stuf as well, then wire brush/angle grinder brush it to get it loose, THEN spray rust converter, then clean some more? or should the rust converter be sprayed AFTER all metal is replaced and wire brushed completely? can someone lay it out for me.. what's my sequence of events |
|
|
|
| McMark |
Sep 26 2007, 07:31 PM
Post
#37
|
|
914 Freak! Group: Retired Admin Posts: 20,180 Joined: 13-March 03 From: Grand Rapids, MI Member No.: 419 Region Association: None |
Rust converters such as POR-15 MetalReady can be used at any time. And feel free to use them liberally. I've found them to help in the rust removal process. Get a bottle and spray everything in there and let it sit overnight (at least) to dry completely. Then hit it with the wire wheel and start bringing it down to metal. MetalReady has a zinc additive, which protects the metal from surface rusting as quickly. So it's a good to spray each section as you finish it, as well.
|
|
|
|
| Chuck |
Sep 26 2007, 09:21 PM
Post
#38
|
|
What it eventually will look like . . . . Group: Members Posts: 355 Joined: 29-March 07 From: Maple Grove, MN Member No.: 7,632 Region Association: Northstar Region |
QUOTE(flipity @ Sep 26 2007, 03:34 PM) I wish my car was in that condition! My floors look like swiss cheese, I know my inner longs are rusted out, and my hell hole is shot, and no real idea on how to weld. Its gonna be a fun project! Hope yours goes well. (IMG:style_emoticons/default/welcome.png) |
|
|
|
| stateofidleness |
Sep 30 2007, 07:13 PM
Post
#39
|
|
Senior Member Group: Members Posts: 810 Joined: 1-September 07 From: Canyon Lake, Texas! Member No.: 8,065 Region Association: None |
alright guys, hit a snag.. just need some clarifying.
what do ya'll do with the wiring in the center tunnel when you're working on the pans? in the pictures of SirAndy's car, the wiring harness is gone.. is it simple a matter of yanking it out?? or does it involve labelling each wire and disconnecting.... ive got all the tar off the inside and was also wondering about those removable circular plates in the floor.. should i cut those out and weld in metal over it completely or try to salvage them and reshape them to fit properly? also, ive got all the sticky glue residue left from the tar, does this need to be removed before i spray the rust converter or can i just spray over it? thanks for the help! anxious to get welding but still arent sure about the process order.... DUMB QUESTION: do i have to remove the engine or fuel lines or anything before welding on the floor pans? |
|
|
|
| thomasotten |
Sep 30 2007, 08:28 PM
Post
#40
|
|
Senior Member Group: Members Posts: 1,565 Joined: 16-November 03 From: San Antonio, Texas Member No.: 1,349 |
You should be able to weld without worrying about the fuel lines. Thick plastic is what they are, and unless you have a fire, you should be OK with welding spark.
Go over the rusty parts with a wire brush. Then weld if needed, then spray metal-ready again, then paint with POR-15. I would try to salvage the circular plates... but if they are too rusted, I wouldn't worry about authenticity there.... besides, yours is a Chalon... authenticity is out the window already! I am not seeing a whole lot of metal replacement on your floor pans, from the photos you are showing. |
|
|
|
|
1 User(s) are reading this topic (1 Guests and 0 Anonymous Users)
0 Members:

|
Lo-Fi Version | Time is now: 7th July 2025 - 02:39 AM |
Invision Power Board
v9.1.4 © 2025 IPS, Inc.