|
|
|
Porsche, and the Porsche crest are registered trademarks of Dr. Ing. h.c. F. Porsche AG.
This site is not affiliated with Porsche in any way. Its only purpose is to provide an online forum for car enthusiasts. All other trademarks are property of their respective owners. |
|
|

  |

| stateofidleness |
 Oct 3 2007, 02:23 PM Oct 3 2007, 02:23 PM
Post
#41
|
|
Senior Member  Group: Members Posts: 810 Joined: 1-September 07 From: Canyon Lake, Texas! Member No.: 8,065 Region Association: None |
what all precautions do i need to take before i go wire brushing/grinding on the interior?
started using a drill with wire brush attachment, and some saw sparks on a few occasions.. should i have the wiring harness removed? how bout anything around the pedal assembly?? just wanna be safe! tryin to finish the "prep" work today so that i can start cutting and welding in new pieces! Thanks |
   |

 
|
| jd74914 |
Oct 3 2007, 03:10 PM
Post
#42
|
|
Its alive Group: Members Posts: 4,850 Joined: 16-February 04 From: CT Member No.: 1,659 Region Association: North East States |
Don't worry about the wiring harness or cluster. If you are working near glass or anything that you don't want to get hit by sparks, just cover it up, you don't have to pull anything out.
|
|
|
|
| stateofidleness |
Oct 3 2007, 06:00 PM
Post
#43
|
|
Senior Member Group: Members Posts: 810 Joined: 1-September 07 From: Canyon Lake, Texas! Member No.: 8,065 Region Association: None |
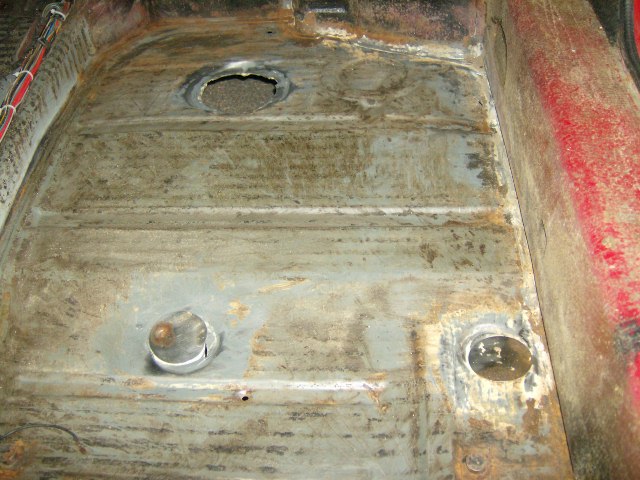
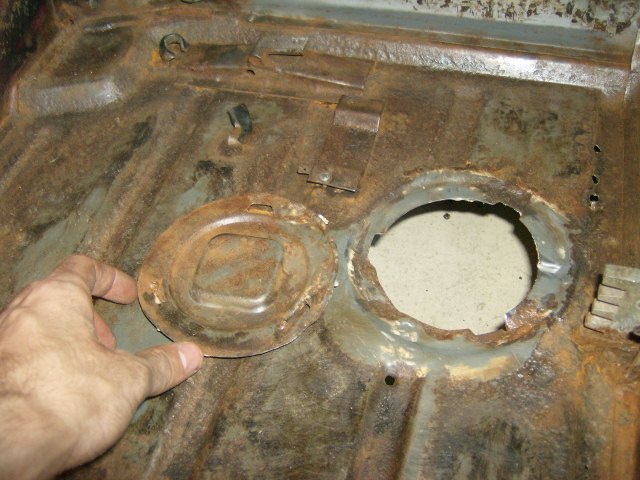
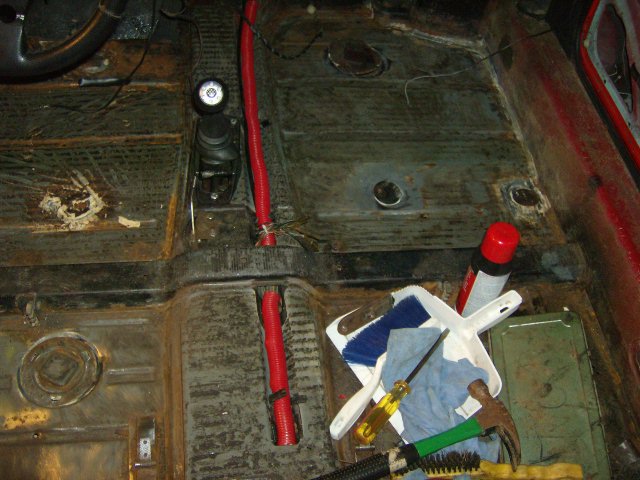
ok finished for the day... here's where i left off
few pics and questions on some of the wiring and whether those hole things in the floor look salvageable or if they should be cut out side note: (can someone explain all those holes and donuts in the floorpans? theres like 4 removable plates, 2 indentations in teh front that look like donuts, and then the metal looking small plates that arent removable.. confusing??) 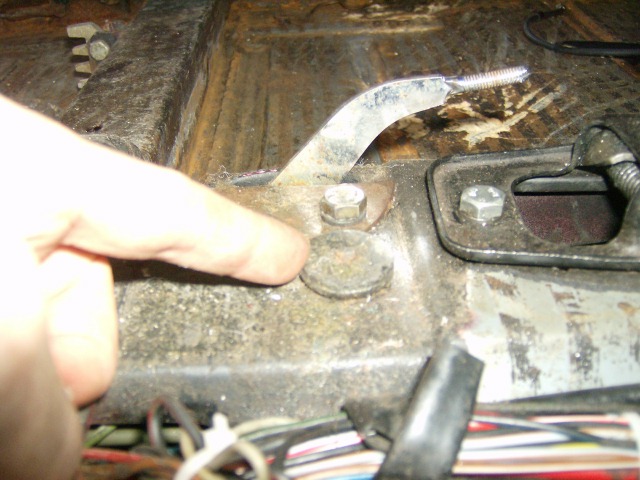 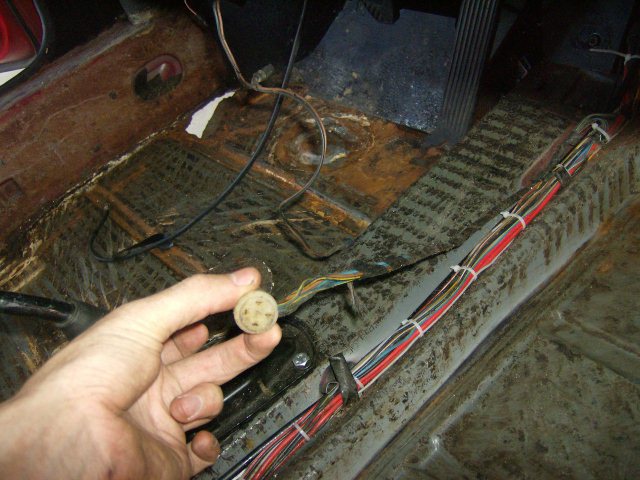 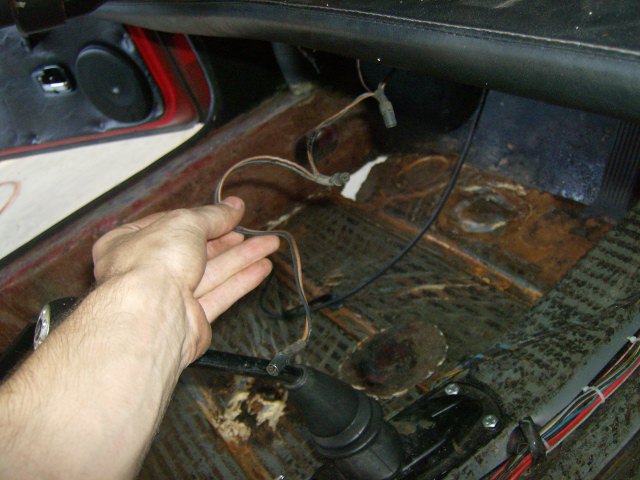 |
|
|
|
| stateofidleness |
Oct 3 2007, 06:01 PM
Post
#44
|
|
Senior Member Group: Members Posts: 810 Joined: 1-September 07 From: Canyon Lake, Texas! Member No.: 8,065 Region Association: None |
   |
|
|
|
| stateofidleness |
Oct 3 2007, 06:09 PM
Post
#45
|
|
Senior Member Group: Members Posts: 810 Joined: 1-September 07 From: Canyon Lake, Texas! Member No.: 8,065 Region Association: None |
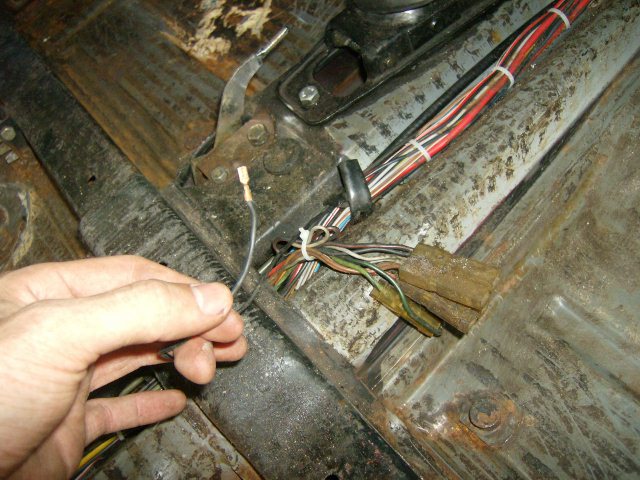
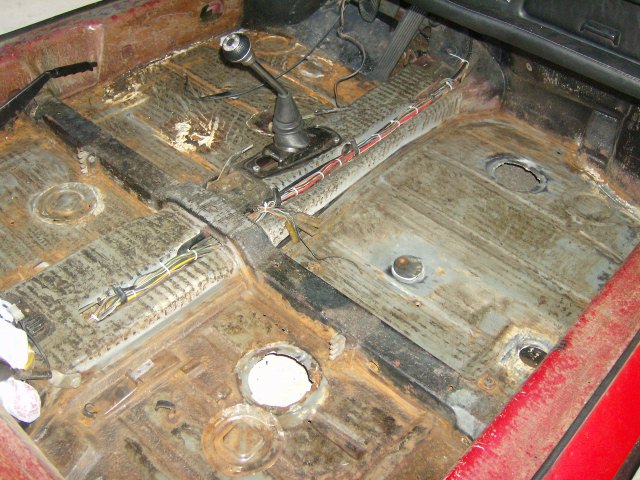  have any of ya'll completely removed the rat's nest of wires that go under the passenger seat?? seems like since it's not even functioning, that it could be removed.. Things I dont know: 1. what is the round connector for thats in the center tunnel wiring harness as showin in the pic? 2. What is that little rotating "knob" next to the heater control lever for on right in front of the shifter? 3. what is that one lone black wire with female spade for thats running along the center tunnel as seen in the pic? 4. any ingenious ideas to make a really thin shop vac attachment to clean down under the center tunnel nooks and crannies? i folded a paper plate into a funnel shape and it kinda worked... |
|
|
|
| ejm |
Oct 3 2007, 06:36 PM
Post
#46
|
|
I can see the light at the end of the tunnel Group: Members Posts: 2,707 Joined: 3-February 03 From: Massachusetts Member No.: 224 Region Association: None |
QUOTE 1. what is the round connector for thats in the center tunnel wiring harness as showin in the pic? For the emission maintance counter box some cars had QUOTE 2. What is that little rotating "knob" next to the heater control lever for on right in front of the shifter? Can't tell from pic. This is about where the console screws down QUOTE 3. what is that one lone black wire with female spade for thats running along the center tunnel as seen in the pic? Looks like the wire for the heater control light QUOTE 4. any ingenious ideas to make a really thin shop vac attachment to clean down under the center tunnel nooks and crannies? i folded a paper plate into a funnel shape and it kinda worked... Use compressed air to blow the junk to one end QUOTE side note: (can someone explain all those holes and donuts in the floorpans? theres like 4 removable plates, 2 indentations in teh front that look like donuts, and then the metal looking small plates that arent removable.. confusing??) Big ones were used at the factory. Little ones look like they cover where the carpet mounting posts were. |
|
|
|
| rjames |
Oct 3 2007, 08:15 PM
Post
#47
|
|
I'm made of metal Group: Members Posts: 4,305 Joined: 24-July 05 From: Shoreline, WA Member No.: 4,467 Region Association: Pacific Northwest |
QUOTE ok finished for the day... here's where i left off few pics and questions on some of the wiring and whether those hole things in the floor look salvageable or if they should be cut out Doesn't look too bad. If you're patient with your welding you could probably fill those holes in the floorboard with out too much trouble. I personally would grind away even more of the rust until you are completely down to bare metal. For me a wire wheel didn't work so well for this, but a stripping disk similar to the one in the top left corner (and usually available at Home Depot) was able to get rid of ALL surface rust on my floor pans. 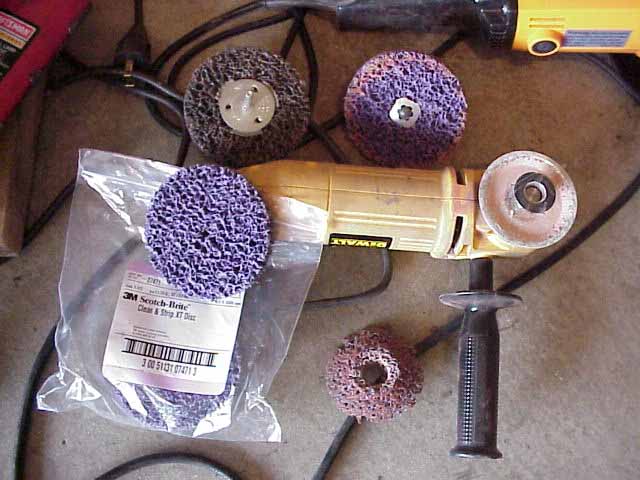 After, weld up your holes, then just treat the pans with a rust converter/etcher like metal ready, and then cover with POR15 or similar product and yer good to go! |
|
|
|
| stateofidleness |
Oct 3 2007, 09:15 PM
Post
#48
|
|
Senior Member Group: Members Posts: 810 Joined: 1-September 07 From: Canyon Lake, Texas! Member No.: 8,065 Region Association: None |
oh really? i have some of those type "discs" but didn't really know their use
i will give those a try! |
|
|
|
| SLKWrx |
Oct 3 2007, 09:38 PM
Post
#49
|
|
Member Group: Members Posts: 328 Joined: 28-September 04 From: Mickleton, NJ Member No.: 2,845 Region Association: North East States |
Those stripping disks work wonders on removing paint and rust. Buy a good number of them though because they definitely consume themselves.
|
|
|
|
| stateofidleness |
Oct 4 2007, 12:49 AM
Post
#50
|
|
Senior Member Group: Members Posts: 810 Joined: 1-September 07 From: Canyon Lake, Texas! Member No.: 8,065 Region Association: None |
hardest part was getting the old sealer off.... how much needs to come off?? i did enough to clear for the engman kit and whatever i could get to physically under the small flat metal piece round things..
i guess those stripping discs wont cause sparks either! question, on the metal ready or rust converter step, do i spray the entire interior floor with it, or jsut the rusty spots? i have enough for the whole thing, i just didnt know if it would be ineffective on clean metal i will post a pic of the product i have.. dad has cases of it from work! let me know if it will do the job! will post tomorrow |
|
|
|
| Cevan |
Oct 4 2007, 09:05 AM
Post
#51
|
|
Senior Member Group: Members Posts: 1,079 Joined: 11-December 06 From: Western Massachusetts Member No.: 7,351 |
My first car had about 10 years worth of squirrel bedding, crap, and decayed acorns in every nook and cranny, including under the engine tin. I took a 3 foot piece of plastic tubing (about 5/8 ID) and fabricated a small reducer and duct-taped the whole thing to the end of a Eureka Mighty Mite vacuum. It worked great.
|
|
|
|
| angerosa |
Oct 4 2007, 11:48 AM
Post
#52
|
|
Member Group: Members Posts: 334 Joined: 21-August 07 From: Reston, VA Member No.: 8,023 Region Association: MidAtlantic Region |
Wait a minute here! Your 22 and your girlfriend/fiance (don't tell her) wants to work on this car with you? Marry her now! That's way hot!
|
|
|
|
| stateofidleness |
Oct 5 2007, 08:31 PM
Post
#53
|
|
Senior Member Group: Members Posts: 810 Joined: 1-September 07 From: Canyon Lake, Texas! Member No.: 8,065 Region Association: None |
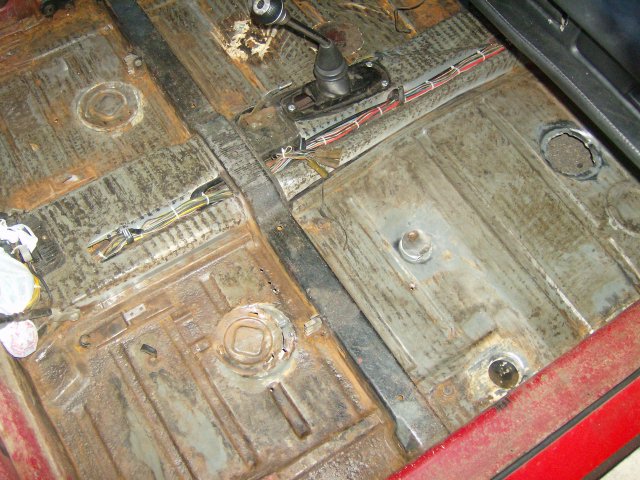
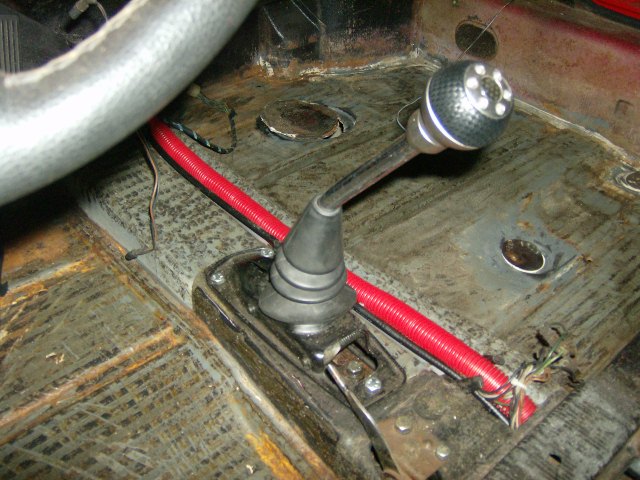
some progress... did some cable management.. we'll see how the carpet lays over the sleeving and if i cant get it respectably "stock" then i will take it off before final reassambly.. its good protection for now at least!
  i have a questions here... see how i got some of it to shiny metal and the rest is just that smeared black residue from the tar remnants... the stripping discs AND the wire discs both just smear it... would a good degreaser type product get it off and look like shiny metal? im wondering if i need to keep sacrificing my discs or if a degreaser will cure it. 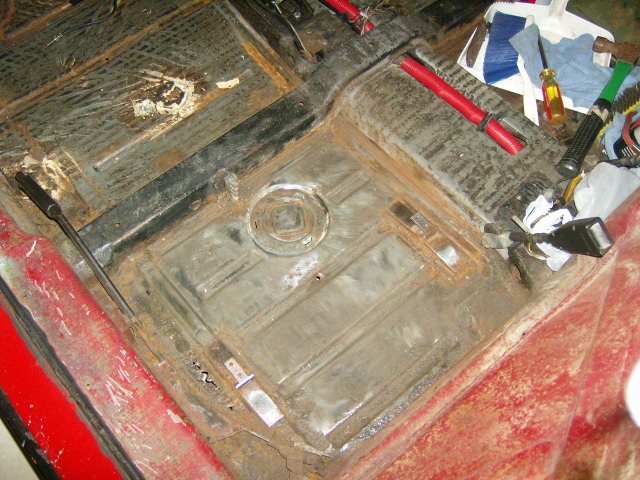 |
|
|
|
| jonferns |
Oct 5 2007, 08:39 PM
Post
#54
|
|
Advanced Member Group: Members Posts: 2,081 Joined: 29-March 07 From: New Jersey Member No.: 7,631 Region Association: North East States |
nice cable management.....
|
|
|
|
| rjames |
Oct 5 2007, 09:28 PM
Post
#55
|
|
I'm made of metal Group: Members Posts: 4,305 Joined: 24-July 05 From: Shoreline, WA Member No.: 4,467 Region Association: Pacific Northwest |
QUOTE question, on the metal ready or rust converter step, do i spray the entire interior floor with it, or jsut the rusty spots? i have enough for the whole thing, i just didnt know if it would be ineffective on clean metal If you are using Metal Ready and Por15, just follow their instructions. Gid rid of all the rust and tar you can, wash/clean the surface real good, then apply Metal Ready on all exposed metal. Let the the stuff sit on there for 15-30 minutes, and then wash that off with warm water. Dry it quickly (hair dryer works here) and then on goes the POR15. Follow the instructions on both containers and you'll be fine. Based on your the last picture you posted, it still looks like you can get rid of some more rust. Remove your E-brake and get in there as much as you can too. The tar will start to coat the stripping disks. You can clean it off by running the disk on concrete to wear down the part that has the tar, or just put a new disk on. Apply some elbow grease (make sure you are wearing eye protection and a mask to keep the dust out of your lungs) and get rid of as much rust as you can. As far as the seam sealer goes, get rid of what you need to get rid of. If it looks like there's rust under it, then keep at it. I used a chisel for some of the sealer. Usually if the sealer has rust underneath it, it will come up fairly easy. The whole process is a PITA, but on the positive side, if you do it correctly, you will never have to do it again! (IMG:style_emoticons/default/beer.gif) |
|
|
|
| stateofidleness |
Oct 10 2007, 06:47 PM
Post
#56
|
|
Senior Member Group: Members Posts: 810 Joined: 1-September 07 From: Canyon Lake, Texas! Member No.: 8,065 Region Association: None |
Update:
trying to figure out why the passenger door handle wont open it from the outside, but it will from the inside... i dont really know how the mechanism functions so i dont know if something is missing or broken? doesn't feel like theres ANY resistance on the outer handle at all whereas the driver's door does... i took some pics.. maybe you can spot something that is broken or missing? also.. haynes manual is kinda confusing on it's removal.. what's involved? 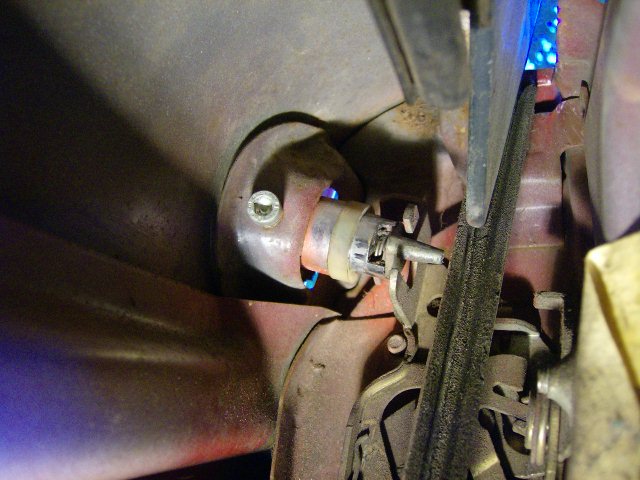 with handle pulled: 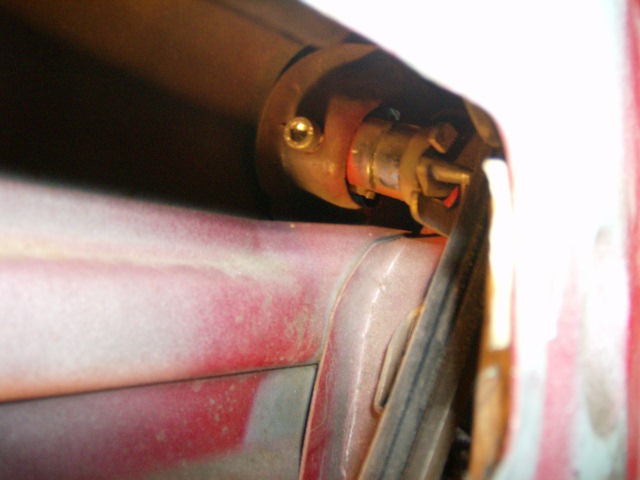 |
|
|
|
| Cevan |
Oct 10 2007, 07:35 PM
Post
#57
|
|
Senior Member Group: Members Posts: 1,079 Joined: 11-December 06 From: Western Massachusetts Member No.: 7,351 |
It's probably the door latch cam, circled below. When you pull the exterior door handle, it pushes this plastic piece against part of the door lock mechanism. A part of it breaks off and no longer activates the mechanism.
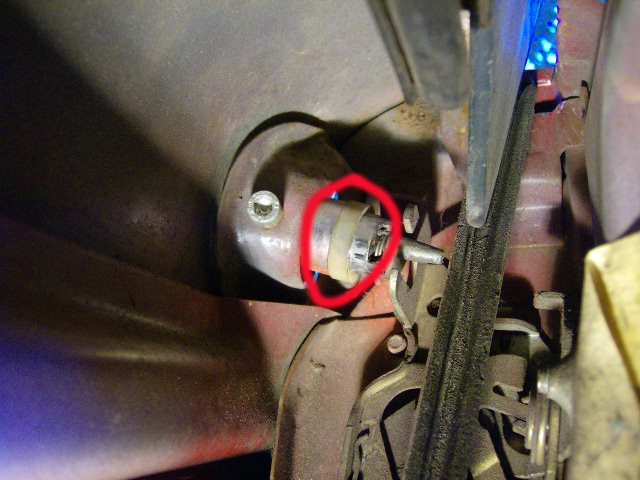 Auto Atlanta sells a replacement one that's allegedly made of stonger plastic. I've purchased and installed one before. You can get it here. It looks like your door panel is already removed. To remove the exterior door handle, there is the 5mm allen bolt in your photo and another nut on the interior part of the door. It comes right out. There is a couple of rubber gaskets, one behind the nut and a curved one near the allen bolt. Just be careful removing the old piece and installing the new one. The part of the door handle that contacts this cam is brittle. |
|
|
|
| Lou W |
Oct 10 2007, 07:46 PM
Post
#58
|
|
"Here Kitty Kitty" my ass...... Group: Members Posts: 4,109 Joined: 9-May 04 From: Roseburg, OR. Member No.: 2,039 Region Association: Spain |
Your car sure is looking gud. (IMG:style_emoticons/default/beerchug.gif)
(IMG:style_emoticons/default/popcorn[1].gif) |
|
|
|
| charliew |
Oct 10 2007, 11:43 PM
Post
#59
|
|
Advanced Member Group: Members Posts: 2,363 Joined: 31-July 07 From: Crawford, TX. Member No.: 7,958 |
You probably should go to restomotive's web site and check out the por 15 and metal ready and their marine clean process. It will only take a few minutes. The stuff you have thats free might be great but the application is what makes it work either great or crummy. The tar could be cleaned up with laquer thinner. The laquer thinner will evaporate very quickly if it's hot maybe we are going to get some cool weather now. Keep the tar saturated for awhile till it softens and wipe it off. Even sand blasting won't remove tar. A big grinder with a twisted cup brush is the best to clean rust and tar off. Be careful when grinding rust cure it makes a bad dust for your lungs and eyes, maybe use a small fan to blow the dust away as you clean the panels. The tough spots are where you can't get in the tight areas. You can use a small screwdriver to scrape theses areas to get rid of the loose scale. Attention to details is what makes a good job. Preparation is the key to a good job. A good guy to get to know is Mark Heard in Boerne, Tx. He has sold me some good parts and knows 914's well. He's on this forum as 914sixer. If you apply por 15 correctly you can't knock it off with a hammer. Also if you leave it on your skin or anything else it will be there a long time. It also has a very short shelf life so only buy what you will use and be sure to keep the lid groove clean or you won't get it off. Don't work out of the can, dip some out and put it in another container to dip your brush into. I use little paper cups I have for mixing resin in. They also have a cloth you can put down on perforated areas and paint the por15 over and it's like fiberglass cloth and resin. The surface must be positively clean for it to stick. Good luck with your new project. There was a chalon for sale on craigslist somewhere around Shertz is your's it?
I am starting a 914 with a suby motor and tranny with AA steel flares and such as soon as I can get a few other projects out of the way. I live outside of Waco, TX. Charlie |
|
|
|
| stateofidleness |
Oct 11 2007, 01:07 AM
Post
#60
|
|
Senior Member Group: Members Posts: 810 Joined: 1-September 07 From: Canyon Lake, Texas! Member No.: 8,065 Region Association: None |
i believe this stuff i have is called Re-Vive
mine isnt the one in schertz.. id be curious to see it though how far is crawford? link me to restomotive's site! a good walkthrough would definitely be sweet i finally got some discs for my big grinder and that stuff was like magic! hard to get in the seams and stuff though... i think what i am confused on is.. one person says get as much rust off as you can.. and the other says leave rust and spray converter... so do i want to get the metal as clean and shiny as possible in the most areas or do i want to just get the "loose" stuff off?? i got the two "rear" pans completely grinded tonight and i sprayed a coat of my rust converter and will see what happens in the morning.. if it aint what i expected, i can also go back to the prep stage |
|
|
|
|
1 User(s) are reading this topic (1 Guests and 0 Anonymous Users)
0 Members:

|
Lo-Fi Version | Time is now: 7th July 2025 - 02:43 AM |
Invision Power Board
v9.1.4 © 2025 IPS, Inc.