|
|
|
Porsche, and the Porsche crest are registered trademarks of Dr. Ing. h.c. F. Porsche AG.
This site is not affiliated with Porsche in any way. Its only purpose is to provide an online forum for car enthusiasts. All other trademarks are property of their respective owners. |
|
|

  |

| Jeff Hail |
 Oct 16 2007, 09:48 PM Oct 16 2007, 09:48 PM
Post
#41
|
|
Senior Member  Group: Members Posts: 1,141 Joined: 3-May 07 From: LA/ CA Member No.: 7,712 |
I mentioned the other day double walled panels. This is one of them. I traced the second layer with a Sharpie to show where it starts and stops. This is where the lower wheelhouse comes together with the inner long. It is a entirely separate plate from the long and wheelhouse. You will also notice it has a radius to it. The radius is to allow some flex in the panel without making it to rigid.
If panel connections are in a high flex zone they need to be able to move by design. If they do not flex you end up with metal fatigue. A secondary purpose is to reinforce the seatbelt anchor area from pulling out in a collision. Imagine a 200lb man going from 65mph to 0 in 10ths of a second. That is a lot of energy focused on a tiny bolt anchor in a very short time. Cheap insurance. In the back of my mind I think Karmann knew this area was prone to corrosion so they added a little more metal down to the anchor mount. Manufacturers use double walls for a reason. Stressed area's, panel intersections and joints. I will fab the extra layer and add it in later. Notice the seatbelt anchor is located in this strengthened area and it is ready to fall out now from the rust damage. The rear corner of the inner long connects to the inner lower firewall. This area makes up a portion of what is called a torque box. It is one of the strongest area's of the vehicle. It is in this lower area from side to side when all panels are tied together to the center tunnel it forms a structure. Do not compromise here. Do not take shortcuts. Attached image(s) 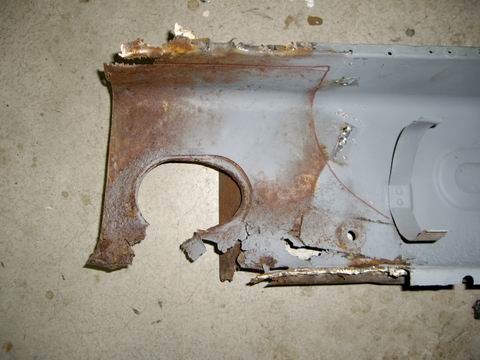
|
   |

 
|
| Jeff Hail |
Oct 16 2007, 10:01 PM
Post
#42
|
|
Senior Member Group: Members Posts: 1,141 Joined: 3-May 07 From: LA/ CA Member No.: 7,712 |
A mock up shot from underneath.
Attached image(s) 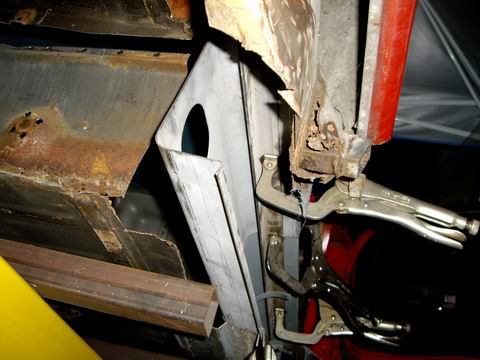
|
|
|
|
| Jeff Hail |
Oct 16 2007, 10:35 PM
Post
#43
|
|
Senior Member Group: Members Posts: 1,141 Joined: 3-May 07 From: LA/ CA Member No.: 7,712 |
An important note I would like to mention: "Inserts and sleeves"The focus here is on the 914 but apply's to any car. More so one without a fixed roof!
Whenever you make a butt welded joint whether on a rocker panel, A-pillar, center post or quarter panel/ sail panel and hinge pillars you have to make a sleeve or an insert and it needs to be properly sized and welded. This would not apply to butt welded flairs and cosmetic items. Any area that is a stressed panel as noted above and butt welded will most likely fail if not sleeved. It may not fail from normal use but you do not want to find out in a collision. Everyone has heard the term "clipped". This is when a car is cut in half and welded back together. You do not see this practice much anymore and I would like to not see it at all. I have seen post collision failure because sleeves were not incorporated and it is ugly at least. A sleeve or an insert is a reinforcement shaped just like the two panels being joined. This can be 3 or 4 sided when say sectioning a rocker panel. Imagine the arm of a long sleeve shirt inside a snug fitting long sleeved sweatshirt. A perfect teaching example using this principle would be it makes thinks stiff. Everyone knows it restricts movement most of the time. It does the same thing with metal. Sleeves and inserts can be made from a piece of an old damaged part or the replacement panel if enough is left over. The reason sleeves and inserts are used are: It provides a backing for the Mig welded butt joint. Keeps burn through to a minimum. Ensures a completely closed joint. Aligns the part's for the best fit possible. Making a sleeve or insert: Should be twice the width of the cross section. For example the 914 has an inner long that is approx 3-1/4 inches wide (thick without the outer long). The sleeve should be 6-1/2 inches long. It should also be equal in thickness to the parent metal it is being welded to. Plug weld's would be used to weld the sleeve to thin sheetmetal. The butt weld and plug welds should not overlap into each other's heat zone. If you haven't got this by now then another easily understood example would be the Engman Long Kit. The exeption here is the Engman Kit covers the entire long and cross section on one side versus bridging two panels welded end to end. |
|
|
|
| SirAndy |
Oct 16 2007, 10:36 PM
Post
#44
|
|
Resident German Group: Admin Posts: 41,602 Joined: 21-January 03 From: Oakland, Kalifornia Member No.: 179 Region Association: Northern California |
very nice! you have some skillz, sir ... (IMG:style_emoticons/default/pray.gif)
(IMG:style_emoticons/default/smilie_pokal.gif) Andy |
|
|
|
| Jeff Hail |
Oct 16 2007, 11:08 PM
Post
#45
|
|
Senior Member Group: Members Posts: 1,141 Joined: 3-May 07 From: LA/ CA Member No.: 7,712 |
We always can use tutorials with pics. Here is a cross section of the inner long and floor joints. The floor connects about half way across the inner long. The factory used a sealer that looks like a ribbon of Pigeon poop. Lumpy acoustic ceiling stuff in appearance and looks just like the 911 poop ribbon used.
Another inch and half of seam sealer and the bean counters would have lost sleep. Another inch and half of seam sealer and half the rust threads would be non existant! Funny thing think of todays new car warranties on outer body rust through. If you have seen how cars are now sealed and the generous use of corrosion products that look like they were applied by a firehose. You have to wonder why they didn't protect cars like the 914 especially since the were produced in Europe of all places? Lets not go there. It was the bean counters.....you can bet on it. Attached image(s) 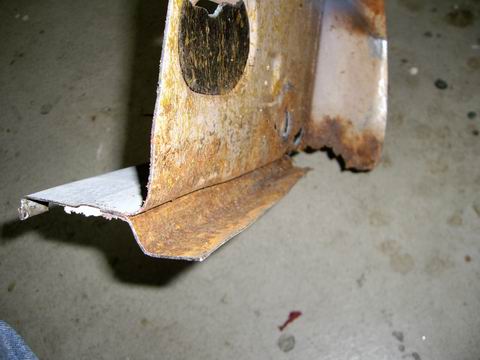
|
|
|
|
| type11969 |
Oct 17 2007, 09:13 AM
Post
#46
|
|
Senior Member Group: Members Posts: 1,231 Joined: 2-December 03 From: Collingswood, NJ Member No.: 1,410 Region Association: North East States |
Jeff-
Seriously nice work, thanks for the info too. Definitely way nicer than my repairs, feel free to comment on anything I have done. I certainly don't think I will be finding any faults with your work! -Chris |
|
|
|
| Jeff Hail |
Oct 18 2007, 09:34 PM
Post
#47
|
|
Senior Member Group: Members Posts: 1,141 Joined: 3-May 07 From: LA/ CA Member No.: 7,712 |
Don't you love it when you are making a new post and the site goes down. Damn right in the middle....
Fabricated a sleeve out of 18 guage steel for the inner long. Fit sleeve to new long section and old front long. Drill a bunch of holes for plug welds. Apply a light coat of weld thru primer. Start tacking..... uh oh running out of C02/ Argon and daylight. This is supposed to be sunny California! I only get 2 hours of daylight after my day job. This doesn't fly with me! Oh well. Saturday I will burn some more metal...... A little progress anyways. Still a perfect door gap! Attached image(s) 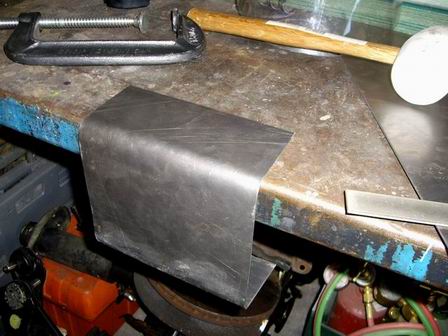 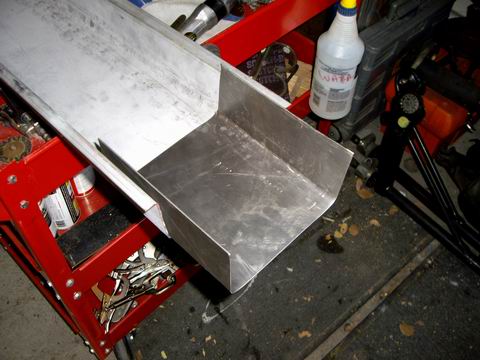 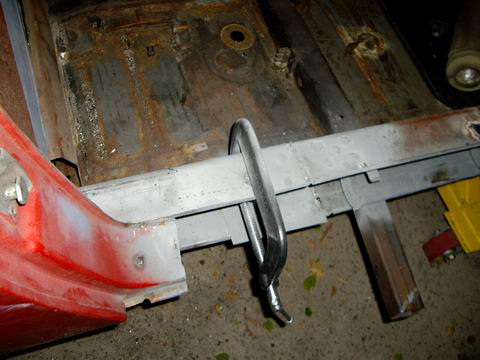 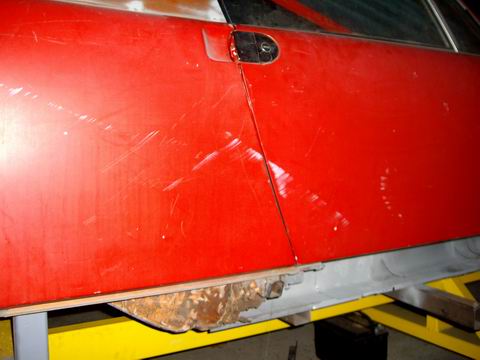
|
|
|
|
| nola914 |
Oct 19 2007, 12:28 AM
Post
#48
|
|
Member Group: Members Posts: 77 Joined: 19-January 06 From: New Orleans, LA Member No.: 5,440 |
Jeff:
Is there a source for the horizontal and vertical dimensions (over a level plane) for the various support points under the chassis? I have a 73 with a good motor and trans, with hell hole problems that I would like to take a crack at repairing. But down here in New Orleans, there aren't any "good" 914's that I could borrow to try and get the correct measurements. I was thinking about building a jig from 2x10's and 4x4's, bolted and cross braced to hold against warping, and using 1/2" or 5/8" bolts for anchors and resting points. I would use a laser to true everything up. Second hand wood is more than plentiful around here because of all of the demolition going on, so it would cost me very little to build, maybe $25 bucks for the bolts and lags. But I need to find out the dimensions for the mount points. It won't be as pretty as yours, but I think it would do the trick. |
|
|
|
| watsonrx13 |
Oct 19 2007, 05:11 AM
Post
#49
|
|
Advanced Member Group: Members Posts: 2,734 Joined: 18-February 03 From: Plant City, FL Member No.: 312 Region Association: South East States |
QUOTE(nola914 @ Oct 19 2007, 02:28 AM)  Jeff: Is there a source for the horizontal and vertical dimensions (over a level plane) for the various support points under the chassis? I have a 73 with a good motor and trans, with hell hole problems that I would like to take a crack at repairing. But down here in New Orleans, there aren't any "good" 914's that I could borrow to try and get the correct measurements. I was thinking about building a jig from 2x10's and 4x4's, bolted and cross braced to hold against warping, and using 1/2" or 5/8" bolts for anchors and resting points. I would use a laser to true everything up. Second hand wood is more than plentiful around here because of all of the demolition going on, so it would cost me very little to build, maybe $25 bucks for the bolts and lags. But I need to find out the dimensions for the mount points. It won't be as pretty as yours, but I think it would do the trick. David, our very own site has this information. It's under '914 info', body dimensions... Here's the link. -- Rob |
|
|
|
| Jeff Hail |
Oct 19 2007, 09:52 AM
Post
#50
|
|
Senior Member Group: Members Posts: 1,141 Joined: 3-May 07 From: LA/ CA Member No.: 7,712 |
QUOTE(nola914 @ Oct 18 2007, 11:28 PM) Jeff: Is there a source for the horizontal and vertical dimensions (over a level plane) for the various support points under the chassis? I have a 73 with a good motor and trans, with hell hole problems that I would like to take a crack at repairing. But down here in New Orleans, there aren't any "good" 914's that I could borrow to try and get the correct measurements. I was thinking about building a jig from 2x10's and 4x4's, bolted and cross braced to hold against warping, and using 1/2" or 5/8" bolts for anchors and resting points. I would use a laser to true everything up. Second hand wood is more than plentiful around here because of all of the demolition going on, so it would cost me very little to build, maybe $25 bucks for the bolts and lags. But I need to find out the dimensions for the mount points. It won't be as pretty as yours, but I think it would do the trick. Underbody dimensions are very hard to find for the 914. I think you can still get them from Tru-Way on CD. Fortunatly the 914 has a symetrical body meaning center -side to side can be done by cross measuring. Datum measurements (from a flat plane) for height are easy if the body is stripped. By 1970's standards the 914 platform is considered stiff when the roof is bolted on. The dimensions found on this site are 90% upper body and I they will get you where you need to be. For the underbody it is really simple. A 914 is essentially just a sheetmetal box and it has a flat bottom. You could make a platform from wood 4x4s but it will change dimension with heat and humidity. Probably not enough to loose sleep over. If you have good jack pads that aren't damaged you can use the 4 locations under the tub to build your foundation. Unless you are cutting out major structural parts you should not get into trouble. If you are just repairing and replacing parts all you need is to support the body equally. If you have an extra eighty grand you can get one of these (kidding) Attached image(s) 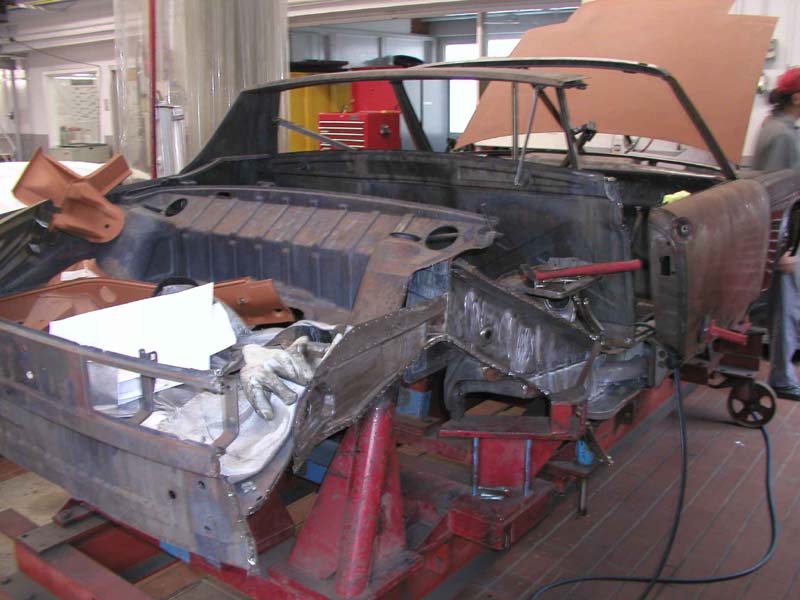 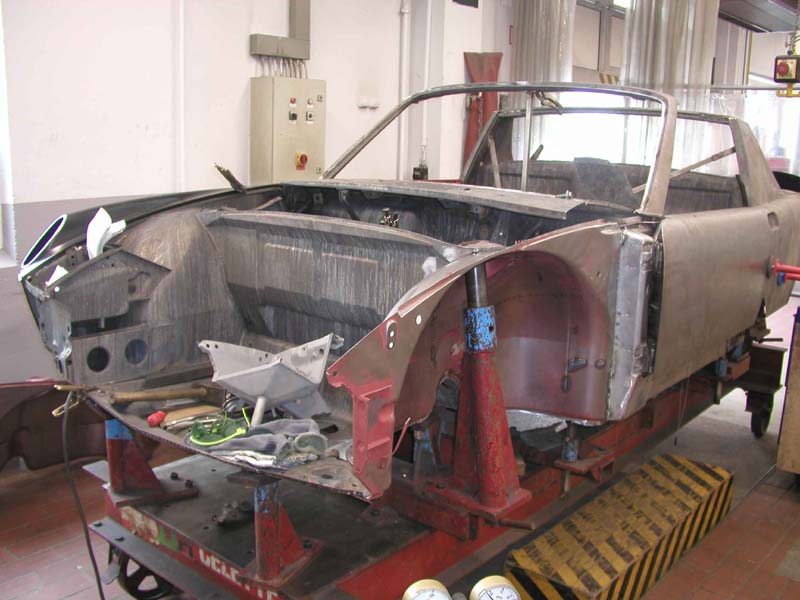
|
|
|
|
| Jeff Hail |
Oct 20 2007, 09:57 PM
Post
#51
|
|
Senior Member Group: Members Posts: 1,141 Joined: 3-May 07 From: LA/ CA Member No.: 7,712 |
Second time the site went down trying to post pictures. Lets try this again.
The "House of Steel" is open". Lets burn some metal! Finished welding the sleeve to the inner long. I still finish metal that isnt seen on the outside. I know it's there and has to meet my standard of quality. Welded all the plugs on the outside and butt welded the seam. Almost invisible. The way it should be. Grind everything smooth and coat of etching primer is all it needs. Really windy in Santa Clarita today. Those Santa Ana's are mighty. Fist time in my life I had to turn the diffuser gas up to 40CFH! A few tips for non experienced welders out there: When welding inverted you want to strike a fast hot arc. Cut your wire with a pair of diagonals everytime you strike an arc. This will create a fast burn in and reduce pooling and puddle sag. Gravity is working against you when you weld upside-down. If you don't cut the wire everytime you have a small ball of oxidized metal on the tip of the wire. This has to burn off first and slows penetration. Cut the wire each time! It will make a good clean fast weld. Attached image(s) 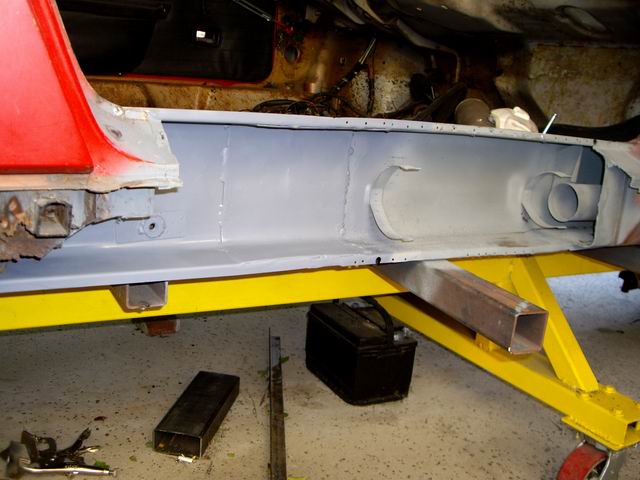 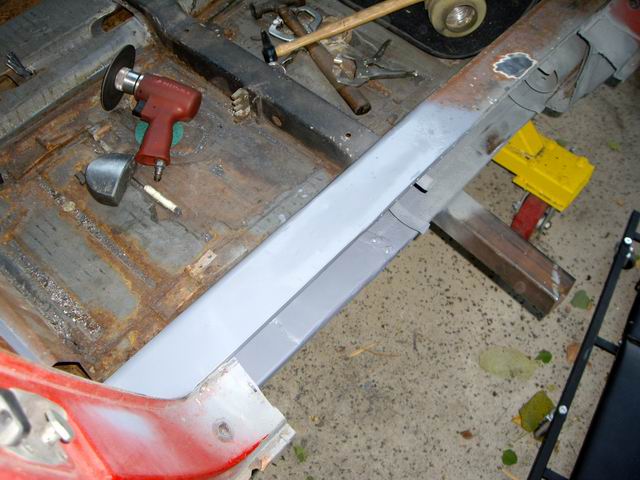 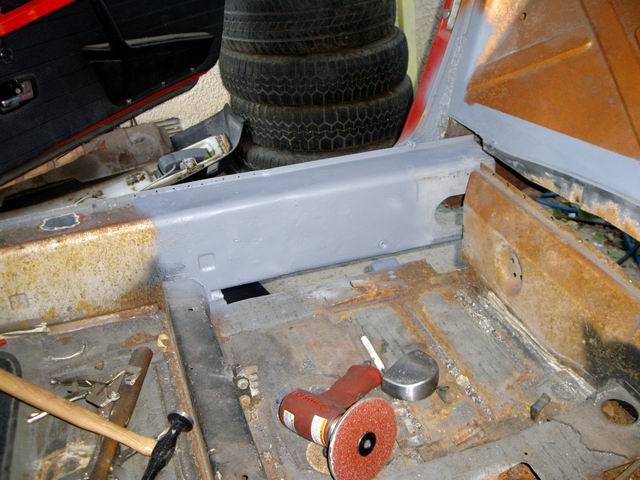
|
|
|
|
| degreeoff |
Oct 20 2007, 10:28 PM
Post
#52
|
|
I like big butts and I can not lie! Group: Members Posts: 1,622 Joined: 9-February 03 From: Booowieeee MD (near DC) Member No.: 275 Region Association: MidAtlantic Region |
(IMG:style_emoticons/default/beerchug.gif) I just have to say....'right on my man' wish I had that kind of patience...mine will last for 10 yrs if I am lucky but hey, then I'll do it agin!
|
|
|
|
| Jeff Hail |
Oct 20 2007, 10:45 PM
Post
#53
|
|
Senior Member Group: Members Posts: 1,141 Joined: 3-May 07 From: LA/ CA Member No.: 7,712 |
Threw a second coat of primer on before it got dark. Came out clean.
Attached image(s) 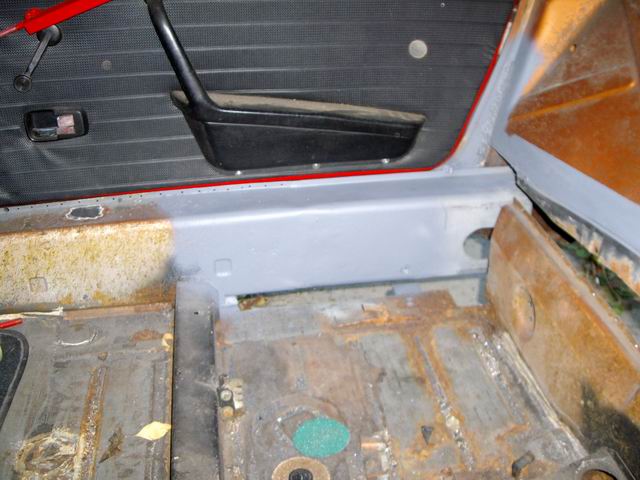
|
|
|
|
| Jeff Hail |
Oct 20 2007, 11:13 PM
Post
#54
|
|
Senior Member Group: Members Posts: 1,141 Joined: 3-May 07 From: LA/ CA Member No.: 7,712 |
A little more on welding thin sheetmetal:
Use weld thru primer. Do not be concerned about if you have sprayed on enough. Less is better. When you weld you are going to burn off the primer at the weld zone anyway. The zinc is only there to surround the weld zone once burned through and reduce oxidation. I recomend scratching off any zinc primer at the weld zone area. You will get a faster hotter arc and will have less contamination resulting in a stronger flatter weld. When you are done take a Roloc disc and remove any left over weld thru primer in the area. The high zinc content has poor adhesion properties so you do want it left over as a primer for the surrounding area's. Use a proper respirator. Zinc Oxide fumes are hazardous at least and can kill . There is no cure for heavy metal poisoning. Basically what zinc does is, it causes the bodies natural defenses to go into overdrive. Thus the same as other heavy metal poisoning. This has been called in the past "Monday Morning Fever", "Brass Fever", "The Brass Shakes", "Foundry Flu", etc. . . Like a condom use protection. I cannot emphasize enough on safety. |
|
|
|
| rjames |
Oct 21 2007, 12:24 AM
Post
#55
|
|
I'm made of metal Group: Members Posts: 3,910 Joined: 24-July 05 From: Shoreline, WA Member No.: 4,467 Region Association: Pacific Northwest |
Any advice on which brand of weld through primer to use?
Do the ones in the spray cans work well enough? Great thread Jeff! |
 |
|
| Jeff Hail |
Oct 21 2007, 12:35 AM
Post
#56
|
|
Senior Member Group: Members Posts: 1,141 Joined: 3-May 07 From: LA/ CA Member No.: 7,712 |
QUOTE(rjames @ Oct 20 2007, 11:24 PM) Any advice on which brand of weld through primer to use? Do the ones in the spray cans work well enough? Great thread Jeff! I use Wurth products but I think any Zinc rich primer will be fine. Spray cans are sufficient as you do not need a lot. Just a press of the nozzle is enough. It's not a metal primer so don't be concerned about coating an entire part. Just a dusting around the weld area is all that is needed. Too much and it creates penetration issues. Any left over should be removed and a good metal primer should be applied after grinding. If you are seeing a green flash or sputtering when striking an arc you are using too much zinc primer. |
|
|
|
| rhodyguy |
Oct 21 2007, 10:18 AM
Post
#57
|
|
Chimp Sanctuary NW. Check it out. Group: Members Posts: 22,055 Joined: 2-March 03 From: Orion's Bell. The BELL! Member No.: 378 Region Association: Galt's Gulch |
this thread NEVER ceases to amaze!! wow. the astro scraper @$40 and change is a must have. please (if you're so inclined), submitt a write up for the classic forum. you're providing examples of first rate work, pictures, and text.
k |
|
|
|
| majkos |
Oct 21 2007, 10:30 AM
Post
#58
|
|
Senior Member Group: Members Posts: 1,370 Joined: 29-February 04 From: Mile High 914 Member No.: 1,729 Region Association: Rocky Mountains |
(IMG:style_emoticons/default/agree.gif)
Your tips has saved me 20 years of trial and errors! First rate indeed! (IMG:style_emoticons/default/pray.gif) |
|
|
|
| TJB/914 |
Oct 21 2007, 10:51 AM
Post
#59
|
|
Mid-Engn. Group: Members Posts: 4,325 Joined: 24-February 03 From: Plymouth & Petoskey, MI Member No.: 346 Region Association: Upper MidWest |
Mr. Jeff Hail
Your metal work is magnificent (IMG:style_emoticons/default/pray.gif) I like the way you explain things to us amateurs. It's so easy to understand. Have you ever thought about writing a "Metal How To Book"?? It would be a great seller. This would be a great EXCELLENCE magazine how to article. Are you listening Pete?? Thanks for posting. (IMG:style_emoticons/default/popcorn[1].gif) (IMG:style_emoticons/default/popcorn[1].gif) (IMG:style_emoticons/default/popcorn[1].gif) (IMG:style_emoticons/default/popcorn[1].gif) (IMG:style_emoticons/default/popcorn[1].gif) Tom |
|
|
|
| StratPlayer |
Oct 21 2007, 01:25 PM
Post
#60
|
|
StratPlayer Group: Members Posts: 3,263 Joined: 27-December 02 From: SLC, Utah Member No.: 27 Region Association: Rocky Mountains |
This is truely amazing stuff here. My hats off to you sir on some fine work, and a gallant man to take on a project like this. (IMG:style_emoticons/default/smilie_pokal.gif)
|
|
|
|
|
2 User(s) are reading this topic (2 Guests and 0 Anonymous Users)
0 Members:

|
Lo-Fi Version | Time is now: 19th April 2024 - 09:48 PM |
Invision Power Board
v9.1.4 © 2024 IPS, Inc.