|
|
|
Porsche, and the Porsche crest are registered trademarks of Dr. Ing. h.c. F. Porsche AG.
This site is not affiliated with Porsche in any way. Its only purpose is to provide an online forum for car enthusiasts. All other trademarks are property of their respective owners. |
|
|

  |

| ruddyboys |
 Oct 22 2007, 10:20 AM Oct 22 2007, 10:20 AM
Post
#1
|
|
Hummel eigentümer  Group: Members Posts: 595 Joined: 3-March 04 From: Monroe, NY Member No.: 1,749 Region Association: North East States |
I have this old toy I had as a child I want to give to my boys, unfortunatly I need 5 plastic missle and only have 1. I looked around and can not find these. Is there a way I can make a mold of the one I have an make replicas of the original?
Attached image(s) 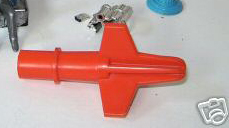
|
   |

 
|
| d914 |
Oct 22 2007, 10:38 AM
Post
#2
|
|
Advanced Member Group: Members Posts: 2,350 Joined: 12-July 03 From: Atlanta, ga Member No.: 904 Region Association: South East States |
QUOTE(ruddyboys @ Oct 22 2007, 12:20 PM)  I have this old toy I had as a child I want to give to my boys, unfortunatly I need 5 plastic missle and only have 1. I looked around and can not find these. Is there a way I can make a mold of the one I have an make replicas of the original? don't know on the mold, but have you searched ebay? |
|
|
|
| Wes V |
Oct 22 2007, 10:41 AM
Post
#3
|
|
Member Group: Members Posts: 482 Joined: 11-October 07 From: Los angeles Member No.: 8,211 |
get a copy of the book "the prop builder's Molding and Casting Handbook" by Thurston James. It will tell you everything you need to know.
I got a copy from a special effects supply shop (I live in L.A.) called Burman. Burman is also a good supply place for just about any of the materials you would need. Wes V |
|
|
|
| michaelmoo |
Oct 22 2007, 12:13 PM
Post
#4
|
|
Member Group: Members Posts: 312 Joined: 21-May 04 From: Kennesaw, GA Member No.: 2,092 |
http://www.alumilite.com/ I use this stuff a lot when making custom models. Works great and you can get it at most, if not all, good (yes i said good) hobby shops. |
|
|
|
| ruddyboys |
Oct 22 2007, 12:33 PM
Post
#5
|
|
Hummel eigentümer Group: Members Posts: 595 Joined: 3-March 04 From: Monroe, NY Member No.: 1,749 Region Association: North East States |
The part that bothers me is it has to be hollow so it can fit over a spring. I was thinking placing it to mold with the point facing down and doing a 2 part mold so the top part of the mold will fill in the center hollow. Reverse the mold and fill thru a small hole at the tip.
|
|
|
|
| VaccaRabite |
Oct 22 2007, 02:13 PM
Post
#6
|
|
En Garde! Group: Admin Posts: 13,841 Joined: 15-December 03 From: Dallastown, PA Member No.: 1,435 Region Association: MidAtlantic Region |
After you cast it, drill out the base. You are allready going to be using a 2 part mold. I'd make it from rubber if you can.
Zach |
|
|
|
| GWN7 |
Oct 23 2007, 02:05 AM
Post
#7
|
|
King of Road Trips Group: Members Posts: 6,280 Joined: 31-December 02 From: Winnipeg, MB, Canada Member No.: 56 Region Association: Northstar Region |
QUOTE(ruddyboys @ Oct 22 2007, 10:33 AM) The part that bothers me is it has to be hollow so it can fit over a spring. I was thinking placing it to mold with the point facing down and doing a 2 part mold so the top part of the mold will fill in the center hollow. Reverse the mold and fill thru a small hole at the tip. Hi, If the center part is hollow and smooth it should be a simple mold to make. Your sort of right on a two part mold, but it actually would end up as a 3 part mold. You have to be able to take the finished piece out of the mold when it's done. With the fins on that piece you will have to be able to take the mold apart to get the finished piece out. The window end caps I make are a 3 piece mold. The problem with a small hole at the tip pour is air entrapment which will leave a void in what your making. I just made a mold for a power steering insulator for a 51 Imperial and it took 4 trys to get it right and I think I sort of know what I'm doing. |
|
|
|
| rhodyguy |
Oct 23 2007, 07:06 AM
Post
#8
|
|
Chimp Sanctuary NW. Check it out. Group: Members Posts: 22,252 Joined: 2-March 03 From: Orion's Bell. The BELL! Member No.: 378 Region Association: Galt's Gulch |
you need to fashion a 'core'. it's what is used in the casting industry to make a void in an item.
k |
|
|
|
| GWN7 |
Oct 24 2007, 11:25 AM
Post
#9
|
|
King of Road Trips Group: Members Posts: 6,280 Joined: 31-December 02 From: Winnipeg, MB, Canada Member No.: 56 Region Association: Northstar Region |
Here's how I'd do that piece............
Make a base the overall size of the piece out of modeling clay (I use Pink or Green because it's easier to make sure you have it all out later) and fill the hole in the bottom with the clay also. Then attach the piece to the base. Would look like this: Attached image(s) 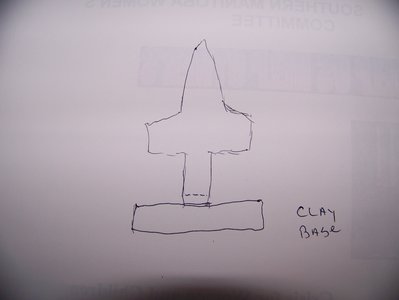
|
|
|
|
| GWN7 |
Oct 24 2007, 11:27 AM
Post
#10
|
|
King of Road Trips Group: Members Posts: 6,280 Joined: 31-December 02 From: Winnipeg, MB, Canada Member No.: 56 Region Association: Northstar Region |
then build your mold box around the base and pour the mold material into the box....let it sit till it cures
Should look like this: Attached image(s) 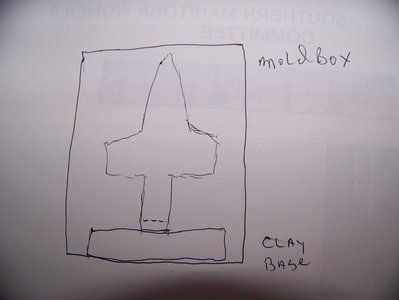
|
|
|
|
| GWN7 |
Oct 24 2007, 11:32 AM
Post
#11
|
|
King of Road Trips Group: Members Posts: 6,280 Joined: 31-December 02 From: Winnipeg, MB, Canada Member No.: 56 Region Association: Northstar Region |
After it is cured you take the mold box off and invert it. Then remove the clay from what is now the top of the mold and the clay from the hollow area. Do not disturb the original piece that is still in the mold.
You then mix up more mold material and pour it into where the clay came out of (this forms a cap for the mold with a spike that goes into the area where the spring will go. Will look like this: Attached image(s) 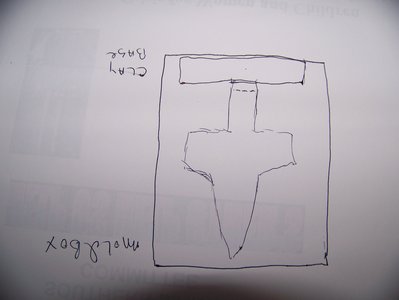
|
|
|
|
| GWN7 |
Oct 24 2007, 11:41 AM
Post
#12
|
|
King of Road Trips Group: Members Posts: 6,280 Joined: 31-December 02 From: Winnipeg, MB, Canada Member No.: 56 Region Association: Northstar Region |
When the cap piece is cured, remove it from the mold. Then take a very sharp knife and cut the mold on two sides (try and line up the cuts with the fins of the rocket) and remove the original part.
Should look like this: Attached image(s) 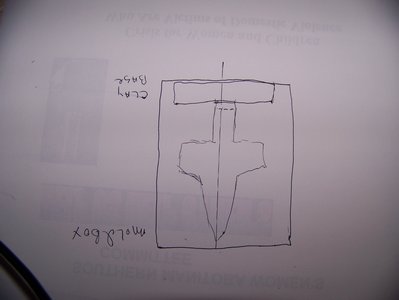
|
|
|
|
| GWN7 |
Oct 24 2007, 11:47 AM
Post
#13
|
|
King of Road Trips Group: Members Posts: 6,280 Joined: 31-December 02 From: Winnipeg, MB, Canada Member No.: 56 Region Association: Northstar Region |
Then all that is left to do is reassemble the mold box around the mold. Mix up the material your going to make the rockets from. Pour it into the mold and insert the cap with the post and let it cure.
Good luck (IMG:style_emoticons/default/smile.gif) |
|
|
|
| ruddyboys |
Oct 24 2007, 12:31 PM
Post
#14
|
|
Hummel eigentümer Group: Members Posts: 595 Joined: 3-March 04 From: Monroe, NY Member No.: 1,749 Region Association: North East States |
Thanks Bruce, That seems to be the way to go. What is a good mold material and the rocket is made of a hard plastic, what should I use for that also.
|
|
|
|
| GWN7 |
Oct 24 2007, 02:13 PM
Post
#15
|
|
King of Road Trips Group: Members Posts: 6,280 Joined: 31-December 02 From: Winnipeg, MB, Canada Member No.: 56 Region Association: Northstar Region |
I'd use a mold material with a soft drometer rating because you have to open the mold to get the finished piece out. Possibly a 30 rating. The top cap I'd use a harder material (I'd use a 90 for this) as you have to pull the post portion out of where the spring goes and don't want it to tear as easy.
As to the plastic I'd try and match the material the orginals are made of (another use for the drometer) or make them out of rubber. That way when when the boys shoot each other with them it won't hurt as much. (IMG:style_emoticons/default/smile.gif) Looking at the original piece from the picture you might have to go with plastic as it looks like the ring near the end is what is used to hold it on the spring shaft before being realised. Other option is send me the piece and I can make them for you |
|
|
|
|
1 User(s) are reading this topic (1 Guests and 0 Anonymous Users)
0 Members:

|
Lo-Fi Version | Time is now: 16th March 2026 - 01:25 PM |
Invision Power Board
v9.1.4 © 2026 IPS, Inc.