|
|
|
Porsche, and the Porsche crest are registered trademarks of Dr. Ing. h.c. F. Porsche AG.
This site is not affiliated with Porsche in any way. Its only purpose is to provide an online forum for car enthusiasts. All other trademarks are property of their respective owners. |
|
|

  |

| McMark |
 Dec 10 2007, 07:29 PM Dec 10 2007, 07:29 PM
Post
#1
|
|
914 Freak!  Group: Retired Admin Posts: 20,179 Joined: 13-March 03 From: Grand Rapids, MI Member No.: 419 Region Association: None |
Removing the alternator with the engine in the car is a challenging task the first time through. But hopefully this guide will make it a little easier. It takes me about 1 hour to remove and replace without even jacking up the car. (IMG:style_emoticons/default/cool.gif)
Tools you'll need: 6mm allen wrench or socket Large screwdriver with a square shaft 8mm socket or wrench 10mm socket or wrench 13mm socket or wrench 21mm socket or wrench Impact gun (not necessary) Start by removing the negative battery cable. Then open the engine bay, grab a largish screw driver and remove these two tin screws. And using a 6mm allen wrench (or even better, a socket) remove the adjustment screw. Careful of the special nut on the back. Losing those is a PITA. 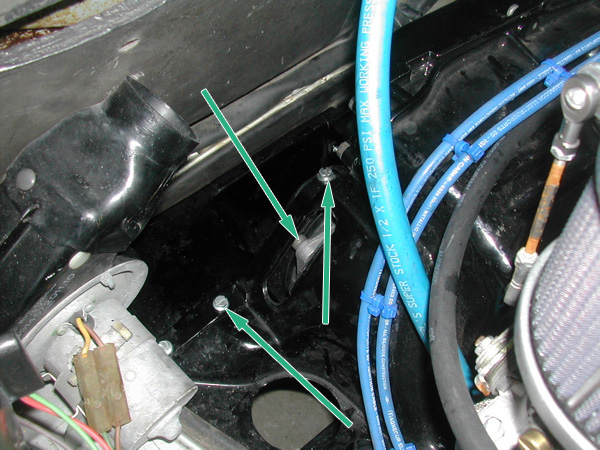 Grab a 13mm wrench (ratcheting wrenches are nice here) and remove this nut from the alternator mount bracket. (BTW, you should be loosening this bolt whenever you replace or tighten your belt.) Also loosen the clamp on the cooling boot and push it off of the backing plate. 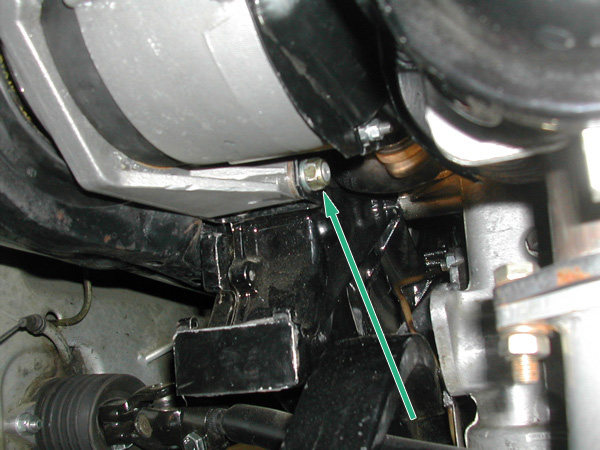 Now that the alternator is loose, remove the belt and feel around near the alternator pulley for this bolt and remove it. 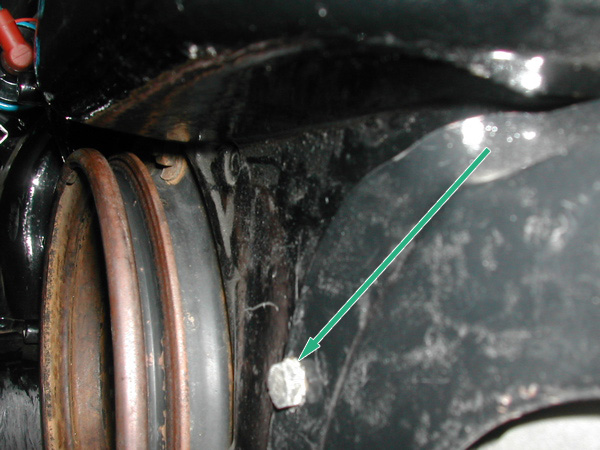 Take your large screwdriver (or possibly 10mm wrench/socket) under the car and remove the tin screw just in front of the alternator. It's the only one you access from under the car, and it's just in front of the alternator. The back side of this screw is pictured below. Next remove the main pivot bolt (remember the nut you removed with the 13mm wrench) by knocking it towards the front of the car. Reach in the engine bay and pull the bolt completely free. The bolt head is pictured below. 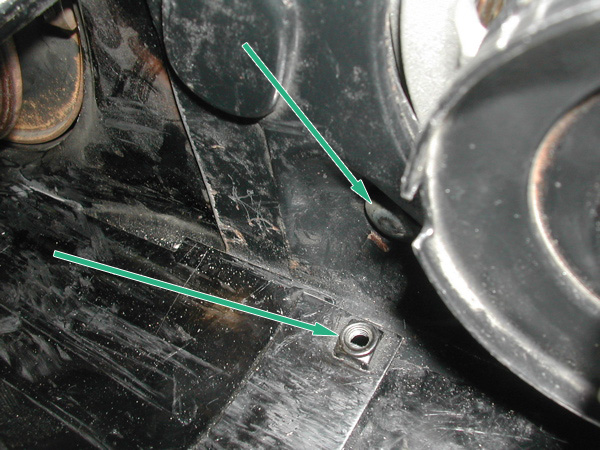 This is a special bolt and is often replaced with an improper substitute. This bolt has a D shaped head and (not visible) has a square shaft like a carriage bolt which keeps it from spinning when you're trying to remove the nut on the other end. (IMG:style_emoticons/default/wink.gif)  The alternator and the surrounding tin are now loose. Remove them by lowering them out. This is the tricky part. I always lower it a bit and then try to pivot the back towards the ground. The alternator ends up coming out like this (you can see the motor mount bar in the bottom left corner and the valve cover in the top right): 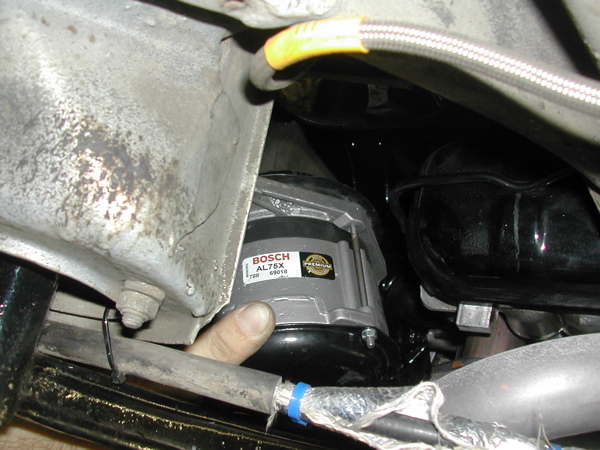 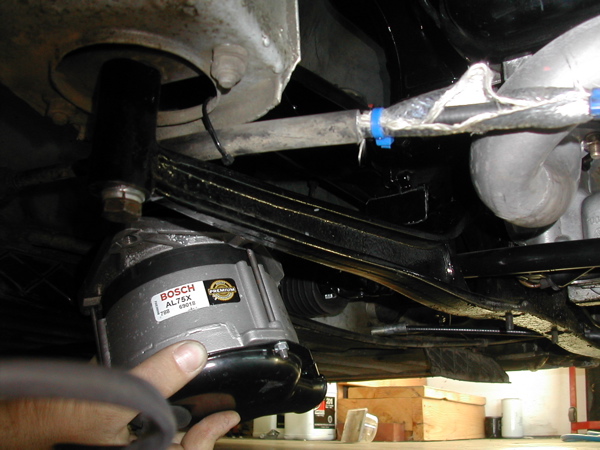 Here is a picture of the alternator mount by itself. The two bolts holding it in place can be loosened to move the alternator forward or backward slightly for alignment. Also notice the square hole at the front. This matches with the special bolt mentioned previously. 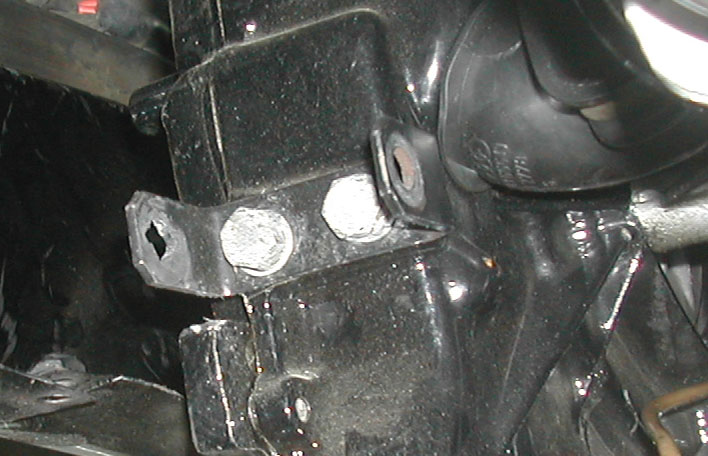 Remove the cable that runs from the alternator to the starter (there is a nut on the starter). BTW, this is the cable that carries power from the alternator to the battery. Also remove the three prong plug from the relay board. Feed these wires though to the underside of the car and pull the alternator completely out. Swap your wiring to the new alternator by removing the rear cover. Remove these three nuts with an 8mm wrench.  Pull back the plate and remove the three prong plug by pulling and undo the nut to remove the big red wire. The stud that this big red wire bolts to is often too long and touches the cover plate. THIS IS VERY BAD AND WILL CAUSE DAMAGE. Check the length of this stud on your new alternator and make sure it is short enough. If it is not, file it, grind it, or cut it. 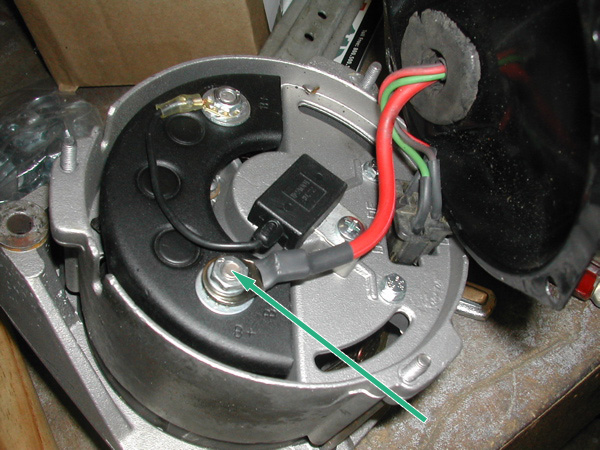 This is a great time to get a rebuilt wiring harness from Jeff Bowlsby. Old wiring limits power flow and can reduce the output of your expensive new alternator. Reinstall the wiring harness, double check the B+ post length, and bolt the rear cover into place. Make sure that the cooling air inlet is close to the pivot shaft. (see the picture above). New/Rebuilt alternators do not come with a pulley so you'll have to remove your old one. An impact gun makes short work of this nut, using a 21mm socket. If you don't have air tools accessible (if you're on the side of the road, for example) you can place a screwdriver between the center shaft and one of the cutouts/teeth/notches like this. A screwdriver with a square shaft is probably necessary. 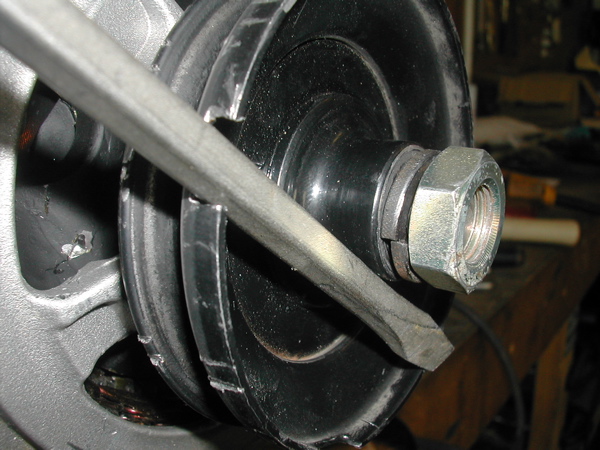 The pulley sometimes drops right off, and sometimes it takes some convincing. A three jaw puller is handy, but sometimes they DO NOT come off. I've bent a few, and even had one that turned inside out instead of coming off. A careful application of heat or some penetrating oil (WD-40 is not penetrating oil) can help. Once you're ready to reinstall the pulley, make sure the key is in place. 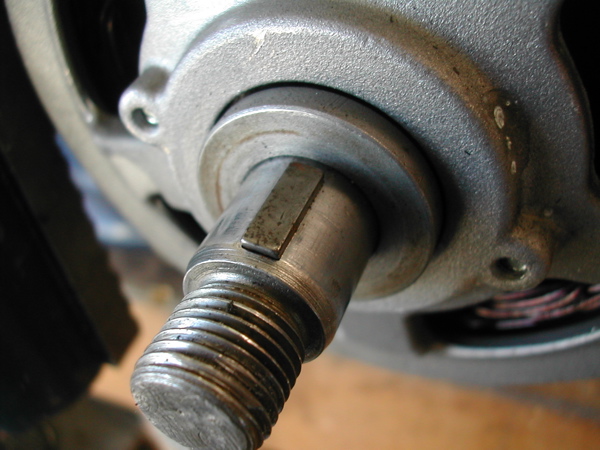 Slide the pulley into place. If it's tight you can carefully sand the inside bore to let it slip on easily. Some motor oil on the shaft and in the bore will help it go on as well as help it come off again later.  Next is a split lock washer. These can be flattened after some use. Your washer should look like this one. The 'beginning' should be offset from the 'end'. 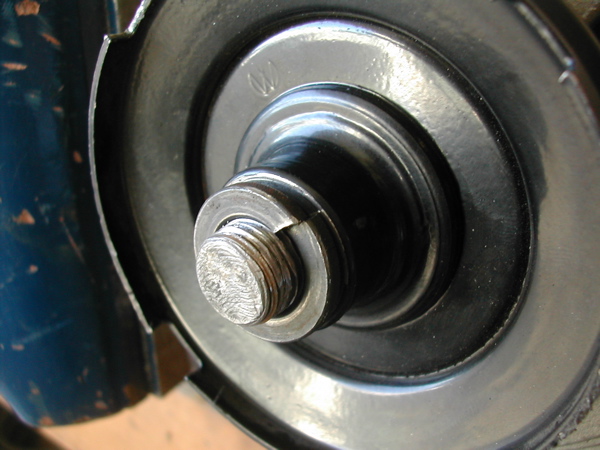 Finally, thread the nut on and torque it to 29 ft/lbs. A torque wrench and the screwdriver trick works well. 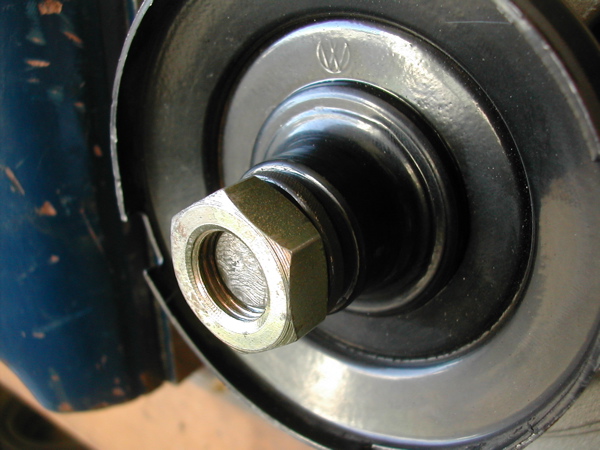 Okay, now we're ready to start reinstallation. First, a look at how the pieces will all fit together. You should have this neat sealing ring. Notice the 'dent'. 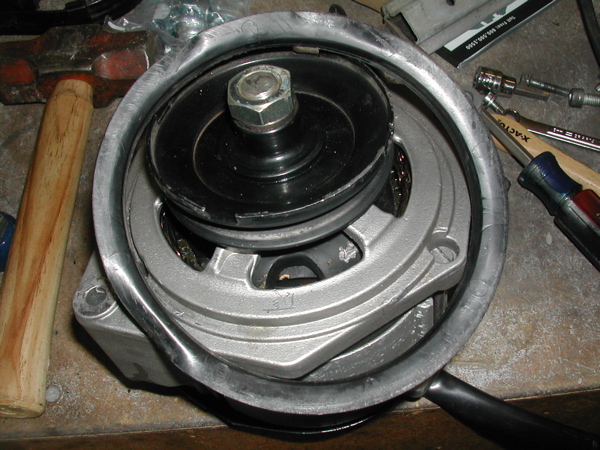 The dent will end up lining up with the pivot bolt, like this. 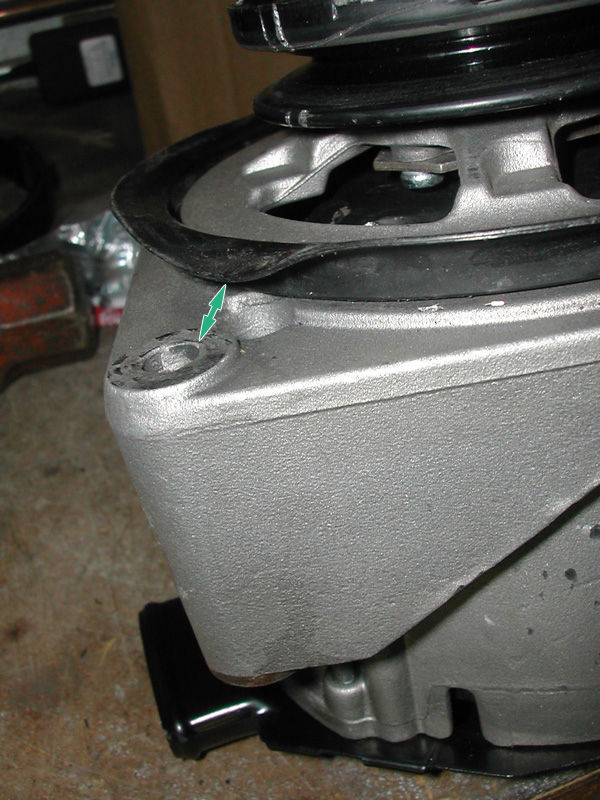 The tin fits over the top of everything like this. 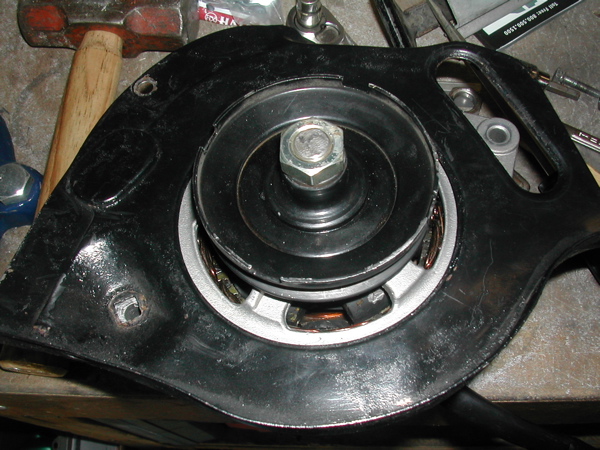 Now this will all fall out of place, but since you'll be installing this mostly 'blind', it's important to know where you need to be. Leave the ring and the tin in place and lift them into place. Again, this is the worst part of this job and will take quite a bit a fiddling, fudging and cursing. Try to get the pulley up into place first and then pivot the back end up. Once you have it into place. Poke a spare, short bolt into the back of the pivot to keep it in place. Attach the tin next, by threading the top tin screws into place first, and then the others. Don't tighten any of them down yet, in case something needs to move. Once the tin is in place then the pivot bolt will slide into place more easily. Wiggle the alternator back and forth as necessary to make the bolt slide into place. As you push it in, you will knock the temporary short bolt out the back. Once the lower bolt is in place, pivot the alternator and attach the upper bolt and special nut. This one is a PITA. Some needle-nose locking pliers will help you maneuver the nut. Re-attach the cooling boot, tighten the tin screws (two on top, one on the front, and one on the bottom), make sure the plastic ring is in place by feel, install the belt, tighten the belt and lock down the top bolt, and finally lock down the bottom nut (make sure the D bolt is oriented correctly). Run the wiring back into place and hook it up. Reattach the negative battery terminal and after quickly double checking everything, start the car and check your volt meter, alternator light, or use a handheld volt meter on the battery. If you're not reading 13.6v or so, then something is old and corroded or failing. Check your wiring (new wiring is good), your voltage regulator, and your battery terminal connections. Yer all done! |
   |

 
|
| Gint |
Dec 10 2007, 09:08 PM
Post
#2
|
|
Mike Ginter Group: Admin Posts: 16,066 Joined: 26-December 02 From: Denver CO. Member No.: 20 Region Association: Rocky Mountains |
Nice pics! And a perfect example of tech article layout and formatting.
Did you want me to put this in the tech article section? |
|
|
|
| McMark |
Dec 10 2007, 09:13 PM
Post
#3
|
|
914 Freak! Group: Retired Admin Posts: 20,179 Joined: 13-March 03 From: Grand Rapids, MI Member No.: 419 Region Association: None |
I would love for you to put in the tech article section. I was hoping you'd say that. (IMG:style_emoticons/default/cool.gif)
|
|
|
|
| ConeDodger |
Dec 10 2007, 09:26 PM
Post
#4
|
|
Apex killer! Group: Members Posts: 23,560 Joined: 31-December 04 From: Tahoe Area Member No.: 3,380 Region Association: Northern California |
Wow! Nicely written. Classic!!!
|
|
|
|
| Gint |
Dec 10 2007, 09:29 PM
Post
#5
|
|
Mike Ginter Group: Admin Posts: 16,066 Joined: 26-December 02 From: Denver CO. Member No.: 20 Region Association: Rocky Mountains |
QUOTE(McMark @ Dec 10 2007, 08:13 PM)  I would love for you to put in the tech article section. I was hoping you'd say that. (IMG:style_emoticons/default/cool.gif) |
|
|
|
| KaptKaos |
Dec 10 2007, 09:29 PM
Post
#6
|
|
Family Group: Members Posts: 4,009 Joined: 23-April 03 From: Near Wausau Member No.: 607 Region Association: Upper MidWest |
Nice Mark!
|
|
|
|
| davep |
Dec 11 2007, 07:42 AM
Post
#7
|
|
914 Historian Group: Benefactors Posts: 5,137 Joined: 13-October 03 From: Burford, ON, N0E 1A0 Member No.: 1,244 Region Association: Canada |
Here is the link to the caveat about Bosch rebuilds:
http://www.914world.com/bbs2/index.php?showtopic=5913 I don't know if this is still a problem, but it is a serious issue. The positive cable should have a rubber boot over the tip to insulate the stud/nut from the cover. There was a paper gasket originally fitted between the cover and the body of the alternator. Be sure the square hole in the mount bracket is in good condition, and repair it if required. Be sure the pivot hole in the alternator body is not ovalled or worn to much since this can cause the pulley to be misaligned with the engine fan pulley. The alternator grounds out through its body to the brackets and the engine fan shroud. Excessive painting has been known to cause grounding issues. It is always a good idea to check the belt tension again after a few hundred miles. |
|
|
|
| purple |
Dec 12 2007, 02:27 PM
Post
#8
|
|
Pigeon feeders attract me Group: Members Posts: 938 Joined: 24-July 07 From: Houston, TX Member No.: 7,942 Region Association: None |
You forgot to show loosening the screw on the rubber air boot that goes onto the back of the alternator. That thing is a pain!
If you dont loosen the clamp that holds it on..you will surely tear the boot and have to find a new one...ask me how i know |
|
|
|
| Garland |
Dec 13 2007, 12:10 PM
Post
#9
|
|
Restoration Fanatic Group: Members Posts: 1,327 Joined: 8-January 04 From: ......Michigan...... Member No.: 1,535 Region Association: Upper MidWest |
With heat exchangers and a complete heating system, you will have to add a few steps.
|
|
|
|
| Gint |
Dec 15 2007, 05:33 PM
Post
#10
|
|
Mike Ginter Group: Admin Posts: 16,066 Joined: 26-December 02 From: Denver CO. Member No.: 20 Region Association: Rocky Mountains |
|
|
|
|
| markb |
Dec 15 2007, 06:25 PM
Post
#11
|
|
914less :( Group: Members Posts: 5,449 Joined: 22-January 03 From: Nipomo, CA Member No.: 180 Region Association: Central California |
QUOTE(Garland @ Dec 13 2007, 10:10 AM) With heat exchangers and a complete heating system, you will have to add a few steps. (IMG:style_emoticons/default/agree.gif) I have had to remove a bunch of tin & a hose to get the alt out. |
|
|
|
| stateofidleness |
Feb 2 2008, 07:53 PM
Post
#12
|
|
Senior Member Group: Members Posts: 810 Joined: 1-September 07 From: Canyon Lake, Texas! Member No.: 8,065 Region Association: None |
this has to be one of the worst jobs to do on the 914...
1hr my ass pelican lmao... try 7... im a noob but still.. damn heating |
|
|
|
| McMark |
Feb 3 2008, 01:38 AM
Post
#13
|
|
914 Freak! Group: Retired Admin Posts: 20,179 Joined: 13-March 03 From: Grand Rapids, MI Member No.: 419 Region Association: None |
There are worse jobs. But this one isn't fun...
|
|
|
|
| stateofidleness |
Feb 3 2008, 01:57 AM
Post
#14
|
|
Senior Member Group: Members Posts: 810 Joined: 1-September 07 From: Canyon Lake, Texas! Member No.: 8,065 Region Association: None |
hey mcmark i was able to do it without removing the wiring harness and everything, i just disconnected the cabling from the alternator as it "hung down" and then hooked the new one up in it's place and then preceded to reinstall everything... i think taking it out completely as you suggest would make it a LOT harder.
also, just want to thank you for putting the socket sizes and all that, pelican doesnt have it and it beats a lot of trial and error as i dont have a lot of metric stuff available to me! thanks |
|
|
|
| McMark |
Feb 3 2008, 06:02 PM
Post
#15
|
|
914 Freak! Group: Retired Admin Posts: 20,179 Joined: 13-March 03 From: Grand Rapids, MI Member No.: 419 Region Association: None |
The wiring harness on the relay board just unplugs (2 seconds) and the connection on the starter is one 13mm nut. Removing the back of the alternator is three small nuts, then a plug and a 13mm nut and you have to do it all lying on your back. (IMG:style_emoticons/default/wink.gif)
I think my way is easier, but everyone's got their preferences. (IMG:style_emoticons/default/cool.gif) I hate air tools for example (everyone yells "WHAT!?" (IMG:style_emoticons/default/ohmy.gif) now). |
|
|
|
| stateofidleness |
Feb 3 2008, 07:52 PM
Post
#16
|
|
Senior Member Group: Members Posts: 810 Joined: 1-September 07 From: Canyon Lake, Texas! Member No.: 8,065 Region Association: None |
i hear ya, just figured it was easier than pulling all the harness through all the little holes and grommets... at least for me i didnt wanna risk the chance of tearing one up or breaking a wire or somethin.
anyways, because of this article, i was able to enjoy that car today! (IMG:style_emoticons/default/wink.gif) thanks again |
|
|
|
| McMark |
Feb 3 2008, 09:07 PM
Post
#17
|
|
914 Freak! Group: Retired Admin Posts: 20,179 Joined: 13-March 03 From: Grand Rapids, MI Member No.: 419 Region Association: None |
Glad it helped. (IMG:style_emoticons/default/thumb3d.gif)
|
|
|
|
| ConeDodger |
Feb 3 2008, 09:21 PM
Post
#18
|
|
Apex killer! Group: Members Posts: 23,560 Joined: 31-December 04 From: Tahoe Area Member No.: 3,380 Region Association: Northern California |
|
|
|
|
| McMark |
Feb 3 2008, 09:31 PM
Post
#19
|
|
914 Freak! Group: Retired Admin Posts: 20,179 Joined: 13-March 03 From: Grand Rapids, MI Member No.: 419 Region Association: None |
|
|
|
|
|
1 User(s) are reading this topic (1 Guests and 0 Anonymous Users)
0 Members:

|
Lo-Fi Version | Time is now: 26th April 2024 - 03:17 PM |
Invision Power Board
v9.1.4 © 2024 IPS, Inc.