|
|
|
Porsche, and the Porsche crest are registered trademarks of Dr. Ing. h.c. F. Porsche AG.
This site is not affiliated with Porsche in any way. Its only purpose is to provide an online forum for car enthusiasts. All other trademarks are property of their respective owners. |
|
|


| Eric_Shea |
 Dec 22 2007, 06:59 PM Dec 22 2007, 06:59 PM
Post
#1
|
|
PMB Performance  Group: Admin Posts: 19,304 Joined: 3-September 03 From: Salt Lake City, UT Member No.: 1,110 Region Association: Rocky Mountains |
This all started with a group buy that was a little slow coming. (IMG:style_emoticons/default/blink.gif)
Enough people came together to get the hard bushings that I felt a "How To" would be in order. While these are not the easiest things to install (easy being slide them in and enjoy), it's not that difficult if you have a few simple tools. In this case, difficulty is actually a good thing. What we'll be doing here is honing the bushings for your individual application. All of the trailing arms I have seen can vary… shafts as well. Once you're done, you should have a nice set of Performance-Poly bushings holding up the rear of your car. The control arms will swing with easy being lifted by one finger. The harder 70D poly in the Performance-Poly bushing will hold up and not fade or sag like the softer 94A poly that is a very common replacement for these arms. I would be remise if I didn't cover removal of the old bushings/shafts so let's start with a breif explaination of how that's done. To remove the old shafts I like to put them in a press. I heat the threaded portion of the shaft until I can see the edge of the bushing beginning to melt. Once I've reached that point, I begin to press the rod through the bushing: 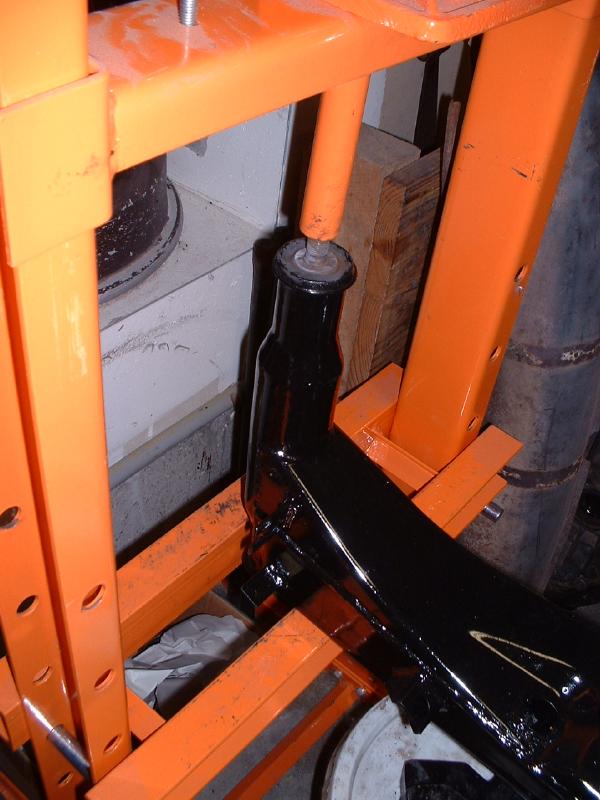 Once the rod has pushed all the way through the first bushing I take it out of the press and use a large screwdriver to pry the old bushing out. It's actually much easier than it sounds. The bushing begins to pull out immediately. 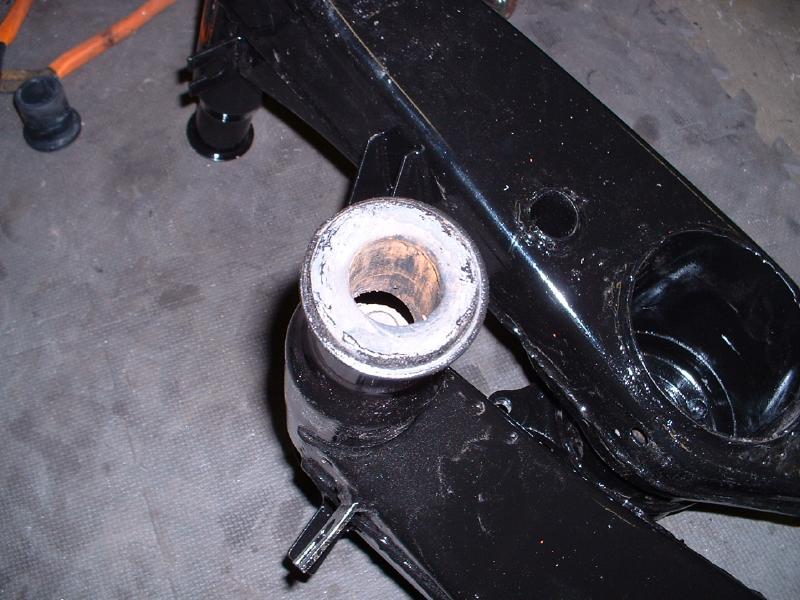 The remainder of the job is to flip the arm in the press and push the shaft back through the second bushing. This will probably require a bench adjustment but not a big deal. Again, make sure you heat the shaft so it slides through the bushing easily. Now, on with the show: Preparation is paramount to any good job. Now might be the time to bead blast your arms, have them painted or powder coated (leave your old bearings in if you're going to do this, you can push them out after the powder coating and your bores will be nice and clean). Along the lines of preparation; I like to have the shafts re-plated with zinc dichromate. If they are rusted and pitted you will need to find some clean replacements. 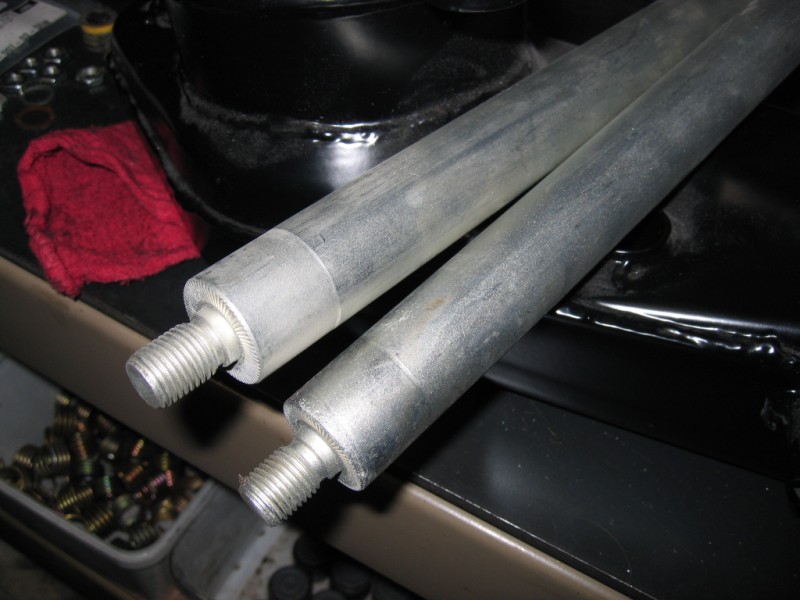 Let's get started on the bushings. To hone the bushings you will need... well... a hone. There are quite a few varieties on the market and even a few for the professional machinist. We'll concentrate on what you can get for the home mechanic. Here's my favorite: www.mcmaster.com part number 6713A12. This should set you back $14.35. You can get the same thing at your FLAPS as well. When you factor in the shipping, it's probably best to support your local guy although... McMaster-Carr is pretty damn cool: 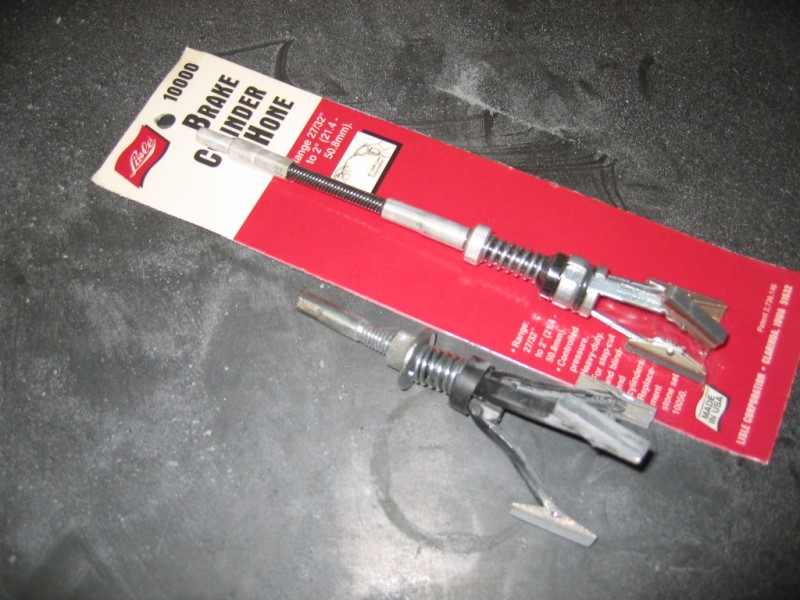 What you're looking at is a standard brake cylinder hone and, my modified version. I simply cut the flex center section out and it made this hone much stouter in the drill. Here's a view of the modified hone in the drill:  The process is fairly straight forward from this point on however; I'll add a few tips for reassurance as you dig in. There will be a lot of trial fitting going on here. Keep your control arm shaft handy as you hone the bushing. Set the hone to the harder end of it's adjustment. The thumb screw you see in the pictures can be cranked down to adjust the tension. WEAR GLOVES AND EYE PROTECTION. The bushing will get to a critical temperature and soften a bit and begin to cut. 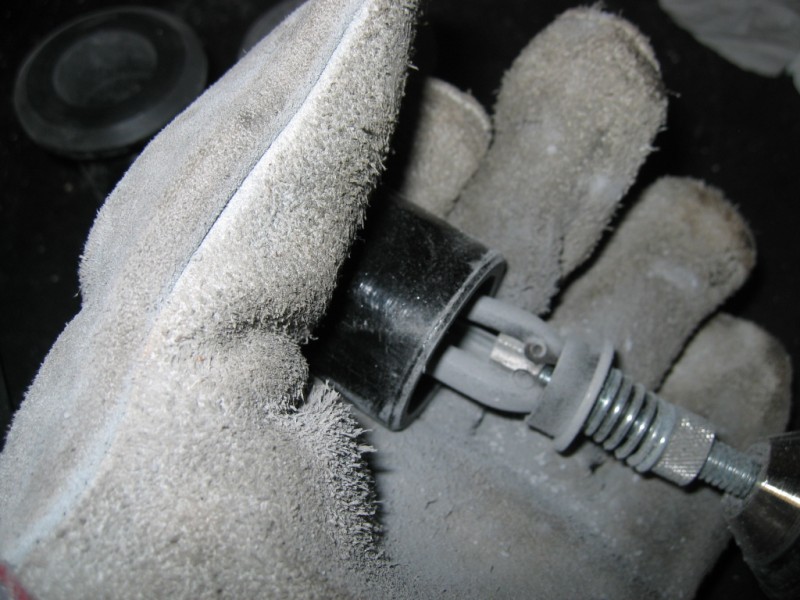 Again, stop after a bit of honing to trial fit the bushing. The bushing will expand considerably while you are honing it. It reacts quite a bit to the temperature. Without the gloves it would be hard to hold. For this reason, you will want the bushing to simply slide down the shaft when it is close to being ready. It will cool and contract and you'll have to go at it again. Remember, there will be a lot of trial fitting here: 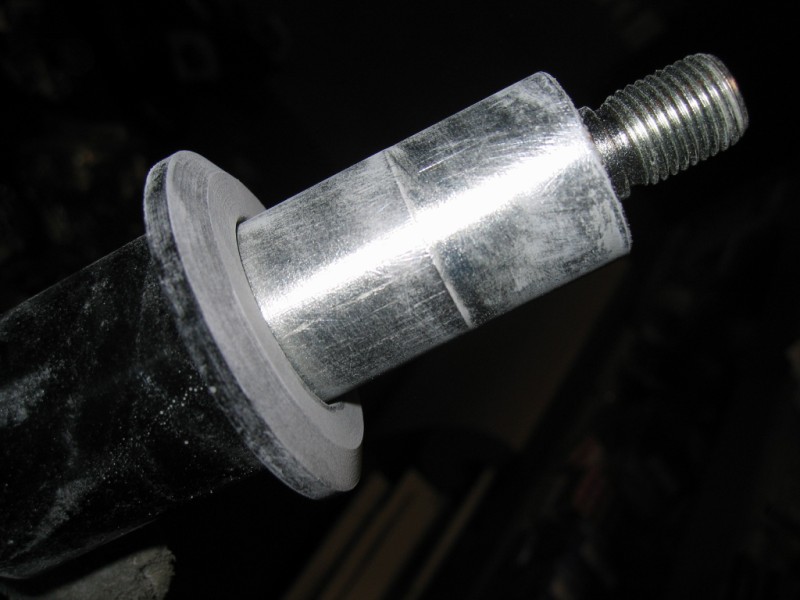 You may want to keep a small tub of ice water handy to cool the bushing again. This will give you a more accurate picture of your progress. 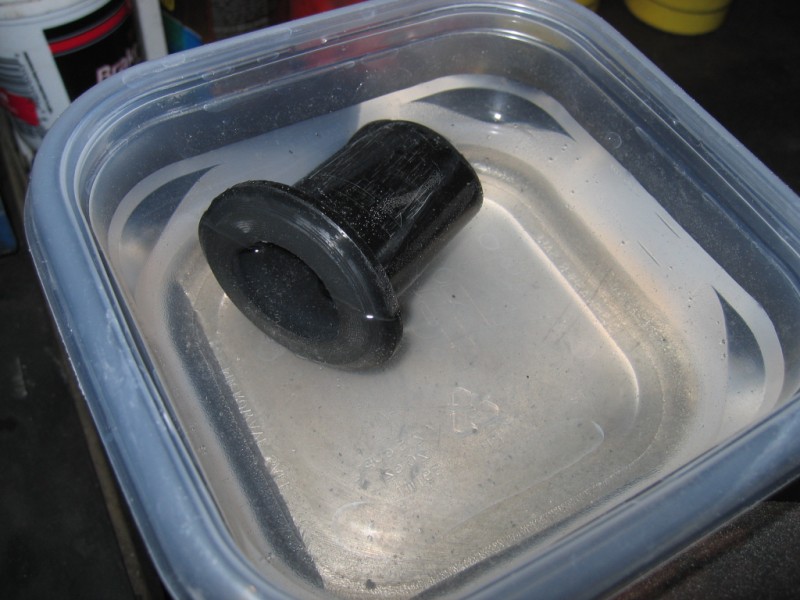 You will be done with the honing process when the cool bushings slide over the shaft with ease. You do not want too much play; just enough for the bushing and shaft to slide effortlessly. Once the assembly is back in the control arm, they can tighten up a bit more (depending on the fit in your individual control arm... remember, they're all slightly different). 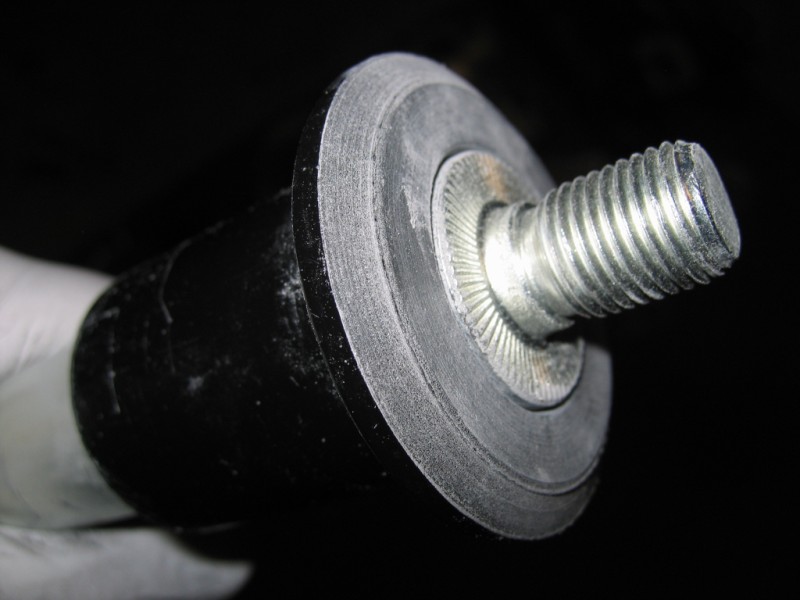 Now, this last part is optional but I think it's a great idea and it's fairly simple "while you're in there". Zerks. I like the 6M zerk. Using some blue masking tape I measure 1" down from the lip of the control arm and make a mark. This is on the inside of the longer riser section of the arm. 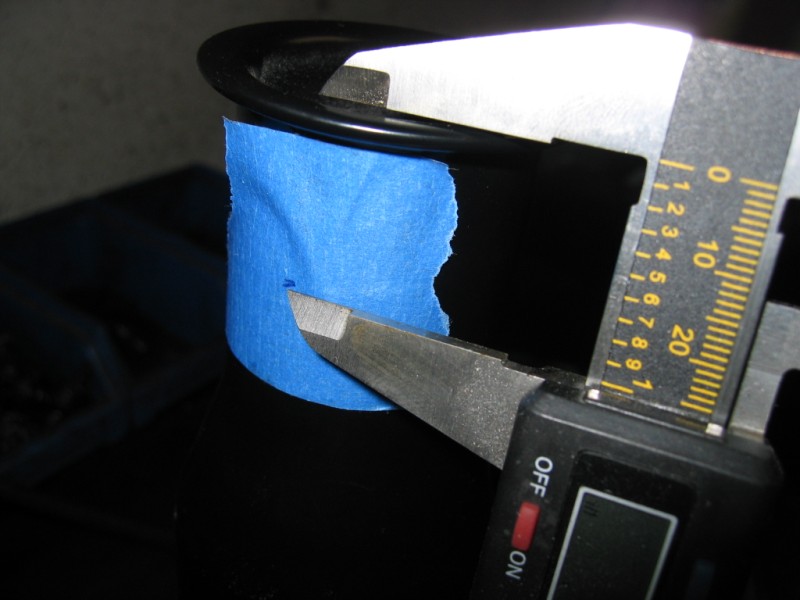 I do the same on the bottom section of the short side: 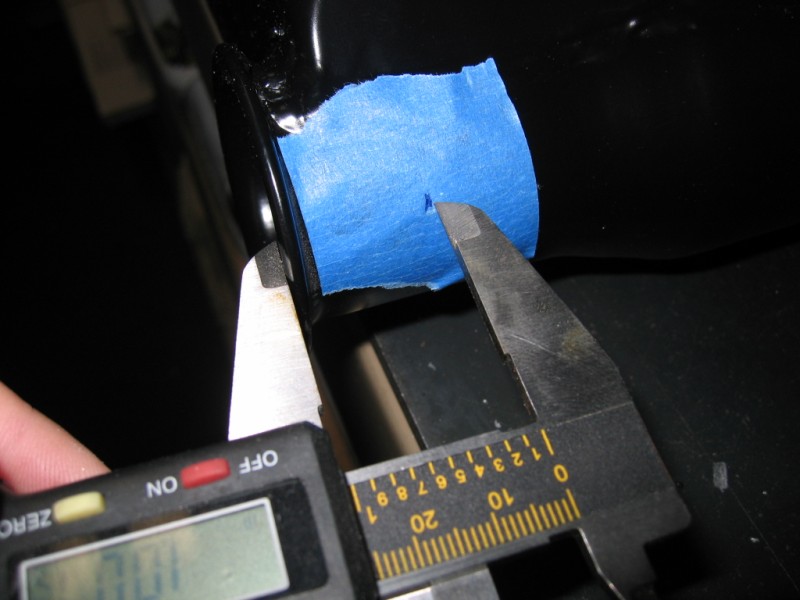 Next it's time to drill and tap. Using a 13/64 bit I drill into the arm at the mark. Make sure your bushings are installed at this point as you'll want to drill and tap completely through them: 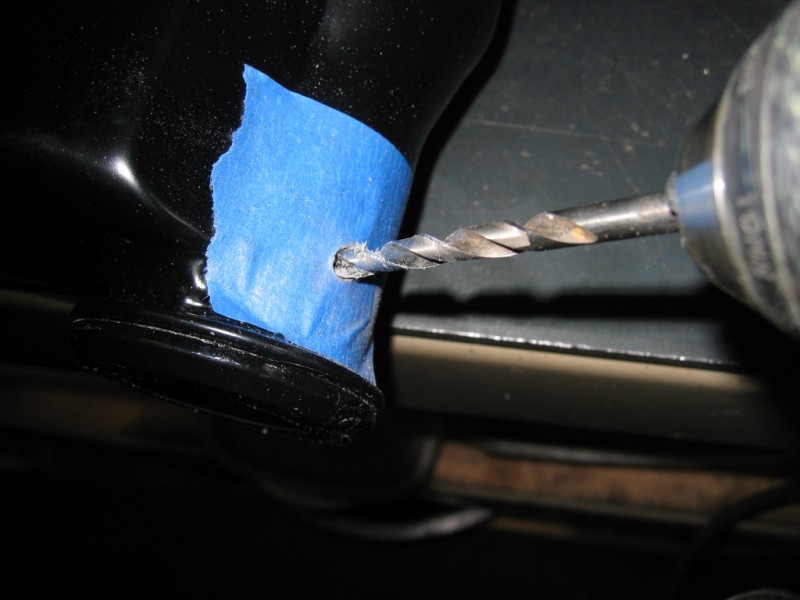 ...and tap the hole with the 6x1 tap: 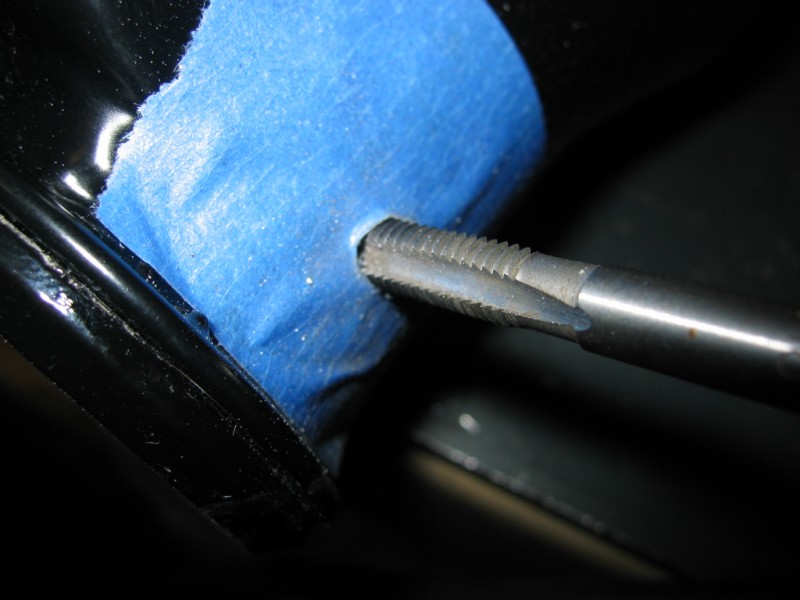 Simply remove the tape and screw in your zerk. 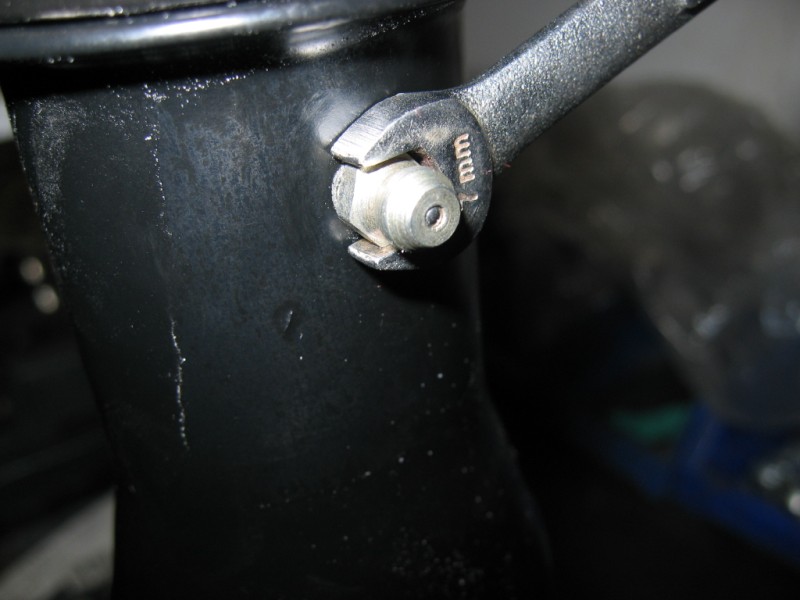 Done. 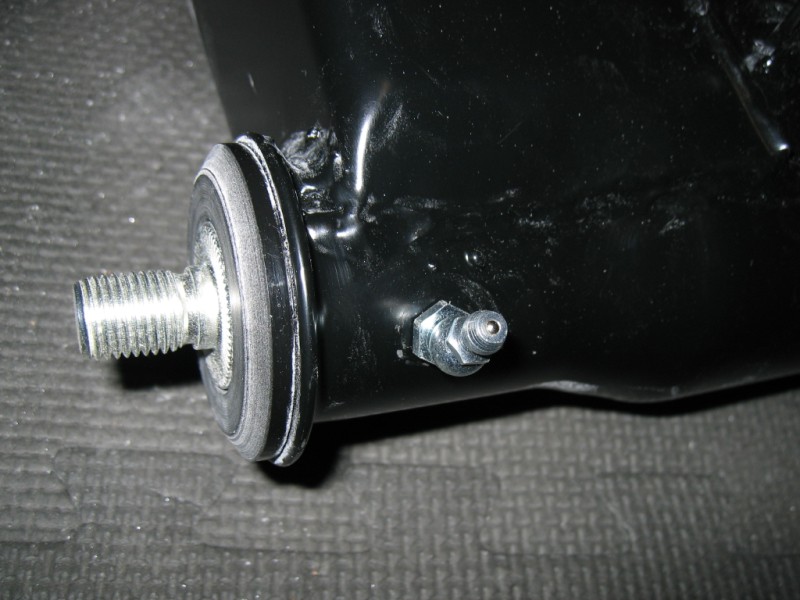 You now have a perfect set of hard Performance-Poly bushings. With a little grease every now and again you will have a trouble free, quiet ride. These bushings are the perfect hardness to provide precise control. When installed properly, they're free floating and non-binding which allows the suspension to work smoothly. Enjoy. |
   |

 
|
  |
Replies(1 - 19)
| ConeDodger |
Dec 22 2007, 11:58 PM
Post
#2
|
|
Apex killer! Group: Members Posts: 24,396 Joined: 31-December 04 From: Tahoe Area Member No.: 3,380 Region Association: Northern California |
Sweet!!!
|
|
|
|
| SirAndy |
Dec 23 2007, 12:29 AM
Post
#3
|
|
Resident German Group: Admin Posts: 42,469 Joined: 21-January 03 From: Oakland, Kalifornia Member No.: 179 Region Association: Northern California |
(IMG:style_emoticons/default/smilie_pokal.gif) good writeup Eric-Meister !!!
|
|
|
|
| daveyboybadion |
Dec 23 2007, 10:03 AM
Post
#4
|
|
Member Group: Members Posts: 108 Joined: 19-January 06 From: Seattle, WA Member No.: 5,437 Region Association: Pacific Northwest |
Eric, excellent tutorial. As I have recently purchased these bushings from you this info will be invaluable in the near future. Thanks...daveyboy
|
|
|
|
| Gint |
Dec 24 2007, 07:04 AM
Post
#5
|
|
Mike Ginter Group: Admin Posts: 16,106 Joined: 26-December 02 From: Denver CO. Member No.: 20 Region Association: Rocky Mountains |
What if the grease zirk is longer than the trailing arm wall and bushing are thick? In other words, what do you do if the zirk is too long and hits the shaft before you get it fully seated?
Do you want this to be a tech article? It would be pretty easy to convert since it's a thread. |
|
|
|
| daveyboybadion |
Dec 24 2007, 01:53 PM
Post
#6
|
|
Member Group: Members Posts: 108 Joined: 19-January 06 From: Seattle, WA Member No.: 5,437 Region Association: Pacific Northwest |
Gint, iffen you can't find the correct length zerk, you can always Red Loctite them at the proper depth as they don't have to seat in order to function. I vote for this thread to be archived as lots of us contemplate this farkle and can use the info...daveyboy
|
|
|
|
| scotty b |
Dec 24 2007, 02:00 PM
Post
#7
|
|
rust free you say ? Group: Members Posts: 16,375 Joined: 7-January 05 From: richmond, Va. Member No.: 3,419 Region Association: None |
Eric I unfortunately bought rears for my dads car befroe you got your in BUT I will still need fronts. Do you have any plans to offer fronts, and will you continue to offer the rears? I do have 2 more cars to do (IMG:style_emoticons/default/wacko.gif)
|
|
|
|
| Eric_Shea |
Dec 24 2007, 04:41 PM
Post
#8
|
|
PMB Performance Group: Admin Posts: 19,304 Joined: 3-September 03 From: Salt Lake City, UT Member No.: 1,110 Region Association: Rocky Mountains |
QUOTE What if the grease zirk is longer than the trailing arm wall and bushing are thick? This is not a problem on the 6m zerk. They just barely sit into the bushing. Any zerk I've seen in fact, would have a hard time going "through" the bushing. It would be a "very" large zerk for sure. the 6m zerks have about 5-6mm on the shaft and the control arm/bushing combo is 8-9mm. Another common zerk is the 1/4" zerk. You would use the same 13/64 bit but get a 1/4-28 tap (28 threads per inch -or- fine). These use a 3/8" wrench to screw them in. (I can supply these BTW...) QUOTE Do you have any plans to offer fronts, and will you continue to offer the rears? I do have 2 more cars to do Not sure. This company was a pain to deal with. But, once everything is all set up the second buy should be easier. I could do fronts if there's enough interest. It would probably have to be another 50 sets (200 units). Price would "probably" be the same. Regarding the rears. I have enough inventory now. You should just order a couple more sets and have them in wait for your other cars. They're available now and basically as cheap as these things get. |
|
|
|
| Eric_Shea |
Dec 24 2007, 04:43 PM
Post
#9
|
|
PMB Performance Group: Admin Posts: 19,304 Joined: 3-September 03 From: Salt Lake City, UT Member No.: 1,110 Region Association: Rocky Mountains |
|
|
|
|
| euro911 |
Jan 6 2008, 07:46 PM
Post
#10
|
|
Retired & living the dream. God help me if I wake up! Group: Members Posts: 8,937 Joined: 2-December 06 From: So.Cal. & No.AZ (USA) Member No.: 7,300 Region Association: Southern California |
(IMG:style_emoticons/default/mad.gif) Crap, I forgot to take notes ... can you go over all this again (IMG:style_emoticons/default/laugh.gif)
Thanks for the article Eric (IMG:style_emoticons/default/smilie_pokal.gif) |
|
|
|
| jim_hoyland |
Feb 23 2008, 12:47 PM
Post
#11
|
|
Get that VIN ? Group: Members Posts: 10,041 Joined: 1-May 03 From: Sunset Beach, CA Member No.: 643 Region Association: Southern California |
Got a question about how tight the fit should be. I honed the bushing, they slide with ease over the long bolts; but when I install into the trailing arm, its really tight. Had to use a wooden mallet-lightly. I pulled them out and greased the bushings and bolts, still pretty tight. Seems like the short end of the trailing arm causes the tighness.
Suggestions ? |
 |
|
| Eric_Shea |
Feb 23 2008, 01:34 PM
Post
#12
|
|
PMB Performance Group: Admin Posts: 19,304 Joined: 3-September 03 From: Salt Lake City, UT Member No.: 1,110 Region Association: Rocky Mountains |
Both the honing process and the trailing arms are not what I would call scientifically symmetrical. I mentioned above:
**Once the assembly is back in the control arm, they can tighten up a bit more (depending on the fit in your individual control arm... remember, they're all slightly different).** Once you have the bushings in the arms you may need to do some final "touch-up" with the hone. Watch as you place the rod into the second bushing. Look at the direction it naturally travels. Flip it around and then put the rod in from the other side. A light amount of honing should be all that is needed. One other thing that has come up with two customers so far; You may need shim stock on some arms. I sent John some of the extra shims I had laying around from some of our Elephant bushing installs and that seemed to do the trick. It seems that aluminum at .003" or .004" may be perfect: www.mcmaster.com Stock #9536K13 |
|
|
|
| jim_hoyland |
Feb 23 2008, 02:59 PM
Post
#13
|
|
Get that VIN ? Group: Members Posts: 10,041 Joined: 1-May 03 From: Sunset Beach, CA Member No.: 643 Region Association: Southern California |
Got it, thanks. : Should I be able to turn the rod when the rod and bushings are assembled into the TA ? Seems like I should---I don't want to over hone the bushing.
Lastly, when I exchange the trailing arms: Do I only have to remove the nuts and pull the TA out--or do I have to remove the end bracket(s) ? Jim |
|
|
|
| Eric_Shea |
Feb 23 2008, 03:38 PM
Post
#14
|
|
PMB Performance Group: Admin Posts: 19,304 Joined: 3-September 03 From: Salt Lake City, UT Member No.: 1,110 Region Association: Rocky Mountains |
QUOTE Should I be able to turn the rod when the rod and bushings are assembled into the TA ? Yes. Not a free "spin" but it should turn. Keep in mind, the weight of the vehicle will have it's way with it. QUOTE when I exchange the trailing arms: Do I only have to remove the nuts and pull the TA out--or do I have to remove the end bracket(s) ? You'll need to remove that end bracket as the rod extends past both openings... no way to slide it out. |
|
|
|
| jim_hoyland |
Mar 9 2008, 01:43 PM
Post
#15
|
|
Get that VIN ? Group: Members Posts: 10,041 Joined: 1-May 03 From: Sunset Beach, CA Member No.: 643 Region Association: Southern California |
Worked out pretty good. Got the bushings in, Zics, New hub bearings and ready for Phase II..
Attached image(s) 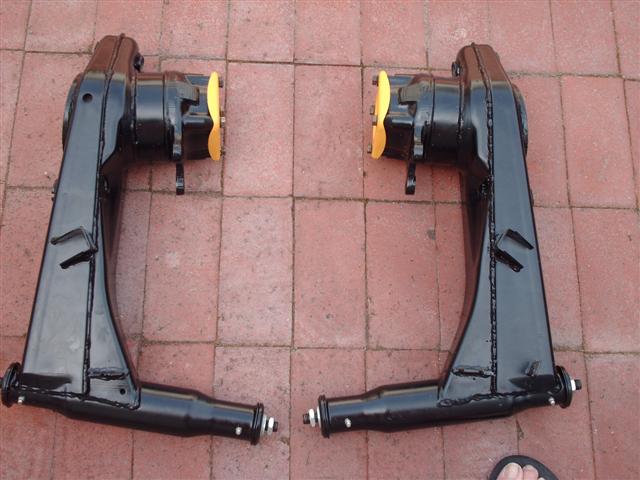
|
|
|
|
| Eric_Shea |
Mar 9 2008, 02:23 PM
Post
#16
|
|
PMB Performance Group: Admin Posts: 19,304 Joined: 3-September 03 From: Salt Lake City, UT Member No.: 1,110 Region Association: Rocky Mountains |
Bearing caps are on upside down and cut your toe nails. (IMG:style_emoticons/default/biggrin.gif)
Wondering (worried) about the position of the outer bleeder... (IMG:style_emoticons/default/confused24.gif) Did you check the location of the outer mount before putting them there? Looks great otherwise! (IMG:style_emoticons/default/smilie_pokal.gif) |
|
|
|
| John |
Mar 9 2008, 02:27 PM
Post
#17
|
|
member? what's a member? Group: Members Posts: 3,393 Joined: 30-January 04 From: Evansville, IN (SIRPCA) Member No.: 1,615 Region Association: None |
E.
A picture showing both zerks installed into the trailing arm where they won't interfere with anything could really help complete the thread. Thanks in advance. |
|
|
|
| Eric_Shea |
Mar 9 2008, 02:33 PM
Post
#18
|
|
PMB Performance Group: Admin Posts: 19,304 Joined: 3-September 03 From: Salt Lake City, UT Member No.: 1,110 Region Association: Rocky Mountains |
Noticed that while leafing through the past posts... (IMG:style_emoticons/default/blink.gif)
|
|
|
|
| jim_hoyland |
Mar 9 2008, 03:16 PM
Post
#19
|
|
Get that VIN ? Group: Members Posts: 10,041 Joined: 1-May 03 From: Sunset Beach, CA Member No.: 643 Region Association: Southern California |
QUOTE(Eric_Shea @ Mar 9 2008, 01:23 PM)  Bearing caps are on upside down and cut your toe nails. (IMG:style_emoticons/default/biggrin.gif) They look so nice that way (IMG:style_emoticons/default/smile.gif) ; will reverse, thanks. Toe nails are scheduled for pm (IMG:style_emoticons/default/biggrin.gif) QUOTE Wondering (worried) about the position of the outer bleeder... (IMG:style_emoticons/default/confused24.gif) Did you check the location of the outer mount before putting them there? I was looking at the pictures from the post and thought they looked like the same position. Am I was off on those ? Are they going to interfere with the mounting, or just be inaccessible ? QUOTE Looks great otherwise! (IMG:style_emoticons/default/smilie_pokal.gif) Fun project, learned how hard getting those bearing is like... (IMG:style_emoticons/default/sad.gif) Attached image(s) 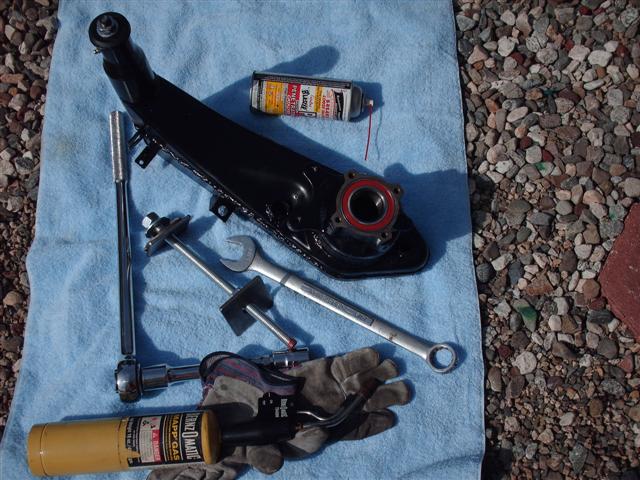
|
|
|
|
| Eric_Shea |
Mar 9 2008, 03:32 PM
Post
#20
|
|
PMB Performance Group: Admin Posts: 19,304 Joined: 3-September 03 From: Salt Lake City, UT Member No.: 1,110 Region Association: Rocky Mountains |
QUOTE Are they going to interfere with the mounting, or just be inaccessible ? Possibly both? (IMG:style_emoticons/default/confused24.gif) I'll mark up your last picture to show where I mount the outer zerk. Your inside zerk looks fine. I like to mount the outside zerk smack-dab in the middle of the tube in relationship to the rest of the arm:  |
|
|
|
|
1 User(s) are reading this topic (1 Guests and 0 Anonymous Users)
0 Members:

|
Lo-Fi Version | Time is now: 2nd April 2026 - 02:54 PM |
Invision Power Board
v9.1.4 © 2026 IPS, Inc.