|
|
|
Porsche, and the Porsche crest are registered trademarks of Dr. Ing. h.c. F. Porsche AG.
This site is not affiliated with Porsche in any way. Its only purpose is to provide an online forum for car enthusiasts. All other trademarks are property of their respective owners. |
|
|

  |

| Spoke |
 Aug 11 2008, 10:16 PM Aug 11 2008, 10:16 PM
Post
#21
|
|
Jerry  Group: Members Posts: 7,398 Joined: 29-October 04 From: Allentown, PA Member No.: 3,031 Region Association: None |
Started to reassemble the distributor and noticed the grounding wire for the advance plate was broken off. I couldn't figure out how to reattach the wire to the advance plate so I made a little wire connector and used a small length of flexible teflon wire. The wire connector will go under the screw for the points and the other end under the hold-down fastener for the advance plate.
Attached image(s) 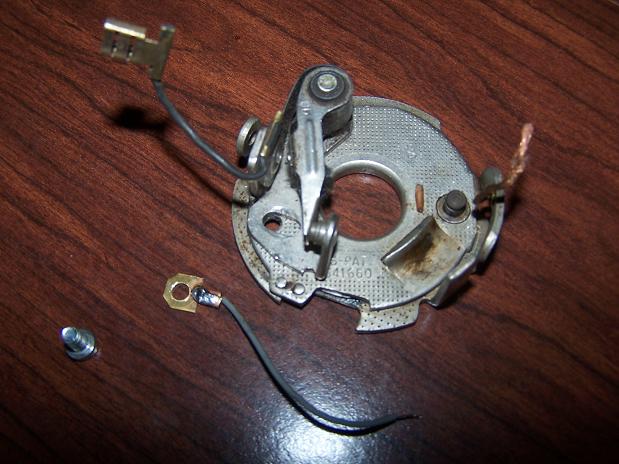
|
   |

 
|
| Spoke |
Aug 11 2008, 10:25 PM
Post
#22
|
|
Jerry Group: Members Posts: 7,398 Joined: 29-October 04 From: Allentown, PA Member No.: 3,031 Region Association: None |
When I installed the distributor, I noticed that when at TDC, the distributor was not pointing to the #1 spark wire. Turns out the distibutor drive was off by about 180 degrees. So to double check TDC, I had to pull the valve cover.
Once at TDC, I used a dowel rod to remove the distributor drive and set correctly. Attached image(s) 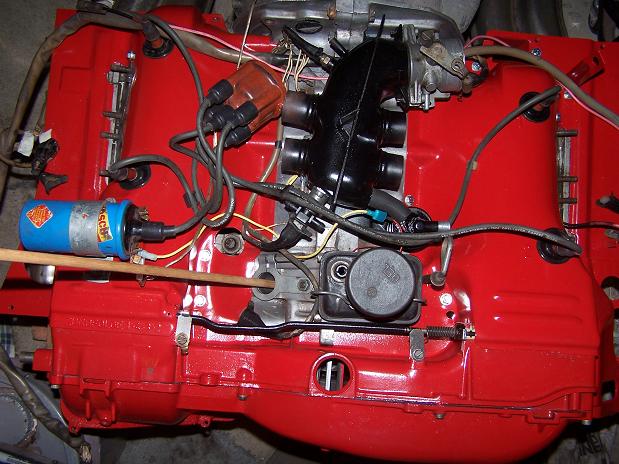
|
|
|
|
| Spoke |
Aug 11 2008, 10:32 PM
Post
#23
|
|
Jerry Group: Members Posts: 7,398 Joined: 29-October 04 From: Allentown, PA Member No.: 3,031 Region Association: None |
Got all the FI stuff on the engine that is needed to fire it up. I'll use the red 914 to provide the fuel from its tank. I have long hoses to run the feed and return to the engine which is sitting beside the car.
I connected the return line to the pump and it started leaking badly. So I tried a second pump that had a marginal leak (a drop an hour) and it too leaked badly. The leak in both came out through the electrical connector. On both pumps, I had just the return line connected, not the feed. Dammit. Looks like I'm in the market for a new fuel pump. Attached image(s) 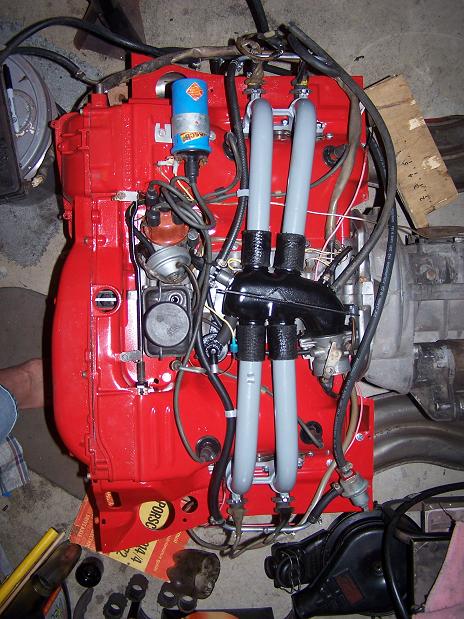
|
|
|
|
| Spoke |
Sep 6 2008, 11:22 AM
Post
#24
|
|
Jerry Group: Members Posts: 7,398 Joined: 29-October 04 From: Allentown, PA Member No.: 3,031 Region Association: None |
Woo Hoo! (IMG:style_emoticons/default/piratenanner.gif)
it is alive. Running on FI now and sounds good. Still have an issue with the points as I think I installed a used set and they were dirty and/or not adjusted properly. No spark at first. Readjusted and cleaned them and it runs good. Starts right up and idles nicely. Haven't run it for more than a minute for a good reason: The engine exhaust is pointing to an interior wall and I get gassed out quickly. Open all doors and windows and leave for 1/2 hour or so. Got a box fan in the window pointing in but still got to move the engine. I'll put the engine back on a furniture dolly so I can move it around and point the exhaust out the garage door. Here's the current setup. The Optima powers the engine. The jumper cables provide heavy current to the starter. The battery charger keeps the battery charged as I haven't installed the alternator yet. I'll pull the alternator out of the car and decide which alternator to use at that time. The orange wire leading to the engine power the FI brain. This is the same harness I used to test just the brain and FI equipment. 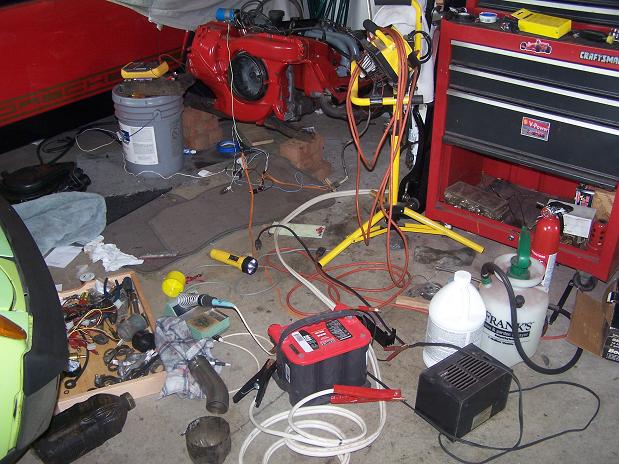 The brain is sitting on a bucket right now. The bracket for the brain is heavily rusted so I don't know how I'll mount it yet. I don't want to do much work like grinding on the brain as to cause internal damage. The fuel pump takes fuel (and returns it) using the existing connections in the red car. I'll be putting in SS center lines when the engine comes out. The pump is powered by the brain through a relay sitting on the floor in front of the fan. 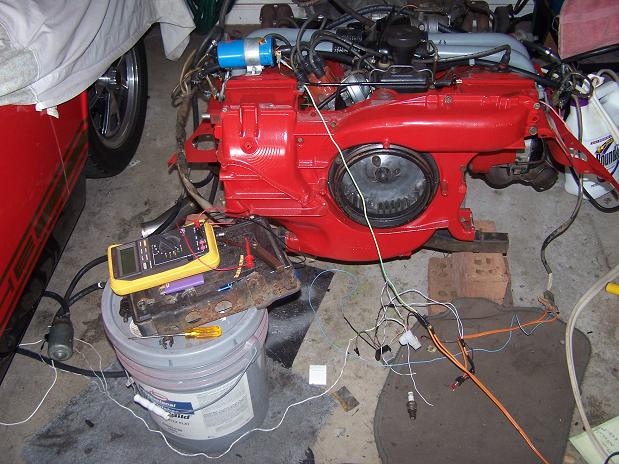 Installed the stock muffler from the red car. Initially I had run the engine with no muffler and it was loud. Installed the muffler hanger too to hold the SSHE in place. Right behind the starter is a toggle switch to energize the coil and a push button switch to turn the starter on. I didn't connect the FI brain input to the starter so when I hit the starter, I have to also press a pushbutton on the FI temporary harness so the injectors fire longer during starting. Benefit of having a separate "starter" switch on the FI harness is I can press the FI harness "starter" button if the engine starts to die, giving the injectors a longer duration and keeping the engine running. Sort of like choking a carbed engine. 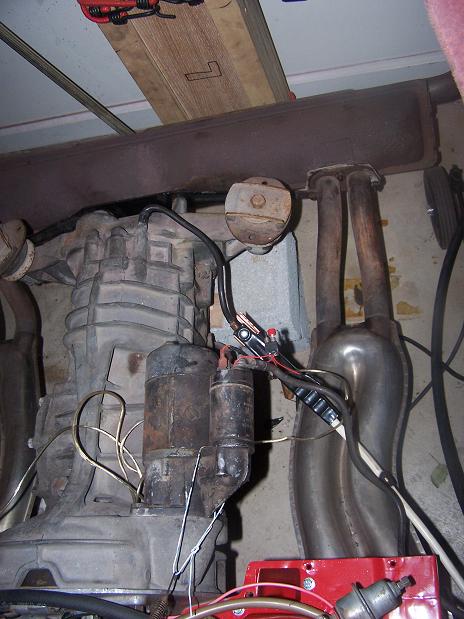 The only items left to mount for the FI are the decel valve and air cleaner. 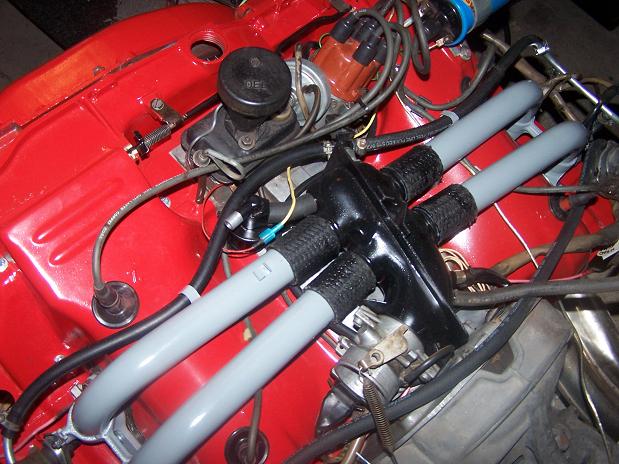 |
|
|
|
| Spoke |
Sep 8 2008, 11:20 PM
Post
#25
|
|
Jerry Group: Members Posts: 7,398 Joined: 29-October 04 From: Allentown, PA Member No.: 3,031 Region Association: None |
Put the engine on a furniture dolly today. Now I can move it towrds the door and do more long term running.
Ran the engine for 5 minutes today. Starts right up. Idles nicely. Revvs good. Ran it long enough to burn some of the residual oil off of the SSHE. Both smoked at first then stopped after a few minutes. Got the red car ready for its lobotomy. Attached image(s) 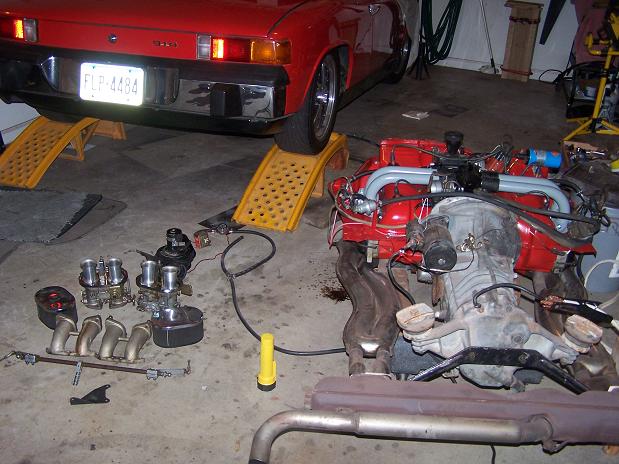
|
|
|
|
| Spoke |
Sep 8 2008, 11:22 PM
Post
#26
|
|
Jerry Group: Members Posts: 7,398 Joined: 29-October 04 From: Allentown, PA Member No.: 3,031 Region Association: None |
Started removing stuff from the engine. These IDF40s and hardware will be for sale now that the new engine is running good on FI.
Attached image(s) 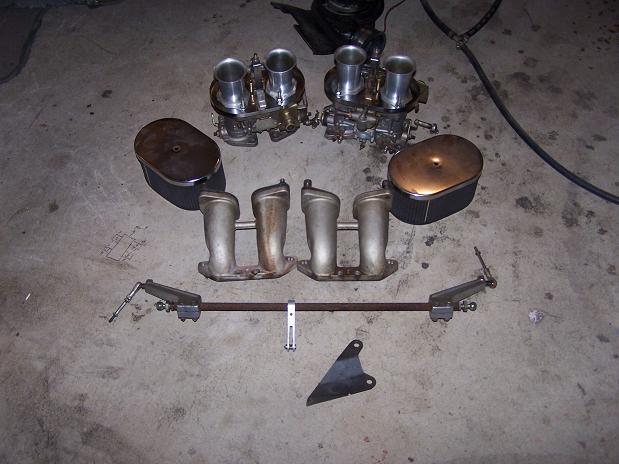
|
|
|
|
| Spoke |
Sep 15 2008, 03:23 PM
Post
#27
|
|
Jerry Group: Members Posts: 7,398 Joined: 29-October 04 From: Allentown, PA Member No.: 3,031 Region Association: None |
My first engine drop. Piece of cake. Put my floor jack under the bottom rear of the engine, removed the front and rear bolts and drop. One hand turning the jack handle and the other hand balancing the tranny.
Does anyone want a 1.7L engine? I have no use for this lump. Attached image(s) 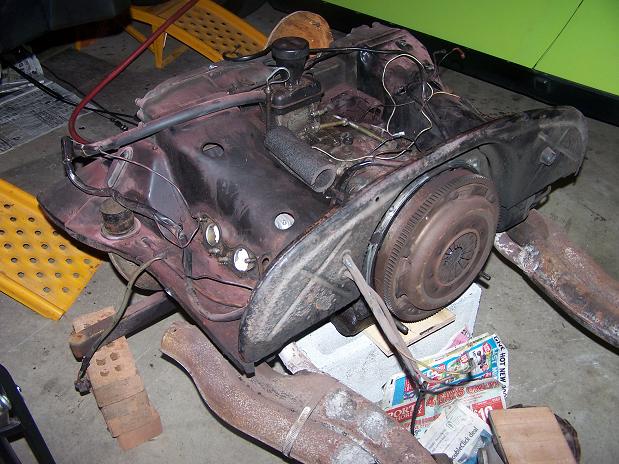 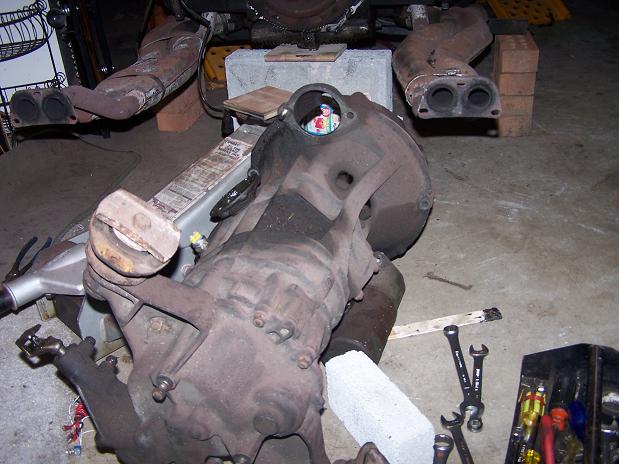
|
|
|
|
| Spoke |
Sep 15 2008, 03:26 PM
Post
#28
|
|
Jerry Group: Members Posts: 7,398 Joined: 29-October 04 From: Allentown, PA Member No.: 3,031 Region Association: None |
The while-I'm-in-there syndrom will include SS fuel lines and clutch tube repair. You can see in this pic how I supported my rusted out firewall around the clutch tube. A little angle iron and U-bolt kept the clutch tube from joining me in the interior. This repair held for 2+ years.
Attached image(s) 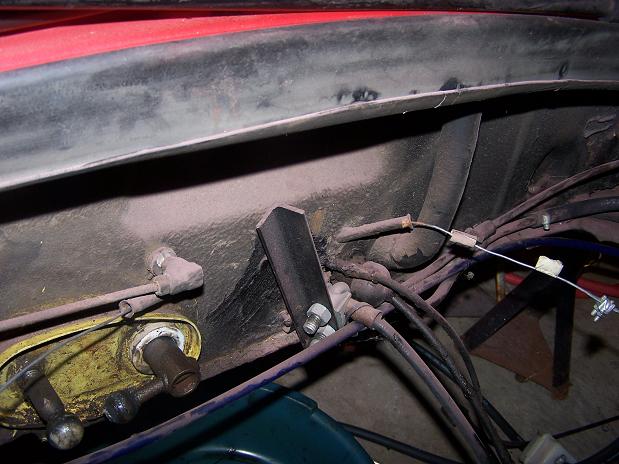
|
|
|
|
| Spoke |
Apr 7 2009, 06:10 PM
Post
#29
|
|
Jerry Group: Members Posts: 7,398 Joined: 29-October 04 From: Allentown, PA Member No.: 3,031 Region Association: None |
Started work on reinforcing the longs. The repair done before was basically overlay a piece of steel over the bottom and outside of the rusted out long. The bottom of the outside piece is seam welded to the added bottom piece but the top was mostly left unattached to the top of the existing rusted out long.
Attached image(s) 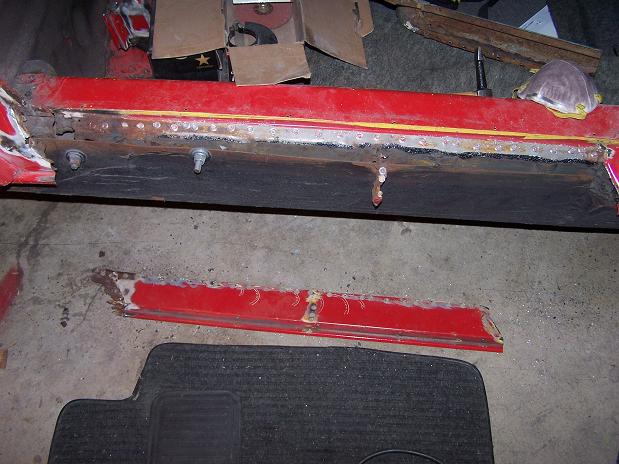 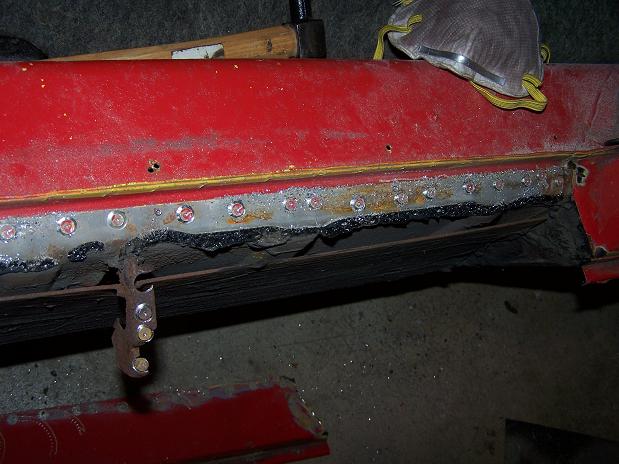
|
|
|
|
| Spoke |
Apr 7 2009, 06:34 PM
Post
#30
|
|
Jerry Group: Members Posts: 7,398 Joined: 29-October 04 From: Allentown, PA Member No.: 3,031 Region Association: None |
Cut the lower part of the fender off. The door jamb was rusted out so I have a replacement piece to put back on.
The bolts where put on by me when I realized that the top of the long was not welded. The bolts tightened up the longs a good bit. The top of the outside long is completely rusted away under the door jamb. The inner fender is a replacement piece. The original inner wall was rusted away and this piece was welded only from inside the engine compartment. The suspension console has been replaced too. Attached image(s) 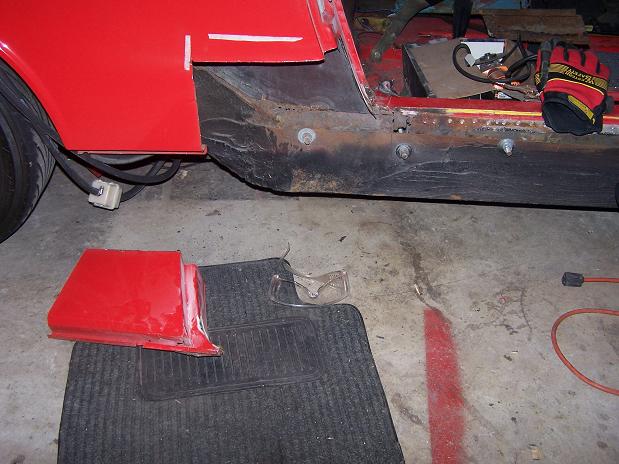 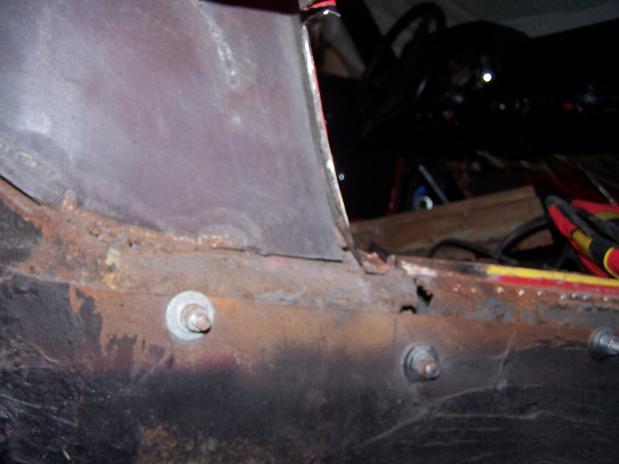
|
|
|
|
| barada |
Apr 7 2009, 06:46 PM
Post
#31
|
|
Member Group: Members Posts: 257 Joined: 5-October 08 From: Atlanta Member No.: 9,613 Region Association: None |
QUOTE(Spoke @ Apr 7 2009, 08:34 PM)  Cut the lower part of the fender off. The door jamb was rusted out so I have a replacement piece to put back on. The bolts where put on by me when I realized that the top of the long was not welded. The bolts tightened up the longs a good bit. The top of the outside long is completely rusted away under the door jamb. The inner fender is a replacement piece. The original inner wall was rusted away and this piece was welded only from inside the engine compartment. The suspension console has been replaced too. Nice thread. I am trying to pick up a non running 1.7 car now, interesting to see your rebuild. |
|
|
|
| Spoke |
Jun 1 2009, 09:45 PM
Post
#32
|
|
Jerry Group: Members Posts: 7,398 Joined: 29-October 04 From: Allentown, PA Member No.: 3,031 Region Association: None |
There is basically nothing left of the lower part of this long from the front to the rear. In this area there was nothing left of the top outer long. This will be replaced with a new piece.
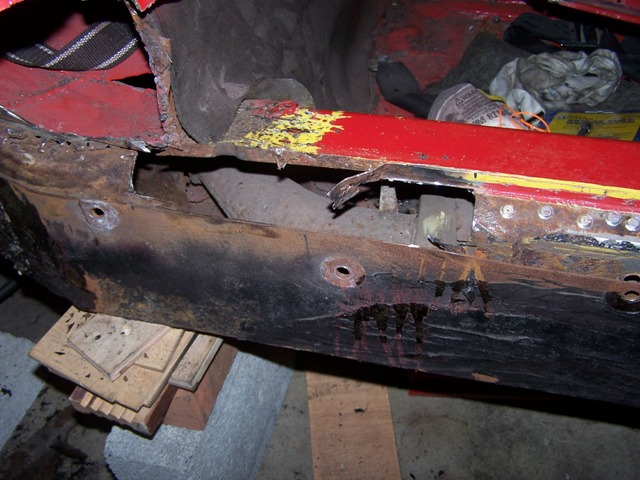 Here is the hell hole from the outside looking in. The black metal inner fender is a replacement piece that was welded from the inside but not outside. So I cut off the bottom of the piece to rebuild all of the metal of the inner fender and weld all seams that I can. Notice the rust through on the outer suspension pickup. This is before I started poking it with my screwdriver. 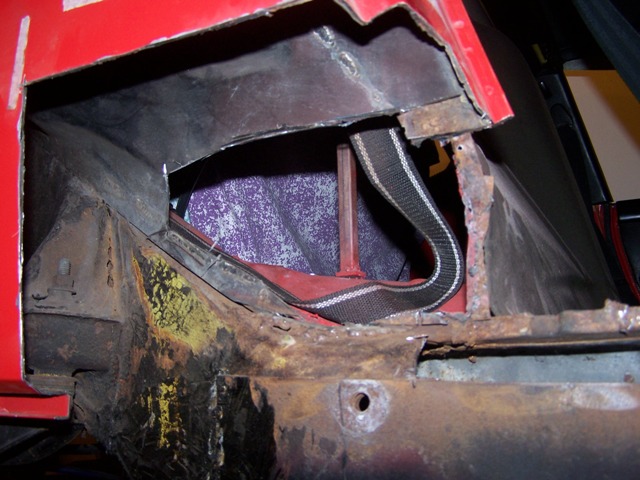 This is the front of the 16 gauge plate that replaces the outer long panel. It is attached to the chassis only about 1/2 way up the plate as the previous work was done with the sill plate still attached. This will all be welded up. 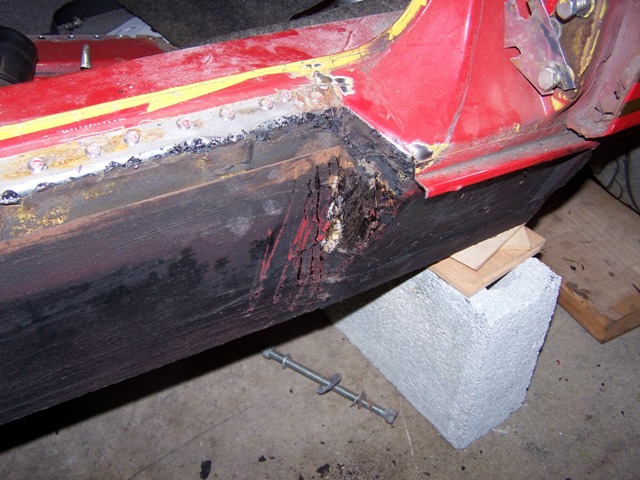 Here is the plate looking straight down. The entire top of the plate was not welded to anything. The top of the original long was basically loose on the outside. 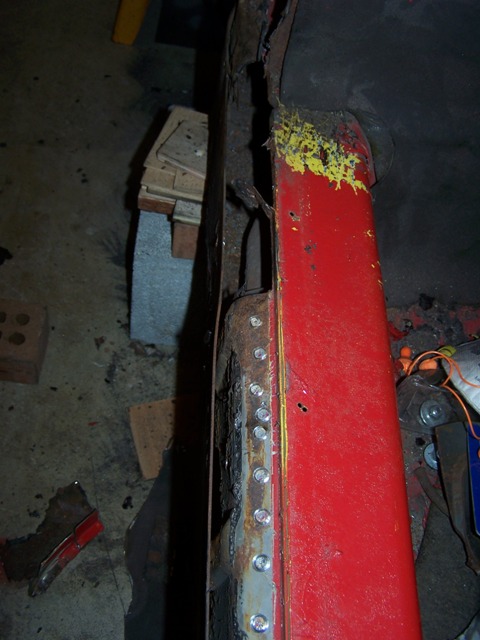 |
|
|
|
| Spoke |
Jun 1 2009, 09:57 PM
Post
#33
|
|
Jerry Group: Members Posts: 7,398 Joined: 29-October 04 From: Allentown, PA Member No.: 3,031 Region Association: None |
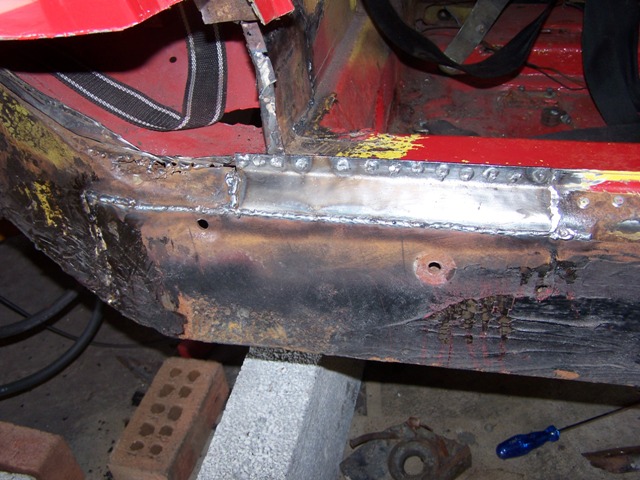
Preparing to weld the steel plate to the existing long metal. The plate will be welded at the rear and on each of the ribs of the existing outer long. The bottom of the outer long is gone so the vertical clamp is setting the height of the long before I weld.
Before doing any welding, I replaced the door to make sure it closed properly. When welding on the steel plate, I welded in one place and waited for the plate to cool as to not deform the long. 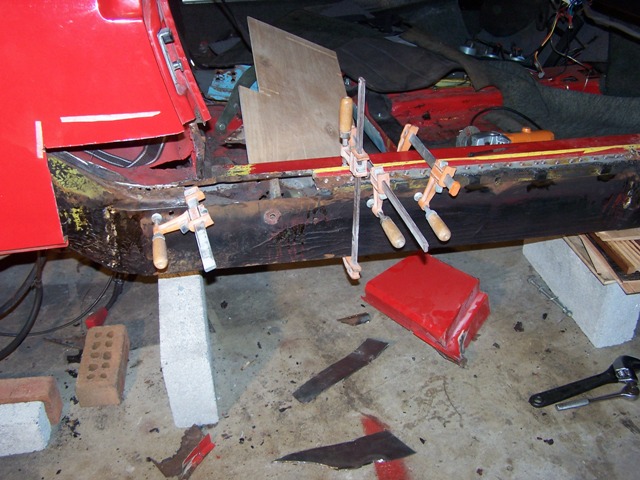 This plate was welded from the hell hole but not edge welded from the cabin. I edge welded it from the cabin. 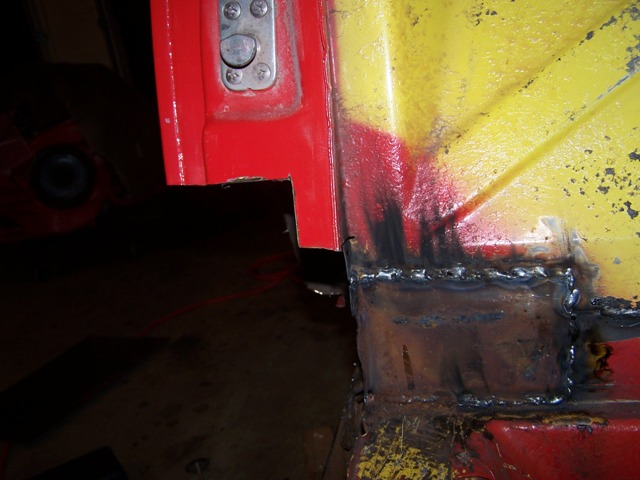 The rear of the plate is now welded. Notice the suspension pickup after poking with a screwdriver. Not sure what I want to do with this yet. The inner suspension pickup has already been replaced with a new piece. 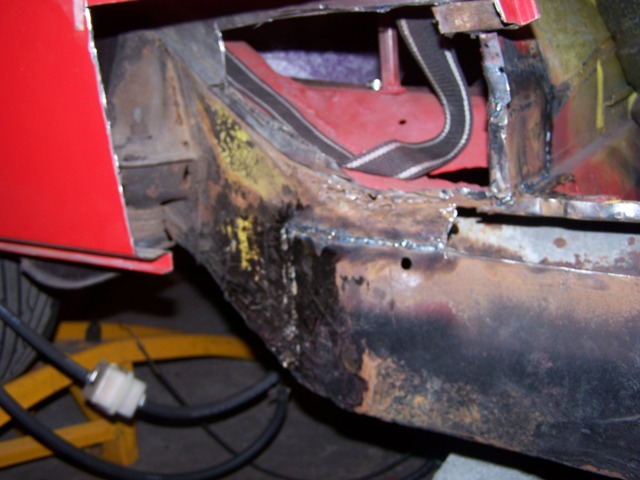 The new plate is being welded on. I welded a small section then let it cool so as not to deform the metal. 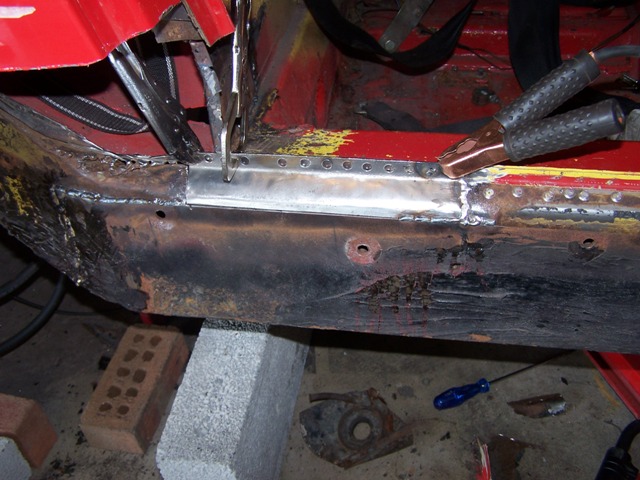 |
|
|
|
| Spoke |
Jun 1 2009, 11:01 PM
Post
#34
|
|
Jerry Group: Members Posts: 7,398 Joined: 29-October 04 From: Allentown, PA Member No.: 3,031 Region Association: None |
I would make more progress on the 914 if I didn't play with this toy as much. It says "turbo" on the back but it should really say "WOW". This car has some giddyup with its 282HP when the turbo kicks in above 3K RPM.
Attached image(s) 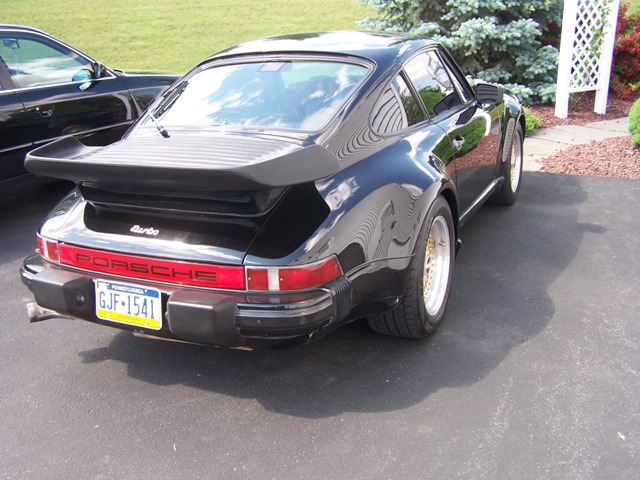
|
|
|
|
| Spoke |
Jun 1 2009, 11:06 PM
Post
#35
|
|
Jerry Group: Members Posts: 7,398 Joined: 29-October 04 From: Allentown, PA Member No.: 3,031 Region Association: None |
The replacement plate is welded in. Like the steel plate, this is 16 gauge steel. I have an Engman's interior long kit to install also.
 Now all the ribs are welded on top to the steel plate. Also made small fill plates and welded them. I will add ribs on the steel plate from angle iron next. It doesn't look pretty but it sure is strong now. Luckily I have rocker panels to cover this mess. 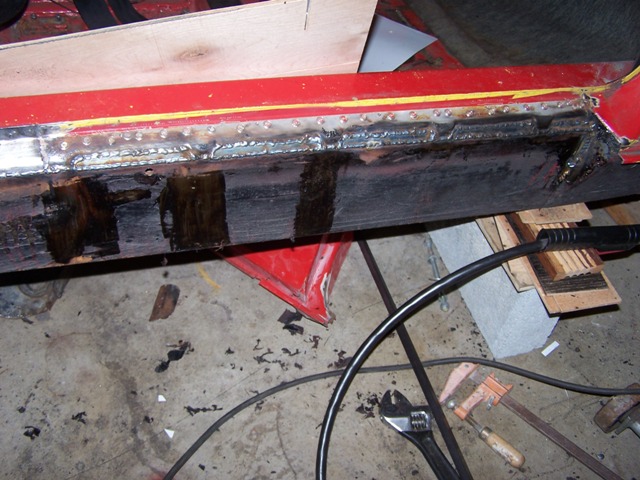 |
|
|
|
| Spoke |
Jun 4 2009, 09:36 PM
Post
#36
|
|
Jerry Group: Members Posts: 7,398 Joined: 29-October 04 From: Allentown, PA Member No.: 3,031 Region Association: None |
Here's a fix I did a while back when I was refurbishing the packpad. 3 of the 4 clips were gone and the fourth was just hanging on. The PO had used some screws into the backpad and into the firewall to hold the backpad in place.
So I got some old steel from a junked PC case and mounted my own brackets made from some heavy steel straps. Then bolted on the PC case steel onto the backpad. Attached image(s) 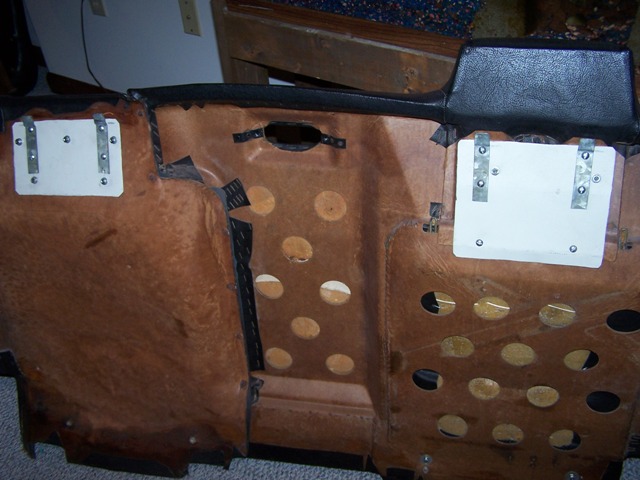 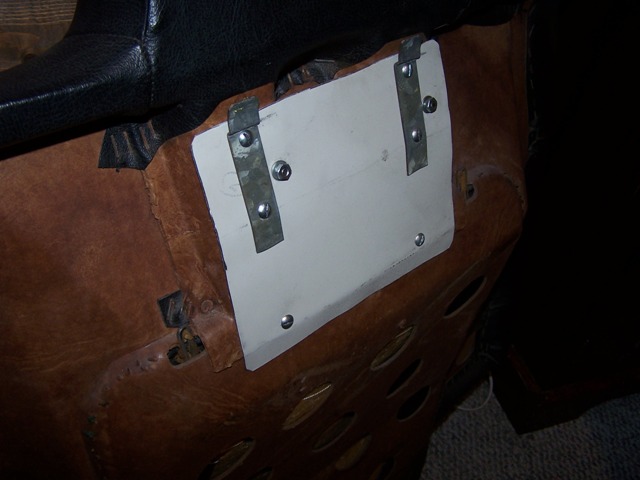
|
|
|
|
| Spoke |
Jun 7 2009, 08:59 AM
Post
#37
|
|
Jerry Group: Members Posts: 7,398 Joined: 29-October 04 From: Allentown, PA Member No.: 3,031 Region Association: None |
Removed all the tar on the passenger side floor. It comes off real easy with a heat gun. This job is probably best done in the winter time as it gets real hot with the gun on.
The front floor pan is in good shape with minimal surface rust. The back pan is not so good with several rust through holes. The 2 putty knifes are sticking in the rusted out part of the lower firewall. Attached image(s) 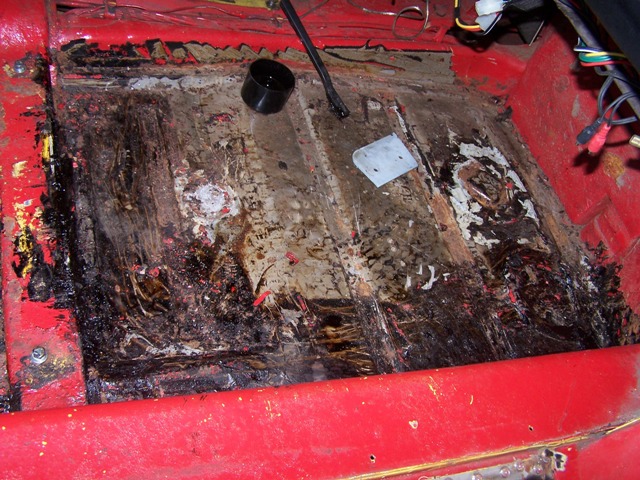 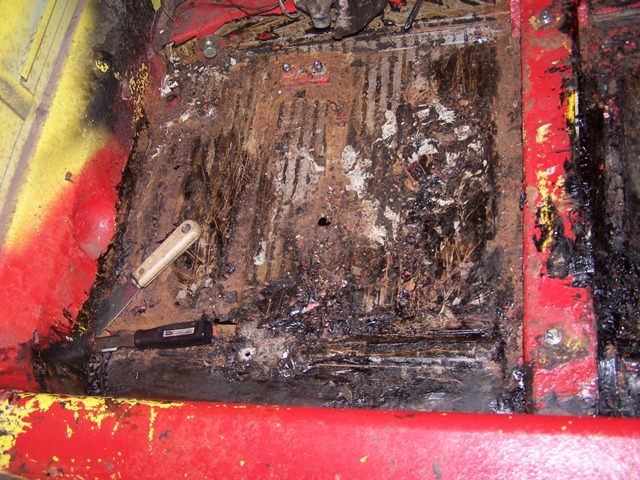
|
|
|
|
| Spoke |
Jun 7 2009, 09:03 AM
Post
#38
|
|
Jerry Group: Members Posts: 7,398 Joined: 29-October 04 From: Allentown, PA Member No.: 3,031 Region Association: None |
The inside long has been patched from front to back. The patch has only been spot brazed. I'll seam weld the all the patches, then install the Engman's inner long kit.
Question: what is the best solvent to remove the remaining tar? I used a wire brush and mineral spirits to get it partially cleaned. Attached image(s) 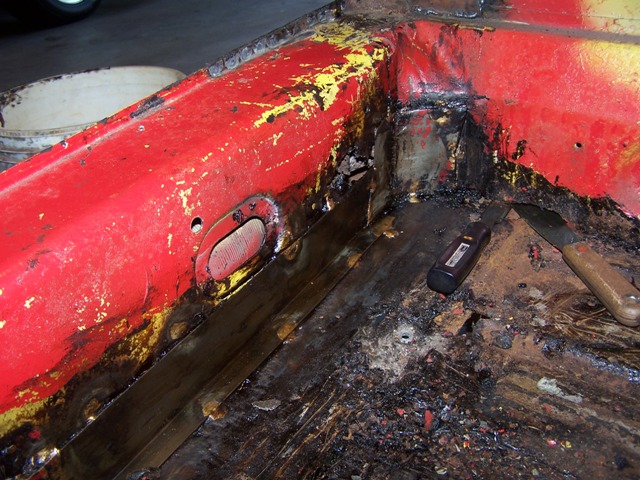 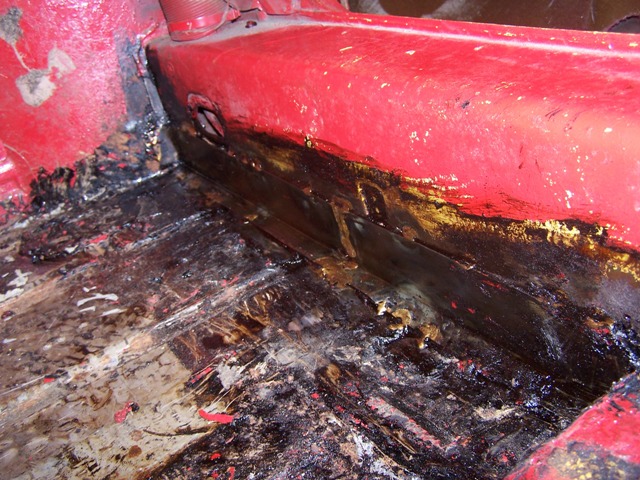
|
|
|
|
| charliew |
Jun 7 2009, 12:35 PM
Post
#39
|
|
Advanced Member Group: Members Posts: 2,363 Joined: 31-July 07 From: Crawford, TX. Member No.: 7,958 |
Where the door gaps still good before you started? Boy there wasn't much support there.
|
|
|
|
| Spoke |
Jul 18 2009, 08:43 AM
Post
#40
|
|
Jerry Group: Members Posts: 7,398 Joined: 29-October 04 From: Allentown, PA Member No.: 3,031 Region Association: None |
Got the gas tank and center fuel lines out today.
I'll be replacing the plastic fuel lines with steel ones from Racer Chris. Once out, I wanted to stress the plastic fuel lines to see if they were hardened. I proceeded to twist them, flex them, and bent them until they creased. These lines are very soft and supple. Some have argued that the plastic tunnel lines are not a fire hazard. These fuel lines would tend to support that theory. At any rate, I'll be replacing them with steel lines. Attached image(s) 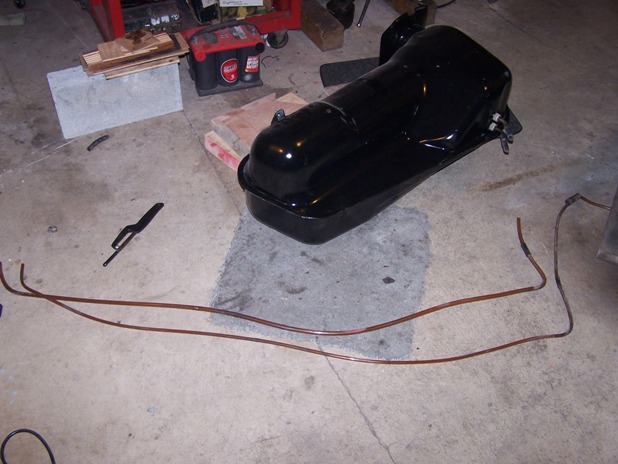
|
|
|
|
|
1 User(s) are reading this topic (1 Guests and 0 Anonymous Users)
0 Members:

|
Lo-Fi Version | Time is now: 10th June 2026 - 09:59 AM |
Invision Power Board
v9.1.4 © 2026 IPS, Inc.