|
|
|
Porsche, and the Porsche crest are registered trademarks of Dr. Ing. h.c. F. Porsche AG.
This site is not affiliated with Porsche in any way. Its only purpose is to provide an online forum for car enthusiasts. All other trademarks are property of their respective owners. |
|
|

  |

| strawman |
 Apr 18 2010, 06:22 PM Apr 18 2010, 06:22 PM
Post
#121
|
|
Senior Member  Group: Members Posts: 891 Joined: 25-January 08 From: Los Osos, CA Member No.: 8,624 Region Association: Central California |
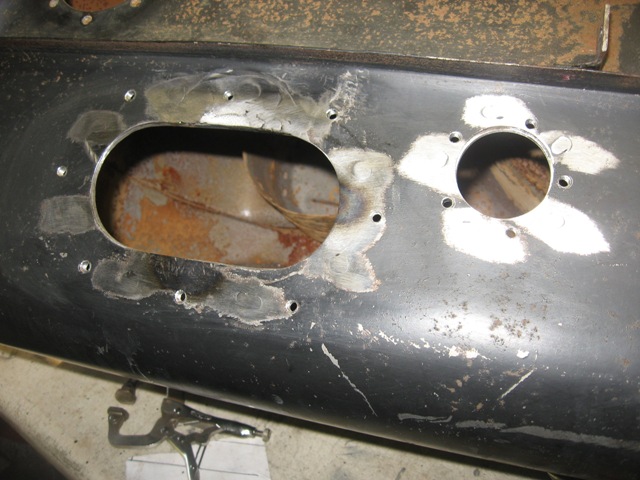
The next pic shows the rings welded into the inside of the tank, as well as the plug welded in (at twelve o'clock) to fill in the remaining portion of the factory 914 fuel level sender hole. I also drilled the mounting screw holes and tapped them, using an m5 x 0.8 screws. You can also see the areas that I had to shrink (heat up & quick chill) to provide a flat mounting area for the fuel pump.
 Finally, here is a pic of the fuel pump and sender mocked up. 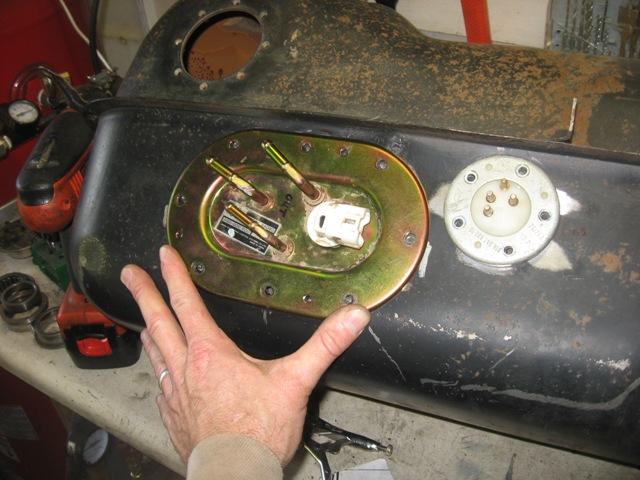 I still need to send the modified tank out to get treated/sealed. Then I'll paint the outside with epoxy primer and paint it SEM Trim satin black. I still need to fabricate plugs to seal up the factory 914 bottom tank outlets. |
   |

 
|
| BIGKAT_83 |
Apr 18 2010, 06:39 PM
Post
#122
|
|
Senior Member Group: Members Posts: 1,800 Joined: 25-January 03 From: Way down south Bogart,GA Member No.: 194 Region Association: South East States |
Strawman I had done the one for my Subaru conversion last year. I must have a different subaru mount. I didn't need to mod it to fit the 914 sump at all. It line up perfect and the subaru fuel level sender even works with a full stroke,but does read backwards from the 914 one. It reads empty with a full tank.
 Bob |
|
|
|
| rickthejetman |
Apr 18 2010, 07:13 PM
Post
#123
|
|
Member Group: Members Posts: 90 Joined: 5-May 09 From: victorville ,ca Member No.: 10,335 Region Association: None |
any reason you guys went with the in tank pump instead of the inline?
|
|
|
|
| strawman |
Apr 18 2010, 07:57 PM
Post
#124
|
|
Senior Member Group: Members Posts: 891 Joined: 25-January 08 From: Los Osos, CA Member No.: 8,624 Region Association: Central California |
QUOTE(BIGKAT_83 @ Apr 18 2010, 05:39 PM)  Strawman I had done the one for my Subaru conversion last year. I must have a different subaru mount. I didn't need to mod it to fit the 914 sump at all. It line up perfect and the subaru fuel level sender even works with a full stroke,but does read backwards from the 914 one. It reads empty with a full tank. Bob Hi Bob -- Interesting. Is that the fuel pump setup from an SVX? I checked the ones for Imprezas and Legacies at local pick-n-pull type places, but couldn't find an SVX to see if it would work better. So I decided to modify the turbo Legacy fuel pump that I already had. I also decided to scrap the idea of the Suby fuel level sender, since I know the 914 sender "talks" to the 914 gauge... the mods I made to the fuel pump bracket also interfered with the Suby sender and made it impossible to fit inside the oblong hole. Any updates on your project? I was in Athens last week -- I wish I thought to look up Athens-area teeners before I left. I woulda liked to have seen your project. Geoff |
|
|
|
| strawman |
Apr 18 2010, 07:58 PM
Post
#125
|
|
Senior Member Group: Members Posts: 891 Joined: 25-January 08 From: Los Osos, CA Member No.: 8,624 Region Association: Central California |
QUOTE(rickthejetman @ Apr 18 2010, 06:13 PM) any reason you guys went with the in tank pump instead of the inline? I wanted to use the Suby fuel pump because I know it communicates with the Suby ECU, and it also matches the return lines that Subaru installed from the factory. I suppose that an inline fuel pump would work... |
|
|
|
| al weidman |
Apr 18 2010, 10:45 PM
Post
#126
|
|
Al Weidman Group: Members Posts: 156 Joined: 22-February 08 From: Oroville, Ca. Member No.: 8,736 Region Association: Northern California |
Looks really good Geoff, lots of little special projects coming together. I'm going to start stripping stuff off my car to get ready for the rotissorie. I busted the windshield already, it must have been too cold. Maybe I could come by the weekend of the trip to Mark's and check out your progress. Al.
|
|
|
|
| strawman |
Apr 20 2010, 09:56 AM
Post
#127
|
|
Senior Member Group: Members Posts: 891 Joined: 25-January 08 From: Los Osos, CA Member No.: 8,624 Region Association: Central California |
QUOTE(al weidman @ Apr 18 2010, 09:45 PM) Looks really good Geoff, lots of little special projects coming together. I'm going to start stripping stuff off my car to get ready for the rotissorie. I busted the windshield already, it must have been too cold. Maybe I could come by the weekend of the trip to Mark's and check out your progress. Al. Sounds good, Al. I plan to help out on the Limo project on May 1, too. Sorry to hear that you broke your windshield... Geoff |
|
|
|
| Justinp71 |
Apr 20 2010, 12:20 PM
Post
#128
|
|
Senior Member Group: Members Posts: 1,647 Joined: 11-October 04 From: Sacramento, CA Member No.: 2,922 Region Association: None |
Man way to go Geoff... I cant wait to see this out at an autocross (IMG:style_emoticons/default/smile.gif)
|
|
|
|
| strawman |
May 25 2010, 08:24 PM
Post
#129
|
|
Senior Member Group: Members Posts: 891 Joined: 25-January 08 From: Los Osos, CA Member No.: 8,624 Region Association: Central California |
Finally finished up the fuel tank. I ended up using a (modified) POR-15 tank sealing kit to re-finish the tank. By "modified," I mean I bought a gallon each of Marine Clean and Metal Ready, as well as a quart of the US Standard Tank Sealer, for the same price as the "standard" kit, which includes a fuel stabilizer that I don't need right now.
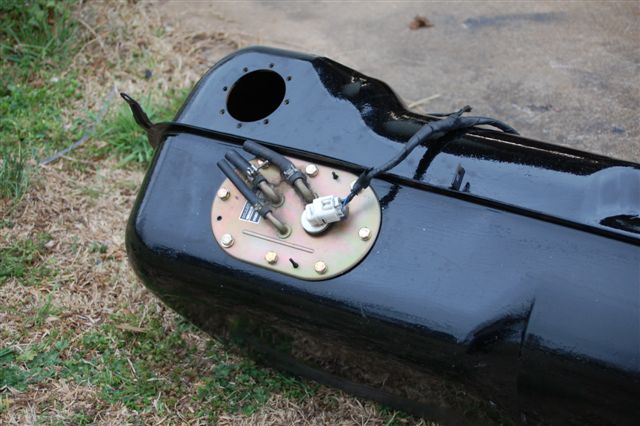
I searched the internet and found a good write-up on how to refinish the inside of a tank, found at http://www.ratwell.com/technical/FuelTankRestoration.html First I stripped the tank of the factory paint, using a wire wheel on my 4-1/2" grinder, some 80-grit sandpaper and a lot of elbow grease. I then used Muriatic Acid to remove the rust inside the tank. It is nasty stuff, so be careful; wear thick rubber gloves and eye protection. I poured about two cups of acid and a Wal-Mart pack of steel slingshot pellets into a couple of inches of water inside the tank. You need to seal up the tank (I used Gorilla tape) so that you can slosh the acid solution around in the tank for long enough to make your arms REALLY ache. You'll need to repeat until the solution comes out clean, and the inside of the tank looks clean. I collected the effluent spread out equally into four 5-gallon buckets, and used almost 10 pounds of Baking Soda to neutralize it. Being a homebrewer, I already had pH strips to test the resulting yuck to make sure it was safe (pH ~7.0) to pour down the drain. Next comes the Marine Clean in a 1:1 hot water solution; be prepared for a lot of suds! You want to slosh this stuff around, and let it sit on each side of the tank for 30 minutes at a time between sloshings to make sure all of the varnish is removed. This stuff is biodegradable, so I poured the effluent into a bucket and then tossed it onto the roadway in front of my house. I did this four times until the effluent was crystal clear. Next up is the Metal Ready, which I left inside on each side for 5 minutes on each side at a time. No real need to slosh it around violently, since you really only want to keep the stuff in contact with the metal to keep it wet. You can reuse this stuff if you strain it; I used a paint strainer, although the previous steps meant the effluent was pretty darn clean and the filter didn't collect much debris. Use an air nozzle, followed by heat gun, to completely dry the tank inside and out. Re-seal the holes with tape, mix the US Standard Tank Sealer well (apparently they don't want you to shake it, but it is a bit "chunky" and requires a lot of mixing with a wooden stirrer), and then pour it in. Finish up the taping, and slosh it around per the instructions. The toughest part is getting all of the excess sealer out of the tank -- it is damn near impossible to do that, so I canted the tank on a lower corner to collect the excess (about 1/8"). A pain in the ass? Definitely. Worth it to have it done professionally? Sure. But I already bought the materials from my paint supplier (Rainbow in Woodland, CA) before McMark suggested I have it done professionally; he also recommends the Caswell kit, but I already purchased the POR-15 kit before he advised me. And I couldn't find a radiator shop nearby that would take on this project. That and I'm a stubborn/CSOB who enjoys completing a job myself... I shoulda taken more pics of the cleaning in progress, but I was lazy (and my arms were too tired from sloshing around the various chemicals to hold up a camera!!!). Here are a few pics of the final product. Inside the finished tank: 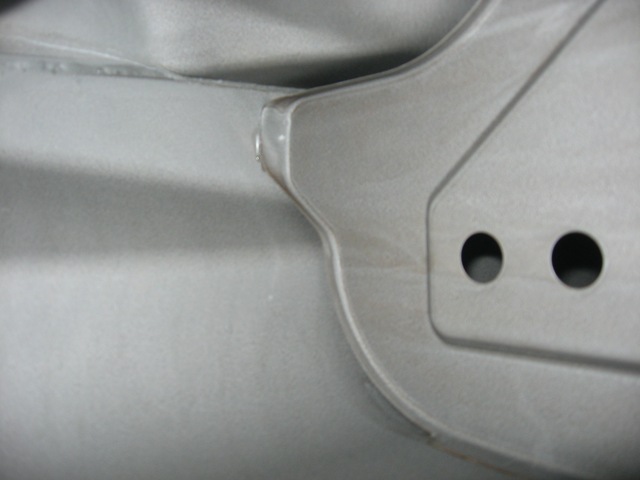 Outside of tank epoxy primered: 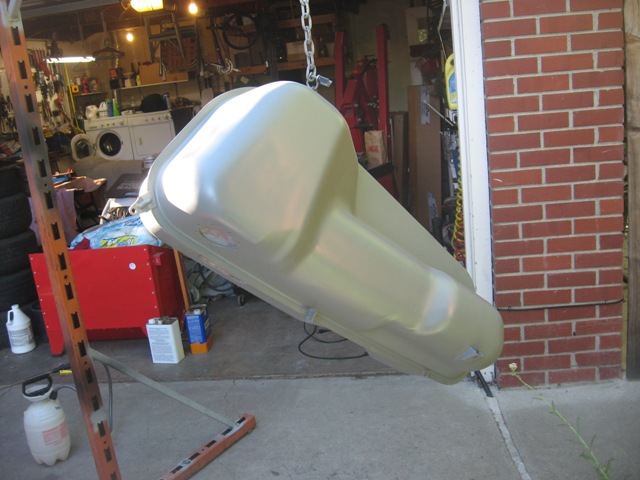 Finally, tank painted: 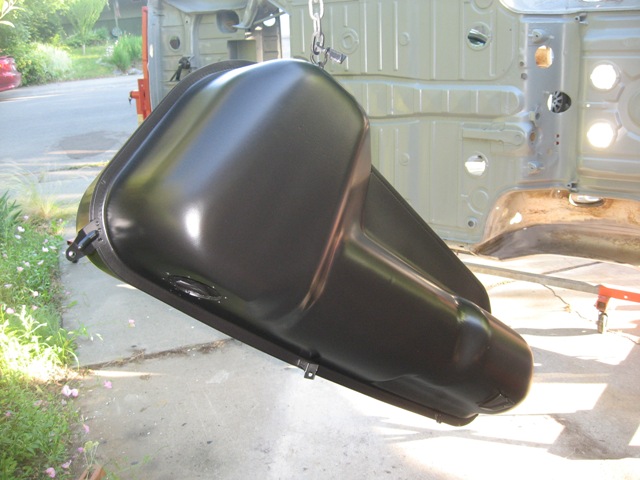 Since I'm using an in-tank modified Subaru fuel pump, I won't need the factory tank outputs. I ended up cutting small disks out of aluminum stock to block them off. I decided against welding them up in case I ever need to drain the tank in the future. |
|
|
|
| strawman |
May 25 2010, 08:33 PM
Post
#130
|
|
Senior Member Group: Members Posts: 891 Joined: 25-January 08 From: Los Osos, CA Member No.: 8,624 Region Association: Central California |
I also refinished the underside of the car. Another PITA project, but I am very happy with the results. I spent many hours with wire wheels, 80-grit sandpaper, scrapers and a LOT of elbow grease. I'm just glad I'm using a rotisserie; you guys that have done this while laying on your back are truly heroic!!!
Below is a pic of the underside completely stripped, including a couple of small rust holes that had to be patched: 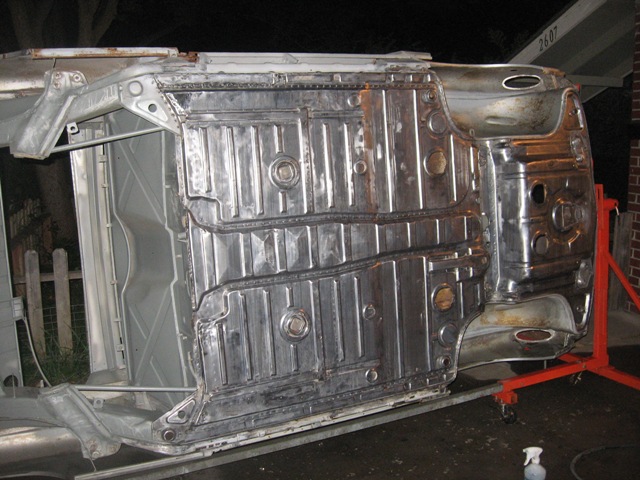 Next up is the metal Marine Cleaned and Metal Readied:  Finally, here is the underside epoxy primered. You can see the Suby transmission mount bolted on in this picture, too. 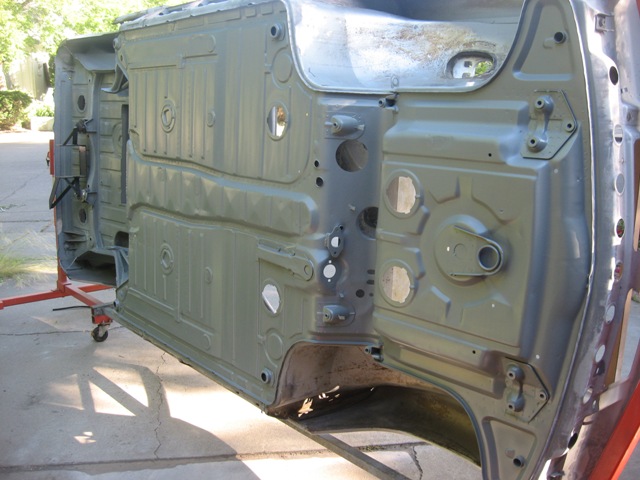 I'm hoping to strip/prime the fenderwells and front trunk this week, and possibly begin welding on the flares this weekend (time and weather permitting!). Stay tuned! |
|
|
|
| charliew |
May 25 2010, 10:11 PM
Post
#131
|
|
Advanced Member Group: Members Posts: 2,363 Joined: 31-July 07 From: Crawford, TX. Member No.: 7,958 |
How did you keep the metal ready from etching your driveway?
|
|
|
|
| strawman |
May 25 2010, 11:11 PM
Post
#132
|
|
Senior Member Group: Members Posts: 891 Joined: 25-January 08 From: Los Osos, CA Member No.: 8,624 Region Association: Central California |
QUOTE(charliew @ May 25 2010, 09:11 PM) How did you keep the metal ready from etching your driveway? I didn't... the Metal Ready just turns portions of it white. The concrete is cracked pretty badly already, so I'll prolly need a new driveway in the few years anyway. Gotta love an understanding wife (IMG:style_emoticons/default/beer.gif) |
|
|
|
| computers4kids |
May 26 2010, 08:02 AM
Post
#133
|
|
Love these little cars! Group: Members Posts: 2,443 Joined: 11-June 05 From: Port Townsend, WA Member No.: 4,253 Region Association: None |
Geoff,
Good Read! You are quite a craftsman...and that is one clean tub bottom. Now that your'e good at it, I'll send you my project (IMG:style_emoticons/default/biggrin.gif) Mark |
|
|
|
| andys |
May 26 2010, 09:57 AM
Post
#134
|
|
Advanced Member Group: Members Posts: 2,165 Joined: 21-May 03 From: Valencia, CA Member No.: 721 Region Association: None |
"A pain in the ass? Definitely. Worth it to have it done professionally? Sure. But I already bought the materials from my paint supplier (Rainbow in Woodland, CA) before McMark suggested I have it done professionally; he also recommends the Caswell kit, but I already purchased the POR-15 kit before he advised me. And I couldn't find a radiator shop nearby that would take on this project. That and I'm a stubborn/CSOB who enjoys completing a job myself..."
Strawman, I had my tank done "professionally" and was very disappointed with the results compared to the DIY results I've seen here and on other threads. The radiator shop I took mine to came highly reccomended by a reputable classis restorer. When I dropped my tank off, the guy seemed very confident, said he's done hundreds, and had a display of business cards from restorers and hotrod shops on his wall. I've driven by the shop many times and know he's been in business for many years. So what I got back was a tank that I first noticed had a dent in the top (my tank was perfect going in). The outside was painted a hideous gloss black that included several runs. I looked inside and saw it was coated with a white coating of some kind that in retrospect looked nothing nearly as nice as in your example or others'. Lastly, there was some kind of soldered patch that was explained as a hole necessary to get the solution to properly flow or circulate during the process. He said this is common practice. So maybe another shop would have done a better job, but after this experience I'd prefer to do the next one myself thinking "if you want it done right, then do it yourself." Andys |
|
|
|
| Dr Evil |
May 26 2010, 01:58 PM
Post
#135
|
|
Send me your transmission! Group: Members Posts: 23,041 Joined: 21-November 03 From: Loveland, OH 45140 Member No.: 1,372 Region Association: MidAtlantic Region |
Wow, I am just looking at this now. I didnt realize that the guy I met at WCR was capable of this (IMG:style_emoticons/default/wink.gif) (IMG:style_emoticons/default/poke.gif)
|
|
|
|
| charliew |
May 26 2010, 09:04 PM
Post
#136
|
|
Advanced Member Group: Members Posts: 2,363 Joined: 31-July 07 From: Crawford, TX. Member No.: 7,958 |
I have a 66 800 scout that is sorta in the middle of a frame off restoration and I took both tanks to a good shop and they did a terrible job. I could look inside and see where they didn't get the sealer all over the inside. The other ended up looking like swiss cheese. Thats why I only do them myself now. The restomotive stuff is very impressive. When you drain the excess out you get some really durable stuff to examine. It's pretty much like a urethane liner. On the tanks I've done I use to use gravel but that was on mainly motorcycle tanks a long time ago, now I use the muratic acid with big flat washers to break the goop up.
My shop and approach is about ten years old and metalready looks like muratic acid on it so I have to plan ahead when I use it. I have a hard time using it on real big surfaces because if it dries it will stay in the seams and is hard to flush off before I paint over it. Boy that tub is looking really nice. |
|
|
|
| McMark |
May 26 2010, 09:38 PM
Post
#137
|
|
914 Freak! Group: Retired Admin Posts: 20,180 Joined: 13-March 03 From: Grand Rapids, MI Member No.: 419 Region Association: None |
That SEM trim black is beautiful, and looks like a darn near perfect match for OE. (IMG:style_emoticons/default/wub.gif)
Doing it yourself takes awhile (I just did a tank with the Caswell and I have about 3 hours in it), but at least you know it's done right. |
|
|
|
| al weidman |
May 26 2010, 10:18 PM
Post
#138
|
|
Al Weidman Group: Members Posts: 156 Joined: 22-February 08 From: Oroville, Ca. Member No.: 8,736 Region Association: Northern California |
Geoff, looking really good. BTW, did we win the photo contest? You are going with Phoenix Red or an orange color, right? I can picture it with those flairs and BBS's. Had a great time at WCR with you the wife and friends. How do you spell that tequila? Cardoza? Al.
|
|
|
|
| strawman |
May 26 2010, 11:08 PM
Post
#139
|
|
Senior Member Group: Members Posts: 891 Joined: 25-January 08 From: Los Osos, CA Member No.: 8,624 Region Association: Central California |
QUOTE(al weidman @ May 26 2010, 09:18 PM) Geoff, looking really good. BTW, did we win the photo contest? You are going with Phoenix Red or an orange color, right? I can picture it with those flairs and BBS's. Had a great time at WCR with you the wife and friends. How do you spell that tequila? Cardoza? Al. Yeah Al, we won it. I instructed Rob-n-McMark to give the WCR-engraved mug to you since you were the driver and I was merely the snapper. You should ask Rob to bring it with him to the Donut Meet this weekend... Phoenix Red (or Giants Orange, as I like to call it) is the color I plan to paint this frankenstein of a car. I really enjoyed hanging out with you and the rest of the West Coast teener folks! |
|
|
|
| McMark |
May 27 2010, 11:09 AM
Post
#140
|
|
914 Freak! Group: Retired Admin Posts: 20,180 Joined: 13-March 03 From: Grand Rapids, MI Member No.: 419 Region Association: None |
Cazadores!
|
|
|
|
|
1 User(s) are reading this topic (1 Guests and 0 Anonymous Users)
0 Members:

|
Lo-Fi Version | Time is now: 17th May 2026 - 06:38 AM |
Invision Power Board
v9.1.4 © 2026 IPS, Inc.