|
|
|
Porsche, and the Porsche crest are registered trademarks of Dr. Ing. h.c. F. Porsche AG.
This site is not affiliated with Porsche in any way. Its only purpose is to provide an online forum for car enthusiasts. All other trademarks are property of their respective owners. |
|
|

  |

| 914GTSTI |
 Jan 4 2013, 08:59 PM Jan 4 2013, 08:59 PM
Post
#261
|
|
Member  Group: Members Posts: 275 Joined: 16-September 07 From: Glendale AZ Member No.: 8,123 Region Association: None |
Very cool! And well done! (IMG:style_emoticons/default/piratenanner.gif) (IMG:style_emoticons/default/piratenanner.gif) (IMG:style_emoticons/default/piratenanner.gif) (IMG:style_emoticons/default/aktion035.gif)
|
   |

 
|
| Zaney |
Jan 5 2013, 12:08 AM
Post
#262
|
|
Deuchland en der Haus Group: Members Posts: 461 Joined: 1-March 04 From: Engine 11 Redmond, WA Member No.: 1,738 Region Association: Pacific Northwest |
Congrats Geoff!!! (IMG:style_emoticons/default/piratenanner.gif)
Hope to see some low altitude fly-bys soon! (IMG:style_emoticons/default/beer.gif) Nate |
|
|
|
| strawman |
Jan 27 2013, 02:23 AM
Post
#263
|
|
Senior Member Group: Members Posts: 891 Joined: 25-January 08 From: Los Osos, CA Member No.: 8,624 Region Association: Central California |
Finally got some time to work on my car. I installed a gauge cluster from a 2000 Subaru Forester, and moved the shifter to a better location (my original placement was too low and far forward). I also changed the geometry of the fore/aft movement of shifter.
I decided to go with a more modern Subaru gauge cluster instead of adapting an electronic Porsche 911 speedometer and/or aftermarket gauges. The Legacy dash is too wide to easily fit in a 914 dash structure, so I searched for a Forester or Impreza cluster instead. I found one from a guy parting a 2000 Forester; bought it for $50 with plugs and a few inches of wiring for each of the three plugs on the back of the cluster. I also grabbed the dash surround, since I'll need to build a new dash top because the Forester cluster is taller than the 914 3-gauge cluster. I also bought a factory service manual including wiring diagrams on Ebay for $8.00. After figuring out the wiring, I dove in... I had to remove the front "hoop" of the dash structure, and weld in three new mounts. I spot-welded two mounts on the backside of the 914 dash structure for the two lower Forester cluster mounts; I welded in two 6mm studs for those two mounts. For the single upper mount, I welded in a piece of bent-up 18gauge strap steel with a hole drilled in it to match the Forester cluster's upper mount. I wanted to keep the cluster as low as possible so that my Momo steering wheel wouldn't obstruct the gauges. Everything works, with the exception of the fuel gauge and low-fuel lamp -- I'll need to figure which resistor is needed to synch 'em up. It also turns out the Forester I pulled this from had almost 230k miles; I will do some research to see if that can be reset to zero. In total, I spent a couple hours figuring out the wiring, and probably three hours on building & welding the mounts. I musta had it in/out a dozen times. Below are some pictures. The first pic shows where the factory 914 hoop was mounted (see the two shiny spots), as well as the upper mount in welded in. You can also see the spotweld burn marks on the front of the dash for the lower mounts on the back of the dash structure. 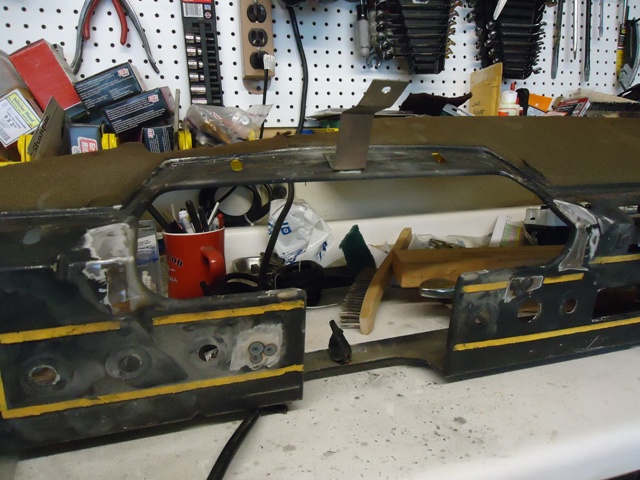 Next is the back of the dash, showing the two lower standoff mounts. They're angled, so they took a lot of massaging to get just right and avoid blocking the stock 914 switch mounting areas. 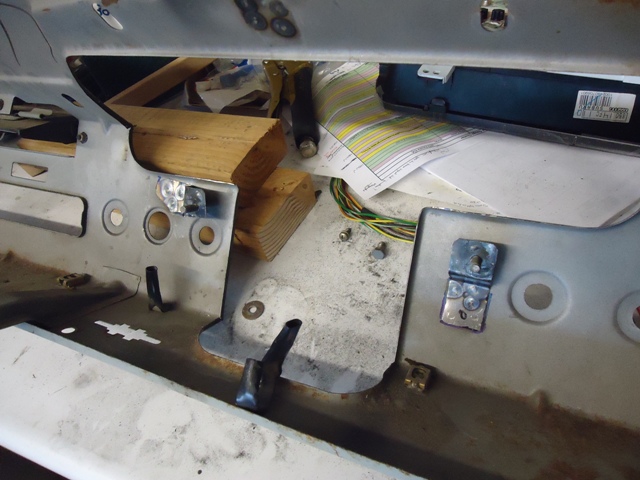 Below shows the back of the dash with the cluster mounted; this picture gives a better perspective of the two lower mounts. 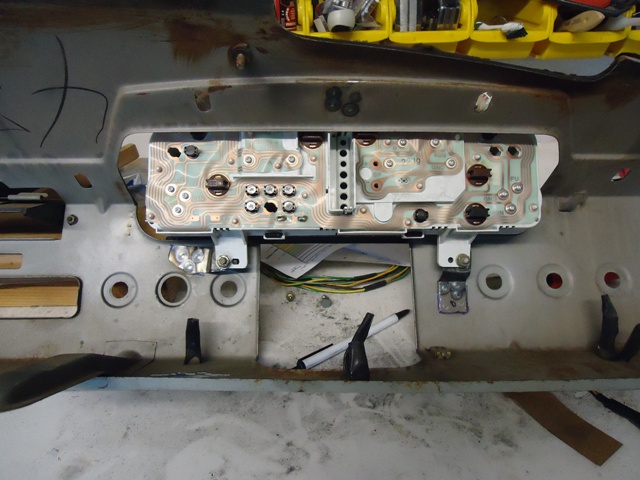 Next is view of the cluster through the steering wheel; I'm also holding up the cluster surround that will help me design the final dash top out of fiberglass. Never mind the state of the cluster face -- I used tape to protect the clear plastic face from scratches during the trial fitting, re-fitting, re-fitting, etc. 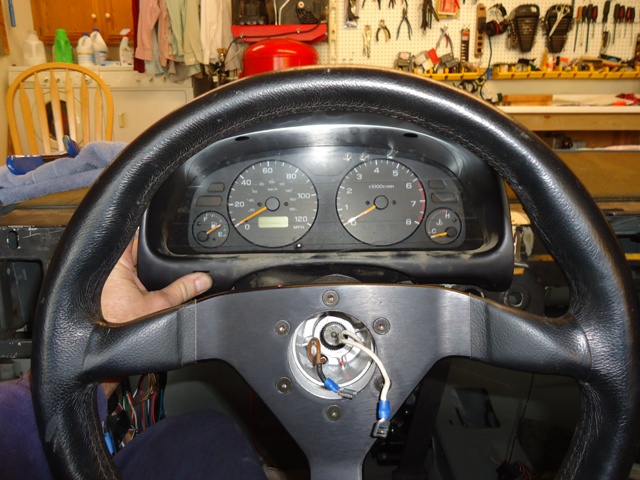 One more pic from an overhead angle. I like it! 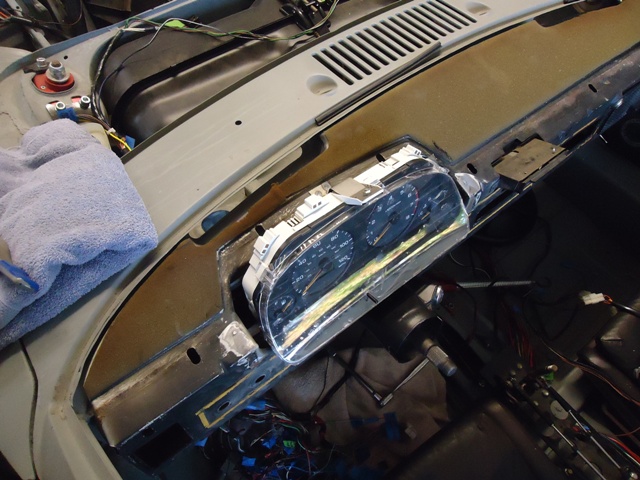 I also was able to change the mounting of my cable shifter, as well as fix the geometry. The former was a simple matter of drilling new holes in the 914 center tunnel and using standoffs to raise my shifter "console" shown in post #115. I didn't take any pictures of the shifter console as mounted, but the shifter is now aligned on a plane with the steering wheel. I also didn't like the very short throw between 1-2 and 3-4 on my MR2 shifter. The only way to change it is to alter the fulcrum, since the push-pull action of the shifter mechanism on the back of the Suby transaxle is essentially non-adjustable. So I cut off the factory cable attachment point from the MR2 shifter lever, fabricated a new one, and welded it on about 0.5" lower. It is much better now; below are before/after pics of the cable mount. 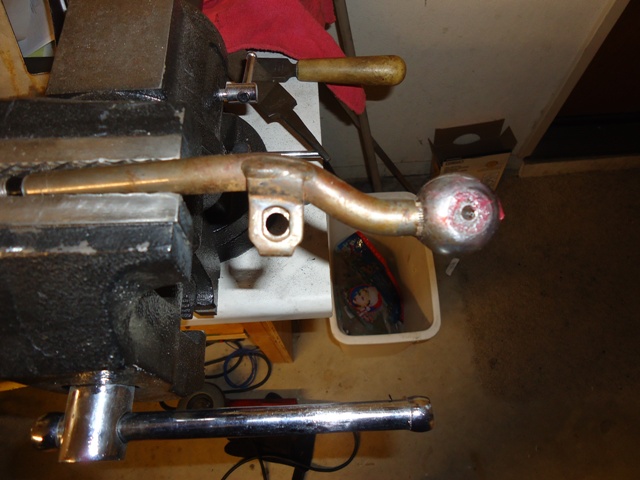 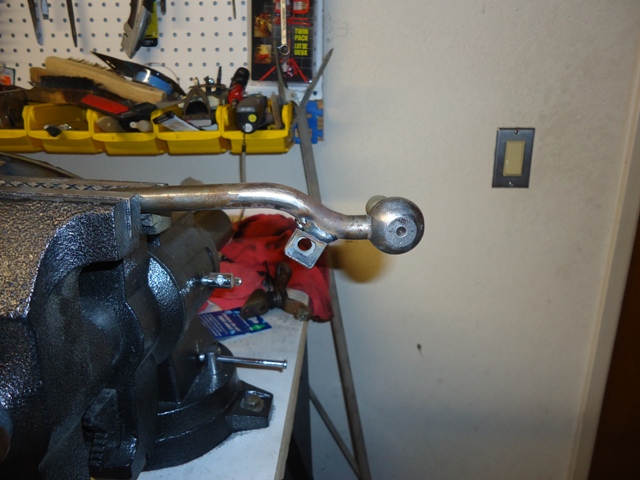 |
|
|
|
| charliew |
Jan 27 2013, 07:50 AM
Post
#264
|
|
Advanced Member Group: Members Posts: 2,363 Joined: 31-July 07 From: Crawford, TX. Member No.: 7,958 |
Great engineering Geoff. The distance from the pivot to the cable mount is probably something me and probably others would like to know. Of course the shifter stalk heigth will also change the throw length. I've never thought about what a "good throw length on a shifter is" but I guess thats up to each builder. I bet in google somewhere there is thread on shifter throw length. The speedometer deal reminds me of a co-worker in the 60's that hooked a drill up to his 63 chevy's speedo and ran it forward for a few days. He might have run it backward, I really don't remember though but with the sender you might come up with something. I wonder how fast you could spin a sender? 200 - 300- 500mph? Or of course check the conversions threads on the suby sites.
|
|
|
|
| scotty b |
Jan 27 2013, 09:00 AM
Post
#265
|
|
rust free you say ? Group: Members Posts: 16,375 Joined: 7-January 05 From: richmond, Va. Member No.: 3,419 Region Association: None |
Really cool about the dash. The shape and size of that one will make it look like a modern 914 dash (IMG:style_emoticons/default/beerchug.gif) It's kind of amazing how close in size all of these Subaru parts are, from the drivetrain to the gauges. It's almost like they were meant to be the modern 914 (IMG:style_emoticons/default/stirthepot.gif) (IMG:style_emoticons/default/smile.gif)
|
|
|
|
| charliew |
Jan 27 2013, 09:26 AM
Post
#266
|
|
Advanced Member Group: Members Posts: 2,363 Joined: 31-July 07 From: Crawford, TX. Member No.: 7,958 |
I think of suby more like a awd more modern peoples car. Like the early vw you can hop them up but really only so far as the drivetrain is only so good for about 350- 375 hp.
|
|
|
|
| Mike Bellis |
Jan 27 2013, 09:35 AM
Post
#267
|
|
Resident Electrician Group: Members Posts: 8,348 Joined: 22-June 09 From: Midlothian TX Member No.: 10,496 Region Association: None |
Great progress! (IMG:style_emoticons/default/beerchug.gif)
|
|
|
|
| Chris H. |
Jan 27 2013, 10:37 AM
Post
#268
|
|
Senior Member Group: Members Posts: 4,085 Joined: 2-January 03 From: Chicago 'burbs Member No.: 73 Region Association: Upper MidWest |
Awesome gauge setup! I was looking for a 6 cyl manual cluster myself. Just trying to figure out how interchangeable they are electronically. Assume it's like everything else (legos). Great work!
|
 |
|
| ruby914 |
Jan 27 2013, 11:10 AM
Post
#269
|
|
Senior Member Group: Members Posts: 720 Joined: 26-April 09 From: Hawthorne, Ca Member No.: 10,305 Region Association: None |
Looking good Geoff.
On the two lower mounts for the cluster, after final assembly, is that set up in a way that you can remove the cluster easy? It looks like you have nuts behind the dash that will be unaccessible later. I am sure you will remove it many more time before it is all over. |
|
|
|
| strawman |
Jan 27 2013, 02:06 PM
Post
#270
|
|
Senior Member Group: Members Posts: 891 Joined: 25-January 08 From: Los Osos, CA Member No.: 8,624 Region Association: Central California |
QUOTE(ruby914 @ Jan 27 2013, 09:10 AM)  On the two lower mounts for the cluster, after final assembly, is that set up in a way that you can remove the cluster easy? It looks like you have nuts behind the dash that will be unaccessible later. I am sure you will remove it many more time before it is all over. Yeah, it is a bee-otch to reinstall the nuts when the whole dash cluster is finally bolted in. I did a practice run once to see if it CAN be done; lotsa swearing, but not so bad that I was forced to throw wrenches. The driver's side mount is the worst of the two. In any case, the future/eventual dash top will need to be removed to pull the cluster or access the lamps as I've constructed it. Not the best option, but I couldn't come up with a good alternative without cutting the front of the dash structure. As I'm typing this, I am thinking that might be a better option, as long as I can remove a dash face cover without removing any switches. Any other ideas? |
|
|
|
| Amenson |
Jan 27 2013, 02:22 PM
Post
#271
|
|
That's opposite lock!! Group: Members Posts: 645 Joined: 27-May 05 From: Dublin, OH Member No.: 4,154 Region Association: None |
QUOTE(strawman @ Jan 27 2013, 12:06 PM) As I'm typing this, I am thinking that might be a better option, as long as I can remove a dash face cover without removing any switches. Any other ideas? Rivnuts!  Cheers, Scott |
|
|
|
| strawman |
Jan 27 2013, 06:33 PM
Post
#272
|
|
Senior Member Group: Members Posts: 891 Joined: 25-January 08 From: Los Osos, CA Member No.: 8,624 Region Association: Central California |
QUOTE(Amenson @ Jan 27 2013, 12:22 PM) Rivnuts! I actually have a copycat Rivnut tool from Harbor Freight that works reasonably well. However, the cluster tabs are at an angle to the face of the dash. I ended up cutting off the original standoff stud mounts and fabricated new standoff mounts with welded-on nuts. I had to drill two holes in the face of the dash so that I could access the Allen head bolts from the front-side. See pics below. 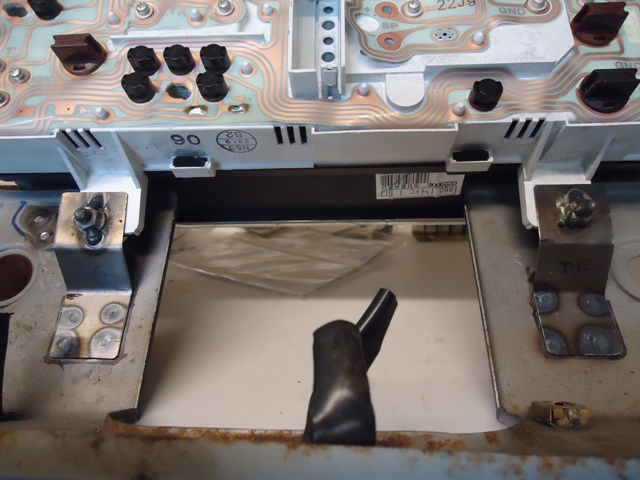 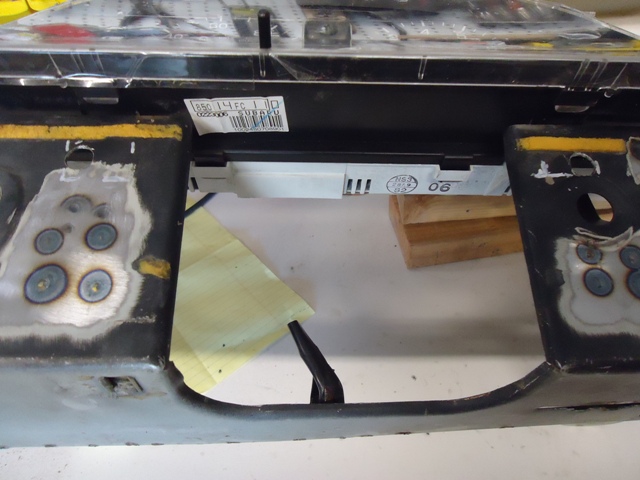 This setup will allow me to remove the cluster to replace bulbs without removing the to-be-built dash top. Much better solution; thanks Ruby914 for making me re-think my original design. (IMG:style_emoticons/default/beerchug.gif) |
|
|
|
| strawman |
Feb 3 2013, 03:32 PM
Post
#273
|
|
Senior Member Group: Members Posts: 891 Joined: 25-January 08 From: Los Osos, CA Member No.: 8,624 Region Association: Central California |
I don't really like the feel of the 914 seats, so I picked up a pair of fabric seats out of a 1994 Mazda Miata for $50 on Craigslist. Below are the details of the mod; it took me about 15 hours of fabricating time to install these seats.
In order to make it easier to measure and not have to lug the seats in/out of the car, I built a jig based on the hole spacing on the bottom of the Miata seat. It should be noted that the driver-side seat has east-west holes that are closer than the passenger side (hint: don't build the jig exactly for the driver side first and expect it to fit the passenger side!). I used an old bed frame I found with a "for free" sign on the street -- gotta love college towns! 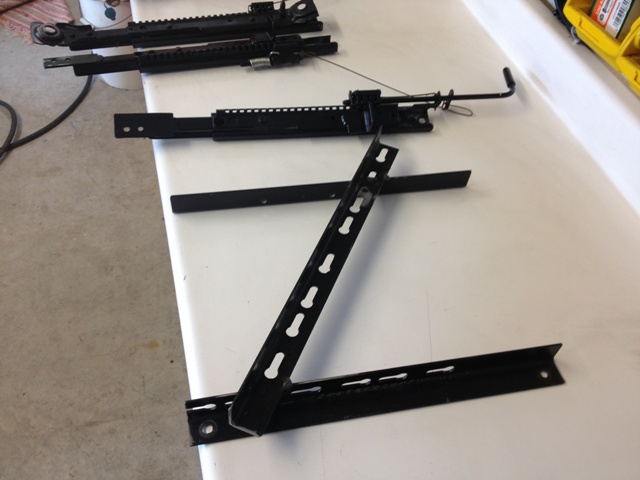 The first picture shows the Miata rails before and after. I am using two 6mm screws to bolt the rear of the modified Miata rail to the factory 914 hinge plates. I had to remove the two heavy-duty rivets to remove the stock Miata rear mount, and weld on new mounts. I also chopped off the forward portion of the Miata rails, and welded pieces of angle iron for the front mounts. 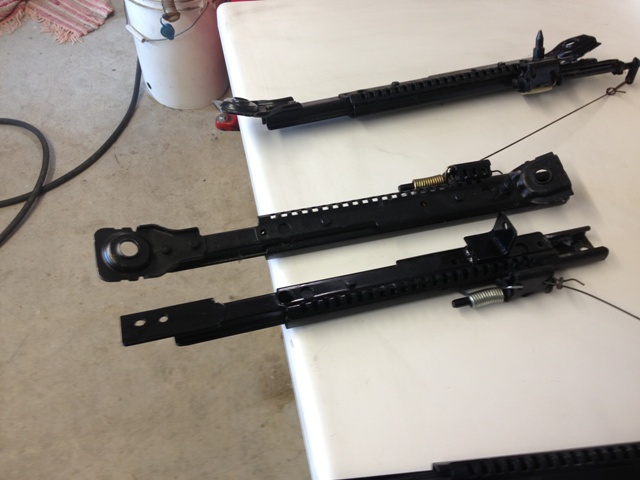 Hear is a close-up of one front mount, and another of the rear mounts. 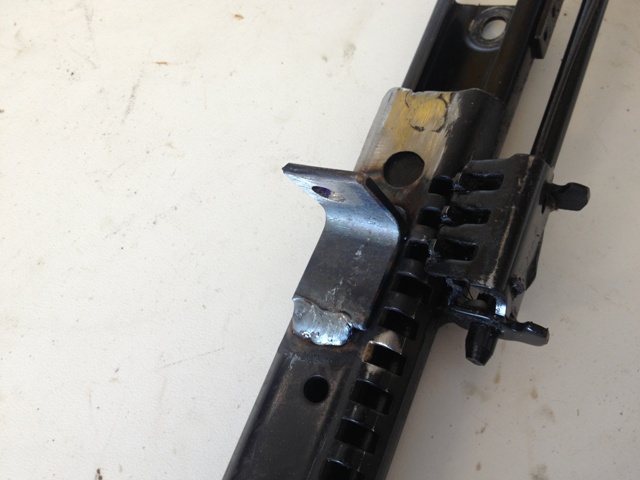 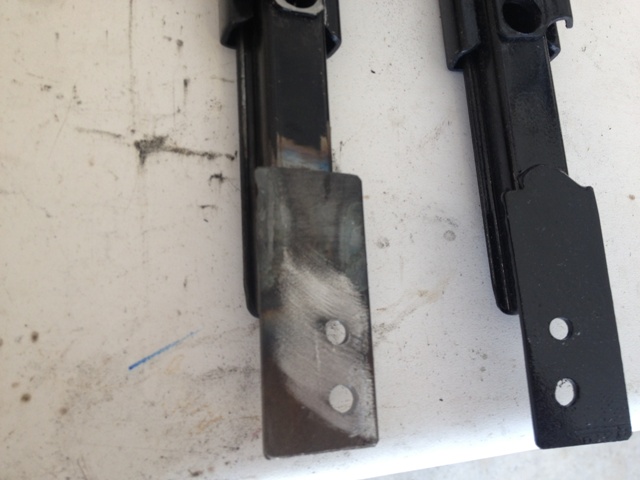 Now comes the part that will make some people cringe: the Miata seat bottom is relatively deep, and the lower pan protrudes below the rail level... which means you have to chop/lower the seat crossmember 0.75". Although the picture below doesn't show it very well, the bright steel piece is what I bent up using a couple of pieces of angle iron pinched in a vise in lieu of using a sheet metal brake. Each 18 gauge piece (driver and passenger) took about an hour, so a brake would've really helped out. 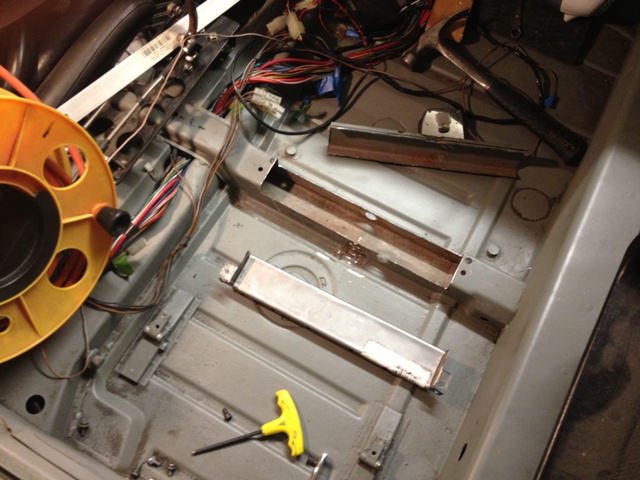 Here is the piece rosette welded in on the passenger side. I actually bought a flange/hole-punch tool from Harbor Freight a while back, and that thing is sweet for making the holes sans burrs. You can see the two holes in the front; those are nut plates that I welded in for the front mounts. 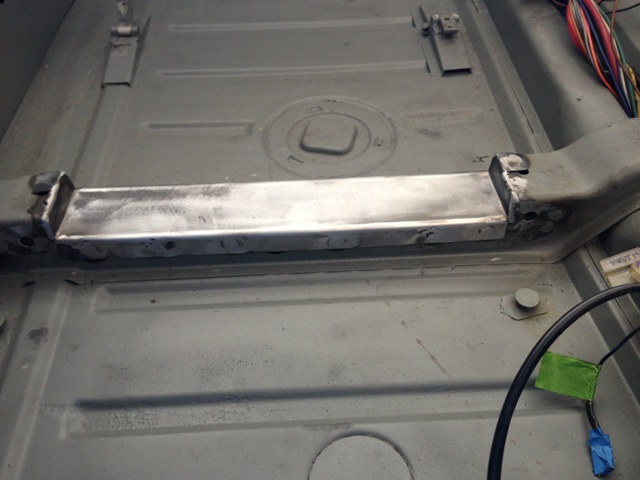 Here is a picture of both sides welded in. 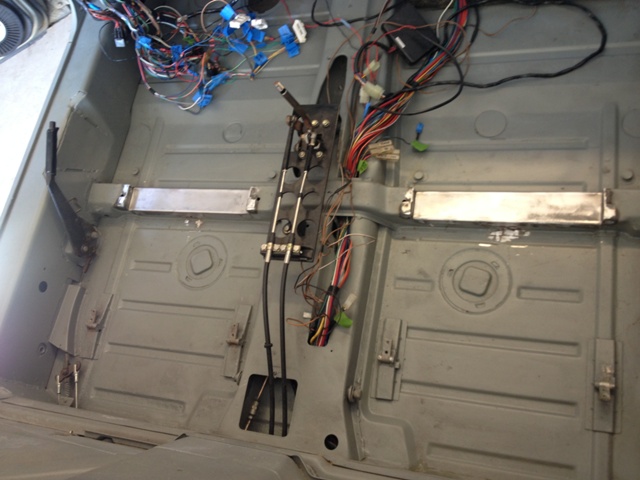 Here is a frontal view of the seats, followed by an angled one. 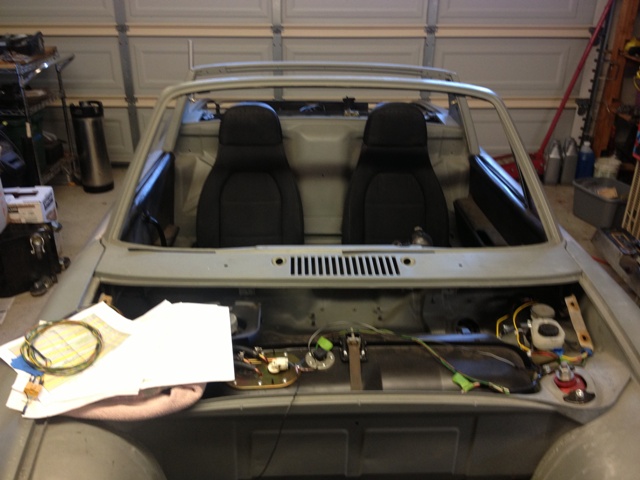 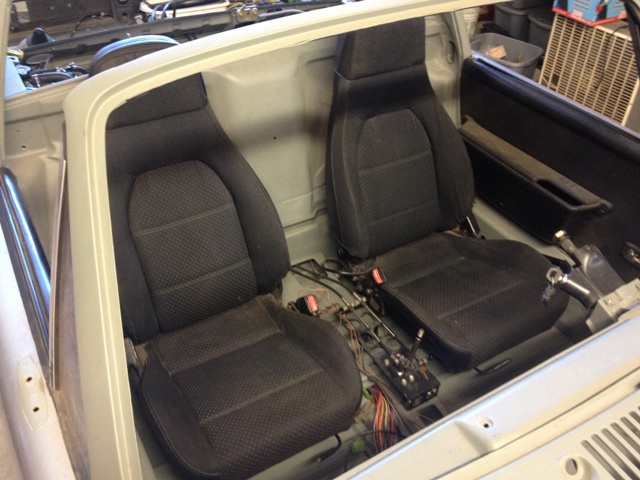 Finally, here is a close-up of the parking brake clearance. While it is a little tighter than the stock 914 setup, I have no problem access it. Cheers, and go 49ers! 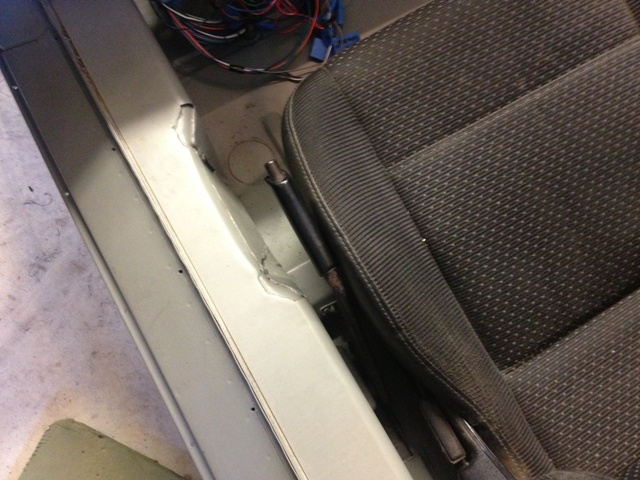 |
|
|
|
| scotty b |
Feb 3 2013, 04:32 PM
Post
#274
|
|
rust free you say ? Group: Members Posts: 16,375 Joined: 7-January 05 From: richmond, Va. Member No.: 3,419 Region Association: None |
Very cool . Have you put the backpad in yet ? It would be really trick to make a new backpad that fit those seats (IMG:style_emoticons/default/smile.gif)
|
|
|
|
| strawman |
Feb 3 2013, 04:40 PM
Post
#275
|
|
Senior Member Group: Members Posts: 891 Joined: 25-January 08 From: Los Osos, CA Member No.: 8,624 Region Association: Central California |
QUOTE(scotty b @ Feb 3 2013, 02:32 PM) Have you put the backpad in yet? Nope, I will be doing the felt carpet thang... |
|
|
|
| charliew |
Feb 4 2013, 09:56 AM
Post
#276
|
|
Advanced Member Group: Members Posts: 2,363 Joined: 31-July 07 From: Crawford, TX. Member No.: 7,958 |
I bought some leather seat covers for both my fiero and a 87 mercedes on ebay from china, for a really good price a coupla years ago. The leather is nice and the stitching looks good. You might check it out if you are going to recover those seats. I have thought about using some fiero seats I have that are extra but they may be too wide.
Those look like they fit good. The hot rod guys like the fiero seats because the bottoms are low. |
|
|
|
| Patmagic |
Mar 14 2013, 12:22 PM
Post
#277
|
|
Newbie Group: Members Posts: 9 Joined: 14-March 13 From: Las Vegas Member No.: 15,653 Region Association: None |
Hello all. Hope I'm in the right place. Thinking of buying a 73 914 with the Subaru svx conversion already done (in a garage) It's a California car so no rust. How do I know if it's been done reasonably correct. Can I assume that the worst thing that could happen is that the engine could be bad and I'll just need to replace it. It's an SVX 6 with the 914 transmission. My goal is to be able to drive anywhere without worrie. Any insight would be appreciated. Thanks
|
|
|
|
| KELTY360 |
Mar 14 2013, 12:45 PM
Post
#278
|
|
914 Neferati Group: Members Posts: 5,189 Joined: 31-December 05 From: Pt. Townsend, WA Member No.: 5,344 Region Association: Pacific Northwest |
QUOTE(Patmagic @ Mar 14 2013, 10:22 AM) Hello all. Hope I'm in the right place. Thinking of buying a 73 914 with the Subaru svx conversion already done (in a garage) It's a California car so no rust. How do I know if it's been done reasonably correct. Can I assume that the worst thing that could happen is that the engine could be bad and I'll just need to replace it. It's an SVX 6 with the 914 transmission. My goal is to be able to drive anywhere without worrie. Any insight would be appreciated. Thanks (IMG:style_emoticons/default/welcome.png) I suggest you start a new thread. You'll get faster, more compete answers. SVX is an awesome engine! |
|
|
|
| Patmagic |
Mar 14 2013, 01:29 PM
Post
#279
|
|
Newbie Group: Members Posts: 9 Joined: 14-March 13 From: Las Vegas Member No.: 15,653 Region Association: None |
QUOTE(KELTY360 @ Mar 14 2013, 10:45 AM) QUOTE(Patmagic @ Mar 14 2013, 10:22 AM) Hello all. Hope I'm in the right place. Thinking of buying a 73 914 with the Subaru svx conversion already done (in a garage) It's a California car so no rust. How do I know if it's been done reasonably correct. Can I assume that the worst thing that could happen is that the engine could be bad and I'll just need to replace it. It's an SVX 6 with the 914 transmission. My goal is to be able to drive anywhere without worrie. Any insight would be appreciated. Thanks (IMG:style_emoticons/default/welcome.png) I suggest you start a new thread. You'll get faster, more compete answers. SVX is an awesome engine! Will do. New guy mistake. Thank You! |
|
|
|
| strawman |
Jun 25 2013, 09:27 PM
Post
#280
|
|
Senior Member Group: Members Posts: 891 Joined: 25-January 08 From: Los Osos, CA Member No.: 8,624 Region Association: Central California |
Damn, too long since I updated... or even worked on my 914, for that matter. (IMG:style_emoticons/default/mad.gif) I've been busy with other projects, including two Bimmers (an M52 engine / ZF trans swap into a '96 318ti and street/track suspension install, and a rear suspension repair & fortification on a '99 Z3 M Roadster). Now it is time to get back on the 'teener!
I spent a lot of time seam-welding the car, and don't like the idea of cutting some of the front structure out to vent the radiator cooling air. Since I've got a spare front hood, I thought I'd try venting through the hood. As explained earlier, I'm running a Griffin 25272 aluminum radiator and fan/shroud from a Lincoln Mark VII. I bought a spare Lincoln fan/shroud so that I could use a portion of the Lincoln shroud base to build a polystyrene buck without ruining the one I plan to use. I bought a 4'x8' sheet of 2" polystyrene from Home Despot and went to town -- I used 3M contact cement to glue each layer to the next, and then cut/filed it into shape using a cheese-grater kind of file, a handsaw and 60-grit sandpaper. Hint, don't use polystyrene; use polyurethane instead (so you can melt it with acetone when voiding the buck!). That took about 10 hours to glue, shape, mock-up, shape, mock-up, shape, etc. I then covered the buck with clear packing tape and rubbed on two layers of mold release wax. Below is a pic. 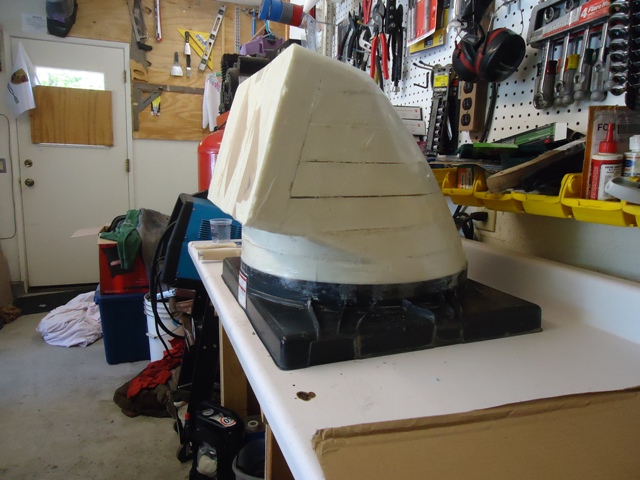 Then I laid the fiberglass, using 2oz mat for the big stuff and 1oz woven cloth for the corners and compound bends, and two-part epoxy. Below are couple of pics of the materials. There are plenty of websites showing how and what to use, so I'll spare the details here. 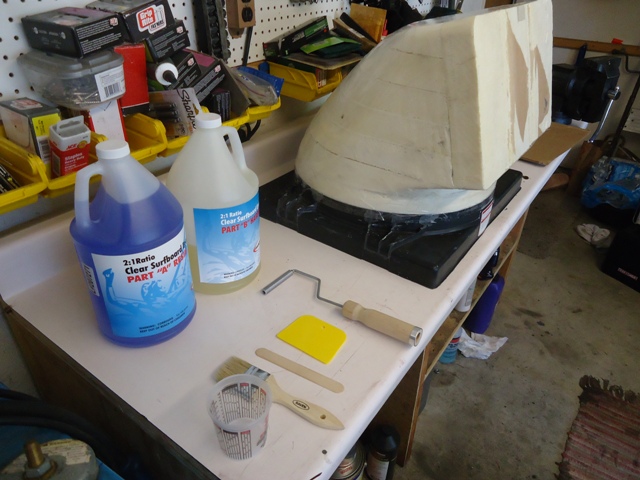 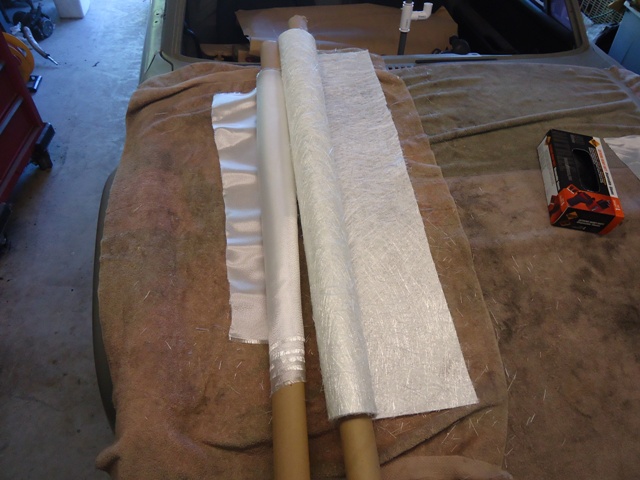 The epoxy is more expensive than traditional polyester resin, but it doesn't smell as horrid and it can be stronger if carefully applied. The roller is key to getting the air bubbles out, and el cheapo brushes ((15 for $10 at HD) work well to wet-out the cloth on a piece of cardboard. Be sure to use gloves or you'll be picking/rubbing resin out of your fingers for days (AMHIK). My goal was 1/8" thickness, although you can see I've ended up with some thicker spots where overlapping of the cloth/mat occurs. I plan to sand it down and spread a thin layer of Bondo once I complete the proof-of-concept...   Here is a pic of the shroud released from the buck. As mentioned above, the type of material I used for the buck didn't melt when I applied acetone -- to my surprise. So I used a serrated kitchen knife (don't tell Nancy!) to begin carving it out, then I was able to break out large pieces. Pretty slick on the inside, eh? 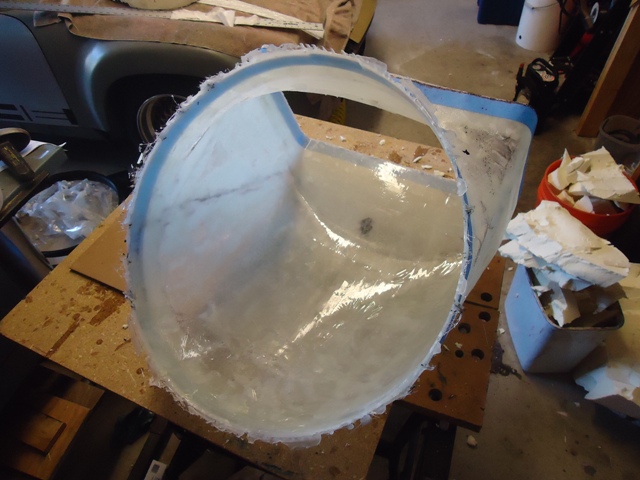 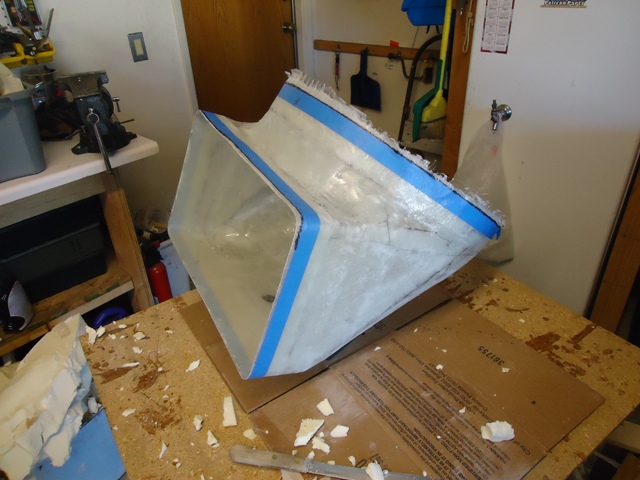 I then trimmed away the edges using a saber saw, and then a sandpaper block to knock down the (VERY!) sharp edges. Here are a few pics of the trimmed fiberglass shroud placed on the Lincoln shroud housing. You can see some of the buck debris in the trash can in the background. 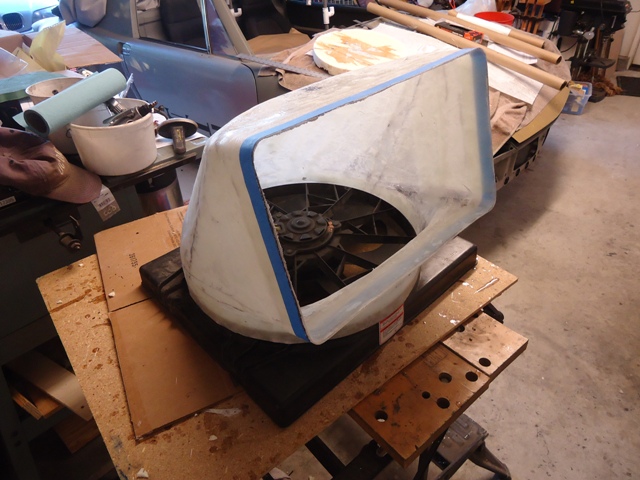 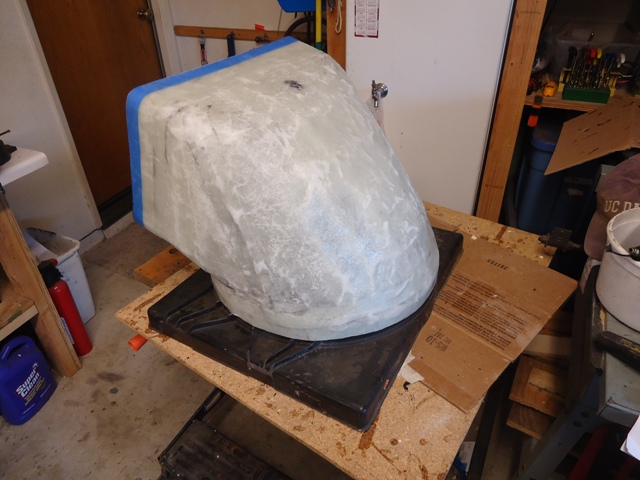 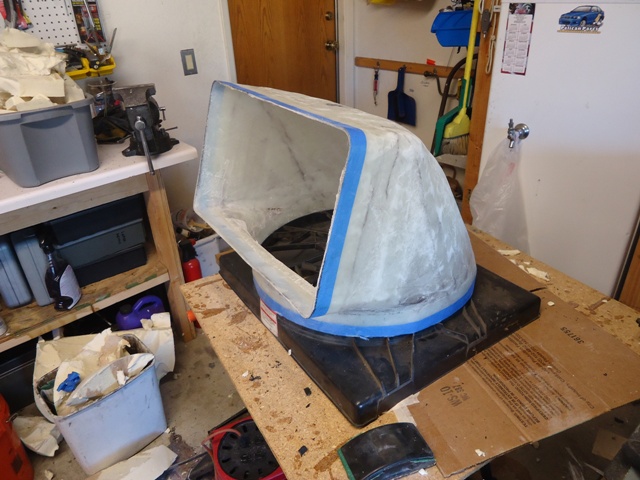 Finally, here are a couple pics of the assembly placed in situ. I plan to carefully mark where the hole in the hood is required, and then incrementally cut away the outlet hole. I planned the hole to maximize the outlet size without cutting into the hood reinforcements, and I nailed it. (IMG:style_emoticons/default/beerchug.gif)  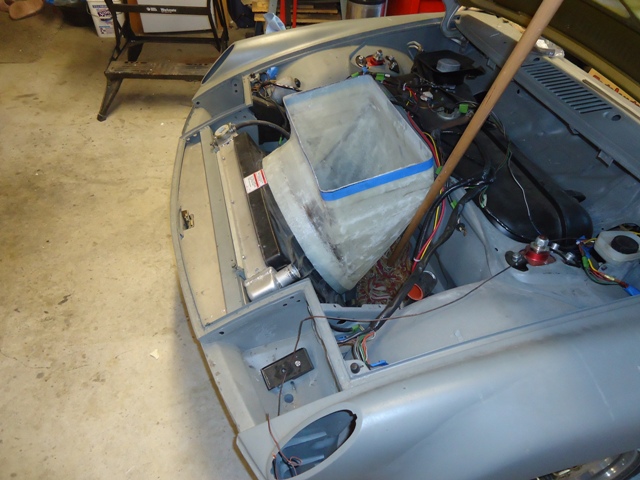 |
|
|
|
|
1 User(s) are reading this topic (1 Guests and 0 Anonymous Users)
0 Members:

|
Lo-Fi Version | Time is now: 17th May 2026 - 11:21 AM |
Invision Power Board
v9.1.4 © 2026 IPS, Inc.