|
|
|
Porsche, and the Porsche crest are registered trademarks of Dr. Ing. h.c. F. Porsche AG.
This site is not affiliated with Porsche in any way. Its only purpose is to provide an online forum for car enthusiasts. All other trademarks are property of their respective owners. |
|
|

  |

| Mike Bellis |
 May 29 2014, 02:43 PM May 29 2014, 02:43 PM
Post
#301
|
|
Resident Electrician  Group: Members Posts: 8,348 Joined: 22-June 09 From: Midlothian TX Member No.: 10,496 Region Association: None |
QUOTE(CptTripps @ Oct 17 2013, 06:13 AM)  Just a thought... Would you have been able to point that DOWN instead of having to cut the hood? It seems like you'd get almost as much airflow out of the bottom of the trunk floor as you would from up high. I only ask because I am thinking of building something similar and want to explore all the options before I go too far. Then you add too much air under the car and the car lifts off the ground. This is bad! In stop and go traffic it also will blow hot air down, out and around into the cabin... Ask me how I know... (IMG:style_emoticons/default/smile.gif) |
   |

 
|
| 76-914 |
May 30 2014, 11:40 PM
Post
#302
|
|
Repeat Offender & Resident Subaru Antagonist Group: Members Posts: 13,883 Joined: 23-January 09 From: Temecula, CA Member No.: 9,964 Region Association: Southern California |
QUOTE(Mike Bellis @ May 29 2014, 01:43 PM) QUOTE(CptTripps @ Oct 17 2013, 06:13 AM) Just a thought... Would you have been able to point that DOWN instead of having to cut the hood? It seems like you'd get almost as much airflow out of the bottom of the trunk floor as you would from up high. I only ask because I am thinking of building something similar and want to explore all the options before I go too far. Then you add too much air under the car and the car lifts off the ground. This is bad! In stop and go traffic it also will blow hot air down, out and around into the cabin... Ask me how I know... (IMG:style_emoticons/default/smile.gif) I hadn't considered that before. Good points, Mike! |
|
|
|
| Chris H. |
May 31 2014, 11:36 AM
Post
#303
|
|
Senior Member Group: Members Posts: 4,085 Joined: 2-January 03 From: Chicago 'burbs Member No.: 73 Region Association: Upper MidWest |
Yeah I was really close to venting through the floor 'til Mike told me that.
He also said some thing about..."if you end up on a dirt or gravel road you'd better hope the fans don't come on or you'll be sorry...ask me how I know.... (IMG:style_emoticons/default/biggrin.gif) " That closed the book on that one. Fine for the track or in situations where you'll pretty much always be moving. Not fine if you'll drive the car like a normal car. |
|
|
|
| BIGKAT_83 |
May 31 2014, 08:39 PM
Post
#304
|
|
Senior Member Group: Members Posts: 1,800 Joined: 25-January 03 From: Way down south Bogart,GA Member No.: 194 Region Association: South East States |
I know of a couple of conversion cars venting out the bottom and it seems to work fine. If I had a car that had been cut in the floor for a AC unit I'd sure give it a try. I just can't bring myself to cut the floor after I welded in patch panels for the AC cut outs.
Bob |
|
|
|
| Mike Bellis |
May 31 2014, 11:17 PM
Post
#305
|
|
Resident Electrician Group: Members Posts: 8,348 Joined: 22-June 09 From: Midlothian TX Member No.: 10,496 Region Association: None |
QUOTE(Chris H. @ May 31 2014, 10:36 AM) Yeah I was really close to venting through the floor 'til Mike told me that. He also said some thing about..."if you end up on a dirt or gravel road you'd better hope the fans don't come on or you'll be sorry...ask me how I know.... (IMG:style_emoticons/default/biggrin.gif) " That closed the book on that one. Fine for the track or in situations where you'll pretty much always be moving. Not fine if you'll drive the car like a normal car. (IMG:style_emoticons/default/av-943.gif) True story... I was at the Goodguys car show creeping my way through the dirt parking lot when all of a sudden... WHOOSH! Fans kicked on and I got a mouth full of dust... (IMG:style_emoticons/default/dry.gif) |
|
|
|
| CptTripps |
Jun 2 2014, 06:08 AM
Post
#306
|
|
:: Punch and Pie :: Group: Members Posts: 3,586 Joined: 26-December 04 From: Tuscaloosa, AL and Akron, OH Member No.: 3,342 Region Association: Upper MidWest |
QUOTE(strawman @ Jul 22 2011, 01:23 AM) Finally, here is a picture of the engine bay with the air-water intercooler and all turbo piping installed. I welded up stand-off mounts using 3/16" rod, which I'll powdercoat after I finish up mounts for the fuel lines, wiring, etc. I still need to finish up the MAF, air cleaner and related piping/mounts. I REALLY wish I could have flipped my intake like this. The way my radiator is set up, makes it impossible. So now I'm stuck trying to cram a ton if intake/outlet tubing in a very small space. It's got me wondering if air/water is really worth the effort at the end of the day. |
|
|
|
| strawman |
Jun 14 2014, 02:58 PM
Post
#307
|
|
Senior Member Group: Members Posts: 891 Joined: 25-January 08 From: Los Osos, CA Member No.: 8,624 Region Association: Central California |
Wow, has it really been almost a year since I last updated? Been busy with a couple of other projects (M52 in my BMW 318ti, rear suspension repair on my BMW Z3 M Roadster, etc.), but I've been working in a little 914 love here-n-there...
The pics below are the second iteration of trying to use a 1998 Subaru Forester dash pod. The first was trying to modify the stock 'teener upper dash cover to accept the Suby pod. The Suby pod is too tall to fit, so I cut out the top of the dash cover (don't worry -- it was far from pristine!) and welded in a new upper hoop. After finagling with the 'teener dash pad for too long, I finally gave up because the proportions were just wrong. That was 20 hours down the drain. So I mocked up what I wanted to achieve using polystyrene for a fiberglass buck. I tried to model the pod cover after the fender flares, while also using the Subaru binnacle (the stock piece that sits up against dash pod) to make it look as smooth/tight as possible to the Suby dash pod. What is shown below is actually the second take on it, since the first pod cover could not be independently removed without having to remove the whole dash... gotta be able to replace dash lights without wanting to crush the car, ya know. That was another 15 hours down the drain. Because I'm not using the stock 'teener upper dash cover, I couldn't use the lower dash cover either. So I welded up the ashtray, seat belt warning light hole, the upper/lower dash holes, and the stiffening "crimps" along the top and bottom. Hard to explain the latter, but if you look at the pics below you'll see the bent-diamond shaped pieces I welded in. I also welded up the holes where the various switches (headlights, fog lights, etc.) were mounted and will drill/mount those once everything is set up to make sure they fit where I want 'em. I'll have to modify the dash vents to fit the stock metal holes, since in the stock configuration they mount in the lower dash cover. First up are a couple pics of the rough pod cover. You can see that I welded nuts onto backing plates and fiberglassed these four units in. 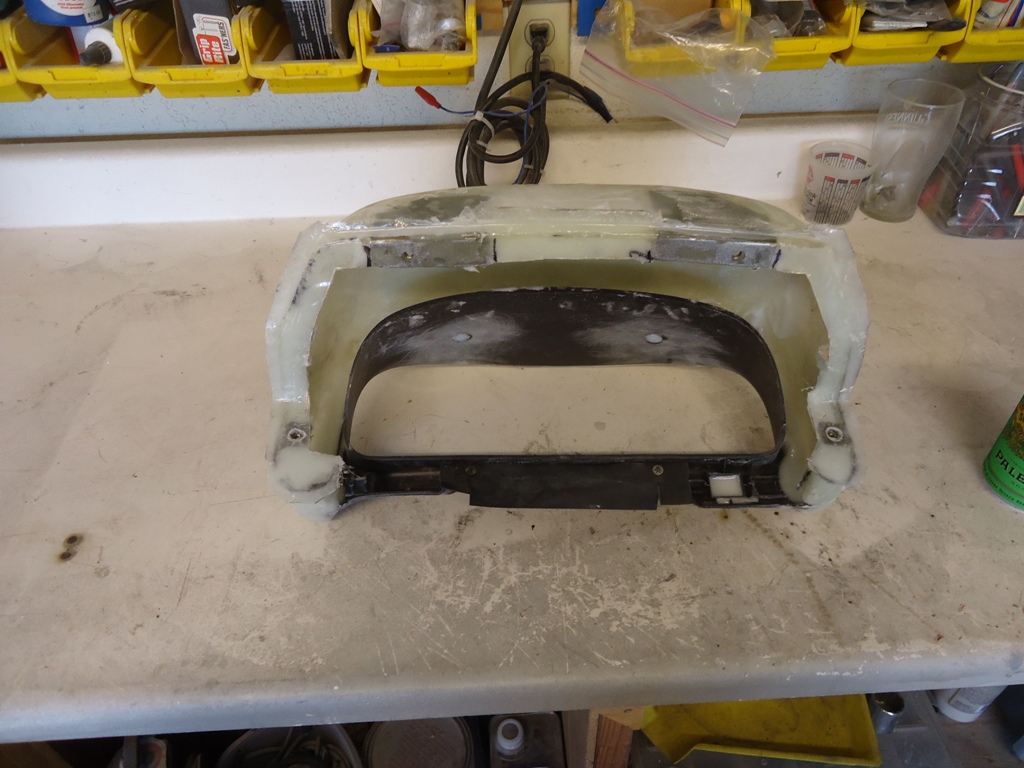 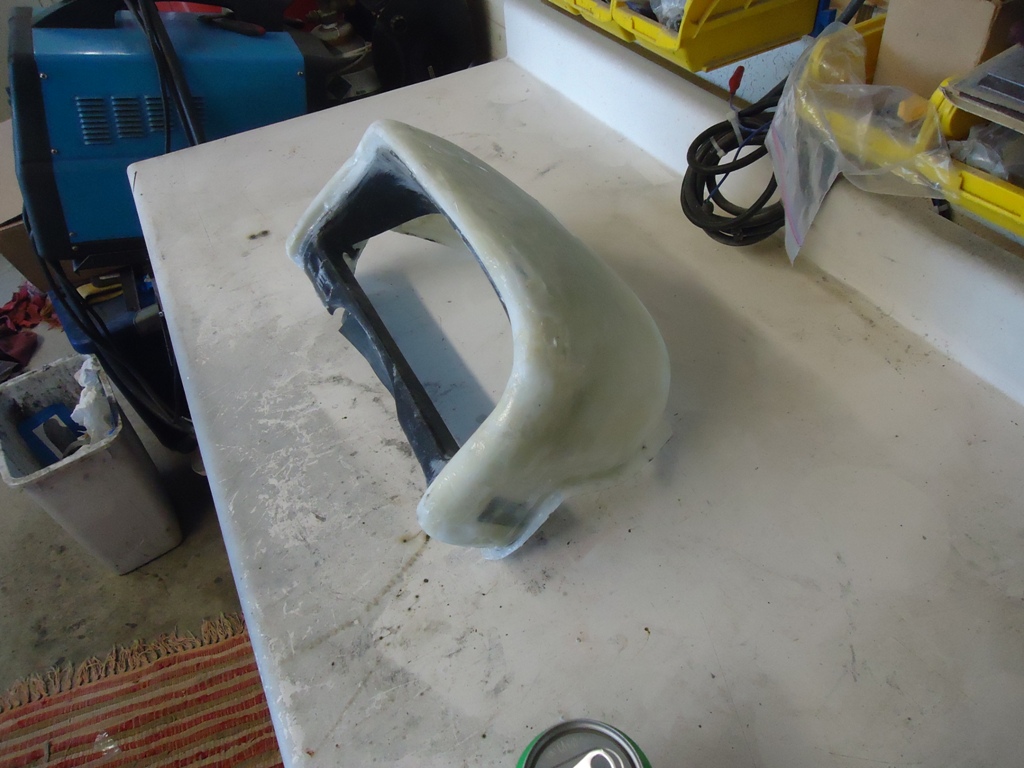 You can see the black plastic binnacle 'glassed-in as mentioned above. I wanted to be sure that the curved and convex Suby dash pad wouldn't have any gaps that would make me squeeze the steering wheel while driving because I hokied it up... Next up are some pics of the mods I made to the stock 'teener metal dash. What is shown below is the welding work and then Metal Ready prior to getting epoxy primered. The pics don't show final metal work (shrinking, pinholes welding, etc.) necessary before skimming with bondo and smoothing. You also wont see in the pics below that I smoothed the outside corners/edges that could only be seen when the doors are open (this is normally covered by the stock 'teener upper and lower dash covers). 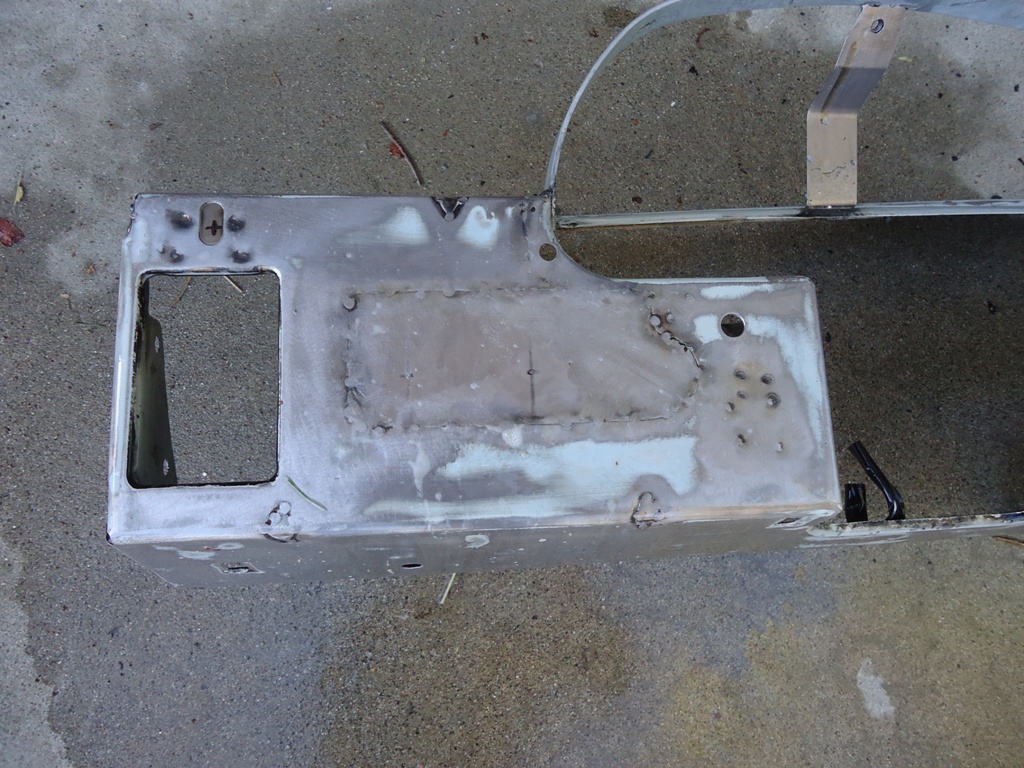 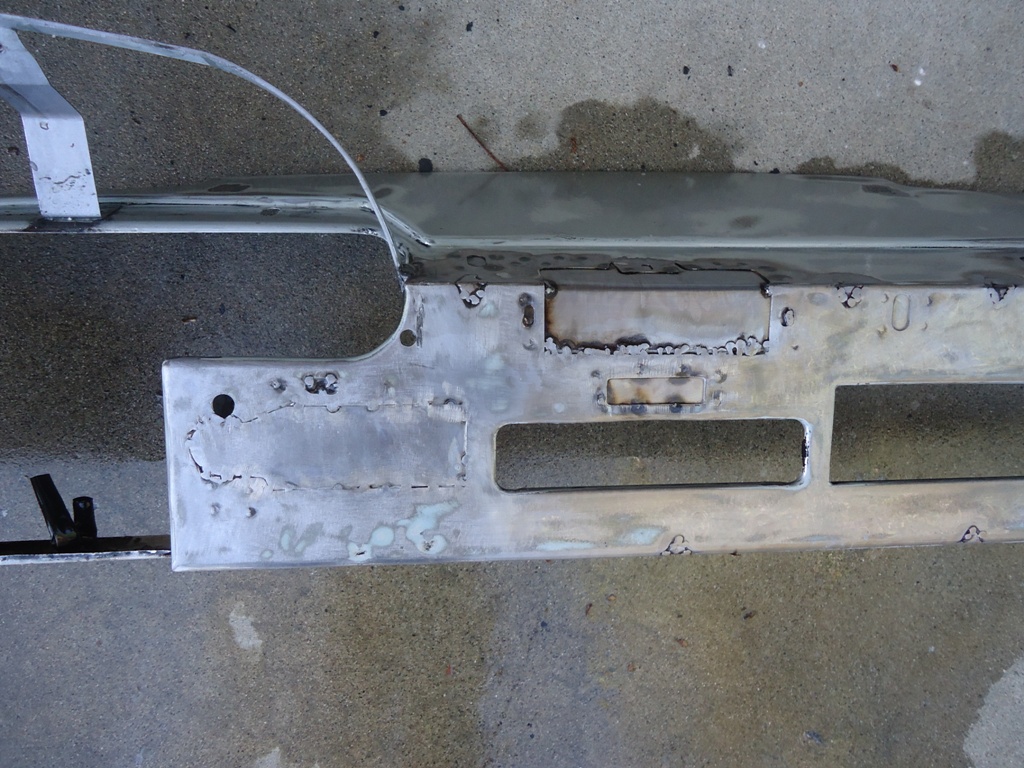 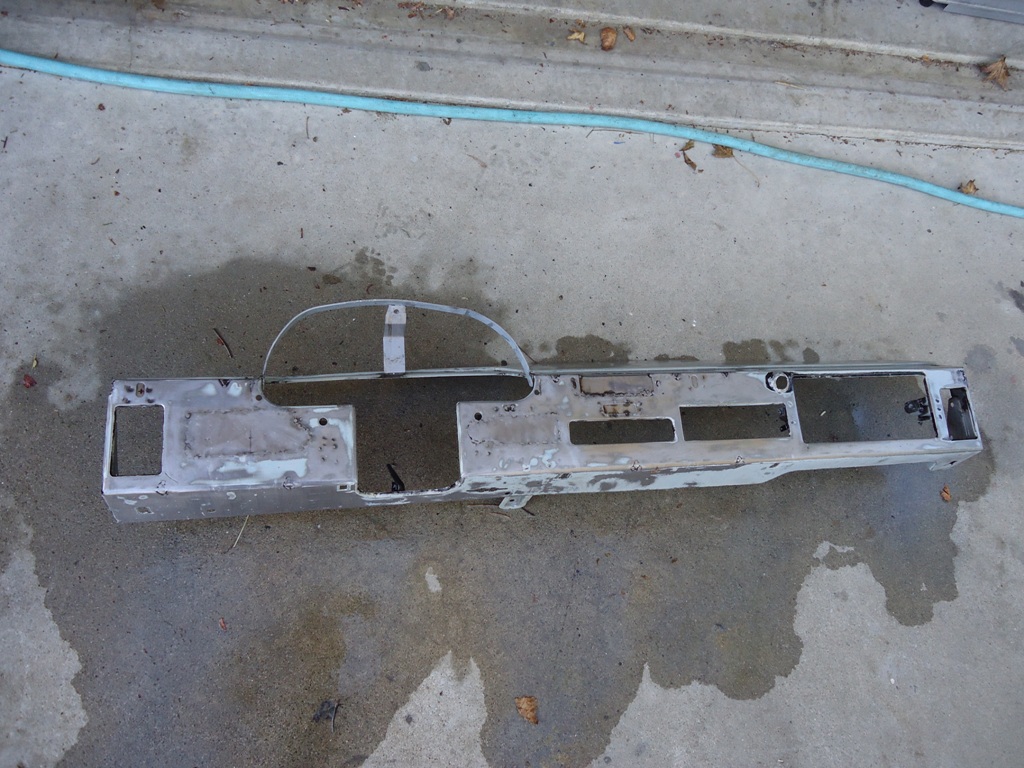 The two holes that are above and to either side of the steering column are used for the two Suby pod lower mounts. I had to weld in two mounts that you can see in the pic below of the backside. The Suby pod has a single mount on the top; I welded in a nut for this mount, which you can also see attached to the upper hoop. 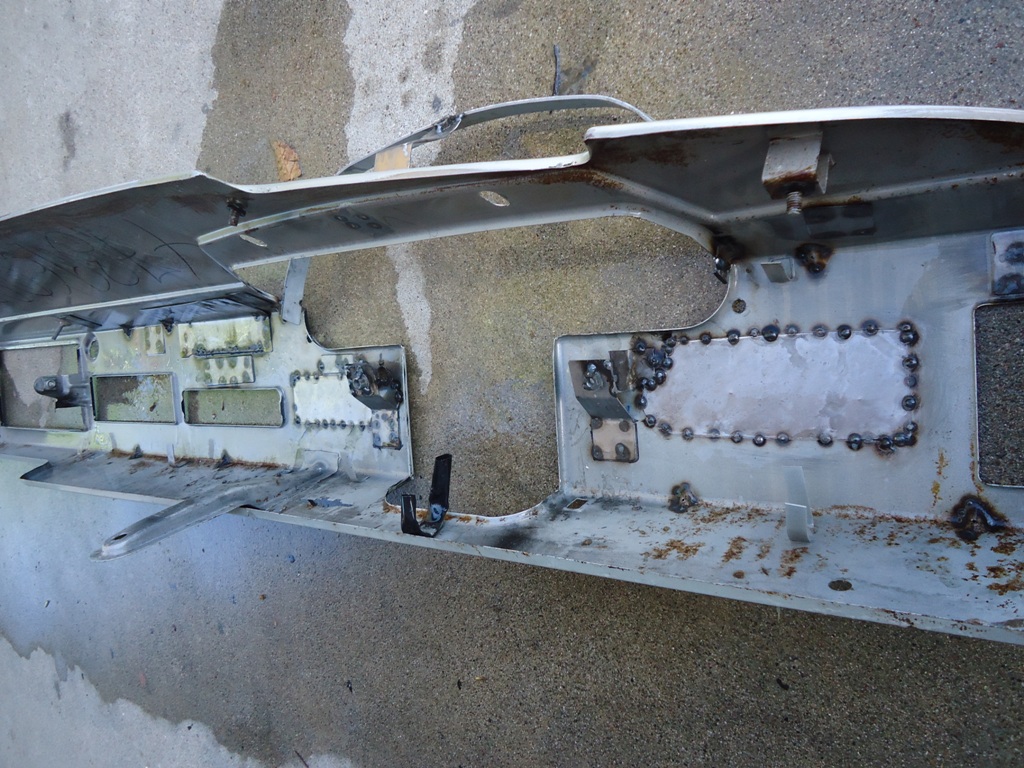 Next up are some pics of everything mocked up. My next step is to decide if I want to have the pod and the metal dash covered (i.e., Alcantara), or if should finish-smooth eveything and paint it matte black or slightly textured black. Opinions? 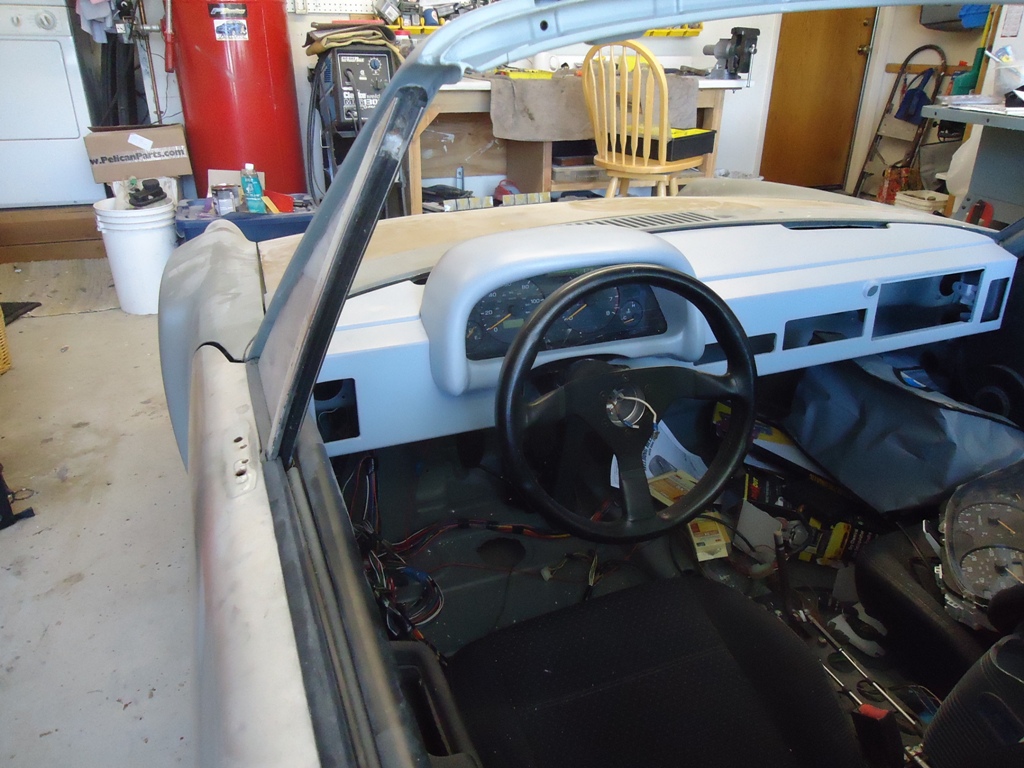 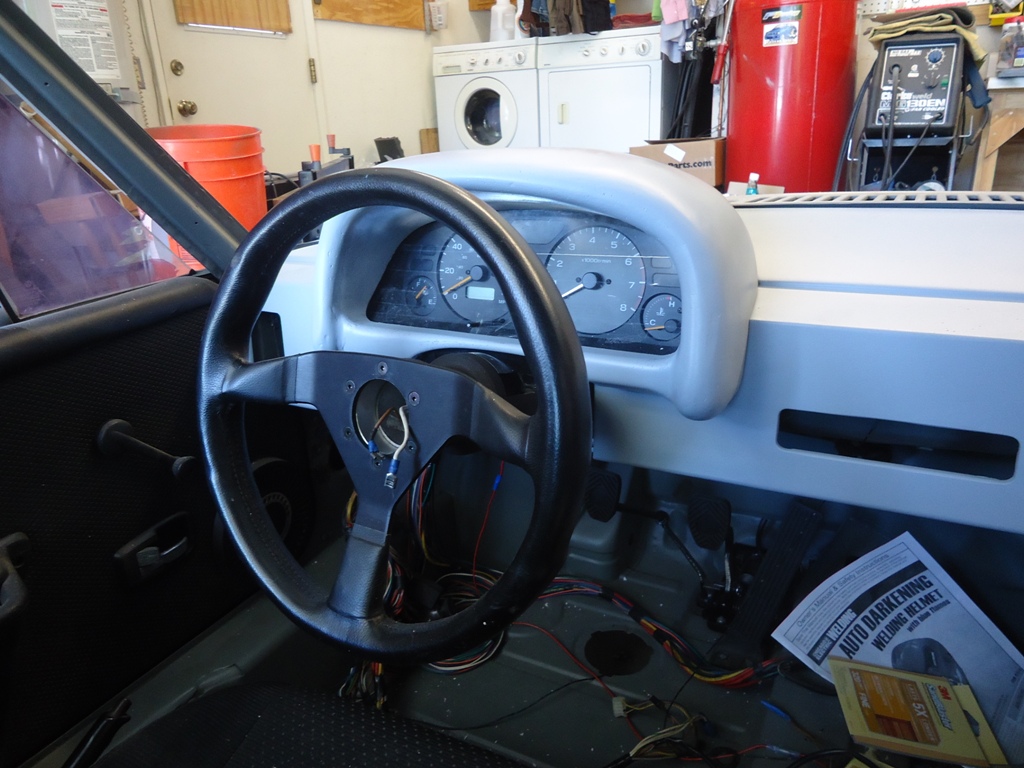 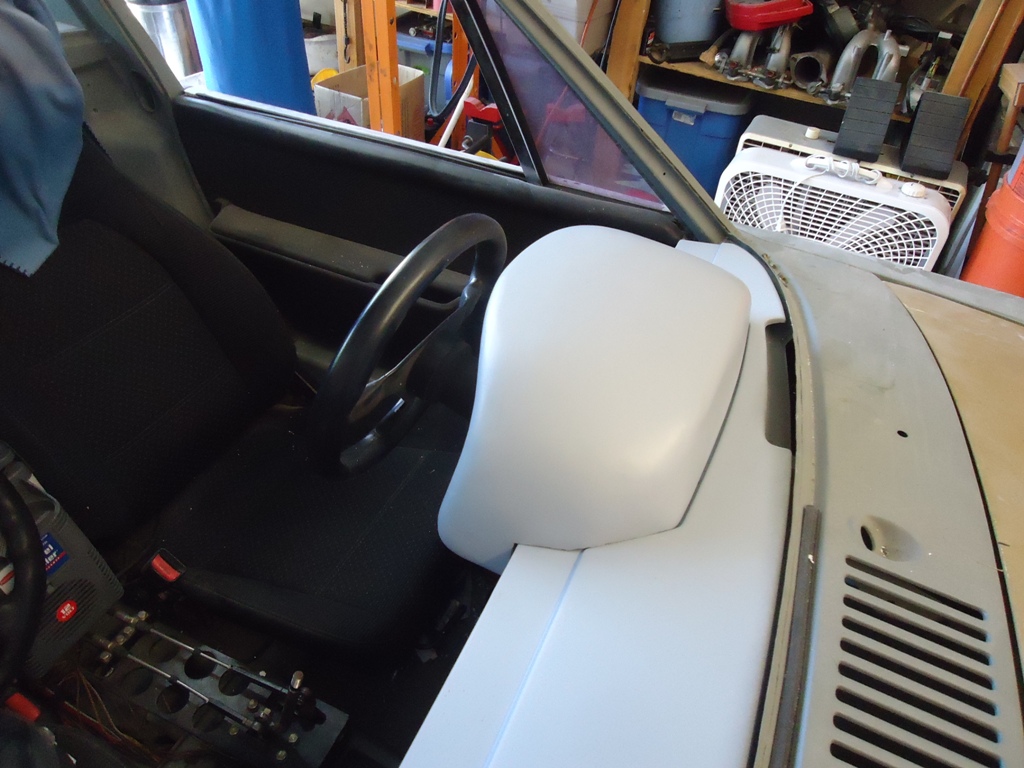 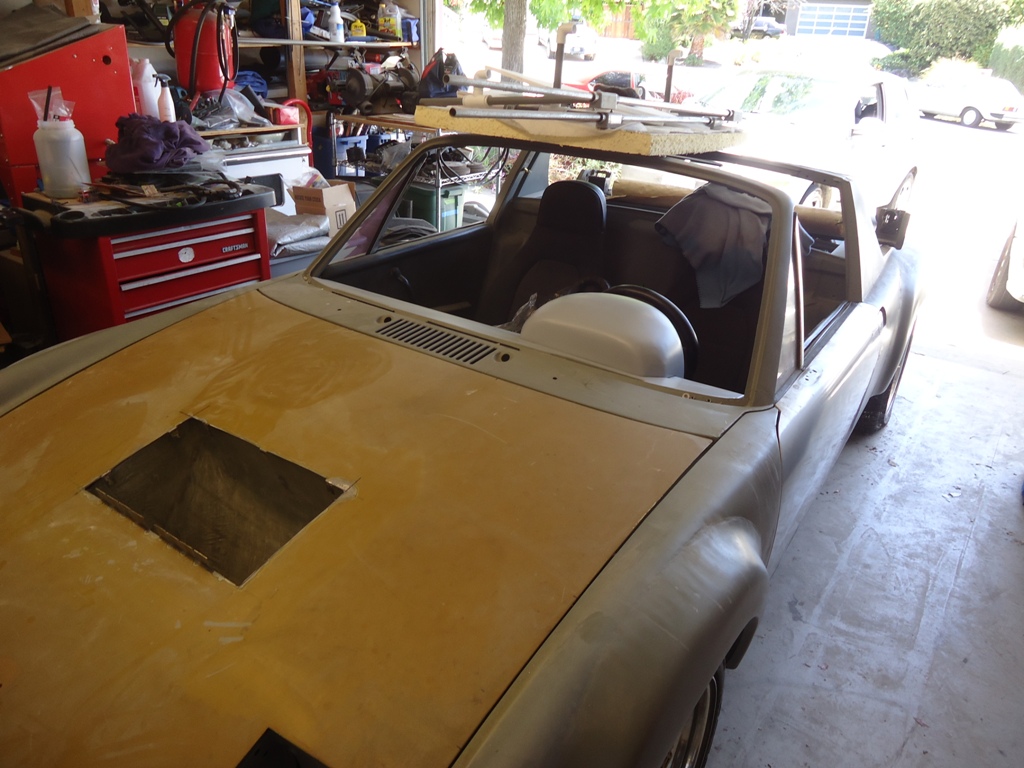 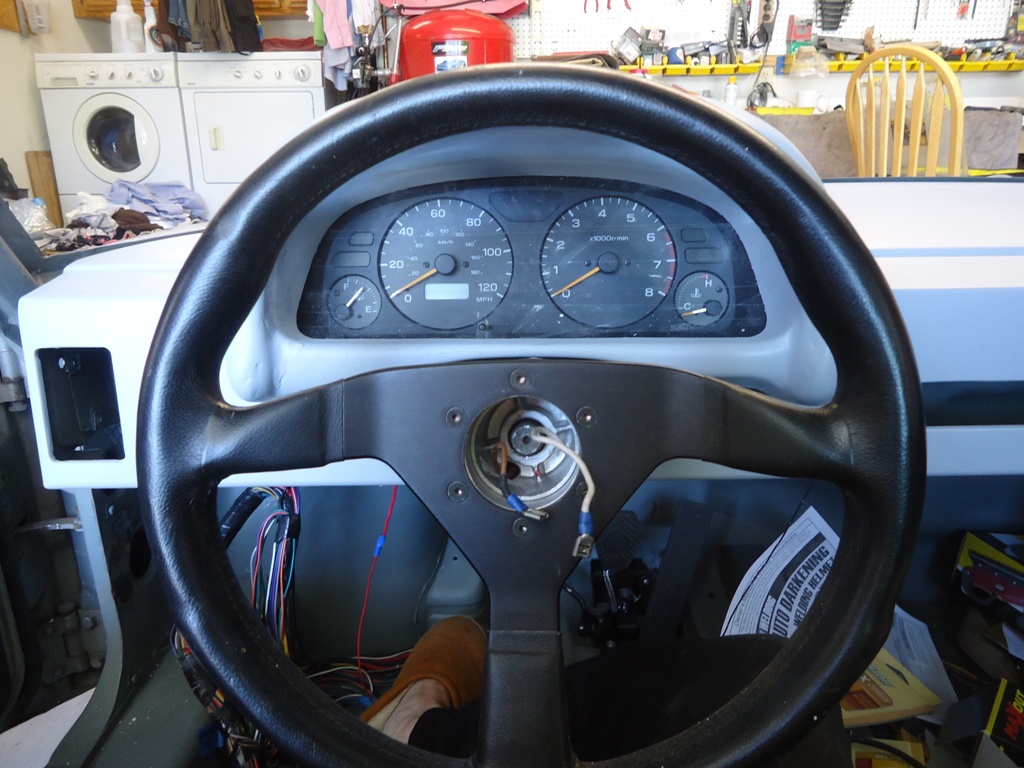 |
|
|
|
| 76-914 |
Jun 14 2014, 03:11 PM
Post
#308
|
|
Repeat Offender & Resident Subaru Antagonist Group: Members Posts: 13,883 Joined: 23-January 09 From: Temecula, CA Member No.: 9,964 Region Association: Southern California |
Looks great. I laughed as I read of wasted hours due to experimentation. (IMG:style_emoticons/default/biggrin.gif)
|
|
|
|
| Chris H. |
Jun 14 2014, 08:46 PM
Post
#309
|
|
Senior Member Group: Members Posts: 4,085 Joined: 2-January 03 From: Chicago 'burbs Member No.: 73 Region Association: Upper MidWest |
Yeah that looks GREAT! You can't go wrong with either...painting or covering it will look nice.
Hours of experimentation...put me down for DAYS! |
|
|
|
| strawman |
Jun 14 2014, 10:37 PM
Post
#310
|
|
Senior Member Group: Members Posts: 891 Joined: 25-January 08 From: Los Osos, CA Member No.: 8,624 Region Association: Central California |
QUOTE(76-914 @ Jun 14 2014, 02:11 PM) I laughed as I read of wasted hours due to experimentation. (IMG:style_emoticons/default/biggrin.gif) I keep a box of receipts for all of my car projects (that I keep hidden from my otherwise understanding wife), but I don't dare track my time. I figure I've got at least 60 hours in this dash project. |
|
|
|
| 76-914 |
Jun 15 2014, 07:41 AM
Post
#311
|
|
Repeat Offender & Resident Subaru Antagonist Group: Members Posts: 13,883 Joined: 23-January 09 From: Temecula, CA Member No.: 9,964 Region Association: Southern California |
I feel your pain (IMG:style_emoticons/default/dry.gif) . I think I dropped about 20 hr's on those gauges before someone flipped the "dumb ass light" on me. (IMG:style_emoticons/default/burro.gif)
|
|
|
|
| CptTripps |
Jun 16 2014, 03:46 PM
Post
#312
|
|
:: Punch and Pie :: Group: Members Posts: 3,586 Joined: 26-December 04 From: Tuscaloosa, AL and Akron, OH Member No.: 3,342 Region Association: Upper MidWest |
That's impressive as hell. Well done sir!
|
|
|
|
| charliew |
Jul 28 2014, 02:00 PM
Post
#313
|
|
Advanced Member Group: Members Posts: 2,363 Joined: 31-July 07 From: Crawford, TX. Member No.: 7,958 |
I haven't seen the product in person but alsacorp.com has announced a velvet wrap for covering exterior panels. The email info I got showed some interior areas done and the photo's looked good. I was thinking I could cover a mercedes dash cover with it and maybe get a decent match to the camel colored leather seats I have for it. i tried to get a link to post here but didn't get it to work. Just google alsacorp.com and search velvet car wrap maybe.
|
|
|
|
| Chris914n6 |
Jul 28 2014, 07:07 PM
Post
#314
|
|
Jackstands are my life. Group: Members Posts: 3,535 Joined: 14-March 03 From: Las Vegas, NV Member No.: 431 Region Association: Southwest Region |
Looks good. I've got a similar dash project for my Nissan cluster.
At my local upholstery place the alcantara was surprisingly pricey but I discovered a black vinyl called Keystone Grabber for the under the windshield piece. It's textured and optically near invisible on reflections. They also had a textured Carbon Fiber vinyl that looked really good. Independant Endura brand. Both were around $10/yd. If you don't want vinyl then there is trunk carpet (speaker box stuff) and dash mat carpet that stretches well. |
|
|
|
| strawman |
Sep 15 2015, 10:44 AM
Post
#315
|
|
Senior Member Group: Members Posts: 891 Joined: 25-January 08 From: Los Osos, CA Member No.: 8,624 Region Association: Central California |
Holy crap, has it really been more than a year since I last updated? Time flies and other projects get in the way. Most recently: a hopped-up TDI swapped into a Eurovan Weekender that you can see in the background below.
I've pulled the doors and stripped them to bare metal, as well as completed more dash changes (see the holes for Vintage Air dash vents in the second picture below) and mounted the headlight, flasher and fog light switches. I also welded-in verticals into the now-stripped hood to create a low-pressure area where hot air vents up from the radiator and air-to-water intercooler's heat exchanger. I worked out a coolant-based heater & defrost system that seems to capably blow hot air to the right places, and this forced me work out the final engine cooling system. I really like the airbox rebuild kit that 914 Rubber sells -- major league thumbs up. I also want to thank Elliot for providing me the four clips for the airbox housing that I lost; I owe him a cold one. Here are a couple of pictures of the car in its bare-bones condition. 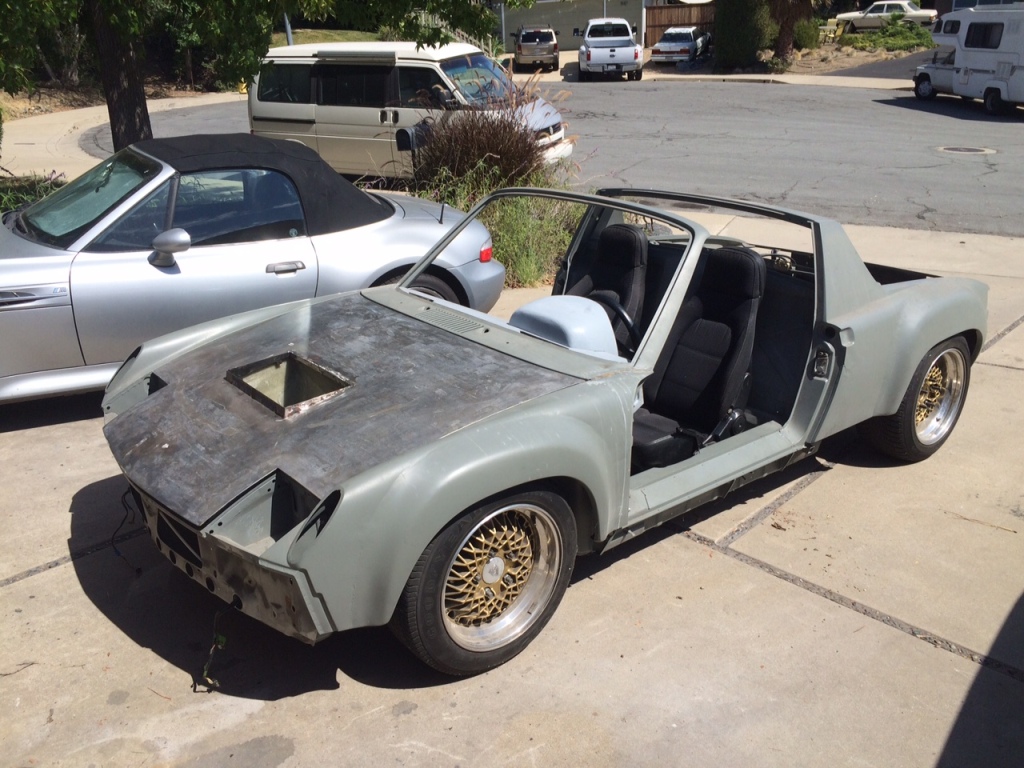 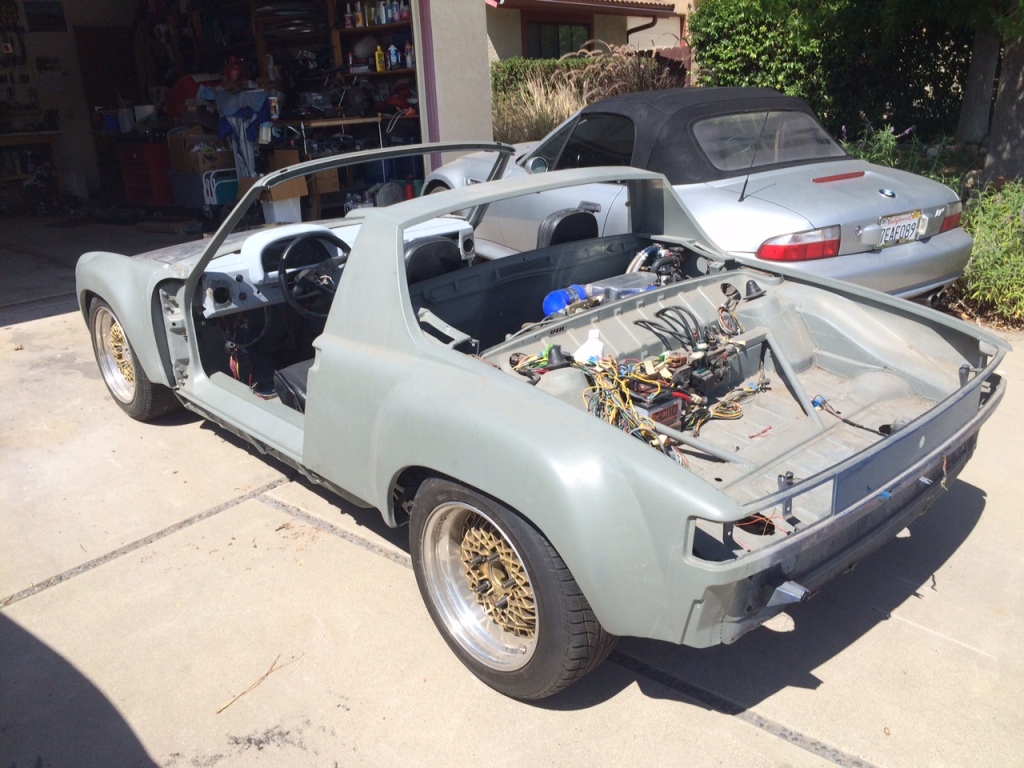 I actually drove the car on my street several times over the weekend, and that has inspired me to focus on this project instead of taking on another (yeah, right! (IMG:style_emoticons/default/blink.gif) ). It is scary fast when the turbo kicks in, and loud, too. I need to rethink my muffler system or my neighbors are going to shoot me. I also installed the front hood opening cable & sheath from 914 Rubber -- high quality stuff. Next up is partially reassembling the car and registering it so that I can shake it down before final bodywork and paint. |
|
|
|
| strawman |
Oct 9 2015, 10:37 PM
Post
#316
|
|
Senior Member Group: Members Posts: 891 Joined: 25-January 08 From: Los Osos, CA Member No.: 8,624 Region Association: Central California |
Just paid the $650 in back fees to register my project; hasn't been registered in CA since 1989. Now I can drive it legally on the street to work out the bugs. Working out electrical gremlins and will update as progress is made. Stay tuned!
|
|
|
|
| JRust |
Oct 10 2015, 12:06 PM
Post
#317
|
|
914 Guru Group: Members Posts: 6,317 Joined: 10-January 03 From: Albany Oregon Member No.: 129 Region Association: Pacific Northwest |
Congrats bud. Thats a huge step! Can't wait to see that bad boy on the road. After seeing it in person. really want to see you behind the wheel enjoying it (IMG:style_emoticons/default/driving.gif)
|
|
|
|
| 76-914 |
Oct 10 2015, 06:06 PM
Post
#318
|
|
Repeat Offender & Resident Subaru Antagonist Group: Members Posts: 13,883 Joined: 23-January 09 From: Temecula, CA Member No.: 9,964 Region Association: Southern California |
Great work, Dean. What color will you paint this one. I can't wait to see you outdo yourself. (IMG:style_emoticons/default/beerchug.gif)
|
|
|
|
| arkitect |
Oct 11 2015, 08:58 AM
Post
#319
|
|
Senior Member Group: Members Posts: 617 Joined: 3-March 10 From: Stockton, CA Member No.: 11,426 Region Association: None |
You've done some great progress with your teener conversion, can't wait to see it finished. I like the stance and wheels. Great that you got it updated with dmv. That's always a big step. Do you have a color in mind?
Dave |
|
|
|
| strawman |
Feb 8 2016, 08:09 PM
Post
#320
|
|
Senior Member Group: Members Posts: 891 Joined: 25-January 08 From: Los Osos, CA Member No.: 8,624 Region Association: Central California |
I finally pulled the trigger and started construction of my new work space. I'm enclosing the side yard, building a concrete pad, and installing a 4-post lift. I'm getting too old to work on my back anymore. I've got the best and most-understanding wife alive...
Below is a pic on the contractor's equipment after Day 1. He plans to pour the concrete stemwall and pad on Thursday. 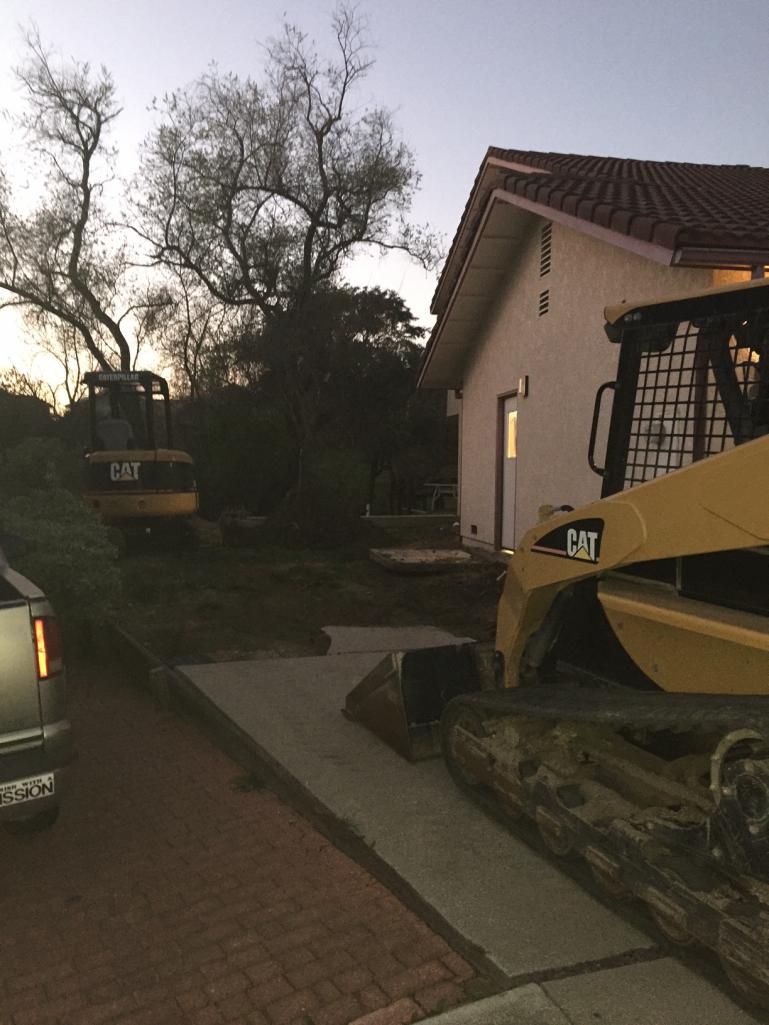 I plan to order an extra-tall 8k 4-post lift later this week from Greg Smith Equipment Sales. More pictures to come as this project moves forward! (IMG:style_emoticons/default/piratenanner.gif) |
|
|
|
|
1 User(s) are reading this topic (1 Guests and 0 Anonymous Users)
0 Members:

|
Lo-Fi Version | Time is now: 17th May 2026 - 12:38 PM |
Invision Power Board
v9.1.4 © 2026 IPS, Inc.