|
|
|
Porsche, and the Porsche crest are registered trademarks of Dr. Ing. h.c. F. Porsche AG.
This site is not affiliated with Porsche in any way. Its only purpose is to provide an online forum for car enthusiasts. All other trademarks are property of their respective owners. |
|
|

  |

| charliew |
 Feb 20 2017, 05:59 PM Feb 20 2017, 05:59 PM
Post
#341
|
|
Advanced Member  Group: Members Posts: 2,363 Joined: 31-July 07 From: Crawford, TX. Member No.: 7,958 |
A turbo suby makes hot oil and the oil will break down sooner and they are prone to using more oil than a na motor, anything you can do to keep oil to the center main and 2and 3 rod is good on a suby. If you drive a turbo suby hard you should check the oil on every other fillup in my opinion.
|
   |

 
|
| strawman |
Feb 20 2017, 07:18 PM
Post
#342
|
|
Senior Member Group: Members Posts: 891 Joined: 25-January 08 From: Los Osos, CA Member No.: 8,624 Region Association: Central California |
QUOTE(76-914 @ Feb 20 2017, 10:52 AM)  Can you post a side view of the site glass? Do they recommend LockTite because I'm thinking 3 Bond sealant if I do this. Sorry, those are the only pics I took! Go to the "Oil Levels" section at Subarugears link for more pics and a better explanation. I toyed with the idea of making my own sight glass, but figured $100 shipped to my doorstep would be "cheaper". Is that a sign of age/wisdom, or merely my wanting to finally get my car on the road?!?!? QUOTE(Mueller @ Feb 20 2017, 12:19 PM) Is there a particular reason for adding the accusump? Is there a known issue with those motors that warrant the extra insurance? Same as in other non-dry sump flat-engines: oil collects in the outside head on a big / high-G sweeper, which can cause an air bubble in the oil pick-up system and a possible main bearing failure. This is, of course, supported scientifically through untold numbers of experts on the Internet (IMG:style_emoticons/default/icon8.gif) . In any case, with the need for a relatively short oil pan for clearance purposes, I figured the $500 I spent on this system (I bought the 3-qt. cannister used) is a good investment and a helluva lot cheaper than ~$3k to dry-sump my Suby engine. On my BMW S52 engine in my 318ti, I welded in a Turner Motorsports oil pan baffle kit, which really helped avoid the annoying "BMW lifter tick" that occurs after a few hard autocross runs or a track session. Unfortunately, there just isn't a lot of room inside a shortened Suby pan... and I can always adapt this Accusump system should I seek a 6-cylinder Suby engine down the road. (IMG:style_emoticons/default/beer3.gif) |
|
|
|
| strawman |
Sep 11 2017, 11:22 AM
Post
#343
|
|
Senior Member Group: Members Posts: 891 Joined: 25-January 08 From: Los Osos, CA Member No.: 8,624 Region Association: Central California |
I spent (wasted, in 914 terms) the past seven months refinishing my hotrod BMW 318ti daily driver. I've completely upgraded the drivetrain and suspension, but it looked like poo -- the clearcoat was coming off. So I sanded it down to the primer coat, found some previous repairs, block sanded it, sprayed two coats of Calypsorot base and three coats of clear in my garage using a "booth" I built out of PVC/conduit pipe, plastic sheeting and five box fans with house filters taped on. I then finish-sanded it (1000, 1200, 2000, 2500 and 3000), followed by polishing and buffing. Of course, I gaffed a few times, and had to re-basecoat the hood, roof, passenger side rear quarter, and the driver fender. And I also had to reclear the driver side door and front fender twice. It was the first time I ever painted a car, but it came out great and served as good practice for my 914. If you're really bored, you can see the build blog at Swapped Tintop 318ti
A few weeks ago, I noticed the Central Coast PCA had an autocross at the Santa Maria Airport scheduled for September 16, so I boldly signed up using my 914. With a deadline facing me, I set to work! The plan is to get it running, see what hits/rubs, work out other bugs, run a few autocrosses, strip it to the chassis again, and finish it in Pantone 172 (SF Giants color!) and black. I started by finishing up the registration process and insuring the car through Haggerty. Below is a cool pic -- the registration expired 25 years ago! 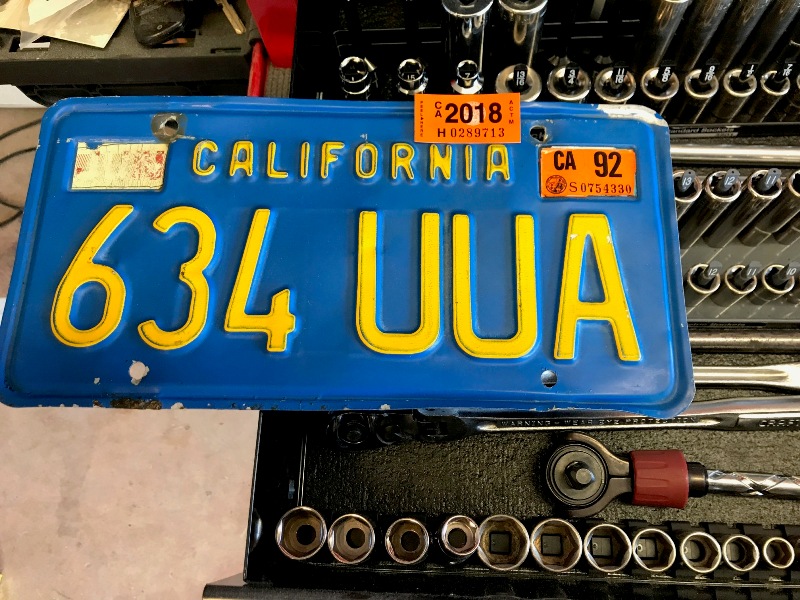 I pulled the stripped door shells from the spare bedroom, cut out the rusty door seal channel parts, welded in new pieces (PITA), and got the doors ready for epoxy primer. The driver door was especially bad, since it was dented, wavy and pockmarked. I also welded up the holes left over from the Vitaloni mirrors on both doors. I finally got the chance to use the shrinking disc I bought a few years ago, and the door blocked-out nicely with only a small skim of Evercoat Rage Extreme filler in a few places. I like using that stuff, but most of it ends up in my nose or on the ground... If you look at Post #76 (from June 7, 2009!), you'll see the "rough" rust repairs that I made in the lower windshield area, which at the time I covered in epoxy primer. I also made rust repairs in the cowl-to-fender seam area, and ended up welding that area up -- both because of the extent of the damage and for my own aesthetic preference. Before I installed the windshield, I need to clean those areas up, smooth 'em, and then reapply epoxy primer. After letting it all dry/cure, I pulled the old PPG windshield out of the attic and test-fitted it. Gawdammit, the windshield hits my fender-flare inspired dash pod!  Out came the rasp file and sanding blocks. I now have about 3/16" clearance, but I am now worried it'll affect defrosting. When I pull everything apart for paint, I'll reconfigure the pod. I used 3M butyl tape in 5/16" using instructions I found on this site. Everything went well, although when I install the new windshield I'll place the butyl bead on the inside edge of the pinchweld. 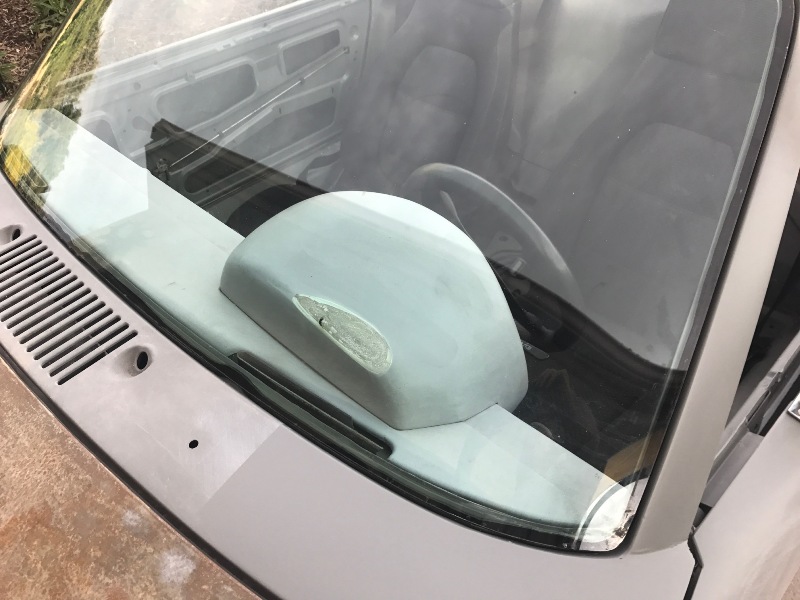 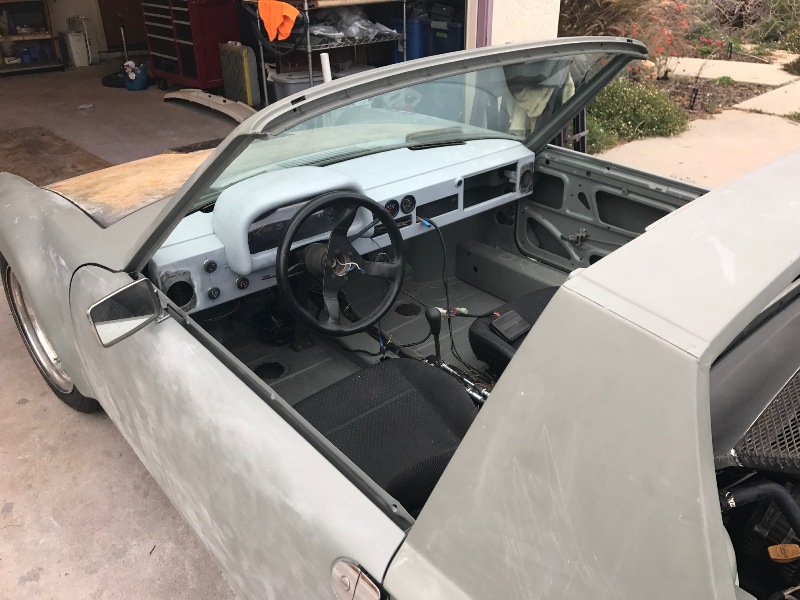 I installed the headlights, doors (without any rubber seals for now), trunk lid and engine lid, and I took it for its first real set of several test-drives. Nothing rubs or grinds (yay!), although the turbo is not producing boost (boo!). And the doors really rattle without the rubber seals! The brakes work great, and my Frankenstein steering system (see post #84) is tight. It is REALLY loud; I set off the alarm on a neighbor's Prius twice on the first two trips around the block. I'll need to rethink the exhaust... The H-pattern shift system is balky -- especially 3rd gear. From second gear, I have to move the lever up, to the right, and then sorta left-n-up toward first gear. I'll see how the adjustments in the cable mounts changes the pattern. I strapped on my string-box alignment setup (see below) and found that front is toed-out a total of 1", so I'll align it tonight. 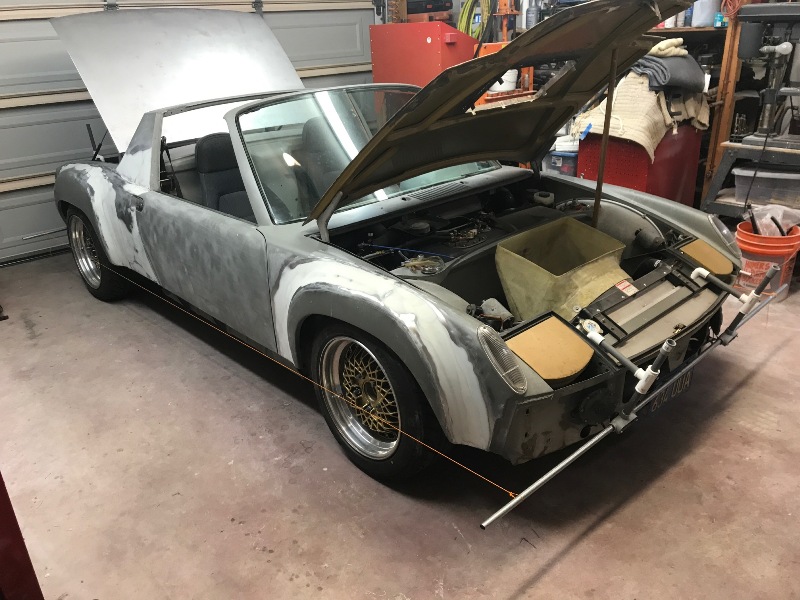 I need to drive it as much as possible this week to figure out its weaknesses before the race on Saturday. I really don't care too much about the boost at this point, since I'll use the autocross more as a testing platform than a competition. |
|
|
|
| 76-914 |
Sep 11 2017, 11:51 AM
Post
#344
|
|
Repeat Offender & Resident Subaru Antagonist Group: Members Posts: 13,883 Joined: 23-January 09 From: Temecula, CA Member No.: 9,964 Region Association: Southern California |
Good to see you back on it! (IMG:style_emoticons/default/popcorn[1].gif)
|
|
|
|
| charliew |
Sep 11 2017, 12:59 PM
Post
#345
|
|
Advanced Member Group: Members Posts: 2,363 Joined: 31-July 07 From: Crawford, TX. Member No.: 7,958 |
still following along on your great build. I went back to refresh on the previous page and noticed the windage tray on your motor and I must have 5 different 4cyl suby shortblocks and I've never seen a tray like that one it is a lot different from the ones I have, also it has a great oil pickup support.
|
|
|
|
| JRust |
Sep 11 2017, 01:57 PM
Post
#346
|
|
914 Guru Group: Members Posts: 6,317 Joined: 10-January 03 From: Albany Oregon Member No.: 129 Region Association: Pacific Northwest |
Nice bud. Can't wait to hear how the autocross goes. I can't think of a better way to test it out (IMG:style_emoticons/default/aktion035.gif)
|
|
|
|
| strawman |
Sep 11 2017, 02:21 PM
Post
#347
|
|
Senior Member Group: Members Posts: 891 Joined: 25-January 08 From: Los Osos, CA Member No.: 8,624 Region Association: Central California |
The rain seems to have gone away, so I went home for lunch and drove the 914 to work. I manage the regional public transit system here in SLO. All the mechanics at my office came out to the parking lot and were crawling all over it -- the best ego boost an executive director can get. (IMG:style_emoticons/default/biggrin.gif)
|
|
|
|
| strawman |
Sep 18 2017, 10:47 AM
Post
#348
|
|
Senior Member Group: Members Posts: 891 Joined: 25-January 08 From: Los Osos, CA Member No.: 8,624 Region Association: Central California |
First tow!!!
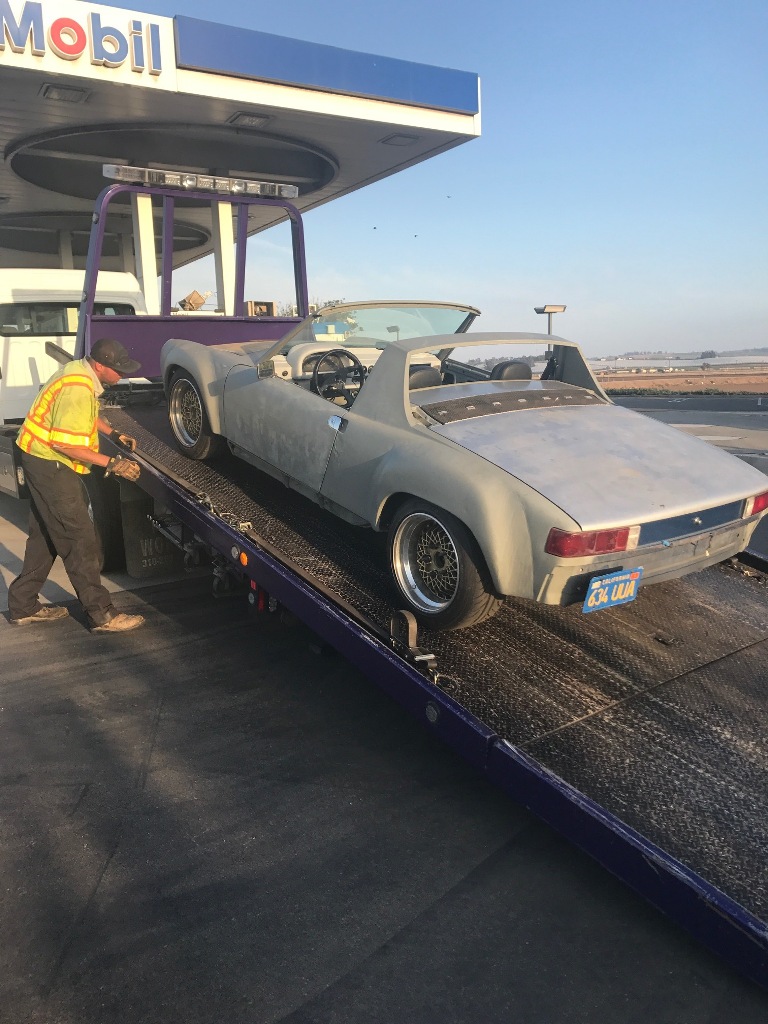 The car had been working reasonably well, although the shifting kept getting balkier, especially 5th and Reverse. The turbo is also not boosting, so it was not accelerating particularly hard. But I had already paid for the September 16th PCA Zone 8 autocross, so I entered it anyway and took the car for its longest-yet drive to Santa Maria. The drive down was uneventful though a little chilly. The course was relatively wide open, with two fun slaloms and a fast finish. There were three other 914s (a pristine '74 2.0, a highly-modified 914-6, and a hashed out '72 1.7), and all ran best times of between 66 and 73 seconds in the first run group. Out of the box, I ran a 68.356 although my car stalled off the line and coughed at every shift. In short, it handles great and can carry speed through turns that would cause my BMW 332ti to blow through a wall of cones. Coolant temps climbed right before my last two of five runs, but the big-ass Lincoln fan kicked in and cooled it right back down. My oil temps also started to climb to about 210 degrees (more on that later...). I ended my fifth run with a clean 67.057, which isn't too bad considering the 914-6 was on Hoosiers and was less than 2 seconds faster. Right before my next set of runs in the afternoon, I started the car up and my dash-mounted oil pressure gauge showed less than 10 psi at idle, and would not climb past 20 psi. A check of the mechanical gauge on my Accusump confirmed it. Oil level was fine, so I parked it for the day. I figured I could nurse it the 30 miles home, and I vigilantly watched the oil pressure, oil temp and coolant temp gauges, while only going 65mph on US-101 -- which is a bit terrifying as huge SUVs raced past me! I made it about three miles when the oil pressure dropped below 10 and the idiot light in the Suby dash (set at 7 psi) began to flicker. I quickly pulled off at the nearby interchange, and when I backed into a parking spot at the Mobil gas station, my gear lever was stuck. Uh oh, two bad things are now happening. I called Hagerty Roadside Assistance, and the picture above shows the result. Yesterday, I got the car up on the lift, pulled the oil filter, used a paint filter cone to check for metal pieces and found nothing. I cut open the filter and unfurled the filter media (what a messy job!). I found no metal or other debris. I then drained the oil through a paint cone filter, and again found no debris. I pulled the sump and discovered the problem right away: I AM A MORON (IMG:style_emoticons/default/stromberg.gif) (IMG:style_emoticons/default/headbang.gif) (IMG:style_emoticons/default/lol-2.gif) In bottom of the sump was an oil soaked Scott's blue shop towel! I remember tucking a towel up in a crevice to help sop up oil when cleaning the surface to ready it for RTV when I installed the SmallCar sump, and obviously I forgot to remove it. The high-Gs pulled at the autocross must have dislodged it and it sucked up against the oil pick-up screen, robbing the engine of oil. I buttoned up everything (all towels accounted for (IMG:style_emoticons/default/aktion035.gif) ), filled it up with another 8 quarts of Shell Rotella T6, and the pressure was back to good at both idle and when revving it up. Hopefully, I didn't cause any long-term damage. I pulled the Subaru transaxle last night, and I'll provide a post-mortem on it in the next couple of days. The long-n-short of it is I had planned to swap out the Phase I 5MT for a Phase II that was already sitting in my garage, but now I'm forced to do it to get the car back on the road. The Suby transmissions are somewhat notorious for bent shift forks, and a common upgrade is to use later-model steel forks in place of the earlier aluminum ones. Internet lore states that this is compounded in the Phase I units that depend upon the (now removed) center differential for oiling; the Phase II units use 5th gear for splashing gear oil. The Phase II transaxles also apparently have a stronger case. More info on the preferred Suby transaxle for a mid-engine swap can be found here. I had to pull the downpipe/muffler to remove the trans, and I figured out why no I'm getting no boost -- the turbo exhaust impeller is partially bound up. I know what you're thinking: maybe he left a rag in the intake of the turbo. Yes, I deserve that. (IMG:style_emoticons/default/chair.gif) I also need to replace the cracking CV boots (that I replaced with new aftermarket ones in 2011!). Finally, my in-tank fuel pump is audibly whining, so I'll need to replace it with a new Walbro 255 l/hr unit. Fun, fun, fun... |
|
|
|
| theer |
Sep 18 2017, 12:05 PM
Post
#349
|
|
Senior Member Group: Members Posts: 692 Joined: 31-July 15 From: Dover, MA Member No.: 19,014 Region Association: North East States |
HA! those darn blue towels. They will also prevent your carb'ed motor from running properly if you leave them in the intake when you re-install the carbs.
Yup, I did that. Fortunately, only on one side. Took me two hours to fish the paper bits back out through the intakes and spark plug holes. To quote Bugs Bunny: "what a maroon." That's all folks - and now back to the regularly scheduled program... |
|
|
|
| 76-914 |
Sep 18 2017, 01:24 PM
Post
#350
|
|
Repeat Offender & Resident Subaru Antagonist Group: Members Posts: 13,883 Joined: 23-January 09 From: Temecula, CA Member No.: 9,964 Region Association: Southern California |
We all do it. I once left a paring knife (making gaskets) on top of the cam in an old hot rod. (IMG:style_emoticons/default/headbang.gif) I'm glad nothing major happened to your car. (IMG:style_emoticons/default/beerchug.gif)
|
|
|
|
| strawman |
Oct 6 2017, 12:33 PM
Post
#351
|
|
Senior Member Group: Members Posts: 891 Joined: 25-January 08 From: Los Osos, CA Member No.: 8,624 Region Association: Central California |
Okay, I discovered the reason why my Phase I Suby transaxle locked up: the reverse countergear shaft drifted and tweaked the case (and, again, I'm a moron). I discovered this when I was assembling the replacement Phase II trans, when the new input shaft bearing's locating pin interfered with the reverse gear shaft locking pin. I didn't know that the locating pin on the new bearing could be removed and that the locking pin would both lock the reverse shaft and locate the new bearing (IMG:style_emoticons/default/headbang.gif) . It was likely exacerbated by the fact that the Phase I transaxles are not lubricated correctly once you remove the center differential to use in a mid-engine scenario, whereas the Phase II units are lubed independently. Hard to describe -- but if you're rebuilding a Suby transaxle, use Vise-Grips to remove the locating pin from the new input bearing, don't cavalierly toss the locking pin, and use a Phase II transaxle from the get-go (they also seem to have beefier shift forks). There's a lot of great info now available on the Factory Five 818 discussion board that wasn't available when I started this project.
The Phase II trans also has eight size M10 engine-trans mount holes, whereas the Phase I has only four. While four of the eight holes line up perfectly with the earlier engines, this is a problem because the later engines use two through-bolts to mount the starter; the Phase I transaxles use one M10-1.25 stud and one M10 through-bolt. The best solution would have been to install an M10-1.25 Heli-Coil into one of the eight holes and twist in a stud, but I didn't want to buy a $65 Heli-Coil kit when it would be cheap-n-easy to drill/tap for an M12-1.25 stud. Instead of drilling a larger hole in the starter, I chucked up an M12 stud in my HF lathe to step it down to accept an M10-1.25 nut. The Phase II transaxle is now in the car, after first updating the hardware in the OBX limited-slip -- a common upgrade that I learned of after originally installing in the Phase I transaxle (IMG:style_emoticons/default/dry.gif) . It is less yhan $30 shipped, which can be found at kit/instructions. The gearing is slightly higher in the Phase II trans (final drive 3.90 vs. 4.11; June 2025 edit: this is wrong -- the 2001 Outback actually also has a 4.11 final drive!), but that should be better since the Phase I was a little low for my liking -- I had to shift from 1st gear almost immediately after taking off. If anyone is undertaking a Suby trans overhall, PM me and I'll ship the jig I built that holds it steady while setting the backlash... I am using a "secret sauce" that is generally lauded on the Factory Five 818 forum: one quart each of Pennzoil Synchromesh and Red Line Heavy Shockproof, and two quarts of Castrol Limited Slip 80W-90. 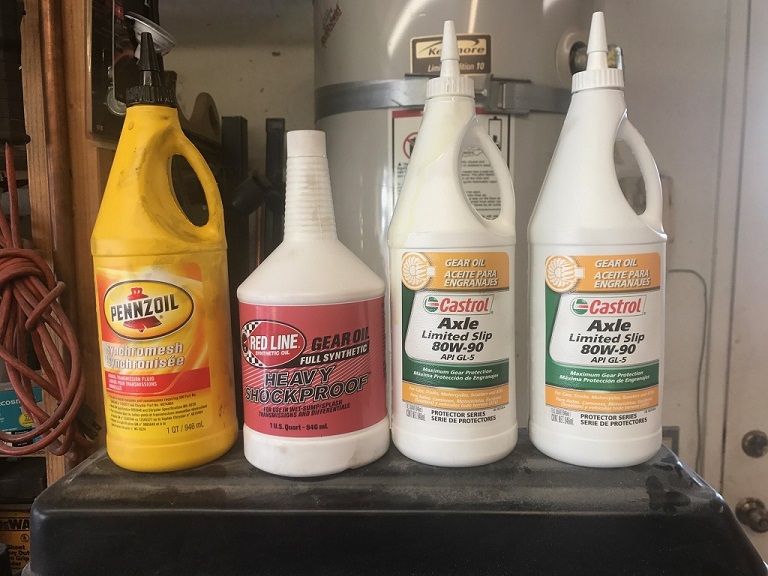 One other thing that I had to redo: replace the el-cheapo Dorman inner CV boots I used a few year ago when I assembled the hybrid axles. The boots were badly weather-checked and splitting (turning to powder!) despite having fewer than a couple hundred miles on 'em. Do yourself a favor and buy Subaru boots -- they're made of noticeably thicker and higher-quality rubber, and they were less than $20 each. I locally sourced a used TD04L-13T turbo from a 2002-04 WRX, since my original TD05H-16G that came with my engine developed a lot of shaft play / binding and the up-pipe flange is cracked. The TD04 should also spool up faster than the larger TD05, but it'll poop out earlier in the RPM range. It'll be hard for me to compare, since my TD05 didn't boost anyway. I paid $80 for the used TD04 turbo and $60 shipped for a rebuild kit from Turbo Lab of America, plus another $40 for gaskets and new coolant pipes. I separated the housings last night on the TD04 and will rebuild the center cartridge over the weekend. Some say it must be rebalanced; others say as long as the turbines did not make contact with either housing, you can carefully mark their relative positions and buckle it back up. I chose the latter since there are no shiny spots. I also need to slightly reconfigure my turbo inlet piping/hoses, since the TD05H has a slightly unorthodox 90 degree inlet casting. Hopefully, I'll be able to drive it (with boost (IMG:style_emoticons/default/drooley.gif) ) before the weekend is over and the turbo won't spin itself into unbalanced oblivion... 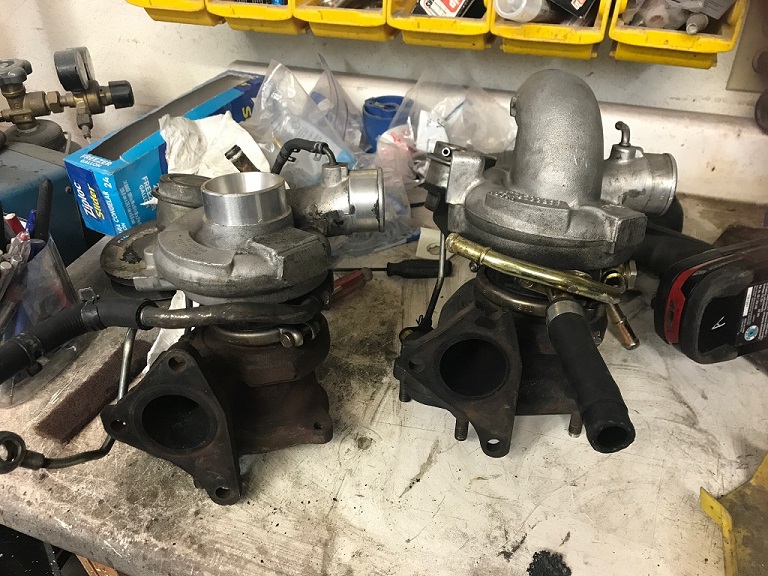 |
|
|
|
| 914forme |
Oct 6 2017, 06:58 PM
Post
#352
|
|
Times a wastin', get wrenchin'! Group: Members Posts: 3,899 Joined: 24-July 04 From: Dayton, Ohio Member No.: 2,388 Region Association: None |
Thank you for the great info and hunting it down (IMG:style_emoticons/default/piratenanner.gif)
Also do you have a picture of the jig? shipping on it can be a few $$$. And I would love to get my OBX in my trans. Nice build on the 318ti |
|
|
|
| strawman |
Oct 7 2017, 02:34 PM
Post
#353
|
|
Senior Member Group: Members Posts: 891 Joined: 25-January 08 From: Los Osos, CA Member No.: 8,624 Region Association: Central California |
QUOTE(914forme @ Oct 6 2017, 05:58 PM) Also do you have a picture of the jig? shipping on it can be a few $$$. A great set of instructions is included at Factory Five 818 Instructions. I cut/pasted all of that info into an MS Word document; PM with your email addy and I'll send the 6MB file. The instructions say to use pieces of wood and shims to steady the trans while setting the backlash, but below is a pic of the scrap metal jig I built to keep it rock-solid -- I don't think it'd cost much to ship and it'd be yours to keep/pass-on. I also used an HF slide hammer screwed into a set of Vise-Grips to keep the shaft from moving (the pics in the attached link will help this make sense). 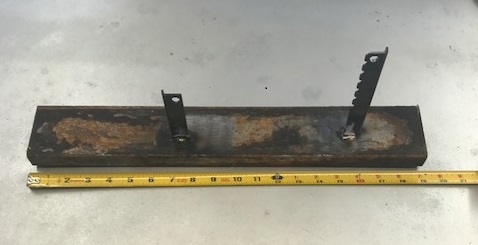 |
|
|
|
| strawman |
Oct 7 2017, 02:50 PM
Post
#354
|
|
Senior Member Group: Members Posts: 891 Joined: 25-January 08 From: Los Osos, CA Member No.: 8,624 Region Association: Central California |
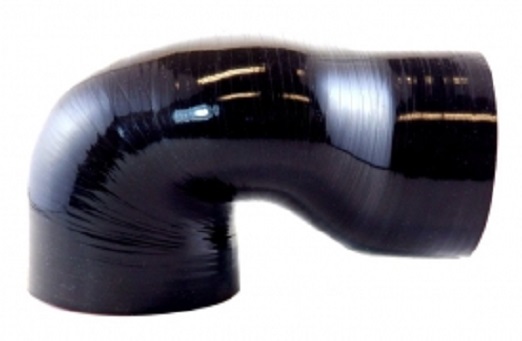
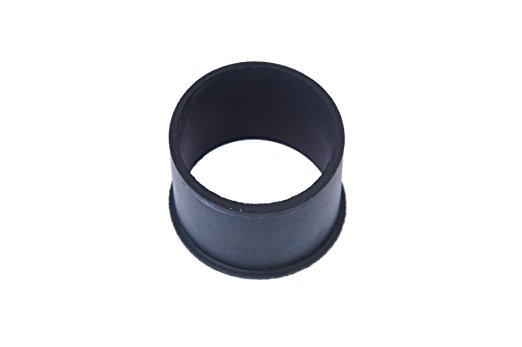
Oh, and everything is mounted up now. However, I had to order a low-clearance/cobra-head silicone 90 degree coupler to clear the intake manifold, as well as a couple of reducers to mate up the 2.5" cobra-head to my 2.25" OD turbo inlet and aluminum piping. So it'll be next weekend before these are shipped and I can get it running. Here's some pics of these pieces for reference:
  |
|
|
|
| 98101 |
Oct 7 2017, 08:57 PM
Post
#355
|
|
Michael in Seattle Group: Members Posts: 373 Joined: 7-October 17 From: Seattle, WA Member No.: 21,495 Region Association: Pacific Northwest |
QUOTE(strawman @ Sep 18 2017, 09:47 AM) In bottom of the sump was an oil soaked Scott's blue shop towel! This made me smile. |
|
|
|
| charliew |
Oct 9 2017, 12:20 PM
Post
#356
|
|
Advanced Member Group: Members Posts: 2,363 Joined: 31-July 07 From: Crawford, TX. Member No.: 7,958 |
a few years ago I studied every tranny lube thread I could find on the suby but it was mainly for the 6 sp as my son's sti scratched 5th at wot every time since new. we tried different lubes and decided it was fruitless. while I was searching it was said that you could get too slippery and the syncros could not let the gears settle on a even speed while engaging. the only way I can see to really know is of course trial and error. just like the trial and error of the fluid level after changing the rear to 2wd. the age and mileage on the syncros is also a determining factor on how well the syncros work i'm sure. At any rate you are giving everyone a great deal of good experience related advice on starting out on your adventure. I also have started with a 96 outback turbo tranny which is a ph1 and have already put the locker and bremar stuff in it a long time back. I also at the time thought the 4:11 was too low for the torque range of the turbo suby but that was my first tranny buy as it came with the motor. I guess I will move the new parts to a 05 tranny I bought on ebay a few years ago. Do you turn the key on to drain the accusump as that's the way I do the on the one in my blazer when I change the oil? I am interested if yours completely drains on it's side like that.
|
|
|
|
| strawman |
Mar 11 2018, 08:51 PM
Post
#357
|
|
Senior Member Group: Members Posts: 891 Joined: 25-January 08 From: Los Osos, CA Member No.: 8,624 Region Association: Central California |
Well, I finally sold one of my sidetracks -- the M3-swapped 318ti is now at its new home in Ohio.
As soon as the funds hit my bank account, I ordered a RobTune chipped ECU originally from a JDM WRX STI, a set of '04 USDM WRX STI injectors from eBay, a set of RobTune injector adaptors, and a RobTune coil-pack adaptor kit. All told, this stuff cost me a grand. After repinning a few ECU wires and installing everything, it fired right up. And man does it boost hard now! I've conservatively set the boost at 12psi for now (using the HKS electronic boost controller that I got from JCD914 a few years ago) while I log a few runs to monitor my air-fuel ratio and EGT readings. My next autocross is March 24th, so I'll spent the next few days testing and tuning. It is exciting to finally get this car running the way it should! It is easy to break the tires loose in first and second gear, and it hisses and blows like a hurricane. (IMG:style_emoticons/default/piratenanner.gif) (IMG:style_emoticons/default/beer3.gif) |
|
|
|
| JRust |
Mar 12 2018, 02:55 PM
Post
#358
|
|
914 Guru Group: Members Posts: 6,317 Joined: 10-January 03 From: Albany Oregon Member No.: 129 Region Association: Pacific Northwest |
Love it man. Getting close with mine but has been a slow swap for sure. Post some bideo of it now with the boos working. I need to hear that thing howl (IMG:style_emoticons/default/piratenanner.gif)
|
|
|
|
| Justinp71 |
Mar 13 2018, 12:03 AM
Post
#359
|
|
Senior Member Group: Members Posts: 1,647 Joined: 11-October 04 From: Sacramento, CA Member No.: 2,922 Region Association: None |
QUOTE(strawman @ Mar 11 2018, 06:51 PM) Well, I finally sold one of my sidetracks -- the M3-swapped 318ti is now at its new home in Ohio. As soon as the funds hit my bank account, I ordered a RobTune chipped ECU originally from a JDM WRX STI, a set of '04 USDM WRX STI injectors from eBay, a set of RobTune injector adaptors, and a RobTune coil-pack adaptor kit. All told, this stuff cost me a grand. After repinning a few ECU wires and installing everything, it fired right up. And man does it boost hard now! I've conservatively set the boost at 12psi for now (using the HKS electronic boost controller that I got from JCD914 a few years ago) while I log a few runs to monitor my air-fuel ratio and EGT readings. My next autocross is March 24th, so I'll spent the next few days testing and tuning. It is exciting to finally get this car running the way it should! It is easy to break the tires loose in first and second gear, and it hisses and blows like a hurricane. (IMG:style_emoticons/default/piratenanner.gif) (IMG:style_emoticons/default/beer3.gif) Nice to see your still working on it! So for computer, you did factory wiring with an aftermarket ecu? Can you share your cost vs build time? I'm doing a EJ25 into my off-road car at the moment and weighing the different ecu/wiring options. |
|
|
|
| strawman |
Mar 13 2018, 05:31 PM
Post
#360
|
|
Senior Member Group: Members Posts: 891 Joined: 25-January 08 From: Los Osos, CA Member No.: 8,624 Region Association: Central California |
QUOTE(Justinp71 @ Mar 12 2018, 11:03 PM) Nice to see your still working on it! So for computer, you did factory wiring with an aftermarket ecu? Can you share your cost vs build time? I'm doing a EJ25 into my off-road car at the moment and weighing the different ecu/wiring options. Hi Justin, If you're doing an EJ25D swap, I would recommend a factory ECU and wiring (or an aftermarket Stinger if you're going to turbo it). The factory stuff works really well, unless you plan to modify the fuel maps, use forced induction or mess with other parameters; it almost always starts regardless of the weather or elevation. I originally used an EJ22T (2.2 liter SOHC) engine out of a 91-94 Subaru Legacy, including all factory Subaru sensors, ECU and wiring. I spent a lot of hours studying the 914 and Subaru wiring diagrams, cutting out unnecessary wires, and connecting the ones that needed to flow electrons. I also am using a Subaru dash cluster out of a 1999 Subaru Forester. While that setup ran reasonably well, it had trouble with the larger turbo and slightly bigger injectors (440cc JDM EJ20G vs. 370cc USDM EJ22T) that I installed. I wired in an electronic "clamp" -- sometimes referred to as a Fuel Cut Defencer -- to allow higher turbo boost without hitting the factory boost (9 psi) fuel-cut prematurely, but it was not consistent and often caused the car to fall flat on its face when accelerating. RobTune adapts the ECU out of a mid- to late-90s JDM WRX STI for use on an EJ22T engine and harness; that ECU and the EJ22T ECU both use the same factory four-plug ECU wiring harness. He installs a custom chip, based on a modest list of options (fuel injectors sizing, turbo, exhaust, etc.) and entirely removes the factory fuel cut -- which means an aftermarket boost controller is needed. I bought a JDM ECU off of eBay for $80, and bought a set of yellow-top USDM STI injectors for $150 (rebuilt, including spec sheets) on eBay. I then shipped the ECU to Rob to install his chip for $325, paid $90 for the coil conversion, and $70 for injector adaptors. Using his instructions, I repinned a few wires and voila -- it runs great. Based on dyno runs of RobTune-modified cars, my engine should put out between 250 and 275 horsepower. The advantage of the EJ22T is that the block is closed-deck -- so it will take a lot of boost without blowing head gaskets. The disadvantage is the SOHC heads; Internet Lore says they poop-out above 5000 rpm, but mine seems to pull strong to the new RobTune 7100 rpm redline. DOHC EJ25D or EJ20 heads & intake manifold bolt right on the EJ22T block if I ever decide to make the engine breathe better. Honestly, if I blow up this engine, I'll likely just install an EJ257 and get a factory 300hp setup with easier tuning abilities... Good luck with your project! Geoff |
|
|
|
|
2 User(s) are reading this topic (2 Guests and 0 Anonymous Users)
0 Members:

|
Lo-Fi Version | Time is now: 17th May 2026 - 01:56 PM |
Invision Power Board
v9.1.4 © 2026 IPS, Inc.