|
|

|
Porsche, and the Porsche crest are registered trademarks of Dr. Ing. h.c. F. Porsche AG.
This site is not affiliated with Porsche in any way. Its only purpose is to provide an online forum for car enthusiasts. All other trademarks are property of their respective owners. |
|
|
  |
| strawman |
 Dec 2 2008, 11:32 PM Dec 2 2008, 11:32 PM
Post
#41
|
|
Senior Member    Group: Members Posts: 891 Joined: 25-January 08 From: Los Osos, CA Member No.: 8,624 Region Association: Central California 
|
Had all of last week off work, but we had family in town... so I only got to work on the car last Saturday and Sunday. Got a lot done and took pics on Saturday, which I'll show below.
First up are two pics of the driver side engine bay, showing removal of the engine bay seal channel. I first sawzalled large pieces off, then attacked the spotwelds. Instead of using the PITA spotweld cutter (which sometimes pokes thru the base metal!), I used a round-head burr in my air grinder to weaken the spotweld and then tore the metal in small strips using Vise-Grips. Way faster. The second pic also shows the hole where the heater tube entered the long; I ground that area flush, since I'll be covering that hole and tying in the rear firewall to the long with a piece of 16 ga. 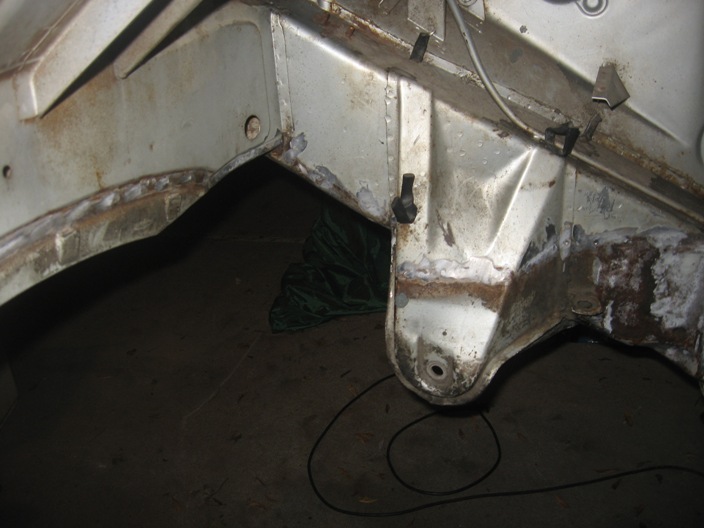 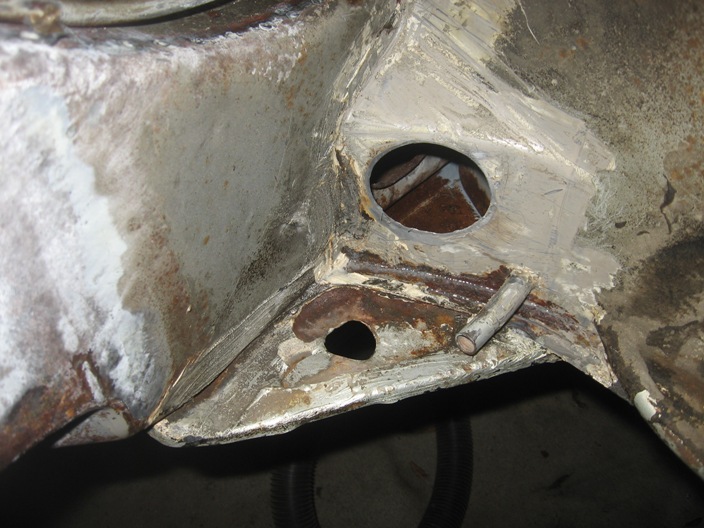 Next up is the passenger side engine bay, which depicts the repairs I made to the hell hole. I still need to ground down the heater tube hole lip and install the reinforcement discussed above. 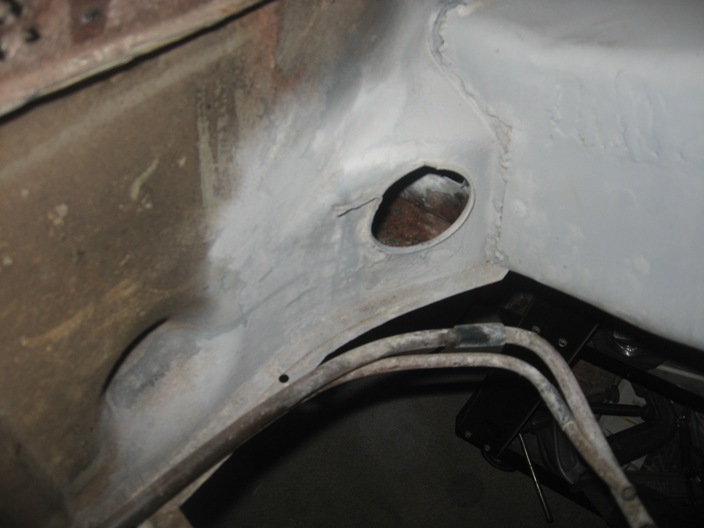 |
| strawman |
 Dec 3 2008, 12:13 AM Dec 3 2008, 12:13 AM
Post
#42
|
|
Senior Member    Group: Members Posts: 891 Joined: 25-January 08 From: Los Osos, CA Member No.: 8,624 Region Association: Central California 
|
On Sunday, I finished up welding in the rear trunk floor and removing most of the remaining seam sealer from that area. I also finished up welding in the final patch on the forward passenger side outer long (as described above).
I picked up some ESAB Easy-Grind .023 MIG wire, and I like it... it does seem to grind down easier than the standard ER70S-6 wire I was using. Flapper wheels on a 4.5" angle grinder do a good job knocking it down, whereas the other wire seemed to need abrasive wheels. I also finished up the removal of the heater tube from the driver side long. There is no rust through on this side, which was a welcome relief after spending so much time on the passenger side long repairs. The pic below depicts the hole I had to cut in the forward portion of the long to remove the heater tube. The pic also shows the area I sandblasted, Marine-Cleaned, Metal-Ready-ed and then covered in POR15. 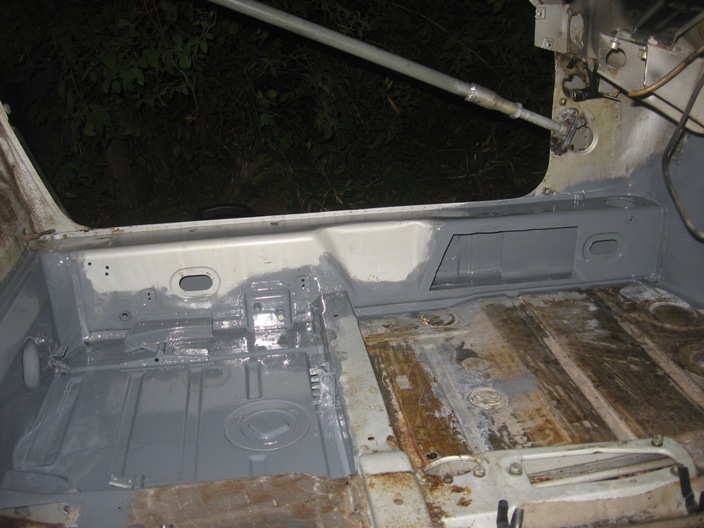 Although not shown in a picture yet, that whole area of the driver side long has already been patched and covered by the Engman long stiffening kit... unfortunately, the rechargeable batteries in my digital camera died and I, too, ran out of steam. Gotta say -- even with the car on a rotisserie -- welding in the Engman kit takes a lot of patience and you're best advised to do some serious stretching before attempting to weld in all those rosettes. I spent the better part of two hours trimming the three pieces to fit just right, and another 90 minutes welding in only the driver's side (wedge myself through the chassis brace, weld, extricate myself while catching my welding helmet on the brace, curse like a sailor, blow compressed air on it; repeat about a hundred times...). I knew I was "done for" when I reached for a beer from the fridge after finishing the last rosette weld and my upper right oblique muscle locked up! I won't be able to work on the car until the middle of the month, when I'll try to finish up the Engman kit installation. I'll post more pics soon. |
| FourBlades |
 Dec 3 2008, 08:10 AM Dec 3 2008, 08:10 AM
Post
#43
|
|
From Wreck to Rockin     Group: Members Posts: 2,056 Joined: 3-December 07 From: Brevard, FL Member No.: 8,414 Region Association: South East States 
|
|
| Root_Werks |
 Dec 3 2008, 09:32 AM Dec 3 2008, 09:32 AM
Post
#44
|
|
Village Idiot      Group: Members Posts: 8,888 Joined: 25-May 04 From: About 5NM from Canada Member No.: 2,105 Region Association: Pacific Northwest 
|
Wow! Great work, I can't believe I didn't see this thread earlier. Keep the progress coming!
(IMG:style_emoticons/default/welder.gif) |
| my928s4 |
 Dec 3 2008, 11:44 AM Dec 3 2008, 11:44 AM
Post
#45
|
|
Member   Group: Members Posts: 349 Joined: 18-August 07 From: Spokane, WA Member No.: 8,018 Region Association: Pacific Northwest |
Nice fabrication work, you have given me some ideas for my fixer upper. Keep it up !
Chris |
| strawman |
 Jan 10 2009, 10:38 PM Jan 10 2009, 10:38 PM
Post
#46
|
|
Senior Member    Group: Members Posts: 891 Joined: 25-January 08 From: Los Osos, CA Member No.: 8,624 Region Association: Central California 
|
Been a while since I posted, and work/family has gotten in the way of big progress, but I haven't been totally dormant. Since my last post, I finished up the Engman kit. Unfortunately, I didn't take any pictures of the progess.
I started the GT stiffening kit that I purchased from Desert Hybrids, as well as the trailing arm stiffening kit. Neither of these kits is drilled or pre-bent, and the instructions were not very helpful. Nonetheless, I found some some good guidance on this site (duh!). The passenger side was made a lot easier by removal of the lower/forward portion of the rear quarter panel. Rear portion, including part of outer suspension console: 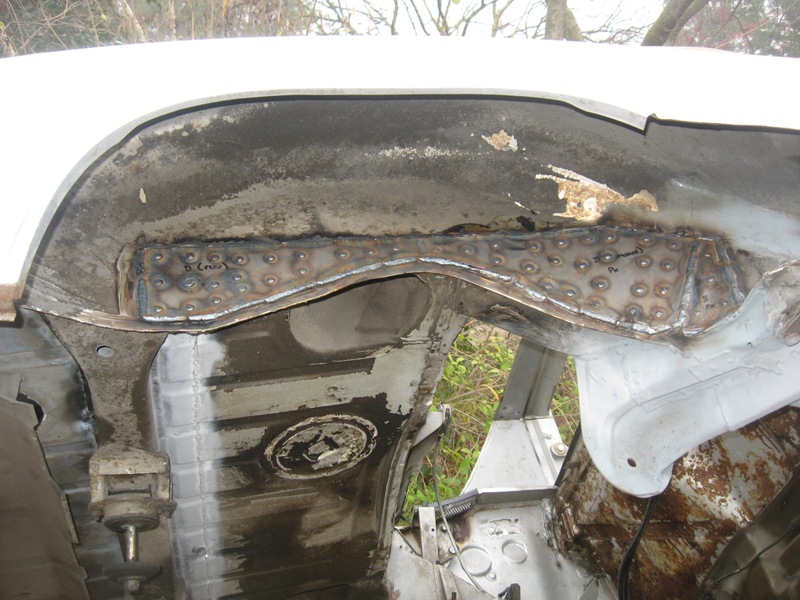 Far forward portion, by the jack post: 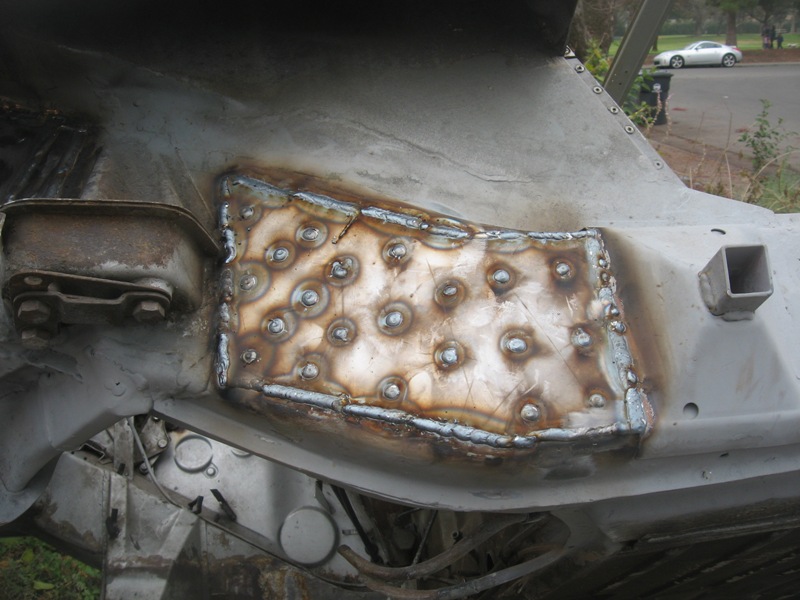 Here's a pic of of everything ground down: 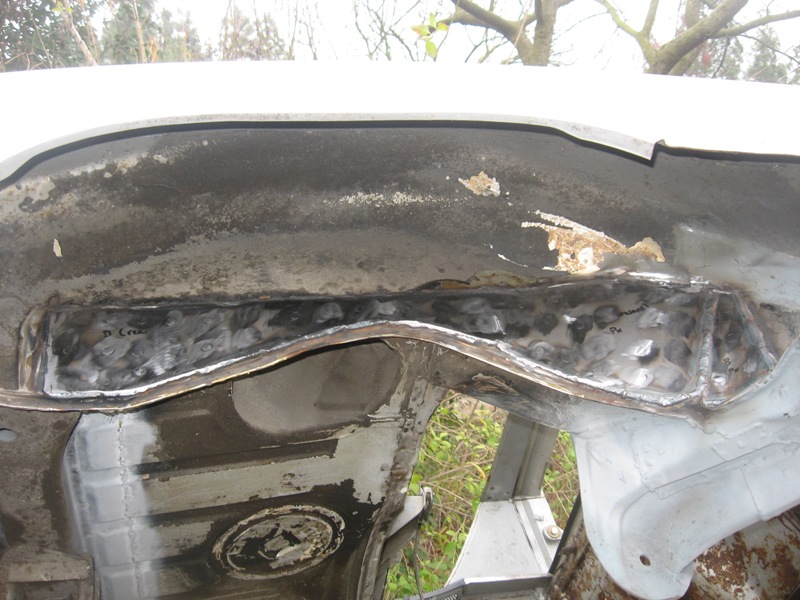 |
| strawman |
 Jan 10 2009, 10:47 PM Jan 10 2009, 10:47 PM
Post
#47
|
|
Senior Member    Group: Members Posts: 891 Joined: 25-January 08 From: Los Osos, CA Member No.: 8,624 Region Association: Central California 
|
Here's some pics of the driver's side. As I got deeper into this portion of job, I realized that the jack post was too far gone. So I cut that portion out and just won a replacement on Ebay.
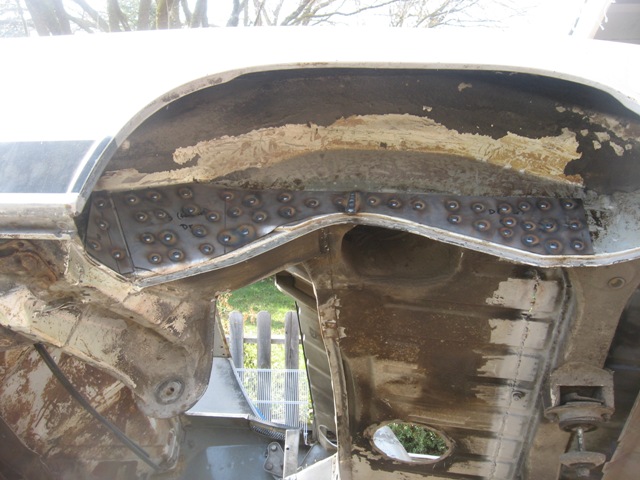 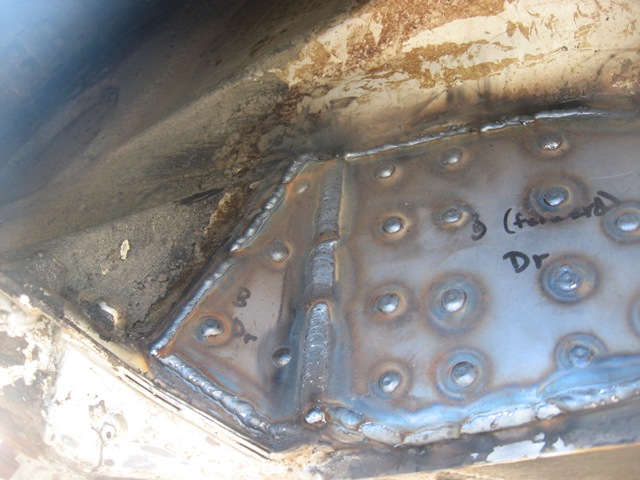 Here is a pic of the jack post half-way removed. Getting the upper spot welds out was a bee-otch, but the burr bit in my die grinder helped knock it out. Fortunately, there is no rust through, so I'll treat it and weld in the new piece. 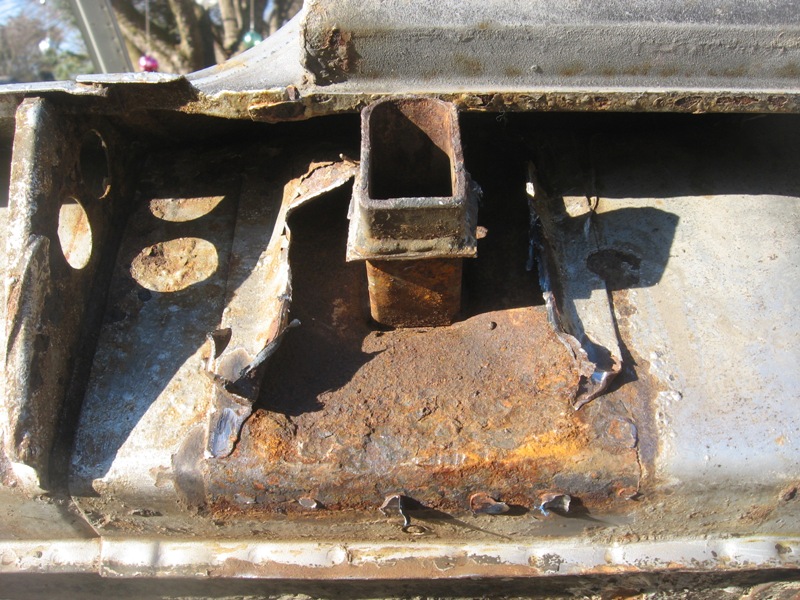 |
| strawman |
 Jan 10 2009, 11:02 PM Jan 10 2009, 11:02 PM
Post
#48
|
|
Senior Member    Group: Members Posts: 891 Joined: 25-January 08 From: Los Osos, CA Member No.: 8,624 Region Association: Central California 
|
Finally, here's some of the trailing arm stiffening kit install. I still have to weld the outer seams and clean up the rosette welds.
First up is one arm, smoothed, weld-thru primered and ready for the install. 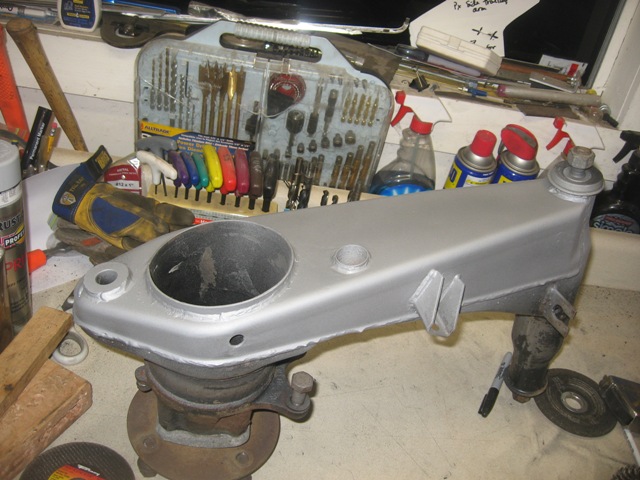 Next up is the plate, drilled and weld-thru primered. 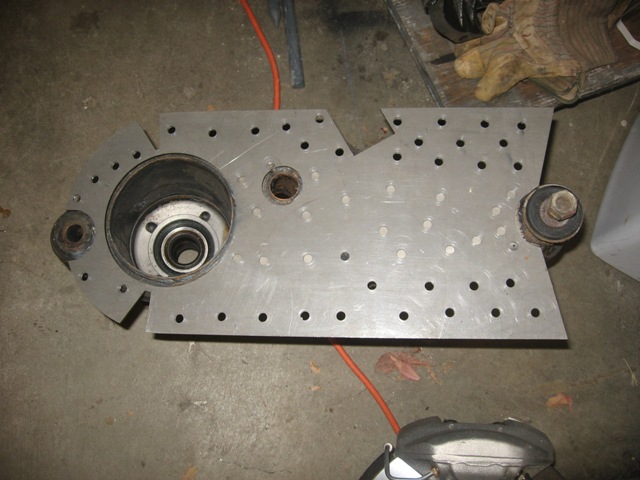 Here are both arms, with the plates rosette welded and ready for seam welding. 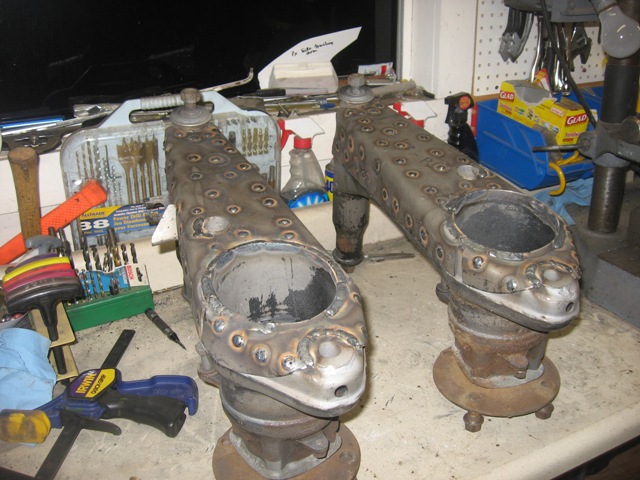 Finally, here is a pic of the underside GT stiffening kit on the passenger side. That one was the most difficult and it took a lot of muscle/grunting/swearing to bend it in to shape. 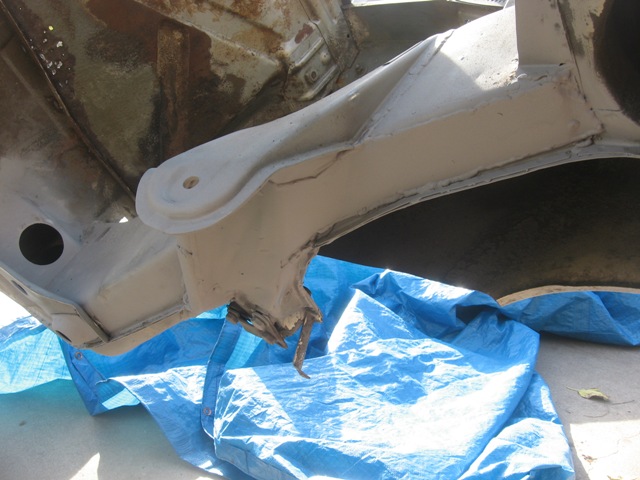 I really recommend cutting out templates of each piece in posterboard prior to drilling the holes... I had to fill-in a couple holes that the "instructions" otherwise suggested would be over solid metal. The template also helps you pre-bend the pieces. I believe that is most important on the trailing arm kits, since you want to make sure the rosette welds are in places that will help you bend the sides over. Does that make sense? I'm heading to DC for work for a week, but I hope to finish up the trailing arms and the GT stiffening kit next weekend. Happy New Year! |
| jc914 |
 Jan 11 2009, 12:13 PM Jan 11 2009, 12:13 PM
Post
#49
|
|
Member   Group: Members Posts: 289 Joined: 15-September 08 From: Miami, Florida Member No.: 9,548 Region Association: South East States |
Nice work (IMG:style_emoticons/default/popcorn[1].gif)
|
| strawman |
 Jan 21 2009, 11:31 PM Jan 21 2009, 11:31 PM
Post
#50
|
|
Senior Member    Group: Members Posts: 891 Joined: 25-January 08 From: Los Osos, CA Member No.: 8,624 Region Association: Central California 
|
The AA rocker covers that I bought as part of the GT flare group buy arrived late last week, as well as a few Ebay items that I won (jack post kit, poly trailing arm bushings and bump steer kit). I also had a chance to spend some quality time with the car on MLK, Jr. Day. In short, I finished cutting out the old driver's side jack post, installed the new one, and finished up welding in the GT Stiffening kit on the driver's side.
First up is a pic of the jack post welded onto the long, complete with SEM weld-thru primer covering everything. The welds match what the factory did (only along the vertical sides): 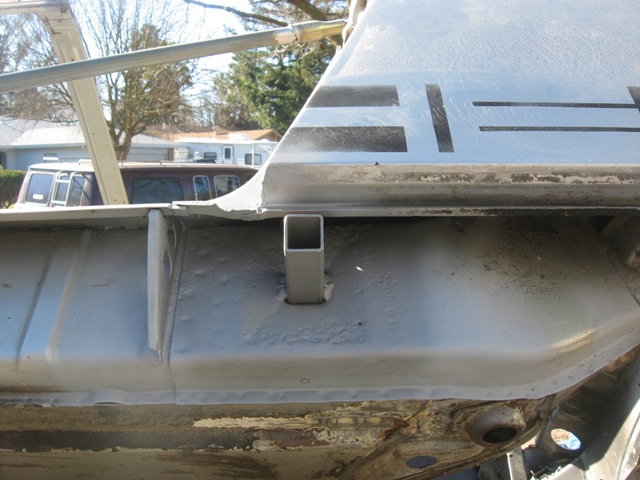 Next up is the jack post "cover." I found the only way to install it without removing the lower/forward quarter panel was to cut the upper/forward corner of the cover, and flatten out the bend that wraps over the top of the long. Maybe a pic would better explain this... 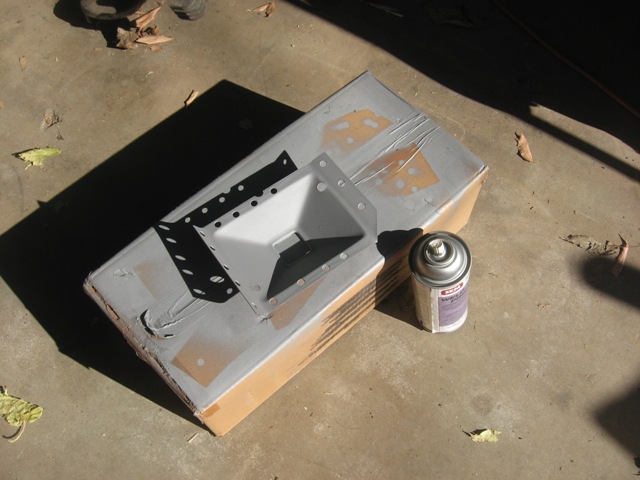 After rosette welding the cover to the long and welding along the post/cover joint, I was able to hammer down the upper edge and finish up the rosette welds along on the top. Here is a pic of the completed installation: 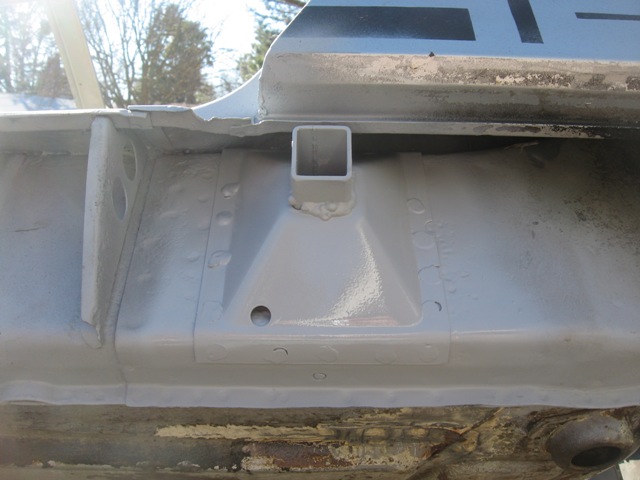 Next up is completion of the GT stiffening kit that was begun and chronicled earlier. A pic of that effort: 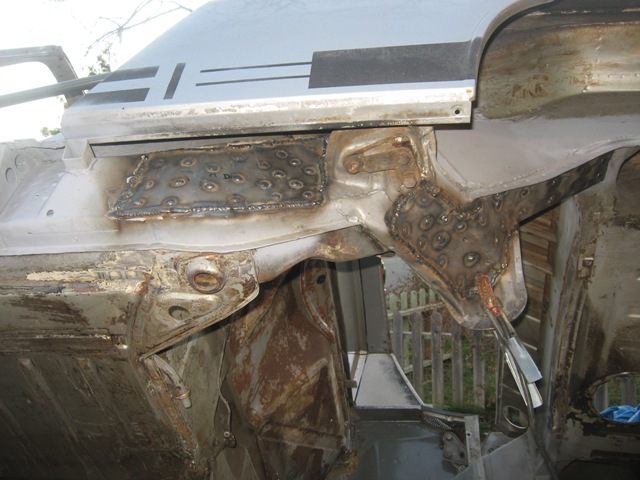 I still have to grind down the welds to make it look purty. I also spent about 4 hours scraping off the tar undercoat from most of the underside and driver's side inner fenderwells. I still have about four hours to finish the underside and the passenger side inner fenderwells. I can't imagine doing that without a rotisserie! Next up is fixing the rust in the windshield area, then fix some rust holes in the sail panel area on both sides, then some frunk rubber channel rust repairs, then reinstalling the lower/forward passenger side quarter panel that I cut out to do the hell hole repairs, then two small firewall rust hole repairs, then welding in the passenger side long sill, etc. This list might seem never-ending to some, but I am making progress -- and that feels good. In fact, this project is cathartic for me and helps me deal with the stress of work/life/etc. Unfortunately, my left hip is failing due to advanced osteoarthritis (and I'm only 42!), so I've scheduled surgery in late February to have it replaced, too. My right one was replaced in October 2007, and it is about 95% healed, so I'm confident this surgery will go just as well. So I won't be able to do any heavy lifting or acrobatics (i.e., welding upside down!) for a few months. Over the next few weeks, I'll try to set up projects that I can do on the workbench -- things like finalize the shifting mechanism, grind down welds on the reinforced trailing arms, new gaskets on Suby engine, etc. during my rehab. I might need to convince my wife to help move some things around to keep things moving along, which might pique her interest in this project (but I'm not holding my breath!). |
| charliew |
 Jan 22 2009, 01:12 PM Jan 22 2009, 01:12 PM
Post
#51
|
|
Advanced Member     Group: Members Posts: 2,363 Joined: 31-July 07 From: Crawford, TX. Member No.: 7,958 |
My wife seems afraid of my shop which is ok to me. She usually just puts her head in the door to yell at me. She is a good cook though and babies me and my sons and dogs so I only yell back a little. I'm 63 and my right hip is sometimes a bother but my knees are great. My dad had hip and knee surgery and he said the knee is tougher than the hip. I do have a uncle that he finally ended up with no hip after three surgerys. He still goes strong, riding a mower and swimming, driving and all. I had ulcer surgery in the mid 80's and pulled a stitch 8 days after surgery (the first day home from the hospital) laying on my back under the dash of a jeep pickup doing a sbc install. Good luck.
|
| Zaney |
 Jan 22 2009, 03:22 PM Jan 22 2009, 03:22 PM
Post
#52
|
|
Deuchland en der Haus   Group: Members Posts: 461 Joined: 1-March 04 From: Engine 11 Redmond, WA Member No.: 1,738 Region Association: Pacific Northwest |
Geoff,
Could you post a picture of the "burr bit" that you used for grinding down the hard to get spot welds? I am in the middle of my passenger side woes and could use any and all tips and tools to do a good job. Awesome Fab and Welding work! (IMG:style_emoticons/default/welder.gif) (IMG:style_emoticons/default/smilie_pokal.gif) Thanks, Nate |
| charliew |
 Jan 24 2009, 01:19 PM Jan 24 2009, 01:19 PM
Post
#53
|
|
Advanced Member     Group: Members Posts: 2,363 Joined: 31-July 07 From: Crawford, TX. Member No.: 7,958 |
A burr is a term for a carbide bit that fits in a air tool. The ones I use for porting heads come in different shaft lengths and 1/4 shaft size. They have many different shapes and are good for many uses. When you use them on aluminum you will need a lubricant to keep the aluminum from sticking to the cutter. I don't remember the terminology but they have a coarse and finer tooth cutter for different materials. Finer for harder materials and coarse for the softer materials. You can get a set or buy them individually.
|
| strawman |
 Jan 25 2009, 10:26 PM Jan 25 2009, 10:26 PM
Post
#54
|
|
Senior Member    Group: Members Posts: 891 Joined: 25-January 08 From: Los Osos, CA Member No.: 8,624 Region Association: Central California 
|
A burr is a term for a carbide bit that fits in a air tool. The ones I use for porting heads come in different shaft lengths and 1/4 shaft size. They have many different shapes and are good for many uses. When you use them on aluminum you will need a lubricant to keep the aluminum from sticking to the cutter. I don't remember the terminology but they have a coarse and finer tooth cutter for different materials. Finer for harder materials and coarse for the softer materials. You can get a set or buy them individually. Yup, Charlie beat me to the punch. I bought a set that includes a "ball" end bit, a straight bit, and a "tree" tapered end bit. The ball end bit is also great for weakening spot welds if you're tossing the removed panel piece. Here's some pics of typical bits: http://www.carbidebur.com/shapes/burs.htm If memory serves, I bought my 3-piece set at Sears about three years ago... Geoff |
| strawman |
 Jan 25 2009, 10:54 PM Jan 25 2009, 10:54 PM
Post
#55
|
|
Senior Member    Group: Members Posts: 891 Joined: 25-January 08 From: Los Osos, CA Member No.: 8,624 Region Association: Central California 
|
I bought a 1969 911 rear suspension/brake system today for $75 (I love Craigslist!). The purchase included the suspension arms, parking brakes & cables, calipers and non-vented rotors. Now I have almost everything I need for my 5-bolt conversion both front and rear.
Below are some pics of the pieces I will use on my setup, based on Paul Sayegh's write-up in the February 2009 edition of Excellence magazine. Excellent article, by the way -- and very timely! Unfortunately, my budget won't allow the use of the Porsche "reds" calipers that Paul used... Pic before tearing everything apart. 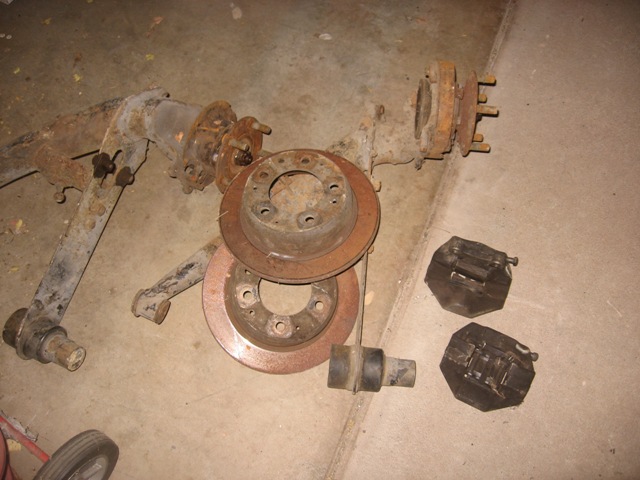 Here's a pic of the components I'll use. I have the backing plates, too, but I forgot to include them in the photo. Obviously, I still need to remove the parking brake pieces from the 911 "banana" arm. 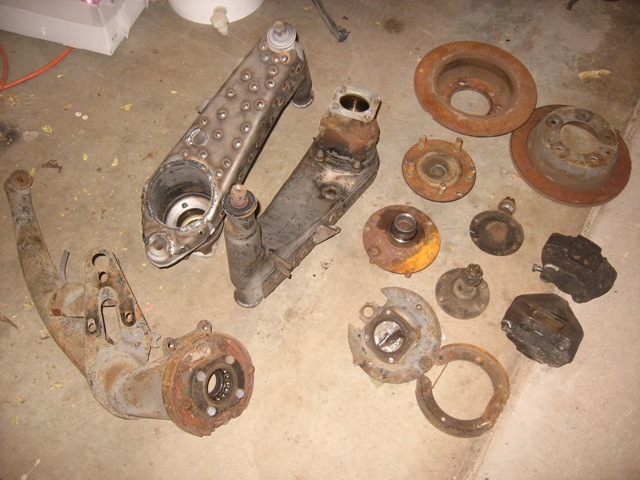 Some of these pieces are pretty rusty, but nothing cancerous/terminal. Like I'm scared of rust, tho! I'm thinking I'll replace some of the hardware with new and get the remainder plated. I'm hoping to upgrade to vented rotors, too, but I'll need to research my options for spacing/widening the calipers to fit 'em. Fun, fun!!! |
| strawman |
 Feb 18 2009, 11:04 AM Feb 18 2009, 11:04 AM
Post
#56
|
|
Senior Member    Group: Members Posts: 891 Joined: 25-January 08 From: Los Osos, CA Member No.: 8,624 Region Association: Central California 
|
I picked up a 1976 911 roller for parts a couple of weeks ago -- primarily for the fake Fuchs (it turns out they're only 15x7 (IMG:style_emoticons/default/sad.gif) ), Porsche rear reflector, and to get the rim-centering rear hubs for my 5-bolt rear suspension conversion.
I have been busy stripping parts to sell (I've actually netted money for my project on this deal (IMG:style_emoticons/default/beer3.gif)), so I haven't worked on the 914 in a while. Here are a couple of pics of that hulk: 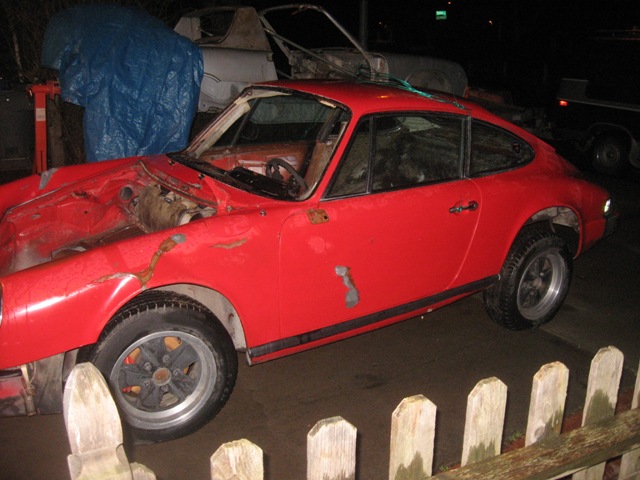 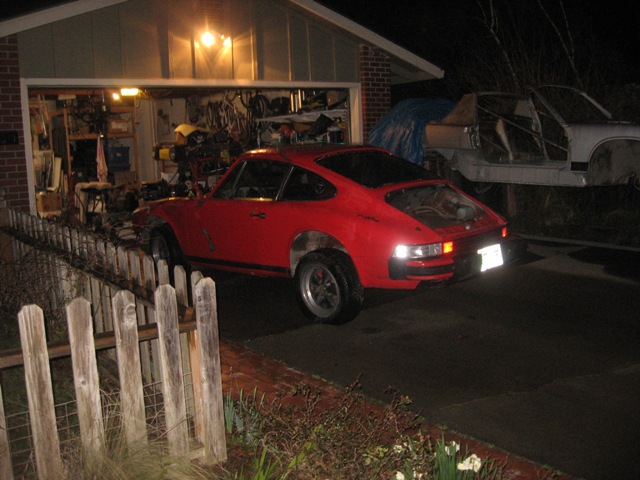 This means that I'll have a spare set of 1969-73 hubs, brakes, rotors (non-vented) and parking brakes (shoes, hardware and cables). Anyone interested? I paid $75, so I'd want the same... I'll put this in the Classified section later, but I thought I'd let any bored souls who have been following this thread have a crack at this setup first. PM me if you're interested. My hip replacement surgery is tomorrow morning, so I'll be in lala land for the next few days and prolly won't be able to respond to PMs for a week. |
| dlo914 |
 Feb 18 2009, 12:46 PM Feb 18 2009, 12:46 PM
Post
#57
|
|
Whatchu' lookin' at?!?!     Group: Members Posts: 3,433 Joined: 6-September 04 From: San Gabriel, CA Member No.: 2,697 |
Great work so far! Will definitely follow your project since a buddy of mine wants to do the same and start a suby project.
|
| strawman |
 Apr 26 2009, 09:41 PM Apr 26 2009, 09:41 PM
Post
#58
|
|
Senior Member    Group: Members Posts: 891 Joined: 25-January 08 From: Los Osos, CA Member No.: 8,624 Region Association: Central California 
|
My hip replacement surgery went well, and I've got about 75% range of motion back. I am not supposed to do much heavy lifting, so I've been puttering around the garage and staring longingly at my teener. So I couldn't take it anymore and dove back in yesterday and part of today.
First up is the rust on the driver side sail panel. As you can see, it rusted through... 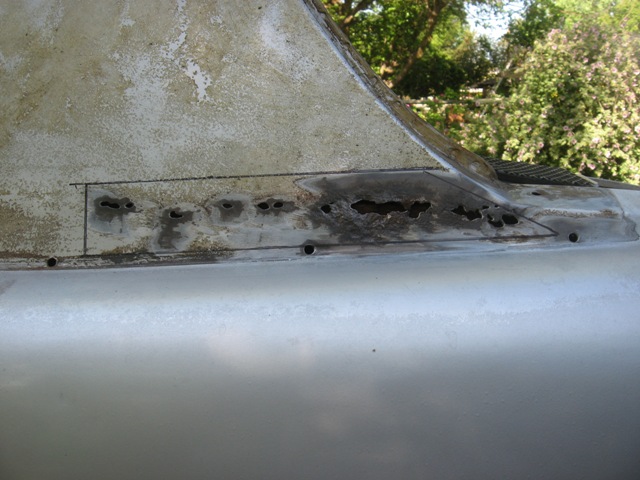 Once the nasty piece was cut out, you can see things were pretty corroded inside. What the picture doesn't show is the foam strips that sit right behind this area. What were the Porsche engineers thinking! 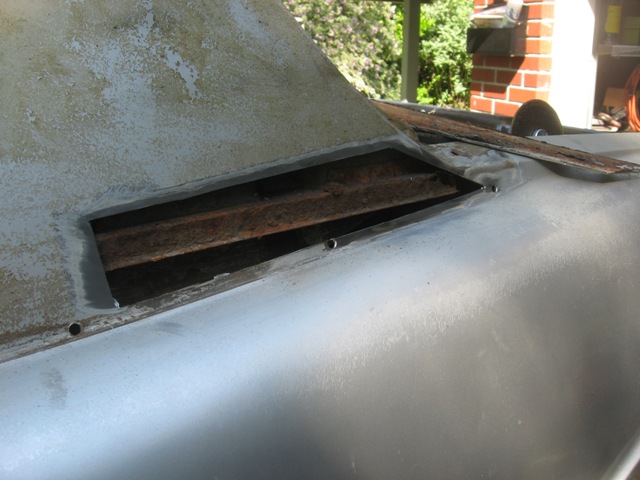 I sandblasted the area as best I could, then did the POR-15 thing on the inside, as well as the back side of the patch. Here is the patch waiting for welding. 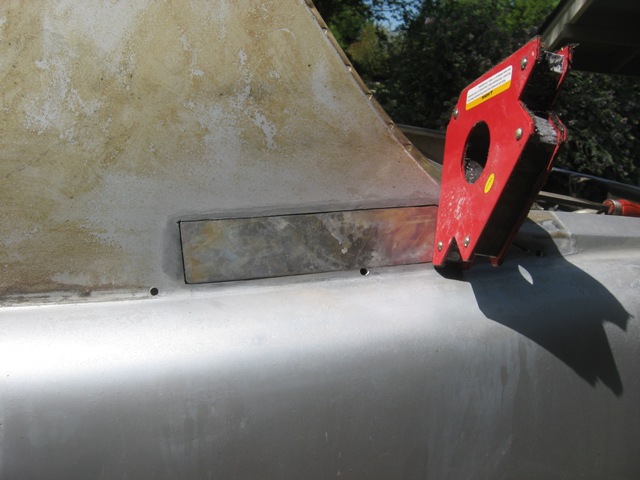 Next up is the patch welded in. To avoid warpage, I made a tack weld, blew compressed air on it until I couldn't feel any heat with my bare hand, then tacked about an inch away, and then repeated about a gazillion times. Here is the finished piece. 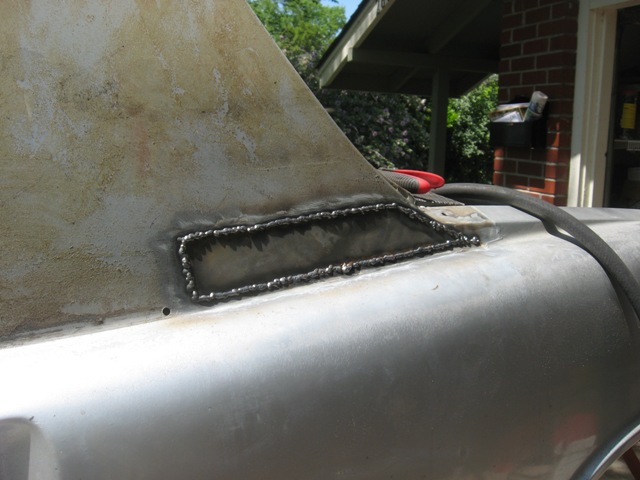 And here it is smoothed down prior to primering. 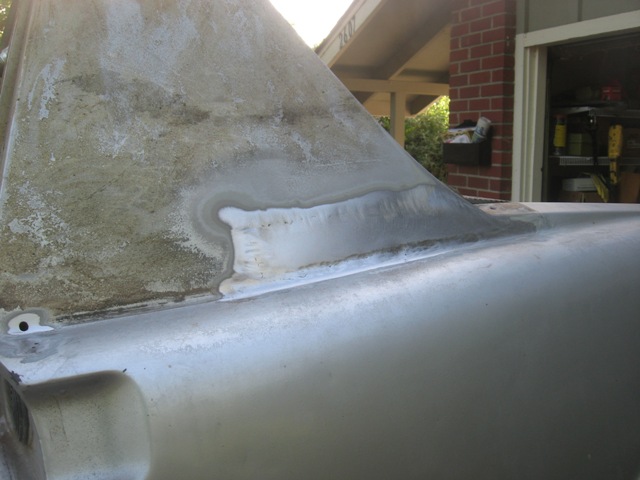 Next up is the area right behind above the driver side door handle... |
| strawman |
 Apr 26 2009, 10:30 PM Apr 26 2009, 10:30 PM
Post
#59
|
|
Senior Member    Group: Members Posts: 891 Joined: 25-January 08 From: Los Osos, CA Member No.: 8,624 Region Association: Central California 
|
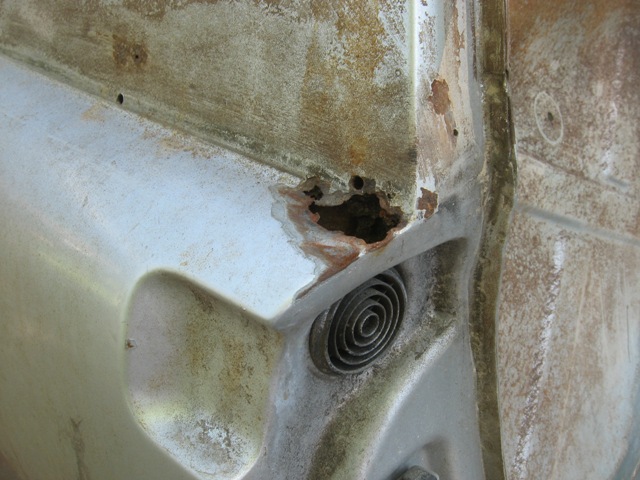
I knew there was a mess under the passenger side sail just above the door handle, as it was perforated already. But once I got underneath, I can't believe EVERY 914 is not rusting through in that area. Here is a pic before I started cutting metal.
 And here is the culprit. Complete nastiness! That chunk of sealant traps moisture against the metal, inviting rust-through. 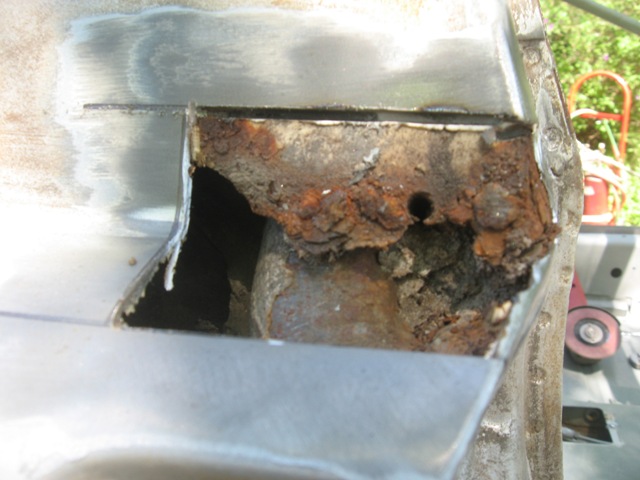 I dug away as much of the sealant as I could reasonably get to and until I found clean metal underneath. Then I POR15-ed the area and the patch, which I cut from Martin Baker's (I can't remember his 'world name!) parts car several months ago. 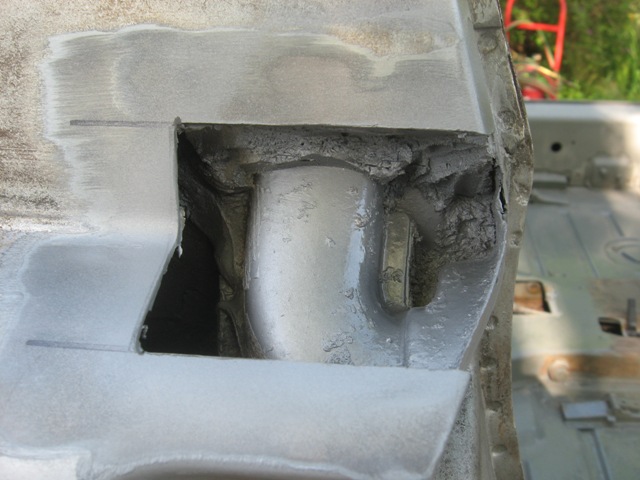 The patch piece was rusted on the back side, too (go figure!), but it was salvageable though thin. I welded it in, using the same tack/cool/tack method described in the post above. One additional challenge is that the quarter panel seam and door jamb (just above the door vent) is brazed by the factory, then leaded for smoothness. So I had to carefully grind away all the brass and lead to give me a good welding area, but I still got a lot of popping and burn-through trying to join these two pieces of metal. The welds are pretty "snotty," but they'll hold and the snottiness will be hidden by bondo before paint. Here is an after shot prior to primering. 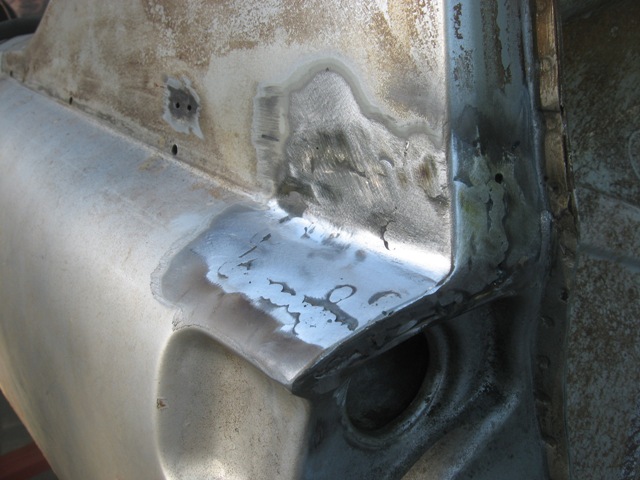 Next up is preparing to re-install the lower passenger side quarter panel that I had to cut out to make the hell hole repairs described earlier. Guess what? Yupper, I found some more rust! Attached image(s) 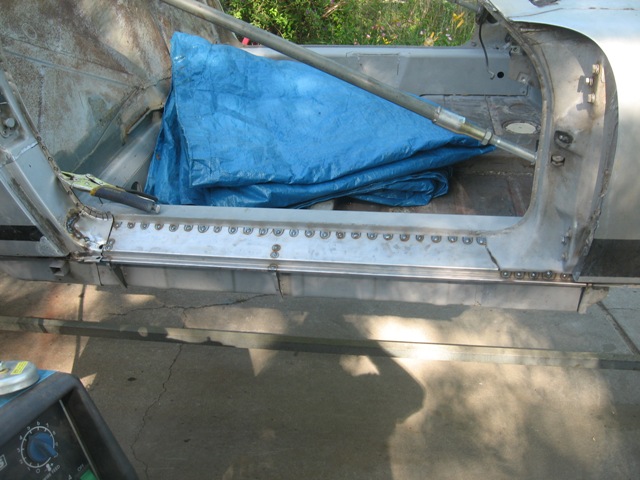
|
| strawman |
 Apr 26 2009, 10:48 PM Apr 26 2009, 10:48 PM
Post
#60
|
|
Senior Member    Group: Members Posts: 891 Joined: 25-January 08 From: Los Osos, CA Member No.: 8,624 Region Association: Central California 
|
The forward/lower area of the passenger side quarter panel is rusted pretty thin from the backside, but it is salvageable. However, the portion that joins up with the sill plate was gonzo. So I cut a new piece out of 18 gauge, formed it and began the fabrication process while installing the new sill and sill triangles. Here is a pic of the fabricated piece, tacked in place.
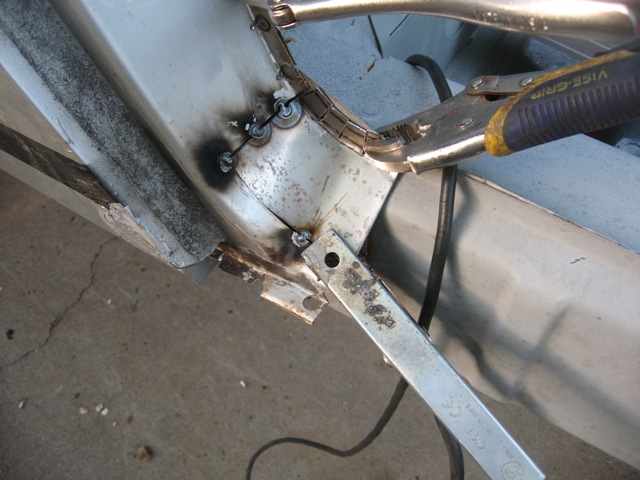 Here is a pic of the triangles that I got from AA. One of them had one of the two "steps" about 1/8" off from the other one, which wouldn't allow the sill to sit tight against it. So I added a 1/8" piece of flat stock (look at the foward triangle). 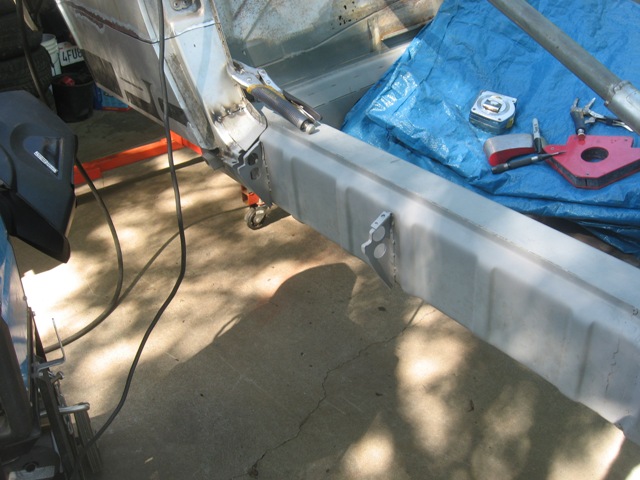 Here is the sill installed, which I also got from AA. Again, I rosette welded a hole, cooled it with compressed air until I couldn't feel any heat with my hand, then moved on to another hole approximately half the length of the sill away. Takes a long time, but that method will hopefully ensure a straight/true tub when I'm done. Fingers crossed! 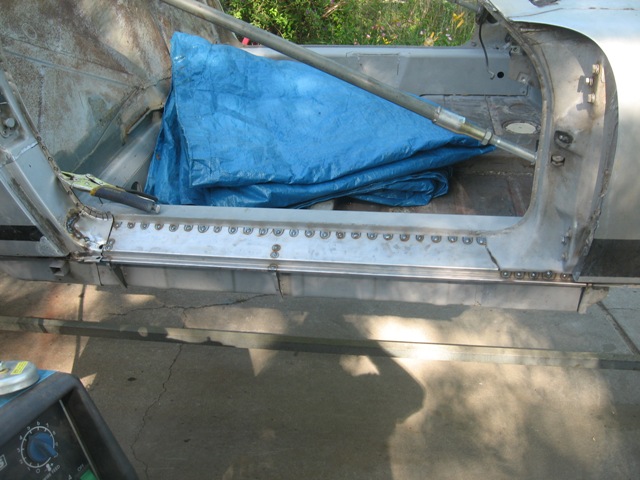 And here it is ground smooth prior to primer. Again, I would grind a rosette, cool it with air, then move onto another rosette, to avoid warpage. 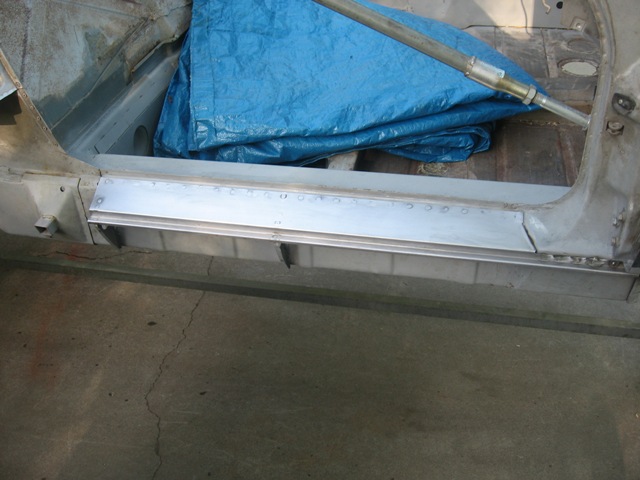 I need to make a couple more small patches on the passenger side sail, fill in the trim holes on both sides, weld in the passenger side lower quarter panel, and then I'll be ready to attack the rust holes in the windshield frame and the frunk seal channel. During my hip recovery, I was bored silly so I spent many hours scraping away the undercoating on the floor bottom and the wheel wells (gotta love a rotisserie!). I also welded up the 911 parking brake solution that Paul Sayegh demonstrated in Excellence Magazine. Someday soon I'll be ready to weld in the GT flares and begin the turbo Subaru engine/trans fitment... |
  |
2 User(s) are reading this topic (2 Guests and 0 Anonymous Users)
0 Members:

|
Lo-Fi Version | Time is now: 16th February 2026 - 08:21 AM |
Invision Power Board
v9.1.4 © 2026 IPS, Inc.


