|
|
|
Porsche, and the Porsche crest are registered trademarks of Dr. Ing. h.c. F. Porsche AG.
This site is not affiliated with Porsche in any way. Its only purpose is to provide an online forum for car enthusiasts. All other trademarks are property of their respective owners. |
|
|

  |

| Loser_Cruiser |
 Jul 3 2008, 12:43 AM Jul 3 2008, 12:43 AM
Post
#1
|
|
Member  Group: Members Posts: 407 Joined: 4-April 05 From: Bellingham, WA Member No.: 3,873 Region Association: Pacific Northwest |
I just wanted to change my rear pads, that was like 5 hours ago and now im in my kitchen with the caliper on my table. First problem was that stupid inside brake adjuster cover. Now that I have that off I can't get the inside piston to go all the way back inside the caliper so I can put the new pad in. Whats stopping it from goiing in. I followed the directions from the pelican parts section by the way.
|
   |

 
|
| Eric_Shea |
Jul 3 2008, 12:47 AM
Post
#2
|
|
PMB Performance Group: Admin Posts: 19,274 Joined: 3-September 03 From: Salt Lake City, UT Member No.: 1,110 Region Association: Rocky Mountains |
Push with your thumb while you turn...
|
|
|
|
| Loser_Cruiser |
Jul 3 2008, 12:55 AM
Post
#3
|
|
Member Group: Members Posts: 407 Joined: 4-April 05 From: Bellingham, WA Member No.: 3,873 Region Association: Pacific Northwest |
ok, I just tried that(again) and I also tried turing the adjuster(anti-clockwise) while prying with an old wooden hammer handle. No budge. What other things could I try or what would cause this. I have a second rear caliper that moves the inside piston in and out pretty easily with just the adjuster but of course its for the other side. BTW this is the passanger side (76) im working with if it makes a difference.
|
|
|
|
| Eric_Shea |
Jul 3 2008, 01:01 AM
Post
#4
|
|
PMB Performance Group: Admin Posts: 19,274 Joined: 3-September 03 From: Salt Lake City, UT Member No.: 1,110 Region Association: Rocky Mountains |
If you have a high speed wrench, try short bursts counter clockwise while pushing. You're inner mechanism is spinning.
|
|
|
|
| Loser_Cruiser |
Jul 3 2008, 01:12 AM
Post
#5
|
|
Member Group: Members Posts: 407 Joined: 4-April 05 From: Bellingham, WA Member No.: 3,873 Region Association: Pacific Northwest |
Ok, i just tried with my electric drill, no go, would a air tool be too much? i can try that tomorrow. Is there away to fix this problem easily, is it even an actual problem? I don't really know what the things problem is but I have a 4th of july car show/parade thing i was gonna do with my vw club, but this is really a bummer. I appreciate your help though.
|
|
|
|
| davep |
Jul 3 2008, 07:49 AM
Post
#6
|
|
914 Historian Group: Benefactors Posts: 5,138 Joined: 13-October 03 From: Burford, ON, N0E 1A0 Member No.: 1,244 Region Association: Canada |
Since the inner adjuster is geared, it works in reverse to normal action; think left hand thread not right hand thread.
The inner mechanism is supposed to be locked into a groove in the piston. There are many times that is is pulled out of that groove, and then the adjuster will not be able to function. To correct that you need to turn the adjuster clockwise to move the mechanism out; listen for the snap as the lock ring falls into the groove, so do this in a quiet environment. In many cases it is best to adjust the piston right out of the bore. Sometimes you can get the piston to move freely, but if not then try turning the adjuster clockwise a few turns, pull back on the lever to force the piston out, turn adjuster and repeat until the lever no longer moves the piston. Carefully wiggle the piston from the bore. Clean the piston with a green scrubbie, and rinse with alcohol. Carefully clean the bore outside of the sealing ring where most of the corrosion occurs. Lubricate the piston with a little fresh fluid, and reinstall. Keep pressure on the piston as you turn the adjuster counter-clockwise; the piston must move as you turn the adjuster. There are special tools that can be used to apply this pressure. |
|
|
|
| Loser_Cruiser |
Jul 3 2008, 11:24 AM
Post
#7
|
|
Member Group: Members Posts: 407 Joined: 4-April 05 From: Bellingham, WA Member No.: 3,873 Region Association: Pacific Northwest |
ok i took the piston out and this assembly in the piston fell out and this is what i have now. where does the spring go in. do i need to remove that inner piece to do it and how? thanks guys
Attached image(s) 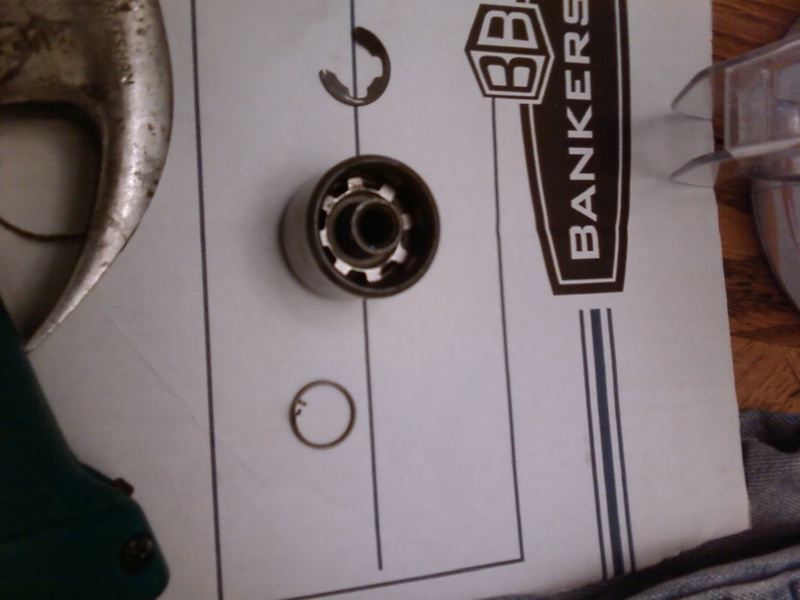
|
|
|
|
| Loser_Cruiser |
Jul 3 2008, 01:04 PM
Post
#8
|
|
Member Group: Members Posts: 407 Joined: 4-April 05 From: Bellingham, WA Member No.: 3,873 Region Association: Pacific Northwest |
no one knows?
|
|
|
|
| davep |
Jul 3 2008, 04:24 PM
Post
#9
|
|
914 Historian Group: Benefactors Posts: 5,138 Joined: 13-October 03 From: Burford, ON, N0E 1A0 Member No.: 1,244 Region Association: Canada |
Of course I know! (IMG:style_emoticons/default/biggrin.gif) Eric Shea as well.
Just not watching every minute here, nor am I at home with parts in my hand to see how far you have to take it apart to repair. I 'think' you may have to pull the guts out, but that can be tricky without special tools. I generally fully disassemble the whole thing when I do a rebuild, so I make my own tools to take apart and put them together again. Patience grasshopper, we will get back to you shortly. BTW, this is the early style adjuster, your late style is a little different: http://www.914world.com/bbs2/index.php?showtopic=77361 |
|
|
|
| davep |
Jul 3 2008, 08:45 PM
Post
#10
|
|
914 Historian Group: Benefactors Posts: 5,138 Joined: 13-October 03 From: Burford, ON, N0E 1A0 Member No.: 1,244 Region Association: Canada |
Okay, it looks like you can just reassemble without further disassembly.
Start by reinserting the circlip, but make sure the hole in the part below is exposed so that the spring can be reinserted. Place the spring over the post with the tail end down. Angle the tail into the hole between the ends of the circlip. Tension the spring, and fit the tang into the hole in the side of the post. The hole should be slightly offset compared with the hole in the horizontal surface below. Clean the bore as best you can, but do not damage the rubber seal ring inside. Clean and lube the piston before reinstalling. |
|
|
|
| Loser_Cruiser |
Jul 3 2008, 10:58 PM
Post
#11
|
|
Member Group: Members Posts: 407 Joined: 4-April 05 From: Bellingham, WA Member No.: 3,873 Region Association: Pacific Northwest |
thank you very much. I found an extra caliper in the garage today that so far tonight has been working good. So I think I will reassemble this one and then rebuild my extras. Thank you very much. Sorry if I was sounding impatient I really had to get this done today as tomorrow is a parade event locally here with my vw club and since my bug is down and out and I already registered I needed something. THanks again.
|
|
|
|
| davep |
Jul 4 2008, 07:54 AM
Post
#12
|
|
914 Historian Group: Benefactors Posts: 5,138 Joined: 13-October 03 From: Burford, ON, N0E 1A0 Member No.: 1,244 Region Association: Canada |
In general this is a question that probably only a select few can answer. I was hoping Eric might chime in, but he must be unavailable. I don't like to post an answer unless I am sure of the advice I give. I had to find a junk piston with the particular mechanism and take it apart to test the procedure.
|
|
|
|
| jimkelly |
Jul 4 2008, 01:31 PM
Post
#13
|
|
Delaware USA Group: Members Posts: 4,969 Joined: 5-August 04 From: Delaware, USA Member No.: 2,460 Region Association: MidAtlantic Region |
|
|
|
|
|
1 User(s) are reading this topic (1 Guests and 0 Anonymous Users)
0 Members:

|
Lo-Fi Version | Time is now: 9th May 2024 - 01:07 AM |
Invision Power Board
v9.1.4 © 2024 IPS, Inc.