|
|
|
Porsche, and the Porsche crest are registered trademarks of Dr. Ing. h.c. F. Porsche AG.
This site is not affiliated with Porsche in any way. Its only purpose is to provide an online forum for car enthusiasts. All other trademarks are property of their respective owners. |
|
|

  |

| Rand |
 Jul 7 2008, 11:51 AM Jul 7 2008, 11:51 AM
Post
#1
|
|
Cross Member  Group: Members Posts: 7,409 Joined: 8-February 05 From: OR Member No.: 3,573 Region Association: None |
Taking one of the nuts off, the stud broke.
I welded a nut to the end of the stud so I could get a socket on it, but she doesn't want to turn. Feels like it will break again. So I've been hitting the stud with PB Blaster. I could heat it with a torch. Hopefully it will come loose, but I may end up having to drill the thing out and tap the hole for a step stud. Grr, right before WCR (IMG:style_emoticons/default/headbang.gif) Any suggestions? |
   |

 
|
| 736conver |
Jul 7 2008, 11:59 AM
Post
#2
|
|
Advanced Member Group: Members Posts: 2,117 Joined: 25-May 03 From: SE Wisconsin Member No.: 736 Region Association: None |
Heat it up with a torch
|
|
|
|
| ericread |
Jul 7 2008, 12:30 PM
Post
#3
|
|
The Viper Blue 914 Group: Members Posts: 2,177 Joined: 7-December 07 From: Irvine, CA (The OC) Member No.: 8,432 Region Association: Southern California |
Probably a stoopid question.... If you heat up the stud, won't it expand and make it more difficult to remove? How about a bit of dry ice no the end of the stud (cooling = contraction, heating =expansion)?
OTOH, probably not enough surface area to get the cold to propogate doen the stud... Help! I'm a'll confused! (IMG:style_emoticons/default/confused24.gif) Eric Read |
|
|
|
| Rand |
Jul 7 2008, 12:35 PM
Post
#4
|
|
Cross Member Group: Members Posts: 7,409 Joined: 8-February 05 From: OR Member No.: 3,573 Region Association: None |
Eric, you are right, but I wouldn't be trying to turn it while it's still hot. The heat technique is a cycle - heat it, let it cool, then try and turn it. Sometimes that expansion / contraction will help it loosen up.
|
|
|
|
| VaccaRabite |
Jul 7 2008, 12:46 PM
Post
#5
|
|
En Garde! Group: Admin Posts: 13,442 Joined: 15-December 03 From: Dallastown, PA Member No.: 1,435 Region Association: MidAtlantic Region |
My local machineist taught me to heat up that area surrounding the stuck stud, and then put a cold wet rag on the stud to make it quickly contract while the surrounding metal was still hot.
This has worked on the one really bitch of a stud I have had yet to pull, though I watched him do it while hoping I would not have to repeat the performance. Zach |
|
|
|
| 736conver |
Jul 7 2008, 12:48 PM
Post
#6
|
|
Advanced Member Group: Members Posts: 2,117 Joined: 25-May 03 From: SE Wisconsin Member No.: 736 Region Association: None |
The heat will break the rust or if someone used loctite in there. After I broke 2 on the first engine I had I never tried removing them again without heating them up first. Works everytime now.
|
|
|
|
| VaccaRabite |
Jul 7 2008, 12:53 PM
Post
#7
|
|
En Garde! Group: Admin Posts: 13,442 Joined: 15-December 03 From: Dallastown, PA Member No.: 1,435 Region Association: MidAtlantic Region |
The next time I have a stuck one, I might try welding a nut on it and using an air impact wrench to remove it. I did not have one the last time I had a stuck stud. Somehow, the impact wrench seems gentler then the heat and vice grips that I have usd in the past. Never tried it though, so I don't know.
Zach |
|
|
|
| ericread |
Jul 7 2008, 12:57 PM
Post
#8
|
|
The Viper Blue 914 Group: Members Posts: 2,177 Joined: 7-December 07 From: Irvine, CA (The OC) Member No.: 8,432 Region Association: Southern California |
|
|
|
|
| rjames |
Jul 7 2008, 01:14 PM
Post
#9
|
|
I'm made of metal Group: Members Posts: 3,928 Joined: 24-July 05 From: Shoreline, WA Member No.: 4,467 Region Association: Pacific Northwest |
QUOTE Taking one of the nuts off, the stud broke. I welded a nut to the end of the stud so I could get a socket on it, but she doesn't want to turn. Feels like it will break again. Damn Rand, that's a bummer. (IMG:style_emoticons/default/sad.gif) Try heating it up and keep us posted. |
|
|
|
| HAM Inc |
Jul 7 2008, 02:43 PM
Post
#10
|
|
Senior Member Group: Members Posts: 846 Joined: 24-July 06 From: Watkinsville,GA Member No.: 6,499 Region Association: None |
I've encountered every level of "frozen" when dealing with exhaust studs. I have also tried every trick for removing them. The only method that works consistently is heat and PB Blaster. Don't let the head cool to much or the stud will just freeze back up. Heat the boss, but not the stud itself (it weakens the steel) spray it with PB. When the head cools enough th stop boiling the PB then try to break the stud loose. If it won't budge then heat again. If it budges don't get greedy. Rotate the stud back and forth to the extent that it will move freely while spraying it PB. Increase the amount that you try to unscrew slightly all the while twisting back and forth. The rotating back and forth helps work the stud loose. If you try to unwind it all at once (if it's really frozen in there) it will break. Some studs will break and that is just all there is to it.
BTW Zach I tried the nut weld/impact idea. Seemed like a good idea, but it just broke the stud nearly every time. The key is heat and gentle application of torque while rocking back and forth. It's a high profanity operation anyway you slice it when laying under a car. |
|
|
|
| Rand |
Jul 7 2008, 04:07 PM
Post
#11
|
|
Cross Member Group: Members Posts: 7,409 Joined: 8-February 05 From: OR Member No.: 3,573 Region Association: None |
Thanks Len! (IMG:style_emoticons/default/beerchug.gif)
|
|
|
|
| Rand |
Jul 7 2008, 05:06 PM
Post
#12
|
|
Cross Member Group: Members Posts: 7,409 Joined: 8-February 05 From: OR Member No.: 3,573 Region Association: None |
I also have a stripped stud (me and my exhaust stud luck lately).
Len, what method would you use to repair stipped studs with engine in car? I'm not real fond of helicoils. I know time-serts are popular. But I like the idea of just going with a larger step stud. Thoughts? So, when installing the new stud.... What is the best practice? Just screw it in dry? Or some kind of treatment? |
|
|
|
| rjames |
Jul 7 2008, 05:42 PM
Post
#13
|
|
I'm made of metal Group: Members Posts: 3,928 Joined: 24-July 05 From: Shoreline, WA Member No.: 4,467 Region Association: Pacific Northwest |
Rand, when I stripped an exhaust stud last winter, after much research I went with the TimeCert over the Helicoil. Seems like a lot of people point to Helicoils as something that will eventually fail.
I also went to a 8x9mm step stud. This means using the 9mm TimeCert tap which taps threads to slightly larger than 10mm (to allow the insertion of the TimeCert). I went with 8x9 based on advice from another here who feels that by only tapping to 9mm for the TimeCert (which allows you to use an 8x8mm stud) increases the chance of the stud stripping again due to lack of 'bite' on the 9mm threads, which is too close to the original 8mm threads. If that's confusing, let me know- I'm operating on minimal sleep right now. (IMG:style_emoticons/default/blink.gif) (IMG:style_emoticons/default/biggrin.gif) By the way, I was able to do this with the engine in the car. In hindsight it was really pretty easy. However, I was pretty puckered up during the entire process for fear of fuching things up. The process is still very much burned into my brain, so if you need help let me know! |
|
|
|
| Rand |
Jul 10 2008, 12:50 AM
Post
#14
|
|
Cross Member Group: Members Posts: 7,409 Joined: 8-February 05 From: OR Member No.: 3,573 Region Association: None |
Arr! The bastard put up a fight, but I won. Well, at least the first battle so far...
So, welding the nut to the stud didn't end up working... It just twisted off. That stud was stuck tight. And being so small, I couldn't get enough welding surface to have any success with the welded nut idea. So.... Welded a piece of flatbar along side the stud. That way I could get a good weld on both sides of the stud to the flatbar and get some real power on it. A crescent wrench can grab the flatbar.... Then my only problem would be if it just broke the stud again. I was prepared to drill and tap at that point. BUT... First, use technique... Heated the head around the stud with a mapp gas torch. Sprayed PB Blaster at the threads. Started to twist... Not just try and unscrew the thing - it's seized too tight for that. But... back and forth a little (as Len mentioned). It began to move. Each time, as starting to unscrew more it would bind more. So, more heat, more PB Blaster, more twisting back and forth. As it freed up, kept working it out. Done! Now on to installing new studs. |
|
|
|
| Rand |
Jul 10 2008, 01:08 AM
Post
#15
|
|
Cross Member Group: Members Posts: 7,409 Joined: 8-February 05 From: OR Member No.: 3,573 Region Association: None |
Visuals, see pic below...
Left: The broken stud with the flatbar welded to it. Yeah, crude, but I got it out. Middle: The stripped stud that started this whole mess. Note the galled threads at the head end (bottom), full of aluminum from the head. I'll be drilling and tapping that hole for a larger step stud. Right: A new step stud. Only problem is, this is the longest one my local VW shop had, and it is shorter than I want. I'm hoping I can find a couple of longer step studs locally tomorrow so I can fix this thing on my lunch break and drive it to WCR. Attached image(s) 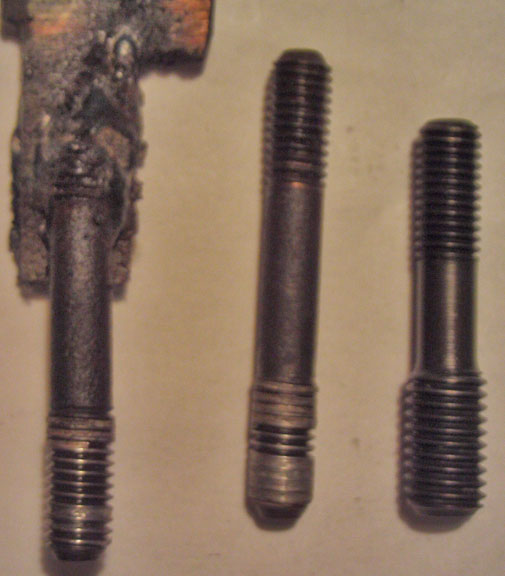
|
|
|
|
| Gint |
Jul 10 2008, 07:32 AM
Post
#16
|
|
Mike Ginter Group: Admin Posts: 16,071 Joined: 26-December 02 From: Denver CO. Member No.: 20 Region Association: Rocky Mountains |
If you can find a timesert kit locally you could have it back on the road pretty quickly.
|
|
|
|
| rhodyguy |
Jul 10 2008, 07:49 AM
Post
#17
|
|
Chimp Sanctuary NW. Check it out. Group: Members Posts: 22,076 Joined: 2-March 03 From: Orion's Bell. The BELL! Member No.: 378 Region Association: Galt's Gulch |
when drilling, gauge the depth and put a bit of tape on the bit so you don't drill to deep. you REALLY don't want to go too deep.
|
|
|
|
| Bartlett 914 |
Jul 10 2008, 08:01 AM
Post
#18
|
|
Advanced Member Group: Members Posts: 2,215 Joined: 30-August 05 From: South Elgin IL Member No.: 4,707 Region Association: Upper MidWest |
QUOTE(Rand @ Jul 9 2008, 11:08 PM)  Visuals, see pic below... Left: The broken stud with the flatbar welded to it. Yeah, crude, but I got it out. Middle: The stripped stud that started this whole mess. Note the galled threads at the head end (bottom), full of aluminum from the head. I'll be drilling and tapping that hole for a larger step stud. Right: A new step stud. Only problem is, this is the longest one my local VW shop had, and it is shorter than I want. I'm hoping I can find a couple of longer step studs locally tomorrow so I can fix this thing on my lunch break and drive it to WCR. I once used a "Keylock insert" from Mcmaster carr. I think the OD is about 10mm (maybe 12). You drill and tap the head. The difference is it is held in place by 4 small keys that are stamped between the od of the threaded insert and the tapped hole. This prevents removal. I did need to modify the tap used to allow the threaded hole to tapped deeper. A step stud was not necessary. These are available in stainless steel. |
 |
|
| 6freak |
Jul 10 2008, 12:16 PM
Post
#19
|
|
MR.C Group: Members Posts: 4,740 Joined: 19-March 08 From: Tacoma WA Member No.: 8,829 Region Association: Pacific Northwest |
QUOTE(Rand @ Jul 7 2008, 10:51 AM) Taking one of the nuts off, the stud broke. I welded a nut to the end of the stud so I could get a socket on it, but she doesn't want to turn. Feels like it will break again. So I've been hitting the stud with PB Blaster. I could heat it with a torch. Hopefully it will come loose, but I may end up having to drill the thing out and tap the hole for a step stud. Grr, right before WCR (IMG:style_emoticons/default/headbang.gif) Any suggestions? ? whats a PB blaster |
|
|
|
| Rand |
Jul 10 2008, 12:20 PM
Post
#20
|
|
Cross Member Group: Members Posts: 7,409 Joined: 8-February 05 From: OR Member No.: 3,573 Region Association: None |
PB Blaster is a penetrating lubricant. One of the best.
(IMG:http://specialtauto.com/delorean-parts/images/PB-Blaster.jpg) |
|
|
|
|
1 User(s) are reading this topic (1 Guests and 0 Anonymous Users)
0 Members:

|
Lo-Fi Version | Time is now: 12th May 2024 - 02:21 PM |
Invision Power Board
v9.1.4 © 2024 IPS, Inc.