
 Need Help Removing Steering Rack, Now I Get IT!!! Need Help Removing Steering Rack, Now I Get IT!!! |
|
|

|
Porsche, and the Porsche crest are registered trademarks of Dr. Ing. h.c. F. Porsche AG.
This site is not affiliated with Porsche in any way. Its only purpose is to provide an online forum for car enthusiasts. All other trademarks are property of their respective owners. |
|
|
  |

| ericread |
  Aug 2 2008, 05:13 PM Aug 2 2008, 05:13 PM
Post
#1
|
|
The Viper Blue 914  Group: Members Posts: 2,177 Joined: 7-December 07 From: Irvine, CA (The OC) Member No.: 8,432 Region Association: Southern California  |
HELP!!! I have read and re-read the prior posts on steering rack replacement. I am at the point where the following has been completed:
1. Removed fuel tank. 2. Removed right and left tie rods. 3. Detatched U-Joint directly inside driver compartment. 4. Removed two bolts that attach steering rack to the support. 5. Removed two bolts that attach support bar to body (off the tabs that face the rear of the car (shown at item 6 in the diagram). 6. Removed the two bolts that attach master cylinder to the bulkhead/pedal cluster. 7. Removed the two bolts that hold the steering shaft bearing (over the steering shaft bellows underneath the fuel tank). 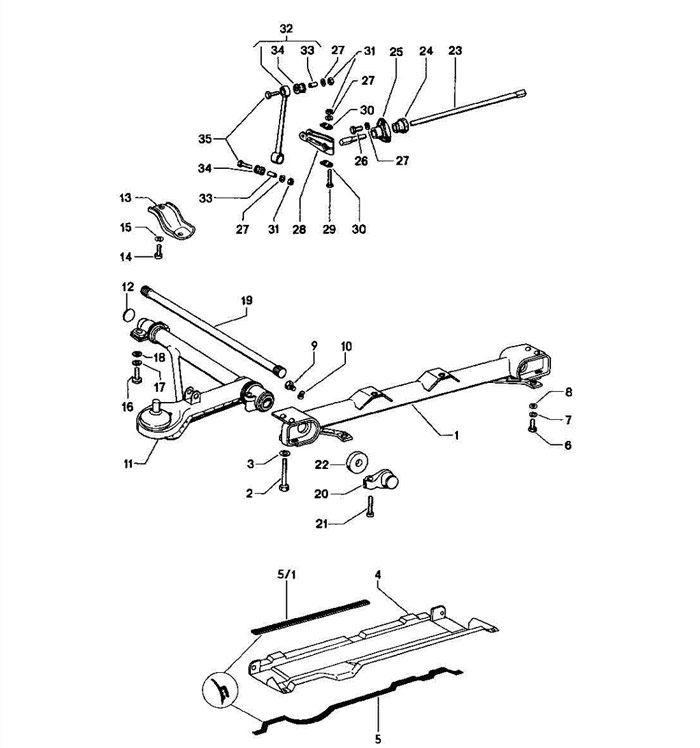 Question 1: How do I move the master cylinder out of the way? The short brake line that goes to the tunnel doesn't give the master cylinder a lot of distance to back off, and the support bar (item #1 in the diagram) is in the way when I pull the master cylinder back. Question 2: How do I actually remove the rack? The steering shaft directly connected to the rack seems to require that I drop the rack directly down. But the bolt tabs on the support bar itself (Item #1 in the diagram), as well as the bolt tabs that run a few inches to the underside of the body (towards the rear or the body) (item # 6 in the diagram) all seem to be in the way? What am I missing??? My thanks. Eric Read |
   |

 
|
| ericread |
Aug 2 2008, 07:55 PM
Post
#2
|
|
The Viper Blue 914 Group: Members Posts: 2,177 Joined: 7-December 07 From: Irvine, CA (The OC) Member No.: 8,432 Region Association: Southern California |
No answer yet.... Hmmmmm (IMG:style_emoticons/default/idea.gif) Guess I need photos.
Another 914 site participant suggested I push the bellows up, and unbolt the steering shaft from the steering rack. Here is a picture or the fuel tank area. As you can see, the steering shaft bellows is quite hard and takes up the entire area. Unless I cut the bellows (which I don't want to do), how can I push the bellows up? The bellows are already pretty well compressed, and do not seem to want to compress any further. Or am I just being a wimp, and the bellows is compressable, I'm just not trying hard enough? 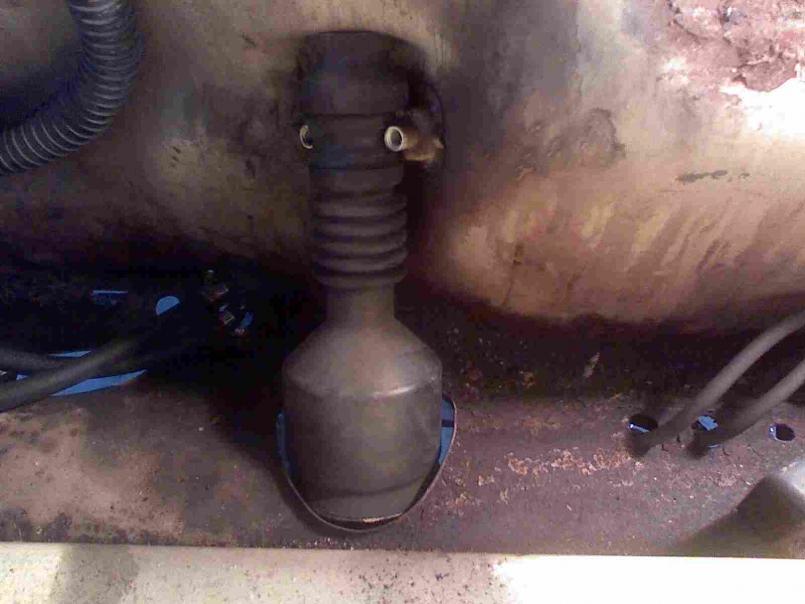 Here's the inside of the cockpit which shows the steering shaft. 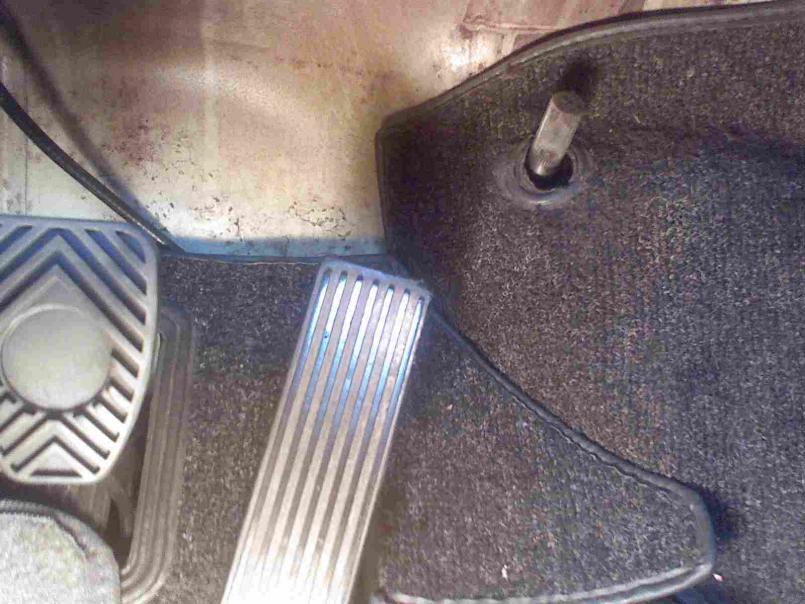 A picture from underneath the car showing the steering rack disconnected, but not yet removed. (IMG:style_emoticons/default/headbang.gif) 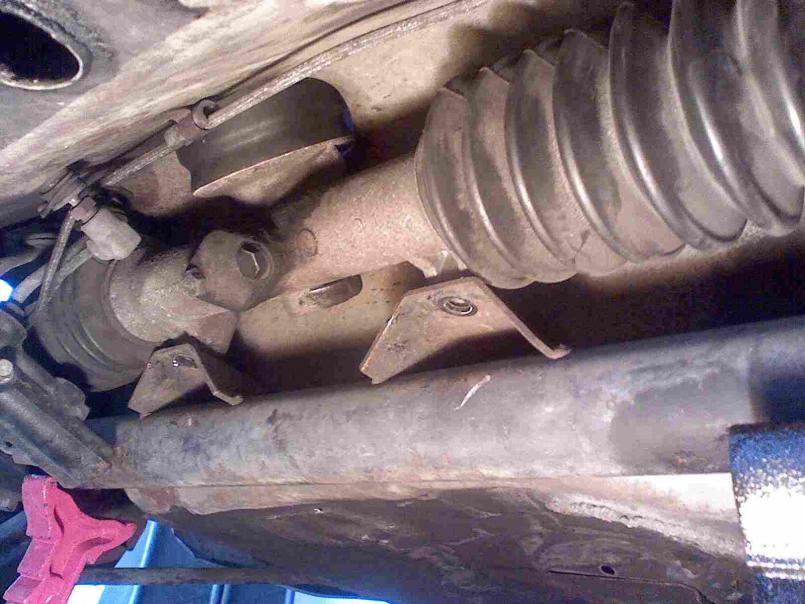 And a final picture from underneath, showing the support bar brackets. 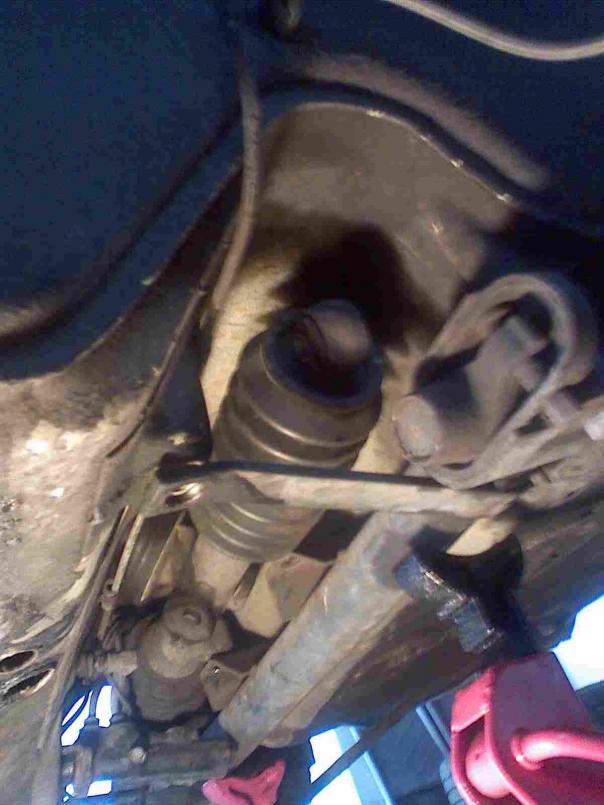 Is removing the bellows and unbolting the steering shaft still the best answer? Again, my thanks! Eric Read (IMG:style_emoticons/default/wavey.gif) |
|
|
|
| Richard Casto |
Aug 2 2008, 08:02 PM
Post
#3
|
|
Blue Sky Motorsports, LLC Group: Members Posts: 1,465 Joined: 2-August 05 From: Durham, NC Member No.: 4,523 Region Association: South East States |
There might be a way to do it without dropping the entire front suspension. But if I was to do it, I would just drop the entire front suspension, then pull the rack off.
|
|
|
|
| Spoke |
Aug 2 2008, 08:04 PM
Post
#4
|
|
Jerry Group: Members Posts: 7,436 Joined: 29-October 04 From: Allentown, PA Member No.: 3,031 Region Association: None 
|
If you disconnect the 2 big bolts holding the crossmember and lower the crossmember, you should be able to pull out the rack.
When I 5-lugged my car, I removed everything, then installed the rack first, then the crossmember. |
|
|
|
| ericread |
Aug 2 2008, 08:05 PM
Post
#5
|
|
The Viper Blue 914 Group: Members Posts: 2,177 Joined: 7-December 07 From: Irvine, CA (The OC) Member No.: 8,432 Region Association: Southern California |
QUOTE(Richard Casto @ Aug 2 2008, 07:02 PM)  There might be a way to do it without dropping the entire front suspension. But if I was to do it, I would just drop the entire front suspension, then pull the rack off. I'm really trying to avoid that, but it's looking like that may be the only reasonable way to complete this... (IMG:style_emoticons/default/sad.gif) Eric |
|
|
|
| ericread |
Aug 2 2008, 08:11 PM
Post
#6
|
|
The Viper Blue 914 Group: Members Posts: 2,177 Joined: 7-December 07 From: Irvine, CA (The OC) Member No.: 8,432 Region Association: Southern California |
QUOTE(Spoke @ Aug 2 2008, 07:04 PM) If you disconnect the 2 big bolts holding the crossmember and lower the crossmember, you should be able to pull out the rack. When I 5-lugged my car, I removed everything, then installed the rack first, then the crossmember. Please explain... Lowering the cross-member requires only two additional bolts? Is the the bar shown in this picture? 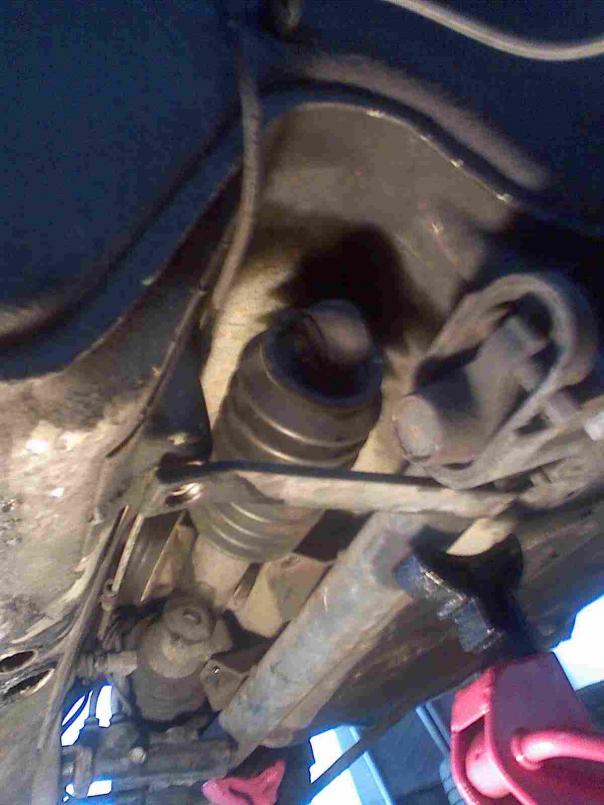 It seems to me that the entire front suspension is attached to this bar? Is that the bar identified as #1 in the following diagram? Where exactly are the two bolts needed to lower this bar? 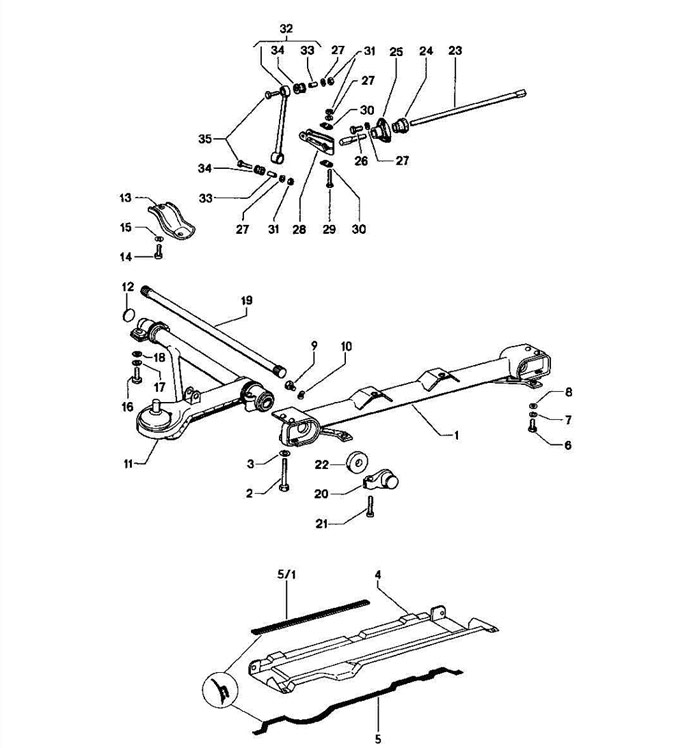 Thanks! (IMG:style_emoticons/default/smile.gif) Eric |
|
|
|
| Spoke |
Aug 2 2008, 09:09 PM
Post
#7
|
|
Jerry Group: Members Posts: 7,436 Joined: 29-October 04 From: Allentown, PA Member No.: 3,031 Region Association: None
|
remove #2 and #6 and the crossmember #1 should start hanging down, giving you more room to remove the rack.
There isn't much holding the front suspension on the car. There's 2 bolts on the front of each A-Arm, bolts #2 and #6 on the crossmember, and the 2 bolts on top of the struts and the whole suspension comes off. Removing #2 and #6 should allow the crossmember to droop enough to remove the rack. The crossmember can be removed by removing the torsion bar adjusters (#20 and #21) and tapping the crossmember with a hammer towards the back of the car. |
|
|
|
| ericread |
Aug 2 2008, 09:12 PM
Post
#8
|
|
The Viper Blue 914 Group: Members Posts: 2,177 Joined: 7-December 07 From: Irvine, CA (The OC) Member No.: 8,432 Region Association: Southern California |
QUOTE(Spoke @ Aug 2 2008, 08:09 PM) remove #2 and #6 and the crossmember #1 should start hanging down, giving you more room to remove the rack. There isn't much holding the front suspension on the car. There's 2 bolts on the front of each A-Arm, bolts #2 and #6 on the crossmember, and the 2 bolts on top of the struts and the whole suspension comes off. Removing #2 and #6 should allow the crossmember to droop enough to remove the rack. Excellent!! My thanks for the advice. I'll get to work on this first thing in the morning. Eric (IMG:style_emoticons/default/bye1.gif) |
|
|
|
| Spoke |
Aug 2 2008, 09:27 PM
Post
#9
|
|
Jerry Group: Members Posts: 7,436 Joined: 29-October 04 From: Allentown, PA Member No.: 3,031 Region Association: None
|
Just looked at your pics. Your jackstands are under the crossmember so you will have to reposition them behind the front wheel wells where are the little bumps. Use a piece of wood to distribute the weight and place near the edge of the wheel well so the weight isn't on an unsupported area of the floor pan.
Attached image(s) 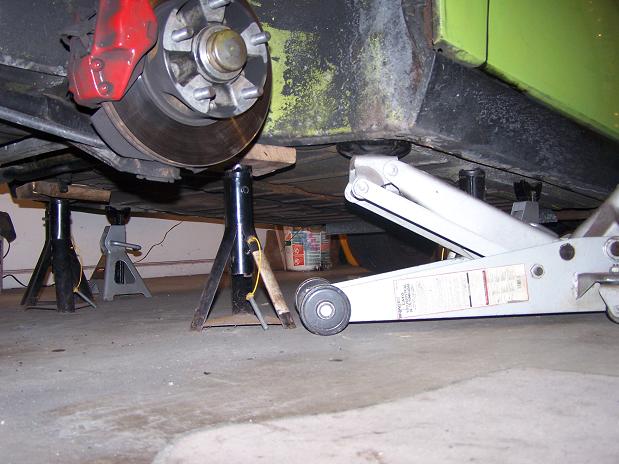
|
|
|
|
| ericread |
Aug 2 2008, 09:39 PM
Post
#10
|
|
The Viper Blue 914 Group: Members Posts: 2,177 Joined: 7-December 07 From: Irvine, CA (The OC) Member No.: 8,432 Region Association: Southern California |
QUOTE(Spoke @ Aug 2 2008, 08:27 PM) Just looked at your pics. Your jackstands are under the crossmember so you will have to reposition them behind the front wheel wells where are the little bumps. Use a piece of wood to distribute the weight and place near the edge of the wheel well so the weight isn't on an unsupported area of the floor pan. Take a close look and you'll see the top of the jacks are actually several inches under the crossmember. My primary jackstands are under the lifting "bumps" you mention. These are secondary jackstands in case I experience a failure with a primary jackstand. I will move them aside when I drop the crossmember. Thanks for taking a look at the pics. Let me know if you see something else that might pose a problem. Your review and advice is greatly appreciated. Eric (IMG:style_emoticons/default/bye1.gif) |
|
|
|
| ericread |
Aug 3 2008, 03:07 PM
Post
#11
|
|
The Viper Blue 914 Group: Members Posts: 2,177 Joined: 7-December 07 From: Irvine, CA (The OC) Member No.: 8,432 Region Association: Southern California |
Thanks everybody. I ended up dropping the entire front suspension. That allowed me to easily swap out the old 914 steering rack with the replacement 911 steering rack. I knew ahead of time that I would need to swap the 914 steering shaft for the 911 steering shaft, as the 911 steering shaft is too short.
When I removed the old 914 rack I determined that there was significant free play in the teeth of the rack! So I guess you can wear these suckers out. Since my odometer had just turned (I believe for the third time) 300,000 miles does present some wear on those "un-wearable" parts. Let me know if anybody out there wants a worn steering rack. It's yours for the price of shipping. As for dropping the front suspension, I always fear what I don't know. But, like dropping the engine, once you have done it, it seems much less overwhelming. Thanks again everybody for your advice! (IMG:style_emoticons/default/smilie_pokal.gif) Eric Read (IMG:style_emoticons/default/wavey.gif) |
|
|
|
| mcbrems |
Oct 16 2026, 05:05 PM
Post
#12
|
|
The First Porsche was Electric! Group: Members Posts: 59 Joined: 26-April 10 From: North San Diego County, CA Member No.: 11,660 Region Association: Southern California |
FIX: Remove master cylinder nuts and angle master cylinder above crossmember - IT WORKED FOR ME !!
No need to drop the whole front suspension, the fallback is to droop the crossmember as Spoke describes earlier in this thread QUOTE(ericread @ Aug 2 2008, 04:13 PM) Question 1: How do I move the master cylinder out of the way? The short brake line that goes to the tunnel doesn't give the master cylinder a lot of distance to back off, and the support bar (item #1 in the diagram) is in the way when I pull the master cylinder back. Hey Eric - I know this is a very old thread, but I just ran into the same issue, and the Haynes manual mentions nothing about the brake cylinder obstructing the removal of the support crossmember bar. I leave this here as a searchable post for future owners. With the steering rack bolts removed from the support crossmember, as well as the mounting bolts at the adjuster cap ends and at the rear brackets, the support crossmember was loose and hung about an inch lower. Then I removed the master cylinder nuts, pulled it partly away from the firewall, and was able to angle the master cylinder upwards just enough to clear the support crossbeam with a little coaxing. There was enough flex to angle the master cylinder upwards without needing to remove any of the reservoir feed tubes or hard lines, although I did need to release the lines from the bendable tabs that hold them in place. Then I was able to tap the crossbeam backwards with a rubber mallet to remove it. I was happy that I didn't need to drop the entire front suspension. "Installation is the reverse order of the removal procedure." (IMG:style_emoticons/default/beer.gif) |
|
|
|
|
2 User(s) are reading this topic (2 Guests and 0 Anonymous Users)
0 Members:

|
Lo-Fi Version | Time is now: 17th October 2026 - 04:50 AM |
Invision Power Board
v9.1.4 © 2026 IPS, Inc.