|
|
|
Porsche, and the Porsche crest are registered trademarks of Dr. Ing. h.c. F. Porsche AG.
This site is not affiliated with Porsche in any way. Its only purpose is to provide an online forum for car enthusiasts. All other trademarks are property of their respective owners. |
|
|

  |

| ahdoman |
 Sep 2 2008, 10:16 PM Sep 2 2008, 10:16 PM
Post
#1
|
|
It's phonetic...Ah-D-O-Man (Audioman)  Group: Members Posts: 667 Joined: 7-November 05 From: Santa Clarita, Ca. Member No.: 5,084 Region Association: Southern California |
I did an extensive search to no avail...I thought I remember someone mentioning a way to be able to spray paint (POR 15 or other rust treatment) inside the longs just by making a small access hole? I need to close up my hell hole repair but before I do I would like to spray rust treatment into the long. Thankfully the long is not rusted but I can see surface rust down in there. Anybody got any suggestions? A list of parts to do that would be great!
|
   |

 
|
| Rusty |
Sep 2 2008, 10:21 PM
Post
#2
|
|
Wanted: Engine case GA003709 Group: Admin Posts: 7,941 Joined: 24-December 02 From: North Alabama Member No.: 6 Region Association: Galt's Gulch |
There is an oval access hole from inside the passenger compartment. I think it's covered with a piece of tar or pressboard. If you still have the cardboard heater tubes in your long, they're awkward to work around.
Try a garden sprayer with a very flexible wand. I got one at Ace Hardware many years ago. |
|
|
|
| 2-OH! |
Sep 2 2008, 10:42 PM
Post
#3
|
|
Senior Member Group: Members Posts: 552 Joined: 17-October 03 From: Santa Clarita, Kalifornication Member No.: 1,253 |
Make a swab using a long piece of wire and a wad of rag...Messy but effective...Floods the entire area inside the long...
2-OH! |
|
|
|
| craig downs |
Sep 3 2008, 03:41 AM
Post
#4
|
|
Senior Member Group: Members Posts: 768 Joined: 25-November 05 From: mira loma ca. Member No.: 5,189 Region Association: Southern California |
The thread is somewhere I saw it a couple of months back and Andy showed an access hole diagram for the whole car. You use a sprayer that uses wands with tiny spray tips.
|
|
|
|
| ahdoman |
Sep 3 2008, 09:00 AM
Post
#5
|
|
It's phonetic...Ah-D-O-Man (Audioman) Group: Members Posts: 667 Joined: 7-November 05 From: Santa Clarita, Ca. Member No.: 5,084 Region Association: Southern California |
Thanks Craig. That's what I'm looking for. I'm trying to find out what the wand was and the tip. I remember it being a real slick setup.
|
|
|
|
| r_towle |
Sep 3 2008, 01:01 PM
Post
#6
|
|
Custom Member Group: Members Posts: 24,574 Joined: 9-January 03 From: Taxachusetts Member No.: 124 Region Association: North East States |
go to Eastwood, they have all the cool wands.
Rich |
|
|
|
| SirAndy |
Sep 3 2008, 01:18 PM
Post
#7
|
|
Resident German Group: Admin Posts: 41,623 Joined: 21-January 03 From: Oakland, Kalifornia Member No.: 179 Region Association: Northern California |
QUOTE(ahdoman @ Sep 2 2008, 08:16 PM)  (POR 15 or other rust treatment) POR 15 is *not* an adequate rust treatment if you're planning to just spray it into the longs! It will *not* neutralize any rust! You'll need to use something along the lines of Ospho or Metal Ready ... (IMG:style_emoticons/default/shades.gif) Andy Attached image(s) 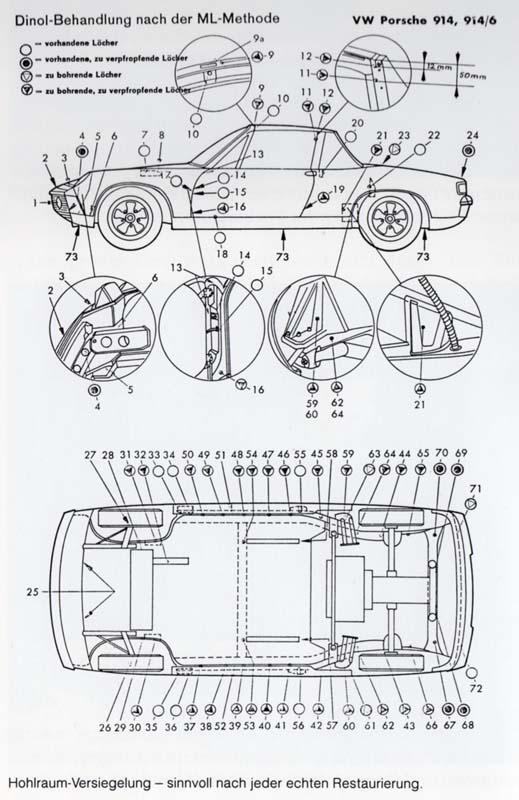
|
|
|
|
| SirAndy |
Sep 3 2008, 01:22 PM
Post
#8
|
|
Resident German Group: Admin Posts: 41,623 Joined: 21-January 03 From: Oakland, Kalifornia Member No.: 179 Region Association: Northern California |
more on that here:
http://www.914world.com/bbs2/index.php?sho...p;p=&#entry (IMG:style_emoticons/default/bye1.gif) Andy |
|
|
|
| SirAndy |
Sep 3 2008, 01:24 PM
Post
#9
|
|
Resident German Group: Admin Posts: 41,623 Joined: 21-January 03 From: Oakland, Kalifornia Member No.: 179 Region Association: Northern California |
Looks like "Dinol cavity wax" is what the factory used to spray inside the cavities ...
(IMG:style_emoticons/default/idea.gif) Andy |
|
|
|
| r_towle |
Sep 3 2008, 01:43 PM
Post
#10
|
|
Custom Member Group: Members Posts: 24,574 Joined: 9-January 03 From: Taxachusetts Member No.: 124 Region Association: North East States |
Eric, partsman, had ziebart rust proofing on his car.
It was still sticky and never really hardened...and it was not rusty where they put it...unfortunate they did not do inside the longs...we had to replace those... If zeibart is available, or something like that, I would use it. It certainly was wax based, and was not hard old and flaky. Rich |
|
|
|
| Rusty |
Sep 3 2008, 02:13 PM
Post
#11
|
|
Wanted: Engine case GA003709 Group: Admin Posts: 7,941 Joined: 24-December 02 From: North Alabama Member No.: 6 Region Association: Galt's Gulch |
Years ago, some jackass wrote a Pelican article that covered this.
http://www.pelicanparts.com/techarticles/9...gitude_repl.htm it's a shame he didn't take pictures during the process. (IMG:style_emoticons/default/sad.gif) |
|
|
|
| sww914 |
Sep 3 2008, 04:10 PM
Post
#12
|
|
Advanced Member Group: Members Posts: 2,439 Joined: 4-June 06 Member No.: 6,146 Region Association: None |
Modern VW's are built with so much wax in the cavities that after you unbolt the fender you need to break the wax loose. It's SOP in quality body shops to fill cavities with a wand spraying wax inside of any cavities that have been replaced or welded on.
Look here- http://solutions.3m.co.uk/wps/portal/3M/en...rosion-Removal/ I think that it's the best option after you have neutralized all of the rust that you can get. |
|
|
|
| Joe Owensby |
Sep 3 2008, 06:06 PM
Post
#13
|
|
JoeO Group: Members Posts: 527 Joined: 7-January 06 From: Spartanburg, SC Member No.: 5,385 Region Association: South East States |
Eastwood sells just what you need. They have a kit that includes the waxy type sealant along with an assortment of wands needed to spray inside cavities. I used their stuff on mine. You can get one of the spray nozzles put on the end of a 3/8 inch flexible hose, and work it up through the oval hole mentioned earlier. They have spray nozzles that spray out the end, and also out the side. using both of these allows you to get up into the long and also the sides , even with the air tube still in the long. Just spray and rotate to get full coverage as you pull out the hose. I also accessed the front portion of the inner long through a hole inside the front door jam. JoeO
|
|
|
|
| Wes V |
Sep 3 2008, 07:11 PM
Post
#14
|
|
Member Group: Members Posts: 482 Joined: 11-October 07 From: Los angeles Member No.: 8,211 |
Steve;
I've seen the spray "wands" at Harbor Freight. As for spraying POR15, I agree with SirAndy. The stuff works great, but you have to metal brush off all loose flakes first (which you can't do in the longs). Before you spray anything in there, make sure the drain "holes" along the bottom of the longs are clear of any crap. Now you will ask; "what holes"?? If you look along the bottom seam where the two sections of the longs are spot welded, you will notice that there are areas that open up and leave a gap. I'm pretty sure they were intended as drains. I could be wrong, but I can't think of any other reason for them. Wes Vann |
|
|
|
| ahdoman |
Sep 3 2008, 11:20 PM
Post
#15
|
|
It's phonetic...Ah-D-O-Man (Audioman) Group: Members Posts: 667 Joined: 7-November 05 From: Santa Clarita, Ca. Member No.: 5,084 Region Association: Southern California |
WOW! Thanks for all the good replies everybody.
Andy - I realize that POR15 won't eliminate the rust. My longs are clean enough that I can't justify cutting them open to properly treat them. I was just hoping to use something like Ospho or Metal Ready, give it a good coat of Rust Bullet and call it done. Wes - I know about the drain holes and I promise to not plug them up. In regards to the wax filler type of product; isn't using that kind of useless unless you can completely clean and treat the metal before applying? |
|
|
|
| shoguneagle |
Sep 3 2008, 11:30 PM
Post
#16
|
|
shoguneagle Group: Members Posts: 1,180 Joined: 3-January 03 From: CA, OR, AZ (CAZOR); New Mexico Member No.: 84 Region Association: Northern California |
Hi,
I may be the one your are referring to painting Por-15 into the longs and related sections. I used the Por-15 System which is important since Por-15 is only a rust inhibitor/encapulsing systme. This mean you have to treat the metal with a Phosphoric Acid solution (Metal Etch, Ospho, etc) with has to have the metal cleaned with a prep solution. After all the foregoing is done then you have to flush and dry the inter longs and related areas with water, air, drainage, etc making sure you get as much water out as possible. Then the Por-15 is applied through holes that are available or that have to be drilled. As long as the Por-15 does not get any sunlight (UV rays) it should not break down. On surfaces exposed to UV light or where additional paint is to be applied, you should use Por-15 primer and then paint. I used the Por-15 System and drilled holes following ones that I needed and using the information that Andy provided regarding the hole placement. It was applied with a low pressure direct nozzle air gun I bought from the local paint and used the short extention. The wands that others mentioned are just too small orfice for the Por-15 inhibitor to flow through. The information Andy has provide is crucial to understanding the different areas where you put the rust inhibitor. As far as the longs go, I was interested in the weld areas as well as the inner long since I had added stress kitting on each long. I welded on the Brad Mayuer long kit as well as the inner long kit from Engman(??). Weldable primer was used as the first line of defense against rust, then the Phosphoric Acit solution after washing. Washed and dried the areas with air, etc. then applied the Por-15 inhibitor. I drilled something like 20 half-inch holes in what I thought were critical areas and where I sprayed into the areas. These were determined by the spray pattern of the gun I used, the physical arrangement of the underlying metals, etc. I also had replaced the floorboards which gave me additional open areas in the central tunnel, access to the stress points on the car, and other related items. I have not done the blind areas yet since I was only interested at this point the areas where the car was connected and had frame/suspension stress points. The blind points as per the information provided by Andy will be followed. There are many good systems and they all follow the above process. In direct open areas I always go back to the rust treatment of "Naval Jelley". This has been a round a long time and contains the Phosphoric Acid solution. First is to clean as much rust out as one can, treat the metal per directions which turns the rust into black iron oxide (this what the Phosphoric Acid does); wash after treatment, paint with zinc chromate primer, paint with etching primer, paint. A little long winded and as always do your own research to where you are satisfied. Good luck and enjoy the project. An after thought, be sure to use protective clothing, breather, gloves, etc and follow all the safety/health items. These solutions/paints can cause damage and health problems. If you let Por-15 dry on your skin, you will wear it for up to six weeks. Just ask me how I know even when wearing protective clothing. Steve Hurt |
|
|
|
| ahdoman |
Sep 3 2008, 11:42 PM
Post
#17
|
|
It's phonetic...Ah-D-O-Man (Audioman) Group: Members Posts: 667 Joined: 7-November 05 From: Santa Clarita, Ca. Member No.: 5,084 Region Association: Southern California |
Hey Steve - good info but what I am looking for is how he built the wand / gun mechanism. If I remember right it was cheap with parts available from your local hardware store.
|
|
|
|
| IronHillRestorations |
Sep 4 2008, 07:31 AM
Post
#18
|
|
I. I. R. C. Group: Members Posts: 6,716 Joined: 18-March 03 From: West TN Member No.: 439 Region Association: None |
My post from '05
OK, my secret technique revealed! What we do in my restoration shop is clean, treat/arrest the corrosion, repair any corrosion that involves very heavy pitting or perforation, treat with phosphoric acid wash, rinse, dry, and paint. We use a undercoating kit that can be purchased at JC Whitney, Eastwood, and other auto supply houses. We treat the entire car, that is all the dead air spaces, boxed support members, etc. First remove the control cables, and shift mechanism, as well as the pedal cluster, and most of the interior. Mask off the wiring harness with plastic and masking tape. Clean out the tunnel with compressed air and a shop vac. Manually scrape whatever you can reach with wire brushes, stainless toothbrushes, etc. Next you need very hot water and cheap automatic dishwashing detergent (like cascade). You don't want to get this on finished surfaces, as the trisoduim phosphate can dull painted surfaces. Mix up hot water with the detergent, and spray in into the tunnel. With the undercoating kit you get spray wands and different nozzles to blast in the corners, etc. Again, use the shop vac to remove the water. Next rinse with clean warm water, and clean this up. Blow dry with compressed air and the undercoating wands and nozzles. Check out the cleaning job with a light and a inspection mirror, make sure everything is nice and clean. Let it dry for a few days. At this point a little flash rust isn't going to hurt anything. Now it gets more fun! You can use Ospho, Oxysolve, any corrosion treatment with phosphoric acid that leaves a phosphate coating. You mix up the acid as directed, and after you've donned your safety goggles, respirator, and rubber gloves, you spray the area with the acid mixture. Most of them require liberal dousing, and you want to keep it wet for several minutes, longer if you've got more serious corrosion. Next you rinse the acid off with water, and clean it up. Blow it dry. Let it sit for a few days. Last you can use the same undercoating kit to blast your favorite corrosion paint over the treated areas. This is alot of work, and makes a big mess, but it's the best thing you can do to mitigate corrosion. It's also a good thing to do if you've welded on structural supports like the GT stiffening kit, Mayeur kit, etc. If you don't treat the backside of a panel that you've welded, it will rust. |
|
|
|
| Bartlett 914 |
Sep 4 2008, 10:25 AM
Post
#19
|
|
Advanced Member Group: Members Posts: 2,214 Joined: 30-August 05 From: South Elgin IL Member No.: 4,707 Region Association: Upper MidWest |
QUOTE(9146986 @ Sep 4 2008, 05:31 AM) My post from '05 OK, my secret technique revealed! What we do in my restoration shop is clean, treat/arrest the corrosion, repair any corrosion that involves very heavy pitting or perforation, treat with phosphoric acid wash, rinse, dry, and paint. We use a undercoating kit that can be purchased at JC Whitney, Eastwood, and other auto supply houses. We treat the entire car, that is all the dead air spaces, boxed support members, etc. First remove the control cables, and shift mechanism, as well as the pedal cluster, and most of the interior. Mask off the wiring harness with plastic and masking tape. Clean out the tunnel with compressed air and a shop vac. Manually scrape whatever you can reach with wire brushes, stainless toothbrushes, etc. Next you need very hot water and cheap automatic dishwashing detergent (like cascade). You don't want to get this on finished surfaces, as the trisoduim phosphate can dull painted surfaces. Mix up hot water with the detergent, and spray in into the tunnel. With the undercoating kit you get spray wands and different nozzles to blast in the corners, etc. Again, use the shop vac to remove the water. Next rinse with clean warm water, and clean this up. Blow dry with compressed air and the undercoating wands and nozzles. Check out the cleaning job with a light and a inspection mirror, make sure everything is nice and clean. Let it dry for a few days. At this point a little flash rust isn't going to hurt anything. Now it gets more fun! You can use Ospho, Oxysolve, any corrosion treatment with phosphoric acid that leaves a phosphate coating. You mix up the acid as directed, and after you've donned your safety goggles, respirator, and rubber gloves, you spray the area with the acid mixture. Most of them require liberal dousing, and you want to keep it wet for several minutes, longer if you've got more serious corrosion. Next you rinse the acid off with water, and clean it up. Blow it dry. Let it sit for a few days. Last you can use the same undercoating kit to blast your favorite corrosion paint over the treated areas. This is alot of work, and makes a big mess, but it's the best thing you can do to mitigate corrosion. It's also a good thing to do if you've welded on structural supports like the GT stiffening kit, Mayeur kit, etc. If you don't treat the backside of a panel that you've welded, it will rust. Your technique looks great. I think I will try this on my car this winter (well after driving season is over). So how are you getting into the longs? The tunnel is easy to see. Are you cutting holes in the longs? Someone awhile ago suggested cutting a hole at the front of the long in the wheel well area. There was some discussion if this would work because of a bracket for the sound absorber may be in the way. I'm not sure is this was answered. |
|
|
|
| dflesburg |
Sep 4 2008, 10:44 AM
Post
#20
|
|
Senior Member Group: Members Posts: 1,719 Joined: 6-April 04 From: Warm and Cheerful Centerville Ohio Member No.: 1,896 Region Association: None |
It was hot as hell here yesterday, my daughters cabrio 1997 was dripping yellowish wax out the bottom of the sunny side (west).
Gross stuff. That process is very close to what we do on our cars here. Thats if we don't have the body dipped. A cheap plastic spray bottle from Handyman Hardware works for the acid ( we buy that at Lowes in the concrete section ) and it works well for the encapsulator paint too. Be sure to clean it well between paintings or it will clog and become useless. |
|
|
|
|
1 User(s) are reading this topic (1 Guests and 0 Anonymous Users)
0 Members:

|
Lo-Fi Version | Time is now: 6th May 2024 - 04:32 AM |
Invision Power Board
v9.1.4 © 2024 IPS, Inc.