|
|
|
Porsche, and the Porsche crest are registered trademarks of Dr. Ing. h.c. F. Porsche AG.
This site is not affiliated with Porsche in any way. Its only purpose is to provide an online forum for car enthusiasts. All other trademarks are property of their respective owners. |
|
|

  |

| rick 918-S |
 Aug 26 2009, 07:36 AM Aug 26 2009, 07:36 AM
Post
#41
|
|
Hey nice rack! -Celette  Group: Members Posts: 21,122 Joined: 30-December 02 From: Now in Superior WI Member No.: 43 Region Association: Northstar Region |
Maybe one of the west coast guys has a complete good fender. The problem with parts from up here in the rust belt is that the fenders all rust at the lowest point next to the door and up next to the plastic seam strip at the cowl line. It's hard to get a part you dont end up repairing. Then there's a wad of seam sealer packed up inside the fender to the cowl. Even harder to separate the fender from the cowl without damaging your donor part. If yours is good at the door and cowl line you should try to find a way to section it.
I fully understand the thought process with regard to changing the whole piece. Specially with the inner wheel house concern. I think your thinking by splicing the fender in the middle of the wheel opening it's possible to end up with a crooked or miss matched wheel opening. Your right, but if you made a card board templet for the cut line and matched the vertical cut from a donor car to your car you would still be good. I will take a photo of my idea for you and post it here later today. |
   |

 
|
| rick 918-S |
Aug 26 2009, 08:05 AM
Post
#42
|
|
Hey nice rack! -Celette Group: Members Posts: 21,122 Joined: 30-December 02 From: Now in Superior WI Member No.: 43 Region Association: Northstar Region |
OK, I ran out really fast and did this quick. I think there are photos here on the world site of a fender section McMark did this way. As I recall it turned out nice and helps avoid a fit problem when you've had a damaged wheel house.
First find a print shop that makes those big desk top calendars we all used to have until we plopped a lap top on it and decided we didn't need it any more. They will have tag board. (the card board backing for the calendars) This is the best stuff for making patterns. I didn't fully trim the piece and match it as I suggested but you get the idea. Take good measurements and be sure to take your time when cutting and trimming. Attached image(s) 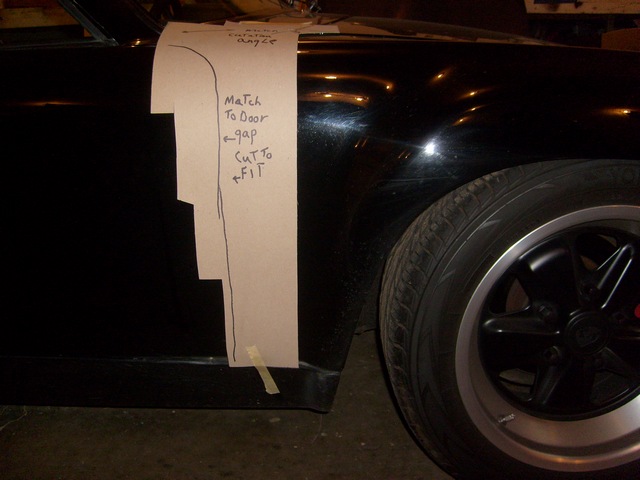 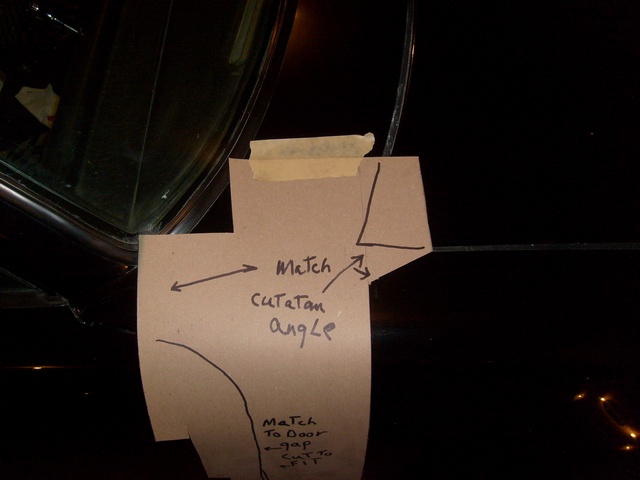
|
|
|
|
| jmill |
Aug 26 2009, 09:16 AM
Post
#43
|
|
Green Hornet Group: Members Posts: 2,449 Joined: 9-May 08 From: Racine, Wisconsin Member No.: 9,038 Region Association: Upper MidWest |
Thanks for the input Rick. Budman (Chris) is out in Az and seems to trip over good cars every other week. He's got one now that I'm trying to get the parts off of. I threw the pics of what I needed up here cause it was easy and I'm lazy.
I like your template idea. My problem is that the fender is wavy between that inner support bulkhead type deal behind the tire and the door pillar. The door pillar was even moved a bit. The bottom is right but when that front corner came up it pushed the top of the window and door pillar down. I don't know if your picking up what I'm trying to say. In short it changed the angle at the bottom of the door pillar where it meets the long. The passenger door closes ok but you can tell it's not quite right. The striker lifts the door up a pinch where it needs to be when it closes. My plan was to remove the fender and then straighten the pillar out by gently lifting the bottom corner of the door to fix the angle. I suppose I can still do that but not cut the entire fender out. I was thinking that straightening the wavy fender by the door would be a pain with little working room to swing the hammer. From what your saying it's a pain to weld in a complete fender. |
|
|
|
| rick 918-S |
Aug 26 2009, 10:01 AM
Post
#44
|
|
Hey nice rack! -Celette Group: Members Posts: 21,122 Joined: 30-December 02 From: Now in Superior WI Member No.: 43 Region Association: Northstar Region |
Oh, I get it. I was thinking you were just working the inner panel at the gas tank bulkhead not back as far as the cowl pillar. That's a tougher pull. We need a Cellette bench up here in this area of the country with the 914 fixtures. Post a picture of the cowl damage if you can.
Someplace here on the site I think we have chassis measurements. I've never had good luck with the search function but try it. How does the drivers door fit? If that fits and works properly, take measurements and use it to gauge what is going on with the passenger side. How does the targa top fit? Is it pushed back on the passenger side? |
|
|
|
| rick 918-S |
Aug 26 2009, 10:24 AM
Post
#45
|
|
Hey nice rack! -Celette Group: Members Posts: 21,122 Joined: 30-December 02 From: Now in Superior WI Member No.: 43 Region Association: Northstar Region |
I thought I had a better photo of this tool but you need one of these. On a 914 you can pull or spread the cowl by cranking this puller/spreader in or out.
This is my M3 I bought wrecked during repairs.  Here is a photo of the door gap and wrinkled panel over the wheel. The gap at the top of the door was over an inch wide. 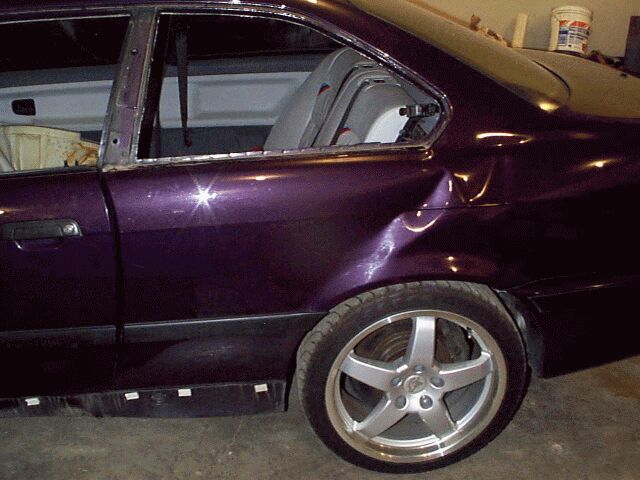 Here it is after I pulled it and worked out the wrinkle in the quarter panel. Most guys would have thrown the panel away but BMW's have serial numbers on all the body panels and I wanted to retain the original sheet metal.   If you can't find a tool to borrow locally let me know. |
|
|
|
| jmill |
Aug 26 2009, 11:30 AM
Post
#46
|
|
Green Hornet Group: Members Posts: 2,449 Joined: 9-May 08 From: Racine, Wisconsin Member No.: 9,038 Region Association: Upper MidWest |
QUOTE(rick 918-S @ Aug 26 2009, 11:01 AM)  How does the drivers door fit? If that fits and works properly, take measurements and use it to gauge what is going on with the passenger side. How does the targa top fit? Is it pushed back on the passenger side? Drivers door is perfect and closes smooth as butter. Targa top is cockeyed a bit because the window pillar is jazzed. Passenger door closes and gaps are fine but you can tell that the striker has to lift the door up a pinch to fit right. I want it to close as smooth as the drivers side. I'll post pics tonight. The cowl looks fine too. IIRC the front fender to door gap isn't bad either. The only hint that it isn't right is the targa top fit and when you close the door it needs a little extra on it to latch. Do you have anymore pictures of that tool? That looks like just what I need. I can fab up something to work similar if I can see what it looks like. |
|
|
|
| type11969 |
Aug 26 2009, 02:33 PM
Post
#47
|
|
Senior Member Group: Members Posts: 1,231 Joined: 2-December 03 From: Collingswood, NJ Member No.: 1,410 Region Association: North East States |
Jmill -
Any interest in loaning or selling that front suspension mount jig you made? Looks great! My 914 was hit in the driver's side front fender at some point and the mounts are definitely tweaked. I have a whole donor floor section with the mounts, but I think I can use the existing passenger side mounts as a starting point. Your jig would make it possible, I don't have a good car to build one off of. Let me know, no rush. Thanks, Chris |
|
|
|
| rick 918-S |
Aug 26 2009, 05:13 PM
Post
#48
|
|
Hey nice rack! -Celette Group: Members Posts: 21,122 Joined: 30-December 02 From: Now in Superior WI Member No.: 43 Region Association: Northstar Region |
QUOTE(jmill @ Aug 26 2009, 09:30 AM) QUOTE(rick 918-S @ Aug 26 2009, 11:01 AM) How does the drivers door fit? If that fits and works properly, take measurements and use it to gauge what is going on with the passenger side. How does the targa top fit? Is it pushed back on the passenger side? Drivers door is perfect and closes smooth as butter. Targa top is cockeyed a bit because the window pillar is jazzed. Passenger door closes and gaps are fine but you can tell that the striker has to lift the door up a pinch to fit right. I want it to close as smooth as the drivers side. I'll post pics tonight. The cowl looks fine too. IIRC the front fender to door gap isn't bad either. The only hint that it isn't right is the targa top fit and when you close the door it needs a little extra on it to latch. Do you have anymore pictures of that tool? That looks like just what I need. I can fab up something to work similar if I can see what it looks like. Yep, just what I thought. I'll get a photo of my spreader. Yes, you can make one with all thread and a piece of tubing. Mine has right and left hand threads so both ends retract or expand But you can get by with one end moving. Don't move the windsheild post. The cowl is tipped back slightly. Push the cowl back with a spreader. Put the tool at the base of the door latch pillar and extend it to the top of the cowl in line with the dash. This will in turn lift the back of the door and move the top of the windsheild pillar out slightly. Again, move a little, check it, move a little, check it. Just for grins, remove the weather seal on the body of both right and left sides. Take a measurement from the base of the pinch weld flange at the latch post to the pinch weld flange next to the upper dash on both the right and left sides. I bet there's 3mm difference. This will continue on up to the top of the windsheild frame. (three thicknesses of a dime) The could show 5mm (five thicknesses of a dime) difference if you go from the lower latch pillar to the top of the winsheild frame. |
|
|
|
| jmill |
Aug 26 2009, 05:28 PM
Post
#49
|
|
Green Hornet Group: Members Posts: 2,449 Joined: 9-May 08 From: Racine, Wisconsin Member No.: 9,038 Region Association: Upper MidWest |
I took a bunch of pics and really looked at the door. I closed it really slow looking it all over. It seems like the door pillar is fine but the window post is bent down. When I close the door the wing window post of the door hits the window post which pushes the door down and then the striker has to lift it back up. Here's some pics.
Attached thumbnail(s) 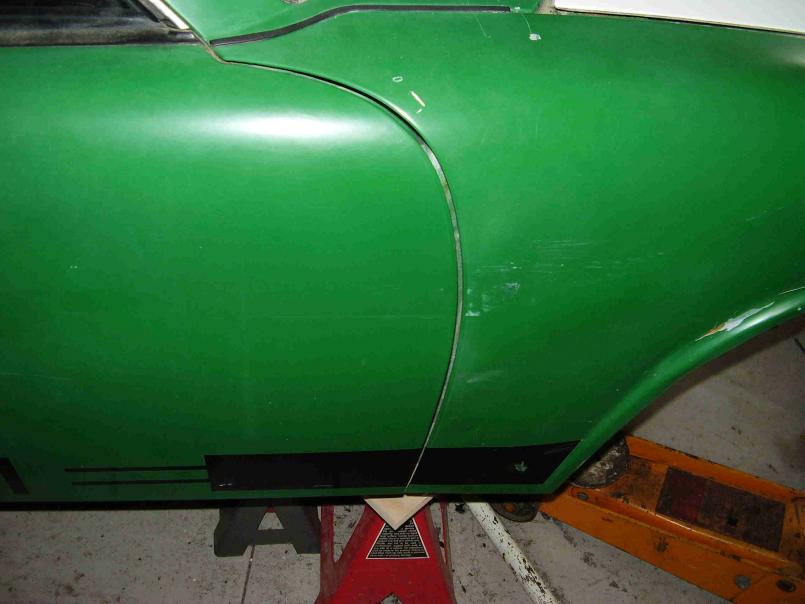 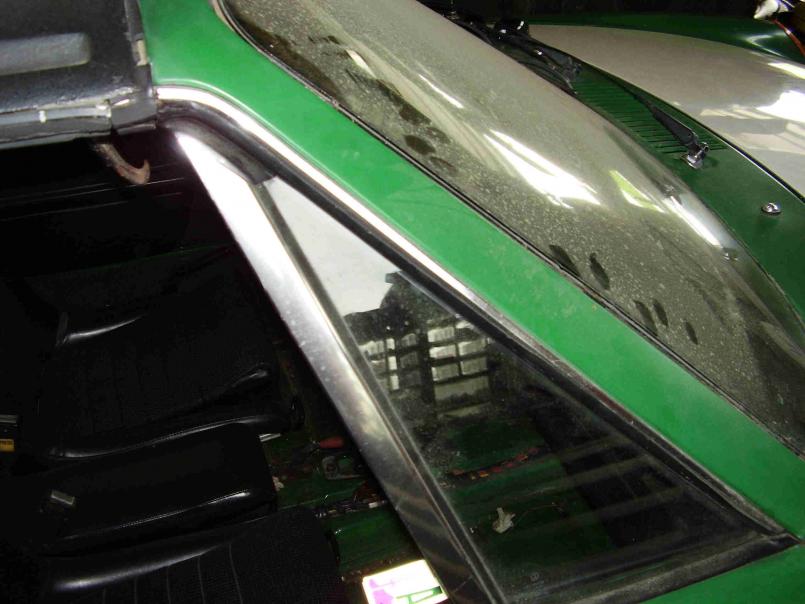 
|
|
|
|
| jmill |
Aug 26 2009, 05:37 PM
Post
#50
|
|
Green Hornet Group: Members Posts: 2,449 Joined: 9-May 08 From: Racine, Wisconsin Member No.: 9,038 Region Association: Upper MidWest |
More pics.
Attached thumbnail(s) 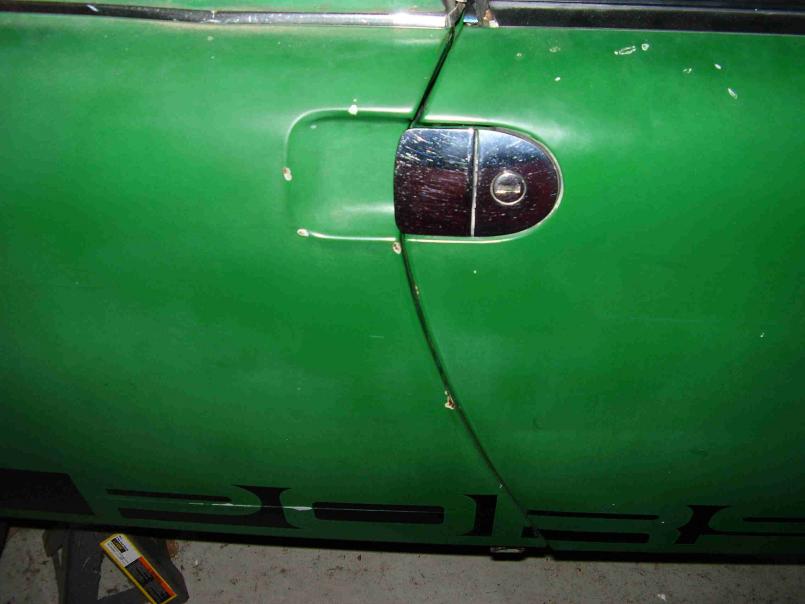 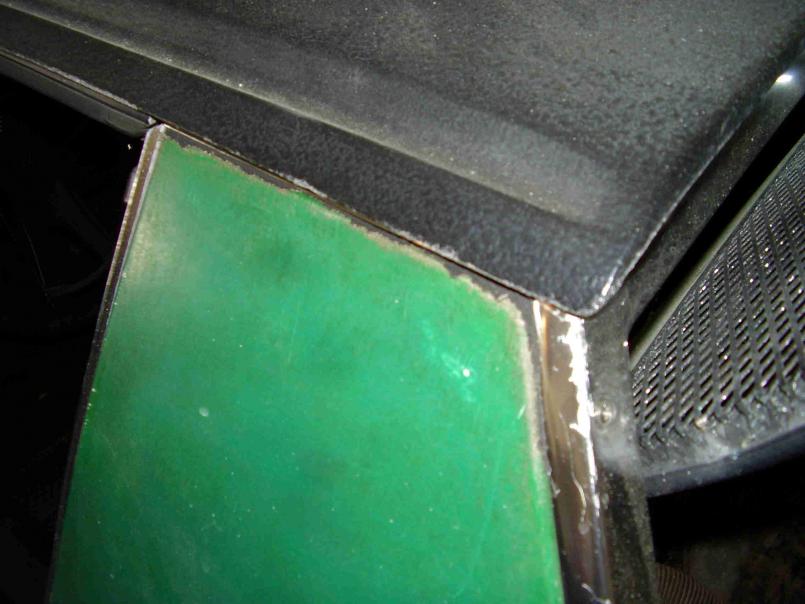 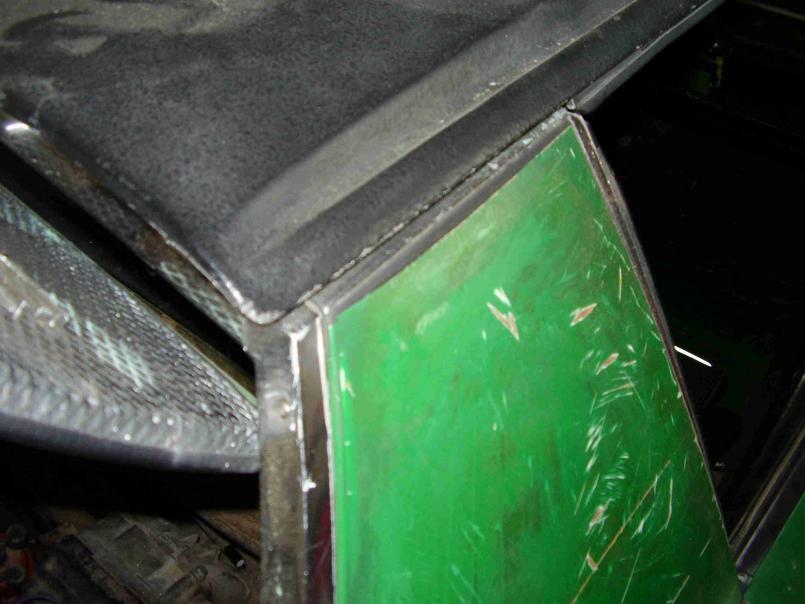
|
|
|
|
| rick 918-S |
Aug 26 2009, 05:38 PM
Post
#51
|
|
Hey nice rack! -Celette Group: Members Posts: 21,122 Joined: 30-December 02 From: Now in Superior WI Member No.: 43 Region Association: Northstar Region |
Yes your vent window will press against the windsheild post because as the door lifts up to meet the striker the hinge point acts like a tetter totter. If you move the top of the cowl forward the windsheid frame will go with it. The back of the door will raise to line up with the striker and the door will no longer tetter totter the vent glass into the windsheild frame seal.
Do this. Go out to the garage. Remove the targa top. Measure the distance from the right side of the top of the windsheild frame back to the targa bar latch. Then check the left side the same. Oh and do this with the doors open. Then do it with the doors closed. Then report. |
|
|
|
| jmill |
Aug 26 2009, 05:47 PM
Post
#52
|
|
Green Hornet Group: Members Posts: 2,449 Joined: 9-May 08 From: Racine, Wisconsin Member No.: 9,038 Region Association: Upper MidWest |
QUOTE(type11969 @ Aug 26 2009, 03:33 PM) Any interest in loaning or selling that front suspension mount jig you made? I need to make a better one. There are a few holes on it that I can barely get a bolt in because I welded the frame too close to the holes. I had to open up a few holes in it too. Your second in line. Another member here expressed some interest a while back. If he doesn't want it you can have it for the price of shipping. I need to hang onto it until I get the car all pieced back together though. |
|
|
|
| type11969 |
Aug 26 2009, 05:50 PM
Post
#53
|
|
Senior Member Group: Members Posts: 1,231 Joined: 2-December 03 From: Collingswood, NJ Member No.: 1,410 Region Association: North East States |
QUOTE(jmill @ Aug 26 2009, 03:47 PM) QUOTE(type11969 @ Aug 26 2009, 03:33 PM) Any interest in loaning or selling that front suspension mount jig you made? I need to make a better one. There are a few holes on it that I can barely get a bolt in because I welded the frame too close to the holes. I had to open up a few holes in it too. Your second in line. Another member here expressed some interest a while back. If he doesn't want it you can have it for the price of shipping. I need to hang onto it until I get the car all pieced back together though. Sounds great to me, like I said, no rush, I have a lot of work still left to do before I even get to the front. |
|
|
|
| jmill |
Aug 26 2009, 06:34 PM
Post
#54
|
|
Green Hornet Group: Members Posts: 2,449 Joined: 9-May 08 From: Racine, Wisconsin Member No.: 9,038 Region Association: Upper MidWest |
QUOTE(rick 918-S @ Aug 26 2009, 06:38 PM) Do this. Go out to the garage. Remove the targa top. Measure the distance from the right side of the top of the windsheild frame back to the targa bar latch. Then check the left side the same. Oh and do this with the doors open. Then do it with the doors closed. Then report. Drivers side = 24 7/8 - open or closed Passenger side = 24 11/16 open and 24 3/4 closed |
|
|
|
| rick 918-S |
Aug 26 2009, 07:28 PM
Post
#55
|
|
Hey nice rack! -Celette Group: Members Posts: 21,122 Joined: 30-December 02 From: Now in Superior WI Member No.: 43 Region Association: Northstar Region |
QUOTE(jmill @ Aug 26 2009, 04:34 PM) QUOTE(rick 918-S @ Aug 26 2009, 06:38 PM) Do this. Go out to the garage. Remove the targa top. Measure the distance from the right side of the top of the windsheild frame back to the targa bar latch. Then check the left side the same. Oh and do this with the doors open. Then do it with the doors closed. Then report. Drivers side = 24 7/8 - open or closed Passenger side = 24 11/16 open and 24 3/4 closed I'm correct but I was 1mm short. You have a 6mm difference from your right side to your left. Now, do this: Remove the pinch weld mounted seal in the right and left door jamb. Then find a place on both latch pillars (right and left) that are the same approximately at the height of the belt line. With the doors open, measure from the latch pillar on both sides from the pinch weld flange to the same place at the base (bottom corner) of both "A" pillars to the edge of the pinch weld flange. I'm betting you get the same measurement. |
|
|
|
| jmill |
Aug 26 2009, 07:59 PM
Post
#56
|
|
Green Hornet Group: Members Posts: 2,449 Joined: 9-May 08 From: Racine, Wisconsin Member No.: 9,038 Region Association: Upper MidWest |
Yup, same measurement.
|
|
|
|
| r_towle |
Aug 26 2009, 08:52 PM
Post
#57
|
|
Custom Member Group: Members Posts: 24,705 Joined: 9-January 03 From: Taxachusetts Member No.: 124 Region Association: North East States |
Im late to the show.
Did you hit something? If not, remove the window, corner window, chrome piece etc etc. THEN close the door. The chrome upright is extremely adjustable. Rich |
|
|
|
| jmill |
Aug 26 2009, 08:58 PM
Post
#58
|
|
Green Hornet Group: Members Posts: 2,449 Joined: 9-May 08 From: Racine, Wisconsin Member No.: 9,038 Region Association: Upper MidWest |
I didn't hit anything. An owner before me ricocheted it off a wall. It's slow going but it's coming together.
|
|
|
|
| r_towle |
Aug 26 2009, 09:04 PM
Post
#59
|
|
Custom Member Group: Members Posts: 24,705 Joined: 9-January 03 From: Taxachusetts Member No.: 124 Region Association: North East States |
Remove the window.
Set the door perfect. Then put the window back in. One trick is to tip the chrome upright away from the centerline of the car. Everything still works fine and that is why it is adjustable. Rich |
|
|
|
| rick 918-S |
Aug 26 2009, 09:21 PM
Post
#60
|
|
Hey nice rack! -Celette Group: Members Posts: 21,122 Joined: 30-December 02 From: Now in Superior WI Member No.: 43 Region Association: Northstar Region |
No don't remove the window. The window fit the opening before the accident. Adjust the cowl like I told you and the door will self correct. As you move the cowl back the door will close on the striker without lifting and the window won't be forced into the windsheild pillar.
It will do no good to adjust the door or window until you have corrected the chassis. Then you can fine tune the opening by moving the door slightly or the window slightly. Your chassis is 6mm off. Correct that first. You will know your doing good if the door stops raising up when you hit the striker and the measurement at the top of the windsheild stays the same with the door open or closed like the driver side. |
|
|
|
|
15 User(s) are reading this topic (14 Guests and 0 Anonymous Users)
1 Members: Lockwodo

|
Lo-Fi Version | Time is now: 21st November 2025 - 02:56 PM |
Invision Power Board
v9.1.4 © 2025 IPS, Inc.