|
|
|
Porsche, and the Porsche crest are registered trademarks of Dr. Ing. h.c. F. Porsche AG.
This site is not affiliated with Porsche in any way. Its only purpose is to provide an online forum for car enthusiasts. All other trademarks are property of their respective owners. |
|
|

  |

| dbgriffith75 |
 Oct 6 2008, 01:57 PM Oct 6 2008, 01:57 PM
Post
#1
|
|
TheGrif  Group: Members Posts: 509 Joined: 25-July 07 From: Iowa, USA Member No.: 7,945 Region Association: Upper MidWest |
Okay, this time I'm not trying to argue as to what gauge sheetmetal should be used for the repair, I promise (IMG:style_emoticons/default/biggrin.gif)
But I've been mulling it over the last few days as to how I should go about installing the replacement panel once it's fabricated and ready for installation. If you check out my porsche pics (link in my sig) and look at pic#5, you can see where I'm going to need to do a little repair on the firewall as well, so I'm considering this in these drawings. I've come up with a couple of different options, see below: 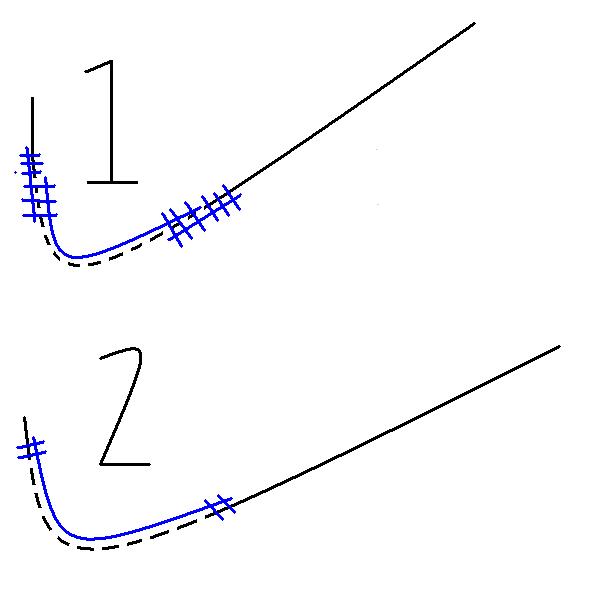 For some reason paint is being gay and not letting me add text into the pic, but here's a "key" for them: The dotted black lines is the chunk to be replaced. The blue lines denote replacement panel and where they cross at the ends is what will be plug welds. I'd be drilling through both the replacement panel and the part of the engine shelf/firewall to accomplish this. And just to be clear, I will be cutting out the old sheet metal to be replaced, not just leaving it there. Option 1: Plug weld support shims to the engine shelf and firewall, then do the same for the replacement panel. I'd also weld the seam where the new and old sheet metal meet. Afterwards, I'd grind down the welds for a virtually seamless repair. The advantage to this option is that when it's all said and done and the painting is finished, it would be difficult to tell that any repair work has been done; but it would be more time consuming. Option 2: Instead of support shims, I'd simply overlap the replacement panel on top of the old sheet metal, then drill and plug weld the overlap. But I'd still also weld the seams on top; and again grind for as seamless a look as I can get. However, with this option, it would be easier to tell that repair work had been done; and would save some time in doing the repair. So which option do you guys think would be the best? Or is there a better way to do it? Thanks! (IMG:style_emoticons/default/beerchug.gif) |
   |

 
|
| 2-OH! |
Oct 6 2008, 02:19 PM
Post
#2
|
|
Senior Member Group: Members Posts: 552 Joined: 17-October 03 From: Santa Clarita, Kalifornication Member No.: 1,253 |
From looking at pic #5, it looks to me like the top of your Long is rotted...That's usual...
Take a Dremmel tool and the flex wand that fits onto it and about a 100 of those small cutting disc (because it's the only thing that will fit down in there) and cut away the old rusted portion until you get to at lease solid metal...Including the top of the long... The benefit of doing this is to allow you to see down into the long...That way you can determine what you need to do next... It is easier for me to make a few small patches that fit correctly than to make one big one and try to bend/shape it into place... DO NOT just try to cover this area with new sheet metal...Go down inside and fix it correctly... The Long is a much heavier gauge than the skin, so when replacing it, use metal that is at least as thick or thicker to repair it...This is the main structural piece for the car... RE 2-OH! |
|
|
|
| r_towle |
Oct 6 2008, 02:22 PM
Post
#3
|
|
Custom Member Group: Members Posts: 24,705 Joined: 9-January 03 From: Taxachusetts Member No.: 124 Region Association: North East States |
I looked at your pics.
Clean it first. Cut out the top piece from the firewall all the way up till you get good clean metal...solid thick weldable metal up towards the trunk lid spring mounts.. Cut the firewall out, the piece that is bad... Its two pieces with a flange, so if the bottom piece is junk and above the flange is ok...just take out the bottom piece. If you can, cut out a big piece so you can get into the hello hole easier. You can butt weld all that back in later... Steps I would take. 1) cut out firewall to get in there and work. 2) cut out top of long...go slow so you retain the flange on the inner long at the top. 3) cut/fix inner fender 4) cut/ fix engine shelf with small patch pieces. 5) Treat inner long with metal magic no rust snake oil. 6) cut/fit top piece on long 7) grind all welds down 8) weld in firewall piece 9) grind welds more... 10) sandblast entire area 11) primer/paint Rich |
|
|
|
| dbgriffith75 |
Oct 6 2008, 09:18 PM
Post
#4
|
|
TheGrif Group: Members Posts: 509 Joined: 25-July 07 From: Iowa, USA Member No.: 7,945 Region Association: Upper MidWest |
I appreciate the advice on the long guys, but that's not what I was asking...
Yes Rich, I see that you said to use small patches, but I'm not going to do that. Talk about WORK! I plan to form one big piece to replace the hell hole and firewall; this will look better and take less work to install; hence asking which option you thought would be better for welding and replacing the panel. I'll see what I can do about getting a better picture of the firewall. I assure you it's not as bad as it looks- prolly 85% of the rust you're seeing in the pic is from when I sandblasted the firewall the first time and failed to take the proper steps to prevent surface rust from forming. Then again, I wasn't planning on having to wait 3 months for my shoulder to heal at that time either. But if I can get a better pic of the firewall, that might help you guys advise me better. |
|
|
|
| Richard Casto |
Oct 7 2008, 07:51 AM
Post
#5
|
|
Blue Sky Motorsports, LLC Group: Members Posts: 1,465 Joined: 2-August 05 From: Durham, NC Member No.: 4,523 Region Association: South East States |
I am doing it differently (an option you didn't list above).
Most of the Hell Hole is double walled. Much of your top layer is rusted out and some of the bottom layer. I would remove 100% of the rust even if this means cutting out more than you would like. Then when you have solid edges, remove about 1" of the top layer but leave the bottom layer (this is tricky, but can be done). This allows the replacements to overlap good metal. Butt weld in the replacement bottom layer. Drill holes in your top layer first (for the plug welds). Clamp in the top layer over the botom and then plug weld first to ensure the top and bottom layers are tight against each others and then I butt weld the edges of the top layer last. Grind it all down and it should look good.  In this image, the black is existing top and bottom layers. The green is the new metal that you fabricate. Both are 20g. The red is the butt welds. The purple is plug/rosette welds. This is much like your option #1, but without a backing plate. If you can't do this, I would then pick option #1 |
|
|
|
| Richard Casto |
Oct 7 2008, 07:59 AM
Post
#6
|
|
Blue Sky Motorsports, LLC Group: Members Posts: 1,465 Joined: 2-August 05 From: Durham, NC Member No.: 4,523 Region Association: South East States |
QUOTE(dbgriffith75 @ Oct 6 2008, 11:18 PM)  Yes Rich, I see that you said to use small patches, but I'm not going to do that. Talk about WORK! I plan to form one big piece to replace the hell hole and firewall; this will look better and take less work to install; IMHO, I also would make the replacement sections as big as you can, but not so big they are a pain in the ass to work with. (IMG:style_emoticons/default/smile.gif) At some point trying to craft one mongo section that will do it all is going to take more time and work than maybe breaking that big section into two or three smaller parts. I personally would not use one for both the hell hole and the firewall. It WILL be faster and easier to do it in sections. Fix the hell hole first, then do the firewall. But only after cutting out all rust first. |
|
|
|
| dbgriffith75 |
Oct 7 2008, 11:07 AM
Post
#7
|
|
TheGrif Group: Members Posts: 509 Joined: 25-July 07 From: Iowa, USA Member No.: 7,945 Region Association: Upper MidWest |
I see what you're getting at in your sketch Richard- I wasn't aware that it was double walled. I may just do it that way now.
As for making the replacements too big to work with... well, I understand what you're saying, but metal work is something of a specialty for me. I spent a couple years of my life as a welder/fabricator, so forming the steel and welding it aren't so much the issue as I'm just trying to figure out what the best way to do the repair is. At the same time, I don't expect to cover it all in one big piece. I probably could fabricate it, but I'm not foolish enough to believe that one big chunk is the only way to save time; and it will be easier to form sections. I just meant one chunk of steel for the actual "hole" of the hellhole. Here's a little better breakdown of my plan: 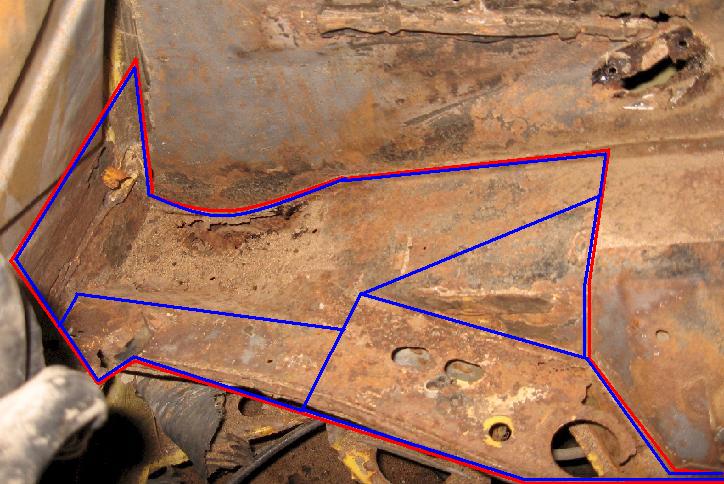 The red denotes the entire section I plan on replacing. The blue is the breakdown of the sections I plan to make. It's just the way Towle made it sound like I should use lots of smaller pieces, which would have taken more time and work. I suppose I should actually be working on the hellhole when discussing this, but my shoulder's not quite up for it yet so I'm just trying to plan ahead. |
|
|
|
| r_towle |
Oct 7 2008, 11:24 AM
Post
#8
|
|
Custom Member Group: Members Posts: 24,705 Joined: 9-January 03 From: Taxachusetts Member No.: 124 Region Association: North East States |
The piece going up the firewall should be seperate...trust me.
It should actually be two pieces to retain the flange...its ALOT easier to do it that way. The added plus is the firewall piece goes in LAST... You will appreciate doing it that way... Even with your shoulder hurting...try getting any tool you own in there to cut and grind way in the bottom corner...you cant. Cut the firewall out, maybe even bigger than you show (save the piece) Then fix all the rest... Put the firewall back in as a seperate piece (s) at the end,,,,you will really have an easier time at it... Rich |
|
|
|
| dbgriffith75 |
Oct 7 2008, 02:35 PM
Post
#9
|
|
TheGrif Group: Members Posts: 509 Joined: 25-July 07 From: Iowa, USA Member No.: 7,945 Region Association: Upper MidWest |
Okay, I see what you're getting at now about the firewall Rich. For grinding purposes and such, it would be easier to keep it seperate. Thanks.
|
|
|
|
| SirAndy |
Oct 7 2008, 02:39 PM
Post
#10
|
|
Resident German Group: Admin Posts: 42,479 Joined: 21-January 03 From: Oakland, Kalifornia Member No.: 179 Region Association: Northern California |
QUOTE(2-OH! @ Oct 6 2008, 12:19 PM) DO NOT just try to cover this area with new sheet metal...Go down inside and fix it correctly... (IMG:style_emoticons/default/agree.gif) |
|
|
|
| dbgriffith75 |
Oct 7 2008, 03:27 PM
Post
#11
|
|
TheGrif Group: Members Posts: 509 Joined: 25-July 07 From: Iowa, USA Member No.: 7,945 Region Association: Upper MidWest |
In light of SirAndy's input, just wanted to be clear that I had no intentions of just covering up the old sheet metal with the new. I'm a slacker, but not that much of a slacker. (IMG:style_emoticons/default/biggrin.gif)
|
|
|
|
|
1 User(s) are reading this topic (1 Guests and 0 Anonymous Users)
0 Members:

|
Lo-Fi Version | Time is now: 2nd May 2026 - 03:19 AM |
Invision Power Board
v9.1.4 © 2026 IPS, Inc.