|
|
|
Porsche, and the Porsche crest are registered trademarks of Dr. Ing. h.c. F. Porsche AG.
This site is not affiliated with Porsche in any way. Its only purpose is to provide an online forum for car enthusiasts. All other trademarks are property of their respective owners. |
|
|


| Eric_Shea |
 Dec 6 2008, 05:26 PM Dec 6 2008, 05:26 PM
Post
#1
|
|
PMB Performance  Group: Admin Posts: 19,274 Joined: 3-September 03 From: Salt Lake City, UT Member No.: 1,110 Region Association: Rocky Mountains |
Ahhh…the blessing and the curse that is the ATE integrated hand brake caliper. This is the tale of the funky little caliper I’ve come to love (and hate).
Let me start with one of those “If you think you’ve got it bad” stories to help make everyone feel better: If you think you’ve got it bad, you should see the poor Alfa guys who use basically the same caliper. Their ATE IHB (integrated hand brake) caliper is mounted on the transmission. This places it out of the airstream and mounts it on a hot tranny. You get to get under your car to adjust the venting clearance and they often overheat contributing to brake fade. Adding a little more salt to the wound; try to upgrade “that” system… So we have this funny caliper with a handbrake that is ingeniously integrated into the braking system. When it’s working, it works pretty damn well. But what are our problems: 1. You have to adjust them annually or bi-annually. 2. They can be expensive to perform an honest to goodness “upgrade”. 3. They can be tricky to adjust. 4. Most of them are inoperable. That’s right… most of the rear calipers on 914’s on the road today are not working at all! As the hallowed holiday season approaches, this may be a great time to look at your brake system and perform some simple maintenance procedures. Here are the ones that top my list: 1. Change your fluid. 2. Check and change your soft lines. 3. Check and change your pads. 4. Adjust your rear calipers. In this thread we’ll cover the procedure and the pitfalls of adjusting your rear calipers. Let’s start with a bit of a lesson as to what these things are and why we need to adjust them. With the ATE IHB caliper there is no need for a separate drum brake system (E.G; the 911 system) to operate the hand brake or emergency brake. Here’s how it works; you pull the lever in the passenger’s compartment. The lever pulls on the cables. The cables pull the arms. The arms move the internal adjustment mechanism forcing the inside piston/pad against the rotor. If the venting clearance is set properly, this forces the rotor against the outside pad as well clamping the rotor securely between the pads. It’s that simple. Here’s a picture of the “chain” as it affects the inner piston on the caliper: 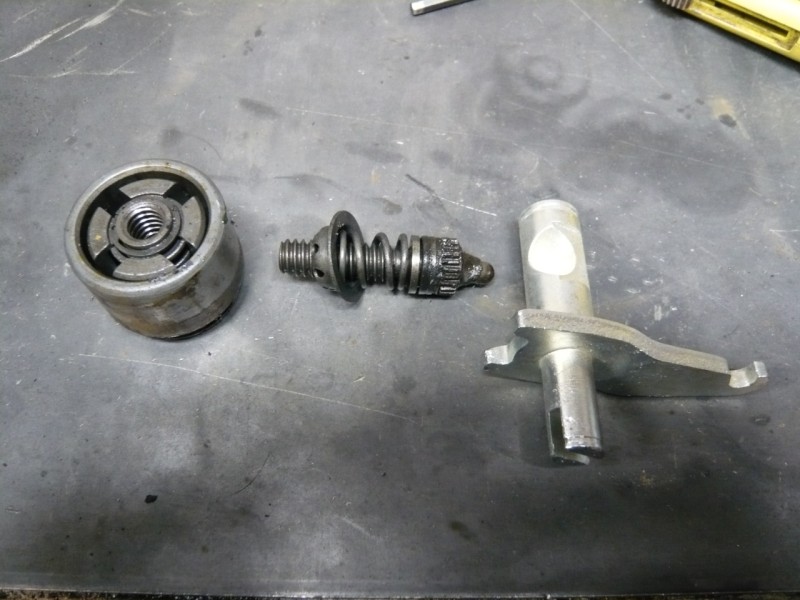 Because we are only utilizing one piston in this process, it is imperative that the adjusting clearance on both the inner and the outer piston be set properly and often. Here's the outer adjuster chain. A bit more simple than the inner setup: 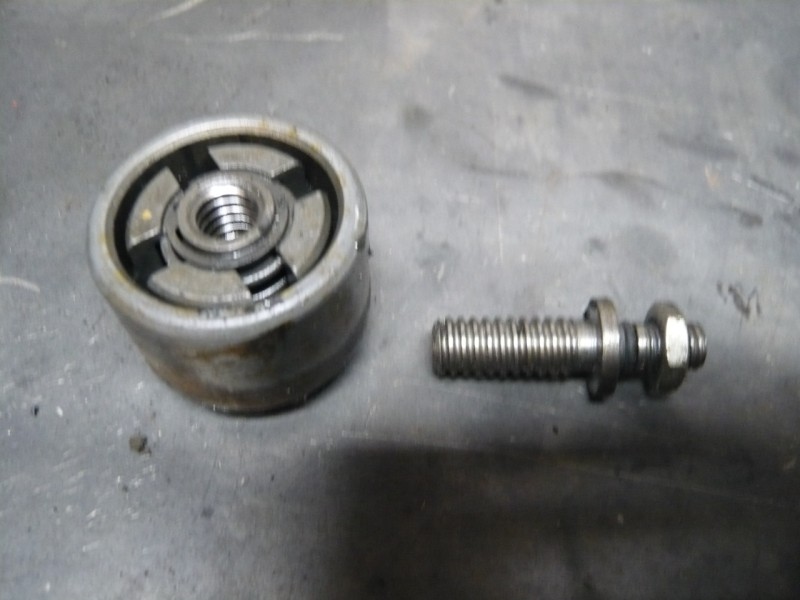 In basic terms, the adjustment mechanism inside the piston simply allows the piston to be adjusted inward or outward while still performing it’s job as a brake caliper piston; apply fluid pressure… clamp rotors. The mechanism allows the piston to travel a good 4-5mm to do this job. Now… if your pads have worn, and you’ve never adjusted your venting clearance, your piston will travel to the furthest extension point and either be blown off its adjuster or (as in most cases herein) not work at all. By properly setting your venting clearances a couple of times per year you’ll help ensure your rear calipers are working. With working rear calipers you’ll stop faster and safer and you’ll have better times at the track. Here's a close up view of the internal adjuster mechanism as it sits in your piston. Imaging your piston moving up and down via this mechanism: 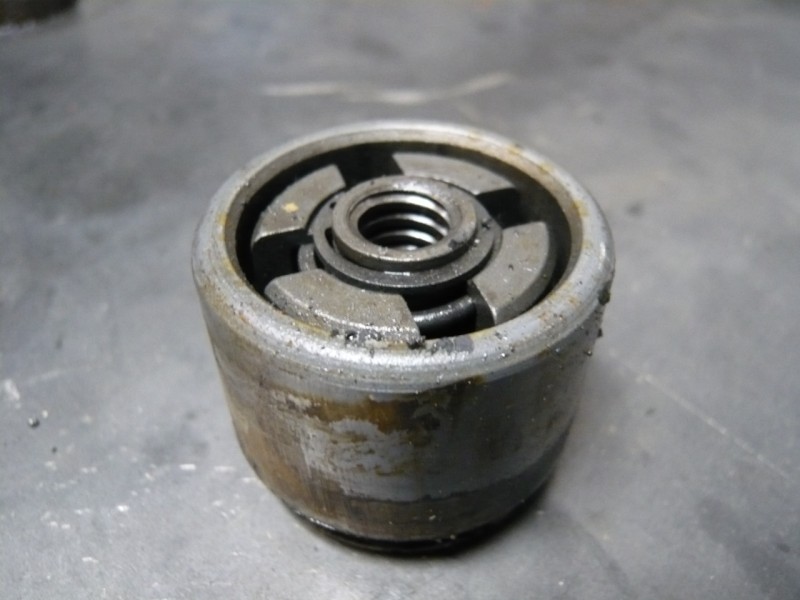 To properly set the venting clearance (as with any job) you’ll need to prep properly. Included herein are some basics meant to augment the factory manual. Here’s a list of some tools needed to perform this job: o 4mm hex socket (or 4mm wrench long enough to go through the arm). o 13mm socket o Socket wrench or arm o 6” socket extension o Cold Chisel (possible/probable) o Hammer (possible/probable) o Feeler gauges in .004 or .008 sizes. o Vise Grips o 4mm hex wrench (simple) Before we begin this procedure I want to make sure we cover a few things. Make sure you’ve bled the brakes and there’s fluid in the calipers. Also, make sure this is performed on a car that is completed and running. You will need to have your stub axles in and properly torqued before you attempt to set your venting clearance. Don’t laugh, you’ll be surprised at how many people try to do this while their cars are in the build process. If the hubs are not torqued to the stub axle you can get considerable wobble or run-out. Let’s get started. 1. Raise car on a lift or with a jack and place on jackstands. 2. Remove the rear wheels. 3. Remove the cables from the arms. Inspect, clean and lube the cables at this time. 4. Remove the outer dust cover (if your car still has one) and unscrew the lock nut. Here's a shot of the outer dust cover being removed: 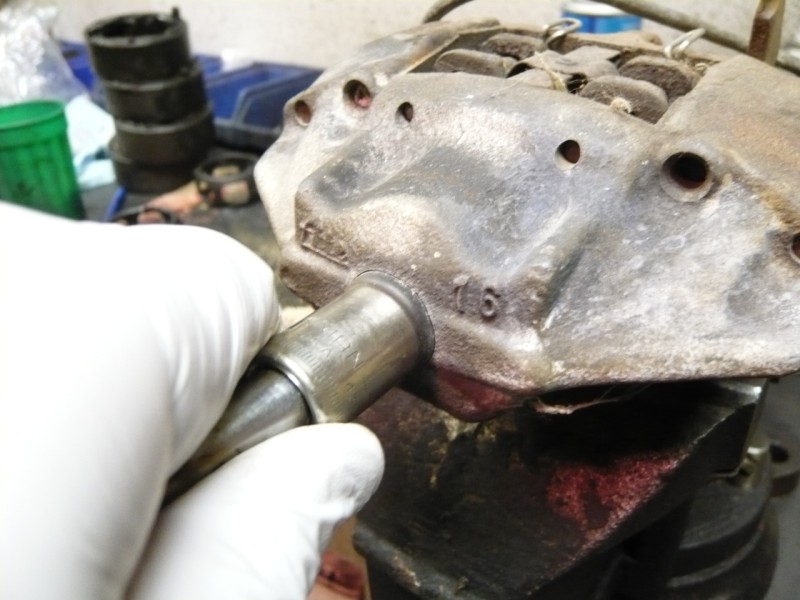 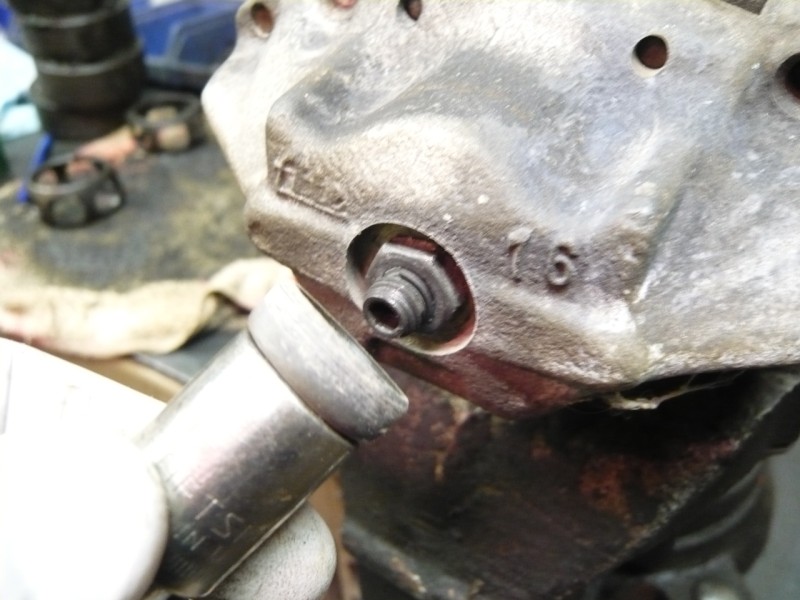 IMPORTANT – You MUST loosen this lock nut (red arrown in the following picture) to allow the outer adjuster to operate freely. Notice the clip on the adjuster shaft (yellow arrow). This is meant to hold the lock nut in place. Do not agressively hyper extend the 13mm lock nut past this clip, you just need to loosen it.: 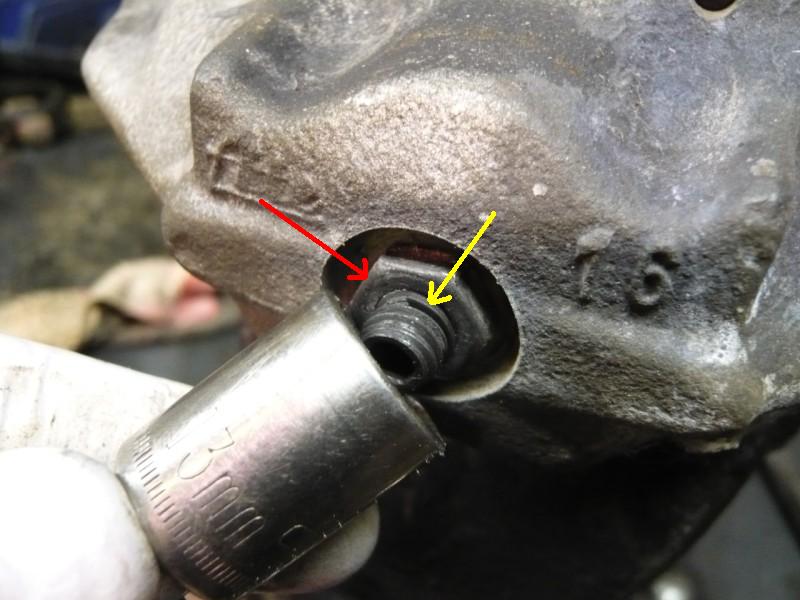 Failure to loosen this lock nut prior to attempting to adjust the outer adjuster is the number one cause of stripped outer adjusters. If you strip your outer adjuster the caliper will need to be rebuilt and/or the adjuster replaced. These are very fragile at 4mm and you may find that the previous owner has already stripped the adjuster for you. That being the case, you may be able to salvage it by tapping the top of the adjuster with a hammer and form the top back into shape enough for the hex to bite. There is a “Special Tool” that is used to loosen and tighten this lock nut but I’ll show you the 914 guy CSOB version herein. I like to call it “Special Tool VG13MM”: 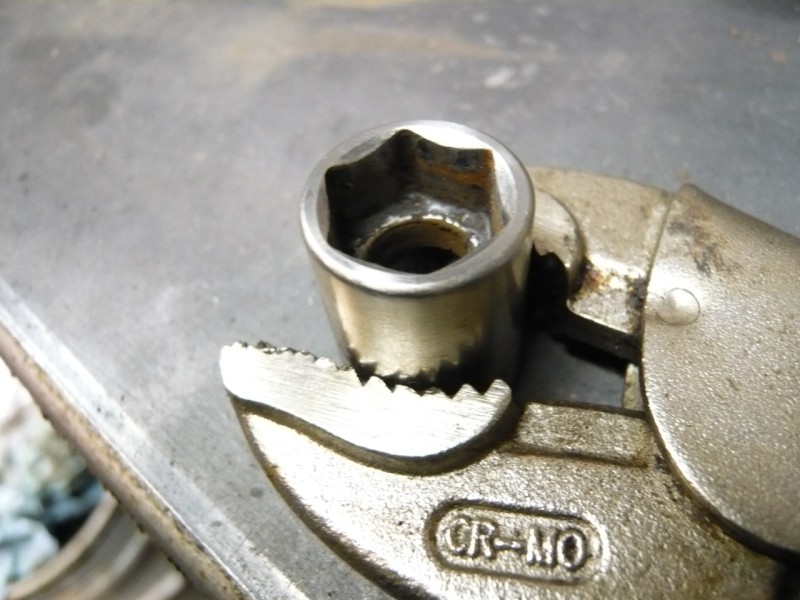 That’s right, take a 13mm socket and clamp it in a pair of Vise Grip pliers. This allows access to the inner adjuster via the 4mm hex through the opening in the socket. Once the lock nut is loosened you are now ready to adjust the gap. 5. Look for the run-out or wobble in the rotor. They all have it, you’ll want to look for the high side and have that in your pad area while you adjust the clearance. I like to use a Sharpie and outline the caliper top and bottom on the rotor so the rotor stays in the same place as I adjust. Take a .004” feeler and put it between the outer pad and the rotor. Using a simple 4mm hex wrench adjust the clearance to .004” so there is light pressure on the gauge.: 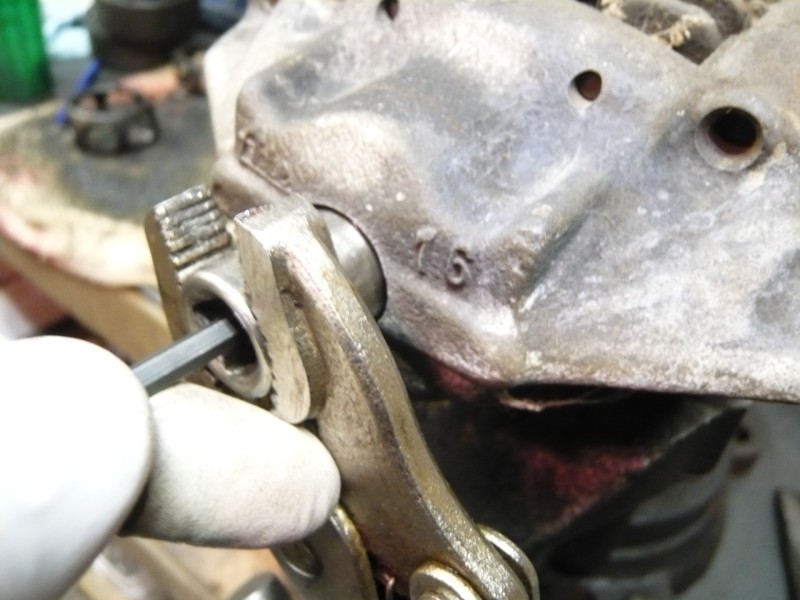 Lets address this .004” and .008” debate that needlessly rains supreme on the Internet. The factory had originally printed a .008” spec in the Factory Manuals. All of the other (Haynes and Clymer) manuals picked up this spec. Since then they (the factory) changed the spec to .004”. The Alfa manuals spec at .01”. Does it matter? NO! You’re splitting hairs here… LITERALLY. The difference between .004 and .008 is the difference between a thin hair and a thick hair. A business card is .011”: 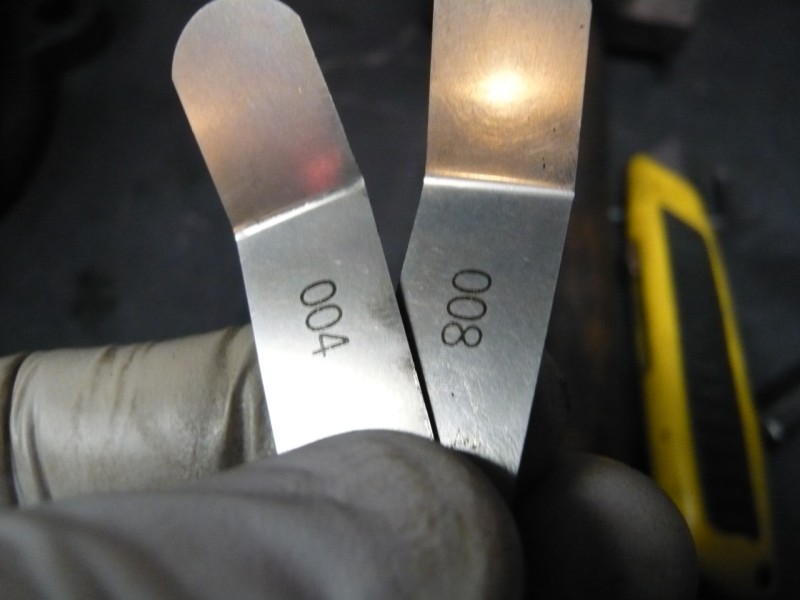 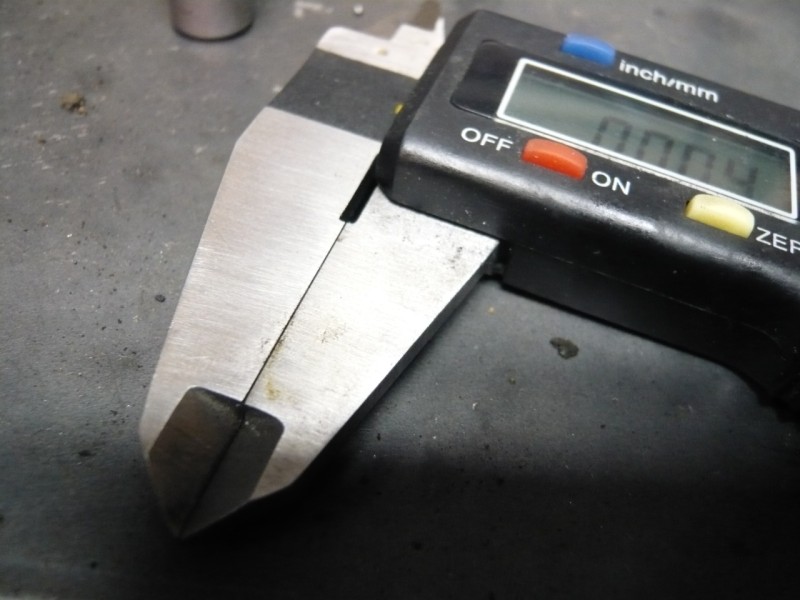   The problem doesn’t lie in .004 and .008”, it lays in what your pads are adjusted to now which is much greater than either of those two, I’m guessing!! (IMG:style_emoticons/default/biggrin.gif) 6. Remove the feeler gauge and rotate the rotor making sure you did adjust to the “high” spot on the rotor. There should be no binding as you rotate the rotor. If this checks out true, hold the adjuster with the 4mm hex and tighten the 13mm lock nut with our new “Special Tool” VG13MM. 7. Move on to the inner adjuster. This is where the problems can arise. The number one problem with the inner adjuster is the cover that seals it from the elements. These have a 4mm hex head when new and the small hex and shallow depth of this hex fitting is in no way capable of overcoming the rust and grunge that builds up on the 10x1 thread engagement. Basically stating; the thread engagement is too much for the 4mm hex to overcome in “most” cases. Look at that pathetic little thing!:  What does this mean? A “stripped” 4mm hex and now you’re left wondering how you’ll ever be able to adjust your inner adjusters. To make matter worse; all of this needs to be accessed through that hole in your control arm. There is a solution for getting this cover off and there is a longer term fix. If you have a feel for these kind of things (and I don’t expect most of you to know when the breaking point is on a 4mm hex) you can tell if it’s going to come or not. If it’s tight STOP, especially if you’re not equipped with the “longer term fix” (which would be a new cover). You’ll need to use this piece again so let’s not bugger it up too badly. The best way to remove it is to use a cold chisel and turn it with the chisel and hammer: 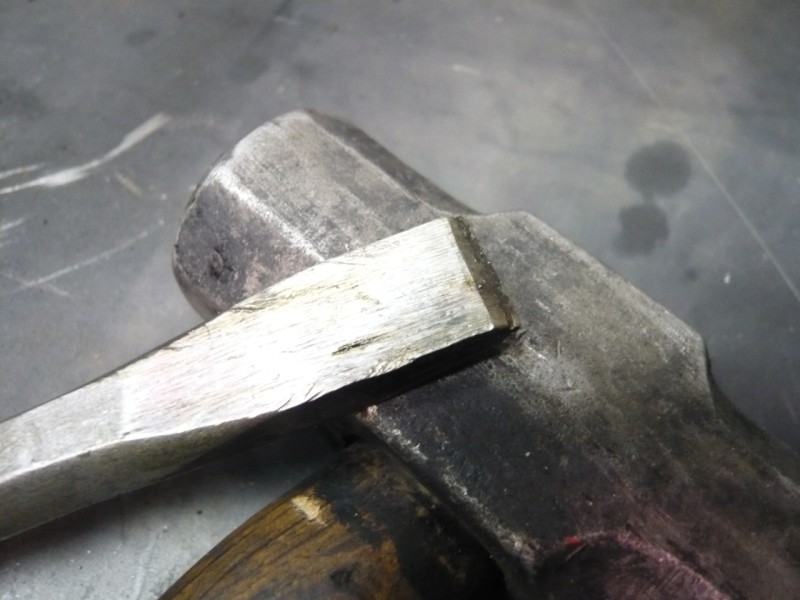 You will probably need to take the caliper off the mounts to do this but, here goes the procedure. Placing the chisel at the 8:00 position, angle it 45 degrees in the direction of desired movement. Sharp blows with the hammer and chisel will loosen the cover without further damaging the 4mm hex: 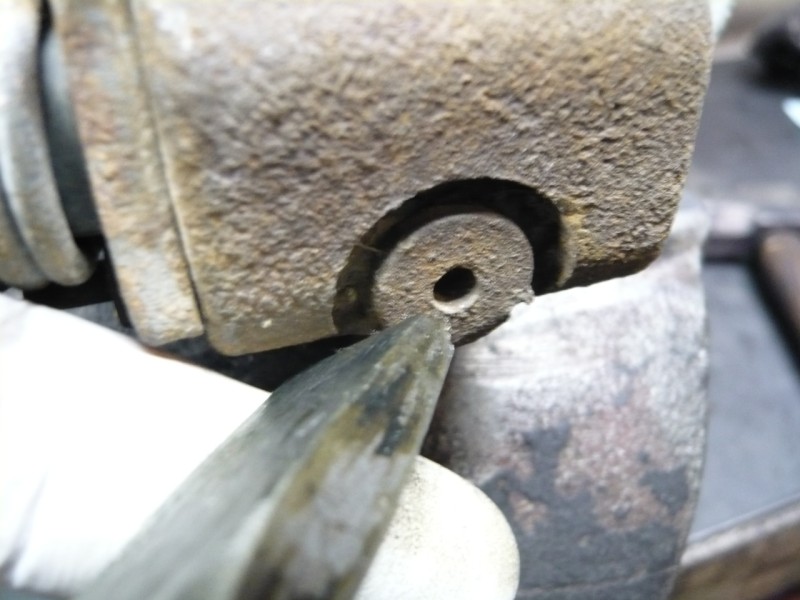 In this example you can see the force required to get these off sometimes (red arrow) and you can see that this has been done before (yellow arrow):  This allows you to reinstall the cover once you’re done adjusting the caliper. Insert the hex and spin off the cover: 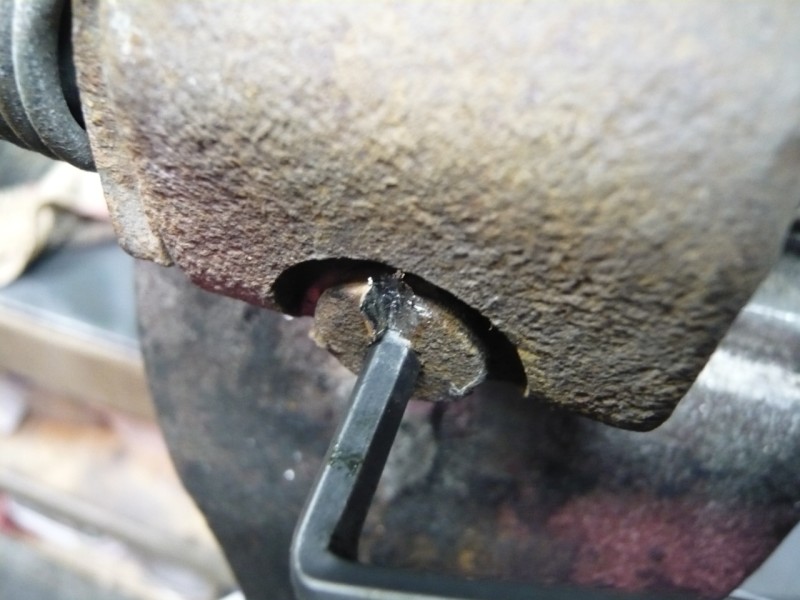 Once you get the cover off you can remove the copper washer with a utility knife: 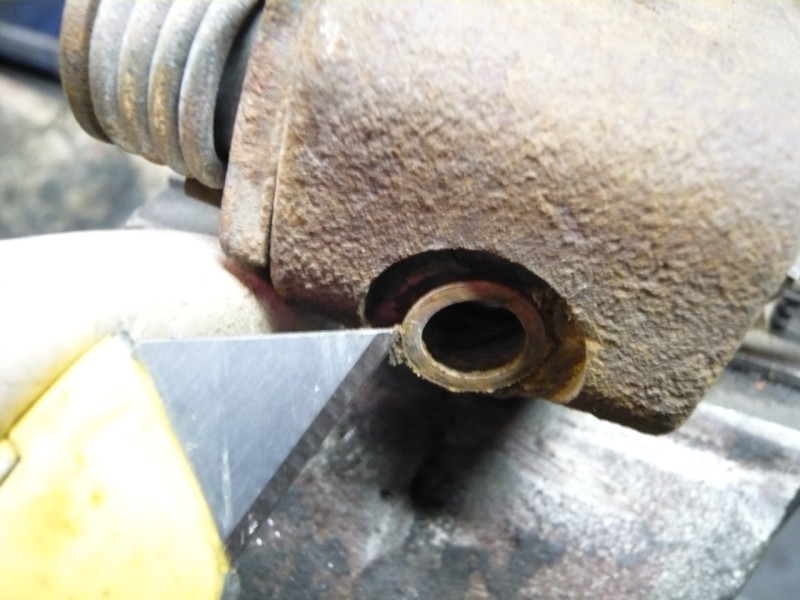 and access the inner adjuster gear: 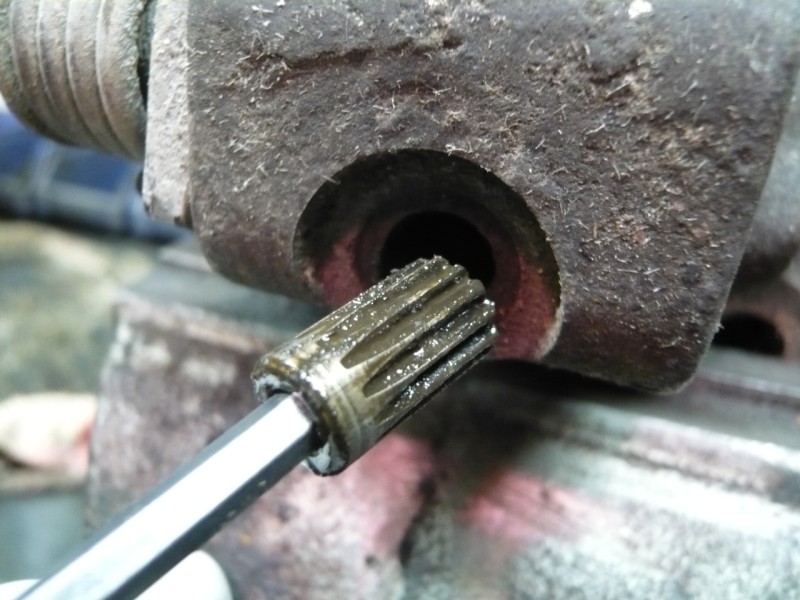 Lets clarify the use of gears and the direction of rotation upon adjusting the inner piston. The reason we need the above gear is the handbrake arm (in the first picture) is squarely in the way of direct contact with the inner adjuster. The way around this is to place a gear below the adjuster to drive it. Once something is gear driven the motion for adjusting is sent in the opposite direction so… what would be a counter clockwise move to get a piston to adjust out is now a clockwise move… make sense? As stated before; to properly adjust the inner pistons you need to go through the adjuster hole on the control arm. Once the cap is off you’ll take a 4mm hex socket on a 6” extension arm and adjust through the arm: 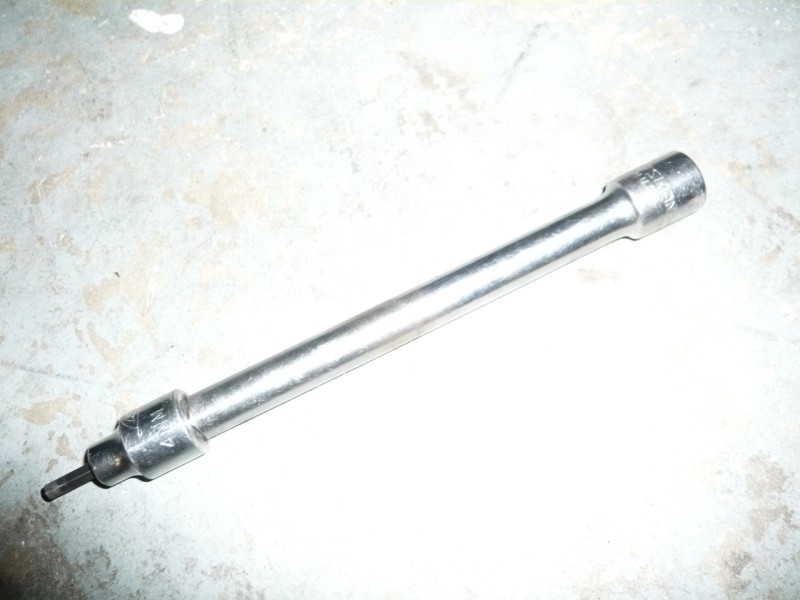 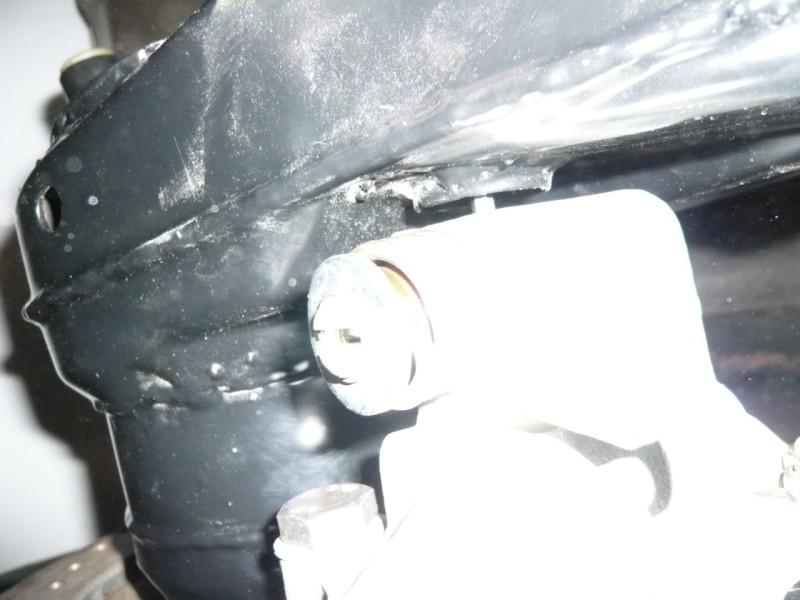 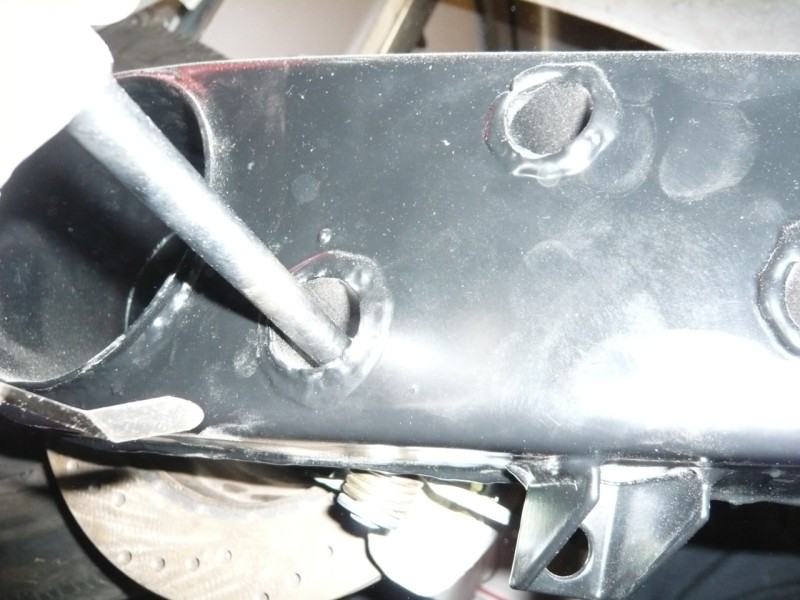 (pay no attention to the extra holes in the arms herein) TIP: If you think your calipers are old, grungy and stuck, tap the handbrake arm inward with a hammer (watching not to hit too hard or go too far and shear off the stop pin for the arm). Do you remember how we described this hand brake arm mechanism earlier? Imagine it now breaking an old, grungy, fluid and rust bond by forcing the piston out toward the rotor. By tapping it you will force the piston loose and it will probably adjust properly (even though it probably needs a rebuild at this point). Make sure you are at that high spot on your run-out and adjust your inner pad to the .004” setting. 8. Double check the clearance on the run-out and reinstall the adjuster cover, leaving that gear right where you found it. If you did not find a gear in there you’re not alone. We stopped supplying gears as most cores came back missing a gear. Fear not. You can adjust both calipers with one gear. Check your other caliper for a gear and use it on both. Regarding the adjuster cover and the “fix”; we have sourced a plug that has the same 10x1 thread pattern and has the same look as the factory plug. It is much better because it has a 5mm “very deep” hex slot in it. The 5mm slot will overcome anything those 10x1 threads can throw at it and, with the extra depth, it has much more wrench engagement: 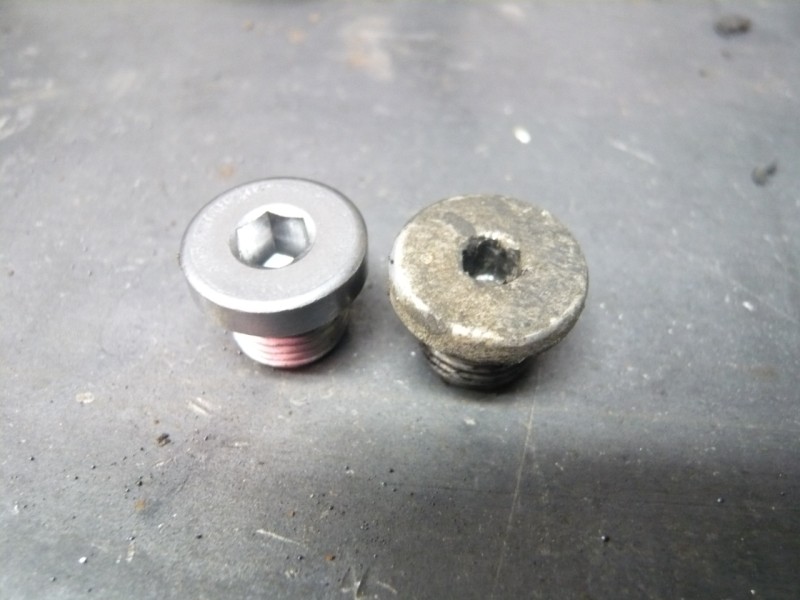 This is better than some of the other aftermarket plugs as it allows you to mount and dismount your calipers in normal fashion. The other aftermarket solutions are 10mm raised body plugs that stick out so far they do not allow you to mount your caliper to the arm with the plug on. You will need to remove that plug and reinstall it through the arms. Not a big deal but, when there’s a better solution, use it. 9. Reinstall your cables making sure they operate smoothly and freely. Now you can enjoy not only a renewed hand brake functionality but rear calipers that are really working! Seriously… I’m willing to bet that 80% of the 914’s on the road have inoperative rear calipers. Just think what it will be like once you’re firing on all 4 again! (IMG:style_emoticons/default/ohmy.gif) |
   |

 
|
Posts in this topic
 Eric_Shea 914 Rear Caliper Adjustment Procedure Dec 6 2008, 05:26 PM
 r_towle Great job.
This should go in the Technical area, ... Dec 6 2008, 06:04 PM Eric_Shea
:D
Well... it's TRUE! :D
Thanks Rich... Dec 6 2008, 06:05 PM ConeDodger Both the author and the article are:
CLASSICS Dec 6 2008, 06:41 PM markb Well done! :) Dec 6 2008, 07:14 PM jim_hoyland Do the e-brake cable require adjustment at the fir... Dec 6 2008, 09:18 PM TC 914-8 Great job Eric,
I have done this several times be... Dec 7 2008, 01:39 AM
r_towle Great job.
This should go in the Technical area, ... Dec 6 2008, 06:04 PM Eric_Shea
:D
Well... it's TRUE! :D
Thanks Rich... Dec 6 2008, 06:05 PM ConeDodger Both the author and the article are:
CLASSICS Dec 6 2008, 06:41 PM markb Well done! :) Dec 6 2008, 07:14 PM jim_hoyland Do the e-brake cable require adjustment at the fir... Dec 6 2008, 09:18 PM TC 914-8 Great job Eric,
I have done this several times be... Dec 7 2008, 01:39 AM
 r_towle
Great job Eric,
I have done this several times b... Dec 7 2008, 11:43 AM Phoenix 914-6GT Very nice Eric :beer2: Dec 7 2008, 02:52 AM SLITS Yo Moroni Boy, I pull the anti-rattle spring on t... Dec 7 2008, 10:22 AM Eric_Shea
Couple of things here...
1. Go for it. I'l... Dec 7 2008, 11:23 AM TC 914-8
Couple of things here...
1. Go for it. I... Dec 7 2008, 01:21 PM eg914 Thanks for this post. The special 13mm tool is sh... Dec 7 2008, 11:49 AM 9146986 For the "special tool" I've always u... Dec 7 2008, 12:46 PM Eric_Shea
Sometimes the boxed end wrenches just don't ... Dec 7 2008, 02:45 PM echocanyons Is it completely necessary to remove the cables to... Apr 19 2009, 06:22 PM type2man Very nice write up. I wish I would have seen it ab... Apr 19 2009, 08:05 PM charliew I am going to go to the 911 eb setup but I wanted ... Apr 19 2009, 11:12 PM Cap'n Krusty FWIW, in the 36 years I've been working on 914... Apr 19 2009, 11:26 PM type47 So now I'm concerned that my rear brakes are n... Apr 20 2009, 09:17 AM rdauenhauer Uh :( what if you find that turning your inner a... Apr 27 2009, 12:47 AM sixnotfour Seriously you guys didnt get the inners adjusted ?... Apr 27 2009, 01:03 AM rdauenhauer yup..brand new calipers. No workie on BOTH inside ... Apr 27 2009, 01:18 PM Eric_Shea Sorry Rich, only 6 years late on a reply but, I wa... Dec 14 2015, 02:29 PM tomrev I have to smile; in desperation, I used the same v... Dec 14 2015, 03:37 PM Marty Yeoman
To remedy this, you'll need to overcome the ... Apr 28 2016, 04:49 PM SKL1 Great right-up Eric. And good timing.
Even thou... Dec 15 2015, 02:01 PM Amphicar770 The how to restore / modify 914 book mentions remo... May 17 2016, 08:18 PM Eric_Shea I like to leave them in. We're talking about ... May 17 2016, 09:07 PM Amphicar770 Hi Eric,
So, tonight I went to adjust the rears o... May 19 2016, 09:13 PM Eric_Shea Yes. Do you need a pair?
May 20 2016, 08:32 AM Amphicar770
Yes. Do you need a pair?
My bad. Next time ... May 20 2016, 08:53 AM Fatboy007 Fantastic article thank you for the help! May 23 2018, 09:04 AM jfort Dumb question probably. I need to adjust the hand ... Oct 2 2018, 08:57 AM mepstein
Dumb question probably. I need to adjust the hand... Oct 2 2018, 09:20 AM jfort thanks, mepstein, for the quick reply. as the rest... Oct 2 2018, 09:44 AM mepstein
thanks, mepstein, for the quick reply. as the res... Oct 2 2018, 10:59 AM 914werke @Eric_Shea So every few yrs its seems I have to r... Nov 6 2020, 08:57 PM mepstein I think you will have to manually push in the pist... Nov 6 2020, 09:56 PM Eric_Shea Pressure may be needed to retract extended pistons... Nov 7 2020, 07:54 AM 914werke Ya no joy, is the process to then push them comple... Nov 7 2020, 11:54 AM Van914 Rich,
Having the same problem today on a PMB rebui... Nov 6 2023, 05:53 PM PatMc
Rich,
Having the same problem today on a PMB rebu... Nov 6 2023, 08:11 PM davep You do realize that the rear pistons do not move f... Nov 6 2023, 06:37 PM
r_towle
Great job Eric,
I have done this several times b... Dec 7 2008, 11:43 AM Phoenix 914-6GT Very nice Eric :beer2: Dec 7 2008, 02:52 AM SLITS Yo Moroni Boy, I pull the anti-rattle spring on t... Dec 7 2008, 10:22 AM Eric_Shea
Couple of things here...
1. Go for it. I'l... Dec 7 2008, 11:23 AM TC 914-8
Couple of things here...
1. Go for it. I... Dec 7 2008, 01:21 PM eg914 Thanks for this post. The special 13mm tool is sh... Dec 7 2008, 11:49 AM 9146986 For the "special tool" I've always u... Dec 7 2008, 12:46 PM Eric_Shea
Sometimes the boxed end wrenches just don't ... Dec 7 2008, 02:45 PM echocanyons Is it completely necessary to remove the cables to... Apr 19 2009, 06:22 PM type2man Very nice write up. I wish I would have seen it ab... Apr 19 2009, 08:05 PM charliew I am going to go to the 911 eb setup but I wanted ... Apr 19 2009, 11:12 PM Cap'n Krusty FWIW, in the 36 years I've been working on 914... Apr 19 2009, 11:26 PM type47 So now I'm concerned that my rear brakes are n... Apr 20 2009, 09:17 AM rdauenhauer Uh :( what if you find that turning your inner a... Apr 27 2009, 12:47 AM sixnotfour Seriously you guys didnt get the inners adjusted ?... Apr 27 2009, 01:03 AM rdauenhauer yup..brand new calipers. No workie on BOTH inside ... Apr 27 2009, 01:18 PM Eric_Shea Sorry Rich, only 6 years late on a reply but, I wa... Dec 14 2015, 02:29 PM tomrev I have to smile; in desperation, I used the same v... Dec 14 2015, 03:37 PM Marty Yeoman
To remedy this, you'll need to overcome the ... Apr 28 2016, 04:49 PM SKL1 Great right-up Eric. And good timing.
Even thou... Dec 15 2015, 02:01 PM Amphicar770 The how to restore / modify 914 book mentions remo... May 17 2016, 08:18 PM Eric_Shea I like to leave them in. We're talking about ... May 17 2016, 09:07 PM Amphicar770 Hi Eric,
So, tonight I went to adjust the rears o... May 19 2016, 09:13 PM Eric_Shea Yes. Do you need a pair?
May 20 2016, 08:32 AM Amphicar770
Yes. Do you need a pair?
My bad. Next time ... May 20 2016, 08:53 AM Fatboy007 Fantastic article thank you for the help! May 23 2018, 09:04 AM jfort Dumb question probably. I need to adjust the hand ... Oct 2 2018, 08:57 AM mepstein
Dumb question probably. I need to adjust the hand... Oct 2 2018, 09:20 AM jfort thanks, mepstein, for the quick reply. as the rest... Oct 2 2018, 09:44 AM mepstein
thanks, mepstein, for the quick reply. as the res... Oct 2 2018, 10:59 AM 914werke @Eric_Shea So every few yrs its seems I have to r... Nov 6 2020, 08:57 PM mepstein I think you will have to manually push in the pist... Nov 6 2020, 09:56 PM Eric_Shea Pressure may be needed to retract extended pistons... Nov 7 2020, 07:54 AM 914werke Ya no joy, is the process to then push them comple... Nov 7 2020, 11:54 AM Van914 Rich,
Having the same problem today on a PMB rebui... Nov 6 2023, 05:53 PM PatMc
Rich,
Having the same problem today on a PMB rebu... Nov 6 2023, 08:11 PM davep You do realize that the rear pistons do not move f... Nov 6 2023, 06:37 PM  |
1 User(s) are reading this topic (1 Guests and 0 Anonymous Users)
0 Members:

|
Lo-Fi Version | Time is now: 28th April 2024 - 11:01 PM |
Invision Power Board
v9.1.4 © 2024 IPS, Inc.