|
|

|
Porsche, and the Porsche crest are registered trademarks of Dr. Ing. h.c. F. Porsche AG.
This site is not affiliated with Porsche in any way. Its only purpose is to provide an online forum for car enthusiasts. All other trademarks are property of their respective owners. |
|
|
  |
| ThePaintedMan |
 Jan 5 2014, 05:29 PM Jan 5 2014, 05:29 PM
Post
#381
|
|
Advanced Member     Group: Members Posts: 3,887 Joined: 6-September 11 From: St. Petersburg, FL Member No.: 13,527 Region Association: South East States 
|
This is really good stuff John, and some lucid, well-thought ideas on how to check the shape of the chassis. In particular, I think it was wise to check that trailing arm to see how warped it was. Does this mean that the car is still within factory +/- specs on all of the suspension points? I know it's not perfect, but basically it's "good enough"?
Really happy for ya dude! Glad you're doing it right. Question - I noticed that car ran as a 914/4 in GTU for the first two outings. I wonder if Manuel or Vince has any details or pictures on how the car was setup that way? It appears it only ran once as a /6? |
| FourBlades |
 Jan 5 2014, 07:09 PM Jan 5 2014, 07:09 PM
Post
#382
|
|
From Wreck to Rockin     Group: Members Posts: 2,056 Joined: 3-December 07 From: Brevard, FL Member No.: 8,414 Region Association: South East States 
|
Hey thanks George! I think so far the chassis and suspension points look good
enough that I think the setup and alignment will be good and it will handle well. I have some receipts for new pistons and cylinders after the /4 outings. I think they holed a piston during one of the Sebring outings. Eventually they switched to a /6. Really looking forward to talking to Manuel about how they built and campaigned the car. (IMG:style_emoticons/default/chowtime.gif) I need to compile all the race history into one post. Today I measured the front A arms to see if they were parallel as Rick and Chris suggested. This was very easy to measure starting with the front: 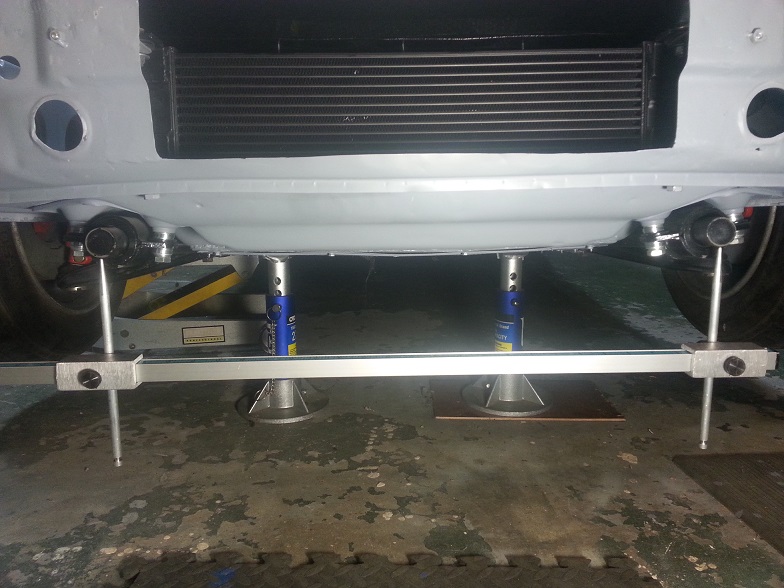 And then measured the arms at the rear: 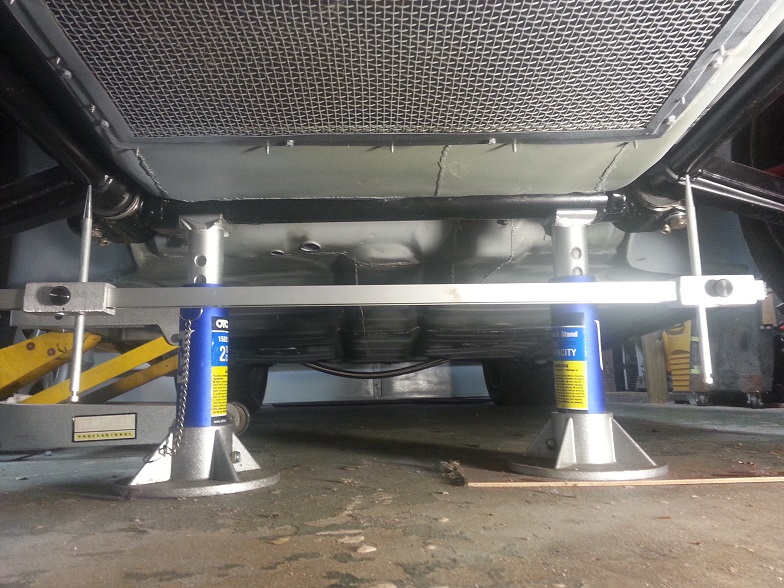 As closely as I can tell, they are exactly parallel! I did not move the pointers on the tram gauge at all from the front to rear measurements. This felt good to see. John |
| FourBlades |
 Jan 5 2014, 07:21 PM Jan 5 2014, 07:21 PM
Post
#383
|
|
From Wreck to Rockin     Group: Members Posts: 2,056 Joined: 3-December 07 From: Brevard, FL Member No.: 8,414 Region Association: South East States 
|
So I did find some things wrong with the car through measurements and
comparisons with my other two 914s. One thing is the passenger fender was "drooping" by almost an inch on the outside. This caused the front end to look wrong on close inspection. I made a template of part of the front panel from my red car and it was obvious right away that something was wrong when I held it up to my IMSA car. 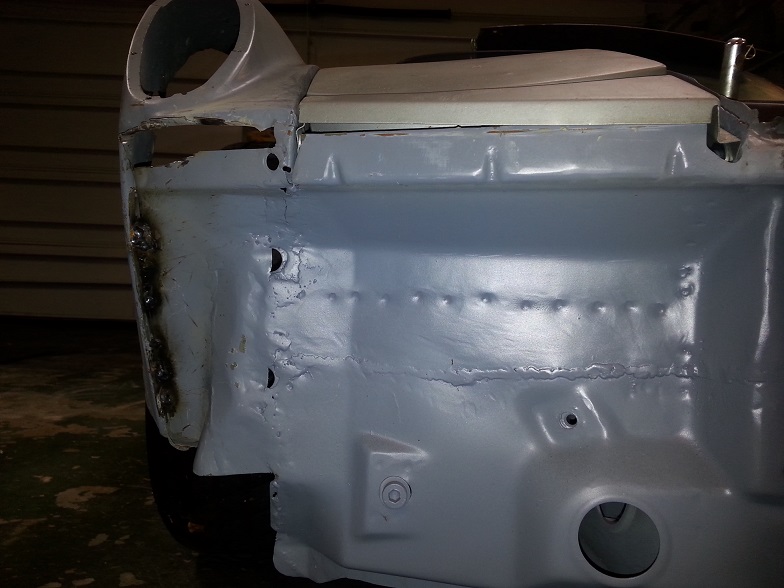 The big gap was closed up the way I had it welded. I cut it apart and tacked it the way it should have been before taking this picture. Now it looks much more correct. Notice the front panel is patched together from several pieces and some sheet metal. Now you may be asking what kind of dumb ass welds their fender on in a way that is off by an inch? Good question. Until you have done something like this before it is not obvious to you all the possible things that can go wrong. It all seemed to fit together nicely at the time. The fiberglass front bumper fit perfectly. (IMG:style_emoticons/default/blink.gif) This only took about an hour to fix but much longer to understand. Next time I will know much more about how to position each panel. John |
| FourBlades |
 Jan 5 2014, 07:40 PM Jan 5 2014, 07:40 PM
Post
#384
|
|
From Wreck to Rockin     Group: Members Posts: 2,056 Joined: 3-December 07 From: Brevard, FL Member No.: 8,414 Region Association: South East States 
|
And then there is the real puzzler. The driver side headlight is very tight in its
opening. I made a template of the opening from my red car and compared it to this one. The passenger side looks very good. 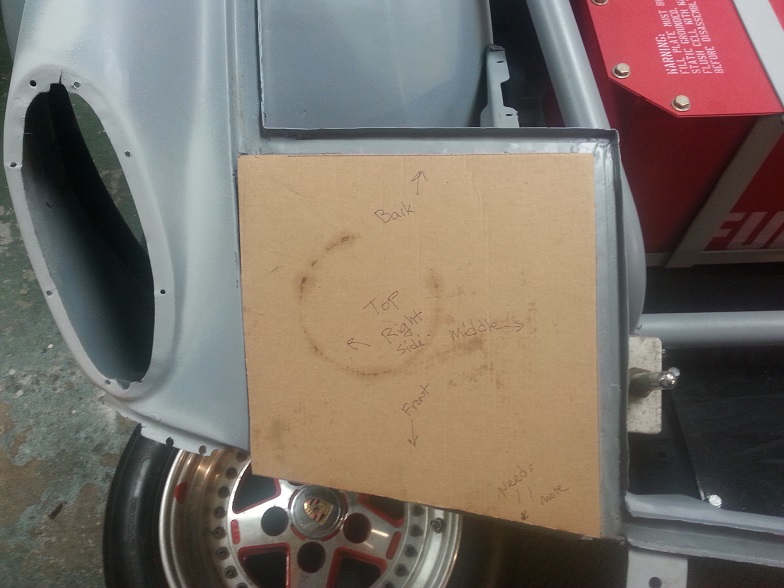 The driver side is way off. (IMG:style_emoticons/default/mad.gif) 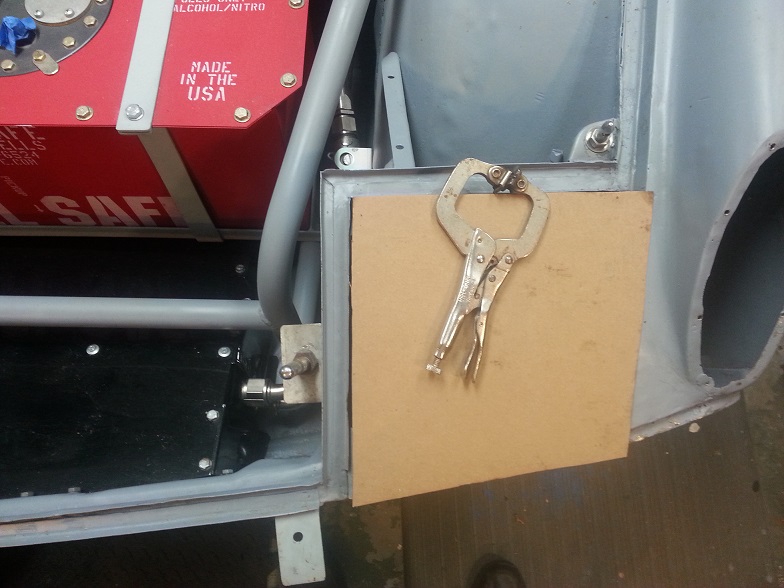 Lining up the template with the headlight bucket and drawing a line down the fender: 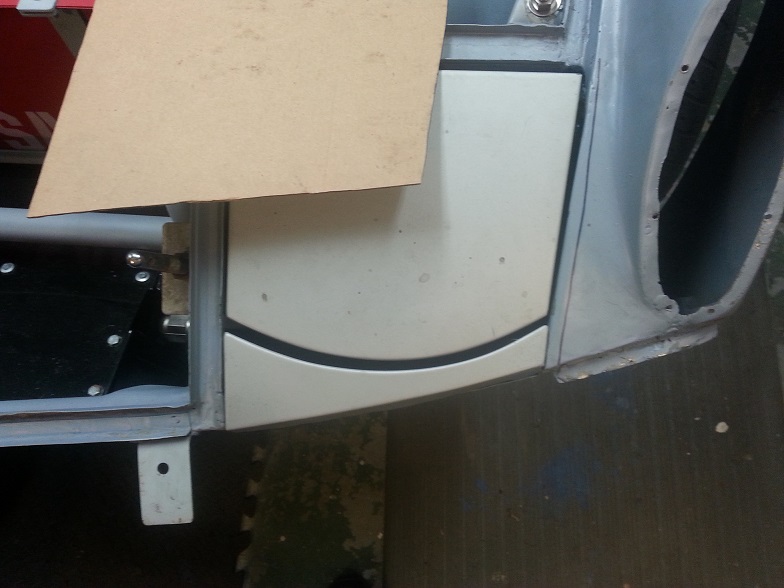 It seems the fender was mounted too close to the center line of the car when the POs welded on a replacement fender sometime long ago. The headlight bucket is attached to the front panel in exactly the stock location. The headlight buckets are parallel to each other and the right distance apart. Remember back in post 221 when I realized the front of the car was too narrow and I used a porto power to jack it back into place? I was short by 1 cm from where it should have been. http://www.914world.com/bbs2/index.php?sho...1937&st=220 Looking at what I started with and how I pieced it back together it is not surprising!!! 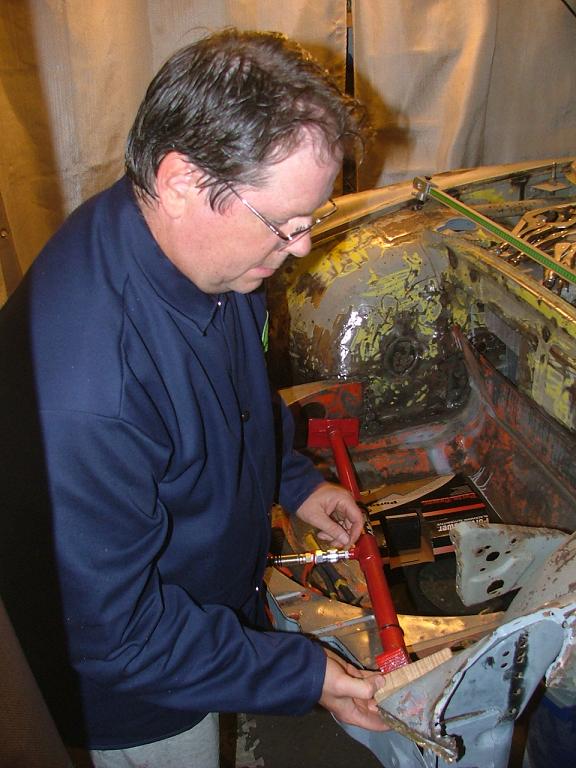 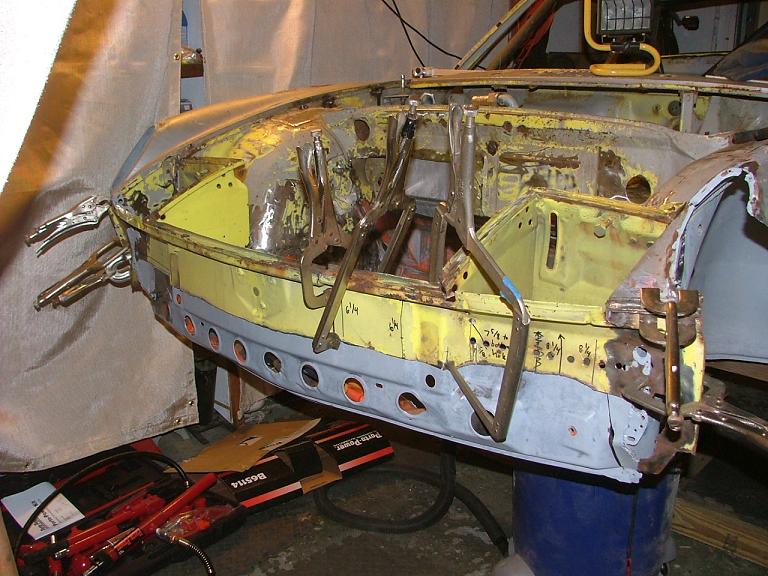 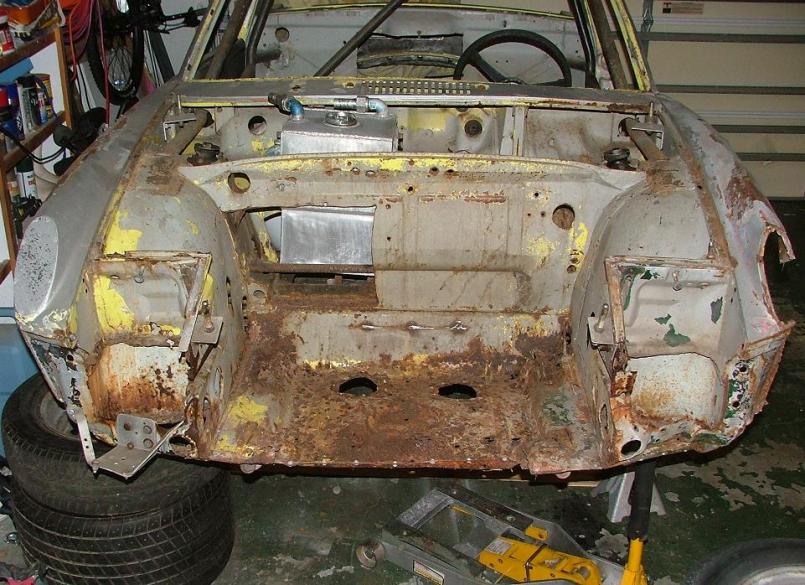 Anyway, now the question is, how do I fix it? If I could get 3 mm more opening then the headlight would operate smoothly and I think this would not be noticeable unless you really looked hard. John |
| ThePaintedMan |
 Jan 5 2014, 07:55 PM Jan 5 2014, 07:55 PM
Post
#385
|
|
Advanced Member     Group: Members Posts: 3,887 Joined: 6-September 11 From: St. Petersburg, FL Member No.: 13,527 Region Association: South East States 
|
So the buckets are in the right place, but you still have clearance problems with the headlight and the right fender, correct?
If the left side marker and fender look correct, why not make a template of that and flip it over to see if the fender still needs to come out some? Then you could split it along the seam for the front trunk. Tack it in the back, and pull the front over to make up the 3mm difference. I really want to be there to help you! (IMG:style_emoticons/default/headbang.gif) |
| FourBlades |
 Jan 5 2014, 08:05 PM Jan 5 2014, 08:05 PM
Post
#386
|
|
From Wreck to Rockin     Group: Members Posts: 2,056 Joined: 3-December 07 From: Brevard, FL Member No.: 8,414 Region Association: South East States 
|
I wish you lived closer George!
The shrinkage (Jerry) is inside the driver side headlight bucket. The distance between buckets is ok. The distance between the fenders is off by 1 cm and that 1 cm is missing from the driver side bucket. Not sure if this makes sense to people. I could cut through the front fascia within the bucket and try to jack the fender over another 5 mm or so. Now that I have welded on a new outside fender it makes the fender like a double walled box that I would be afraid to force over. I could also make a dremel cut down the fender on the line I scribed and narrow the fender by a couple mm. Then the fender would be too narrow but I doubt it would be noticeable. Worst case I cut the whole fender off and weld on the new one after cutting the fascia and widening the front end. (IMG:style_emoticons/default/headbang.gif) (IMG:style_emoticons/default/headbang.gif) (IMG:style_emoticons/default/headbang.gif) John |
| FourBlades |
 Jan 5 2014, 08:06 PM Jan 5 2014, 08:06 PM
Post
#387
|
|
From Wreck to Rockin     Group: Members Posts: 2,056 Joined: 3-December 07 From: Brevard, FL Member No.: 8,414 Region Association: South East States 
|
And the rest of youse! Quit lurking and post some abusive comments or ideas.
Now I got to go play with the new Ruf 911 c spec racer in iracing. (IMG:style_emoticons/default/biggrin.gif) |
| McMark |
 Jan 5 2014, 09:44 PM Jan 5 2014, 09:44 PM
Post
#388
|
|
914 Freak!                Group: Retired Admin Posts: 20,180 Joined: 13-March 03 From: Grand Rapids, MI Member No.: 419 Region Association: None |
You're iRacing when you could be working?! (IMG:style_emoticons/default/mad.gif)
|
| sixnotfour |
 Jan 5 2014, 11:18 PM Jan 5 2014, 11:18 PM
Post
#389
|
|
914 Wizard           Group: Members Posts: 11,092 Joined: 12-September 04 From: Life Elevated..planet UT. Member No.: 2,744 Region Association: Rocky Mountains 

|
Attached image(s) 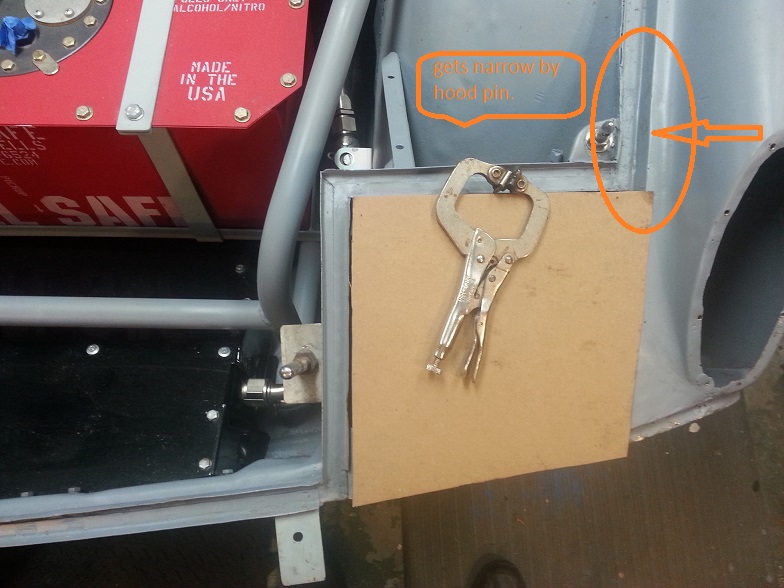 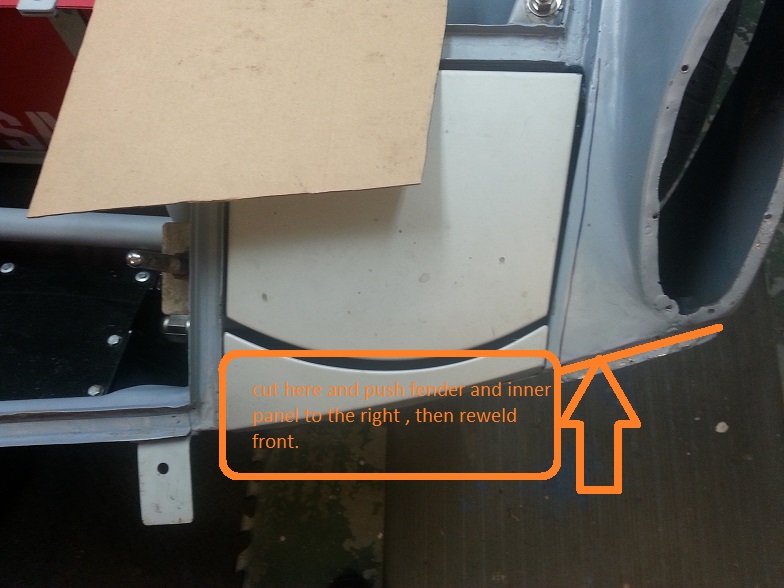
|
| FourBlades |
 Jan 6 2014, 08:45 AM Jan 6 2014, 08:45 AM
Post
#390
|
|
From Wreck to Rockin     Group: Members Posts: 2,056 Joined: 3-December 07 From: Brevard, FL Member No.: 8,414 Region Association: South East States 
|
Great observation! Thanks! John |
| zambezi |
 Jan 6 2014, 11:06 AM Jan 6 2014, 11:06 AM
Post
#391
|
|
Senior Member    Group: Members Posts: 711 Joined: 14-April 08 From: Lafayette, LA Member No.: 8,920 Region Association: South East States |
How does a known good hood fit? Check that now too so there are no more surprises. It will also show you where you can and cannot add space to get the headlight correct.
|
| FourBlades |
 Jan 6 2014, 11:24 AM Jan 6 2014, 11:24 AM
Post
#392
|
|
From Wreck to Rockin     Group: Members Posts: 2,056 Joined: 3-December 07 From: Brevard, FL Member No.: 8,414 Region Association: South East States 
|
Great idea. I will try that.
Keep the ideas coming. John |
| rick 918-S |
 Jan 6 2014, 06:40 PM Jan 6 2014, 06:40 PM
Post
#393
|
|
Hey nice rack! -Celette                Group: Members Posts: 21,169 Joined: 30-December 02 From: Now in Superior WI Member No.: 43 Region Association: Northstar Region 

|
(IMG:style_emoticons/default/FERG.gif) Your car is coming along nicely. It will be up to Porsche standards in no time!
|
| Chris Pincetich |
 Jan 6 2014, 08:16 PM Jan 6 2014, 08:16 PM
Post
#394
|
|
B-)     Group: Members Posts: 2,082 Joined: 3-October 05 From: Point Reyes Station, CA Member No.: 4,907 Region Association: Northern California |
If you test fit the hood and front bumpers, does it still seem too narrow?
If you fix the driver's side bucket will it cause problems fitting the hood and bumpers back on?? It's all connected (eventually) (IMG:style_emoticons/default/biggrin.gif) Keep up the great work (IMG:style_emoticons/default/beerchug.gif) |
| FourBlades |
 Jan 6 2014, 08:57 PM Jan 6 2014, 08:57 PM
Post
#395
|
|
From Wreck to Rockin     Group: Members Posts: 2,056 Joined: 3-December 07 From: Brevard, FL Member No.: 8,414 Region Association: South East States 
|
Good questions Chris.
I will try the hood and stock bumper to see how those fit. I plan to see how the fairly rare fiberglass bumper that was used on the car fits on my stock cars just for a comparison. I plan to take this slow and get it right this time. I could cut all the damaged panels off and totally rebuild it to look completely stock but I think that would not be true to how it was when it raced. I like the subtle signs of battle damage, they just need to be a little more subtle.. (IMG:style_emoticons/default/biggrin.gif) John |
| ChrisFoley |
 Jan 7 2014, 07:44 AM Jan 7 2014, 07:44 AM
Post
#396
|
|
I am Tangerine Racing      Group: Members Posts: 8,018 Joined: 29-January 03 From: Bolton, CT Member No.: 209 Region Association: None 
|
I like the subtle signs of battle damage, they just need to be a little more subtle.. (IMG:style_emoticons/default/biggrin.gif) John (IMG:style_emoticons/default/agree.gif) Without the battle scars it just wouldn't be the same car. |
| rhodyguy |
 Jan 7 2014, 08:41 AM Jan 7 2014, 08:41 AM
Post
#397
|
|
Chimp Sanctuary NW. Check it out.                Group: Members Posts: 22,252 Joined: 2-March 03 From: Orion's Bell. The BELL! Member No.: 378 Region Association: Galt's Gulch |
(IMG:style_emoticons/default/agree.gif) patina. if you can align it, roll with it.
|
| FourBlades |
 Jan 7 2014, 10:12 AM Jan 7 2014, 10:12 AM
Post
#398
|
|
From Wreck to Rockin     Group: Members Posts: 2,056 Joined: 3-December 07 From: Brevard, FL Member No.: 8,414 Region Association: South East States 
|
I think you guys get it. When you see the car in person it has a certain feel to it and you can tell it has had an interesting history. I am trying to save this look while still making a functional car out of it. John |
| FourBlades |
 Jan 20 2014, 05:52 PM Jan 20 2014, 05:52 PM
Post
#399
|
|
From Wreck to Rockin     Group: Members Posts: 2,056 Joined: 3-December 07 From: Brevard, FL Member No.: 8,414 Region Association: South East States 
|
Fixing the driver side headlight bucket. The bucket is too narrow and the headlight
rubs when opening and closing. I am going to try the easy way to fix it. If that does not work I can move on to more drastic measures. 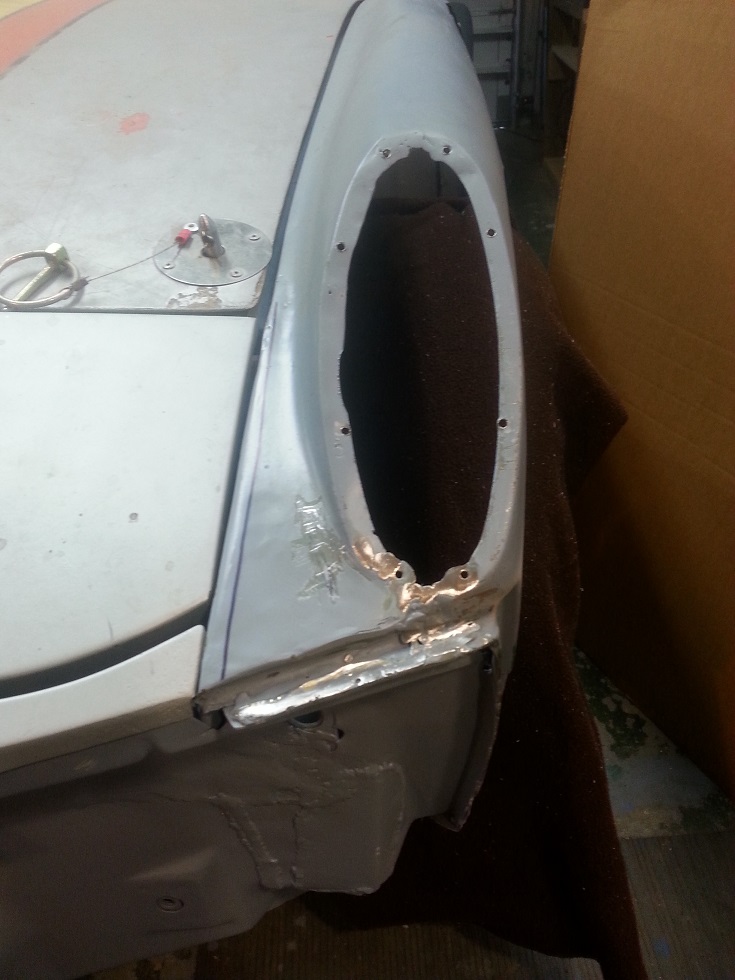 The turn signal bucket area is also in really bad shape. The contour around the turn signal has been flattened out and the metal is weak and cracked. 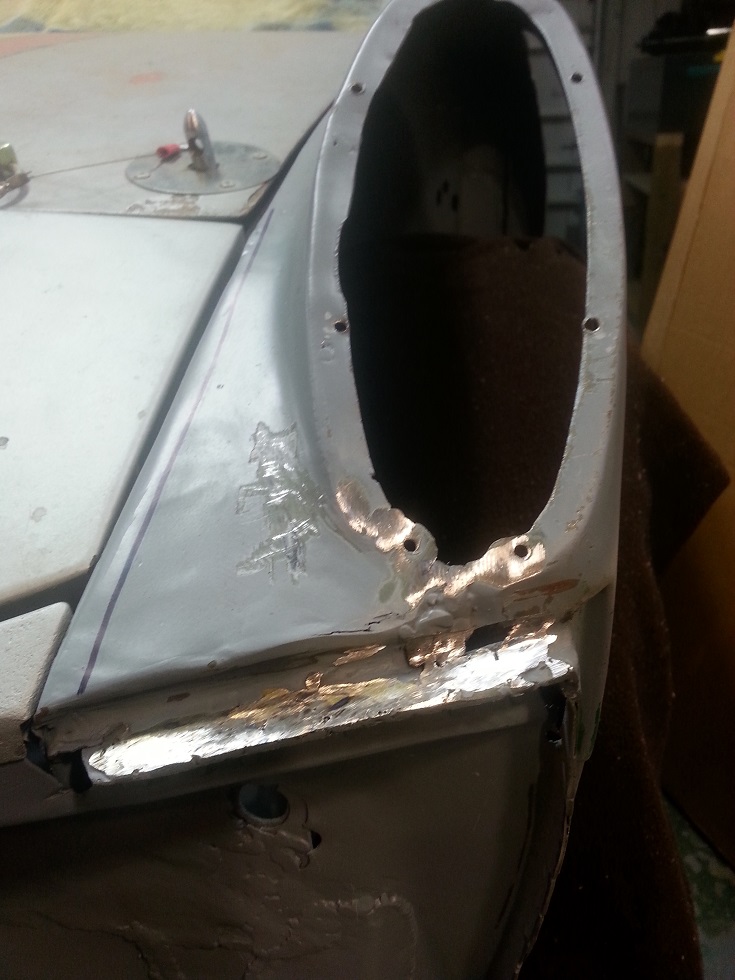 Start cutting out the bad metal at the bottom of the fender. 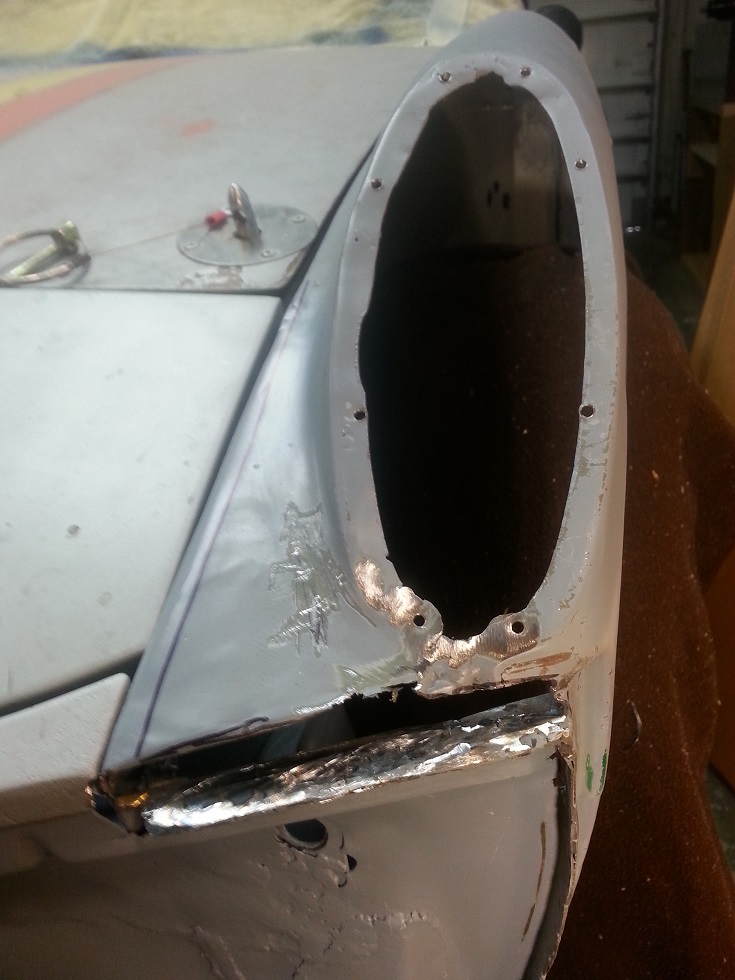 Cut a pie shaped piece out of the fender about 5 mm wide at the bottom and tapering to 1 mm at the top. 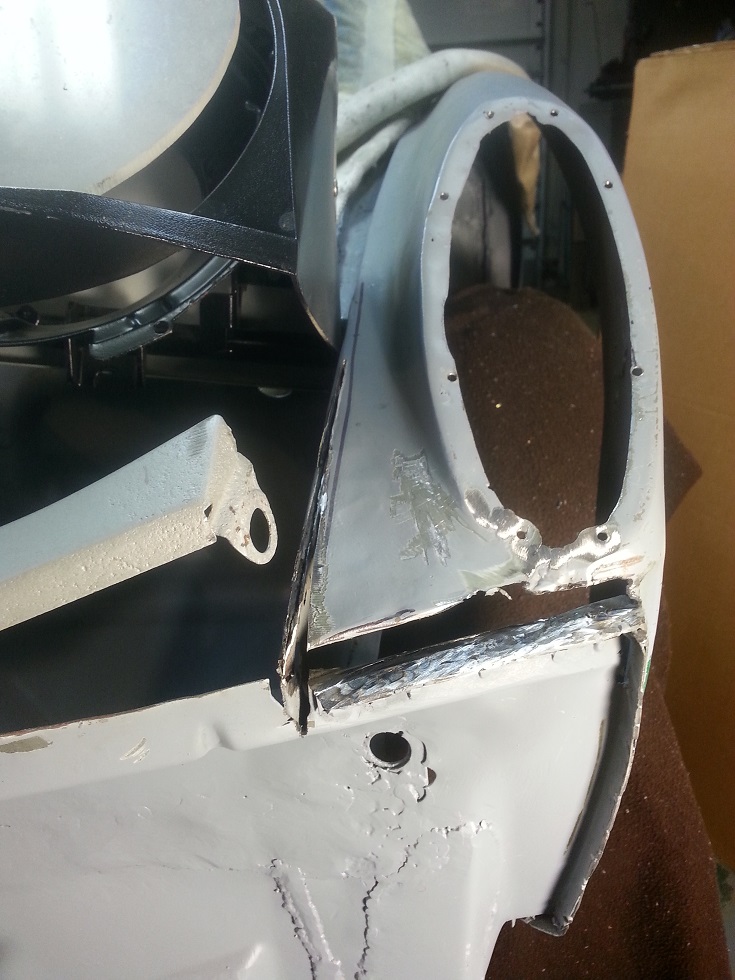 Going to post this much as a test, last night I typed it all and the server died. John |
| FourBlades |
 Jan 20 2014, 06:00 PM Jan 20 2014, 06:00 PM
Post
#400
|
|
From Wreck to Rockin     Group: Members Posts: 2,056 Joined: 3-December 07 From: Brevard, FL Member No.: 8,414 Region Association: South East States 
|
OK, that post worked so I will continue the story.
Used a LFH and some careful pounding to realign the side of the fender. 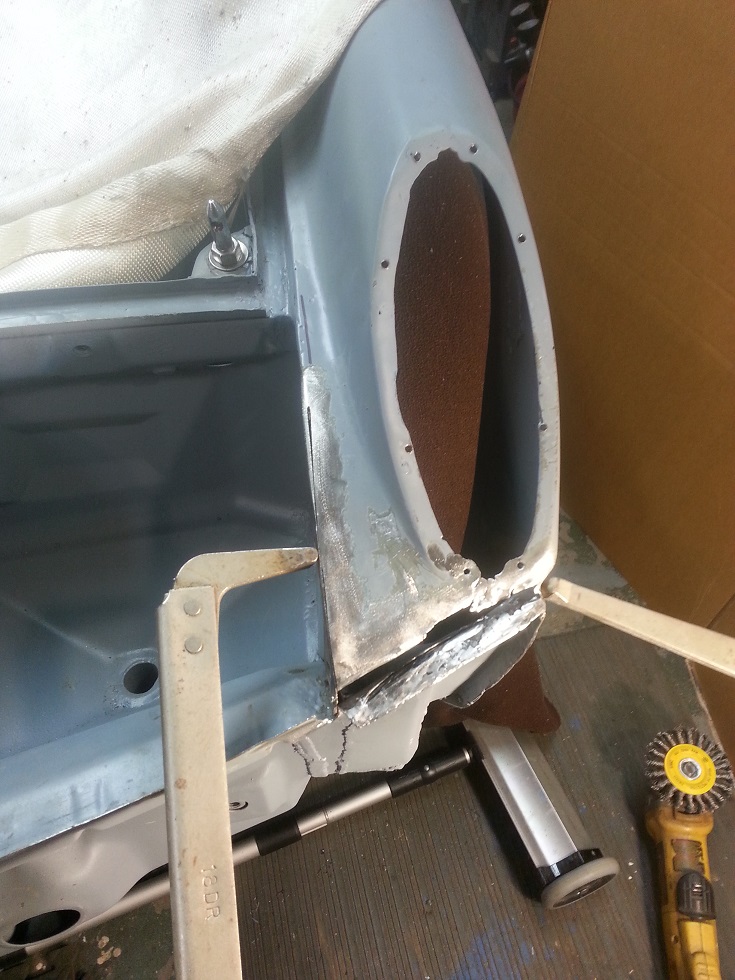 Shoot some tacks to keep it in place. 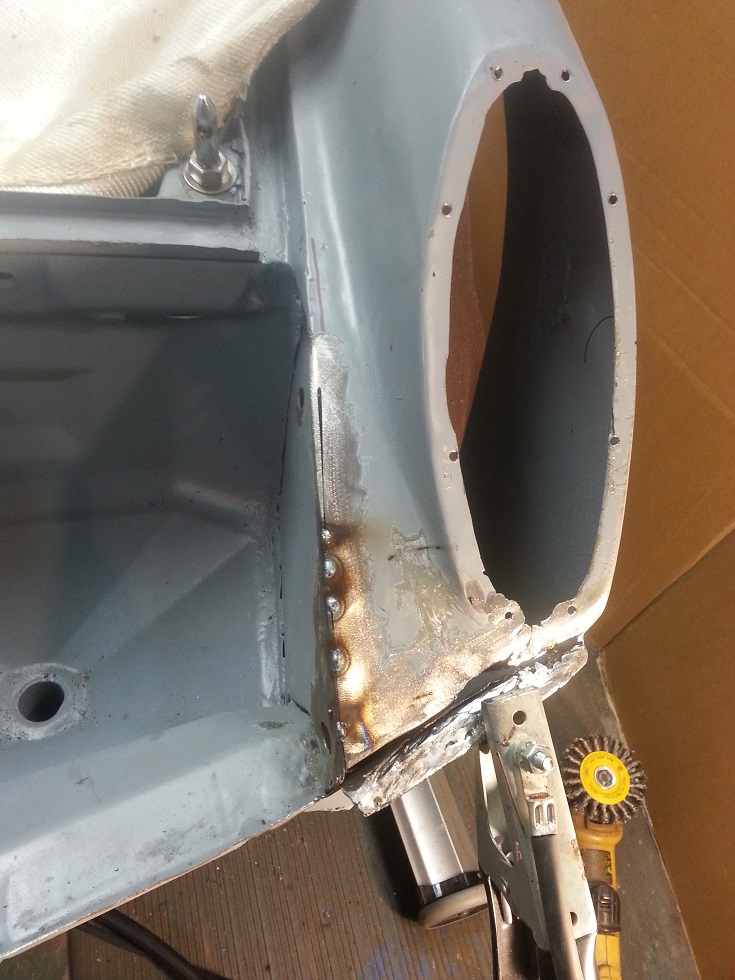 Check the headlight fit. It operates smoothly and the seams look even. 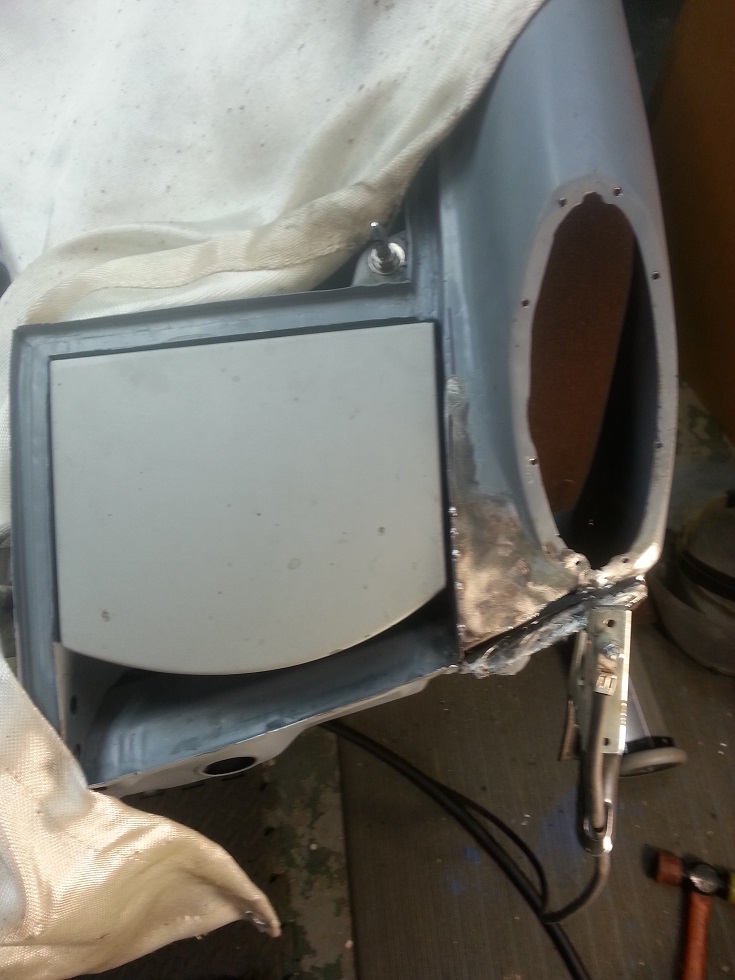 Check it with a ruler. The fender is straighter now and looks better. 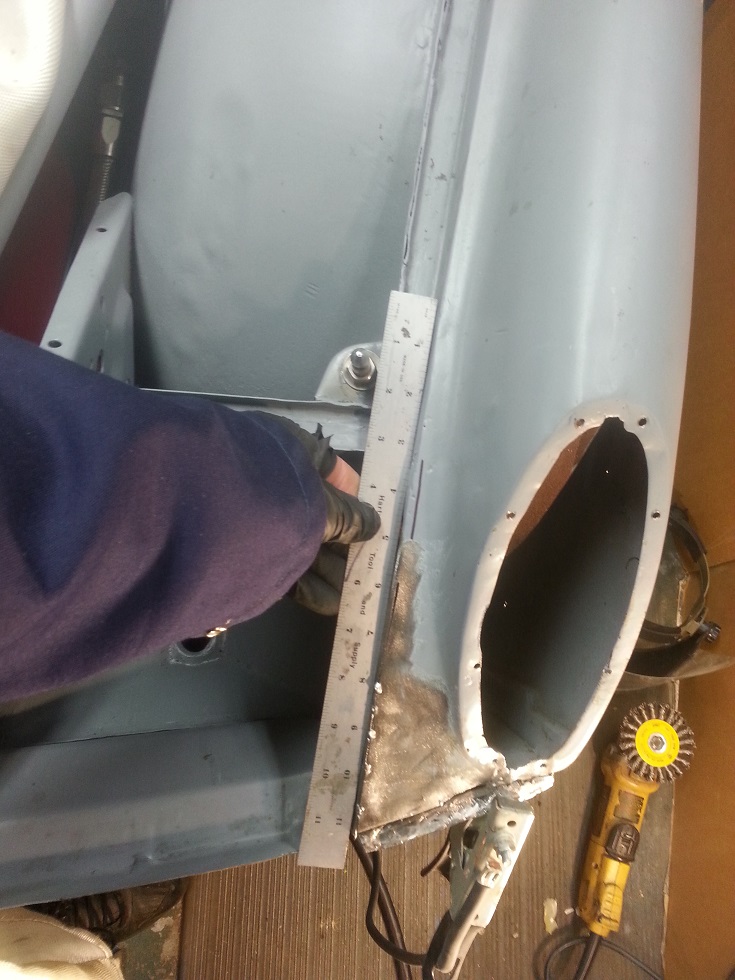 It all looks good, to stitch it up. 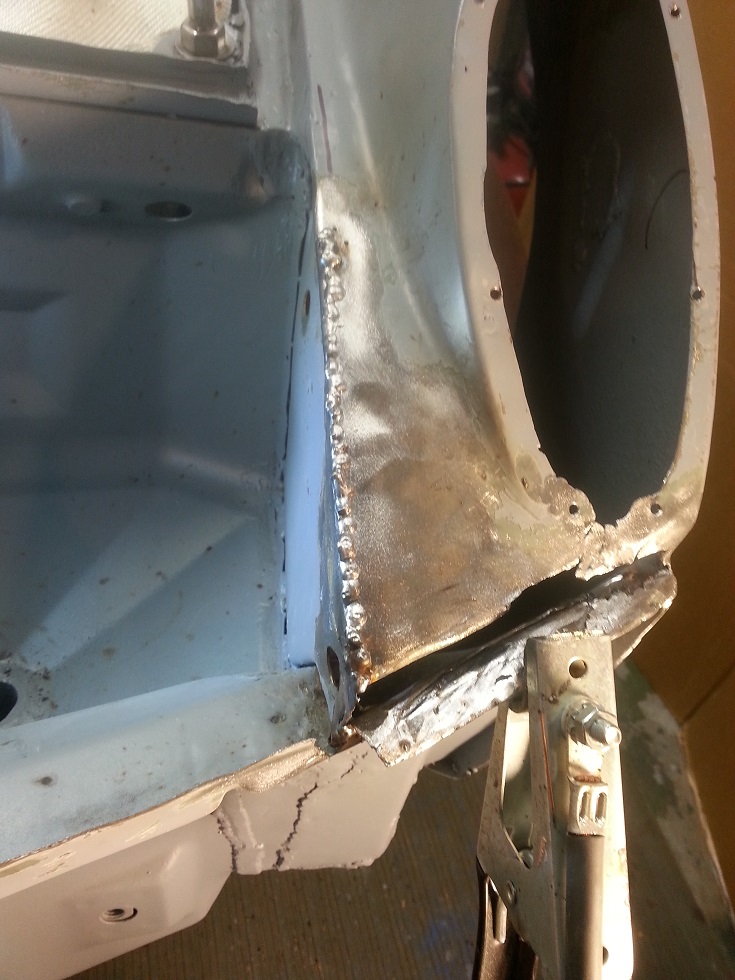 Grind and sand it smooth. This kind of 90 degree seam is really easy to weld and finish even in thin metal. 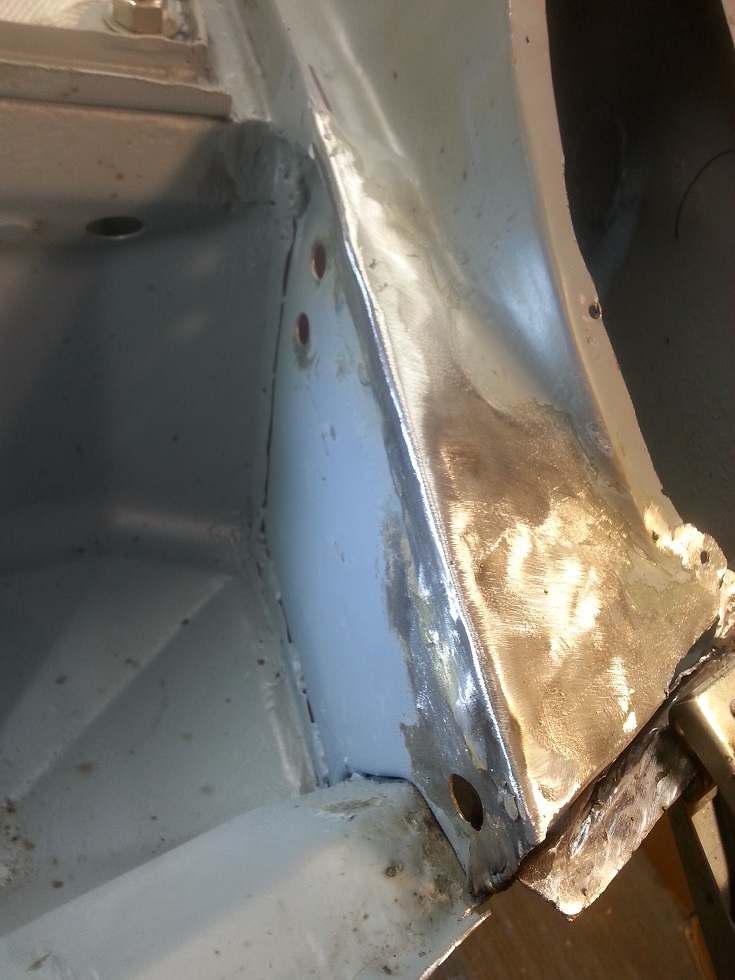 Now to tackle the hard part. John |
  |
1 User(s) are reading this topic (1 Guests and 0 Anonymous Users)
0 Members:

|
Lo-Fi Version | Time is now: 15th January 2026 - 07:31 AM |
Invision Power Board
v9.1.4 © 2026 IPS, Inc.


