|
|
|
Porsche, and the Porsche crest are registered trademarks of Dr. Ing. h.c. F. Porsche AG.
This site is not affiliated with Porsche in any way. Its only purpose is to provide an online forum for car enthusiasts. All other trademarks are property of their respective owners. |
|
|

  |

| FourBlades |
 Aug 29 2021, 07:58 PM Aug 29 2021, 07:58 PM
Post
#601
|
|
From Wreck to Rockin  Group: Members Posts: 2,056 Joined: 3-December 07 From: Brevard, FL Member No.: 8,414 Region Association: South East States |
I need to add a rear anti roll bar to the list of things that need to be mocked up. That may be one part I never bought for this car. (IMG:style_emoticons/default/sad.gif) John |
   |

 
|
| carr914 |
Aug 30 2021, 04:37 AM
Post
#602
|
|
Racer from Birth Group: Members Posts: 133,237 Joined: 2-February 04 From: Tampa,FL Member No.: 1,623 Region Association: South East States |
Don't need a Rear Bar for Racing
|
|
|
|
| FourBlades |
Oct 26 2021, 03:51 PM
Post
#603
|
|
From Wreck to Rockin Group: Members Posts: 2,056 Joined: 3-December 07 From: Brevard, FL Member No.: 8,414 Region Association: South East States |
I have been working on the car a lot, but not posting anything.
Decided it was time to install the braking system. The car has zero brake components installed other than the brake pedal. I installed a new master cylinder, new copper nickel brake lines, disassembled and cleaned the original brake proportioning valve, and then installed the beautiful PMB rebuilt calipers. The fronts are their 908 reproduction calipers with quick brake pad change hardware. 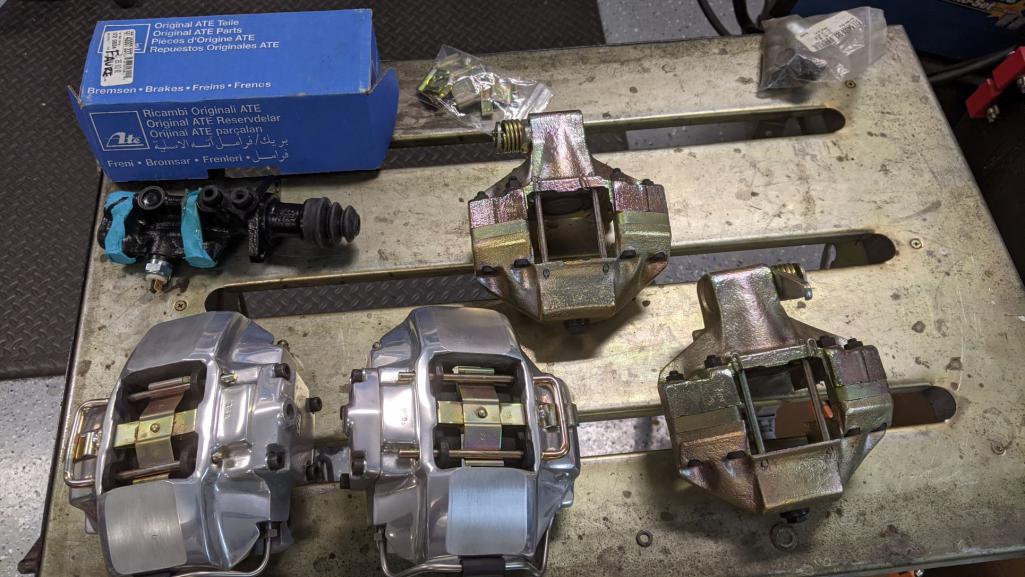 Installed the brake fluid reservoir using a bracket copied from the stock sheet metal. 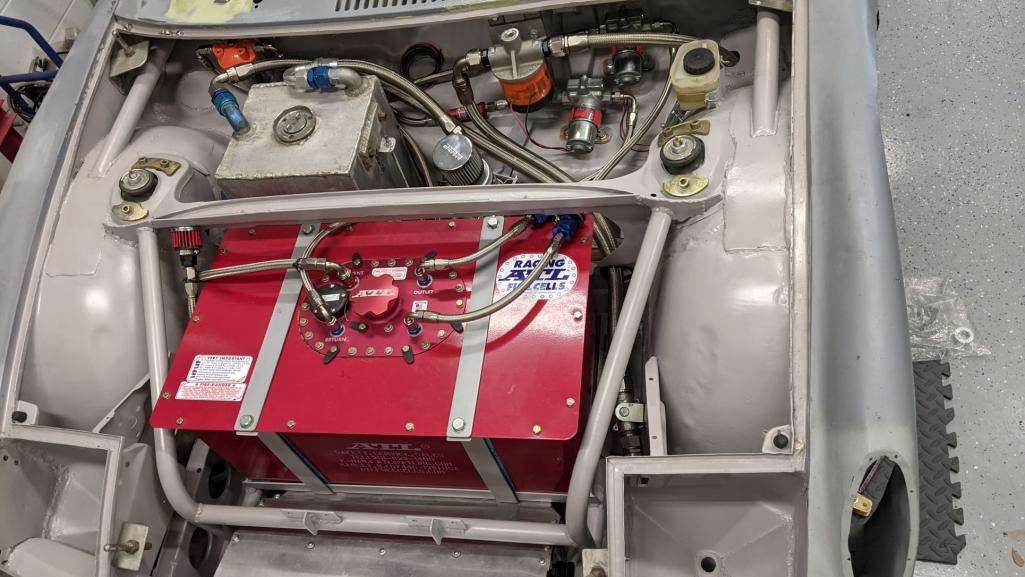 I installed the brake fluid feed lines onto the master cylinder on my work bench, and then fed them up from underneath the car. This took 3 minutes and was easy compared to trying to jam them in while under the car with limited space to work. 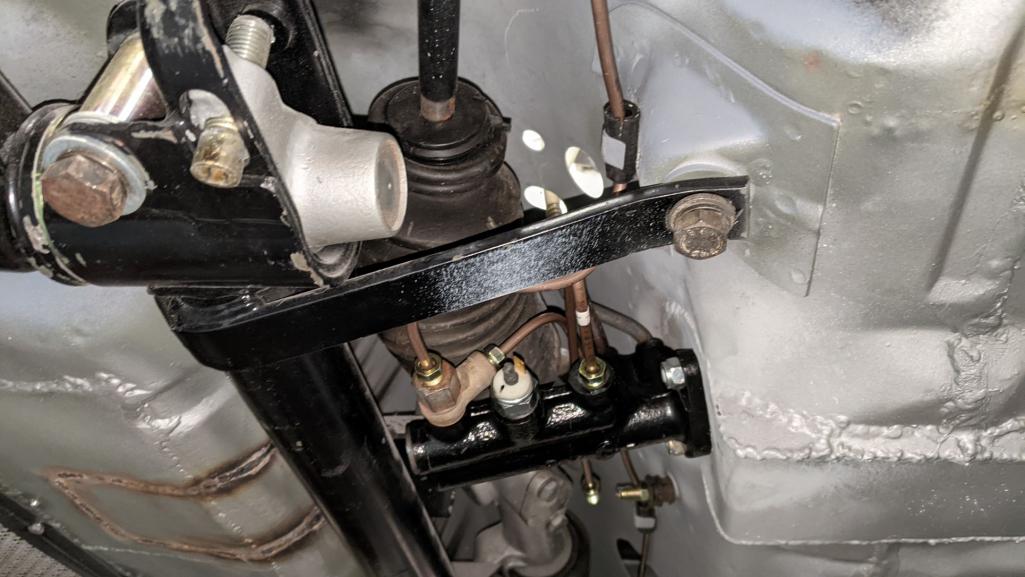 Bruce Stone tracked down some brake fittings for me, which was a big help. One fitting is still missing in this picture. Can you spot it? Now brakes are working, just need a few more rounds of bleeding. John |
|
|
|
| FourBlades |
Oct 26 2021, 04:03 PM
Post
#604
|
|
From Wreck to Rockin Group: Members Posts: 2,056 Joined: 3-December 07 From: Brevard, FL Member No.: 8,414 Region Association: South East States |
Moved on to installing the front sway bar. The challenge here is that the two large bearings need to be exactly parallel to each other or they bind the bar up and add resistance that should not be there. I wanted the bar to move with light finger pressure when the drop links were not connected. This turned out to be a pain in the ass until I figured out a (primitive) system for aligning them.
I started by getting one side parallel by installing the bar most of the way and adding washers under the three bolts holding the bearing on until it was pointing exactly at the other bearing. Then I moved the bar to the other side and repeated the process. At first, I tried sticking the bar through both bearings, but it bound up so badly this made it impossible to see what adjustments were needed. After trying a washer here and there and getting frustrated, I pulled the bar out of the one that was aligned and left it in the unaligned bearing only. Looking down you can see the sway bar is way off to one side. 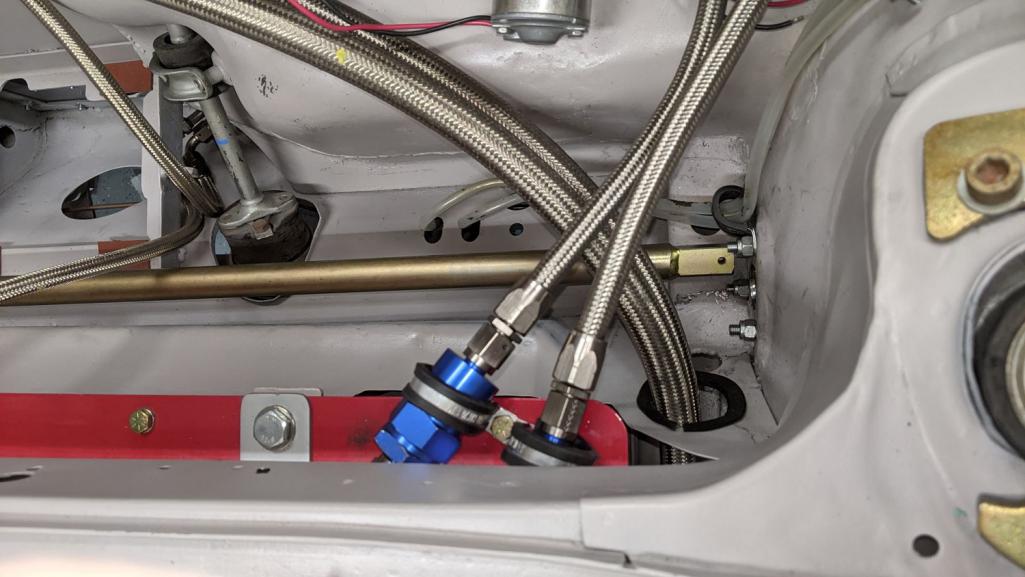 Added a washer to compensate, still off to the side. 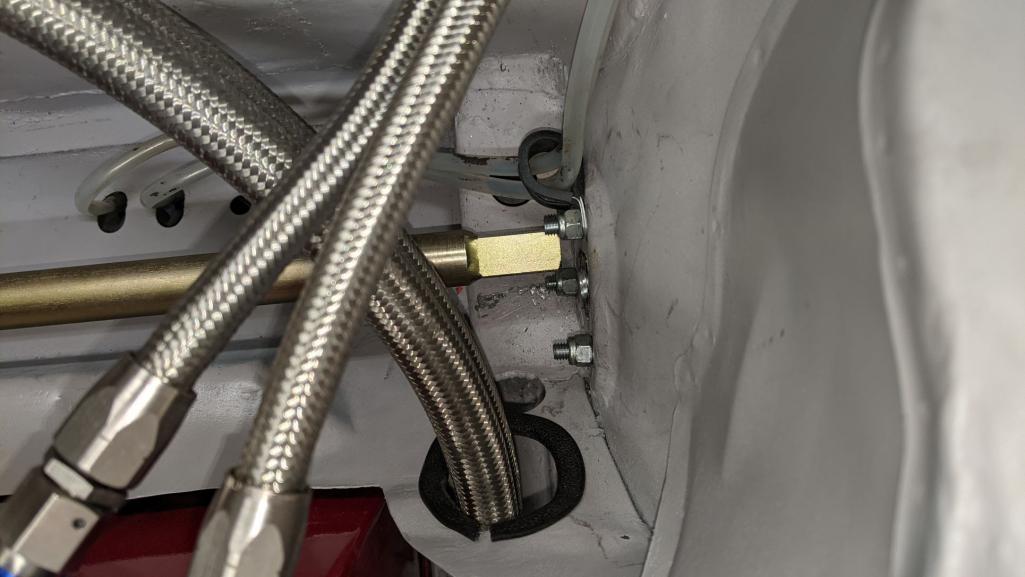 Added another washer and the side-to-side alignment looks good. 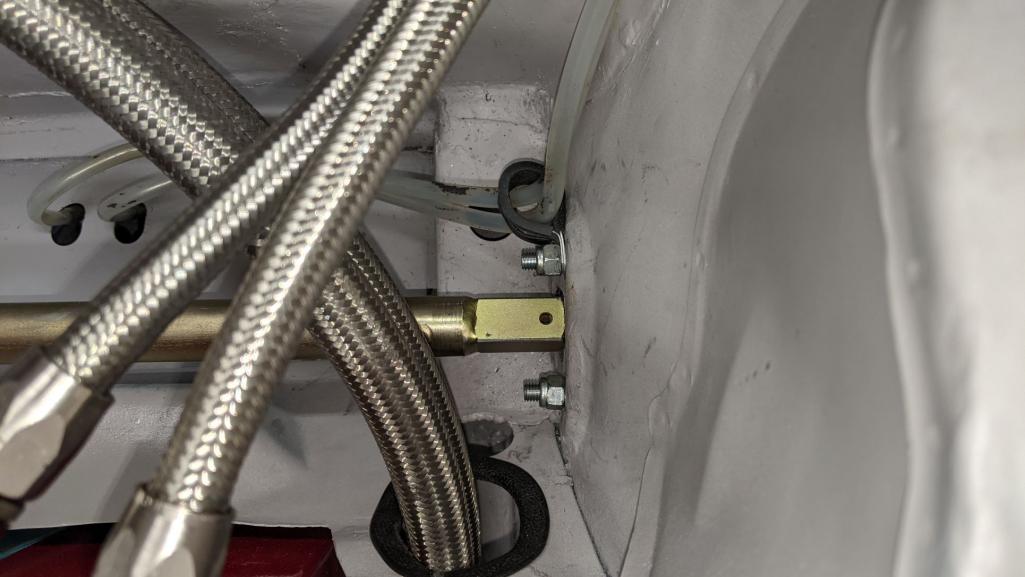 But it is too high. 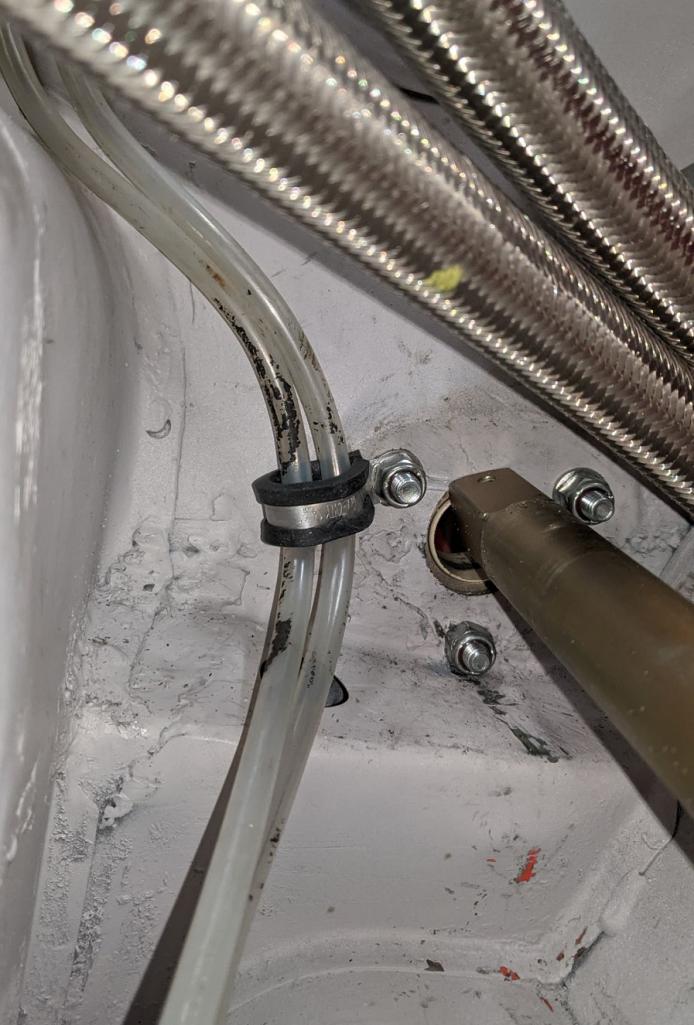 Removed a washer from the lower bolt and it lined up nicely. Doing it systematically like this saved a lot of frustration because guessing and trial and error were not working. I had several thicknesses of washers ready but did not end up needing them. Sway bar and drop links installed. Wrote on the car how many washers were needed where on each side. Should probably weld on some shim plates so the washers don’t go everywhere anytime this bar is taken off. Something to think about if you are installing this type sway bar. 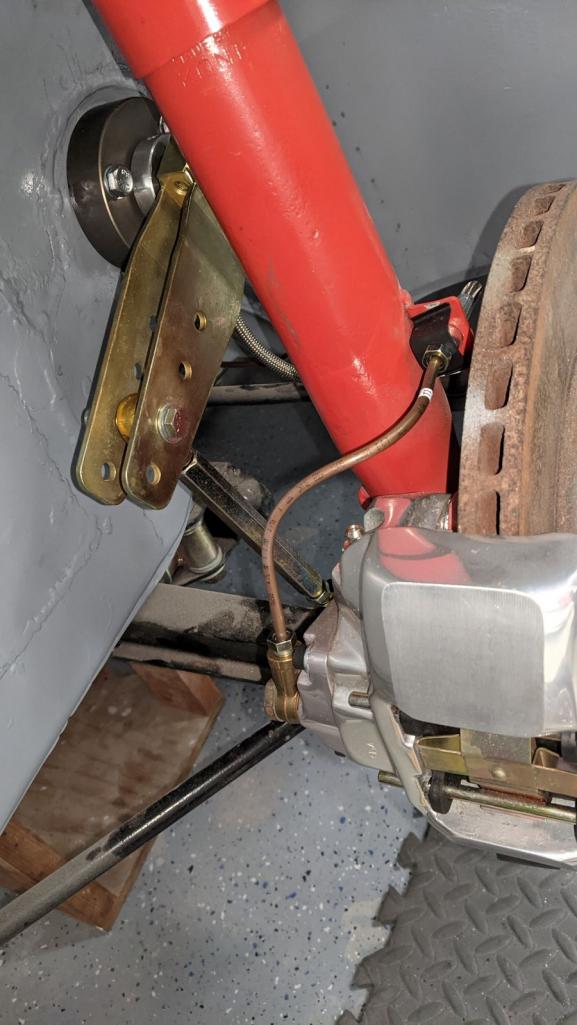 Still more work to post... John |
|
|
|
| gms |
Oct 28 2021, 10:44 AM
Post
#605
|
|
Advanced Member Group: Members Posts: 2,750 Joined: 12-March 04 From: Chicagoland Member No.: 1,785 Region Association: Upper MidWest |
you think you will make it out for the 2022 season?
|
|
|
|
| rhodyguy |
Oct 28 2021, 11:13 AM
Post
#606
|
|
Chimp Sanctuary NW. Check it out. Group: Members Posts: 22,252 Joined: 2-March 03 From: Orion's Bell. The BELL! Member No.: 378 Region Association: Galt's Gulch |
Write the washer #s in the appropriate spots with a Sharpie. No one will ever see them. They will last forever.
|
|
|
|
| FourBlades |
Oct 29 2021, 04:23 PM
Post
#607
|
|
From Wreck to Rockin Group: Members Posts: 2,056 Joined: 3-December 07 From: Brevard, FL Member No.: 8,414 Region Association: South East States |
Hey Glenn, I am just enjoying taking my time bolting stuff on and doing a little light fab work. This is really the enjoyable part of the build where there's no more rust and crud to deal with and it's all just putting on shiny new stuff.
That is a great idea Rhody, I am going to do that right away. I don't want to have to go through the process of figuring this out again. Lol John |
|
|
|
| FourBlades |
Nov 27 2021, 08:37 PM
Post
#608
|
|
From Wreck to Rockin Group: Members Posts: 2,056 Joined: 3-December 07 From: Brevard, FL Member No.: 8,414 Region Association: South East States |
Time to work on the mysteries of the electrical system, starting with mounting the battery. The original builders had the battery under the cowl, which I could not make work. I at least wanted to find room in the front trunk area. It took a while to find a battery the right size and shape that would fit in the room I had available. I wanted to use a 1970s looking lead acid battery and not a lithium ion or other modern (and much smaller) battery.
 I cut a 914 battery tray down to size and made a mount for it that is bolted to the bulkhead panel in two places and the firewall in one place. There is a steel strap going around the whole battery that is welded to the bottom of the mount. I added a final steel strap going to the bulkhead to stop it from vibrating. Even this small battery weighs 25 pounds and I don't want it going anywhere in a crash. Here is a side view of the mount. 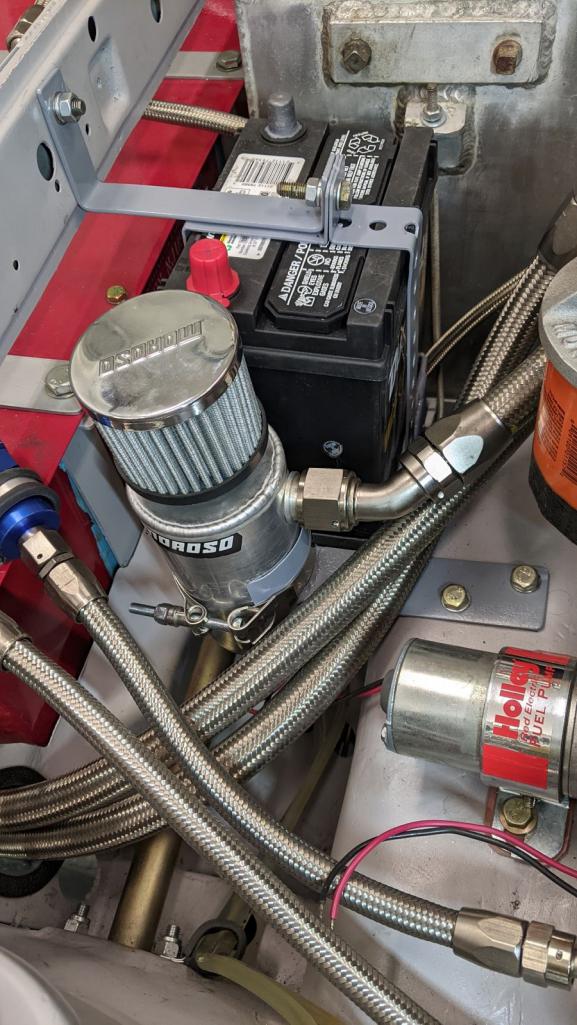 The front of the car is pretty full now. (IMG:style_emoticons/default/biggrin.gif) John |
|
|
|
| FourBlades |
Nov 27 2021, 08:50 PM
Post
#609
|
|
From Wreck to Rockin Group: Members Posts: 2,056 Joined: 3-December 07 From: Brevard, FL Member No.: 8,414 Region Association: South East States |
The carbs have been sitting for almost 10 years, so I thought it would be prudent to clean and rebuild them. I have an ultrasonic cleaner with heat that will hold one carb body. Here is the before picture:
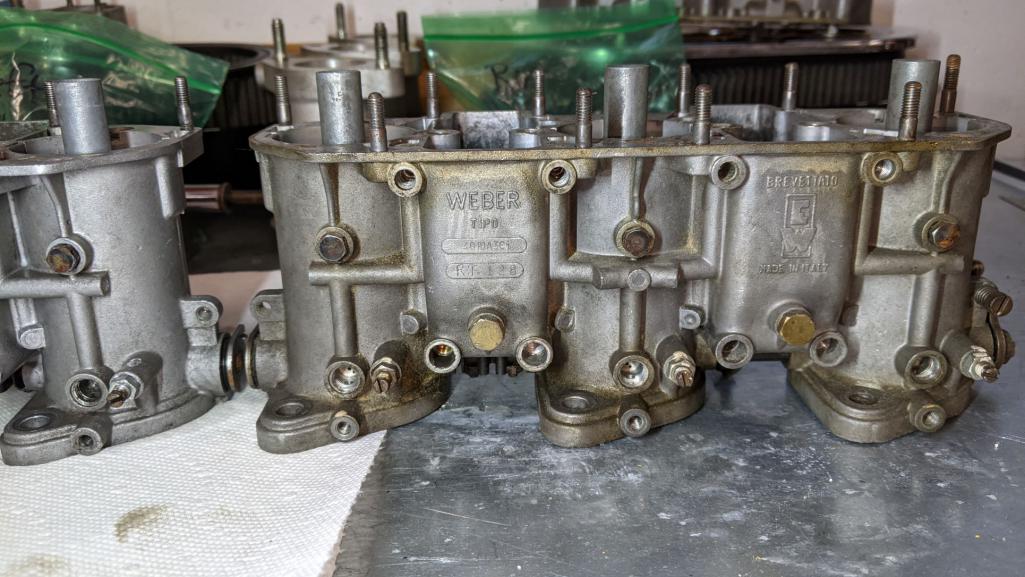 Here is the other carb which has been through 4 hours of 50C plus ultrasound treatment. The machine works on 30 minute cycles, which 30 minutes does pretty much nothing, many cycles are required. 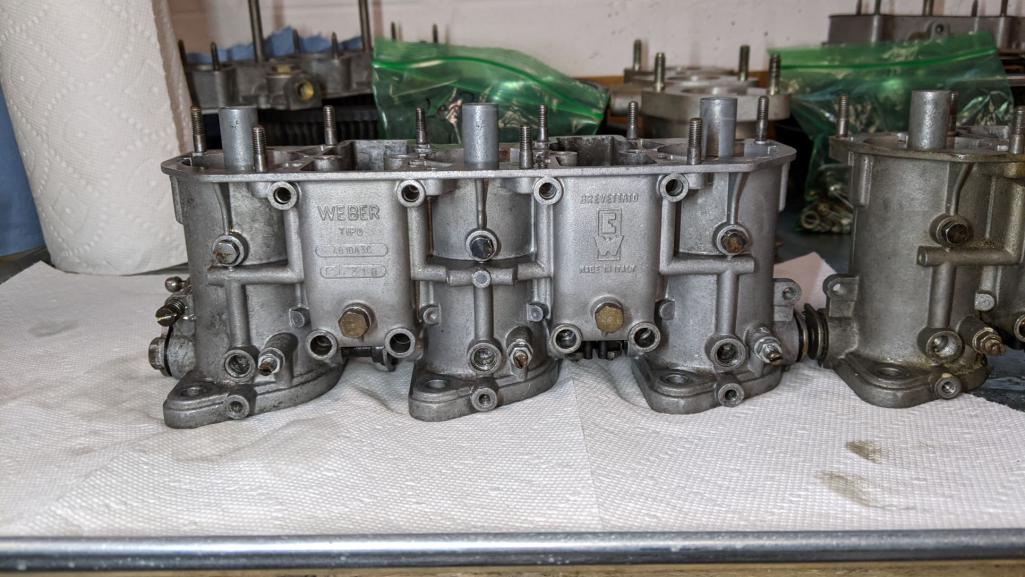 The outside of the carbs are much cleaner, and so are the little passages inside, I hope. I blew compressed air through all the passages and thoroughly dried them after the cleaning. I also examined and blew out all the jets. The air bleed adjusters all had slightly different settings, which I did not want to disturb, so I left them in place. The throttle shafts moved smoothly and freely and the butterfly plates all closed tightly so I left them in place too. These were very clean inside and I probably did not need to go through all this, but I needed to know their state, and once apart it made sense to clean and refresh it all. Ready for reassembly. I spent one weekend on the teardown and cleaning, and the next on reassembly. 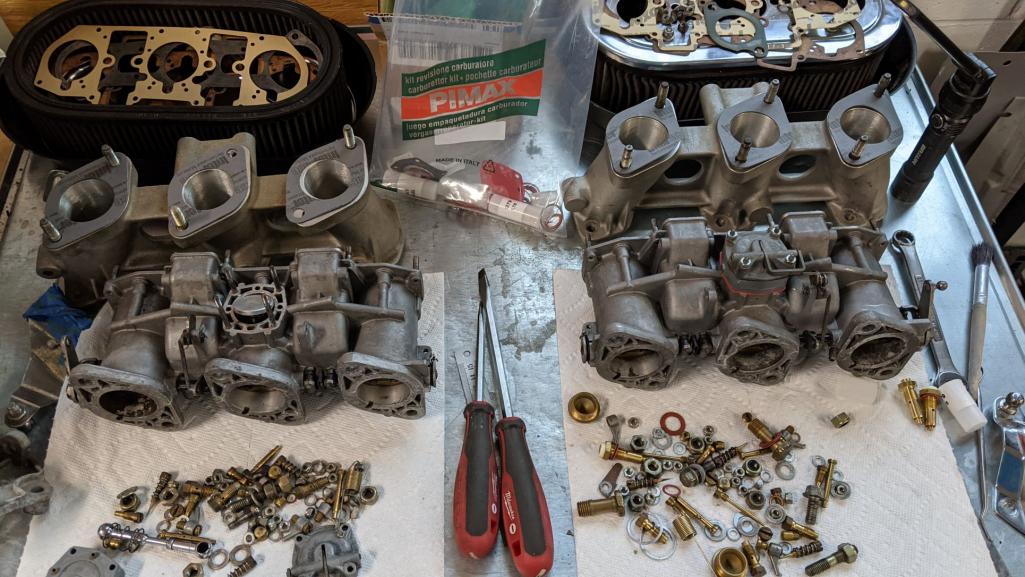 John |
|
|
|
| FourBlades |
Nov 27 2021, 09:08 PM
Post
#610
|
|
From Wreck to Rockin Group: Members Posts: 2,056 Joined: 3-December 07 From: Brevard, FL Member No.: 8,414 Region Association: South East States |
Picked up the PMO spacer kit to keep the carbs a little cooler. Comes with longer studs, which you will probably need, and new 10mm/12mm metal lock nuts, which makes installation a lot easier against the tight carb bodies compared to normal 12mm lock nuts. If you have installed these, you will know what I mean.
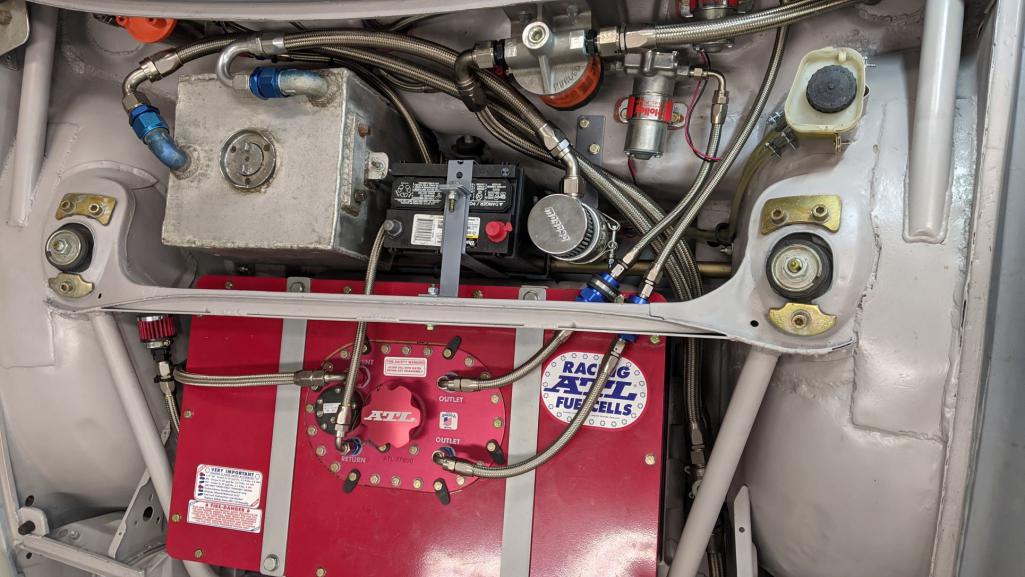
Following a great tip from Ben (mb911) I got them from Larry at Youroil.net. I think it took less than a week for them to show up at my doorstep. 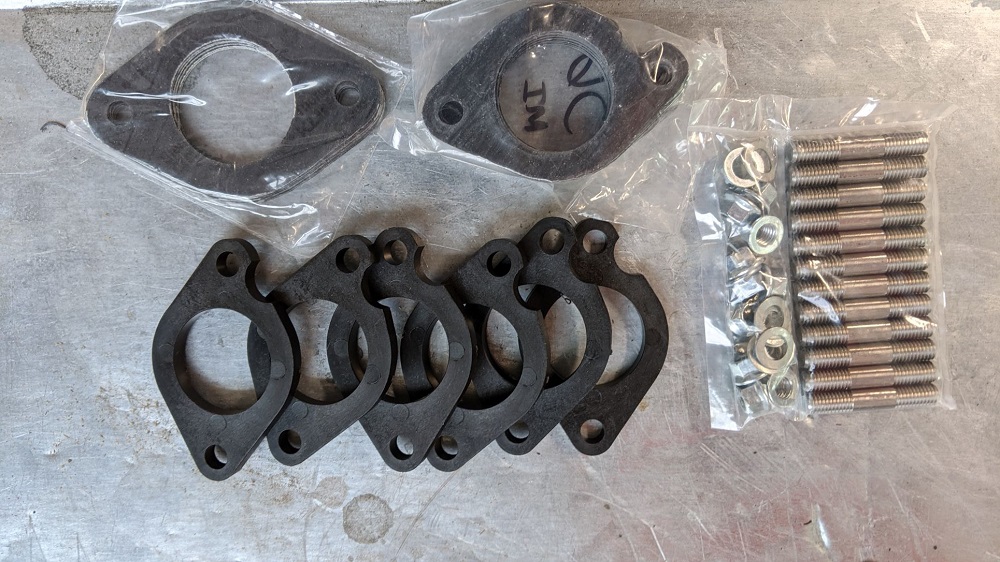 So here is where I have been hanging out a lot lately. I find it easiest to work on the engine if I kneel in the rear trunk. You can see my feet at the bottom of the picture (I am standing for the picture). 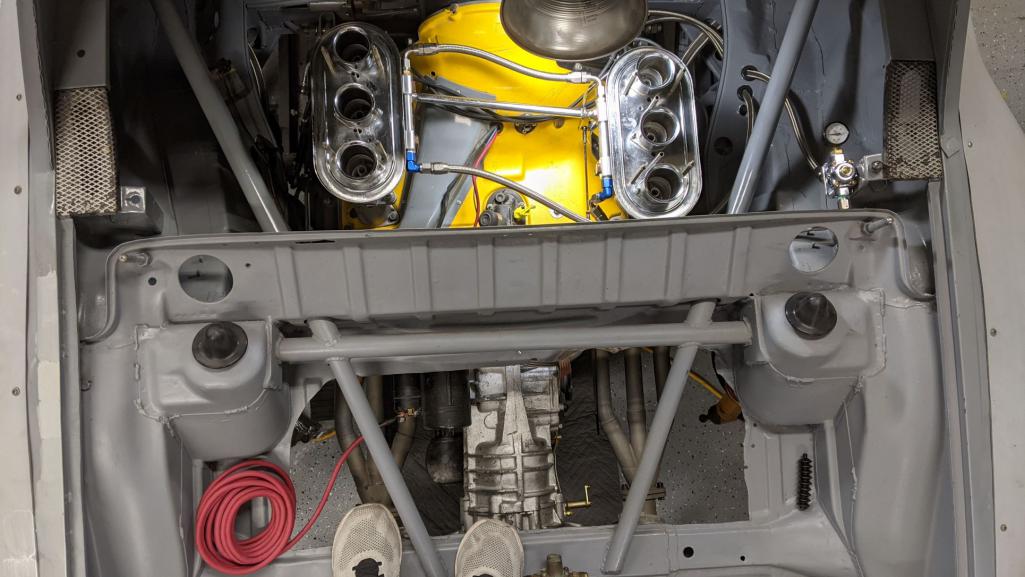 A lot of the rear trunk sheet metal was cut away by the original builders, for cooling maybe? Or for easier access to the transmission and starter? You can see that I have fully plumbed the fuel system, with the fuel regulator and gauge on the right side. There is a fuel return going back to the fuel cell, I am wondering if I need some kind of restrictor after the second carb to maintain some fuel pressure at the carb fuel inlet ports? I have a fuel pressure gauge on both side of the fuel pressure regulator so I should be able to see what happens with the engine running. I am using the PMO fuel blocks to make the AN connections. On the side of the trans you can see the Rich Johnson throttle linkage, which is a nice piece that is easy to install. Still have to fiddle with all the geometry to get the linkage working nicely. I also have the oil system fully plumbed, so I need to build enough of the electrical system to try starting this beast. I plan to test each system carefully for leaks and proper operation as I go... John |
|
|
|
| FourBlades |
Nov 27 2021, 09:17 PM
Post
#611
|
|
From Wreck to Rockin Group: Members Posts: 2,056 Joined: 3-December 07 From: Brevard, FL Member No.: 8,414 Region Association: South East States |
Which leads me to today's question about alternator connections.
There is a thick red wire, which goes to the main lug on the starter (and a very large wire goes from there to the battery positive terminal). There is a thin blue wire, which I believe goes to the alternator light on the gauges. 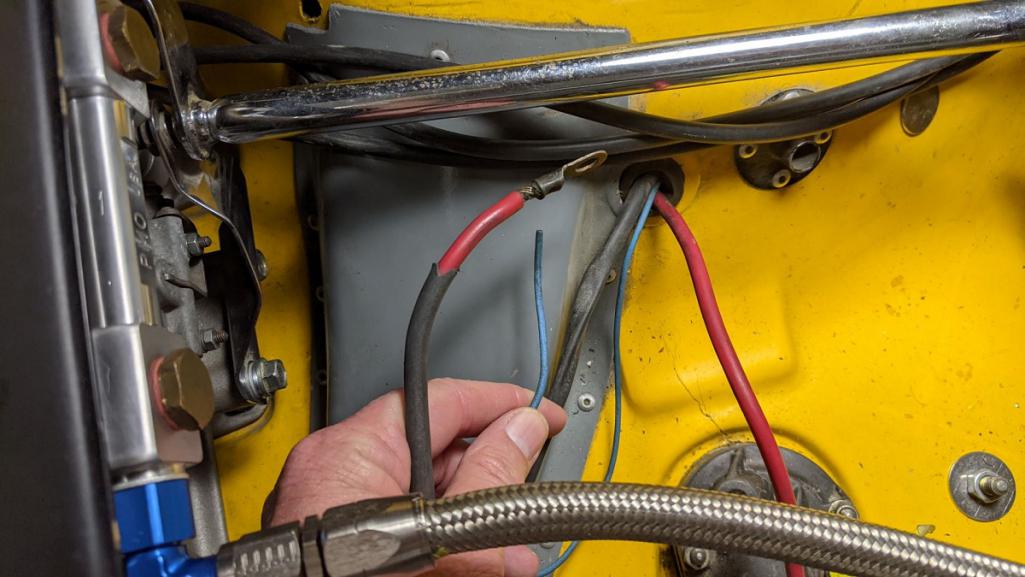 There is a plug with 3 wires that just happens to plug perfectly into this crusty old 914 voltage regulator I had on the shelf. I am pretty sure that is what is needed to complete the alternator connections. 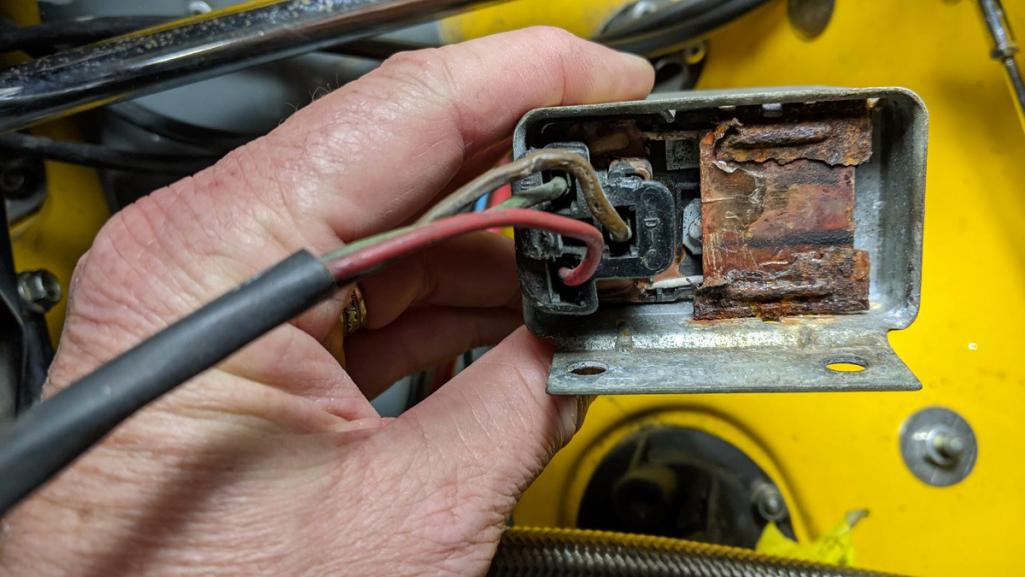 I ordered a new voltage regulator from 914 Rubber as part of my Black Friday splurge. What do you all think, have I got it correct??? John |
|
|
|
| johnhora |
Nov 28 2021, 02:51 PM
Post
#612
|
|
Senior Member Group: Members Posts: 902 Joined: 7-January 03 From: Derby City KY Member No.: 107 Region Association: None |
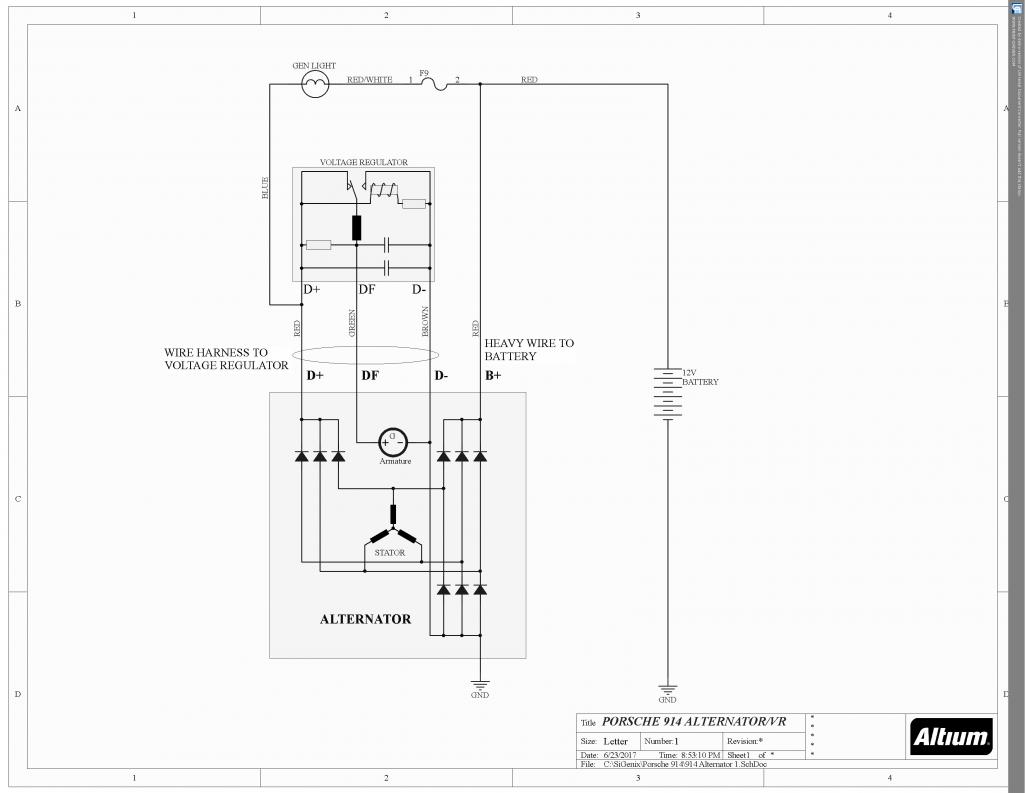
John this may help some...I'm looking for another chart
 |
|
|
|
| FourBlades |
Nov 28 2021, 06:15 PM
Post
#613
|
|
From Wreck to Rockin Group: Members Posts: 2,056 Joined: 3-December 07 From: Brevard, FL Member No.: 8,414 Region Association: South East States |
That is very helpful John, I think it confirms what I believe. Now I am trying to figure out where to put the kill switch inside the cockpit where the driver can reach it while belted in. Going to use a pull cable from rennline to actuate it from outside the car so corner workers can shut the car off too. Thinking the same for the fire bottle. Will it be weird to have two pull cables on the outside of the car, one for electrical cut off and one for fire? Not sure I have seen that but I admit it is not something I have looked for… John |
|
|
|
| stownsen914 |
Nov 29 2021, 05:13 PM
Post
#614
|
|
Senior Member Group: Members Posts: 1,011 Joined: 3-October 06 From: Ossining, NY Member No.: 6,985 Region Association: None |
QUOTE(FourBlades @ Nov 28 2021, 07:15 PM)  Will it be weird to have two pull cables on the outside of the car, one for electrical cut off and one for fire? Should be fine as long as you have the stickers indicating which is which |
|
|
|
| URY914 |
Nov 29 2021, 07:46 PM
Post
#615
|
|
I built the lightest 914 in the history of mankind. Group: Members Posts: 133,518 Joined: 3-February 03 From: Jacksonville, FL Member No.: 222 Region Association: None |
I thought most rules had batteries in plastic boxes so nothing can fall on the posts and spark?
|
|
|
|
| FourBlades |
Nov 29 2021, 09:03 PM
Post
#616
|
|
From Wreck to Rockin Group: Members Posts: 2,056 Joined: 3-December 07 From: Brevard, FL Member No.: 8,414 Region Association: South East States |
HSR rules don't require it. I will check svra rules. John |
|
|
|
| stownsen914 |
Nov 29 2021, 09:52 PM
Post
#617
|
|
Senior Member Group: Members Posts: 1,011 Joined: 3-October 06 From: Ossining, NY Member No.: 6,985 Region Association: None |
Worth checking rules, you might be fine without the box. But they will probably want a rubber boot covering the positive terminal. The generic ones like any auto parts store (or Amazon) has will work fine.
The car's coming along nicely - keep up the good work. |
|
|
|
| 9146GUY |
Nov 30 2021, 08:32 AM
Post
#618
|
|
Member Group: Members Posts: 132 Joined: 29-November 15 From: Central Ohio Member No.: 19,420 Region Association: Upper MidWest |
John
In my old car we had 2 kill switches, one on the cowl and one next to the driver seat in the center of the car. They were wired together so either one would kill the car. Make sure you use the kill switches with the alternator diode or it will not kill the car. Sorry I can't find any pictures. |
|
|
|
| ThePaintedMan |
Dec 3 2021, 01:55 PM
Post
#619
|
|
Advanced Member Group: Members Posts: 3,887 Joined: 6-September 11 From: St. Petersburg, FL Member No.: 13,527 Region Association: South East States |
QUOTE(FourBlades @ Nov 28 2021, 07:15 PM) That is very helpful John, I think it confirms what I believe. Now I am trying to figure out where to put the kill switch inside the cockpit where the driver can reach it while belted in. Going to use a pull cable from rennline to actuate it from outside the car so corner workers can shut the car off too. Thinking the same for the fire bottle. Will it be weird to have two pull cables on the outside of the car, one for electrical cut off and one for fire? Not sure I have seen that but I admit it is not something I have looked for… John John, if you remember the Chump car, this is exactly what I did. Two handles, one inside and one outside for both fire and electrical. I also used a manual pull cable for the external electrical cable as I thought it was simpler and means I didn't have to run extra large-gauge copper cable (weight) for a second cutoff switch. Seems to have no problem passing tech in SCCA (except they always give me crap for it not being on the left-front under the cowl, which is where most cars have it.) Things are looking great, keep up the great work! |
|
|
|
| FourBlades |
Feb 11 2022, 09:25 AM
Post
#620
|
|
From Wreck to Rockin Group: Members Posts: 2,056 Joined: 3-December 07 From: Brevard, FL Member No.: 8,414 Region Association: South East States |
OK, thanks George for the tips. How is your car doing? Do you daily drive it anymore?
I have been very busy working on the car since I lasted posted anything and making good progress. I added a catch can/engine breather. I used the other half of the stock 914 battery tray I had leftover as a mount. I like how the original builders used stock 914 parts and repurposed them when they could. Wanting a vintage looking way of keeping the catch can in place, I stole a leather strap off my wife's old purse (don't tell her). This is an early view when I was figuring out how to attach it. 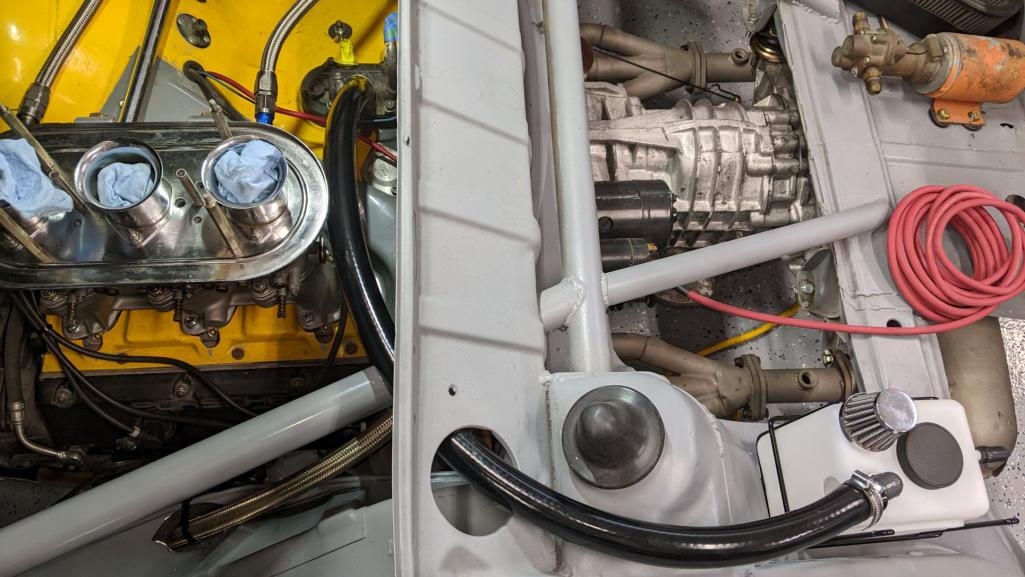 There is plenty of slack in the tubing for the engine to move around and not put tension on it. Here is how it came out. 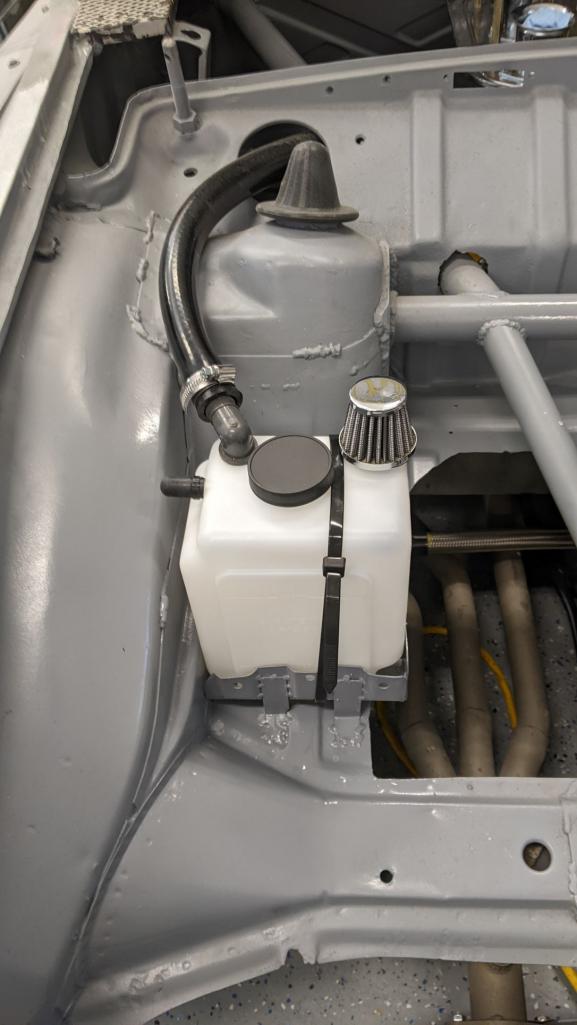 This is pretty amazing progress for the last three months! Just kidding, I have done much more which I will post eventually. John |
|
|
|
|
1 User(s) are reading this topic (1 Guests and 0 Anonymous Users)
0 Members:

|
Lo-Fi Version | Time is now: 14th June 2026 - 04:45 PM |
Invision Power Board
v9.1.4 © 2026 IPS, Inc.