|
|
|
Porsche, and the Porsche crest are registered trademarks of Dr. Ing. h.c. F. Porsche AG.
This site is not affiliated with Porsche in any way. Its only purpose is to provide an online forum for car enthusiasts. All other trademarks are property of their respective owners. |
|
|

  |

| charliew |
 Apr 9 2009, 09:19 AM Apr 9 2009, 09:19 AM
Post
#21
|
|
Advanced Member  Group: Members Posts: 2,363 Joined: 31-July 07 From: Crawford, TX. Member No.: 7,958 |
I wonder if the same switch is on the type 1 vw tranny. There should be lots of places to get those.
|
   |

 
|
| astronomerdave |
Apr 15 2009, 03:43 PM
Post
#22
|
|
Member Group: Members Posts: 69 Joined: 26-January 09 From: Los Angeles, CA Member No.: 9,979 Region Association: Southern California |
(IMG:style_emoticons/default/icon_bump.gif)
QUOTE(astronomerdave @ Apr 9 2009, 02:07 AM)  Does anyone know the position of the pin should be relative to the outside of the transmission? 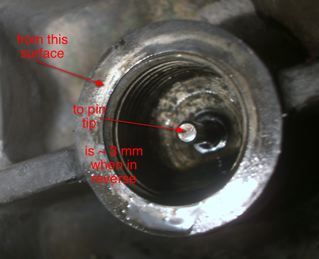 I wanted to try this question again because I got a new switch and pin from Dr. Evil (tnx, btw!) -- I'm using the new pin even though it is only about 0.5 mm longer than my previous pin. But when in reverse it does not push out enough to activate the switch. If I don't use the washer around the switch then the pin will activate it. I didn't do anything to this transmission. It was working, then I removed the motor/tranny from the car, removed the motor from the tranny, installed a new motor, then replaced the new motor/tranny assembly back in the car. That's it. First thing discovered was the reverse light switch failed and now the pin doesn't seem to be coming out enough. (IMG:style_emoticons/default/sad.gif) Did something happen suddenly? How much should the pin move from a fwd gear to reverse, and where relative to the edge of the hole? What could have happened? |
|
|
|
| jk76.914 |
Apr 19 2009, 09:35 AM
Post
#23
|
|
Senior Member Group: Members Posts: 809 Joined: 12-April 05 From: Massachusetts Member No.: 3,925 Region Association: North East States |
This is VERY timely.
Mine did the same thing. Sat for maybe 3 years, then when I got the drivetrain back in, it didn't work. I don't know why, but I'm cutting mine apart to see what broke. I waiting for my new one before I start cutting, because I'm using the old one as a plug so I can drive until then. My pin measures 1.141". My switch pushes smoothly, against the spring, but I have to bottom it out and press kinda hard to get the contacts to close (measured with an ohmmeter). I'm ordering a new one today. Pelican has them for $72.25. 62 in stock. Jim |
|
|
|
| davesprinkle |
Apr 19 2009, 10:23 AM
Post
#24
|
|
Senior Member Group: Members Posts: 720 Joined: 13-October 04 From: Berkeley, CA Member No.: 2,943 Region Association: None |
QUOTE(jk76.914 @ Apr 19 2009, 08:35 AM) This is VERY timely. Mine did the same thing. Sat for maybe 3 years, then when I got the drivetrain back in, it didn't work. I don't know why, but I'm cutting mine apart to see what broke. I waiting for my new one before I start cutting, because I'm using the old one as a plug so I can drive until then. My pin measures 1.141". My switch pushes smoothly, against the spring, but I have to bottom it out and press kinda hard to get the contacts to close (measured with an ohmmeter). I'm ordering a new one today. Pelican has them for $72.25. 62 in stock. Jim You should be careful when purchasing a new switch. I bought 2 brand new switches from AA (roughly $80 each) and they both leaked. Bought a used switch from the good Dr. Evil and it didn't leak. Apparently, Porsche had a run of bad switches. Leaky, leaky. Get a good used switch. |
|
|
|
| detoxcowboy |
Apr 19 2009, 10:29 AM
Post
#25
|
|
Senior Member Group: Members Posts: 1,294 Joined: 30-January 08 Member No.: 8,642 Region Association: Africa |
QUOTE(davesprinkle @ Feb 5 2009, 12:52 PM) OK, I'm now on my third reverse switch, with a consistent problem: After a few hundred miles, the switch contacts become high-resistance (50 Ohms or so) and the switch leaks tranny fluid, filling up the wiring boot. By the way, the last two switches were brand-new Porsche replacements. I'm running Swepco 201, by the way. Anybody have any suggestions about what might be going on? I had same issue with leak coming straight out the switch not the threads and i believe i had to much fluid was the issue.. |
|
|
|
| astronomerdave |
Apr 19 2009, 01:05 PM
Post
#26
|
|
Member Group: Members Posts: 69 Joined: 26-January 09 From: Los Angeles, CA Member No.: 9,979 Region Association: Southern California |
QUOTE(davesprinkle @ Apr 19 2009, 09:23 AM) You should be careful when purchasing a new switch. I bought 2 brand new switches from AA (roughly $80 each) and they both leaked. Bought a used switch from the good Dr. Evil and it didn't leak. You have to be careful with used switches, too. I found the source of my problem. It turns out that the used switch I got from Dr. Evil is a little bit different from my original one. The contact surface of the new-used switch is located deeper inside, which means that it's just out of the reach of my pin when used with the washer. |
|
|
|
| charliew |
Apr 19 2009, 01:07 PM
Post
#27
|
|
Advanced Member Group: Members Posts: 2,363 Joined: 31-July 07 From: Crawford, TX. Member No.: 7,958 |
Ok when things go to hell after you've been messing with it you should think about what you've disturbed in the process. Do you think maybe it isn't going as far into reverse as it was before as in the shifting mechanism or linkage not moveing far enough to transfer the switch? I would guess the switch plunger is bearing on the end of the shaft that the reverse gear yoke is mounted on. When you put it in reverse the shaft and yoke is not going as far as it's supposed to or as far as it used to go.
|
|
|
|
| astronomerdave |
Apr 19 2009, 01:12 PM
Post
#28
|
|
Member Group: Members Posts: 69 Joined: 26-January 09 From: Los Angeles, CA Member No.: 9,979 Region Association: Southern California |
QUOTE(charliew @ Apr 19 2009, 12:07 PM) Ok when things go to hell after you've been messing with it you should think about what you've disturbed in the process. Exactly. Since I don't have measurements of the pin movement before the switch failed, I can't say for sure. But the only component that was messed with here was the switch. That's what led me to look at it more closely, and discover that the new-used switch I got is different from the original. |
|
|
|
| charliew |
Apr 19 2009, 01:22 PM
Post
#29
|
|
Advanced Member Group: Members Posts: 2,363 Joined: 31-July 07 From: Crawford, TX. Member No.: 7,958 |
I'm talking about the amount of shift movement from the shifter and the shift rod moving the shift rod in the tranny. You may not be getting enough motion to the shift rod when it goes into reverse.
You took the tranny out right. You also took the shift mech. loose right? did it go back together exactly like it came out? |
|
|
|
| jk76.914 |
May 3 2009, 05:16 PM
Post
#30
|
|
Senior Member Group: Members Posts: 809 Joined: 12-April 05 From: Massachusetts Member No.: 3,925 Region Association: North East States |
Well I installed my new switch from Pelican last weekend. The switch was sealed in a bag marked "Made in Germany", though there were no markings on the switch itself at all anywhere. (Maybe just the bag was made in Germany??).
So I installed the switch, and a brand new pin, and my backup lights worked properly. But the next day, I discovered they were on all the time! In any gear! So I removed the switch, and swapped the sealing washer with the one that was on the old switch. Tricky getting them off, but not too hard with big pliers. The old washer was about 3x the thickness of the new one. This thicker washer spaced the switch further out on the pin, and so now it's worked the way it should for over a whole week! I was wondering why my original switch failed, so first I x-rayed both to see if I could make out any internal differences (old switch on the left, new one on the right). The plastic end of the switch, where the electrical connections are, is invisible in the x-ray. You can make out a ghost of the sealing rings in the threaded butt of the switch, and see how much thicker the original one was compared to the new one. Inside the switch is a rubber diaphram (I learned after cutting it apart- next photos). The rubber keeps the switch contacts separate from the transmission oil side of the switch, and stretches as the pin pushes the contact bridge up to mate with the two contacts on the connector pins. Aside from the gasket thickness and the fact that the new housing is steel vs. the stainless of the old housing, they look like similar internal designs- except that the new one has an obvious metal dome under the contact bridge. The diaphram itself is invisible to x-rays, so it looks like that contact bridge is floating. This design for a switch or relay is called "bridging contacts". It requires 2x the contacts, is expensive, but it is the best way for high current situations, particularly with DC. 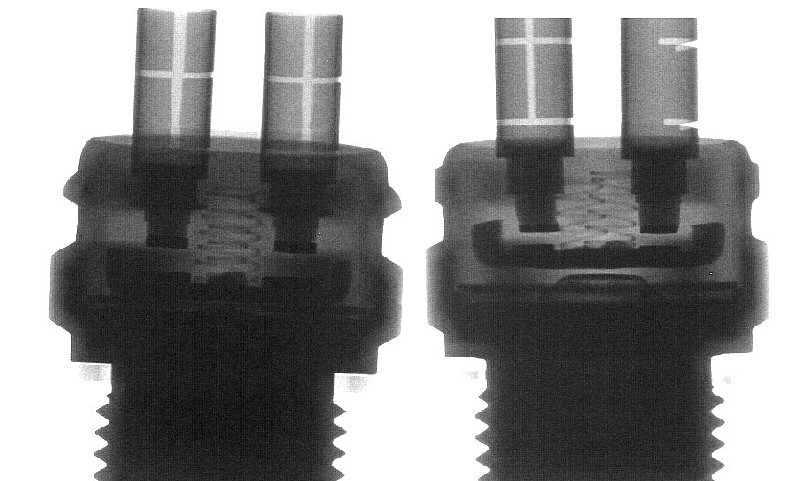 I took my old switch apart, and there was the contact bridge, two springs, and rubber diaphram. The contacts look like silver-cad-oxide, which are used for fairly high current and frequent makes-and-breaks. All in all, a very robust design. Zooming in on the contacts in the plastic housing, I think mine failed because of corrosion on the contacts. (Second photo) 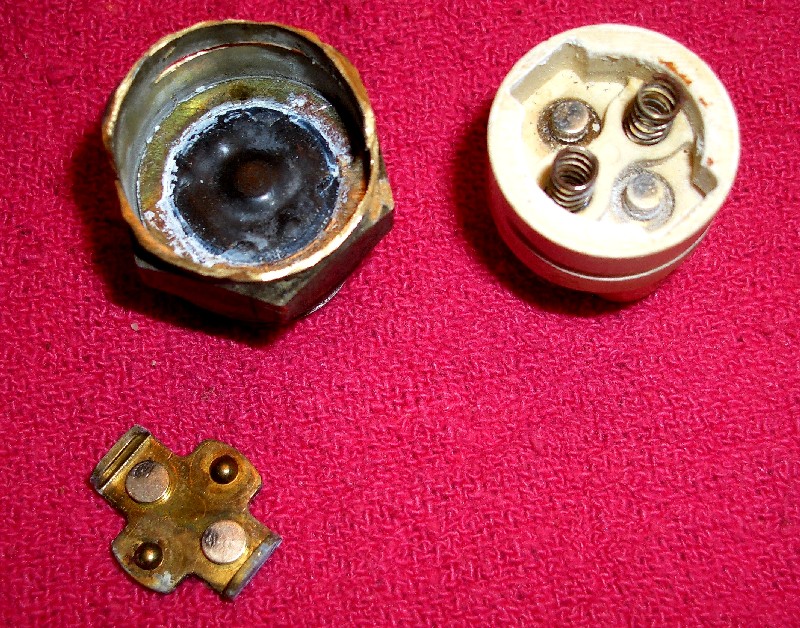 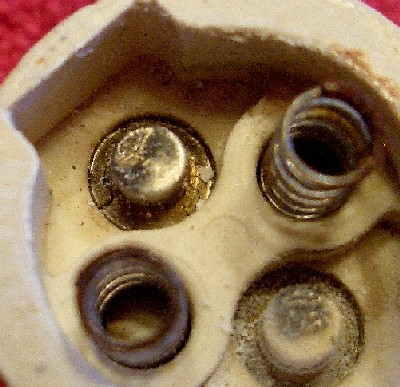 So if I had it to do over, I'd start with both the thick and thin gaskets, with a new pin, and see if the switch closes. If it does, I'd leave it at that. If no, I'd remove the thin ring, and leave the thick one and try again. If no-go, then I'd remove the thick one and try the thin one. I'm guessing also that too much movement may stress that rubber diaphram and it may crack and leak with that thin sealing ring. Just a theory, and I'd be glad to x-ray and disassemble for anyone who has a switch that leaks through the terminals if you're interested to prove or disprove it. Jim |
|
|
|
| Dr Evil |
May 3 2009, 06:20 PM
Post
#31
|
|
Send me your transmission! Group: Members Posts: 23,002 Joined: 21-November 03 From: Loveland, OH 45140 Member No.: 1,372 Region Association: MidAtlantic Region |
Thats just plain cool! Well done (IMG:style_emoticons/default/smile.gif)
|
|
|
|
| davesprinkle |
May 3 2009, 06:46 PM
Post
#32
|
|
Senior Member Group: Members Posts: 720 Joined: 13-October 04 From: Berkeley, CA Member No.: 2,943 Region Association: None |
Good work on this investigation, jk.
I'm surprised to hear that you found a rubber diaphragm inside the switch. As I mentioned, I had two brand-new Porsche switch leak from the contacts. |
|
|
|
| jk76.914 |
May 3 2009, 07:01 PM
Post
#33
|
|
Senior Member Group: Members Posts: 809 Joined: 12-April 05 From: Massachusetts Member No.: 3,925 Region Association: North East States |
The rubber diaphram is in the 33 year old switch. My new switch is on the transmission. My theory is that the new ones are getting over extended and rupturing the rubber. If you want to send me one of your failed ones, I'll x-ray it, and then cut it open and post pictures.
Let me know. Jim |
|
|
|
| charliew |
May 3 2009, 07:25 PM
Post
#34
|
|
Advanced Member Group: Members Posts: 2,363 Joined: 31-July 07 From: Crawford, TX. Member No.: 7,958 |
Why not just put the tranny in reverse with the sw. out and measure how far the pin comes out and then press the sw. in that amount and see if it makes contact? If it doesn't see how far it needs to go in and adjust the sealing washers so it's not over pressing the bridge? The contacts will burn if the light ground is bad or the other connections are loose or dirty. Any high resistance connection means the complete circuit is carrying the aditional load and the contacts opening and closing will be arcing more and burning more.
|
|
|
|
| Cap'n Krusty |
May 3 2009, 07:38 PM
Post
#35
|
|
Cap'n Krusty Group: Members Posts: 10,794 Joined: 24-June 04 From: Santa Maria, CA Member No.: 2,246 Region Association: Central California |
QUOTE(charliew @ Apr 19 2009, 12:22 PM) I'm talking about the amount of shift movement from the shifter and the shift rod moving the shift rod in the tranny. You may not be getting enough motion to the shift rod when it goes into reverse. You took the tranny out right. You also took the shift mech. loose right? did it go back together exactly like it came out? It doesn't work that way. If it goes into reverse, the spot in the rod is where it needs to be. There's no gradation there that would allow one without the other. The Cap'n |
|
|
|
| jk76.914 |
May 3 2009, 08:33 PM
Post
#36
|
|
Senior Member Group: Members Posts: 809 Joined: 12-April 05 From: Massachusetts Member No.: 3,925 Region Association: North East States |
QUOTE(charliew @ May 3 2009, 09:25 PM) Why not just put the tranny in reverse with the sw. out and measure how far the pin comes out and then press the sw. in that amount and see if it makes contact? If it doesn't see how far it needs to go in and adjust the sealing washers so it's not over pressing the bridge? The contacts will burn if the light ground is bad or the other connections are loose or dirty. Any high resistance connection means the complete circuit is carrying the aditional load and the contacts opening and closing will be arcing more and burning more. When you increase the resistance in a circuit, the current flow is reduced, so I don't understand what you mean by "the complete circuit is carrying the aditional load and the contacts opening and closing will be arcing more and burning more." Contacts tend to arc on opening, not closing. They may bounce on closing, and thus arc for an instant pending final closure. When contacts open, and arc, the arc ionizes the air between them, making it conductive, and thus allowing the arc to continue for longer than it would otherwise (like in a vacuum). Contacts switching AC last longer, because the current goes to zero 120 times per second (at least for 60hz AC) and self-extinguish. Contacts switching DC have to deal with the sustained arc. Worst case is DC switching an inductive load, which our light bulbs aren't. Solutions to all this are better contact material and bridging contacts like in our back-up light switches. Bridging contacts effectively open at twice the rate as single contacts, minimizing the opportunity for an ionization path to sustain an arc. The color of these contacts indicates to me that they are likely silver-cadmium oxide- low resistance, good thermal characteristics, and resistance to burning. As I said earlier- a very robust design. |
|
|
|
| astronomerdave |
May 4 2009, 08:35 AM
Post
#37
|
|
Member Group: Members Posts: 69 Joined: 26-January 09 From: Los Angeles, CA Member No.: 9,979 Region Association: Southern California |
QUOTE(jk76.914 @ May 3 2009, 04:16 PM) I was wondering why my original switch failed, so first I x-rayed both to see if I could make out any internal differences Forget the switch, I want the x-ray machine. Too cool. I thought about building one when I was in school, but I presume you have access to this through work. What's the deal there? |
|
|
|
| charliew |
May 4 2009, 09:22 AM
Post
#38
|
|
Advanced Member Group: Members Posts: 2,363 Joined: 31-July 07 From: Crawford, TX. Member No.: 7,958 |
You are correct in what you post about the more resistance the less current. I am just going by experience in 12 vdc auto wiring. When a loose connection happens (more resistance), heat builds up and the connection will fail. I'm kinda old and we went from tube tech. to transistors and had to reverse flow of electrons in the 60's but I think I remember if a loose connection happens in a circuit the amperage would go up and create heat in that connection and continue until it burns enough to open up completely. Black or dark blue brass connectors in a auto connection are good places to investigate problems.
|
|
|
|
|
1 User(s) are reading this topic (1 Guests and 0 Anonymous Users)
0 Members:

|
Lo-Fi Version | Time is now: 4th June 2024 - 10:52 PM |
Invision Power Board
v9.1.4 © 2024 IPS, Inc.