|
|
|
Porsche, and the Porsche crest are registered trademarks of Dr. Ing. h.c. F. Porsche AG.
This site is not affiliated with Porsche in any way. Its only purpose is to provide an online forum for car enthusiasts. All other trademarks are property of their respective owners. |
|
|

  |

| justme |
 Feb 21 2009, 09:38 AM Feb 21 2009, 09:38 AM
Post
#1
|
|
Member  Group: Members Posts: 187 Joined: 1-January 07 From: southampton ma atlantic northeast Member No.: 7,413 Region Association: North East States |
Well I got my 71 from Cali 3 years ago and every winter it goes thru some changes but this year is the "BIG" one.
As you can see the car is stripped and getting ready to change colors. It was a factory silver car that went red and then black. Every new paint job was of a lower quality so time for a change. The car was hit in the front years ago and has a branded title so it'll never be a collector... and I always wanted a tangerine 914,so.....although going back to silver was tempting. I'm also doing a 1911 with 36 dells. It's heart will be a Elgin 7008 with 280 dur and 333 lift. I also had my heads done with 2.0 stainless valves,cnc'd for flow and new seats,guides & springs. These pictures are kinda all over but I'll add a few as I go. Oh...and the fridge has the good'ol New England Porter for inspiration (IMG:style_emoticons/default/beer3.gif) Hope your winter projects are as much fun, can't wait to be driving again (IMG:style_emoticons/default/piratenanner.gif) Attached thumbnail(s) 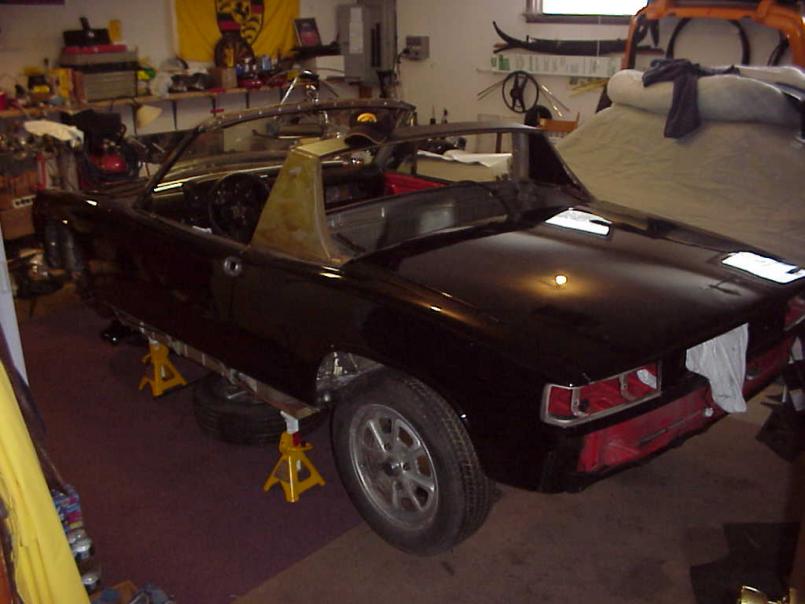 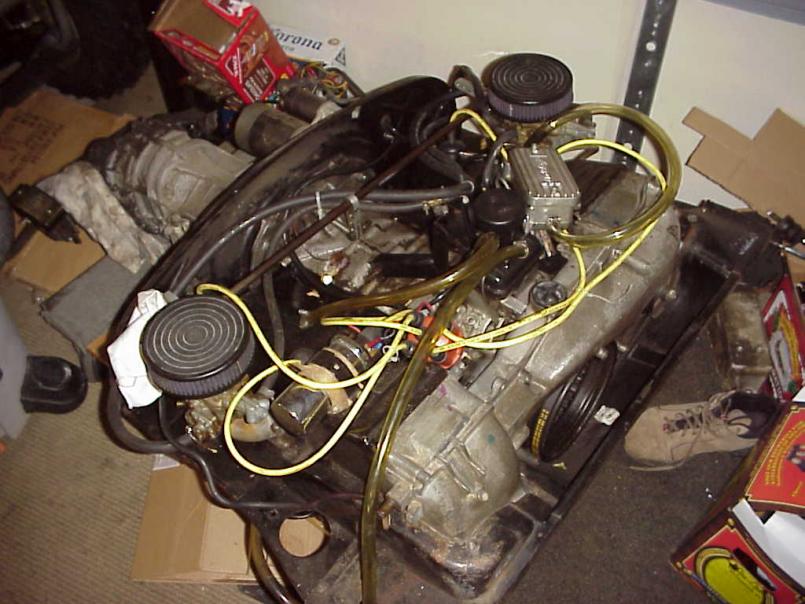 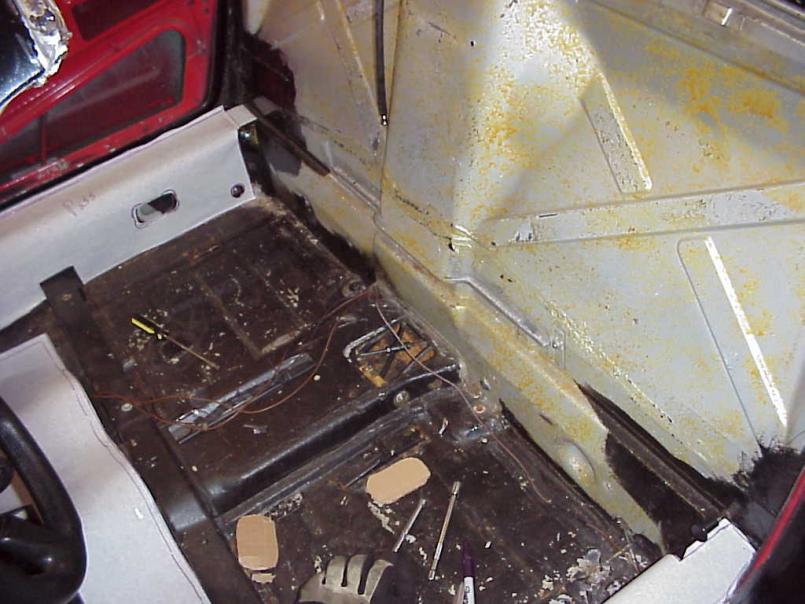 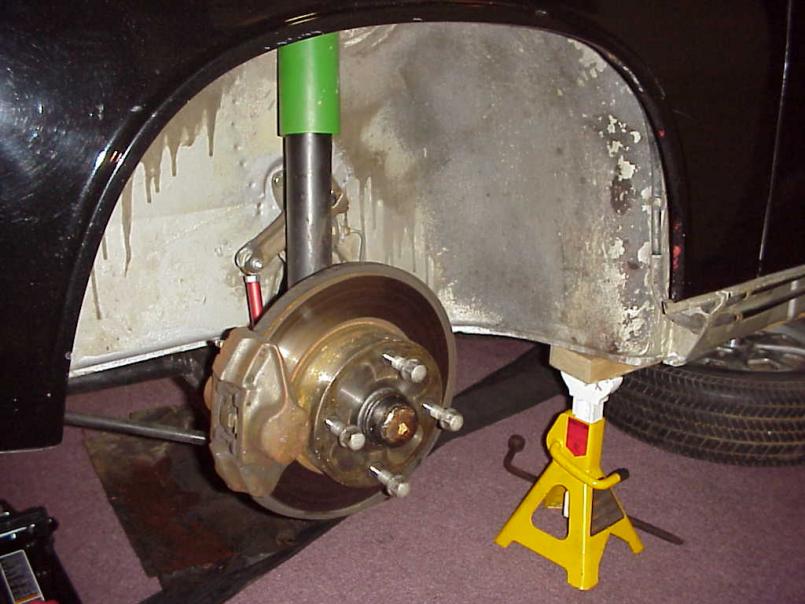 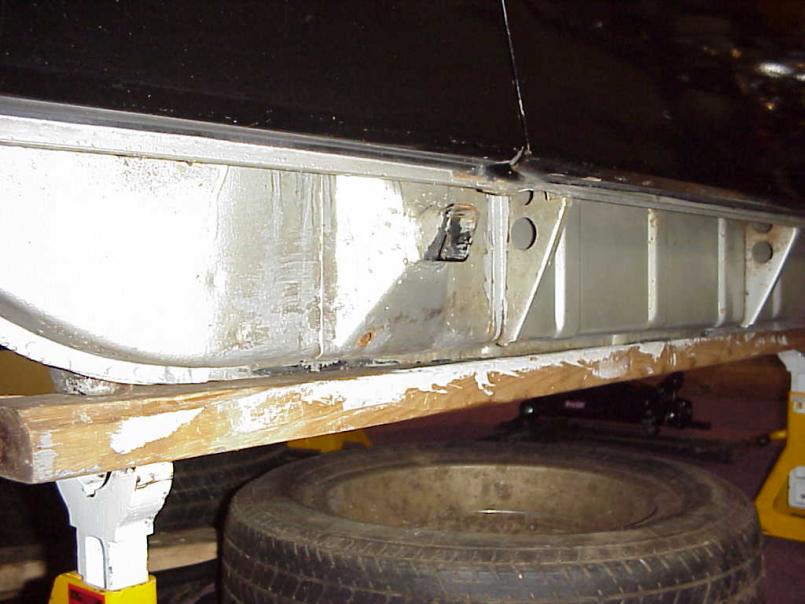 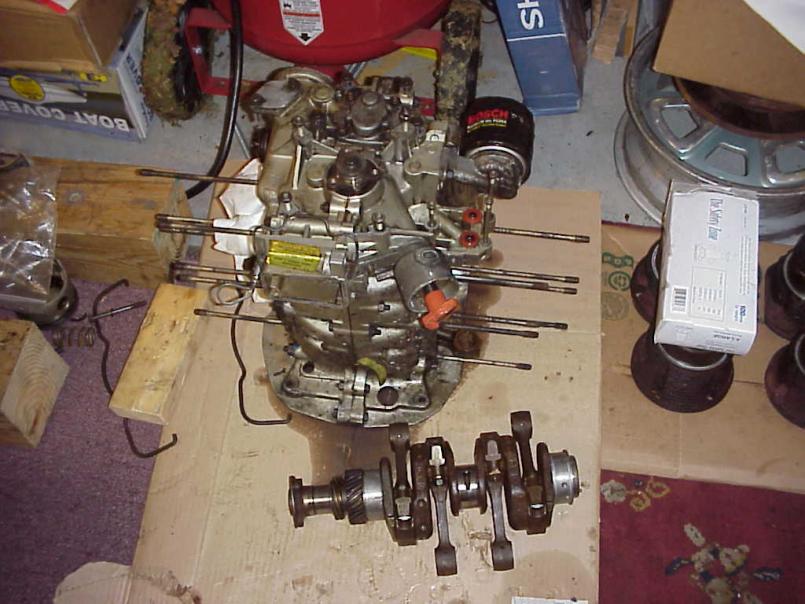
|
   |

 
|
| justme |
Feb 21 2009, 09:40 AM
Post
#2
|
|
Member Group: Members Posts: 187 Joined: 1-January 07 From: southampton ma atlantic northeast Member No.: 7,413 Region Association: North East States |
A few more photo's
The one with my son Alex, is a shot on the wall in the "coral" at Lime Rock for the 2007 ALMS. Just to prove you can tear it down every year and put it back on the road! (IMG:style_emoticons/default/driving.gif) Attached thumbnail(s)  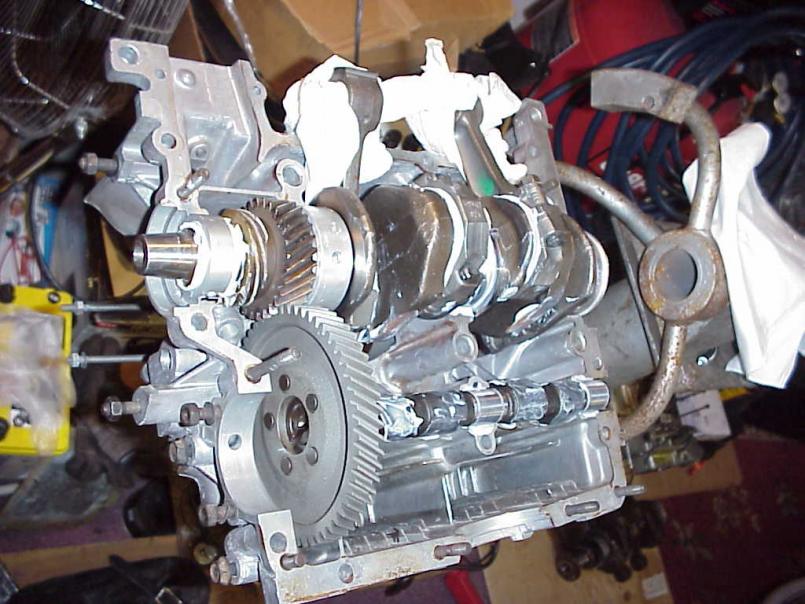 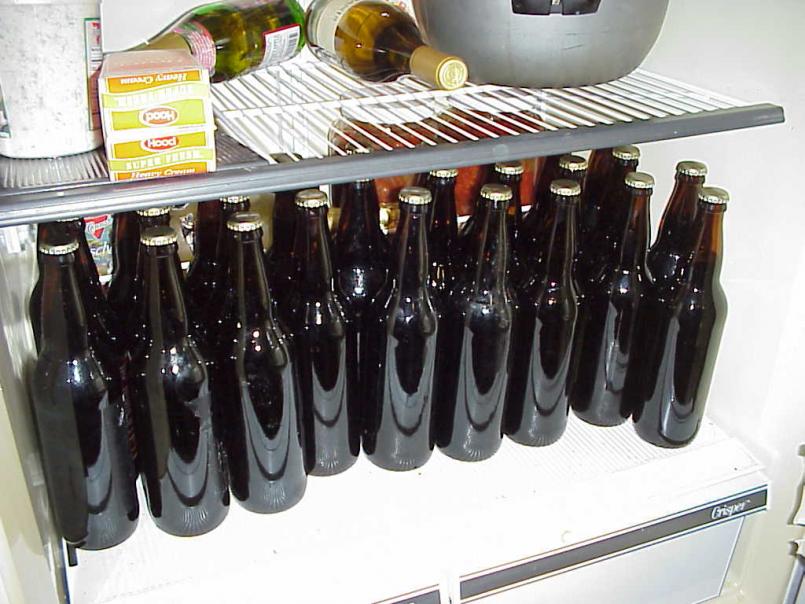 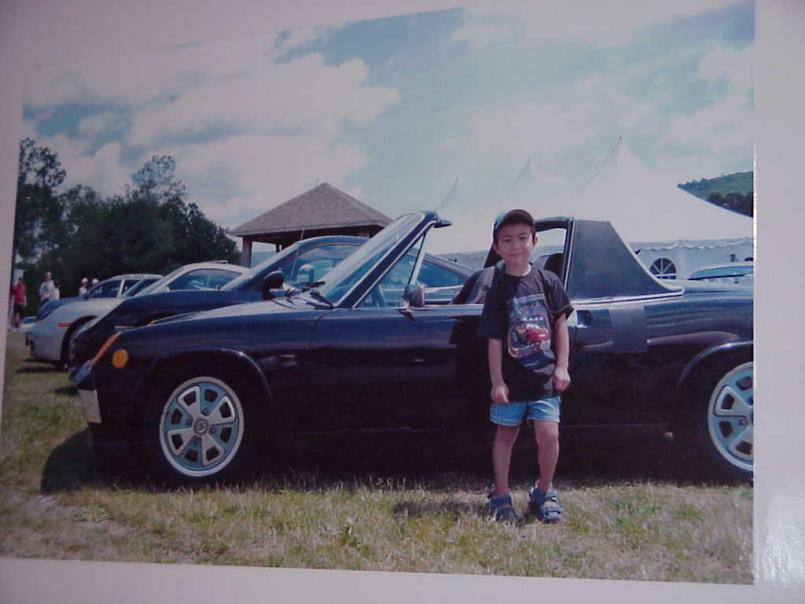 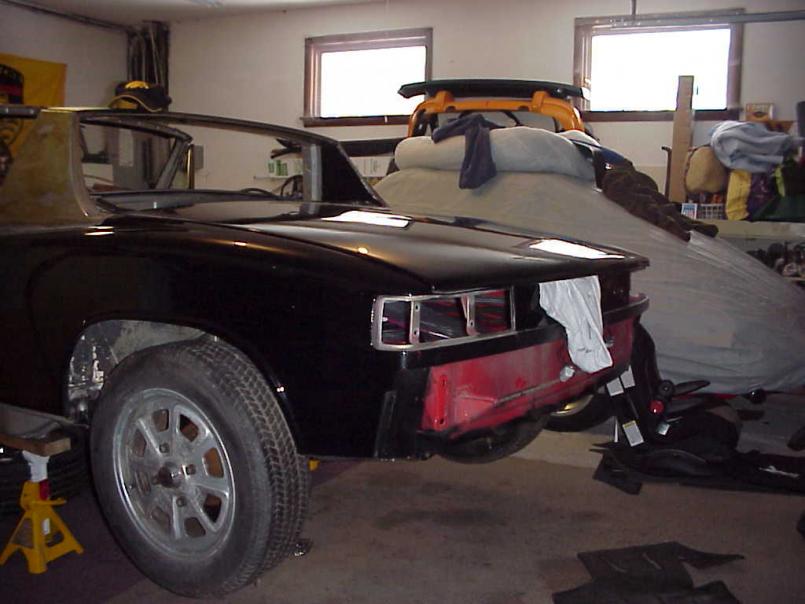
|
|
|
|
| FourBlades |
Feb 21 2009, 10:18 AM
Post
#3
|
|
From Wreck to Rockin Group: Members Posts: 2,054 Joined: 3-December 07 From: Brevard, FL Member No.: 8,414 Region Association: South East States |
Good project, post more pictures! (IMG:style_emoticons/default/piratenanner.gif) What kind of power output do you expect with this combination? Did you brew the porter yourself? (IMG:style_emoticons/default/beer3.gif) John |
|
|
|
| justme |
Feb 21 2009, 12:07 PM
Post
#4
|
|
Member Group: Members Posts: 187 Joined: 1-January 07 From: southampton ma atlantic northeast Member No.: 7,413 Region Association: North East States |
Hi John,
The combo should be a rev happy little motor that'll put out 110-120 HP. The heads are set up to flow the exhaust well and Dema at Elgin want's the cam to run 9.5-10.0 to 1 compression...so it should spin up quick. I'm also lightening the flywheel to help responce. Yea the porter was a self brew. Pretty easy though as we have a brew house ( Deja-Brew.com ) that you can go to and use the brewery. Very tasty (IMG:style_emoticons/default/beer3.gif) Cheers |
|
|
|
| justme |
Feb 23 2009, 09:50 PM
Post
#5
|
|
Member Group: Members Posts: 187 Joined: 1-January 07 From: southampton ma atlantic northeast Member No.: 7,413 Region Association: North East States |
So I had some decent progress with the motor tonight. Got the case bolted together & added p&c's to check and set deck height. Everything went together great and decks were between .044-.047 using the old "anvil" meathod.
I'm hoping to get my new heads on Tuesday and start checking and setting up the valvetrain geometry. I have a set of stainless pushrods from Jake, like the idea of 0 valve lash (IMG:style_emoticons/default/smile.gif) . Hours of Tom Wilsons book, Hot Rodding VW's, Jakes forum & video and this forum have realy made things go smooth so far. I have a local body guy stopping by tomorrow to give me a number on the cost of my color change. Someone posted that Tractor Supply has a color that's a dead on for tangerine. Anyone use there paint? It'll fit my budget and the car will never be a concours queen so... Valvetrain next....I'll probably "clay the piston tops to get clearance #'s also. Lot's of bolting & unbolting. (IMG:style_emoticons/default/bye1.gif) Attached thumbnail(s)  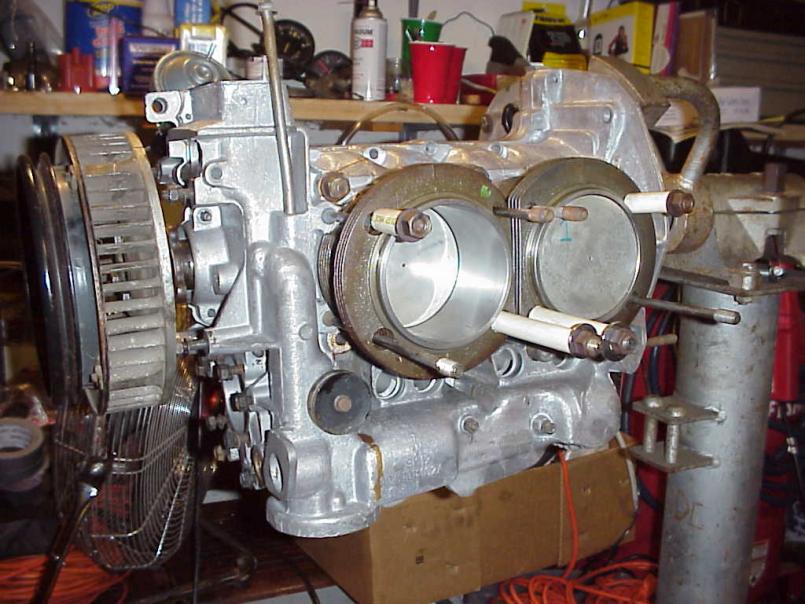 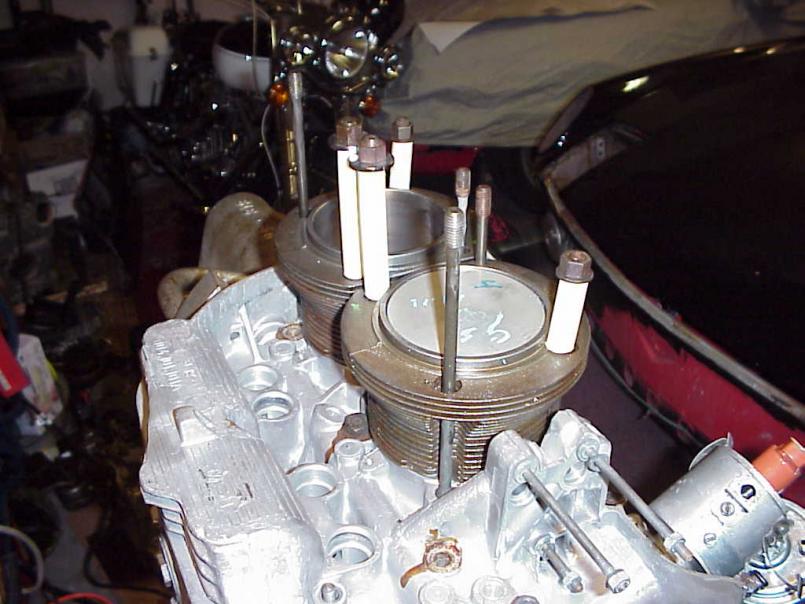 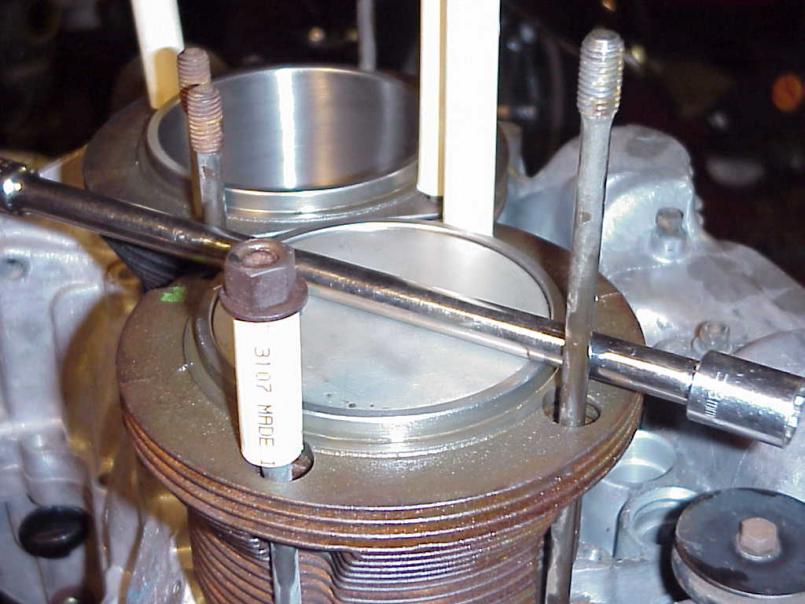
|
|
|
|
| cwpeden |
Feb 23 2009, 10:02 PM
Post
#6
|
|
Great White North, huh? Group: Members Posts: 916 Joined: 20-August 06 From: Victoria BC Member No.: 6,693 Region Association: Canada |
"Clay the pistons"? Havent heard that term before. I'm curious, do tell more.
|
|
|
|
| justme |
Feb 23 2009, 10:17 PM
Post
#7
|
|
Member Group: Members Posts: 187 Joined: 1-January 07 From: southampton ma atlantic northeast Member No.: 7,413 Region Association: North East States |
You place a thin strip of modeling clay on the piston befor bolting the head on. Then after setting up the valvetrain you can rotate the crank thru it's compression cyle to get check the actual valve to piston clearance.
Measure 2 or 3 times & cut 1 time process. Cheers |
|
|
|
| dlo914 |
Feb 24 2009, 04:08 AM
Post
#8
|
|
Whatchu' lookin' at?!?! Group: Members Posts: 3,432 Joined: 6-September 04 From: San Gabriel, CA Member No.: 2,697 |
keep us updated on your progress. cool build!
|
|
|
|
| pktzygt |
Feb 24 2009, 06:34 AM
Post
#9
|
|
Member Group: Members Posts: 328 Joined: 20-March 07 From: Chesapeake, VA Member No.: 7,611 Region Association: MidAtlantic Region |
QUOTE(justme @ Feb 21 2009, 01:07 PM)  Hi John, The combo should be a rev happy little motor that'll put out 110-120 HP. The heads are set up to flow the exhaust well and Dema at Elgin want's the cam to run 9.5-10.0 to 1 compression...so it should spin up quick. I'm also lightening the flywheel to help responce. Yea the porter was a self brew. Pretty easy though as we have a brew house ( Deja-Brew.com ) that you can go to and use the brewery. Very tasty (IMG:style_emoticons/default/beer3.gif) Cheers That's kinda pricey, but I'm sure it has it's advantages. With a $75 initial investment for equipment, I now brew for cheaper per case than budweiser. |
|
|
|
| So.Cal.914 |
Feb 24 2009, 07:14 AM
Post
#10
|
|
"...And it has a front trunk too." Group: Members Posts: 6,588 Joined: 15-February 04 From: Low Desert, CA./ Hills of N.J. Member No.: 1,658 Region Association: None |
|
|
|
|
| justme |
Feb 24 2009, 06:11 PM
Post
#11
|
|
Member Group: Members Posts: 187 Joined: 1-January 07 From: southampton ma atlantic northeast Member No.: 7,413 Region Association: North East States |
QUOTE(pktzygt @ Feb 24 2009, 04:34 AM) QUOTE(justme @ Feb 21 2009, 01:07 PM) Hi John, The combo should be a rev happy little motor that'll put out 110-120 HP. The heads are set up to flow the exhaust well and Dema at Elgin want's the cam to run 9.5-10.0 to 1 compression...so it should spin up quick. I'm also lightening the flywheel to help responce. Yea the porter was a self brew. Pretty easy though as we have a brew house ( Deja-Brew.com ) that you can go to and use the brewery. Very tasty (IMG:style_emoticons/default/beer3.gif) Cheers That's kinda pricey, but I'm sure it has it's advantages. With a $75 initial investment for equipment, I now brew for cheaper per case than budweiser. Yea I'm sure it'd be cheaper to do it at home. It get's me out of the house though and it's still cheaper than the local micro's. Best of all though it taste's great (IMG:style_emoticons/default/beer3.gif) |
|
|
|
| justme |
Feb 24 2009, 09:48 PM
Post
#12
|
|
Member Group: Members Posts: 187 Joined: 1-January 07 From: southampton ma atlantic northeast Member No.: 7,413 Region Association: North East States |
Just took a look at my valve train geometry & checked my piston to valve clearance tonight. Looks pretty good so far (IMG:style_emoticons/default/piratenanner.gif)
The clay was about .105 thick at it's thinnest point, sorry I didn't get photo's of that. Used some of the kids playdough with some scotch tape on the piston. Went well, just like Bill Fisher's book describes. The attached photo's show #2 exhaust then intake @ TDC , 50% lift & full lift. I used a "0" lash setting @ TDC. What do you guy's think? Looks good to me @ 50% lift. I think I have a set of 911 swivel feet someplace in the carnage (IMG:style_emoticons/default/headbang.gif) If I can find them in the next few days I'll do it again before I send the pushrods out to be cut to size. Using the good one's from Jake's store. I always wait till the end of the wrench session for my porter,mmmmmmmm (IMG:style_emoticons/default/beer3.gif) Had one of my paint guy's stop by today too. He's going to get back tomorrow with $$'s but he was willing to listen to what I wanted. I hope that translates well in his work & quote. I left the door open if he want's to talk me into silver over tangerine. We'll see. Cheers (IMG:style_emoticons/default/beer3.gif) Attached thumbnail(s) 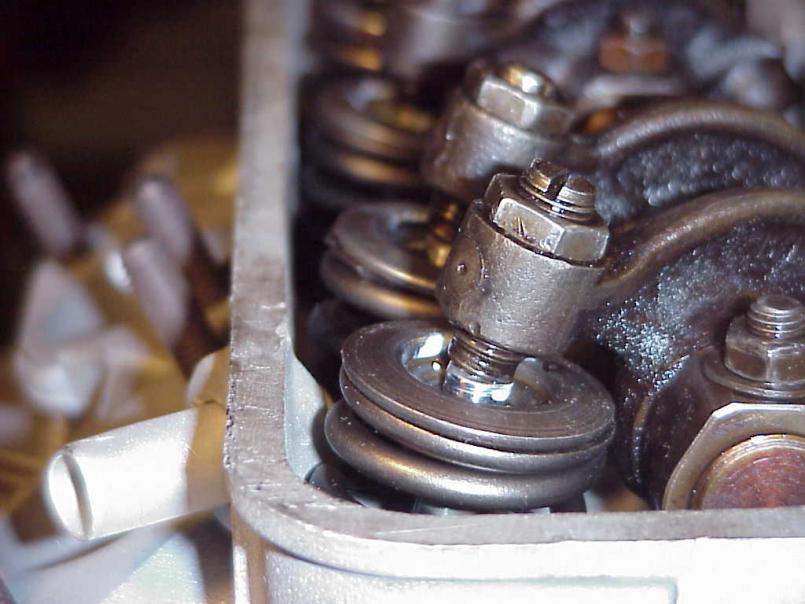 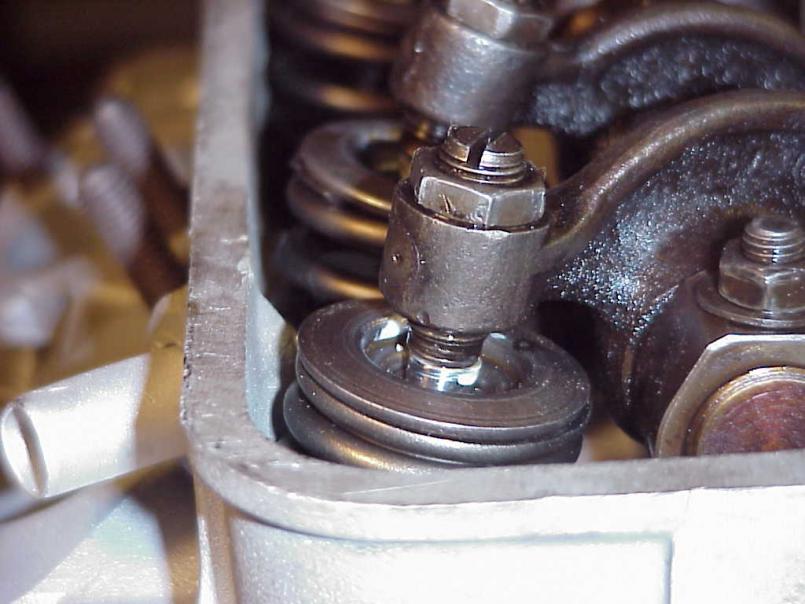 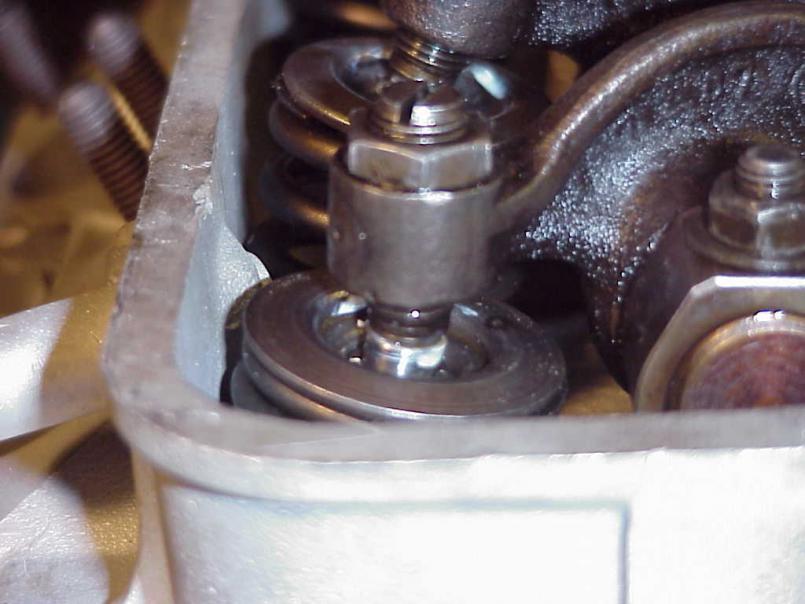  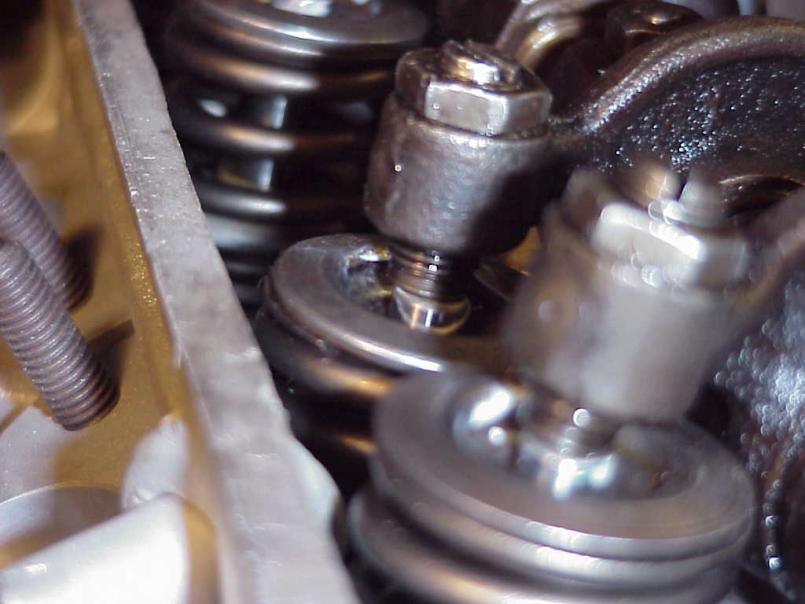 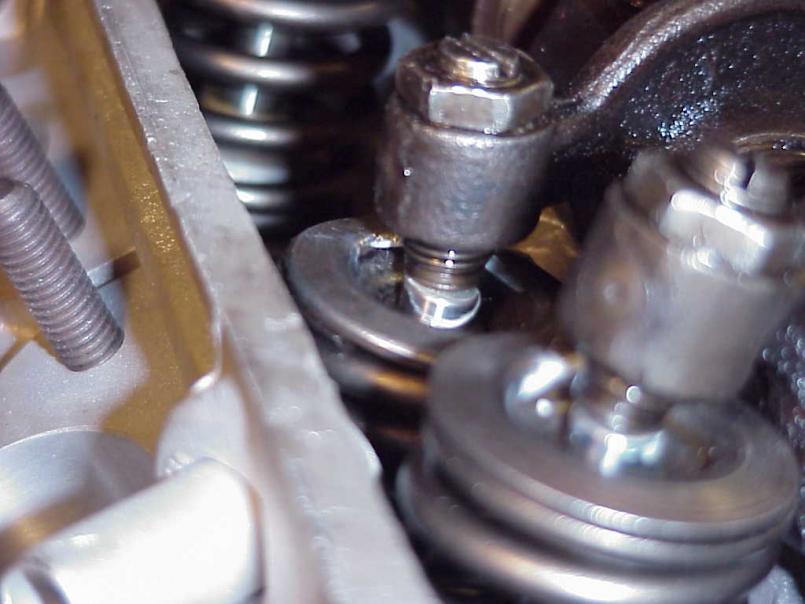
|
|
|
|
| justme |
Feb 26 2009, 06:10 PM
Post
#13
|
|
Member Group: Members Posts: 187 Joined: 1-January 07 From: southampton ma atlantic northeast Member No.: 7,413 Region Association: North East States |
Hi guy's,
Just checking for feedback on the adjuster to valve stem relationship at 50% lift. I think it looks pretty good but wanted to see what all you experienced engine builders thought?? Thanks |
|
|
|
| justme |
Mar 9 2009, 09:24 PM
Post
#14
|
|
Member Group: Members Posts: 187 Joined: 1-January 07 From: southampton ma atlantic northeast Member No.: 7,413 Region Association: North East States |
So it got up to about 60f this weekend. Rolled the teener out and started to strip the factory silver, red and top coat of black. One thing for sure, I'd rather be holding a wrench (IMG:style_emoticons/default/biggrin.gif) ! I know of two dents on the car that have some mud in them but so far everything else is good ol metal. I got down the passenger side before I had to call it quits.
Anyone have any luck using chemicals that don't bake your brain or the planet? I'll throw on a few more images as we go. It keeps comin along! Attached thumbnail(s) 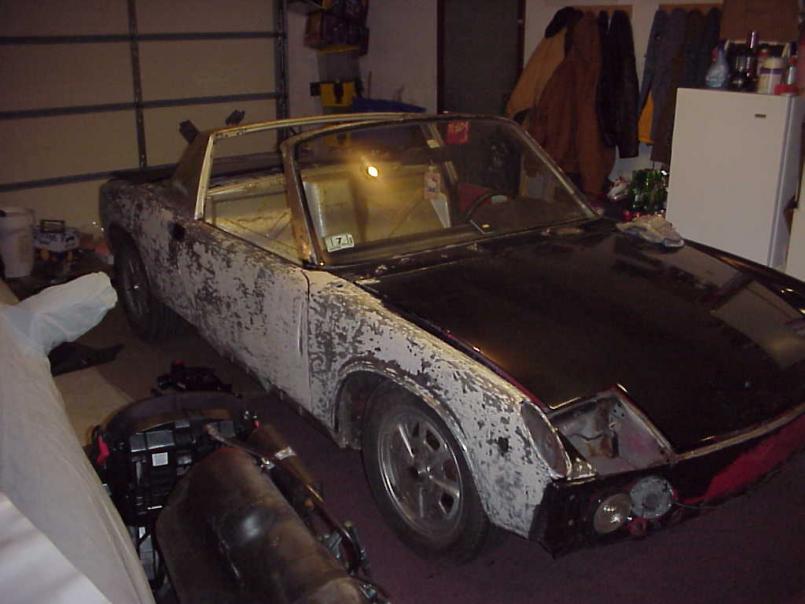 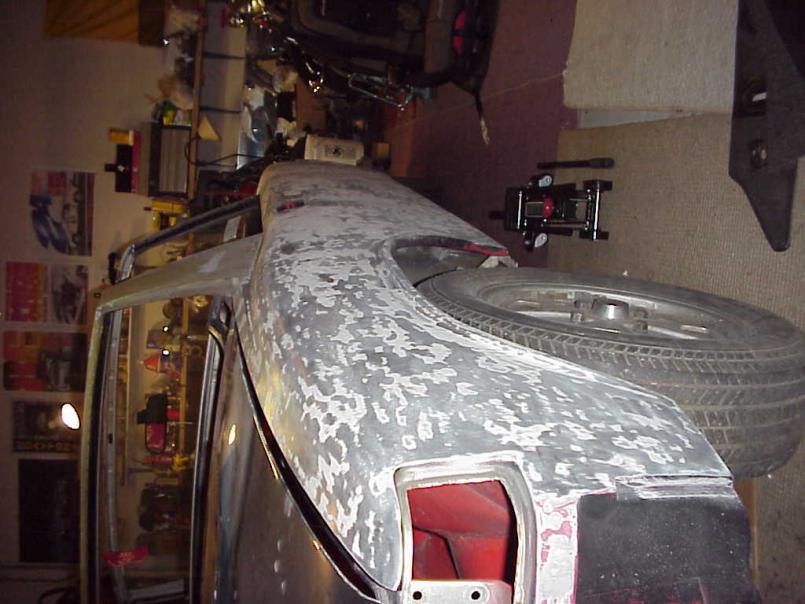 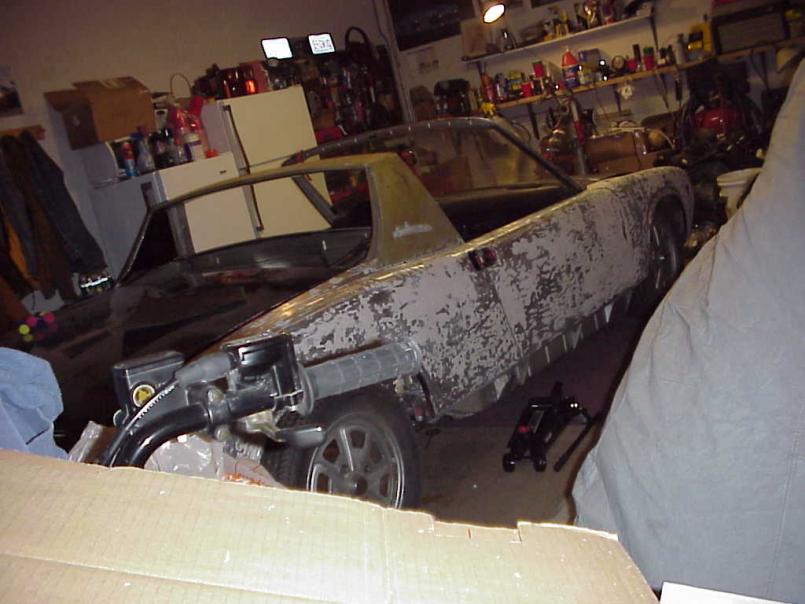 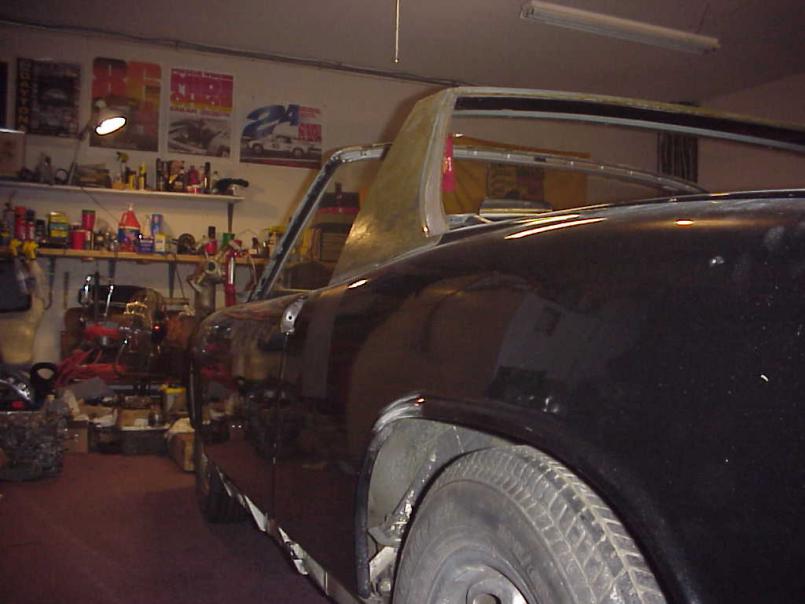
|
|
|
|
| justme |
Mar 16 2009, 06:23 PM
Post
#15
|
|
Member Group: Members Posts: 187 Joined: 1-January 07 From: southampton ma atlantic northeast Member No.: 7,413 Region Association: North East States |
Made some good progress in the last week. After a couple trial runs I have the engine case all buttoned up & sealed (IMG:style_emoticons/default/beer3.gif) . I'll be adding the P&C's & flywheel later thins week.
I also scored some nice 15x6 empi 8 spokes from a local guy. I think I'll use those for my AX whell/tire combo. His dad also GAVE me a Saratoga top in pretty nice shape. KOOL I also made it down the drivers side in an effort to remove paint and get ready for the bodyman. Only one spot on the car so far with just a little bondo, YEA (IMG:style_emoticons/default/piratenanner.gif) Cheers (IMG:style_emoticons/default/beerchug.gif) Phil Attached thumbnail(s) 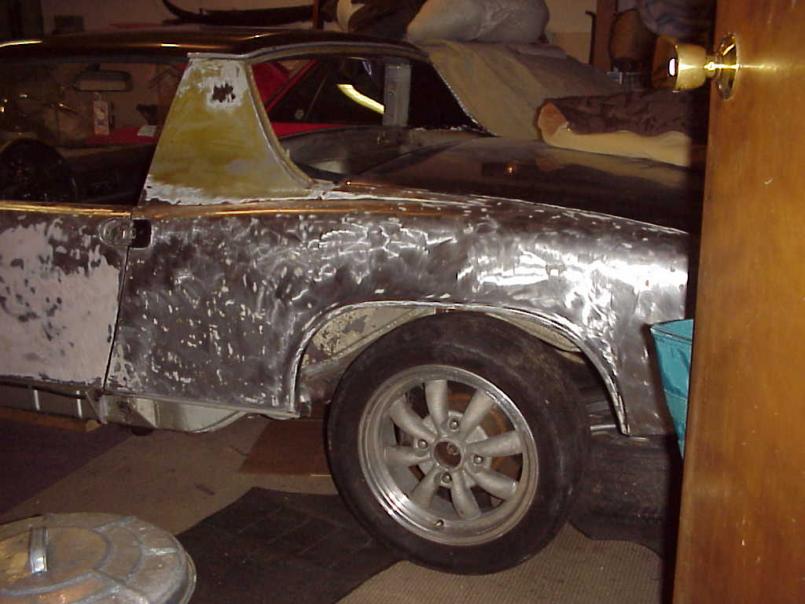 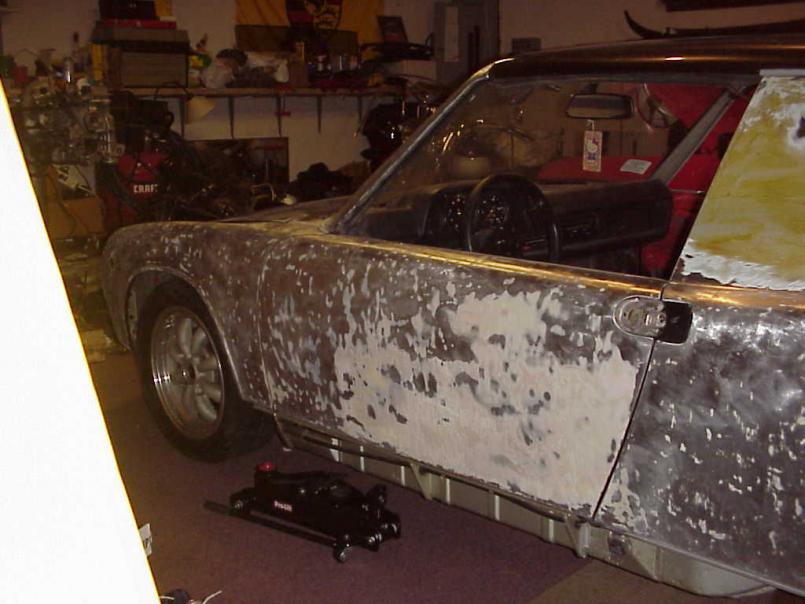  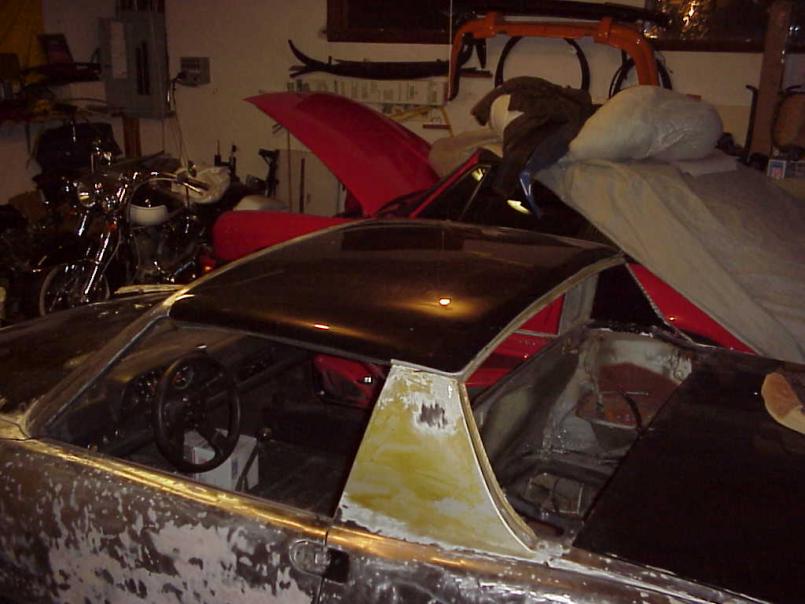
|
|
|
|
| FourBlades |
Mar 16 2009, 06:43 PM
Post
#16
|
|
From Wreck to Rockin Group: Members Posts: 2,054 Joined: 3-December 07 From: Brevard, FL Member No.: 8,414 Region Association: South East States |
I stripped my car using low odor aircraft stripper from the local FLAPS. I still wore a paint respirator because it does contain nasty chemicals. It is supposed to be neutralized with water, so I don't think it is too polluting, but I can't speak for the old paint, which may contain lead. Using stripper is very messy and takes probably 3 days to do a whole car. It is pretty tedious as well but it does not make any noise, which was important to me. You need some serious disposable drop cloths (plastic). You should also try to keep the stripper away from seams, nooks, and crannies because it can be hard to get it all out. This is not too hard on the exterior of the car. I also flushed the stripper 3 times with water on a scotch brite pad to try to get it all off. Then I used paint prep and finally acid etched it with metal ready. We will see if my paint bubbles in a few years or if this was enough to remove it all... This method is easiest on your car's metal. I discovered some manufacturer's marks in the original EDM coating that I thought were cool, but no one else seemed to think so. I mistakenly thought it was the original galvanizing, but someone much more informed than me told me that 914s were not galvanized, which should have been obvious because of the rust poster children they usually become. End of dissertation. PS. I want to try building a motor sometime, yours looks really nice. |
|
|
|
| dlee6204 |
Mar 16 2009, 06:58 PM
Post
#17
|
|
Howdy Group: Members Posts: 2,162 Joined: 30-April 06 From: Burnsville, NC Member No.: 5,956 |
Good job on the progress. Also good score on the Saratoga top! (IMG:style_emoticons/default/smilie_pokal.gif)
|
|
|
|
| justme |
Apr 22 2009, 09:35 PM
Post
#18
|
|
Member Group: Members Posts: 187 Joined: 1-January 07 From: southampton ma atlantic northeast Member No.: 7,413 Region Association: North East States |
QUOTE(justme @ Feb 24 2009, 07:48 PM) Just took a look at my valve train geometry & checked my piston to valve clearance tonight. Looks pretty good so far (IMG:style_emoticons/default/piratenanner.gif) The clay was about .105 thick at it's thinnest point, sorry I didn't get photo's of that. Used some of the kids playdough with some scotch tape on the piston. Went well, just like Bill Fisher's book describes. The attached photo's show #2 exhaust then intake @ TDC , 50% lift & full lift. I used a "0" lash setting @ TDC. What do you guy's think? Looks good to me @ 50% lift. I think I have a set of 911 swivel feet someplace in the carnage (IMG:style_emoticons/default/headbang.gif) If I can find them in the next few days I'll do it again before I send the pushrods out to be cut to size. Using the good one's from Jake's store. I always wait till the end of the wrench session for my porter,mmmmmmmm (IMG:style_emoticons/default/beer3.gif) Had one of my paint guy's stop by today too. He's going to get back tomorrow with $$'s but he was willing to listen to what I wanted. I hope that translates well in his work & quote. I left the door open if he want's to talk me into silver over tangerine. We'll see. Cheers (IMG:style_emoticons/default/beer3.gif) Well after three business trips & Easter I finally made it back to the garage for my teener. After reading Jake's valve train geometry I was able to get within 2% of my cam cards spec lift (IMG:style_emoticons/default/beer3.gif) !!! The adjuster to valve stem alignment looked great at 50% lift also (IMG:style_emoticons/default/piratenanner.gif) I can finally start putting everything together & fire it up. Probably do it on the furniture cart for cam breaking and initial tune before going into the car. Next, body & paint.............. (IMG:style_emoticons/default/w00t.gif) |
|
|
|
| justme |
May 25 2009, 09:11 PM
Post
#19
|
|
Member Group: Members Posts: 187 Joined: 1-January 07 From: southampton ma atlantic northeast Member No.: 7,413 Region Association: North East States |
So life has come ahead of my teener over the last month or so. This past week i was able to steal some time and set up my valvetrain geometry, weld in an Engman inner longitude kit and mock up my Dell 36's.
Work's been nut's(self employed so I should be happy (IMG:style_emoticons/default/smile.gif) ) but I hope to get a few days in this week on body & paint prep. Cheesy pictures attached (IMG:style_emoticons/default/beer3.gif) Attached thumbnail(s) 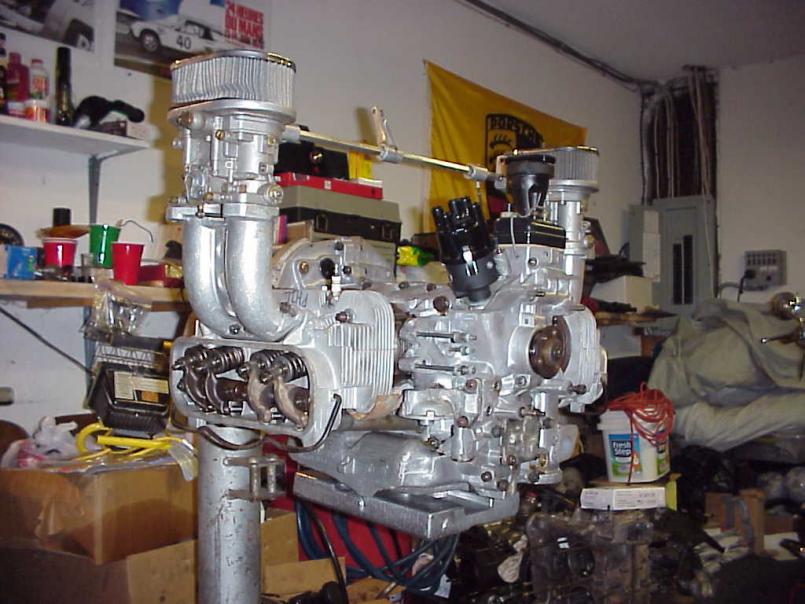  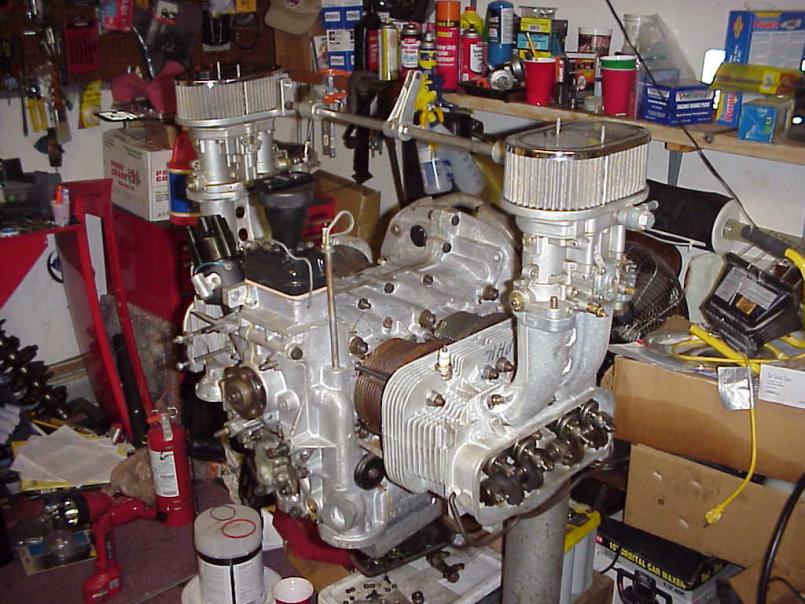  
|
|
|
|
| wertygrog |
May 26 2009, 12:29 AM
Post
#20
|
|
wertygrog Group: Members Posts: 428 Joined: 12-November 05 From: Long Beach, CA Member No.: 5,114 Region Association: Southern California |
Good job! Keep up the pictures!! (IMG:style_emoticons/default/biggrin.gif)
|
|
|
|
|
1 User(s) are reading this topic (1 Guests and 0 Anonymous Users)
0 Members:

|
Lo-Fi Version | Time is now: 9th May 2024 - 10:28 PM |
Invision Power Board
v9.1.4 © 2024 IPS, Inc.