|
|
|
Porsche, and the Porsche crest are registered trademarks of Dr. Ing. h.c. F. Porsche AG.
This site is not affiliated with Porsche in any way. Its only purpose is to provide an online forum for car enthusiasts. All other trademarks are property of their respective owners. |
|
|

  |

| charliew |
 Apr 5 2009, 11:28 AM Apr 5 2009, 11:28 AM
Post
#21
|
|
Advanced Member  Group: Members Posts: 2,363 Joined: 31-July 07 From: Crawford, TX. Member No.: 7,958 |
I would think the passenger side will be easier to adjust than the driver side. Rich's way sounds doable. I don't know if the paint will not get screwed up at the rear jam or the top of the long before you get through. You might try using a 2x4 and lay it on the top of the long and use a bfh and lower the center of the long (make it longer) maybe put jack stands under the jack points so the impact will work better, but 3/8 is never going to happen. You might as a last resort try grinding some of the top rosettes out of the long. Another last resort would be to weld some anchors to the top of the long and use a big spreader while heating the long. It seems to me that a added support at the roof would also help as it's a lot farther up in the door opening to keep the roof straight as you are doing all of this. I will weld some braces to mine when I try this as door openings changing are a real time consuming problem. Have you measured the roof opening? I would do that and see where it's at before you start a game plan. I hate to say it but the rest of us are learning a great lesson at your expense.
The passenger side seems square so maybe you can move the door forward enough to get the door to clear and live with it. The driver door is a good challenge if the top opening is still square but maybe it's also wide and you can just pull the top of the door opening together. I would not use the windshield frame to do any pulling. You could use the targa seat belt mount and pull to the top hinge for more leverage to close the gap. Be careful that you don't just pull the jamb hinge to the rear and screw the front gap up. |
   |

 
|
| FourBlades |
Apr 5 2009, 11:52 AM
Post
#22
|
|
From Wreck to Rockin Group: Members Posts: 2,056 Joined: 3-December 07 From: Brevard, FL Member No.: 8,414 Region Association: South East States |
Charlie, Thanks for the suggestions. I was hoping to help other people to avoid this problem by show casing my own error. (IMG:style_emoticons/default/chair.gif) (IMG:style_emoticons/default/chair.gif) (IMG:style_emoticons/default/chair.gif) I also thought some World member would know what to do to fix it, and I still do. I am pretty sure I read on some forum that a guy had this problem and some old time body men fixed it by heating it up but I can't find the post anymore. OK, just for reference, I spent about four hours on welding in all three pieces of my Engman kit. I used a Hobart Handler 140 amp machine set on 3 for heat and 50 for wire speed (this is pretty hot for sheet metal on this machine). I welded all the rosettes, and also seam welded a lot of the openings, edges, and joints where the pieces meet. I did most of it in one session, but some of the final seam welding I did the next day. I welded 4-5 rosettes and then waited 5 minutes or so to cool off, then welded some more. It was probably a 75 degree day when I did it. I tried Rich's suggestion of using a jack to spread the door opening. It maybe got me another 1/16 or so but was starting to buckle the rear fender near the back of the door. I was using 2x4s on the door pillars. I probably need to make carefully shaped cauls (pieces of wood) that match the door pillar shape to spread the load more and have a second person pull out on the rear fender. I can live with this if I can't fix it...first time I hit a tire wall at Sebring I hope it is on the passenger side. (IMG:style_emoticons/default/happy11.gif) Thanks again for all the suggestions... John |
|
|
|
| charliew |
Apr 5 2009, 12:13 PM
Post
#23
|
|
Advanced Member Group: Members Posts: 2,363 Joined: 31-July 07 From: Crawford, TX. Member No.: 7,958 |
About thirty years ago I torch welded the floors in a early military jeep. I did a lot of welding without stopping at first. I welded a seam about a foot long and steped back and admired my progress and it seemed ok. After moving to the other side to do another I got about 1/2 way through and heard a loud pop like someone hit it with a hammer and the first side split about 6 inches beside the weld. Being a stubborn sob I immediately rewelded it and went back to the side I had moved to. When I finished the second side 12 inches the first side poped again so I stopped and had a dr pepper and cussed a little. From then on if I couldn't put my hand on it it didn't get welded. You can take a 2 inch piece of pipe 20 ft long and weld a 12 bead along the top side and stand back and watch it bow down.
|
|
|
|
| Wes V |
Apr 6 2009, 09:08 AM
Post
#24
|
|
Member Group: Members Posts: 482 Joined: 11-October 07 From: Los angeles Member No.: 8,211 |
I'm trying to get my mind around this whole "shrinkage" thing, so I'm going to post this to try to make it clearer. (in my simple mind)
Let's pretend that we take a 3 foot long length of 4" square tube and support it on it's ends (just sitting on saw horses). To keep it simple, let's assume that it has no weight. A torch is used to heat the top of the tube till red. While hot, the top of the tube expands and the tube bends with the center moving upward. It's allowed to cool down slowly and no force is applied to it. As it cools, the metal contracts and the center "bump" goes down. I was under the impression that it would not go all the way back down to level and most assuredly wouldn't go lower. Am I wrong here?? (the closing of the door gap at it's top would indicate I'm wrong) To further this; Let's assume that we start with a new tube. Heat the top with the torch until red and then while still hot, throw cold water on it. Prior to cooling it off fast, the center would have moved upward. Cooling it off fast would result in it contracting more, and would result in a downward bend. Once again, am I wrong here?? What I'm trying to get clear in my mind is what is happening while welding on the top surface of the Engman angle. My guess is that depending on how the car is supported, the gap at the top of the door would open while the welding is hot, and then closes up while the weld cools off. Wes |
|
|
|
| Richard Casto |
Apr 6 2009, 09:19 AM
Post
#25
|
|
Blue Sky Motorsports, LLC Group: Members Posts: 1,465 Joined: 2-August 05 From: Durham, NC Member No.: 4,523 Region Association: South East States |
QUOTE(FourBlades @ Apr 4 2009, 04:09 PM)  I did use a brace bolted to the upper seat belt mounting point and the lower hinge plate. I think the brace I used must have been too weak. It was made from 1 inch square tubing welded to a (pretty small) turn buckle. Sorry that you are having this issue, but you are really scaring me now. I have pretty much the same brace in place right now and I just finished welding in place the the new outer longitudinal on my passenger side. Right now everything if fine (measurement wise), but I guess I need to remove the braces to see what the measurement are without them in place. (IMG:style_emoticons/default/sad.gif) |
|
|
|
| McMark |
Apr 6 2009, 09:56 AM
Post
#26
|
|
914 Freak! Group: Retired Admin Posts: 20,180 Joined: 13-March 03 From: Grand Rapids, MI Member No.: 419 Region Association: None |
QUOTE seam welded a lot of the openings, edges, and joints where the pieces meet In my experience, this is the problem, John. I rosette weld, and that's it. No outer seam welding. Just a few quick tack-welds. See if your top fits okay. The greatest deflection will be the top of the window frame vs. the top of the roll bar/targa bar. I've used a Porta-Power to restretch a shrunk body. It worked well. Attached image(s) 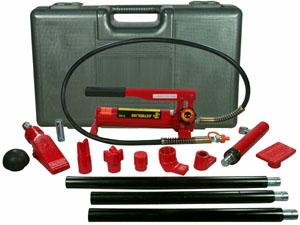
|
|
|
|
| horizontally-opposed |
Apr 6 2009, 10:10 AM
Post
#27
|
|
Advanced Member Group: Members Posts: 3,456 Joined: 12-May 04 From: San Francisco Member No.: 2,058 Region Association: None |
QUOTE(FourBlades @ Apr 5 2009, 10:52 AM) I am pretty sure I read on some forum that a guy had this problem and some old time body men fixed it by heating it up but I can't find the post anymore. Might have been me. Though it wasn't nearly as bad as what you're dealing with. (IMG:style_emoticons/default/sad.gif) http://www.914world.com/bbs2/index.php?sho...80724&st=80 See post #85 pete |
|
|
|
| andys |
Apr 6 2009, 10:39 AM
Post
#28
|
|
Advanced Member Group: Members Posts: 2,165 Joined: 21-May 03 From: Valencia, CA Member No.: 721 Region Association: None |
When I welded my Engman kit, I measured my door gaps (using calipers) both before and after welding. As slow and metodical as I was, the gaps still closed up a little (they were perfect before I started). What I did was to weld a few rosettes one then side, then move to the other side, make a few welds, then back to the first side and so no. When the panel would start to get hot, I'd stop and let everything cool down before resuming. I used a TIG to weld in my kit which I'd never do again; Way too slow and tedious but it does keep the heat input to a minimum.
Wes got a chance to look at the end result of my Engman install, but to help answer his question "heat shrinks." Anything I've ever welded has moved or shrunk as a result of welding. Scab plate installations (such as the Engman kit) are always prone to create shrinkage in my experience. Andys |
|
|
|
| 6freak |
Apr 6 2009, 10:42 AM
Post
#29
|
|
MR.C Group: Members Posts: 4,740 Joined: 19-March 08 From: Tacoma WA Member No.: 8,829 Region Association: Pacific Northwest |
QUOTE(FourBlades @ Apr 4 2009, 12:31 PM) I was test fitting my doors before painting them and noticed this: Driver side. Passenger side. Maybe you could do some milling and shimming of the door hinges ?????I dont know just guessing or think`n outloud....good luck |
|
|
|
| FourBlades |
Apr 6 2009, 11:52 AM
Post
#30
|
|
From Wreck to Rockin Group: Members Posts: 2,056 Joined: 3-December 07 From: Brevard, FL Member No.: 8,414 Region Association: South East States |
Mark: I did a fair amount of seam welding on mine. Maybe 25% of the tops and less of the bottoms. I also did the seam welding in a short time. Part of the problem is that I had finally learned to make a really pretty seam weld so I think I just went overboard. The top still fits pretty well. It takes a little effort to lock the front latches. I am going to check it again to see if the windshield frame is bending. Man worrying about that is going to keep me from sleeping at all at work today... How do you use a porta power to stretch a car body? Pete: I am sure that is the thread I was reading. How did your guy know where to jack up your car? I wonder if your car naturally stretches when on jack stands because of the weight overhanging the front and rear jack stand points? Maybe you need that stretch to counter act the shrinkage? It would be nice to get this down to a repeatable science, for the sake of future 914s... John |
|
|
|
| FourBlades |
Apr 6 2009, 11:56 AM
Post
#31
|
|
From Wreck to Rockin Group: Members Posts: 2,056 Joined: 3-December 07 From: Brevard, FL Member No.: 8,414 Region Association: South East States |
Mr. C: I was wondering about that too. If I needed to add some shim plates it would be easy, but I need to remove some metal. I need negative shims.... Andys: Makes you wonder if all those GT stiffening kits are doing to peoples rear wheel areas. They are not as big, but I bet some shrinkage is going on that is just not very noticeable. Maybe not enough to matter??? John |
|
|
|
| 6freak |
Apr 6 2009, 12:30 PM
Post
#32
|
|
MR.C Group: Members Posts: 4,740 Joined: 19-March 08 From: Tacoma WA Member No.: 8,829 Region Association: Pacific Northwest |
QUOTE(FourBlades @ Apr 6 2009, 10:56 AM) Mr. C: I was wondering about that too. If I needed to add some shim plates it would be easy, but I need to remove some metal. I need negative shims.... Andys: Makes you wonder if all those GT stiffening kits are doing to peoples rear wheel areas. They are not as big, but I bet some shrinkage is going on that is just not very noticeable. Maybe not enough to matter??? John I was think`n you could mill the hing on the P-side some and then shim as needed?the other side looks like you could just shim ....but then hows the glass and the top gonna fit ??.... |
|
|
|
| horizontally-opposed |
Apr 6 2009, 12:33 PM
Post
#33
|
|
Advanced Member Group: Members Posts: 3,456 Joined: 12-May 04 From: San Francisco Member No.: 2,058 Region Association: None |
QUOTE(FourBlades @ Apr 6 2009, 10:52 AM) How did your guy know where to jack up your car? I wonder if your car naturally stretches when on jack stands because of the weight overhanging the front and rear jack stand points? Maybe you need that stretch to counter act the shrinkage? Experimentation + years and years of working with metal. He welded it cold and was super mindful of the potential for problems others had experienced -- and still got shrinkage. Fortunately, he knew what he was doing and was able to fix the problem. Both doors fit up nicely and close perfectly. The final test will be the windows... pete |
|
|
|
| FourBlades |
Apr 6 2009, 02:56 PM
Post
#34
|
|
From Wreck to Rockin Group: Members Posts: 2,056 Joined: 3-December 07 From: Brevard, FL Member No.: 8,414 Region Association: South East States |
Slim line hinges may work....hmm.. Great, windows. Sheesh, I was not even thinking to worry about those... Maybe I will need some lexan windows to save weight... (IMG:style_emoticons/default/unsure.gif) Good thing it never rains here in FL. (IMG:style_emoticons/default/blink.gif) John |
|
|
|
| Wes V |
Apr 6 2009, 03:01 PM
Post
#35
|
|
Member Group: Members Posts: 482 Joined: 11-October 07 From: Los angeles Member No.: 8,211 |
I think something to think about would be to do one side at a time.
Put jack stands at the front and rear of the door opening. Put a floor jack at the front so it just barely supports the front weight. Put a floor jack at the rear so that it also barely supports the weight. Then lower it slightly. Remove the rubber seal on the door, close the door and measure the gaps. That way you could close the door while doing the welding to see how stuff is moving around. My guess is that while welding and the top of the long is hot, the rear of the car would sag downward and touch the floor jack you have there. Don't raise the jack!!!! As the long cools, the rear would raise again, off of the jack. The weight of the cantilevered rear section should limit how much the top of the long shrinks. What I'm getting at is that you should maybe "preload" the longitudinal. Adding a brace, although helpfull wouldn't preload the section (unless you screwed it outward real tight) and as a result, when you remove the brace, it would spring back and close the top gap. Think about this; when a frame shop is trying to get a frame straight, they pull (or push) it past the point where they want it to be. Of course, this is just me talking out the side of my mouth. I've yet to weld in an Engman. Wes |
|
|
|
| Wes V |
Apr 6 2009, 03:03 PM
Post
#36
|
|
Member Group: Members Posts: 482 Joined: 11-October 07 From: Los angeles Member No.: 8,211 |
QUOTE(horizontally-opposed @ Apr 6 2009, 11:33 AM) Fortunately, he knew what he was doing and was able to fix the problem. pete By doing what? Wes |
|
|
|
| burton73 |
Apr 6 2009, 03:20 PM
Post
#37
|
|
Senior member, and old dude Group: Members Posts: 3,867 Joined: 2-January 07 From: Los Angeles Member No.: 7,414 Region Association: Southern California |
John,
Your post was freaking me out all weekend. I had to come in to my shop and put the door on my factory 6 #41 to see if I had done what you had done. My car had perfect longs but we put in new floors pans and I also put in the Engleman Inner long kit. It it a great kit. I welded a short time and rested a long time and them went on to a different area and came back to an area near it in 1 hour. It took a couple of hours to weld one side but I had work to do in the shop. I fired up the welder 4 times for one side. This is for other people to know what not to do. “Andys: Makes you wonder if all those GT stiffening kits are doing to peoples Rear wheel areas. They are not as big, but I bet some shrinkage is going on That is just not very noticeable. Maybe not enough to matter???” I have found a lithe shrinking in the inner fender well near the batter box but it will not matter. Bob 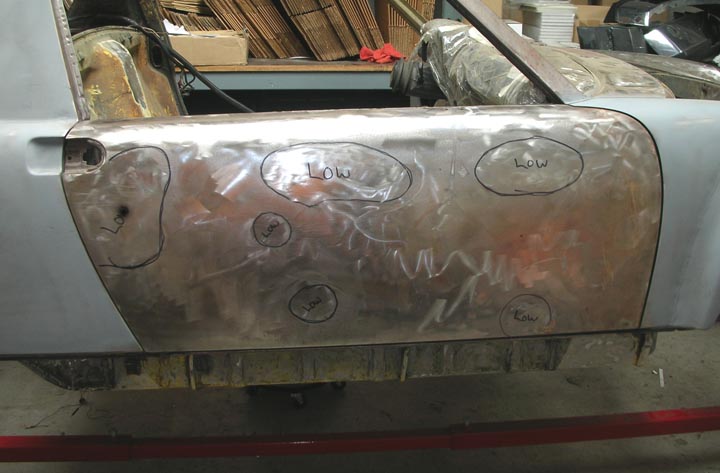 |
|
|
|
| horizontally-opposed |
Apr 6 2009, 03:39 PM
Post
#38
|
|
Advanced Member Group: Members Posts: 3,456 Joined: 12-May 04 From: San Francisco Member No.: 2,058 Region Association: None |
QUOTE(Wes V @ Apr 6 2009, 02:03 PM) QUOTE(horizontally-opposed @ Apr 6 2009, 11:33 AM) Fortunately, he knew what he was doing and was able to fix the problem. pete By doing what? Wes Basically, I think he heated up his previous welds as he applied pressure with a jack. IIRC, I think he did this OFF the lift...but it's been a long time since we did this. I'll try to go over to the shop this week and ask him about it! pete (edited!) |
|
|
|
| FourBlades |
Apr 6 2009, 05:58 PM
Post
#39
|
|
From Wreck to Rockin Group: Members Posts: 2,056 Joined: 3-December 07 From: Brevard, FL Member No.: 8,414 Region Association: South East States |
Bob: Your door gap looks pretty good. Sounds like you took your time. I think my big problem was being much too aggressive on the seam welding. Wes: I think you are on to something. I wonder if Pete's body guys did not do exactly what you are saying. Jack up the middle of the long so the weight of the front and rear of the car are trying to bend the ends of the car down. Then heat a little so it sags the right amount then let it cool. My car was pretty much a throw away, but I still want to make it as good as I can. I also want to follow the medical rule of "first, do no harm". I may need to think about it for a while before doing anything else to it. Many people have installed this kit without any problems, it would be interesting to see how many did it on a lift, on the car's wheels, how long they spent, did they seam weld at all. Don't mean to scare ya out there, I think this is pretty much my fault for going too fast and doing too much. John |
|
|
|
| r_towle |
Apr 6 2009, 06:33 PM
Post
#40
|
|
Custom Member Group: Members Posts: 24,705 Joined: 9-January 03 From: Taxachusetts Member No.: 124 Region Association: North East States |
So,
To use a hydraulic unit to spread the door, you need to make a perfectly matching cawl, scribed to the door jamb. The front cawl should apply pressure to the exact spot that the hinges are mounted. I have done this with the door mounted and the door stay removed. This allows you to open the door wide enough to apply the pressure, and once the pressure has been applied, you gently pull the rear fender. Then remove the jack and cawls and test the door. Rinse and repeat. On the side with a large door gap, if it was me, I would weld on some welding rod to the back of the door and grind that down and call it a day. This is a standard old school bodyman trick...both of them. Rich |
|
|
|
|
1 User(s) are reading this topic (1 Guests and 0 Anonymous Users)
0 Members:

|
Lo-Fi Version | Time is now: 31st July 2025 - 10:02 AM |
Invision Power Board
v9.1.4 © 2025 IPS, Inc.