|
|
|
Porsche, and the Porsche crest are registered trademarks of Dr. Ing. h.c. F. Porsche AG.
This site is not affiliated with Porsche in any way. Its only purpose is to provide an online forum for car enthusiasts. All other trademarks are property of their respective owners. |
|
|


| dlee6204 |
 Apr 30 2009, 05:52 PM Apr 30 2009, 05:52 PM
Post
#101
|
|
Howdy  Group: Members Posts: 2,162 Joined: 30-April 06 From: Burnsville, NC Member No.: 5,956 |
Its that time of year again so I'd thought I'd start a progress thread to help keep me motivated. I bought this car last summer as a nicer project car for me to work on and eventually be able to drive. My goal for this summer is to repair all the rust on the car and to get it running. I'll end up painting it down the road either the original Marathon Blue Metallic or Ravenna Green. I've been collecting parts all winter so hopefully I should be good to go. I've done a little work on it already but I'll bring everyone up to date. Feel free to comment, ask questions, make suggestions, tell me what I'm doing wrong or anything else for that matter. Enjoy!
Here is the car when I first picked it up. The car came fully optioned and even came with SS heat exchangers and a running two liter engine. The car was wrecked at some point and had a crappy repair done to it but I am still trying to figure out what happened. Both the driver's front corner and the driver's rear corner had damage but the door and rear quarter seem fine. I will find out more once I start stripping some paint and bondo. (IMG:style_emoticons/default/dry.gif) 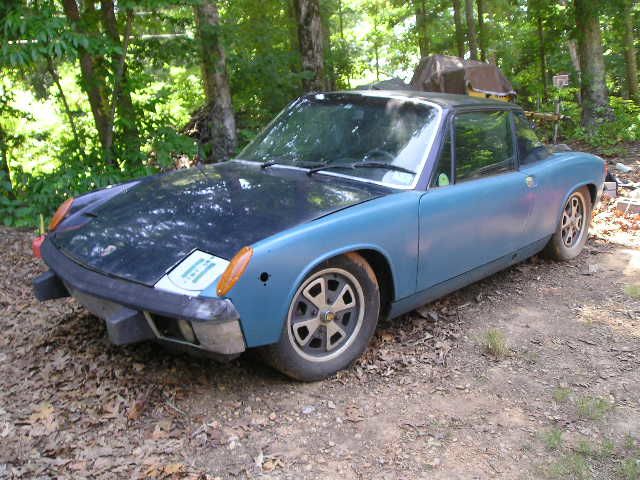 The interior was about a 4 on a 10 scale however the dash is crack free! (IMG:style_emoticons/default/piratenanner.gif) 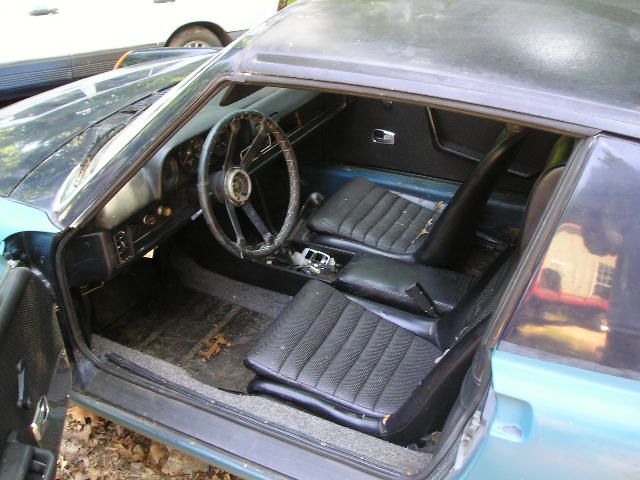 The rear floor pan is shot and I knew that before I bought the car. The previous owner patched the floor at some point and installed three new seat brackets over the bad metal. (IMG:style_emoticons/default/dry.gif) I ordered a new floor pan and a fourth seat bracket from AA today. 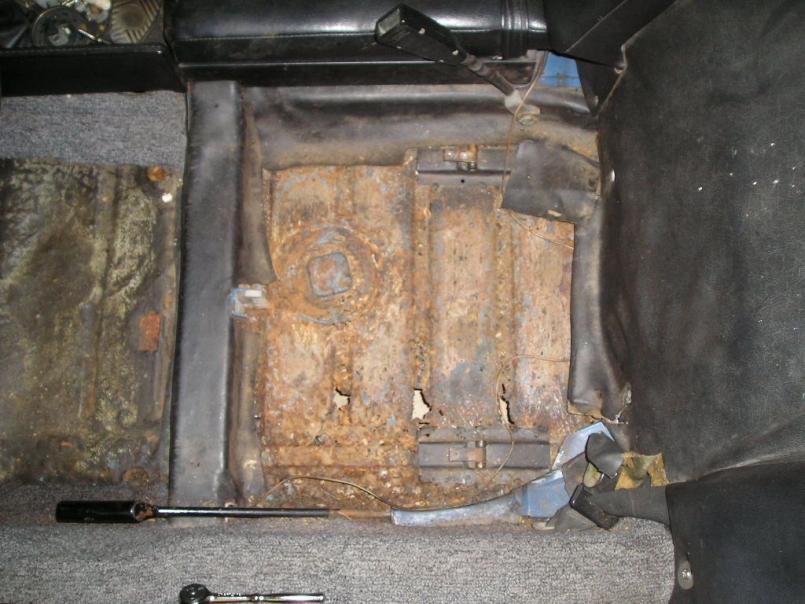 |
   |

 
|
Posts in this topic
 dlee6204 73 2.0L Progress Thread Apr 30 2009, 05:52 PM
 dlee6204 I couldn't help myself but see what it would l... Apr 30 2009, 05:57 PM dlee6204 The first thing I started working on was the horri... Apr 30 2009, 06:08 PM dlee6204 Here is a picture from the front
A little bit of... Apr 30 2009, 06:16 PM dlee6204 I did some trimming and here is the replacement pi... Apr 30 2009, 06:25 PM dlee6204
Now I just need to get a replacement fender f... Apr 30 2009, 06:35 PM dlee6204 So on Monday I drove back from college in Michigan... Apr 30 2009, 07:04 PM dlee6204 My next step was to strip the interior and work on... Apr 30 2009, 07:13 PM dlee6204 Tonight I went ahead and started trimming some bef... Apr 30 2009, 07:21 PM dlee6204 And the last one for the night. I took the heat e... Apr 30 2009, 07:25 PM my928s4 You got your work cut out there! Looking good ... Apr 30 2009, 08:14 PM dlee6204 I was able to get some more work done. This last ... May 12 2009, 09:58 PM dlee6204 And finally the big piece was tacked in today. It ... May 12 2009, 10:06 PM dlee6204 Oh and I also worked on our 62 Bug. I had to repl... May 12 2009, 10:13 PM jcambo7 Looking great... :popcorn: May 13 2009, 10:39 AM dlee6204 I got some more work done this past week. I am do... May 27 2009, 04:27 PM dlee6204 I also bought a portion of the front fender from a... May 27 2009, 04:36 PM dlee6204 Well I got a lot done today. I had a friend come ... Jun 1 2009, 08:36 PM dlee6204 So here is what the driver's side jackpoint lo... Jun 8 2009, 11:01 AM dlee6204 And now on to the other side. I bought a lower wh... Jun 8 2009, 11:18 PM dlee6204 Here are a few pictures of some of the work I got ... Jun 11 2009, 08:28 PM dlee6204 So today I got a lot done. I started off wanting ... Jun 13 2009, 05:52 PM dlee6204 My next job was to work on installing the wheelhou... Jun 13 2009, 06:01 PM dlee6204 :welder: Well I got it welded in. The car no lon... Jun 14 2009, 09:54 PM type11969 Doug-
Your updates are an inspiration for me... Jun 14 2009, 10:04 PM jc914 NICE JOB keep us posted :trophy: :worship: :p... Jun 16 2009, 07:37 PM dlee6204 Well I have been pretty busy the past week or two ... Jun 28 2009, 05:29 PM dlee6204 And then the driver's side had some rust but l... Jun 28 2009, 05:34 PM dlee6204 Well I was trimming for the floor and I found some... Jun 30 2009, 09:15 PM Cupomeat Wow, great job, and you handle all this with such ... Jun 30 2009, 10:36 PM dlee6204 Thanks for commenting! It keeps me motivated... Jul 1 2009, 09:46 PM FourBlades Doug,
You are moving along really well, fast work... Jul 2 2009, 07:33 PM dlee6204 Thanks John! :beer2:
I did a little more to... Jul 2 2009, 09:44 PM dlee6204 Well I made some big progress this weekend. I fir... Jul 6 2009, 09:39 PM
dlee6204 I couldn't help myself but see what it would l... Apr 30 2009, 05:57 PM dlee6204 The first thing I started working on was the horri... Apr 30 2009, 06:08 PM dlee6204 Here is a picture from the front
A little bit of... Apr 30 2009, 06:16 PM dlee6204 I did some trimming and here is the replacement pi... Apr 30 2009, 06:25 PM dlee6204
Now I just need to get a replacement fender f... Apr 30 2009, 06:35 PM dlee6204 So on Monday I drove back from college in Michigan... Apr 30 2009, 07:04 PM dlee6204 My next step was to strip the interior and work on... Apr 30 2009, 07:13 PM dlee6204 Tonight I went ahead and started trimming some bef... Apr 30 2009, 07:21 PM dlee6204 And the last one for the night. I took the heat e... Apr 30 2009, 07:25 PM my928s4 You got your work cut out there! Looking good ... Apr 30 2009, 08:14 PM dlee6204 I was able to get some more work done. This last ... May 12 2009, 09:58 PM dlee6204 And finally the big piece was tacked in today. It ... May 12 2009, 10:06 PM dlee6204 Oh and I also worked on our 62 Bug. I had to repl... May 12 2009, 10:13 PM jcambo7 Looking great... :popcorn: May 13 2009, 10:39 AM dlee6204 I got some more work done this past week. I am do... May 27 2009, 04:27 PM dlee6204 I also bought a portion of the front fender from a... May 27 2009, 04:36 PM dlee6204 Well I got a lot done today. I had a friend come ... Jun 1 2009, 08:36 PM dlee6204 So here is what the driver's side jackpoint lo... Jun 8 2009, 11:01 AM dlee6204 And now on to the other side. I bought a lower wh... Jun 8 2009, 11:18 PM dlee6204 Here are a few pictures of some of the work I got ... Jun 11 2009, 08:28 PM dlee6204 So today I got a lot done. I started off wanting ... Jun 13 2009, 05:52 PM dlee6204 My next job was to work on installing the wheelhou... Jun 13 2009, 06:01 PM dlee6204 :welder: Well I got it welded in. The car no lon... Jun 14 2009, 09:54 PM type11969 Doug-
Your updates are an inspiration for me... Jun 14 2009, 10:04 PM jc914 NICE JOB keep us posted :trophy: :worship: :p... Jun 16 2009, 07:37 PM dlee6204 Well I have been pretty busy the past week or two ... Jun 28 2009, 05:29 PM dlee6204 And then the driver's side had some rust but l... Jun 28 2009, 05:34 PM dlee6204 Well I was trimming for the floor and I found some... Jun 30 2009, 09:15 PM Cupomeat Wow, great job, and you handle all this with such ... Jun 30 2009, 10:36 PM dlee6204 Thanks for commenting! It keeps me motivated... Jul 1 2009, 09:46 PM FourBlades Doug,
You are moving along really well, fast work... Jul 2 2009, 07:33 PM dlee6204 Thanks John! :beer2:
I did a little more to... Jul 2 2009, 09:44 PM dlee6204 Well I made some big progress this weekend. I fir... Jul 6 2009, 09:39 PM
 saigon71
Well I made some big progress this weekend. I fi... Jul 7 2009, 06:28 AM saigon71 Looks good Doug - great work! I will be teari... Jul 7 2009, 06:30 AM dlee6204 I got some more work done. :D I received a box ... Jul 14 2009, 09:30 PM dlee6204 Wow so its been a while since I have last updated ... Aug 10 2009, 09:38 PM dlee6204 And here is what the engine looks like now. As yo... Aug 10 2009, 09:45 PM dlee6204 One more of the engine.
Aug 10 2009, 09:47 PM RoadGlue Your progress thread makes my progress thread look... Aug 11 2009, 10:09 AM dlee6204 I finally got the motor all done. I ended up buy... Aug 18 2009, 01:14 PM trojanhorsepower Hi Doug,
Great to hear of another Teener in NC... Aug 18 2009, 05:47 PM dlee6204 Wow. I am pretty bad at updating this. I've ... Sep 4 2009, 10:50 PM dlee6204 Here are some more pictures of the rust in the whe... Sep 5 2009, 11:59 AM dlee6204 From the inside...
I also welded a new hinge fo... Sep 5 2009, 12:05 PM dlee6204 This afternoon I cleaned up and installed the rear... Sep 6 2009, 12:22 AM dlee6204 I also coated the pedal area and the rest of the f... Sep 6 2009, 12:23 AM dlee6204 Well I got a lot of work done over the long weeken... Sep 8 2009, 03:53 PM dlee6204 I also welded in a new engine lid pull tube from a... Sep 8 2009, 04:02 PM dlee6204 I just found a picture that I took of the old brak... Sep 8 2009, 04:07 PM dlee6204 Oh and the fun doesn't stop there! I went... Sep 8 2009, 04:32 PM dlee6204 Here are a few more shots of the engine. You can s... Sep 8 2009, 04:40 PM dlee6204 Here is a shot of the car on the ground again... Sep 8 2009, 04:52 PM dlee6204 That's all for now. The things left on my to-... Sep 8 2009, 05:14 PM trojanhorsepower Man, your smoke'n.
That all looks great. I t... Sep 9 2009, 12:17 PM bigkensteele Doug, I am trying to figure out if you don't s... Sep 9 2009, 10:46 PM dlee6204
Doug, I am trying to figure out if you don't ... Sep 13 2009, 07:51 PM dlee6204 So it was another productive weekend. I started o... Sep 13 2009, 07:58 PM dlee6204 After I finished with the rust, I worked on the ga... Sep 13 2009, 08:03 PM dlee6204 I finished up the engine and with the gas tank ins... Sep 13 2009, 08:17 PM dlee6204 This weekend I also bled the brakes, installed the... Sep 13 2009, 08:22 PM dlee6204 Here is another shot of the interior.
This eveni... Sep 13 2009, 08:31 PM dlee6204 So this past weekend I slacked off but I still got... Sep 23 2009, 07:40 PM dlee6204 I also installed the door mirror and the under-das... Sep 23 2009, 07:51 PM dlee6204 Well this past weekend was a complete whirlwind. ... Oct 5 2009, 03:39 PM Gint Grats! :trophy:
There is an alternative solu... Oct 6 2009, 07:57 AM dlee6204
I thought about that but all the spares I have ... Oct 6 2009, 08:42 AM FourBlades Great work getting your car on the road!!... Oct 6 2009, 11:25 AM dlee6204
Thank John. That's my thinking exactly. I... Oct 6 2009, 08:22 PM dlee6204 Speaking of not ruining the paint, I forgot to men... Oct 6 2009, 08:33 PM dlee6204 Here are some picture from when I replaced the whe... Oct 15 2009, 08:48 AM dlee6204 When I removed the hub from the bearing, the inner... Oct 15 2009, 08:54 AM dlee6204 And finally, I installed the hub using some thread... Oct 15 2009, 09:01 AM kconway Make sure you ground strap from the tranny to chas... Oct 15 2009, 09:08 AM dlee6204 UPDATE: I've driven the car over 1400 miles s... Nov 30 2009, 11:32 PM dlee6204 Another shot. The metal finish areas are a bit di... Nov 30 2009, 11:37 PM dlee6204 I also started rebuilding a set of axles that I ha... Nov 30 2009, 11:41 PM dlee6204 It started to get chilly here at night so I added ... Dec 1 2009, 12:12 AM Phoenix914 I have really enjoyed reading this thread. You ma... Dec 3 2009, 12:14 PM dlee6204
Thanks Bryan! The radio I used was just a s... Dec 3 2009, 05:00 PM dlee6204 So I did something SAWEET to my car last night. I... Dec 5 2009, 08:13 AM dlee6204 Finished up the second driveshaft...
Oh my...
C... Dec 5 2009, 12:54 PM hi4head Way to go Doug!!
Thing look great and you... Dec 5 2009, 02:08 PM sendjonathanmail It's coming along great Doug. Please keep the ... Dec 5 2009, 09:39 PM dlee6204 I finished the rest of the wheels today. Here... Dec 6 2009, 10:21 PM dlee6204 Finished product
Dec 6 2009, 10:25 PM dlee6204 Now I just need to get the tires mounted.
Tha... Dec 6 2009, 10:26 PM dlee6204 I started restoring a set of good taillights I had... Dec 10 2009, 01:41 PM dlee6204 And sometimes its the small things that bring sati... Dec 10 2009, 01:44 PM dlee6204 I did some work in the rear trunk. At some point ... Dec 10 2009, 01:48 PM dlee6204 And I did a little "upgrade" to the rear... Dec 10 2009, 01:56 PM Gint Those Fuchs look great! And you maintained so... Dec 10 2009, 04:45 PM dlee6204
Those Fuchs look great! And you maintained s... Dec 10 2009, 06:23 PM Cevan Those wheels came out great! Nice work. :be... Dec 10 2009, 06:56 PM dlee6204 Well today I painted some of the heat ducting for ... Dec 11 2009, 09:58 PM dlee6204 Currently the fresh air fan doesn't work so I ... Dec 11 2009, 10:10 PM dlee6204 Here is the fan assembly ready to be installed in ... Dec 11 2009, 10:14 PM dlee6204 So I put the 914 on jack stands this weekend to ge... Dec 13 2009, 10:24 PM dlee6204 Hopefully you guys don't think thats ALL I did... Dec 13 2009, 10:29 PM
saigon71
Well I made some big progress this weekend. I fi... Jul 7 2009, 06:28 AM saigon71 Looks good Doug - great work! I will be teari... Jul 7 2009, 06:30 AM dlee6204 I got some more work done. :D I received a box ... Jul 14 2009, 09:30 PM dlee6204 Wow so its been a while since I have last updated ... Aug 10 2009, 09:38 PM dlee6204 And here is what the engine looks like now. As yo... Aug 10 2009, 09:45 PM dlee6204 One more of the engine.
Aug 10 2009, 09:47 PM RoadGlue Your progress thread makes my progress thread look... Aug 11 2009, 10:09 AM dlee6204 I finally got the motor all done. I ended up buy... Aug 18 2009, 01:14 PM trojanhorsepower Hi Doug,
Great to hear of another Teener in NC... Aug 18 2009, 05:47 PM dlee6204 Wow. I am pretty bad at updating this. I've ... Sep 4 2009, 10:50 PM dlee6204 Here are some more pictures of the rust in the whe... Sep 5 2009, 11:59 AM dlee6204 From the inside...
I also welded a new hinge fo... Sep 5 2009, 12:05 PM dlee6204 This afternoon I cleaned up and installed the rear... Sep 6 2009, 12:22 AM dlee6204 I also coated the pedal area and the rest of the f... Sep 6 2009, 12:23 AM dlee6204 Well I got a lot of work done over the long weeken... Sep 8 2009, 03:53 PM dlee6204 I also welded in a new engine lid pull tube from a... Sep 8 2009, 04:02 PM dlee6204 I just found a picture that I took of the old brak... Sep 8 2009, 04:07 PM dlee6204 Oh and the fun doesn't stop there! I went... Sep 8 2009, 04:32 PM dlee6204 Here are a few more shots of the engine. You can s... Sep 8 2009, 04:40 PM dlee6204 Here is a shot of the car on the ground again... Sep 8 2009, 04:52 PM dlee6204 That's all for now. The things left on my to-... Sep 8 2009, 05:14 PM trojanhorsepower Man, your smoke'n.
That all looks great. I t... Sep 9 2009, 12:17 PM bigkensteele Doug, I am trying to figure out if you don't s... Sep 9 2009, 10:46 PM dlee6204
Doug, I am trying to figure out if you don't ... Sep 13 2009, 07:51 PM dlee6204 So it was another productive weekend. I started o... Sep 13 2009, 07:58 PM dlee6204 After I finished with the rust, I worked on the ga... Sep 13 2009, 08:03 PM dlee6204 I finished up the engine and with the gas tank ins... Sep 13 2009, 08:17 PM dlee6204 This weekend I also bled the brakes, installed the... Sep 13 2009, 08:22 PM dlee6204 Here is another shot of the interior.
This eveni... Sep 13 2009, 08:31 PM dlee6204 So this past weekend I slacked off but I still got... Sep 23 2009, 07:40 PM dlee6204 I also installed the door mirror and the under-das... Sep 23 2009, 07:51 PM dlee6204 Well this past weekend was a complete whirlwind. ... Oct 5 2009, 03:39 PM Gint Grats! :trophy:
There is an alternative solu... Oct 6 2009, 07:57 AM dlee6204
I thought about that but all the spares I have ... Oct 6 2009, 08:42 AM FourBlades Great work getting your car on the road!!... Oct 6 2009, 11:25 AM dlee6204
Thank John. That's my thinking exactly. I... Oct 6 2009, 08:22 PM dlee6204 Speaking of not ruining the paint, I forgot to men... Oct 6 2009, 08:33 PM dlee6204 Here are some picture from when I replaced the whe... Oct 15 2009, 08:48 AM dlee6204 When I removed the hub from the bearing, the inner... Oct 15 2009, 08:54 AM dlee6204 And finally, I installed the hub using some thread... Oct 15 2009, 09:01 AM kconway Make sure you ground strap from the tranny to chas... Oct 15 2009, 09:08 AM dlee6204 UPDATE: I've driven the car over 1400 miles s... Nov 30 2009, 11:32 PM dlee6204 Another shot. The metal finish areas are a bit di... Nov 30 2009, 11:37 PM dlee6204 I also started rebuilding a set of axles that I ha... Nov 30 2009, 11:41 PM dlee6204 It started to get chilly here at night so I added ... Dec 1 2009, 12:12 AM Phoenix914 I have really enjoyed reading this thread. You ma... Dec 3 2009, 12:14 PM dlee6204
Thanks Bryan! The radio I used was just a s... Dec 3 2009, 05:00 PM dlee6204 So I did something SAWEET to my car last night. I... Dec 5 2009, 08:13 AM dlee6204 Finished up the second driveshaft...
Oh my...
C... Dec 5 2009, 12:54 PM hi4head Way to go Doug!!
Thing look great and you... Dec 5 2009, 02:08 PM sendjonathanmail It's coming along great Doug. Please keep the ... Dec 5 2009, 09:39 PM dlee6204 I finished the rest of the wheels today. Here... Dec 6 2009, 10:21 PM dlee6204 Finished product
Dec 6 2009, 10:25 PM dlee6204 Now I just need to get the tires mounted.
Tha... Dec 6 2009, 10:26 PM dlee6204 I started restoring a set of good taillights I had... Dec 10 2009, 01:41 PM dlee6204 And sometimes its the small things that bring sati... Dec 10 2009, 01:44 PM dlee6204 I did some work in the rear trunk. At some point ... Dec 10 2009, 01:48 PM dlee6204 And I did a little "upgrade" to the rear... Dec 10 2009, 01:56 PM Gint Those Fuchs look great! And you maintained so... Dec 10 2009, 04:45 PM dlee6204
Those Fuchs look great! And you maintained s... Dec 10 2009, 06:23 PM Cevan Those wheels came out great! Nice work. :be... Dec 10 2009, 06:56 PM dlee6204 Well today I painted some of the heat ducting for ... Dec 11 2009, 09:58 PM dlee6204 Currently the fresh air fan doesn't work so I ... Dec 11 2009, 10:10 PM dlee6204 Here is the fan assembly ready to be installed in ... Dec 11 2009, 10:14 PM dlee6204 So I put the 914 on jack stands this weekend to ge... Dec 13 2009, 10:24 PM dlee6204 Hopefully you guys don't think thats ALL I did... Dec 13 2009, 10:29 PM  |
1 User(s) are reading this topic (1 Guests and 0 Anonymous Users)
0 Members:

|
Lo-Fi Version | Time is now: 28th May 2026 - 09:32 AM |
Invision Power Board
v9.1.4 © 2026 IPS, Inc.