|
|
|
Porsche, and the Porsche crest are registered trademarks of Dr. Ing. h.c. F. Porsche AG.
This site is not affiliated with Porsche in any way. Its only purpose is to provide an online forum for car enthusiasts. All other trademarks are property of their respective owners. |
|
|

  |

| Randal |
 May 6 2009, 02:42 PM May 6 2009, 02:42 PM
Post
#1
|
|
Advanced Member  Group: Members Posts: 4,446 Joined: 29-May 03 From: Los Altos, CA Member No.: 750 |
If you're going to get a rattle can for any paint work, try the new Krylon one with the blue tip. I asked the TS guys at Krylon and they said all cans should now have this tip - as they've been manufacturing nothing else since January.
Anyway, IT PAINTS GREAT! Much bigger pattern, so you don't have to keep going over and over again and setting yourself up for runs. You can also adjust this tip to change your pattern. Haven't tried that yet, but will shortly. http://www.krylon.com/press/press-releases...h-360/index.jsp I've always liked Krylon as it holds up. Also like Rustoleum, but that stuff is, IMHO, very hard to paint, especially on wheels. |
   |

 
|
| byndbad914 |
May 6 2009, 02:45 PM
Post
#2
|
|
shoehorn and some butter - it fits Group: Members Posts: 1,547 Joined: 23-January 06 From: Broomfield, CO Member No.: 5,463 Region Association: None |
QUOTE(Randal @ May 6 2009, 12:42 PM)  If you're going to get a rattle can for any paint work, try the new Krylon one with the blue tip. I asked the TS guys at Krylon and they said all cans should now have this tip - as they've been manufacturing nothing else since January. My whole car was painted with Krylon with the adjustable tips - and they are way nicer to use. also easier on the finger to trigger. |
|
|
|
| Randal |
May 6 2009, 02:47 PM
Post
#3
|
|
Advanced Member Group: Members Posts: 4,446 Joined: 29-May 03 From: Los Altos, CA Member No.: 750 |
QUOTE(byndbad914 @ May 6 2009, 01:45 PM) QUOTE(Randal @ May 6 2009, 12:42 PM) If you're going to get a rattle can for any paint work, try the new Krylon one with the blue tip. I asked the TS guys at Krylon and they said all cans should now have this tip - as they've been manufacturing nothing else since January. My whole car was painted with Krylon with the adjustable tips - and they are way nicer to use. also easier on the finger to trigger. THE WHOLE CAR?? WOW. Did you rub it out afterwards? |
|
|
|
| J P Stein |
May 6 2009, 07:55 PM
Post
#4
|
|
Irrelevant old fart Group: Members Posts: 8,797 Joined: 30-December 02 From: Vancouver, WA Member No.: 45 Region Association: None |
You'll be sorry if you want to use a real automotive paint over that crap. It will lift....BTDT but never again.
|
|
|
|
| byndbad914 |
May 7 2009, 11:11 AM
Post
#5
|
|
shoehorn and some butter - it fits Group: Members Posts: 1,547 Joined: 23-January 06 From: Broomfield, CO Member No.: 5,463 Region Association: None |
yeah, I more or less buffed it out - I am no auto body guy in any way, shape or form and frankly had never buffed anything out before this car, but since it is a racer that gets chipped like crazy I figured not a big deal to just go for it and touch ups are easy. I borrowed my buddy's $20 Harbor Freight buffer, bought some rubbing compound and went to town - in the end I think it turned out really well.
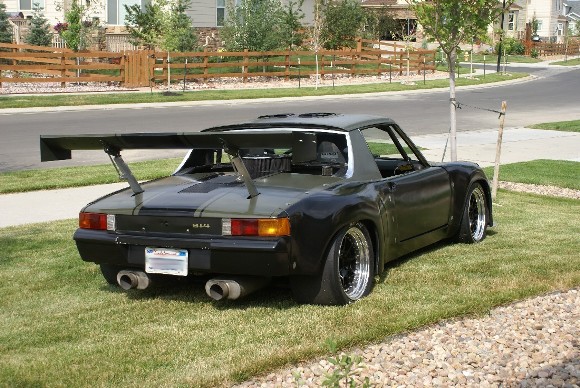 I had just put the lightened early doors on so they weren't fully buffed yet in these shots (still aren't, been lazy (IMG:style_emoticons/default/laugh.gif)) and if you look close enough you can see where I took some of the green off over-buffing (IMG:style_emoticons/default/laugh.gif) There is about 9 coats on this car. I laid three down, did a sand with 800 IIRC, laid down three more, sanded with 1K grit, then two or three more, let it dry, then wet sanded a bit with 2K grit and buffed away with rubbing compound, then laid down a coat of wax. Total cost was around $150 not including rubbing stuff, just rattle cans (about 30 of 'em at $5 each IIRC). Buffing the semi-flat black and the ultra flat green created a cool sheen I was going for - it worked out even better than I had thought it would as I have a sheen but no glare off the hood when tracking the car. JP is totally right about not painting over it later - it needs to come completely off to do that. I intend to only race it so I will be Krylon for life. If and when the day comes I sell it, the car would need to be taken down and straightened out anyway if that person were so inclined. I, frankly, didn't make it ONE day before the paint was chipped up on the track here in CO so seems foolish to put a nice job on it. 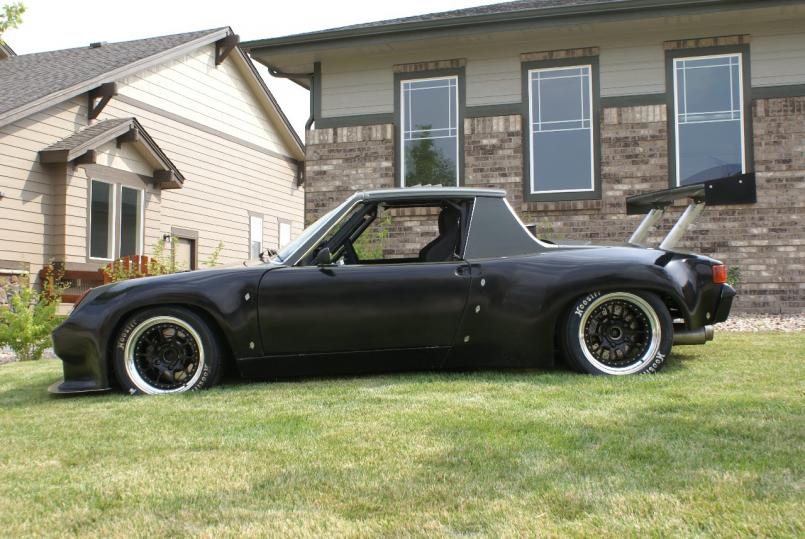 |
|
|
|
| byndbad914 |
May 7 2009, 11:16 AM
Post
#6
|
|
shoehorn and some butter - it fits Group: Members Posts: 1,547 Joined: 23-January 06 From: Broomfield, CO Member No.: 5,463 Region Association: None |
the hood - just used the green tape at the FLAPS where I got the paint cans to make the lines. Easy, cheezy to do if you want to add a racing stripe and the lines are REALLY good with the green stuff (not the blue painters tape - it doesn't stick to the car well at all and I ended up using it only to hold paper over areas I didn't want painted).
 as you can see, I wasted no time on dings and dents for a race car (IMG:style_emoticons/default/lol-2.gif) |
|
|
|
| byndbad914 |
May 7 2009, 11:20 AM
Post
#7
|
|
shoehorn and some butter - it fits Group: Members Posts: 1,547 Joined: 23-January 06 From: Broomfield, CO Member No.: 5,463 Region Association: None |
oh yeah, Randal, spaced until now you guys have a Sheridan kit on The Beast - if you wanted to two-tone it check out my lines and see if you like 'em. I spent a couple days laying tape and looking at how to cut the car in top/bottom sections and once I saw this I thought it was the best.
I also thought about going semi-flat white with a second color but have always been a fan of the black/green combos. White would be easier to maintain on the Sheridan body since it chips off... white! ... and it wouldn't show (IMG:style_emoticons/default/smile.gif) |
|
|
|
| Randal |
May 7 2009, 11:22 AM
Post
#8
|
|
Advanced Member Group: Members Posts: 4,446 Joined: 29-May 03 From: Los Altos, CA Member No.: 750 |
QUOTE(byndbad914 @ May 7 2009, 10:11 AM) yeah, I more or less buffed it out - I am no auto body guy in any way, shape or form and frankly had never buffed anything out before this car, but since it is a racer that gets chipped like crazy I figured not a big deal to just go for it and touch ups are easy. I borrowed my buddy's $20 Harbor Freight buffer, bought some rubbing compound and went to town - in the end I think it turned out really well. I had just put the lightened early doors on so they weren't fully buffed yet in these shots (still aren't, been lazy (IMG:style_emoticons/default/laugh.gif)) and if you look close enough you can see where I took some of the green off over-buffing (IMG:style_emoticons/default/laugh.gif) There is about 9 coats on this car. I laid three down, did a sand with 800 IIRC, laid down three more, sanded with 1K grit, then two or three more, let it dry, then wet sanded a bit with 2K grit and buffed away with rubbing compound, then laid down a coat of wax. Total cost was around $150 not including rubbing stuff, just rattle cans (about 30 of 'em at $5 each IIRC). Buffing the semi-flat black and the ultra flat green created a cool sheen I was going for - it worked out even better than I had thought it would as I have a sheen but no glare off the hood when tracking the car. JP is totally right about not painting over it later - it needs to come completely off to do that. I intend to only race it so I will be Krylon for life. If and when the day comes I sell it, the car would need to be taken down and straightened out anyway if that person were so inclined. I, frankly, didn't make it ONE day before the paint was chipped up on the track here in CO so seems foolish to put a nice job on it. That car looks really great. Did you paint the fenders off the car or all together? BTW who's fenders are those? |
|
|
|
| Randal |
May 7 2009, 11:25 AM
Post
#9
|
|
Advanced Member Group: Members Posts: 4,446 Joined: 29-May 03 From: Los Altos, CA Member No.: 750 |
QUOTE(byndbad914 @ May 7 2009, 10:20 AM) oh yeah, Randal, spaced until now you guys have a Sheridan kit on The Beast - if you wanted to two-tone it check out my lines and see if you like 'em. I spent a couple days laying tape and looking at how to cut the car in top/bottom sections and once I saw this I thought it was the best. I also thought about going semi-flat white with a second color but have always been a fan of the black/green combos. White would be easier to maintain on the Sheridan body since it chips off... white! ... and it wouldn't show (IMG:style_emoticons/default/smile.gif) I like your two tone job. Something like that would look good on The Beast. Scott Yeaman would probably shoot me if I tried it myself after all the work he did on that body!!! |
|
|
|
| byndbad914 |
May 7 2009, 11:28 AM
Post
#10
|
|
shoehorn and some butter - it fits Group: Members Posts: 1,547 Joined: 23-January 06 From: Broomfield, CO Member No.: 5,463 Region Association: None |
we were typing at the same time it looks so see my response above yours - same body kit as your Beast.
I painted the base coats with the parts off in the basement over the winter. The green I did with everything on the car at one time to get the lines straight. edit - yeah, I remembered after my post above you guys did a really nice job on that car! Just consider it a solid base coat then (IMG:style_emoticons/default/laugh.gif) |
|
|
|
| 6freak |
May 7 2009, 12:45 PM
Post
#11
|
|
MR.C Group: Members Posts: 4,740 Joined: 19-March 08 From: Tacoma WA Member No.: 8,829 Region Association: Pacific Northwest |
...Thats awsome ....cool hotrod
|
|
|
|
| byndbad914 |
May 7 2009, 01:54 PM
Post
#12
|
|
shoehorn and some butter - it fits Group: Members Posts: 1,547 Joined: 23-January 06 From: Broomfield, CO Member No.: 5,463 Region Association: None |
thanks!
Randal - here is a shot a few months before I painted the two tone after adding the hood louvers, notice the white chips all over the rear fenders from the front slicks chucking rocks back. All I did was throw a quick 1K grit sand on the area to remove the wax and so forth/rough the surface and then shot three light coats, let it dry and buff again. You can't even tell where it was touched up (IMG:style_emoticons/default/smile.gif) you can also see I just put the doors on before buffing - freshly painted - to get the idea of the diff polishing out makes on the satin colors 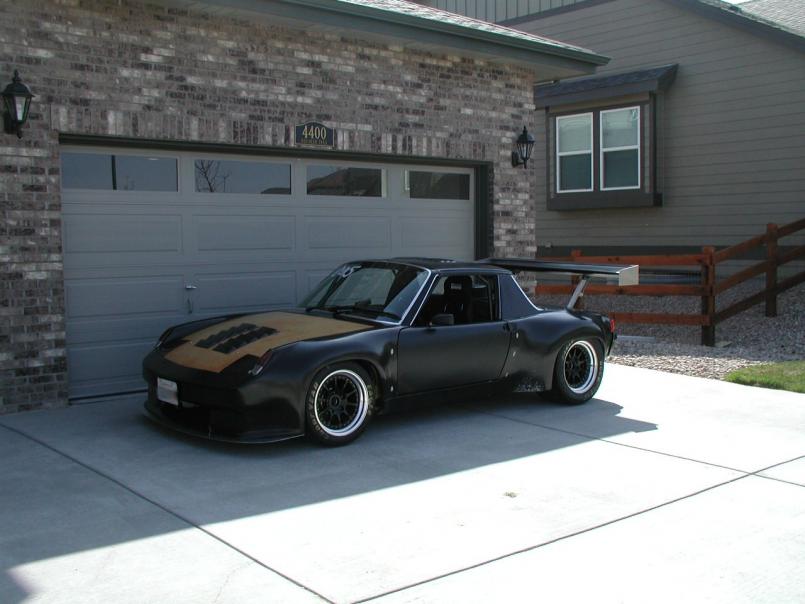 |
|
|
|
| Randal |
May 7 2009, 02:14 PM
Post
#13
|
|
Advanced Member Group: Members Posts: 4,446 Joined: 29-May 03 From: Los Altos, CA Member No.: 750 |
QUOTE(byndbad914 @ May 7 2009, 10:16 AM) the hood - just used the green tape at the FLAPS where I got the paint cans to make the lines. Easy, cheezy to do if you want to add a racing stripe and the lines are REALLY good with the green stuff (not the blue painters tape - it doesn't stick to the car well at all and I ended up using it only to hold paper over areas I didn't want painted). as you can see, I wasted no time on dings and dents for a race car (IMG:style_emoticons/default/lol-2.gif) Love the louvers. That is what I need on 222, pointing the other direction on the light weight aluminum engine hood I'm building, (replacing the total screen GT lid). I couldn't find any big ones like that on the internet. Lots of hot rod louver panels, but nada panels like yours. Did you make those? Beautiful. |
|
|
|
| byndbad914 |
May 7 2009, 02:27 PM
Post
#14
|
|
shoehorn and some butter - it fits Group: Members Posts: 1,547 Joined: 23-January 06 From: Broomfield, CO Member No.: 5,463 Region Association: None |
QUOTE(Randal @ May 7 2009, 12:14 PM) Love the louvers. That is what I need on 222, pointing the other direction on the light weight aluminum engine hood I'm building, (replacing the total screen GT lid). I couldn't find any big ones like that on the internet. Lots of hot rod louver panels, but nada panels like yours. Did you make those? Beautiful. Took me forever to find some nice large louvers online... lemme get you a link. They weren't cheap because I could only get 'em in CF (and NOT a finished piece BTW, they needed paint to look decent). Genesis is the maker but I bought them from elsewhere, not Genesis direct, as I found a place that sold them cheaper than going direct. Lemme look around online a bit and I will come back and edit in a link. Look for Genesis louvers tho' - the roof louvers are also theirs. I think it was HPR where I got 'em - BRB. edit - yep, little dyslexic in my memory, HRP tho' is where I got 'em. A quick Google shows a fair amount of suppliers now and they all seem to be right at $135 each. Again, I am no body guy and have never laid up glass or CF so I am sure they could be made much cheaper, but frankly my time is more valuable than what it would take to lay a pair up. I would rather just go to work for a few hours and call it even hahahaha. Oh yeah, I have bought from HRP a couple times now and they have been really good about having what they say and getting is shipped right out, so I recommend them. But always check price, they are not always the cheapest. In the couple cases I have bought from them they have been same price as elsewhere but I have seen some expensive stuff from them found elsewhere cheaper. http://www.hrpworld.com/index.cfm?form_pro...;action=product |
|
|
|
| byndbad914 |
May 7 2009, 02:36 PM
Post
#15
|
|
shoehorn and some butter - it fits Group: Members Posts: 1,547 Joined: 23-January 06 From: Broomfield, CO Member No.: 5,463 Region Association: None |
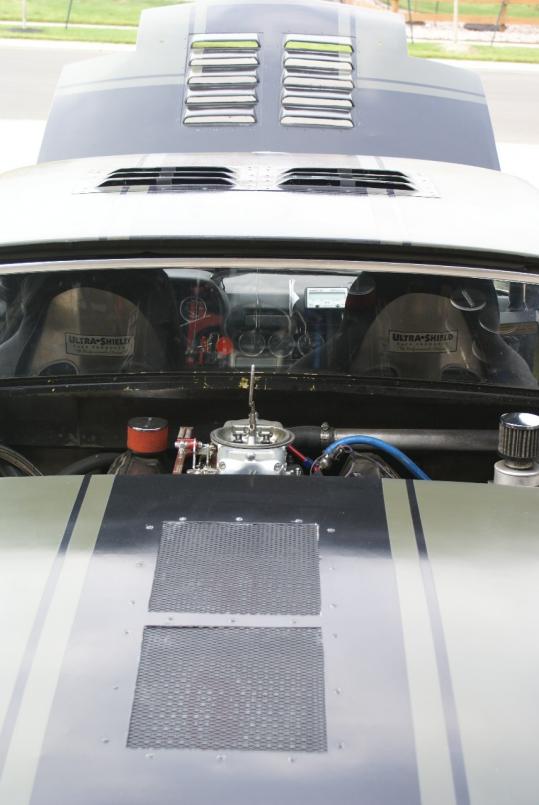
my roof louvers - might be easier to fit on an engine decklid! not a great pic to get a good idea of them, but the best I have on the computer here right now to get you an idea...
 |
|
|
|
| Randal |
May 7 2009, 02:38 PM
Post
#16
|
|
Advanced Member Group: Members Posts: 4,446 Joined: 29-May 03 From: Los Altos, CA Member No.: 750 |
QUOTE(byndbad914 @ May 7 2009, 01:27 PM) QUOTE(Randal @ May 7 2009, 12:14 PM) Love the louvers. That is what I need on 222, pointing the other direction on the light weight aluminum engine hood I'm building, (replacing the total screen GT lid). I couldn't find any big ones like that on the internet. Lots of hot rod louver panels, but nada panels like yours. Did you make those? Beautiful. Took me forever to find some nice large louvers online... lemme get you a link. They weren't cheap because I could only get 'em in CF (and NOT a finished piece BTW, they needed paint to look decent). Genesis is the maker but I bought them from elsewhere, not Genesis direct, as I found a place that sold them cheaper than going direct. Lemme look around online a bit and I will come back and edit in a link. Look for Genesis louvers tho' - the roof louvers are also theirs. I think it was HPR where I got 'em - BRB. And given your track venue I'll bet they do a lot to help the water cooling up front, as trapped air would simply heat the radiator. |
|
|
|
| byndbad914 |
May 7 2009, 03:04 PM
Post
#17
|
|
shoehorn and some butter - it fits Group: Members Posts: 1,547 Joined: 23-January 06 From: Broomfield, CO Member No.: 5,463 Region Association: None |
oh yeah, help suck air out of the front trunk a lot. having a full tube car the seams around the front bulkhead aren't perfect so I would get a fair amount of heat pushed into the car. Those louvers exhaust a LOT of air - I kick the fan on and you can see the little misc fibers hanging off the edges blowing straight back out of them (IMG:style_emoticons/default/biggrin.gif) It also gives the air coming in the front opening somewhere to go other than under the car.
I threaten to build a nice tunnel front and rear of the rad but the car tends to run cool enough H2O temp that I haven't cared. So I have seen 222 a few times but don't recall it's roof config - is it Ginthered and no rear window? I ask because you can also see my screened in rear trunk for the twin coolers. I was trying to pull air from the decklid into the coolers - I was pretty certain it wouldn't work but just had to try it. Over the winter when I put the new trans in I flipped the coolers and exhaust out the hood and it made a HUGE difference - first time out at the track I was probably 40deg cooler on oil temps. There is just too low pressure there with the stock A-pillar/roof config to try and draw air there. |
|
|
|
| Randal |
May 7 2009, 03:15 PM
Post
#18
|
|
Advanced Member Group: Members Posts: 4,446 Joined: 29-May 03 From: Los Altos, CA Member No.: 750 |
QUOTE(byndbad914 @ May 7 2009, 02:04 PM) oh yeah, help suck air out of the front trunk a lot. having a full tube car the seams around the front bulkhead aren't perfect so I would get a fair amount of heat pushed into the car. Those louvers exhaust a LOT of air - I kick the fan on and you can see the little misc fibers hanging off the edges blowing straight back out of them (IMG:style_emoticons/default/biggrin.gif) It also gives the air coming in the front opening somewhere to go other than under the car. I threaten to build a nice tunnel front and rear of the rad but the car tends to run cool enough H2O temp that I haven't cared. So I have seen 222 a few times but don't recall it's roof config - is it Ginthered and no rear window? I ask because you can also see my screened in rear trunk for the twin coolers. I was trying to pull air from the decklid into the coolers - I was pretty certain it wouldn't work but just had to try it. Over the winter when I put the new trans in I flipped the coolers and exhaust out the hood and it made a HUGE difference - first time out at the track I was probably 40deg cooler on oil temps. There is just too low pressure there with the stock A-pillar/roof config to try and draw air there. "222" has a Gunther screen, no windshield and no back window. If you have a WS, a top and a back window you've also got a low pressure area right behind the back window. Also easy to test as you can stick rows of yarn across the deck lid and then video what happens at speed. Now how can those things be going forward?? (IMG:style_emoticons/default/idea.gif) |
|
|
|
| byndbad914 |
May 7 2009, 03:53 PM
Post
#19
|
|
shoehorn and some butter - it fits Group: Members Posts: 1,547 Joined: 23-January 06 From: Broomfield, CO Member No.: 5,463 Region Association: None |
to be honest, I don't think the louvers would do any good pointed forward. Used pointed rearward, a louver utilizes the fact there is a low pressure area surrounding them to exhaust heat. However, flip them around and attempt to use them to draw air in requires using the high pressure front to push it in, so only the front louver would be effective - the ones behind it would be essentially blocked by the first one.
So, now that I really visualize what you are going for, I would say you really just need a single, decent sized scoop to grab air. Paul (URY914) has a big scoop reminiscent of the old Indy stuff and I dunno that you really need to go that far (tho' it definitely adds character to the look of the car), but I would think seats alone would obscure the louvers altogether, so you need to scoop high enough to get good air. Do you want to add pressure to that area of the car tho'??? I have to wonder if scooping from the sides somehow to put cool air in, then exhaust out the rear deck with some louvers maybe would help keep air moving thru there, but also not create a high pressure area pushing under the rear of the car. I think you mostly AX 222 so probably not a big deal in any sort of event given the typical max speeds and short time duration of AXing to worry about pressure there and just need to focus on tunneling fresh air to the intake... |
|
|
|
| Randal |
May 7 2009, 04:06 PM
Post
#20
|
|
Advanced Member Group: Members Posts: 4,446 Joined: 29-May 03 From: Los Altos, CA Member No.: 750 |
QUOTE(byndbad914 @ May 7 2009, 02:53 PM) to be honest, I don't think the louvers would do any good pointed forward. Used pointed rearward, a louver utilizes the fact there is a low pressure area surrounding them to exhaust heat. However, flip them around and attempt to use them to draw air in requires using the high pressure front to push it in, so only the front louver would be effective - the ones behind it would be essentially blocked by the first one. So, now that I really visualize what you are going for, I would say you really just need a single, decent sized scoop to grab air. Paul (URY914) has a big scoop reminiscent of the old Indy stuff and I dunno that you really need to go that far (tho' it definitely adds character to the look of the car), but I would think seats alone would obscure the louvers altogether, so you need to scoop high enough to get good air. Do you want to add pressure to that area of the car tho'??? I have to wonder if scooping from the sides somehow to put cool air in, then exhaust out the rear deck with some louvers maybe would help keep air moving thru there, but also not create a high pressure area pushing under the rear of the car. I think you mostly AX 222 so probably not a big deal in any sort of event given the typical max speeds and short time duration of AXing to worry about pressure there and just need to focus on tunneling fresh air to the intake... OK I get the idea about which way the louvers should be pointed. I like the idea about adding, say a NASA duct, on the side to draw in air. I need to think about how to do that. Also a big duct, ala Paul, might help. |
|
|
|
|
1 User(s) are reading this topic (1 Guests and 0 Anonymous Users)
0 Members:

|
Lo-Fi Version | Time is now: 3rd May 2024 - 02:06 PM |
Invision Power Board
v9.1.4 © 2024 IPS, Inc.