|
|
|
Porsche, and the Porsche crest are registered trademarks of Dr. Ing. h.c. F. Porsche AG.
This site is not affiliated with Porsche in any way. Its only purpose is to provide an online forum for car enthusiasts. All other trademarks are property of their respective owners. |
|
|

  |

| westdesert |
 May 22 2009, 10:48 PM May 22 2009, 10:48 PM
Post
#1
|
|
Newbie  Group: Members Posts: 29 Joined: 27-September 08 From: Utah Member No.: 9,592 Region Association: None |
Hi,
Helping my son with his 914 project. We have a lot of questions but for starters , we could use suggestions on repairing the rust inside of the right motor mount( pictured). The plan is to make it safe and get it on the road. With that in mind how would you approach this spot. thanks for any help Kelly 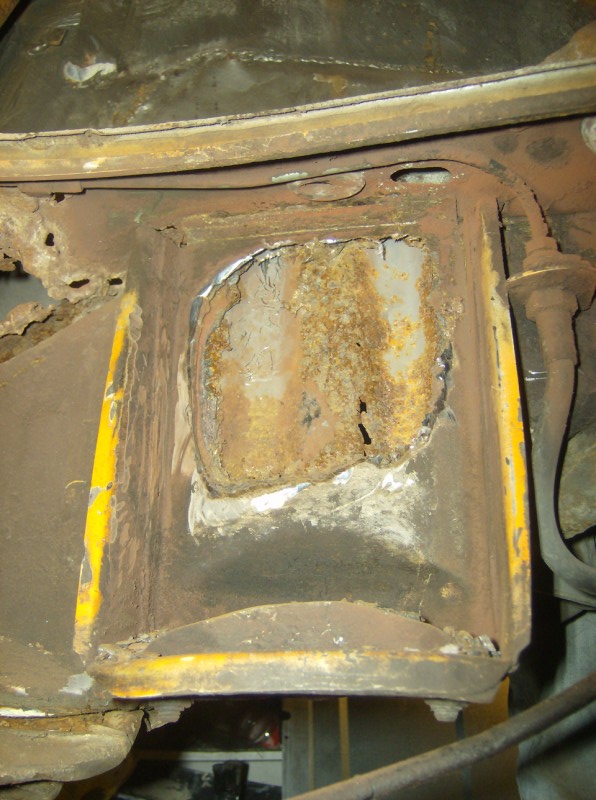 |
   |

 
|
| GeorgeRud |
May 22 2009, 10:51 PM
Post
#2
|
|
Advanced Member Group: Members Posts: 3,725 Joined: 27-July 05 From: Chicagoland Member No.: 4,482 Region Association: Upper MidWest |
That's a common problem area. Contact Restoration Design or Auto Atlanta for the necessary patch panels to replace the rusted areas.
|
|
|
|
| SirAndy |
May 22 2009, 11:01 PM
Post
#3
|
|
Resident German Group: Admin Posts: 41,634 Joined: 21-January 03 From: Oakland, Kalifornia Member No.: 179 Region Association: Northern California |
It looks like it has already eaten into the long. You'll need to cut out the mount to repair the long correctly.
Look around in the classifieds for someone who is parting out a car and get a replacement mount. If you have the time and patience, drill out the spot-welds rather than just cutting the metal off. It'll be a much cleaner install that way ... (IMG:style_emoticons/default/smash.gif) Andy PS: (IMG:style_emoticons/default/welcome.png) |
|
|
|
| dr914@autoatlanta.com |
May 23 2009, 09:04 AM
Post
#4
|
|
914 Guru Group: Members Posts: 7,850 Joined: 3-January 07 From: atlanta georgia Member No.: 7,418 Region Association: None |
QUOTE(westdesert @ May 22 2009, 09:48 PM)  Hi, Helping my son with his 914 project. We have a lot of questions but for starters , we could use suggestions on repairing the rust inside of the right motor mount( pictured). The plan is to make it safe and get it on the road. With that in mind how would you approach this spot. thanks for any help Kelly Looks like the engine mount and the longitudinal can be saved with metal repair. Obviously the engine mount will have to be removed to execute a good repair. If you need the replacement pieces new we have them in stock. The catalog shows some good pictures of the area so you can get an idea of how everything fits together. Also we do the repairs here all of the time if you need to call for advice. |
|
|
|
| charliew |
May 23 2009, 12:05 PM
Post
#5
|
|
Advanced Member Group: Members Posts: 2,363 Joined: 31-July 07 From: Crawford, TX. Member No.: 7,958 |
The very innermost piece may be salveable but the mount and the outer skin which is the iner skin of the back of the long (and also the outside part, the part under the battery) is gone. I would get a good used mount from some one parting a car. And just torch yours off it's easier to just get another one. You can't just put a thicker piece in and make up for the other two pieces as you can't weld to all the pieces at the same time. Make a decision after you get the mount off on the next piece in. That may or may not be the deciding factor on whether you need new replacement panels or not. I can see some of the inner well missing to the left that is that next piece in under the mount, it's part of the outside wheel well. You might want to just replace that whole piece and put a used mount on. When you use a torch on thin sheet metal you can heat just the outer piece and blow it off, the only places to be careful of is where the tacks are as the heat will transfer at those spots and then the bottom piece might also get removed. It's really pretty easy once you see whats happening. Do a search to see how all these parts overlap to understand whats bad enough to require new parts. Just review some of the other serious rebuilds.
AA has some good info on the parts but reading where others have repaired the hell hole will show all these pieces also and in what order they go on. Go to the threads where guys are cutting up cars and get some of your parts. Oh yeah try to make a jig to get the mount back where it belongs while the old one is still there. I know it looks like the short cut is just put a patch over the mount hole but the only thing holding the mount on is the spot welds to the next piece in which it only has the edge left out to maybe where the spot welds are. That piece is spot welded to the piece that you see in the hole at the edges and maybe at the tops of the corrugations where they touch. |
|
|
|
| westdesert |
May 24 2009, 01:54 AM
Post
#6
|
|
Newbie Group: Members Posts: 29 Joined: 27-September 08 From: Utah Member No.: 9,592 Region Association: None |
QUOTE(charliew @ May 23 2009, 10:05 AM) The very innermost piece may be salveable but the mount and the outer skin which is the iner skin of the back of the long (and also the outside part, the part under the battery) is gone. I would get a good used mount from some one parting a car. And just torch yours off it's easier to just get another one. You can't just put a thicker piece in and make up for the other two pieces as you can't weld to all the pieces at the same time. Make a decision after you get the mount off on the next piece in. That may or may not be the deciding factor on whether you need new replacement panels or not. I can see some of the inner well missing to the left that is that next piece in under the mount, it's part of the outside wheel well. You might want to just replace that whole piece and put a used mount on. When you use a torch on thin sheet metal you can heat just the outer piece and blow it off, the only places to be careful of is where the tacks are as the heat will transfer at those spots and then the bottom piece might also get removed. It's really pretty easy once you see whats happening. Do a search to see how all these parts overlap to understand whats bad enough to require new parts. Just review some of the other serious rebuilds. AA has some good info on the parts but reading where others have repaired the hell hole will show all these pieces also and in what order they go on. Go to the threads where guys are cutting up cars and get some of your parts. Oh yeah try to make a jig to get the mount back where it belongs while the old one is still there. I know it looks like the short cut is just put a patch over the mount hole but the only thing holding the mount on is the spot welds to the next piece in which it only has the edge left out to maybe where the spot welds are. That piece is spot welded to the piece that you see in the hole at the edges and maybe at the tops of the corrugations where they touch. Thanks everyone for the suggestions and advise. I will start peeling layers off starting with the motor mount. Im not sure how jig would work so I will have to think on that. I think I have seen it in a thread so I will try to find it. Here are a couple of pics of to days project. not sure if I will get them in order. we welded in a section of floor panel. not alot but after months of tearing down and gathering parts it was good to move in a positive direction . (IMG:style_emoticons/default/sawzall-smiley.gif) 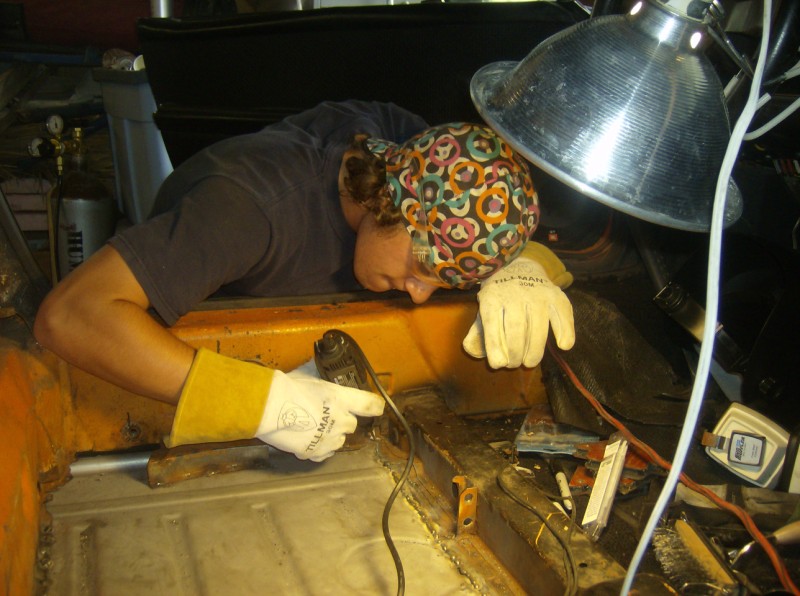 (IMG:style_emoticons/default/smash.gif) (IMG:style_emoticons/default/smash.gif) (IMG:style_emoticons/default/smash.gif) Attached image(s) 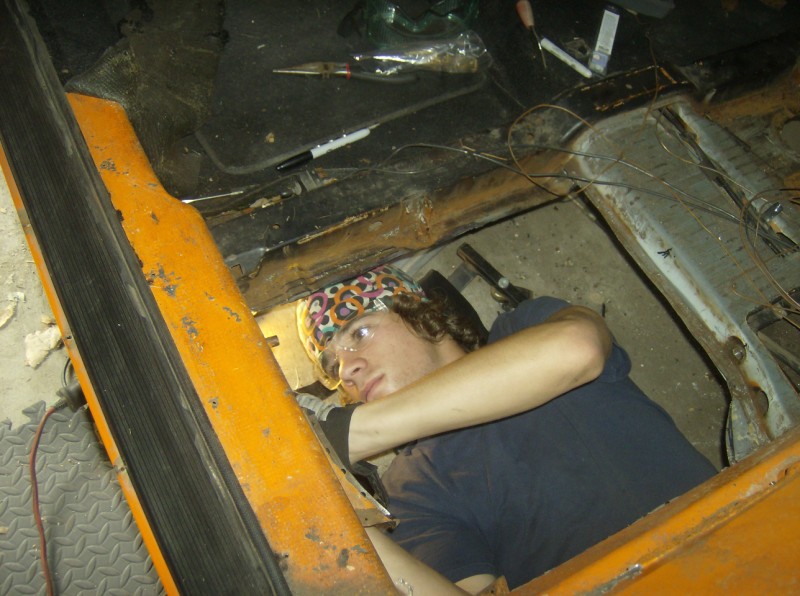
|
|
|
|
| westdesert |
May 27 2009, 12:07 AM
Post
#7
|
|
Newbie Group: Members Posts: 29 Joined: 27-September 08 From: Utah Member No.: 9,592 Region Association: None |
Well we found a motor mount here locally,problem is it is attached to a bunch of other (some useful) stuff.
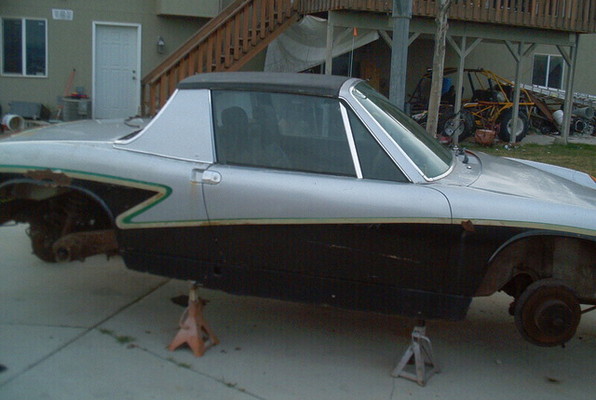 as you can see it is more of a dragger than a roller. will be a pain to move and store. The place I have to store it is soft ground ,gravel. any ideas on safe ways to store it up off the ground or is a jack stand on a piece of plywood good enough?. 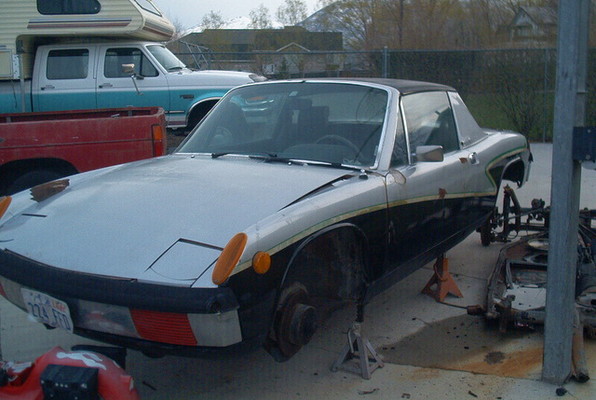 I will be bringing it home in a couple days. then back to work (IMG:style_emoticons/default/sawzall-smiley.gif) (IMG:style_emoticons/default/smash.gif) thanks for your input Kelly |
|
|
|
| jcambo7 |
May 27 2009, 02:04 AM
Post
#8
|
|
Senior Member Group: Members Posts: 1,664 Joined: 24-December 08 From: Graham, WA Member No.: 9,867 Region Association: Pacific Northwest |
Jackstands on plywood would work without it sinking too much. Rain though could be a problem with that for the wood and the ground. One: The wood would become soaked and the stands could start to sink into it. Two: The rain would soften the ground and could cause sinking or shifting of the stands. It would probably work best on gravel though. Better drainage.
|
|
|
|
| Katmanken |
May 27 2009, 08:46 AM
Post
#9
|
|
You haven't seen me if anybody asks... Group: Members Posts: 4,738 Joined: 14-June 03 From: USA Member No.: 819 Region Association: Upper MidWest |
Buy four jackstands and four concrete paving blocks to go under the jackstands.
That's a paint job on the non- roller that should be added to our collection of "period" custom paint....... |
|
|
|
| charliew |
May 27 2009, 09:02 AM
Post
#10
|
|
Advanced Member Group: Members Posts: 2,363 Joined: 31-July 07 From: Crawford, TX. Member No.: 7,958 |
If you are using a mig with gas esab easygrind is a lot easier to grind down and matches the alloy of the original metal. It's not cheap about 55.00 for 10 lbs. but the savings in time and grinding wheels and sanding disk will make up for it. It's what body shops use on sheetmetal and thats all a 914 has is sheetmetal in the unibody.
|
|
|
|
| westdesert |
May 28 2009, 12:01 AM
Post
#11
|
|
Newbie Group: Members Posts: 29 Joined: 27-September 08 From: Utah Member No.: 9,592 Region Association: None |
QUOTE(kwales @ May 27 2009, 06:46 AM) Buy four jackstands and four concrete paving blocks to go under the jackstands. That's a paint job on the non- roller that should be added to our collection of "period" custom paint....... Kwales, that's what I'll do I have a stack of pavers stacked out back. All I could think of was the plywood an at the rate I work it would never hold up. thanks is there a thread of paint jobs I missed. I could certainly post a pic.(I need the practice) I'll have to also add the VIN# to the list for Andy. |
|
|
|
| westdesert |
May 28 2009, 12:10 AM
Post
#12
|
|
Newbie Group: Members Posts: 29 Joined: 27-September 08 From: Utah Member No.: 9,592 Region Association: None |
QUOTE(charliew @ May 27 2009, 07:02 AM) If you are using a mig with gas esab easygrind is a lot easier to grind down and matches the alloy of the original metal. It's not cheap about 55.00 for 10 lbs. but the savings in time and grinding wheels and sanding disk will make up for it. It's what body shops use on sheetmetal and thats all a 914 has is sheetmetal in the unibody. charliew, Thanks for the heads up on the easy grind. Im pretty new to the mig welding so any hint or suggestion helps. The spool that came with the welder is about spent so we will look into the easygrind. Thanks Any body use a drill doctor? Im going to be drilling alot of spotwelds in the comming weeks and can probably justify some sort of bit sharpener. Any suggestions? thanks, Kelly |
|
|
|
|
1 User(s) are reading this topic (1 Guests and 0 Anonymous Users)
0 Members:

|
Lo-Fi Version | Time is now: 12th May 2024 - 10:00 PM |
Invision Power Board
v9.1.4 © 2024 IPS, Inc.