|
|
|
Porsche, and the Porsche crest are registered trademarks of Dr. Ing. h.c. F. Porsche AG.
This site is not affiliated with Porsche in any way. Its only purpose is to provide an online forum for car enthusiasts. All other trademarks are property of their respective owners. |
|
|


| BK911 |
 Jul 6 2009, 07:46 AM Jul 6 2009, 07:46 AM
Post
#1
|
|
Senior Member  Group: Members Posts: 672 Joined: 19-February 04 From: Rocky Top, TN Member No.: 1,674 Region Association: None |
So I spent the holiday weekend removing the engine and cutting out some of the rust at the hellhole. Here is where I am now:
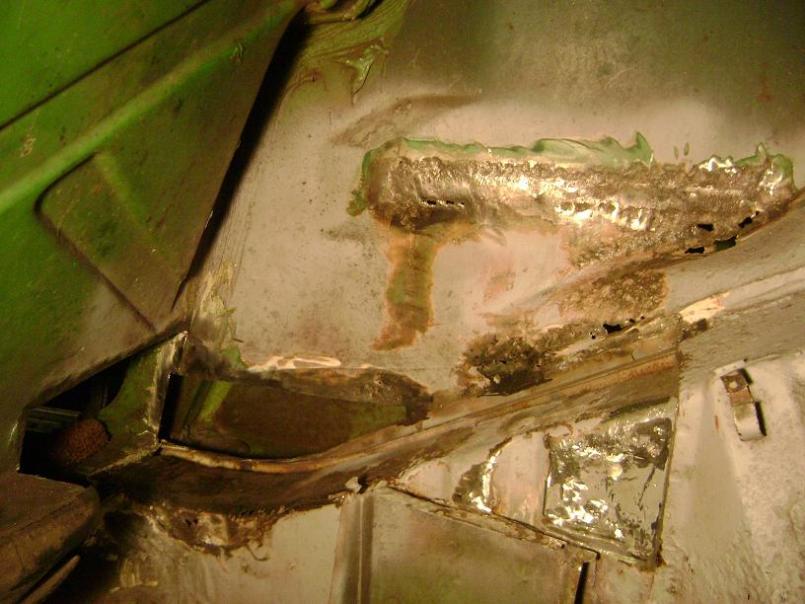 My question is, now what? (IMG:style_emoticons/default/smile.gif) The long looks pretty good with the exception of some pin holes. Should I just plug weld them or cut out a section? How do you finish the inside of the long? I was planning on spraying some metal prep in there then some por-15. Not sure what the metal the battery tray attaches to. I will call it the tray support area. Should I cut this all out or just patch some places? The piece that came with the engman kit that covers the long has a flap that is supposed to "bend down over outer long". I'm nost sure that is possible. That area has another layer from the tray support metal that interferes with bending that piece over the outer long. Should I cut this flap off and just weld along the edge of the tray support metal? What should I do on the outside of the inner long? Seam weld to the piece that covers the top of the long? The engman piece that has the holes cut out for the brake and fuel lines didn't have any provisions for the engine seal. Is the channel for the engine seal available and do I just tack weld it to the engman piece? Or do I need to buy the piece from RD? Any advice will be appreciated! I am moving in a month and need to get this wrapped up asap. Thanks, BK |
   |

 
|
  |
Replies(1 - 4)
| charliew |
Jul 6 2009, 08:25 AM
Post
#2
|
|
Advanced Member Group: Members Posts: 2,363 Joined: 31-July 07 From: Crawford, TX. Member No.: 7,958 |
I don't know if you have done metal replacement before but where there are pin holes there is a big possibility that the metal is so thin it will just keep blowing through and will never be a acceptable repair. The only way to know is to keep cutting it back till it's only good metal. Or to be able to see it from the other side. Metal prep is ok but the por15 is really just a feelgood cover up over rusty metal. I use a alot of por 15 but it is really best if the sun can't get to it and it goes over clean norust metal. It's as hard as any paint can be. Do not expect a topcoat to adhear perfectly every time. All metalprep does is make the surface of thickrust look treated and all por15 does is seal the top to attempt to stop moisture from getting to the top surface. If there are any pin holes to the other side and moisture gets under the por15 it just holds it and gets worse than if there was just a hole there and it can dry out after each wet episode. I use por15 on hunting wagons and have had pretty good results but for the cost it is not the best solution, it's just a hobbiest solution. It has terrible shelf life also once it has been opened.
On good clean bare metal a metal prep rinsed off with a good epoxy primer is the best. If you are going to top coat the primer a non sanding epoxy can be put on and the top coat applied within 12hrs and there will be no sanding required. The sooner the top coat is aplied the better after the primer has dried. Getting the metal dry after applying the metal prep is the trick and getting all the seams dry before the primer is applied can be a challenge. Air pressure and a heat gun is sometimes needed unless it is really hot and can be put in the sun. Do not apply paint to hot metal though, it will not level and will be very rough. |
|
|
|
| McMark |
Jul 6 2009, 01:55 PM
Post
#3
|
|
914 Freak! Group: Retired Admin Posts: 20,180 Joined: 13-March 03 From: Grand Rapids, MI Member No.: 419 Region Association: None |
Use manilla file folders to cut out a pattern for your replacement metal.
Bend and form the metal into shape. Weld and grind the seams. Use liberal metal ready to convert any rust. Use paint or POR-15 to coat the interior of the long as much as possible. You're not going to get it all, but do what you can. Honestly, it sounds like you're overthinking it. |
|
|
|
| IronHillRestorations |
Jul 6 2009, 05:52 PM
Post
#4
|
|
I. I. R. C. Group: Members Posts: 6,930 Joined: 18-March 03 From: West TN Member No.: 439 Region Association: None |
I would purchase the inner fener/upper wheel house piece. That piece will fix the wall behind the tray and the complex bends and curves along the seam. You can fabricate patches that will work, but if you consider your time and want it look as good as possible, the patch panel is a no-brainer.
|
|
|
|
| sean_v8_914 |
Jul 6 2009, 11:45 PM
Post
#5
|
|
Chingon 601 Group: Members Posts: 4,011 Joined: 1-February 05 From: San Diego Member No.: 3,541 |
the inner wheel house is important, yours needs help. much more cutting to do there. fix it first. tie it to the long's vertical. that contour is tricky so buy RD's pc if ya can.
|
|
|
|
|
1 User(s) are reading this topic (1 Guests and 0 Anonymous Users)
0 Members:

|
Lo-Fi Version | Time is now: 30th April 2026 - 03:23 PM |
Invision Power Board
v9.1.4 © 2026 IPS, Inc.