Howdy All,
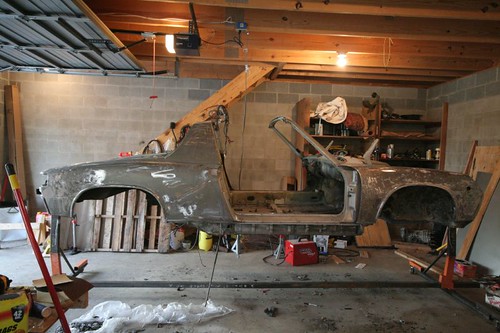
This is the start of a new thread and the progress I am making on this little 914 car. First off, let me give you a little history. I had a WANTED ad in the craigslist area for Tucson and PHX. I got a call from a man stating he had a 914 that he wanted 1500 bucks for. We talked about the car. It ran, drove and he said it would make the drive to Tucson. We talked a little more and we determined he would take 1300 bucks for it. I arrange a rental car, drove to Prescott, dropped off the rental and then met the guy. It was a little rough at first but the car did start and drive... Well? No. Badly... Yes. I decided to go for it and started out the drive. It did infact make it all the way home in the heat of the day and over the mountains. = ) Anyway, so its now home, on stands and ready to begin its new life. Here are some pictures to start the thread.
Eric
Click to view attachment
Click to view attachment
Click to view attachment
Click to view attachment
Full Version: Start of a new Project Thread
I have decided to take it down to the bare metal. After a week of a lot of hours in the garage, here is were we are at today. = )
Click to view attachment
Click to view attachment
Click to view attachment
Click to view attachment
Click to view attachment
Click to view attachment
Click to view attachment
Click to view attachment
My goal with the car is a light weight -simple- reliable SCCA car. I want to remove the horns, flood lights, rear window and anything else I can to get the weight out. I am also doing the inside long kit as well as the rear end kit to ensure it is strong and secure. I would love a 911 front end but this entire project is going to be spendy to say the least. So I am going to stick with the 914 stuff (front arms, hubs, brakes etc). I just was a high bidder on some rear shocks. I will order some 160 lbs springs for the rear if I can find a used set somewhere. I am going to go with a stock sway bar up front and will see about finding some better tortion bars. Anyway, this is just a little direction for where this is going as of right now. Tomorrow someone might call and offer me a front end for 100 bucks and the direction could change. = ) But for now we will march this direction.
Now from all of you... I have NO IDEA WHAT I AM DOING!!! LOL I need all your help with what to do and why I am doing it. My plan is to get the body work done (welding holes, patching rust etc) and then each day take on a new aspect of the car. Clean the parts, fix anything broken and then install it in the car. So what do I need to do before I paint? = ) Like the front drivers eye lash for the light has a bent edge... Not to bad but a little bent. Thats going to be covered and not seen... Do I do more to fix it then I already have? Do I cut it out and weld in a new piece? (my welding isnt perfect... )
Anyway, I will have lots of questions over the next few weeks. My goal (please take a shot of whiskey before reading more) is to have the car on the road and legal by Thanksgiving. HAHAHAHAHAHH SHOOT ME!!! = )
Thanks all.
Eric
Click to view attachment
Click to view attachment
Click to view attachment
Click to view attachment
Now from all of you... I have NO IDEA WHAT I AM DOING!!! LOL
I need all your help with what to do and why I am doing it. My plan is to get the body work done (welding holes, patching rust etc) and then each day take on a new aspect of the car. Clean the parts, fix anything broken and then install it in the car. So what do I need to do before I paint? = ) Like the front drivers eye lash for the light has a bent edge... Not to bad but a little bent. Thats going to be covered and not seen... Do I do more to fix it then I already have? Do I cut it out and weld in a new piece? (my welding isnt perfect... ) Anyway, I will have lots of questions over the next few weeks. My goal (please take a shot of whiskey before reading more) is to have the car on the road and legal by Thanksgiving. HAHAHAHAHAHH SHOOT ME!!! = )
Thanks all.
Eric
Click to view attachment
Click to view attachment
Click to view attachment
Click to view attachment
Click to view attachment
How do I get rid of this box (voltage regulator?)? I dont have fuel injection and I think its all empty except the battery side.
Click to view attachment
Click to view attachment
Click to view attachment
How do I get rid of this box (voltage regulator?)? I dont have fuel injection and I think its all empty except the battery side.
Click to view attachment
Click to view attachment
Click to view attachment
I was told that sand blasting the car is the best way to deal with the rust. It blasts it away (just what I was told) and you know exactly what needs to be fixed. I also was told that within about a week of your car sitting bare without a primer on it or something, that it starts to rust. But I also heard that if you primer it with POR its a problem for the painters(?).
So I was going to get it blasted so when I weld the longs and the rear end that its good perfect clean steel to steel.
LOL So what do I do? Anyone done this before?
I saw one post where the person did all the painting under the car themselves and then built the car and then took it to a painter to do the outside of the car... But I like Patrick Motor sports where they paint the entire car the same color.
Shesh... The choices and the directions to go.
Thanks all.
Eric
Click to view attachment
Click to view attachment
Click to view attachment
Click to view attachment
Click to view attachment
Well, I had it sand blasted. The guy came to my house with a buddy. We dragged it to the back 40, put it up on crates and got him started. It took him about 2:15 to do the entire car. He made sure that he didnt sit in one spot for to long to ensure no warping occured. I didnt realize there was so much bondo on the car... But now... There isnt even DIRT on the car. = )
Eric
Click to view attachment
Click to view attachment
Click to view attachment
Click to view attachment
Click to view attachment
Eric
Click to view attachment
Click to view attachment
Click to view attachment
Click to view attachment
Click to view attachment
Hey there Eric,
What you are doing is admireable.
To atempt such a project and do it so fast.
Keep it going and have a
![popcorn[1].gif](http://www.914world.com/bbs2/style_emoticons/default/popcorn[1].gif)
John
What you are doing is admireable.
To atempt such a project and do it so fast.
Keep it going and have a
John
Welcome to the madness Eric and congrats on the purchase. From the looks of it you did very nicely on the deal. Most of us would kill for those longs on a project car, but I'm not sure about that engine lid support.
As for "not knowing what you're doing", you've come to the right place because none of us know what we're doing. If we did, we'd be doing something else. However, collectively, we manage to keep each other out of trouble.
Good luck and keep us posted.
Tom
As for "not knowing what you're doing", you've come to the right place because none of us know what we're doing. If we did, we'd be doing something else. However, collectively, we manage to keep each other out of trouble.
Good luck and keep us posted.
Tom
QUOTE(Cheapsnake @ Nov 6 2009, 06:13 PM) 
Welcome to the madness Eric and congrats on the purchase. From the looks of it you did very nicely on the deal. Most of us would kill for those longs on a project car, but I'm not sure about that engine lid support.
As for "not knowing what you're doing", you've come to the right place because none of us know what we're doing. If we did, we'd be doing something else. However, collectively, we manage to keep each other out of trouble.
Good luck and keep us posted.
Tom
Thanks Tom and John. = ) Its going to be a tough challenge.
So whats next? I can fix all the holes on the frame and put in the long kit and then the rear stiffening kit and get it all done that way, but what about paint? The car is pretty rough to the touch. It needs an under coat and then a clear coat and then paint? Or is it under coat, paint and then clear? The car is just going to be a daily driver and an autocross car. I am going to get it painted without adding any bondo to the car. It has a couple rough spots but for the most part looks good. Anyway... Onward and upward. Tomorrow I will start fixing holes and rust spots and see where we end up. =)
Thanks again.
Eric
No disrespect to this forum but if you're looking for basic paint advice, check into paint101.com. It's a board specifically for autobody painting and has a ton of good info and a bunch of pros to answer almost any question you have. Beyond that, this board is invaluable for paint advice specific to the 914. I wish I could give you some of that advice based upon experience, but I'm at least 6 months away from that point.
Doing your own paint job is a great experience and you won't regret it.
Tom
Doing your own paint job is a great experience and you won't regret it.
Tom
Nice job on the sandblasting, sure wish I had done it that way looking back.
= ) Things are moving along. Are these added or factory? Need some input team. = ) Dont want to start putting a stiffening rear kit in if these are going to be in the way.
Eric
Click to view attachment
Click to view attachment
Click to view attachment
Click to view attachment
Eric
Click to view attachment
Click to view attachment
Click to view attachment
Click to view attachment
I just got the Engman Long Internal Kit installed. Looks good. Neat stuff. Easy to do.
Eric
Click to view attachment
Click to view attachment
Click to view attachment
Click to view attachment
Click to view attachment
Eric
Click to view attachment
Click to view attachment
Click to view attachment
Click to view attachment
Click to view attachment
Stiffened the rear support and fixed the trunk area.
Eric
Click to view attachment
Click to view attachment
Click to view attachment
Click to view attachment
Eric
Click to view attachment
Click to view attachment
Click to view attachment
Click to view attachment
Put your door back on, RIGHT NOW. Before you go any further, make sure they still fit properly and that the body is in alignment. If the cars is twisted in any way from the addition of the longs, this is the time to address the fix. Also I would start blowing out the extra sand. I can't tell you how many times I used the air line and vacume to clean out the sand from every nook and cranny.
Have you paid a visit to your local auto paint store yet. These guys can be so helpful with advise. Pick a line of products and stay with it. They can help you figure out what fillers go with what primer and paint so the products stick.
Have you paid a visit to your local auto paint store yet. These guys can be so helpful with advise. Pick a line of products and stay with it. They can help you figure out what fillers go with what primer and paint so the products stick.
Here is the fixed hole where the AC unit used to be. Not as pretty as I would like but will be plenty strong for AX.
Click to view attachment
Click to view attachment
Click to view attachment
Click to view attachment
Click to view attachment
Click to view attachment
Click to view attachment
Click to view attachment
Click to view attachment
Click to view attachment
Nice work & quick! Way to tear into it
wow! very inspiring.. thank you for sharing the pics!! 
I wish I could be half as productive as you are, Nice work!
QUOTE(plymouth37 @ Nov 15 2009, 11:51 AM)
I wish I could be half as productive as you are, Nice work!
Here is how the front trunk came out with a little primer. I will seal around the edges with Sealer and that should help the looks a bit. = )
Eric
Click to view attachment
I decided to brace the sitting area. Here is my work. = )
Eric
Click to view attachment
Click to view attachment
Click to view attachment
Click to view attachment
Click to view attachment
Eric
Click to view attachment
Click to view attachment
Click to view attachment
Click to view attachment
Click to view attachment
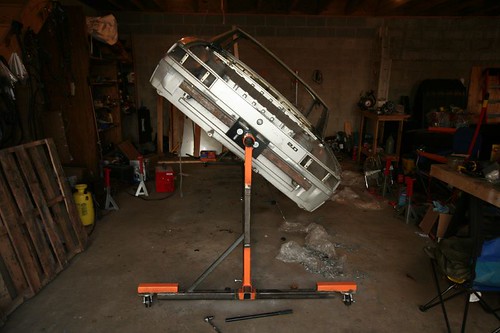
I also decided to build a Rottisserie.
Eric
Click to view attachment
Click to view attachment
Click to view attachment
Click to view attachment
Eric
Click to view attachment
Click to view attachment
Click to view attachment
Click to view attachment
More on building a rotisserie.
Click to view attachment
Click to view attachment
Click to view attachment
Click to view attachment
Click to view attachment
Click to view attachment
Click to view attachment
Click to view attachment
Click to view attachment
Click to view attachment
Click to view attachment
Well, I guess I have reached my upload limit. = ) Now I get to go through and start deletting all the old photos...
=- )
Eric
Click to view attachment
Click to view attachment
Well, I guess I have reached my upload limit. = ) Now I get to go through and start deletting all the old photos...
=- )
Eric
Can you give me an idea of how many hours it took you to dismantle the car? I have to do this soon and will have a deadline but I'm not sure how much time it will take to completely dismantle the car.
QUOTE(PH1 @ Nov 18 2009, 08:20 PM)
Can you give me an idea of how many hours it took you to dismantle the car? I have to do this soon and will have a deadline but I'm not sure how much time it will take to completely dismantle the car.
I think it depends on how you do it. I took pictures of wires and connections. I labelled things and bagged all the little items. I think you could do it in a week taking your time and probably 2 days if it was just get it apart type stuff. = )
Hope this helps.
Eric
QUOTE(Cire @ Nov 18 2009, 10:24 PM)
Hope this helps.
Eric
Thanks, but I will probably need to count on about four times that at my slow pace and with my lack of experience. I want to take pictures and label everything as well but I have no experience in taking cars apart. I have enough trouble keeping them together.
Kelvin
QUOTE(PH1 @ Nov 18 2009, 09:39 PM)
QUOTE(Cire @ Nov 18 2009, 10:24 PM)
Hope this helps.
Eric
Thanks, but I will probably need to count on about four times that at my slow pace and with my lack of experience. I want to take pictures and label everything as well but I have no experience in taking cars apart. I have enough trouble keeping them together.
Kelvin
LOL Me either. This is my first one and I am terrified. I have parts from one end of the garage to the other. Every shelf is full. The wiring harness is 40 feet long and in a corner jeering at me every time I walk by. And to top it off, I add more and more to it. A rottiserie is big and takes up lots more space.
Its a big project... But what the hell. = )
If I can help let me know.
Eric
That's a Delphi car! Going to paint it the factory color?
QUOTE(Gint @ Nov 19 2009, 08:04 AM)
That's a Delphi car! Going to paint it the factory color?
I wonder how much paint will be? I am on a budget so it makes it a little tough. I would love to paint it this color. = )
Eric
Nice progress! I would suggest that you consider widening the stance of the engine stands of your rotisserie. There's a lot of mass moving when you turn the car. While you're at, you might also consider increasing the height so that you can get the car fully vertical -- as it sits right now, I am pretty sure it is not high enough and the body will hit the stands and/or ground. Finally, connecting the two stands together will give it better stability, especially if you need to wheel the thing over cracks/lips in the concrete. Keep up the great work!

Widen the stance. You really don't ever want it to tip.
Also, put in t a cross bar between the two engine stands. This ties it all together and allows you to move the car around on the Rot in your shop. Very helpful in my build. I tried to do it your way first (no cross bar) and the whole thing almost folded the first time I tried to push it.
Here is how I did it, using the same building blocks that you are using:
With the cross bar...
QUOTE(Cire @ Nov 18 2009, 06:40 PM)
Well, I guess I have reached my upload limit. = ) Now I get to go through and start deletting all the old photos...
Uhmmm, no ...
The upload limit is per POST, not per thread ...
 Andy
Andy
QUOTE(Vacca Rabite @ Nov 20 2009, 09:32 AM)
Widen the stance. You really don't ever want it to tip.
Also, put in t a cross bar between the two engine stands. This ties it all together and allows you to move the car around on the Rot in your shop. Very helpful in my build. I tried to do it your way first (no cross bar) and the whole thing almost folded the first time I tried to push it.
I was at HF this morning looking at engine stand for this various purpose. I was wondering how to to solve the problem with the slight upward angle of the pivot, and then I come home to see this! Fortuitous.
Would a 110v mig welder be sufficient to build a rotis, or would I need to hire a local welder to come out and put some heavy beads on it?
QUOTE(Vacca Rabite @ Nov 20 2009, 10:32 AM)
Widen the stance. You really don't ever want it to tip.
Also, put in t a cross bar between the two engine stands. This ties it all together and allows you to move the car around on the Rot in your shop. Very helpful in my build. I tried to do it your way first (no cross bar) and the whole thing almost folded the first time I tried to push it.
Here is how I did it, using the same building blocks that you are using:
With the cross bar...
All taken care of sir. = ) It is stronger with that piece connecting the two engine stands. Having the car on the rottisserie really gives you some different looks at the cars. Things you didnt see before jump out at you now. Its also much easier to get to some things. I cant wait to start the electrical with the car in the air. I can put it on its side and work standing up verses bent over. = )
Good stuff. Here are more pics.
Eric
Click to view attachment
Click to view attachment
Click to view attachment
Click to view attachment
Click to view attachment
Looking great, keep up the good work. 
QUOTE(bigkensteele @ Nov 20 2009, 01:39 PM)
I was at HF this morning looking at engine stand for this various purpose. I was wondering how to to solve the problem with the slight upward angle of the pivot, and then I come home to see this! Fortuitous.
Would a 110v mig welder be sufficient to build a rotis, or would I need to hire a local welder to come out and put some heavy beads on it?
YES! I used a 110 on mine, and it worked like a champ. I used the hottest heat setting and a wire speed of ~3.
You have to do a little geometry to correct the stupid HF engine stand angle.
And I put a big cutting disk on my electric mitre saw to cut the stock perfectly. it is SO much easier to weld up 1/8inch wall clean steel then sheet. The whole thing went together like a dream.
AND, when I sold it I made ~ $100 profit too (over the cost of parts).
Zach
I got 90% of my welding done. Most of the holes are filled. All the rust has been removed except the small corner on the flag that I will tackle this week. My next challenge is the tunnel from the under side... do I need to fix it? The car worked great driving it but I dont want to have to open it up again later...
Here are some pictures. = )
Eric
It looks as though they hit a rock and the car bounced on it down the tunnel area... So there are really 2 maybe 3 areas that need to be pulled out if thats what needs to be done...
Click to view attachment
Click to view attachment
Click to view attachment
Click to view attachment
Click to view attachment
On the third picture... Where it shows the rear stiffening kit installed... I added an extra piece to extend the kit all the way down past the support. Figured it would just help make things a bit stronger.
I talked to Brad and got his Chassis stiffening kit. I cut the jack tube out in preperation for the kit thats coming in the mail. = )
Engman Internal Long Kit
Rear Stiffening Kit
Brad Mayer External Chassis Kit
Tangerine's Ear stuffening kit
Tangerine's Front sway bar support
19 MM Front Sway Bar
Bilstien Gas Charged Struts
140 LBS springs in the rear
Koni rebuilt adjustable shocks in the rear
.... Hope its strong enough to handle the stock 1.7 with baby webers I am installing in her.... LOL
Eric
Click to view attachment
Click to view attachment
Click to view attachment
Click to view attachment
Click to view attachment
Good work!! If i were to post a where it was ... where it is photo you would be hard pressed to find what i have done  damn El Nino
damn El Nino
More Pictures. I got the Rob Mayeur Long Kit installed. Nice easy job and it comes out really clean. So the rear end now has the Rob Mayeur long kit connected to a Rear end stiffening kit. The upper arm that has all that extra steel isnt going to budge... I decided not to box my rear trailing arms... I figure I want the car to be more solid than I can stand and the arms be weak. That way if I slide into a curb, it might only be changing a rear trailing arm not bending the frame. Good stuff.
Eric
Click to view attachment
Click to view attachment
Click to view attachment
Click to view attachment
Click to view attachment
Eric
Click to view attachment
Click to view attachment
Click to view attachment
Click to view attachment
Click to view attachment
This is a "lo-fi" version of our main content. To view the full version with more information, formatting and images, please click here.