i am installing new turbo tie rods and am wondering what is the best way to remove the old ones, specifically the articulated bushing that holds the u shaped connection on the old ones. does it just unscrew form the steering linkage? is it best to remove the tie rod first and then remove the bushing or do it all at once?
Full Version: installing turbo tie rods
You can wedge a screwdriver in the gaps and pry, IIRC.
Knock (or fork or press) the tie rods out and then just unscrew (you may need to use tools). Be nice.
Do you need to save the boots/bellows or do you have new ones?
If you need to re-use be careful.
I wouldn't worry about the joint in the middle.
Do you need to save the boots/bellows or do you have new ones?
If you need to re-use be careful.
I wouldn't worry about the joint in the middle.
QUOTE(whatabout1 @ Mar 8 2010, 03:58 PM) 
Knock (or fork or press) the tie rods out and then just unscrew (you may need to use tools). Be nice.
Do you need to save the boots/bellows or do you have new ones?
If you need to re-use be careful.
I won't worry about the joint in the middle.
don't need the boots, they are shot and i have new ones, plan to cut them off and toss them, so i can just clamp on to the steering assembly to hold it and unscrew the tie rods?
Rich, I shot a little video. Maybe it's just because I'm exhausted, but I'm not sure what part you're getting confused about. It seems like you're making it harder than it is.
https://www.youtube.com/watch?v=Shhj5lAu98E
https://www.youtube.com/watch?v=Shhj5lAu98E
If you don't plan on reusing the U shaped item ( where the tie rod bolts to the rack ) you can use a bar in that opening and unscrew the whole rod , boot holder and all. If you have problems ther ( you have to clamp the rack in a vice to secure it ) a pipe wrench and maybe a cheater pipe will usually do the job. When you install the turbo tie rod assembly , be sure to use some blue thread locker compound on the threads to prevent backing out . Some use the thick washer that comes with the kit , some don't , it's a matter of the tire srubing the inside fender which is the use or non- use , the thick washer is a stop of a sort that limits the rack's travel. If you are looking at the end that screws into the rack , the slots on the end is for a real thin 32mm open end wrench, a lot of guys will just use the pipe wrench on this to get a real good bite and put some good torque on it , don't recall the specs , just real good and itght with the blue loctite compound should do it. This is the way I installed mine , could be wrong , but from what I have read on this forum , it's a pretty good method. YMMV......
Jack / Jaxdream
Jack / Jaxdream
Hey Mark, what happened to the video? [edit: Never mind, I see it's back.  ]
]
I love your "quick tour of the shop" video.
]I love your "quick tour of the shop" video.
QUOTE(jim_hoyland @ Mar 8 2010, 04:46 PM)
thanks guys that clears everything up
be back with the next problem as soon as i can

Little update to this old thread with some missing information. I just did a set and remembered this thread, and realized I left out some info.
Click to view attachment
When removing the old tie rods, the outer boot support also acts as a locknut, keeping the inner joint from unscrewing. In order to remove the inner joint, you need to loosen the lock nut/boot support. I did this by using a 5lb sledge and a drift set into one of the notches. The correct tool would be something like this:
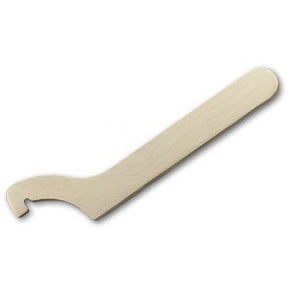
Once the locking ring is loose, the whole assembly unscrews.
Another tip: when installing the new assembly I used the following procedure...
1. Unscrew/remove the new outer ball joint.
2. Slide the thick washer into place and screw the tie rod shaft into the steering rack.
3. Tighten with your special thin wrench.
4. Slide the new boot over the tie rod shaft and slip it into place. Careful use of a screwdriver will help get everything into place. Also, you can twist the whole boot to make sure it's seated all the way around.
5. Rethread the outer ball joint and install it into the strut.
Total job to do both sides, start to finish, was 1.5 hrs.
Click to view attachment
When removing the old tie rods, the outer boot support also acts as a locknut, keeping the inner joint from unscrewing. In order to remove the inner joint, you need to loosen the lock nut/boot support. I did this by using a 5lb sledge and a drift set into one of the notches. The correct tool would be something like this:
Once the locking ring is loose, the whole assembly unscrews.
Another tip: when installing the new assembly I used the following procedure...
1. Unscrew/remove the new outer ball joint.
2. Slide the thick washer into place and screw the tie rod shaft into the steering rack.
3. Tighten with your special thin wrench.
4. Slide the new boot over the tie rod shaft and slip it into place. Careful use of a screwdriver will help get everything into place. Also, you can twist the whole boot to make sure it's seated all the way around.
5. Rethread the outer ball joint and install it into the strut.
Total job to do both sides, start to finish, was 1.5 hrs.
Bilstein wrench that comes with the inserts (it used to) or a motorcycle insert wrench also works.
When all else fails...a pipe wrench also works.
Rich
When all else fails...a pipe wrench also works.
Rich
This is a "lo-fi" version of our main content. To view the full version with more information, formatting and images, please click here.