 Is this article archived somewhere else?
Full Version: "Redbeard" transaxle article
Want to read the often mentioned "Redbeard" transaxle article. The link given to a Road Runner webpage is now no good. Is this article archived somewhere else?
Is this article archived somewhere else?
Probably not. There are a few articles to look at on my vendor page in the vendor section (not selling anything on it, just links to other threads and stuff).
Below is a link to 31 pages of transmission notes as well. Do you have a specific issue we can address?
Below is a link to 31 pages of transmission notes as well. Do you have a specific issue we can address?
It's still rough around the edges, but take a look!
James
Full on Synchro change!
So yer gears are a grinding…I feel your pain. You too can rebuild the 901. It’s not that hard. Really! If all of the oil seals are in decent shape (no leaks!!!), then you can change the synchro’s while leaving the tranny in the car and attached!
Tools - You’ll need a few tools. Most of them ya got, but there 2 special ones which really help
Synchro hub removal tool - This puppy helps you remove the dogteeth from the actual gear. There are ways to get around buying this one. I’ll address those later.

http://www.pelicanparts.com/catalog/shopca...y_pg1.htm#item5
Shift fork alignment tool - There is no substitute for this. If you want to rebuild the tranny, ya need it!

http://www.pelicanparts.com/catalog/shopca..._pg2.htm#item17
Other Tools:
30 mm deep socket (I found one at Autozone for $6.99)
3 and 4 mm pin punches
13 mm socket wrench with extension
17 mm socket
17 mm Allen for the drain plugs
19 mm deep socket (you can substitute a ¾ inch)
"Big Ass" Crescent wrench
Plastic and brass hammers
A thin file
Gasket scraper (or a single edged razor blade)
Some sort of cleaning fluid (I like to use diesel fuel)
Lint free rags
A couple of brass brushes
3 jack stands
2 drive up ramps
A couple of big plastic boxes.
A plastic in-sink washtub.
Parts: 4 gaskets - Intermediate plate to transmission housing, End cover to intermediate plate, the fork gasket and rear cover plate gasket. The factory manuals don’t show the 3rd or 4th gaskets for side shifters, which use an o-ring with the side shifter and no rear cover plate on the rear cover.
Up to 5 synchro bands.
http://www.pelicanparts.com/catalog/shopca...y_pg1.htm#item3
Up to 5 sets of dogteeth
http://www.pelicanparts.com/catalog/shopca...y_pg1.htm#item4
Up to 3 sliders
2nd/3rd and 4th/5th are one type and Rev/1st is different.
http://www.pelicanparts.com/catalog/shopca...y_pg1.htm#item6
A bearing or 2
What will you need? It depends on what is actually wrong and how many gears grind. If it only grinds in 1st or 2nd, you may only need parts for those areas. I’ll show you good and bad parts. If the grinding just started, you may be able to get away with just a few synchro-bands. As a bare minimum, you need to get 2 brand new synchro-bands, for 1st and 2nd. These get the most wear and you might as well replace them while you’re in here!
2 Muffler gaskets
http://www.pelicanparts.com/catalog/shopca...s_pg2.htm#item9
Clean - Clean - Clean
Youze about to get into the inner workings of the transmission. You do not want to get dirt inside. We all get oil leaks and some of this oil ends up on the transmission. Clean the dirt and grime off the transmission. You might try one of those pressure washer engine degreasers at the u-spray it car wash places before starting this job. Besides, no one likes working on a greasy mess. Clean at least the end cover and the intermediate plate on the outside.
At home, back the car up onto the ramps. For safety sake, disconnect the battery. You don’t want someone accidentally starting the car while this is all going on.
You might try a hand held garden sprayer filled with diesel and a catch tub underneath. You can filter and reuse the liquid.
I also tried a personal steam cleaner. It worked well, but not the way I had envisioned, i.e. the grease and grime just dripping off. It loosens the dirt, oil and grease and seems to infuse water into it. This makes it fairly easy to wipe off. A screwdriver wrapped with a cloth helps get into the many crevices. I also have found that deep buildup just needs to be scraped out with an old screwdriver first.
A home pressure washer works well too, up to a point. Nothing alone seems to work. I think a combination of the three, steam, pressure washing and plain old elbow grease will get it clean. You might also consider having the case, side-cover and intermediate plate cleaned by a machine shop, if you pull the tranny off the car.
While you’re under there, take a look at the CV joints and check the boots. Squeeze them while holding a strong light on them. Cracks? Dry rot? Replace them! And don’t forget to repack them with grease!
While you’re cleaning, pay special attention to the nuts that hold the transmission cover on. Clean the threads as best as you can. Small brass brushes help here, along with solvent. Afterwards, spray them liberally with penetrating oil. While they’re soaking in it, remove both drain plugs and drain the tranny oil. Remove the shift-rod cover. Clean the shift rod area and soak it’s nuts with penetrating oil. Spray the exhaust nuts as well. You might consider doing all of this a few days before and doing periodic penetrating oil sprays. Tapping the studs and nuts with a soft brass hammer will help as well.
Support the heat exchangers with wire or jack stands. Remove the muffler and the muffler hanger from the transmission. Disconnect the transmission ground strap from the end cover.
Remove the shift rod:
Tail shift: You disconnect the two 13mm nuts which hold the shift rod support bracket. Then push back on the shift rod or shift the car towards the "odd" gears. You may want to go ahead and completely remove the shift rod from the car and renew all the shift bushings (See the tech article on shifting improvements). Highly recommended.
Side Shifter. Using an Allen wrench, remove the shift rod set screw and separate the shift-rod from the shifter arm. Remove the 2 nuts that hold the shift console to the transmission. Pull the shifter assembly out of the transmission. Disconnect from the shift rod. Soak it in your favorite cleaning fluid.
Remove the speedo cable and speedo drive. On a tail shifter, remove the lower cover plate on the rear cover.
Place a jack stand underneath the transmission, raise the tranny with the jack Remove the transmission support nuts and washers. These are attached to through bolts and you’ll need to place a wrench on top as well as the ratchet on the nut. Now lower the transmission. It will catch on the bolts. Use a punch to push one support bolt up as far as it will go. Do the same to the other side. Lower the tranny. Keep doing this until you get one side free from the bolts, then get the other. Lower the tranny a bit. Support the tranny (and engine!) with the jack stand, near the front of the bell housing. You should have the tranny tail cover low enough now that you can access all the 13mm end cover nuts.
Remove the Tail cover. All of the tail cover nuts should be 13 mm. Don’t worry if the nut is rusted on and the stud backs out. We’ll take care of that later. Remove the nuts and the washers. Put them into a jar with some cleaning solution. On a tail shifter, remove the rear cover nuts washers and cover. Place a large cloth or old towel underneath the transmission, because you are about to have reverse drop out on the ground! Using a plastic and/or brass hammer, tap the cover off. Tap lightly on the "ears", the rear transmission supports. Collect all of the pieces that fell on the ground and remove any loose pieces from the inside of the end cover. Put them back in the end cover and place in a clean plastic box labeled reverse. Make sure all loose pieces are there.
Tail shifter: remove the fork. It is in the same spot the side shifter uses for the shift selector. It’s just behind the backup switch. Use a big screwdriver to pry it out, but only at the "pointy" ends, not in the middle. Note which way the "toes" are pointing (Upwards!)
914/6 Tail shifter! Before you can remove the intermediate plate, remove the accelerator linkage from the intermediate plate.

End Cover coming off – Who the hell painted the tranny Blue? Sheesh!

End cover off
Before we remove the intermediate plate, we need to loosen/remove a couple of things.
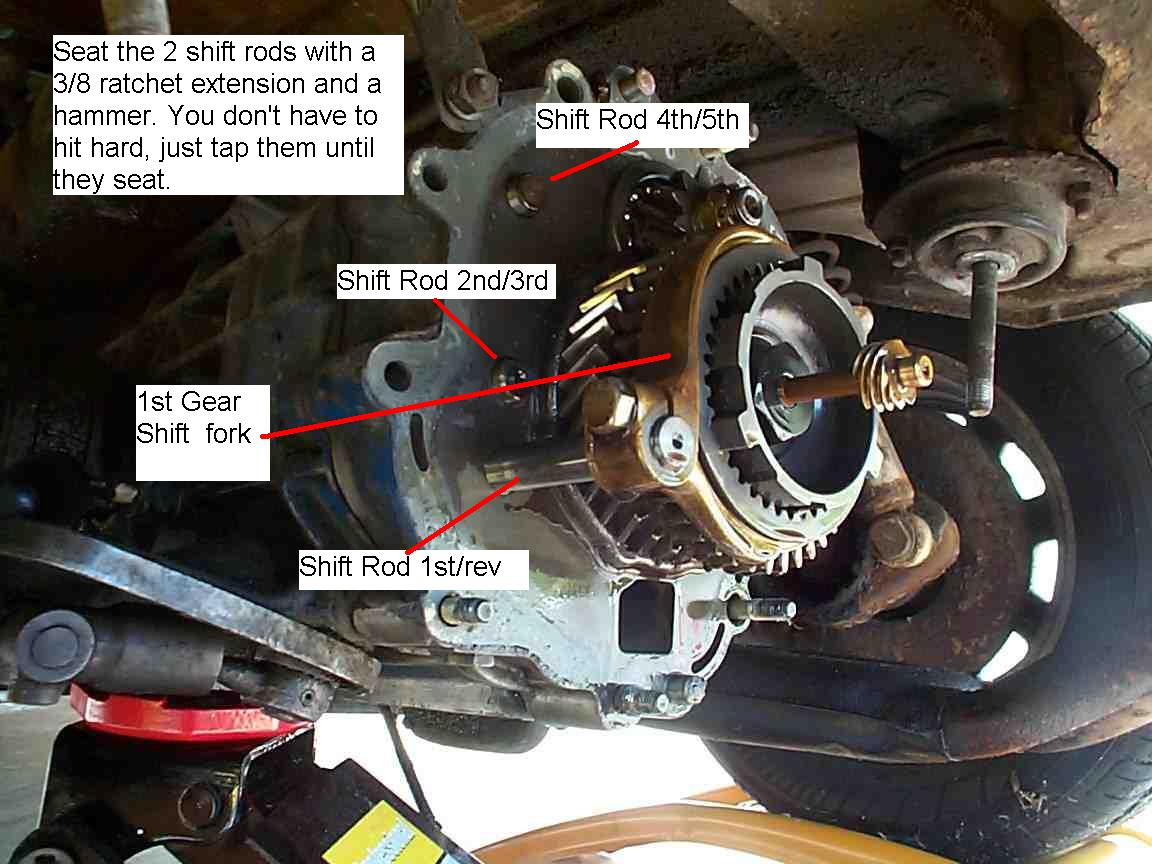
There is a rod on the left side that is connected to a brass ½ moon thing. This is you 1st/rev gear selector. The ½ moon thing is a shift fork. It is sitting on the 1st/rev slider. Push the rod and the slider into the transmission (Towards the front of the car) and engage it to 1st gear (get the slider to engage the teeth). Now look at the same level as the first shift rod on the intermediate plate. You’ll see the protrusions of the other 2 shift rods. Using a ratchet extension and a hammer, tap both of these rods into the intermediate plate. This engages all gears, locking up the entire transmission so it can’t turn. Use the 30mm socket and a breaker bar and loosen the rear bolt with the speedo worm drive (Yeah! THE BIG BOLT). Just make sure you can turn it by hand, but don’t remove it yet.
Take the pin punch and remove the roll pin from the castle nut on the right side of the transmission. Use a 19mm Socket wrench (I like a ¾" deep socket…) and a breaker bar to loosen (but not remove) the castle nut.
Using a 13mm ratchet, remove the little bolt from the shift fork. Slide the shift fork and the slider off the transmission. You may need to use a large screw drive to pry the slider out of engagement with first gear, depending on the condition of first gear. Label this 1st gear shift-fork.
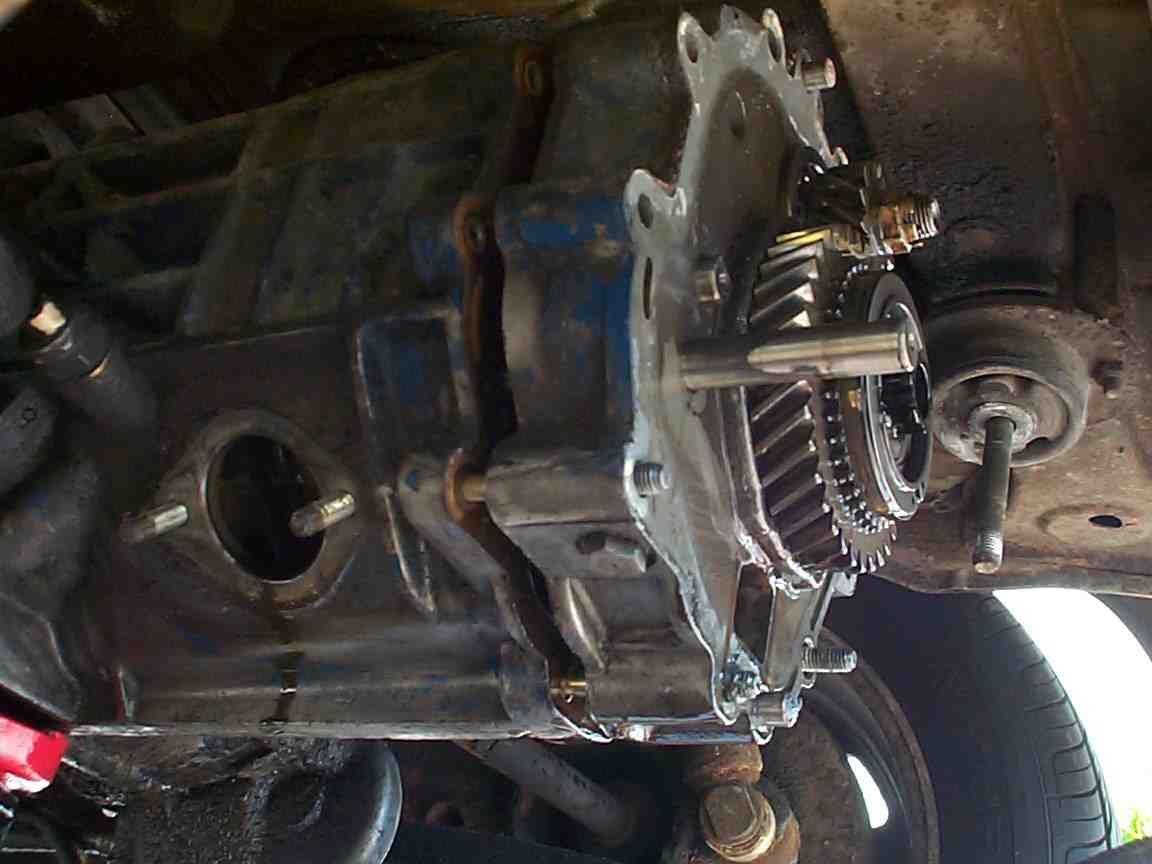
Remove the intermediate plate and the gears: Using a brass hammer, lightly tap the intermediate plate towards yourself. Once it’s loose, hold tightly (It’s heavy!) and pull the intermediate plate and gear stacks out of the transmission.

Intermediate Plate starting to come out. Note the reverse switch on the left side of the picture and the access point for the tail shifter support fork or the side shifter shift console.
Other side, the gear stack is almost out!
The Gutless Tranny! Notice that the CV joints, the starter, etc are still in place. The backup switch hasn’t even been disconnected. Notice that only 4 of the studs that hold the intermediate plate and the end cover on are still there. This seems to be a common situation. Many of the studs will come out. Go buy some new nuts. Get an 8 mm 1.25 pitch die and tap. Use the die to clean the threads on the studs. Use the tap to clean the nuts and the stud holes. Remove the rusted on nuts with a couple of nuts jammed together on the threads at the other end. If you have only 4 remaining stud, go a head and remove them. Use a gasket scraper to remove any remaining gasket on the machined case surface. Re-install the studs into the transmission with some red-locktight.
Now the fun begins!
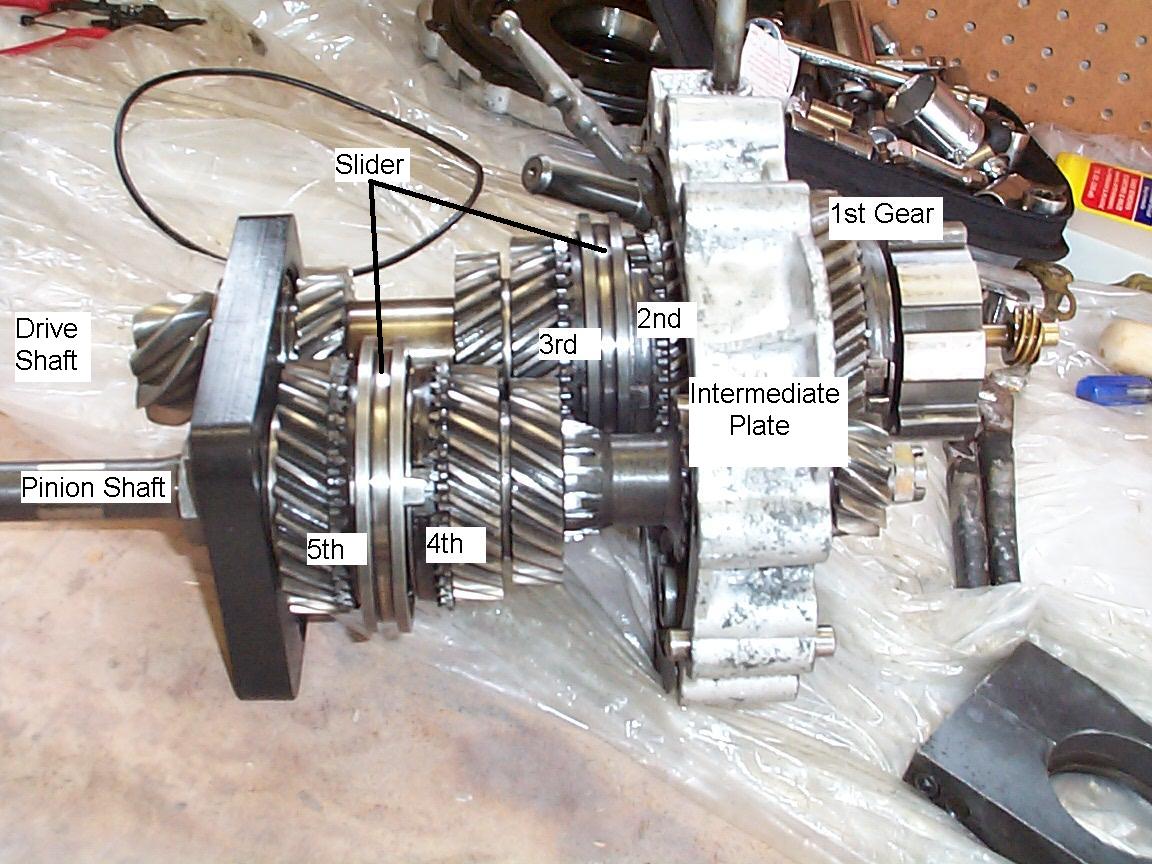
Part 2: Rebuilding the gear stack
[img]http://homepage.mac.com/markd/914WorldTemp/Image1.jpg[img]
Gear Stacks with the Shift-forks removed
I hope you cleared a good work space cause this is going to be fun. Get yourself 2 nice clean plastic boxes. Label them (If you’re into that) Pinion and Drive shaft. If you’re only replacing the 1st and 2nd gear synchros, you only need one box, and you don’t need to remove the shift fork from the drive shaft
If all you want to do is fix 1st & 2nd gear, just remove the pinion shaft by removing the large 30 mm bolt and pulling 1st gear off. Place all of the 1st gear stuff into the pinion shaft box. You should be able to get down to the big washer, slightly angled washer. Put a label on this washer, as 1st gear.
Tap. And I mean TAP, the drive shaft with the brass hammer. The fit of the bearing runner is very tight. You are not driving a nail! You are tapping. Tap tap tap. Tap tap tap. Once there is a little room, you could use a gear puller, but lightly taping will work. Once the collar is off, put it in "the box". Push the shaft away from the shift fork and remove it from the intermediate plate.
Now, you have a couple of choices… The gear-puller is the best solution. But all you need is another tool. I hear you cry. My gear puller also helps on pulling the CV joints apart, among other things. And it’s a cool looking tool. If ya got it, use it to remove 2nd gear. That will pull the other collar and the other washer off. If you don’t have one, you can use the BRASS hammer to whack the gear stack down. It does work, just be gentle, but not too gentle. The brass hammer takes the abuse; the gears do not. Just turn the stack as you whack it.
If you are repairing/inspecting 4th and or 5th gear, do the same with the drive shaft. You might want to do this anyway, since the drive shaft bearing is a weak point and ½ of them have been bad that I’ve seen. Be very careful. The shaft is hollow and the extra holes for the castle nut retaining pin make this end of the shaft weak and hitting too hard may bend the end of the shaft. Putting a couple of nuts on the threads will help strengthen the area.
Once you get it apart, if the ball bearings fall out of the pinion bearing, you have a bad one. If the brass cage is shattered, you have a very bad one! If the cage is missing or the balls are missing, the shaft may unusable.
If the driveshaft bearing runners will not separate at the intermediate plate, first choice is using a liberal amount of carb cleaner and letting it soak for a while. Keep attempting. If it still won't come loose, look at the bearing. If the balls are missing, the journal may be so bunged up that it will never separate.
To get the gears off the driveshaft, use a BIG ASS crescent wrench. Scratch a match mark on the nut and the washer. Pry the anti-rotation washer and flatten it. I’ve used a couple of vise grips on the splined part of the shaft to hold it in place. Sometimes, it is very well torqued and a hammer is not so gently applied to the crescent wrench. Anger management at it’s finest!
Once you have the nut off, remove the washer. Flatten the washer, then fatigue and break the used side of the washer. Use a file to clean up this edge.

This is an ugly shattered cage surrounding a good one. Notice the discoloration of the shattered one. I expect it was run dry. The bearing on the left is located on the upper shaft and will lose oil first, when the transmission is running low on oil.
Keep those trannies filled! You can check your oil level by removing the fill plug and trying to dip your finger into the oil filled case. If you feel no oil, fill it up until it runs out of the fill hole. Of course, don’t do it now with the gear stack out.
Once 2nd gear is off, everything should be easy to access and should slide right off. Now is the time to look at the parts.
The gears themselves are always in mesh between the 2 shafts and spin on those needle-bearing collars. So, one part of the gear set is NOT connected to a shaft, except when the slider engages them.
Take the slider, and place it over the synch band and press down. That is what happens when you engage a gear. The synchband compresses, and the slider slides over it and engages the dogteeth. If the synch band is worn out, it should be fairly easy to put the slider into the dogteeth. Try this on 4th or 5th gear. You feel a lot more resistance.
First lets look at the slider. It is a ring, with lots of little internal slots, in 3 groupings, and 3 large slots. The slider slides over the triangle member on these 3 large slots.
Look at the slider itself. The small slots should have a point at each end (Except 1st gear, which should have a point only on one side). Once the synchro band wears out, this is when you start to hear grinding, the slider is no longer engaging the synch band. It then engages the dogteeth at a different speed and uses the pounding of the dogteeth to get them to the same speed. Not good!
The slider and the dogteeth are pointed this way to help engagement. After they reach the same speed with the synchband, the slider is allowed to continue moving towards the dogteeth. When they encounter each other, the gear will rotate slightly relative to each other. If the points become worn, you may find yourself unable to get the shifter into that gear every time.
2nd gear on my 914/6, at higher RPMs, would synch, but not lower RPMS. This is because the rapidly spinning shaft forces the synchband outward and allows it to engage the slider a bit, less or no grinding. Sliding the gear shift slowly into a grinding gear also helps. But these are temporary solutions at best….
The slider can get some wear from the contact with the synch band, but the majority will come from moving contact with the dogteeth. 3 things happen.
#1. The Slider loses some (or all) of it’s pointiness
#2. The Dogteeth lose some (or all) of it’s pointiness
#3. As the slider wears, the metal is pushed back and mushrooms a little bit, making the slot uneven. This makes it hard to shift into a gear and may prevent the slider from fully engaging the dogteeth, allowing it to "pop" out of gear.

This is a slider with normal wear is could be put right back in (It’s a 4th/5th gear slider, but it is exactly the same as 2nd/3rd). Use a file to make the small slots are straight. Also, use a brass brush and some solvent to remove any gunk in the slots.
The little circumferential scratches come from synchro contact and are normal.
If the points are a little blunted, it’s OK. Clean up the ring as best you can. Make the side of each slot straight. If the points are gone and flat, It’s done. Time for a new one. Using a dremel tool to repoint the sliders works very well. It can save a bunch of money, especially on 1st gear. Usually, it's a lot easier to just replace 2nd/3rd with a used 4th/5th.
The 1st gear slider is different from the other two. It has points only in one direction. It also has gear teeth (reverse!) extending radially out from the edge, which makes its OD bigger. It costs about twice what a 2nd-3rd/4th-5th slider costs.
Removing the Synchband from the gear
Remove the synch bands from the gear by removing the circlip with a pair of snap ring pliers. The synchband sits just inside of the dogteeth.
You need expanding snap ring pliers and I had to modify the pair I own to get the expansion enough. Once the ring is slightly expanded, you let once end slip "upwards" so it's off. Then use a screwdriver under the ring to pry it the rest of the way around.
Once the snap ring is off, the synch band comes out quite easily.
Synch bands:
Take a look at these synch bands:
The bad one here is really bad. If you look at any synchband, the side towards the slider will usually wear more than the side towards the dogteeth. In the picture, the synch band has become so loose, it is sliding around in the dogteeth and a slot has been machined. Porsche factory manual suggests that anytime you have a synchband out, if it is still good, turn it around so the better surface will be towards the slider. And I thought this was just a mechanics trick. Nope. Porsche approved!
Looking edge on, the side with more metal (thicker) is the "good" side, if you lost track. Notice the "good one" has a less even surface with a molybdenum coating. Bad ones the coating is gone and they are usually a bit shiny. Usually the "good side" is harder to install back onto the gear.
If the bad side is so bad it will fit loosely into the dogteeth, it is absolutely done. Pay the $60 and get a new one. If it falls out, it’s too loose. It should compress slightly when going in. If one side sticks in well and the other side slips out, it is somewhat worn but reusable. This is a candidate for "flipping around". Put the looser (worn) side inwards towards the dogteeth.
Dog Teeth.
The dogteeth are press fit into the gear. The Porsche/VW removal tool is a 2-piece plate that locks onto the dogteeth. You then use either a press or a hammer to separate the gear from the dogteeth with the cylinder. (The tool pushes the gear). If you are replacing the dogteeth with new ones, it makes little difference how you remove them. If you are using a donor tranny, get this tool. This is cheaper than 1 set of dogteeth.
(Insert remover pictures here)

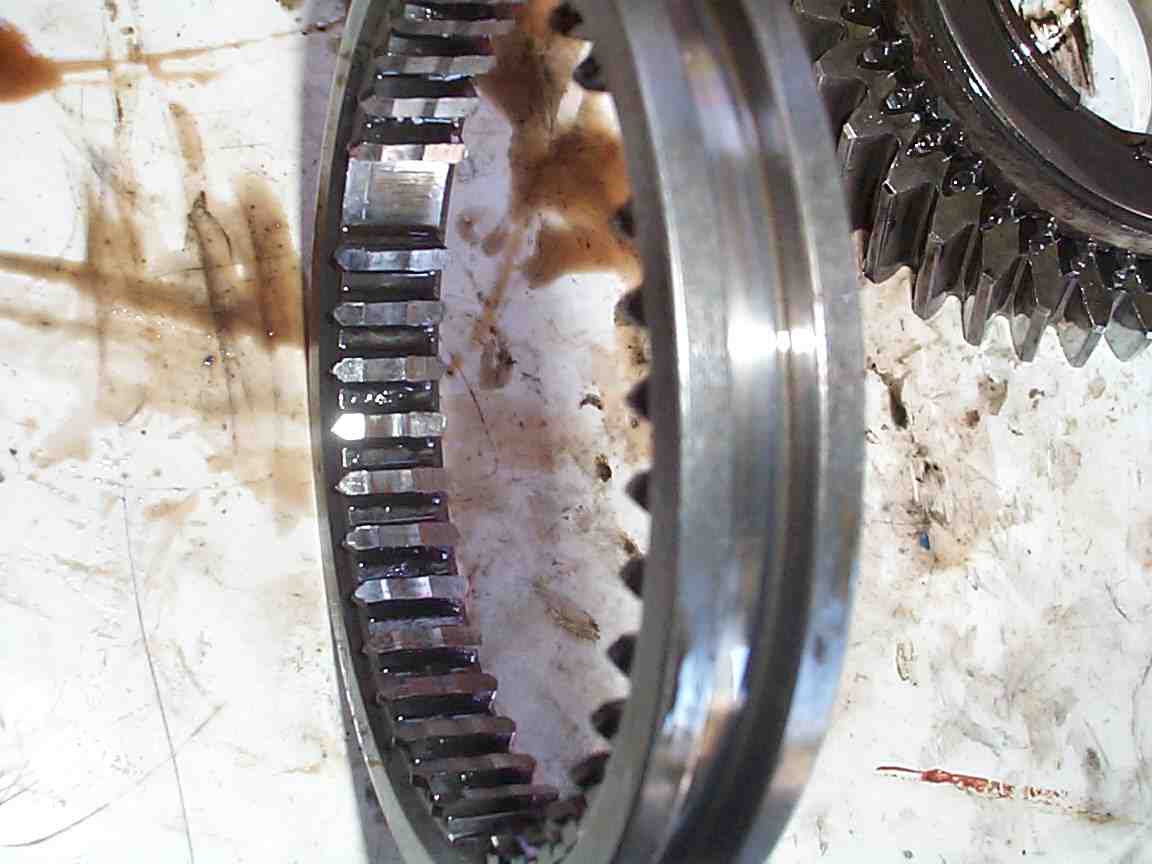
The "teeth" biting into the synchband here are the dogteeth. These are the part that engages the slider.
All Dogteeth are the same for all gears. All Synchro bands are the same for all gears. So, why do 1st gear dogteeth cost less in the catalog? The dogteeth come with brake bands, the little guys that sit under the circlip. 2nd-5th gears need to be synchronized in both directions (Spinning the gear faster and spinning the gear slower – i.e. up-shifting and downshifting). 1st gear only needs to be synchronized in one direction, down shifting. So only the down shift brake band is installed. The only time you would you would need to synch the other way would be if you were moving backwards and tried to synch 1st, which is a no-no. Don’t do it.

Good position brake bands. The Little bands between synchroband and the inside lip of the dogteeth, are the brake bands.
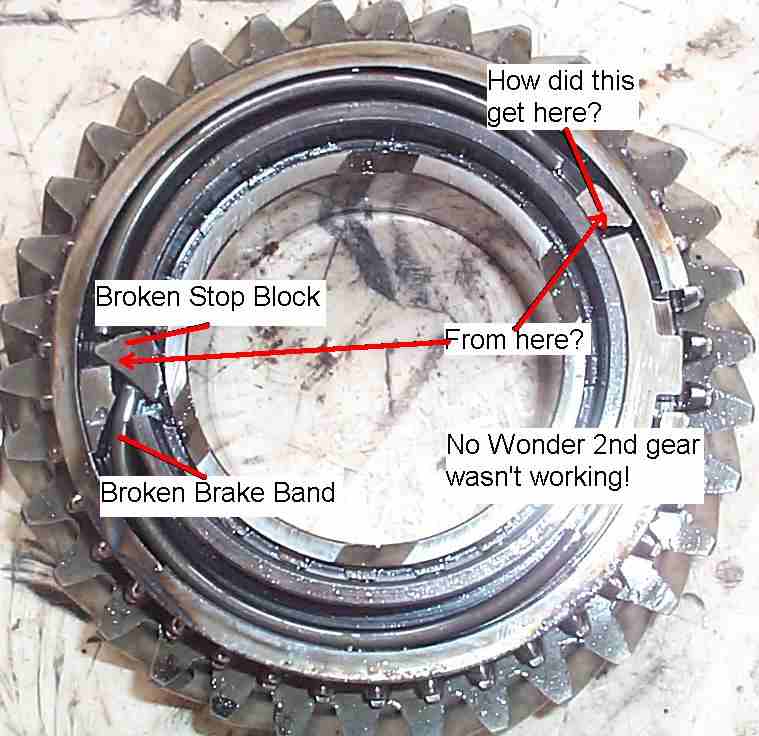
This gear the brake bad wasn’t assembled right. The brake band slipped under the stop block, eventually leading to a broken stop block and bent brake band.

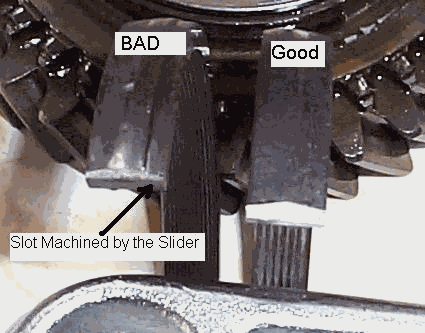
2nd/3rd gear slider –2nd gear side is "up"

2nd gear side, notice the blunting of the points. This is actually still useable. But I’d replace it. Also notice the "mushrooming" between the slots.

2nd/3rd gear slider, 3rd gear side. Notice how much more pointed the 3rd gear side is compared to 2nd gear.
Again, notice how much more pointed the 3rd gear side is compared to 2nd gear.
This slider could be cleaned up and installed with the better side towards 2nd, to even out the wear. Replacing the dogteeth will help too.
Part 2B – "Re-assemble the stack".
Clean the intermediate plate of all gasket material.
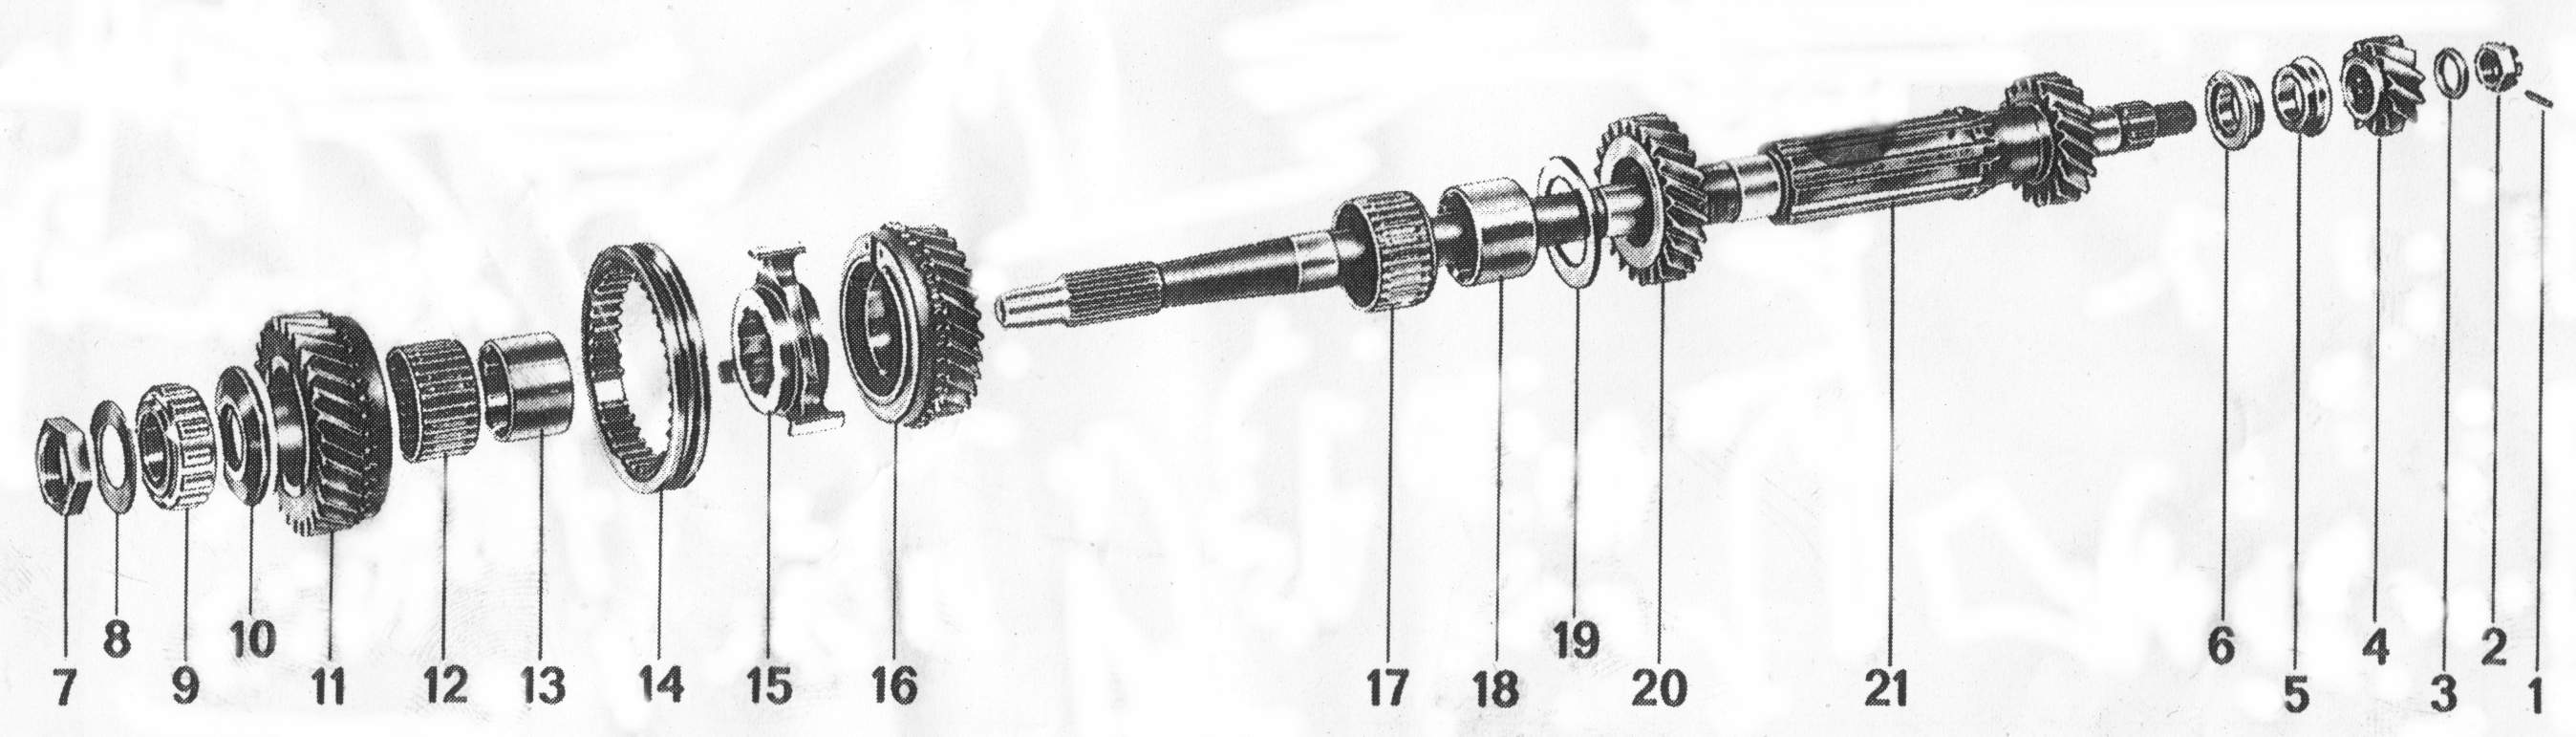
Drive shaft
Flatten the anti rotation washer with a hammer. Use some vise grips to "work" the previously bent side until it fatigues and falls off. Use a file to clean up the washer.
Reassemble up to and including #6. 1-5 install on the other side of the intermediate plate and done afterwards. You are supposed to torque nut #7. You would either need to weld an old socket to a pipe and weld a 32mm socket to the pipe and create a very long deep socket. I used my BIG ASS crescent wrench to both get it apart and put it back together. I tighten it as much as I can, and line up the match marks. The anti-rotation washer (#8) has an inner tab which fits into a slot on the shaft, so it always lines up the same way. Bend a different side up against the flat of the nut (#7).
Pinion Shaft

Reassemble up to #11. 1 through 10 install on the other side of the intermediate plate and are done afterwards. Make sure you get all of the shims (#26) in place.
Slide both shafts into the intermediate plate and then assemble the rest onto each shaft. Don’t torque anything down yet. You may need to tap bearing collars back into place.
Using your fingers, snap the sliders for 2nd/3rd into 2nd and the 4th/5th into 4th. The gear shafts are locked together. Torque the castle nut on the driveshaft to 80 ft-lbs and put its retainer roll pin back in. I keep turning it, a little at a time, until the slots line up with the hole.
Torque the pinion shaft bolt with the deep 30mm socket (80 ft-lbs). Snap the sliders back to the central position. You may need a screwdriver to pry them off of new synchrobands.
Slide the shift-fork alignment tool onto the gear stack. The shift rods can rotate slightly. Make sure that all three shift-rod slots match up position wise. Lock down the shift rods.
Center each slider into the middle of between each gear set. Tighten the shift-fork nut. 1st gear, adjust the shift fork so the slider is just off of the synchband for 1st. Tighten its nut.
The gear stack is back together!
Part 3, putting it all back together –
Clean all of the gasket material from the sealing surfaces on the transmission case and the end cover. You want to save a few bits of the gasket, so you can match it up to the kit. Different colors are a little different thickness. I know, old oil soaked gaskets are not easy to tell apart. Hold it up to a light and you’ll be able to figure it out. Sometimes 2 gaskets were used. There are not just sealing gaskets. These are paper shims. Do not use any gasket sealant on the surfaces, except either non-hardening or very high temp silicone grease (Mobil 1, etc).
Studs that pulled out need to be either replaced or you need to pull the old nut off by jamming 2 nuts together on the stud threads. When you remove the rusted on nut, if you find the threads damaged, you’ll need to replace the stud. If the threads look ok, but dirty, use the die to clean the threads. Dies fit nicely inside a 1 inch deep socket and the ratchet action makes this go much faster. It might be easiest to remove all the studs and clean the gasket surface and then re-install all the studs with red locktite.
Clean up the threads on the transmission housing with a tap. Reinstall the studs. Place the gasket on the transmission housing.
The gear stack should slide in with little or no problem. One "trick" is to engage 4th gear, which helps position the stack to slide in. You may have to turn the gears a little bit (kind of like putting in a distributor). Uh, a hammer helps. Seriously! You lightly tap the intermediate plate to move the gear stack in, the last inch or so. I found that the 2 dowel points to be good positions to tap.
For a tail shifter, Once the gear stack is in place you need to make sure the shift selector rod is inserted in its hole properly in the transmission case. Access this through the side hole in the transmission. Then tap the intermediate plate home.
The hard part: Putting the cover on. Make sure you've removed the speedo drive. Side shifter, it's a breeze. Reassemble reverse onto the reverse shaft. Keeping the cover tilted back a little bit (having the engine and tranny tilted down helps a little bit here. Slide the cover home and get the reserve shaft into it's home. The final "washer" on the reserve stack has to be aligned. Make sure it is in the correct position. The cutout faces the intermediate plate and lines up with the "hump" on the intermediate plate. Adjust it into the correct position with your fingers while the cover is about 1 inch from closure. Once everything is all set, tap it into place with the hammer (Damn thing sure comes in handy, but, don't get wild with it!)
For a tail shifter, it's a bit tougher. You have to do everything on your back! The shift selector fits into a recess in the tail of the cover. I expect this is where the 911 shift-shaft used to go. You have to position it with your fingers from inside the cover, until it's in the correct place, all the while not letting reverse fall off. Point the finger of the end cover rod downwards to keep it out of the way.
When reverse falls out, yell a bit, curse some more, then find the bits that rolled away. Clean 'em off and try again. Follow the rest of the directions as a side shifter.
Once the cover is on, I put a couple of nuts into place.
Use a screwdriver to reach in through the access port on the side of the tranny and disengage 4th/5th.
On the tail shifter, through the access port, slide the gear selector rod toward the front of the car. You should be able to turn the end cover rod and get the finger into the rod slot. Once this is done. Through the side access hole, center the shift selector finger and center the shift rod so that the finger is straight. Make sure that the finger is in the line of the three shift fork rod slots. Now you can put the support fork in.
You need to tap it home. Put the nuts on but don’t torque them. Using a vise grip to grab the external shift rod. Make sure you can select all gear. If it seems hopelessly locked, pull the support out and try again! (Been there, done that…). Once you can select all gears, tighten up the nuts and torque to 18-20 ft-lbs.
For a side shifter, install the gear selector console. Test out the gear selection with the external selector. Don't worry if it's a little stiff. If everything seems ok (being able to select each gear), then go ahead and close up the cover and torque the nuts. Be careful, they only need about 18-20 foot-lbs.
Reconnect the main shifting shaft. Check the gearshift and make sure you can shift into every gear. All set, go ahead and reconnected the tranny ground strap, install all the end cover nuts and torque the nuts on the cover and the side access port. Remember to use only 18-20 ft lbs.
Reinstall the speedo drive. Line up the speedo drive set screw hole with the hole in the end cover. Install the set screw being very careful not to over tighten the screw. The threads are usually an insert and they pull out fairly easily.
Reinstall the gear selector cover. Fill the tranny with 80-90W gear oil and replace the plugs. If you’re going to use really good gear oil (Synthetic or Swepco), wait until you reach the first change. Re-install the muffler.
Reinstall the battery!
While you are at it…You should change at least the tranny end shift rod bushings. My personal feeling is you should change them all (They are cheap), all the way up through to the gearshift in the car. Look at the shift rod tech articles on this web site.
I want to add a few things to those articles:
#1. You should remove the entire shifter assemble and clean and disassemble it. The assembly has 3 springs, a shift lock out plate, 4 c-clips, 2 rods, a top bushing and a spring seat, along with the shifter-shaft and the housing. In finding the final slop in my gearshift assembly, the spring seat was broken and the top bushing was worn. Some of these parts are only available through a Porsche dealer, although I did find the upper bushing and the spring at a major Pelican competitor (Are you listening Wayne?). The spring seats are available only direct from Porsche!
Upper Bushing: 914 424 131/00
Spring: 901 424 132/00
Spring seat (70-72) 901 424 135/00
Spring seat (73-76) 914 424 343/00
The lockout plate can also get damaged/worn out. If it doesn’t look like this, you need to replace it.

Reassemble with some good grease.
#2. I can’t speak for the side shifter, yet, but my tail shifter shift rod and the rear shift bushing, were not the same size. I ended up buying some MAPP gas and a couple of brazing rods from my local hardware store. I heated up the rod to way red hot and melted brazing material onto the rod. I to smoothed it out as much as possible while still molten. After cooling, I used a grinder to rough round it, then strips of emery cloth to smooth and round out the rod. It now is a much tighter fitting rod in the bushings. Brass brazing compound works fine. It’s riding in a plastic bushing! You probably could do this with copper pipe solder as well. And the smoothing would be easier (Softer material). You could weld it, but the smoothing will be much more difficult. You might want to check the rod in all places it rides in a bushing.
As in the first article on helping the tail shifter, make sure the final links do not have much slop in them. If they do, use the brazing material to repair them and a file and emery cloth to smooth them out. You do not want any slop in the linkage!
#3. Aligning the shift rod. I spent a great deal of time aligning my shift rod on my 914/6, which is an original tail shifter. What I’ve found is that the best way to align the shifter is to put the car in 3rd gear, then align the shifter so that 3rd gear is selected when shifter is riding up against the lockout plate with no pressure. This gives you a "slot" for 2nd and 3rd. 1st and reverse will then require a significant effort against the lockout springs to select.
Adjust the forward/backward position of 3rd so that it is in a comfortable spot, but not too far back. Lock the shaft down by tightening the locking collar nut. Shift it into 2nd. If it’s too far forward, loosen and slide the shift selector back. Repeat the 3rd and 2nd alignment until it where you want it forward and back.
A note on the locking nut/bolt. On the side shifter, this is a no-brainer! It’s right under the shifter with easy access. On the tail shifter, it’s under the center armrest, under the access plate. There is a hole in the center tunnel on the driver side (move the driver seat all the way forward for access) big enough for the 13 mm box end wrench (an open end will not fit!). I had to change the position of my locking collar so that the bolt was on the passenger side of the shift rod and the nut is on top. You can then fit a box end wrench through the access hole to the bolt head and a ratchet to the top. And you are holding all of these while holding the gear selector steady and turning the ratchet. No one said owning a Porsche was easy!
Also, use a high temp grease (I prefer synthetic) on all the working parts and plastic bushings. Get the covers and put them in place. Dirt/grit in the grease will help ruin the bushing and/or the shift rods!
James
Full on Synchro change!
So yer gears are a grinding…I feel your pain. You too can rebuild the 901. It’s not that hard. Really! If all of the oil seals are in decent shape (no leaks!!!), then you can change the synchro’s while leaving the tranny in the car and attached!
Tools - You’ll need a few tools. Most of them ya got, but there 2 special ones which really help
Synchro hub removal tool - This puppy helps you remove the dogteeth from the actual gear. There are ways to get around buying this one. I’ll address those later.
http://www.pelicanparts.com/catalog/shopca...y_pg1.htm#item5
Shift fork alignment tool - There is no substitute for this. If you want to rebuild the tranny, ya need it!
http://www.pelicanparts.com/catalog/shopca..._pg2.htm#item17
Other Tools:
30 mm deep socket (I found one at Autozone for $6.99)
3 and 4 mm pin punches
13 mm socket wrench with extension
17 mm socket
17 mm Allen for the drain plugs
19 mm deep socket (you can substitute a ¾ inch)
"Big Ass" Crescent wrench
Plastic and brass hammers
A thin file
Gasket scraper (or a single edged razor blade)
Some sort of cleaning fluid (I like to use diesel fuel)
Lint free rags
A couple of brass brushes
3 jack stands
2 drive up ramps
A couple of big plastic boxes.
A plastic in-sink washtub.
Parts: 4 gaskets - Intermediate plate to transmission housing, End cover to intermediate plate, the fork gasket and rear cover plate gasket. The factory manuals don’t show the 3rd or 4th gaskets for side shifters, which use an o-ring with the side shifter and no rear cover plate on the rear cover.
Up to 5 synchro bands.
http://www.pelicanparts.com/catalog/shopca...y_pg1.htm#item3
Up to 5 sets of dogteeth
http://www.pelicanparts.com/catalog/shopca...y_pg1.htm#item4
Up to 3 sliders
2nd/3rd and 4th/5th are one type and Rev/1st is different.
http://www.pelicanparts.com/catalog/shopca...y_pg1.htm#item6
A bearing or 2
What will you need? It depends on what is actually wrong and how many gears grind. If it only grinds in 1st or 2nd, you may only need parts for those areas. I’ll show you good and bad parts. If the grinding just started, you may be able to get away with just a few synchro-bands. As a bare minimum, you need to get 2 brand new synchro-bands, for 1st and 2nd. These get the most wear and you might as well replace them while you’re in here!
2 Muffler gaskets
http://www.pelicanparts.com/catalog/shopca...s_pg2.htm#item9
Clean - Clean - Clean
Youze about to get into the inner workings of the transmission. You do not want to get dirt inside. We all get oil leaks and some of this oil ends up on the transmission. Clean the dirt and grime off the transmission. You might try one of those pressure washer engine degreasers at the u-spray it car wash places before starting this job. Besides, no one likes working on a greasy mess. Clean at least the end cover and the intermediate plate on the outside.
At home, back the car up onto the ramps. For safety sake, disconnect the battery. You don’t want someone accidentally starting the car while this is all going on.
You might try a hand held garden sprayer filled with diesel and a catch tub underneath. You can filter and reuse the liquid.
I also tried a personal steam cleaner. It worked well, but not the way I had envisioned, i.e. the grease and grime just dripping off. It loosens the dirt, oil and grease and seems to infuse water into it. This makes it fairly easy to wipe off. A screwdriver wrapped with a cloth helps get into the many crevices. I also have found that deep buildup just needs to be scraped out with an old screwdriver first.
A home pressure washer works well too, up to a point. Nothing alone seems to work. I think a combination of the three, steam, pressure washing and plain old elbow grease will get it clean. You might also consider having the case, side-cover and intermediate plate cleaned by a machine shop, if you pull the tranny off the car.
While you’re under there, take a look at the CV joints and check the boots. Squeeze them while holding a strong light on them. Cracks? Dry rot? Replace them! And don’t forget to repack them with grease!
While you’re cleaning, pay special attention to the nuts that hold the transmission cover on. Clean the threads as best as you can. Small brass brushes help here, along with solvent. Afterwards, spray them liberally with penetrating oil. While they’re soaking in it, remove both drain plugs and drain the tranny oil. Remove the shift-rod cover. Clean the shift rod area and soak it’s nuts with penetrating oil. Spray the exhaust nuts as well. You might consider doing all of this a few days before and doing periodic penetrating oil sprays. Tapping the studs and nuts with a soft brass hammer will help as well.
Support the heat exchangers with wire or jack stands. Remove the muffler and the muffler hanger from the transmission. Disconnect the transmission ground strap from the end cover.
Remove the shift rod:
Tail shift: You disconnect the two 13mm nuts which hold the shift rod support bracket. Then push back on the shift rod or shift the car towards the "odd" gears. You may want to go ahead and completely remove the shift rod from the car and renew all the shift bushings (See the tech article on shifting improvements). Highly recommended.
Side Shifter. Using an Allen wrench, remove the shift rod set screw and separate the shift-rod from the shifter arm. Remove the 2 nuts that hold the shift console to the transmission. Pull the shifter assembly out of the transmission. Disconnect from the shift rod. Soak it in your favorite cleaning fluid.
Remove the speedo cable and speedo drive. On a tail shifter, remove the lower cover plate on the rear cover.
Place a jack stand underneath the transmission, raise the tranny with the jack Remove the transmission support nuts and washers. These are attached to through bolts and you’ll need to place a wrench on top as well as the ratchet on the nut. Now lower the transmission. It will catch on the bolts. Use a punch to push one support bolt up as far as it will go. Do the same to the other side. Lower the tranny. Keep doing this until you get one side free from the bolts, then get the other. Lower the tranny a bit. Support the tranny (and engine!) with the jack stand, near the front of the bell housing. You should have the tranny tail cover low enough now that you can access all the 13mm end cover nuts.
Remove the Tail cover. All of the tail cover nuts should be 13 mm. Don’t worry if the nut is rusted on and the stud backs out. We’ll take care of that later. Remove the nuts and the washers. Put them into a jar with some cleaning solution. On a tail shifter, remove the rear cover nuts washers and cover. Place a large cloth or old towel underneath the transmission, because you are about to have reverse drop out on the ground! Using a plastic and/or brass hammer, tap the cover off. Tap lightly on the "ears", the rear transmission supports. Collect all of the pieces that fell on the ground and remove any loose pieces from the inside of the end cover. Put them back in the end cover and place in a clean plastic box labeled reverse. Make sure all loose pieces are there.
Tail shifter: remove the fork. It is in the same spot the side shifter uses for the shift selector. It’s just behind the backup switch. Use a big screwdriver to pry it out, but only at the "pointy" ends, not in the middle. Note which way the "toes" are pointing (Upwards!)
914/6 Tail shifter! Before you can remove the intermediate plate, remove the accelerator linkage from the intermediate plate.
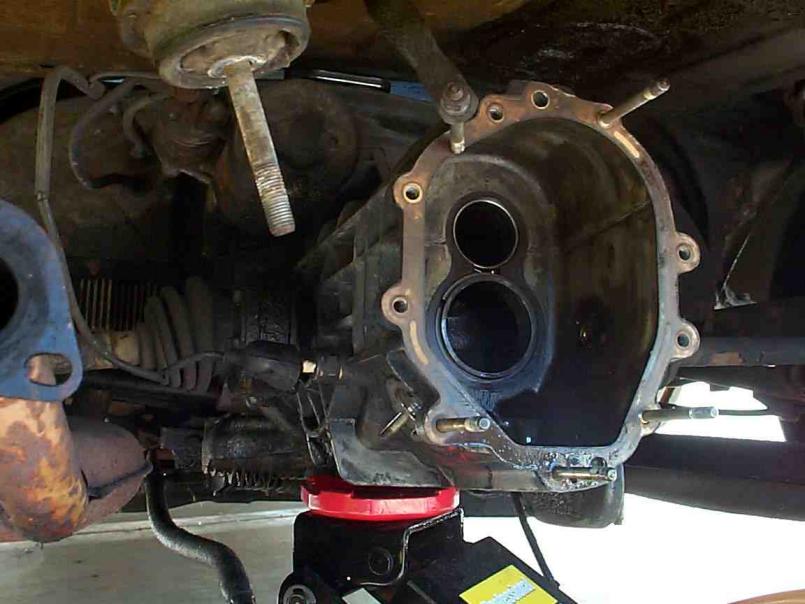
End Cover coming off – Who the hell painted the tranny Blue? Sheesh!
End cover off
Before we remove the intermediate plate, we need to loosen/remove a couple of things.
There is a rod on the left side that is connected to a brass ½ moon thing. This is you 1st/rev gear selector. The ½ moon thing is a shift fork. It is sitting on the 1st/rev slider. Push the rod and the slider into the transmission (Towards the front of the car) and engage it to 1st gear (get the slider to engage the teeth). Now look at the same level as the first shift rod on the intermediate plate. You’ll see the protrusions of the other 2 shift rods. Using a ratchet extension and a hammer, tap both of these rods into the intermediate plate. This engages all gears, locking up the entire transmission so it can’t turn. Use the 30mm socket and a breaker bar and loosen the rear bolt with the speedo worm drive (Yeah! THE BIG BOLT). Just make sure you can turn it by hand, but don’t remove it yet.
Take the pin punch and remove the roll pin from the castle nut on the right side of the transmission. Use a 19mm Socket wrench (I like a ¾" deep socket…) and a breaker bar to loosen (but not remove) the castle nut.
Using a 13mm ratchet, remove the little bolt from the shift fork. Slide the shift fork and the slider off the transmission. You may need to use a large screw drive to pry the slider out of engagement with first gear, depending on the condition of first gear. Label this 1st gear shift-fork.
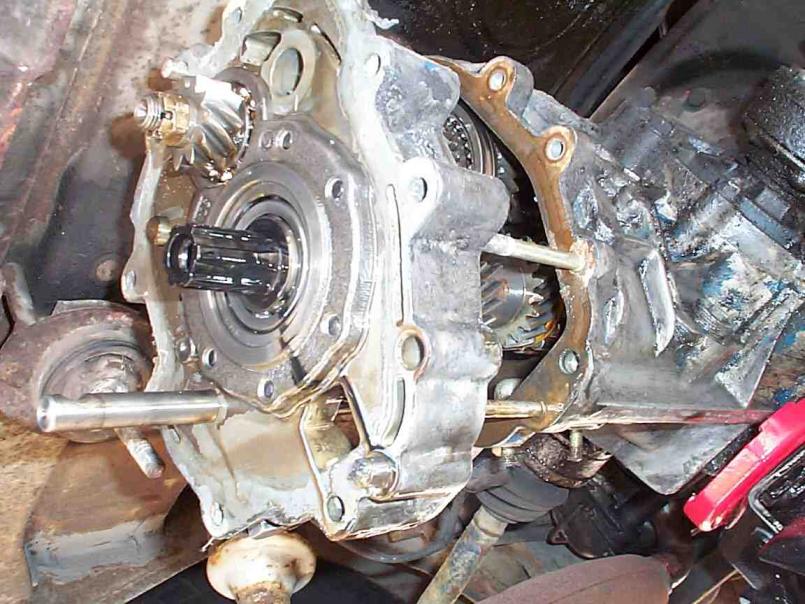
Remove the intermediate plate and the gears: Using a brass hammer, lightly tap the intermediate plate towards yourself. Once it’s loose, hold tightly (It’s heavy!) and pull the intermediate plate and gear stacks out of the transmission.
Intermediate Plate starting to come out. Note the reverse switch on the left side of the picture and the access point for the tail shifter support fork or the side shifter shift console.
Other side, the gear stack is almost out!
The Gutless Tranny! Notice that the CV joints, the starter, etc are still in place. The backup switch hasn’t even been disconnected. Notice that only 4 of the studs that hold the intermediate plate and the end cover on are still there. This seems to be a common situation. Many of the studs will come out. Go buy some new nuts. Get an 8 mm 1.25 pitch die and tap. Use the die to clean the threads on the studs. Use the tap to clean the nuts and the stud holes. Remove the rusted on nuts with a couple of nuts jammed together on the threads at the other end. If you have only 4 remaining stud, go a head and remove them. Use a gasket scraper to remove any remaining gasket on the machined case surface. Re-install the studs into the transmission with some red-locktight.
Now the fun begins!
Part 2: Rebuilding the gear stack
[img]http://homepage.mac.com/markd/914WorldTemp/Image1.jpg[img]
Gear Stacks with the Shift-forks removed
I hope you cleared a good work space cause this is going to be fun. Get yourself 2 nice clean plastic boxes. Label them (If you’re into that) Pinion and Drive shaft. If you’re only replacing the 1st and 2nd gear synchros, you only need one box, and you don’t need to remove the shift fork from the drive shaft
If all you want to do is fix 1st & 2nd gear, just remove the pinion shaft by removing the large 30 mm bolt and pulling 1st gear off. Place all of the 1st gear stuff into the pinion shaft box. You should be able to get down to the big washer, slightly angled washer. Put a label on this washer, as 1st gear.
Tap. And I mean TAP, the drive shaft with the brass hammer. The fit of the bearing runner is very tight. You are not driving a nail! You are tapping. Tap tap tap. Tap tap tap. Once there is a little room, you could use a gear puller, but lightly taping will work. Once the collar is off, put it in "the box". Push the shaft away from the shift fork and remove it from the intermediate plate.
Now, you have a couple of choices… The gear-puller is the best solution. But all you need is another tool. I hear you cry. My gear puller also helps on pulling the CV joints apart, among other things. And it’s a cool looking tool. If ya got it, use it to remove 2nd gear. That will pull the other collar and the other washer off. If you don’t have one, you can use the BRASS hammer to whack the gear stack down. It does work, just be gentle, but not too gentle. The brass hammer takes the abuse; the gears do not. Just turn the stack as you whack it.
If you are repairing/inspecting 4th and or 5th gear, do the same with the drive shaft. You might want to do this anyway, since the drive shaft bearing is a weak point and ½ of them have been bad that I’ve seen. Be very careful. The shaft is hollow and the extra holes for the castle nut retaining pin make this end of the shaft weak and hitting too hard may bend the end of the shaft. Putting a couple of nuts on the threads will help strengthen the area.
Once you get it apart, if the ball bearings fall out of the pinion bearing, you have a bad one. If the brass cage is shattered, you have a very bad one! If the cage is missing or the balls are missing, the shaft may unusable.
If the driveshaft bearing runners will not separate at the intermediate plate, first choice is using a liberal amount of carb cleaner and letting it soak for a while. Keep attempting. If it still won't come loose, look at the bearing. If the balls are missing, the journal may be so bunged up that it will never separate.
To get the gears off the driveshaft, use a BIG ASS crescent wrench. Scratch a match mark on the nut and the washer. Pry the anti-rotation washer and flatten it. I’ve used a couple of vise grips on the splined part of the shaft to hold it in place. Sometimes, it is very well torqued and a hammer is not so gently applied to the crescent wrench. Anger management at it’s finest!
Once you have the nut off, remove the washer. Flatten the washer, then fatigue and break the used side of the washer. Use a file to clean up this edge.
This is an ugly shattered cage surrounding a good one. Notice the discoloration of the shattered one. I expect it was run dry. The bearing on the left is located on the upper shaft and will lose oil first, when the transmission is running low on oil.
Keep those trannies filled! You can check your oil level by removing the fill plug and trying to dip your finger into the oil filled case. If you feel no oil, fill it up until it runs out of the fill hole. Of course, don’t do it now with the gear stack out.
Once 2nd gear is off, everything should be easy to access and should slide right off. Now is the time to look at the parts.
The gears themselves are always in mesh between the 2 shafts and spin on those needle-bearing collars. So, one part of the gear set is NOT connected to a shaft, except when the slider engages them.
Take the slider, and place it over the synch band and press down. That is what happens when you engage a gear. The synchband compresses, and the slider slides over it and engages the dogteeth. If the synch band is worn out, it should be fairly easy to put the slider into the dogteeth. Try this on 4th or 5th gear. You feel a lot more resistance.
First lets look at the slider. It is a ring, with lots of little internal slots, in 3 groupings, and 3 large slots. The slider slides over the triangle member on these 3 large slots.
Look at the slider itself. The small slots should have a point at each end (Except 1st gear, which should have a point only on one side). Once the synchro band wears out, this is when you start to hear grinding, the slider is no longer engaging the synch band. It then engages the dogteeth at a different speed and uses the pounding of the dogteeth to get them to the same speed. Not good!
The slider and the dogteeth are pointed this way to help engagement. After they reach the same speed with the synchband, the slider is allowed to continue moving towards the dogteeth. When they encounter each other, the gear will rotate slightly relative to each other. If the points become worn, you may find yourself unable to get the shifter into that gear every time.
2nd gear on my 914/6, at higher RPMs, would synch, but not lower RPMS. This is because the rapidly spinning shaft forces the synchband outward and allows it to engage the slider a bit, less or no grinding. Sliding the gear shift slowly into a grinding gear also helps. But these are temporary solutions at best….
The slider can get some wear from the contact with the synch band, but the majority will come from moving contact with the dogteeth. 3 things happen.
#1. The Slider loses some (or all) of it’s pointiness
#2. The Dogteeth lose some (or all) of it’s pointiness
#3. As the slider wears, the metal is pushed back and mushrooms a little bit, making the slot uneven. This makes it hard to shift into a gear and may prevent the slider from fully engaging the dogteeth, allowing it to "pop" out of gear.
This is a slider with normal wear is could be put right back in (It’s a 4th/5th gear slider, but it is exactly the same as 2nd/3rd). Use a file to make the small slots are straight. Also, use a brass brush and some solvent to remove any gunk in the slots.
The little circumferential scratches come from synchro contact and are normal.
If the points are a little blunted, it’s OK. Clean up the ring as best you can. Make the side of each slot straight. If the points are gone and flat, It’s done. Time for a new one. Using a dremel tool to repoint the sliders works very well. It can save a bunch of money, especially on 1st gear. Usually, it's a lot easier to just replace 2nd/3rd with a used 4th/5th.
The 1st gear slider is different from the other two. It has points only in one direction. It also has gear teeth (reverse!) extending radially out from the edge, which makes its OD bigger. It costs about twice what a 2nd-3rd/4th-5th slider costs.
Removing the Synchband from the gear
Remove the synch bands from the gear by removing the circlip with a pair of snap ring pliers. The synchband sits just inside of the dogteeth.
You need expanding snap ring pliers and I had to modify the pair I own to get the expansion enough. Once the ring is slightly expanded, you let once end slip "upwards" so it's off. Then use a screwdriver under the ring to pry it the rest of the way around.
Once the snap ring is off, the synch band comes out quite easily.
Synch bands:
Take a look at these synch bands:
The bad one here is really bad. If you look at any synchband, the side towards the slider will usually wear more than the side towards the dogteeth. In the picture, the synch band has become so loose, it is sliding around in the dogteeth and a slot has been machined. Porsche factory manual suggests that anytime you have a synchband out, if it is still good, turn it around so the better surface will be towards the slider. And I thought this was just a mechanics trick. Nope. Porsche approved!
Looking edge on, the side with more metal (thicker) is the "good" side, if you lost track. Notice the "good one" has a less even surface with a molybdenum coating. Bad ones the coating is gone and they are usually a bit shiny. Usually the "good side" is harder to install back onto the gear.
If the bad side is so bad it will fit loosely into the dogteeth, it is absolutely done. Pay the $60 and get a new one. If it falls out, it’s too loose. It should compress slightly when going in. If one side sticks in well and the other side slips out, it is somewhat worn but reusable. This is a candidate for "flipping around". Put the looser (worn) side inwards towards the dogteeth.
Dog Teeth.
The dogteeth are press fit into the gear. The Porsche/VW removal tool is a 2-piece plate that locks onto the dogteeth. You then use either a press or a hammer to separate the gear from the dogteeth with the cylinder. (The tool pushes the gear). If you are replacing the dogteeth with new ones, it makes little difference how you remove them. If you are using a donor tranny, get this tool. This is cheaper than 1 set of dogteeth.
(Insert remover pictures here)
The "teeth" biting into the synchband here are the dogteeth. These are the part that engages the slider.
All Dogteeth are the same for all gears. All Synchro bands are the same for all gears. So, why do 1st gear dogteeth cost less in the catalog? The dogteeth come with brake bands, the little guys that sit under the circlip. 2nd-5th gears need to be synchronized in both directions (Spinning the gear faster and spinning the gear slower – i.e. up-shifting and downshifting). 1st gear only needs to be synchronized in one direction, down shifting. So only the down shift brake band is installed. The only time you would you would need to synch the other way would be if you were moving backwards and tried to synch 1st, which is a no-no. Don’t do it.
Good position brake bands. The Little bands between synchroband and the inside lip of the dogteeth, are the brake bands.
This gear the brake bad wasn’t assembled right. The brake band slipped under the stop block, eventually leading to a broken stop block and bent brake band.
2nd/3rd gear slider –2nd gear side is "up"
2nd gear side, notice the blunting of the points. This is actually still useable. But I’d replace it. Also notice the "mushrooming" between the slots.
2nd/3rd gear slider, 3rd gear side. Notice how much more pointed the 3rd gear side is compared to 2nd gear.
Again, notice how much more pointed the 3rd gear side is compared to 2nd gear.
This slider could be cleaned up and installed with the better side towards 2nd, to even out the wear. Replacing the dogteeth will help too.
Part 2B – "Re-assemble the stack".
Clean the intermediate plate of all gasket material.
Drive shaft
Flatten the anti rotation washer with a hammer. Use some vise grips to "work" the previously bent side until it fatigues and falls off. Use a file to clean up the washer.
Reassemble up to and including #6. 1-5 install on the other side of the intermediate plate and done afterwards. You are supposed to torque nut #7. You would either need to weld an old socket to a pipe and weld a 32mm socket to the pipe and create a very long deep socket. I used my BIG ASS crescent wrench to both get it apart and put it back together. I tighten it as much as I can, and line up the match marks. The anti-rotation washer (#8) has an inner tab which fits into a slot on the shaft, so it always lines up the same way. Bend a different side up against the flat of the nut (#7).
Pinion Shaft
Reassemble up to #11. 1 through 10 install on the other side of the intermediate plate and are done afterwards. Make sure you get all of the shims (#26) in place.
Slide both shafts into the intermediate plate and then assemble the rest onto each shaft. Don’t torque anything down yet. You may need to tap bearing collars back into place.
Using your fingers, snap the sliders for 2nd/3rd into 2nd and the 4th/5th into 4th. The gear shafts are locked together. Torque the castle nut on the driveshaft to 80 ft-lbs and put its retainer roll pin back in. I keep turning it, a little at a time, until the slots line up with the hole.
Torque the pinion shaft bolt with the deep 30mm socket (80 ft-lbs). Snap the sliders back to the central position. You may need a screwdriver to pry them off of new synchrobands.
Slide the shift-fork alignment tool onto the gear stack. The shift rods can rotate slightly. Make sure that all three shift-rod slots match up position wise. Lock down the shift rods.
Center each slider into the middle of between each gear set. Tighten the shift-fork nut. 1st gear, adjust the shift fork so the slider is just off of the synchband for 1st. Tighten its nut.
The gear stack is back together!
Part 3, putting it all back together –
Clean all of the gasket material from the sealing surfaces on the transmission case and the end cover. You want to save a few bits of the gasket, so you can match it up to the kit. Different colors are a little different thickness. I know, old oil soaked gaskets are not easy to tell apart. Hold it up to a light and you’ll be able to figure it out. Sometimes 2 gaskets were used. There are not just sealing gaskets. These are paper shims. Do not use any gasket sealant on the surfaces, except either non-hardening or very high temp silicone grease (Mobil 1, etc).
Studs that pulled out need to be either replaced or you need to pull the old nut off by jamming 2 nuts together on the stud threads. When you remove the rusted on nut, if you find the threads damaged, you’ll need to replace the stud. If the threads look ok, but dirty, use the die to clean the threads. Dies fit nicely inside a 1 inch deep socket and the ratchet action makes this go much faster. It might be easiest to remove all the studs and clean the gasket surface and then re-install all the studs with red locktite.
Clean up the threads on the transmission housing with a tap. Reinstall the studs. Place the gasket on the transmission housing.
The gear stack should slide in with little or no problem. One "trick" is to engage 4th gear, which helps position the stack to slide in. You may have to turn the gears a little bit (kind of like putting in a distributor). Uh, a hammer helps. Seriously! You lightly tap the intermediate plate to move the gear stack in, the last inch or so. I found that the 2 dowel points to be good positions to tap.
For a tail shifter, Once the gear stack is in place you need to make sure the shift selector rod is inserted in its hole properly in the transmission case. Access this through the side hole in the transmission. Then tap the intermediate plate home.
The hard part: Putting the cover on. Make sure you've removed the speedo drive. Side shifter, it's a breeze. Reassemble reverse onto the reverse shaft. Keeping the cover tilted back a little bit (having the engine and tranny tilted down helps a little bit here. Slide the cover home and get the reserve shaft into it's home. The final "washer" on the reserve stack has to be aligned. Make sure it is in the correct position. The cutout faces the intermediate plate and lines up with the "hump" on the intermediate plate. Adjust it into the correct position with your fingers while the cover is about 1 inch from closure. Once everything is all set, tap it into place with the hammer (Damn thing sure comes in handy, but, don't get wild with it!)
For a tail shifter, it's a bit tougher. You have to do everything on your back! The shift selector fits into a recess in the tail of the cover. I expect this is where the 911 shift-shaft used to go. You have to position it with your fingers from inside the cover, until it's in the correct place, all the while not letting reverse fall off. Point the finger of the end cover rod downwards to keep it out of the way.
When reverse falls out, yell a bit, curse some more, then find the bits that rolled away. Clean 'em off and try again. Follow the rest of the directions as a side shifter.
Once the cover is on, I put a couple of nuts into place.
Use a screwdriver to reach in through the access port on the side of the tranny and disengage 4th/5th.
On the tail shifter, through the access port, slide the gear selector rod toward the front of the car. You should be able to turn the end cover rod and get the finger into the rod slot. Once this is done. Through the side access hole, center the shift selector finger and center the shift rod so that the finger is straight. Make sure that the finger is in the line of the three shift fork rod slots. Now you can put the support fork in.
You need to tap it home. Put the nuts on but don’t torque them. Using a vise grip to grab the external shift rod. Make sure you can select all gear. If it seems hopelessly locked, pull the support out and try again! (Been there, done that…). Once you can select all gears, tighten up the nuts and torque to 18-20 ft-lbs.
For a side shifter, install the gear selector console. Test out the gear selection with the external selector. Don't worry if it's a little stiff. If everything seems ok (being able to select each gear), then go ahead and close up the cover and torque the nuts. Be careful, they only need about 18-20 foot-lbs.
Reconnect the main shifting shaft. Check the gearshift and make sure you can shift into every gear. All set, go ahead and reconnected the tranny ground strap, install all the end cover nuts and torque the nuts on the cover and the side access port. Remember to use only 18-20 ft lbs.
Reinstall the speedo drive. Line up the speedo drive set screw hole with the hole in the end cover. Install the set screw being very careful not to over tighten the screw. The threads are usually an insert and they pull out fairly easily.
Reinstall the gear selector cover. Fill the tranny with 80-90W gear oil and replace the plugs. If you’re going to use really good gear oil (Synthetic or Swepco), wait until you reach the first change. Re-install the muffler.
Reinstall the battery!
While you are at it…You should change at least the tranny end shift rod bushings. My personal feeling is you should change them all (They are cheap), all the way up through to the gearshift in the car. Look at the shift rod tech articles on this web site.
I want to add a few things to those articles:
#1. You should remove the entire shifter assemble and clean and disassemble it. The assembly has 3 springs, a shift lock out plate, 4 c-clips, 2 rods, a top bushing and a spring seat, along with the shifter-shaft and the housing. In finding the final slop in my gearshift assembly, the spring seat was broken and the top bushing was worn. Some of these parts are only available through a Porsche dealer, although I did find the upper bushing and the spring at a major Pelican competitor (Are you listening Wayne?). The spring seats are available only direct from Porsche!
Upper Bushing: 914 424 131/00
Spring: 901 424 132/00
Spring seat (70-72) 901 424 135/00
Spring seat (73-76) 914 424 343/00
The lockout plate can also get damaged/worn out. If it doesn’t look like this, you need to replace it.
Reassemble with some good grease.
#2. I can’t speak for the side shifter, yet, but my tail shifter shift rod and the rear shift bushing, were not the same size. I ended up buying some MAPP gas and a couple of brazing rods from my local hardware store. I heated up the rod to way red hot and melted brazing material onto the rod. I to smoothed it out as much as possible while still molten. After cooling, I used a grinder to rough round it, then strips of emery cloth to smooth and round out the rod. It now is a much tighter fitting rod in the bushings. Brass brazing compound works fine. It’s riding in a plastic bushing! You probably could do this with copper pipe solder as well. And the smoothing would be easier (Softer material). You could weld it, but the smoothing will be much more difficult. You might want to check the rod in all places it rides in a bushing.
As in the first article on helping the tail shifter, make sure the final links do not have much slop in them. If they do, use the brazing material to repair them and a file and emery cloth to smooth them out. You do not want any slop in the linkage!
#3. Aligning the shift rod. I spent a great deal of time aligning my shift rod on my 914/6, which is an original tail shifter. What I’ve found is that the best way to align the shifter is to put the car in 3rd gear, then align the shifter so that 3rd gear is selected when shifter is riding up against the lockout plate with no pressure. This gives you a "slot" for 2nd and 3rd. 1st and reverse will then require a significant effort against the lockout springs to select.
Adjust the forward/backward position of 3rd so that it is in a comfortable spot, but not too far back. Lock the shaft down by tightening the locking collar nut. Shift it into 2nd. If it’s too far forward, loosen and slide the shift selector back. Repeat the 3rd and 2nd alignment until it where you want it forward and back.
A note on the locking nut/bolt. On the side shifter, this is a no-brainer! It’s right under the shifter with easy access. On the tail shifter, it’s under the center armrest, under the access plate. There is a hole in the center tunnel on the driver side (move the driver seat all the way forward for access) big enough for the 13 mm box end wrench (an open end will not fit!). I had to change the position of my locking collar so that the bolt was on the passenger side of the shift rod and the nut is on top. You can then fit a box end wrench through the access hole to the bolt head and a ratchet to the top. And you are holding all of these while holding the gear selector steady and turning the ratchet. No one said owning a Porsche was easy!
Also, use a high temp grease (I prefer synthetic) on all the working parts and plastic bushings. Get the covers and put them in place. Dirt/grit in the grease will help ruin the bushing and/or the shift rods!
Here ya go!
It's still rough around the edges, but take a look!
James
Full on Synchro change!
So yer gears are a grinding…I feel your pain. You too can rebuild the 901. It’s not that hard. Really! If all of the oil seals are in decent shape (no leaks!!!), then you can change the synchro’s while leaving the tranny in the car and attached!
Tools - You’ll need a few tools. Most of them ya got, but there 2 special ones which really help
Synchro hub removal tool - This puppy helps you remove the dogteeth from the actual gear. There are ways to get around buying this one. I’ll address those later.
http://www.pelicanparts.com/catalog/shopca...y_pg1.htm#item5
Shift fork alignment tool - There is no substitute for this. If you want to rebuild the tranny, ya need it!
http://www.pelicanparts.com/catalog/shopca..._pg2.htm#item17
Other Tools:
30 mm deep socket (I found one at Autozone for $6.99)
3 and 4 mm pin punches
13 mm socket wrench with extension
17 mm socket
17 mm Allen for the drain plugs
19 mm deep socket (you can substitute a ¾ inch)
"Big Ass" Crescent wrench
Plastic and brass hammers
A thin file
Gasket scraper (or a single edged razor blade)
Some sort of cleaning fluid (I like to use diesel fuel)
Lint free rags
A couple of brass brushes
3 jack stands
2 drive up ramps
A couple of big plastic boxes.
A plastic in-sink washtub.
Parts: 4 gaskets - Intermediate plate to transmission housing, End cover to intermediate plate, the fork gasket and rear cover plate gasket. The factory manuals don’t show the 3rd or 4th gaskets for side shifters, which use an o-ring with the side shifter and no rear cover plate on the rear cover.
Up to 5 synchro bands.
http://www.pelicanparts.com/catalog/shopca...y_pg1.htm#item3
Up to 5 sets of dogteeth
http://www.pelicanparts.com/catalog/shopca...y_pg1.htm#item4
Up to 3 sliders
2nd/3rd and 4th/5th are one type and Rev/1st is different.
http://www.pelicanparts.com/catalog/shopca...y_pg1.htm#item6
A bearing or 2
What will you need? It depends on what is actually wrong and how many gears grind. If it only grinds in 1st or 2nd, you may only need parts for those areas. I’ll show you good and bad parts. If the grinding just started, you may be able to get away with just a few synchro-bands. As a bare minimum, you need to get 2 brand new synchro-bands, for 1st and 2nd. These get the most wear and you might as well replace them while you’re in here!
2 Muffler gaskets
http://www.pelicanparts.com/catalog/shopca...s_pg2.htm#item9
Clean - Clean - Clean
Youze about to get into the inner workings of the transmission. You do not want to get dirt inside. We all get oil leaks and some of this oil ends up on the transmission. Clean the dirt and grime off the transmission. You might try one of those pressure washer engine degreasers at the u-spray it car wash places before starting this job. Besides, no one likes working on a greasy mess. Clean at least the end cover and the intermediate plate on the outside.
At home, back the car up onto the ramps. For safety sake, disconnect the battery. You don’t want someone accidentally starting the car while this is all going on.
You might try a hand held garden sprayer filled with diesel and a catch tub underneath. You can filter and reuse the liquid.
I also tried a personal steam cleaner. It worked well, but not the way I had envisioned, i.e. the grease and grime just dripping off. It loosens the dirt, oil and grease and seems to infuse water into it. This makes it fairly easy to wipe off. A screwdriver wrapped with a cloth helps get into the many crevices. I also have found that deep buildup just needs to be scraped out with an old screwdriver first.
A home pressure washer works well too, up to a point. Nothing alone seems to work. I think a combination of the three, steam, pressure washing and plain old elbow grease will get it clean. You might also consider having the case, side-cover and intermediate plate cleaned by a machine shop, if you pull the tranny off the car.
While you’re under there, take a look at the CV joints and check the boots. Squeeze them while holding a strong light on them. Cracks? Dry rot? Replace them! And don’t forget to repack them with grease!
While you’re cleaning, pay special attention to the nuts that hold the transmission cover on. Clean the threads as best as you can. Small brass brushes help here, along with solvent. Afterwards, spray them liberally with penetrating oil. While they’re soaking in it, remove both drain plugs and drain the tranny oil. Remove the shift-rod cover. Clean the shift rod area and soak it’s nuts with penetrating oil. Spray the exhaust nuts as well. You might consider doing all of this a few days before and doing periodic penetrating oil sprays. Tapping the studs and nuts with a soft brass hammer will help as well.
Support the heat exchangers with wire or jack stands. Remove the muffler and the muffler hanger from the transmission. Disconnect the transmission ground strap from the end cover.
Remove the shift rod:
Tail shift: You disconnect the two 13mm nuts which hold the shift rod support bracket. Then push back on the shift rod or shift the car towards the "odd" gears. You may want to go ahead and completely remove the shift rod from the car and renew all the shift bushings (See the tech article on shifting improvements). Highly recommended.
Side Shifter. Using an Allen wrench, remove the shift rod set screw and separate the shift-rod from the shifter arm. Remove the 2 nuts that hold the shift console to the transmission. Pull the shifter assembly out of the transmission. Disconnect from the shift rod. Soak it in your favorite cleaning fluid.
Remove the speedo cable and speedo drive. On a tail shifter, remove the lower cover plate on the rear cover.
Place a jack stand underneath the transmission, raise the tranny with the jack Remove the transmission support nuts and washers. These are attached to through bolts and you’ll need to place a wrench on top as well as the ratchet on the nut. Now lower the transmission. It will catch on the bolts. Use a punch to push one support bolt up as far as it will go. Do the same to the other side. Lower the tranny. Keep doing this until you get one side free from the bolts, then get the other. Lower the tranny a bit. Support the tranny (and engine!) with the jack stand, near the front of the bell housing. You should have the tranny tail cover low enough now that you can access all the 13mm end cover nuts.
Remove the Tail cover. All of the tail cover nuts should be 13 mm. Don’t worry if the nut is rusted on and the stud backs out. We’ll take care of that later. Remove the nuts and the washers. Put them into a jar with some cleaning solution. On a tail shifter, remove the rear cover nuts washers and cover. Place a large cloth or old towel underneath the transmission, because you are about to have reverse drop out on the ground! Using a plastic and/or brass hammer, tap the cover off. Tap lightly on the "ears", the rear transmission supports. Collect all of the pieces that fell on the ground and remove any loose pieces from the inside of the end cover. Put them back in the end cover and place in a clean plastic box labeled reverse. Make sure all loose pieces are there.
Tail shifter: remove the fork. It is in the same spot the side shifter uses for the shift selector. It’s just behind the backup switch. Use a big screwdriver to pry it out, but only at the "pointy" ends, not in the middle. Note which way the "toes" are pointing (Upwards!)
914/6 Tail shifter! Before you can remove the intermediate plate, remove the accelerator linkage from the intermediate plate.

End Cover coming off – Who the hell painted the tranny Blue? Sheesh!
End cover off
Before we remove the intermediate plate, we need to loosen/remove a couple of things.
There is a rod on the left side that is connected to a brass ½ moon thing. This is you 1st/rev gear selector. The ½ moon thing is a shift fork. It is sitting on the 1st/rev slider. Push the rod and the slider into the transmission (Towards the front of the car) and engage it to 1st gear (get the slider to engage the teeth). Now look at the same level as the first shift rod on the intermediate plate. You’ll see the protrusions of the other 2 shift rods. Using a ratchet extension and a hammer, tap both of these rods into the intermediate plate. This engages all gears, locking up the entire transmission so it can’t turn. Use the 30mm socket and a breaker bar and loosen the rear bolt with the speedo worm drive (Yeah! THE BIG BOLT). Just make sure you can turn it by hand, but don’t remove it yet.
Take the pin punch and remove the roll pin from the castle nut on the right side of the transmission. Use a 19mm Socket wrench (I like a ¾" deep socket…) and a breaker bar to loosen (but not remove) the castle nut.
Using a 13mm ratchet, remove the little bolt from the shift fork. Slide the shift fork and the slider off the transmission. You may need to use a large screw drive to pry the slider out of engagement with first gear, depending on the condition of first gear. Label this 1st gear shift-fork.
Remove the intermediate plate and the gears: Using a brass hammer, lightly tap the intermediate plate towards yourself. Once it’s loose, hold tightly (It’s heavy!) and pull the intermediate plate and gear stacks out of the transmission.
Intermediate Plate starting to come out. Note the reverse switch on the left side of the picture and the access point for the tail shifter support fork or the side shifter shift console.
Other side, the gear stack is almost out!
The Gutless Tranny! Notice that the CV joints, the starter, etc are still in place. The backup switch hasn’t even been disconnected. Notice that only 4 of the studs that hold the intermediate plate and the end cover on are still there. This seems to be a common situation. Many of the studs will come out. Go buy some new nuts. Get an 8 mm 1.25 pitch die and tap. Use the die to clean the threads on the studs. Use the tap to clean the nuts and the stud holes. Remove the rusted on nuts with a couple of nuts jammed together on the threads at the other end. If you have only 4 remaining stud, go a head and remove them. Use a gasket scraper to remove any remaining gasket on the machined case surface. Re-install the studs into the transmission with some red-locktight.
Now the fun begins!
Part 2: Rebuilding the gear stack
Gear Stacks with the Shift-forks removed
I hope you cleared a good work space cause this is going to be fun. Get yourself 2 nice clean plastic boxes. Label them (If you’re into that) Pinion and Drive shaft. If you’re only replacing the 1st and 2nd gear synchros, you only need one box, and you don’t need to remove the shift fork from the drive shaft
If all you want to do is fix 1st & 2nd gear, just remove the pinion shaft by removing the large 30 mm bolt and pulling 1st gear off. Place all of the 1st gear stuff into the pinion shaft box. You should be able to get down to the big washer, slightly angled washer. Put a label on this washer, as 1st gear.
Tap. And I mean TAP, the drive shaft with the brass hammer. The fit of the bearing runner is very tight. You are not driving a nail! You are tapping. Tap tap tap. Tap tap tap. Once there is a little room, you could use a gear puller, but lightly taping will work. Once the collar is off, put it in "the box". Push the shaft away from the shift fork and remove it from the intermediate plate.
Now, you have a couple of choices… The gear-puller is the best solution. But all you need is another tool. I hear you cry. My gear puller also helps on pulling the CV joints apart, among other things. And it’s a cool looking tool. If ya got it, use it to remove 2nd gear. That will pull the other collar and the other washer off. If you don’t have one, you can use the BRASS hammer to whack the gear stack down. It does work, just be gentle, but not too gentle. The brass hammer takes the abuse; the gears do not. Just turn the stack as you whack it.
If you are repairing/inspecting 4th and or 5th gear, do the same with the drive shaft. You might want to do this anyway, since the drive shaft bearing is a weak point and ½ of them have been bad that I’ve seen. Be very careful. The shaft is hollow and the extra holes for the castle nut retaining pin make this end of the shaft weak and hitting too hard may bend the end of the shaft. Putting a couple of nuts on the threads will help strengthen the area.
Once you get it apart, if the ball bearings fall out of the pinion bearing, you have a bad one. If the brass cage is shattered, you have a very bad one! If the cage is missing or the balls are missing, the shaft may unusable.
If the driveshaft bearing runners will not separate at the intermediate plate, first choice is using a liberal amount of carb cleaner and letting it soak for a while. Keep attempting. If it still won't come loose, look at the bearing. If the balls are missing, the journal may be so bunged up that it will never separate.
To get the gears off the driveshaft, use a BIG ASS crescent wrench. Scratch a match mark on the nut and the washer. Pry the anti-rotation washer and flatten it. I’ve used a couple of vise grips on the splined part of the shaft to hold it in place. Sometimes, it is very well torqued and a hammer is not so gently applied to the crescent wrench. Anger management at it’s finest!
Once you have the nut off, remove the washer. Flatten the washer, then fatigue and break the used side of the washer. Use a file to clean up this edge.
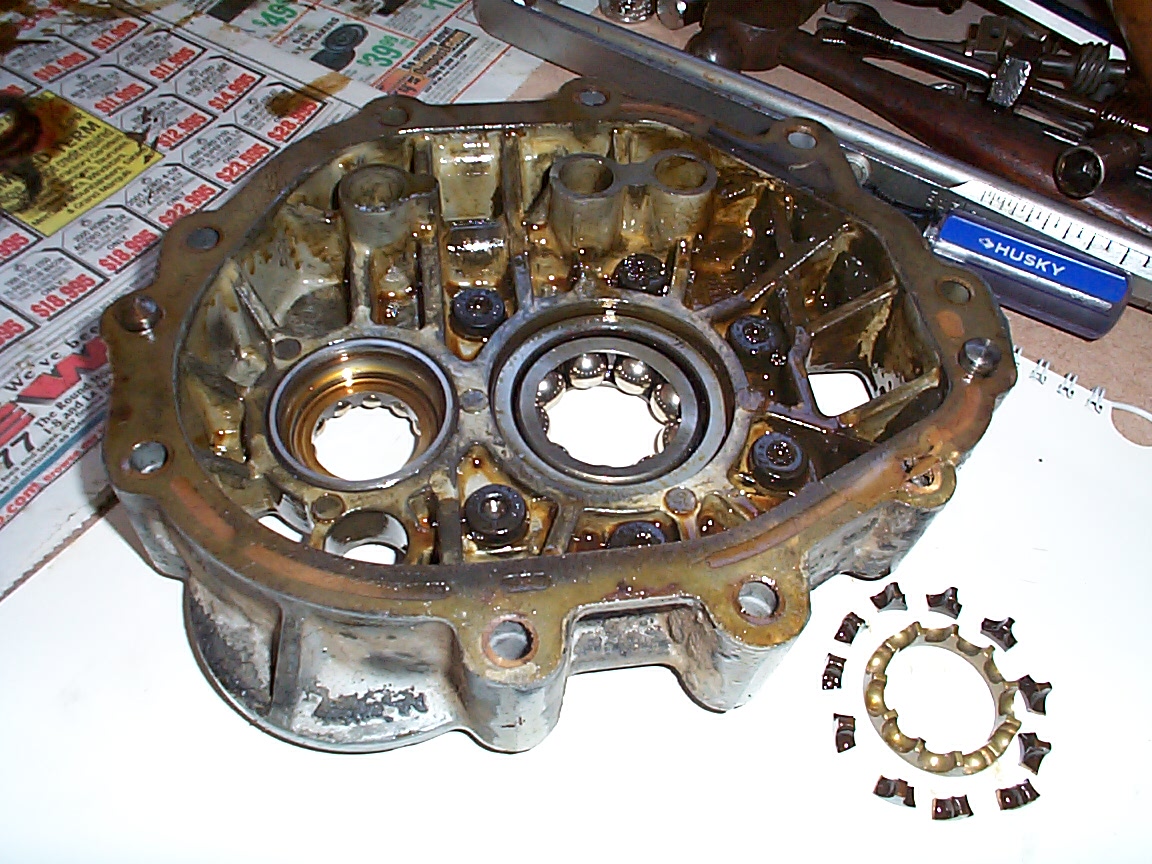
This is an ugly shattered cage surrounding a good one. Notice the discoloration of the shattered one. I expect it was run dry. The bearing on the left is located on the upper shaft and will lose oil first, when the transmission is running low on oil.
Keep those trannies filled! You can check your oil level by removing the fill plug and trying to dip your finger into the oil filled case. If you feel no oil, fill it up until it runs out of the fill hole. Of course, don’t do it now with the gear stack out.
Once 2nd gear is off, everything should be easy to access and should slide right off. Now is the time to look at the parts.
The gears themselves are always in mesh between the 2 shafts and spin on those needle-bearing collars. So, one part of the gear set is NOT connected to a shaft, except when the slider engages them.
Take the slider, and place it over the synch band and press down. That is what happens when you engage a gear. The synchband compresses, and the slider slides over it and engages the dogteeth. If the synch band is worn out, it should be fairly easy to put the slider into the dogteeth. Try this on 4th or 5th gear. You feel a lot more resistance.
First lets look at the slider. It is a ring, with lots of little internal slots, in 3 groupings, and 3 large slots. The slider slides over the triangle member on these 3 large slots.
Look at the slider itself. The small slots should have a point at each end (Except 1st gear, which should have a point only on one side). Once the synchro band wears out, this is when you start to hear grinding, the slider is no longer engaging the synch band. It then engages the dogteeth at a different speed and uses the pounding of the dogteeth to get them to the same speed. Not good!
The slider and the dogteeth are pointed this way to help engagement. After they reach the same speed with the synchband, the slider is allowed to continue moving towards the dogteeth. When they encounter each other, the gear will rotate slightly relative to each other. If the points become worn, you may find yourself unable to get the shifter into that gear every time.
2nd gear on my 914/6, at higher RPMs, would synch, but not lower RPMS. This is because the rapidly spinning shaft forces the synchband outward and allows it to engage the slider a bit, less or no grinding. Sliding the gear shift slowly into a grinding gear also helps. But these are temporary solutions at best….
The slider can get some wear from the contact with the synch band, but the majority will come from moving contact with the dogteeth. 3 things happen.
#1. The Slider loses some (or all) of it’s pointiness
#2. The Dogteeth lose some (or all) of it’s pointiness
#3. As the slider wears, the metal is pushed back and mushrooms a little bit, making the slot uneven. This makes it hard to shift into a gear and may prevent the slider from fully engaging the dogteeth, allowing it to "pop" out of gear.
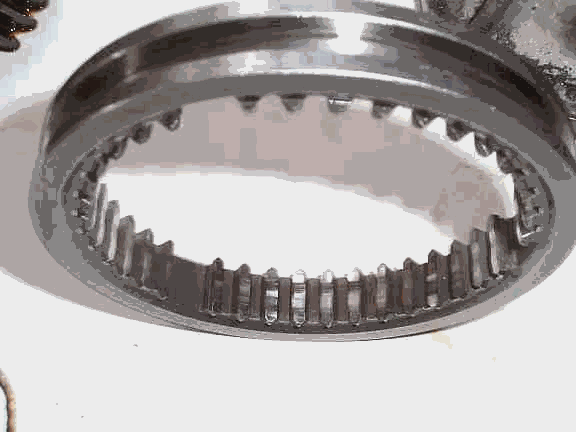
This is a slider with normal wear is could be put right back in (It’s a 4th/5th gear slider, but it is exactly the same as 2nd/3rd). Use a file to make the small slots are straight. Also, use a brass brush and some solvent to remove any gunk in the slots.
The little circumferential scratches come from synchro contact and are normal.
If the points are a little blunted, it’s OK. Clean up the ring as best you can. Make the side of each slot straight. If the points are gone and flat, It’s done. Time for a new one. Using a dremel tool to repoint the sliders works very well. It can save a bunch of money, especially on 1st gear. Usually, it's a lot easier to just replace 2nd/3rd with a used 4th/5th.
The 1st gear slider is different from the other two. It has points only in one direction. It also has gear teeth (reverse!) extending radially out from the edge, which makes its OD bigger. It costs about twice what a 2nd-3rd/4th-5th slider costs.
Removing the Synchband from the gear
Remove the synch bands from the gear by removing the circlip with a pair of snap ring pliers. The synchband sits just inside of the dogteeth.
You need expanding snap ring pliers and I had to modify the pair I own to get the expansion enough. Once the ring is slightly expanded, you let once end slip "upwards" so it's off. Then use a screwdriver under the ring to pry it the rest of the way around.
Once the snap ring is off, the synch band comes out quite easily.
Synch bands:
Take a look at these synch bands:

The bad one here is really bad. If you look at any synchband, the side towards the slider will usually wear more than the side towards the dogteeth. In the picture, the synch band has become so loose, it is sliding around in the dogteeth and a slot has been machined. Porsche factory manual suggests that anytime you have a synchband out, if it is still good, turn it around so the better surface will be towards the slider. And I thought this was just a mechanics trick. Nope. Porsche approved!
Looking edge on, the side with more metal (thicker) is the "good" side, if you lost track. Notice the "good one" has a less even surface with a molybdenum coating. Bad ones the coating is gone and they are usually a bit shiny. Usually the "good side" is harder to install back onto the gear.
If the bad side is so bad it will fit loosely into the dogteeth, it is absolutely done. Pay the $60 and get a new one. If it falls out, it’s too loose. It should compress slightly when going in. If one side sticks in well and the other side slips out, it is somewhat worn but reusable. This is a candidate for "flipping around". Put the looser (worn) side inwards towards the dogteeth.
Dog Teeth.
The dogteeth are press fit into the gear. The Porsche/VW removal tool is a 2-piece plate that locks onto the dogteeth. You then use either a press or a hammer to separate the gear from the dogteeth with the cylinder. (The tool pushes the gear). If you are replacing the dogteeth with new ones, it makes little difference how you remove them. If you are using a donor tranny, get this tool. This is cheaper than 1 set of dogteeth.
(Insert remover pictures here)
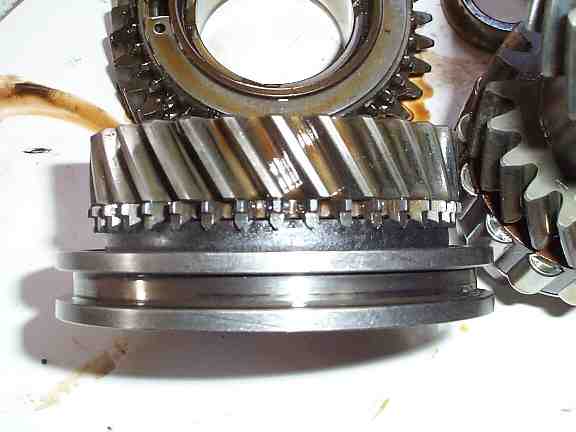
The "teeth" biting into the synchband here are the dogteeth. These are the part that engages the slider.
All Dogteeth are the same for all gears. All Synchro bands are the same for all gears. So, why do 1st gear dogteeth cost less in the catalog? The dogteeth come with brake bands, the little guys that sit under the circlip. 2nd-5th gears need to be synchronized in both directions (Spinning the gear faster and spinning the gear slower – i.e. up-shifting and downshifting). 1st gear only needs to be synchronized in one direction, down shifting. So only the down shift brake band is installed. The only time you would you would need to synch the other way would be if you were moving backwards and tried to synch 1st, which is a no-no. Don’t do it.
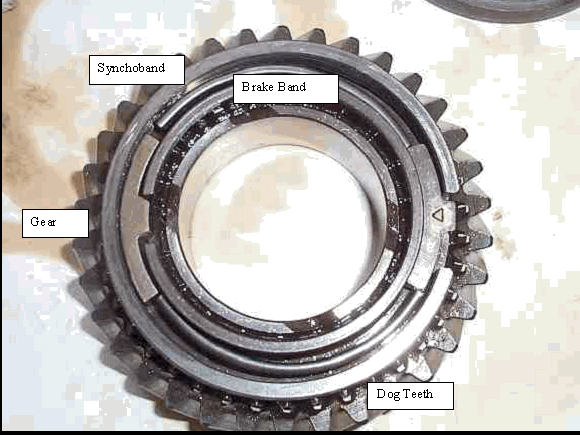
Good position brake bands. The Little bands between synchroband and the inside lip of the dogteeth, are the brake bands.

This gear the brake bad wasn’t assembled right. The brake band slipped under the stop block, eventually leading to a broken stop block and bent brake band.
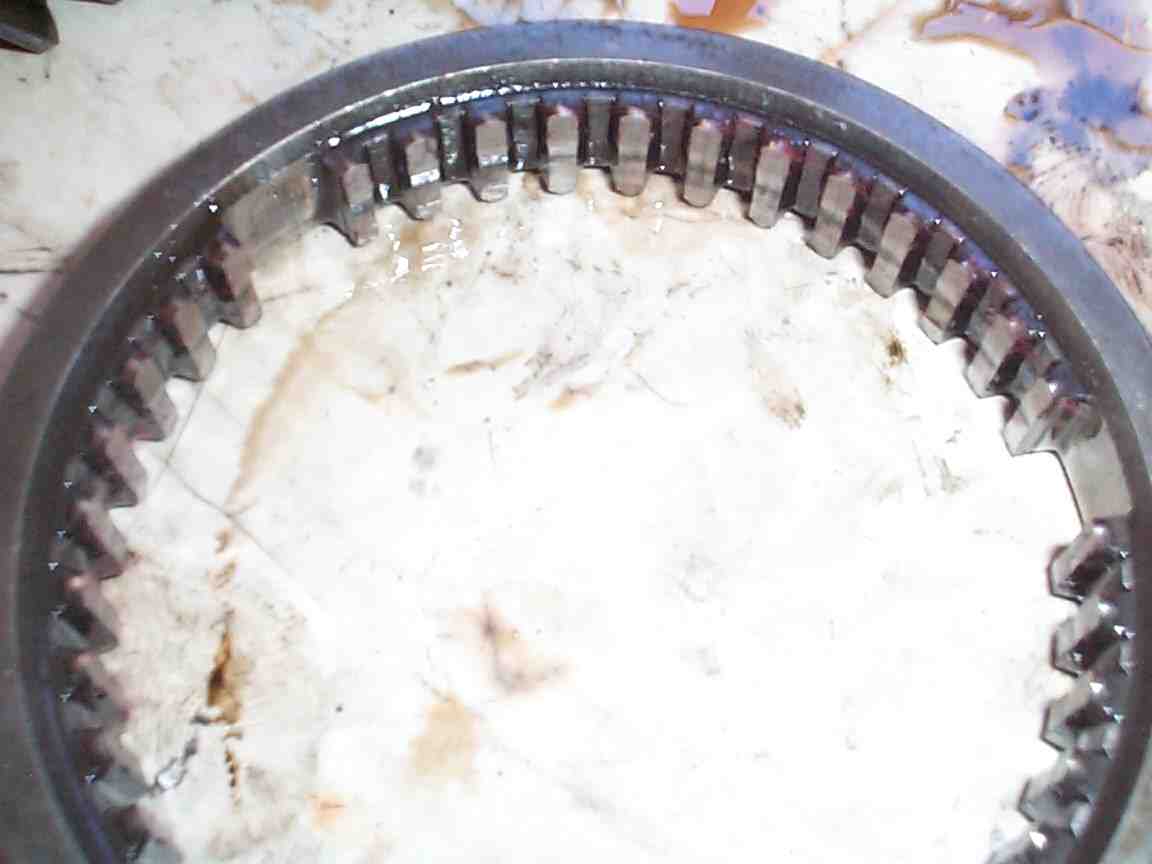
2nd/3rd gear slider –2nd gear side is "up"
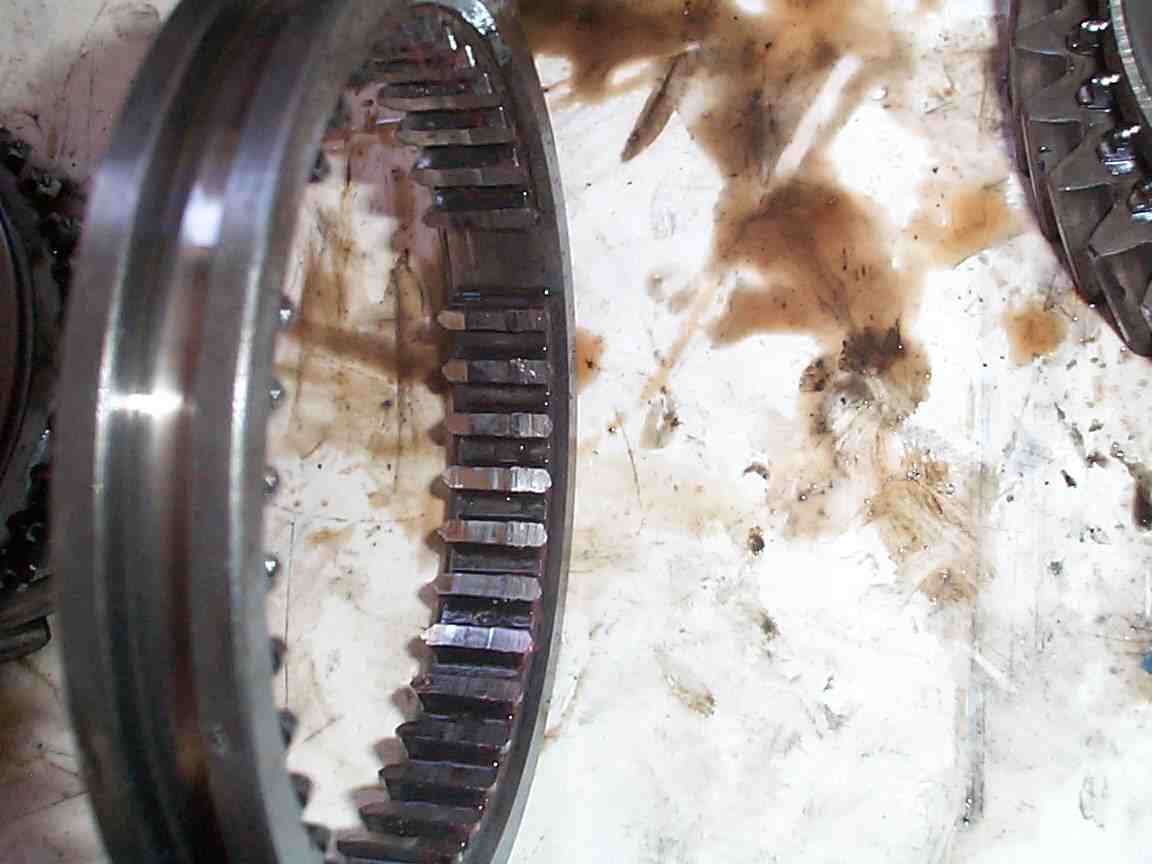
2nd gear side, notice the blunting of the points. This is actually still useable. But I’d replace it. Also notice the "mushrooming" between the slots.
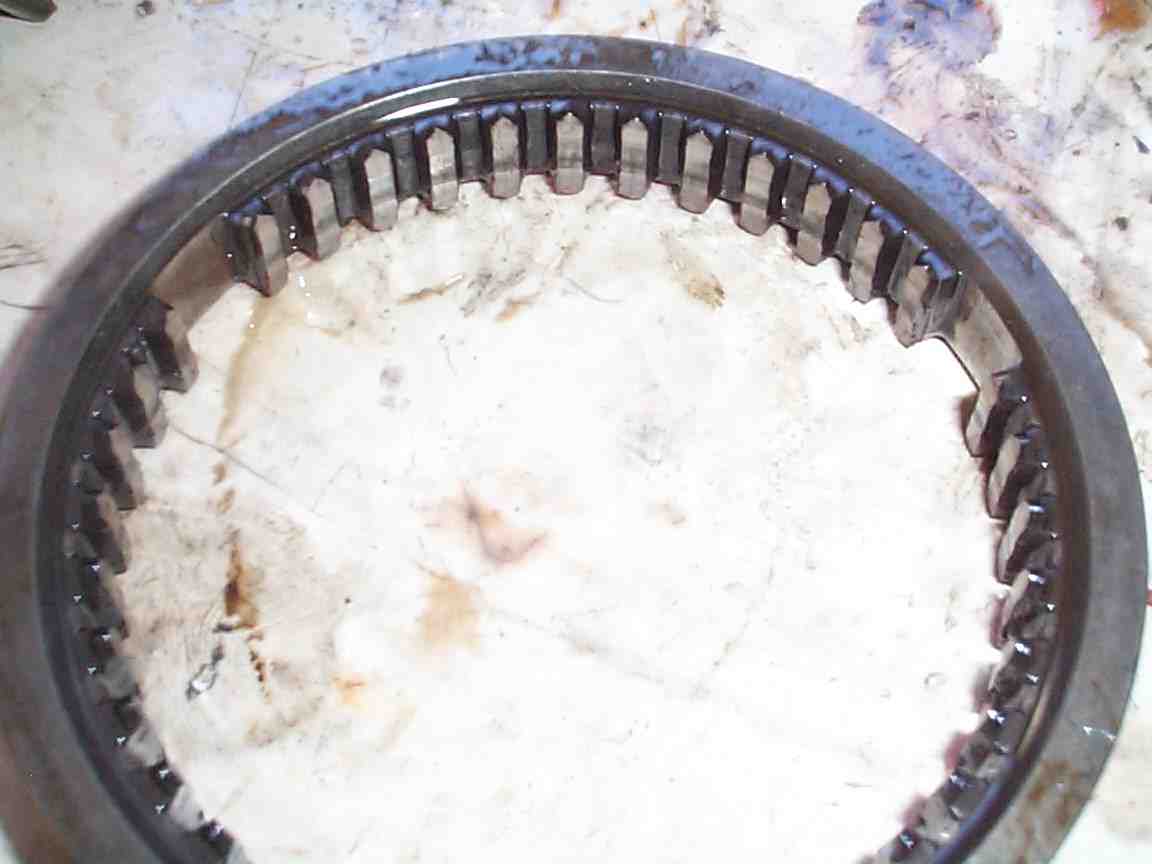
2nd/3rd gear slider, 3rd gear side. Notice how much more pointed the 3rd gear side is compared to 2nd gear.

Again, notice how much more pointed the 3rd gear side is compared to 2nd gear.
This slider could be cleaned up and installed with the better side towards 2nd, to even out the wear. Replacing the dogteeth will help too.
Part 2B – "Re-assemble the stack".
Clean the intermediate plate of all gasket material.
Drive shaft

Flatten the anti rotation washer with a hammer. Use some vise grips to "work" the previously bent side until it fatigues and falls off. Use a file to clean up the washer.
Reassemble up to and including #6. 1-5 install on the other side of the intermediate plate and done afterwards. You are supposed to torque nut #7. You would either need to weld an old socket to a pipe and weld a 32mm socket to the pipe and create a very long deep socket. I used my BIG ASS crescent wrench to both get it apart and put it back together. I tighten it as much as I can, and line up the match marks. The anti-rotation washer (#8) has an inner tab which fits into a slot on the shaft, so it always lines up the same way. Bend a different side up against the flat of the nut (#7).
Pinion Shaft

Reassemble up to #11. 1 through 10 install on the other side of the intermediate plate and are done afterwards. Make sure you get all of the shims (#26) in place.
Slide both shafts into the intermediate plate and then assemble the rest onto each shaft. Don’t torque anything down yet. You may need to tap bearing collars back into place.
Using your fingers, snap the sliders for 2nd/3rd into 2nd and the 4th/5th into 4th. The gear shafts are locked together. Torque the castle nut on the driveshaft to 80 ft-lbs and put its retainer roll pin back in. I keep turning it, a little at a time, until the slots line up with the hole.
Torque the pinion shaft bolt with the deep 30mm socket (80 ft-lbs). Snap the sliders back to the central position. You may need a screwdriver to pry them off of new synchrobands.
Slide the shift-fork alignment tool onto the gear stack. The shift rods can rotate slightly. Make sure that all three shift-rod slots match up position wise. Lock down the shift rods.
Center each slider into the middle of between each gear set. Tighten the shift-fork nut. 1st gear, adjust the shift fork so the slider is just off of the synchband for 1st. Tighten its nut.
The gear stack is back together!
Part 3, putting it all back together –
Clean all of the gasket material from the sealing surfaces on the transmission case and the end cover. You want to save a few bits of the gasket, so you can match it up to the kit. Different colors are a little different thickness. I know, old oil soaked gaskets are not easy to tell apart. Hold it up to a light and you’ll be able to figure it out. Sometimes 2 gaskets were used. There are not just sealing gaskets. These are paper shims. Do not use any gasket sealant on the surfaces, except either non-hardening or very high temp silicone grease (Mobil 1, etc).
Studs that pulled out need to be either replaced or you need to pull the old nut off by jamming 2 nuts together on the stud threads. When you remove the rusted on nut, if you find the threads damaged, you’ll need to replace the stud. If the threads look ok, but dirty, use the die to clean the threads. Dies fit nicely inside a 1 inch deep socket and the ratchet action makes this go much faster. It might be easiest to remove all the studs and clean the gasket surface and then re-install all the studs with red locktite.
Clean up the threads on the transmission housing with a tap. Reinstall the studs. Place the gasket on the transmission housing.
The gear stack should slide in with little or no problem. One "trick" is to engage 4th gear, which helps position the stack to slide in. You may have to turn the gears a little bit (kind of like putting in a distributor). Uh, a hammer helps. Seriously! You lightly tap the intermediate plate to move the gear stack in, the last inch or so. I found that the 2 dowel points to be good positions to tap.
For a tail shifter, Once the gear stack is in place you need to make sure the shift selector rod is inserted in its hole properly in the transmission case. Access this through the side hole in the transmission. Then tap the intermediate plate home.
The hard part: Putting the cover on. Make sure you've removed the speedo drive. Side shifter, it's a breeze. Reassemble reverse onto the reverse shaft. Keeping the cover tilted back a little bit (having the engine and tranny tilted down helps a little bit here. Slide the cover home and get the reserve shaft into it's home. The final "washer" on the reserve stack has to be aligned. Make sure it is in the correct position. The cutout faces the intermediate plate and lines up with the "hump" on the intermediate plate. Adjust it into the correct position with your fingers while the cover is about 1 inch from closure. Once everything is all set, tap it into place with the hammer (Damn thing sure comes in handy, but, don't get wild with it!)
For a tail shifter, it's a bit tougher. You have to do everything on your back! The shift selector fits into a recess in the tail of the cover. I expect this is where the 911 shift-shaft used to go. You have to position it with your fingers from inside the cover, until it's in the correct place, all the while not letting reverse fall off. Point the finger of the end cover rod downwards to keep it out of the way.
When reverse falls out, yell a bit, curse some more, then find the bits that rolled away. Clean 'em off and try again. Follow the rest of the directions as a side shifter.
Once the cover is on, I put a couple of nuts into place.
Use a screwdriver to reach in through the access port on the side of the tranny and disengage 4th/5th.
On the tail shifter, through the access port, slide the gear selector rod toward the front of the car. You should be able to turn the end cover rod and get the finger into the rod slot. Once this is done. Through the side access hole, center the shift selector finger and center the shift rod so that the finger is straight. Make sure that the finger is in the line of the three shift fork rod slots. Now you can put the support fork in.
You need to tap it home. Put the nuts on but don’t torque them. Using a vise grip to grab the external shift rod. Make sure you can select all gear. If it seems hopelessly locked, pull the support out and try again! (Been there, done that…). Once you can select all gears, tighten up the nuts and torque to 18-20 ft-lbs.
For a side shifter, install the gear selector console. Test out the gear selection with the external selector. Don't worry if it's a little stiff. If everything seems ok (being able to select each gear), then go ahead and close up the cover and torque the nuts. Be careful, they only need about 18-20 foot-lbs.
Reconnect the main shifting shaft. Check the gearshift and make sure you can shift into every gear. All set, go ahead and reconnected the tranny ground strap, install all the end cover nuts and torque the nuts on the cover and the side access port. Remember to use only 18-20 ft lbs.
Reinstall the speedo drive. Line up the speedo drive set screw hole with the hole in the end cover. Install the set screw being very careful not to over tighten the screw. The threads are usually an insert and they pull out fairly easily.
Reinstall the gear selector cover. Fill the tranny with 80-90W gear oil and replace the plugs. If you’re going to use really good gear oil (Synthetic or Swepco), wait until you reach the first change. Re-install the muffler.
Reinstall the battery!
While you are at it…You should change at least the tranny end shift rod bushings. My personal feeling is you should change them all (They are cheap), all the way up through to the gearshift in the car. Look at the shift rod tech articles on this web site.
I want to add a few things to those articles:
#1. You should remove the entire shifter assemble and clean and disassemble it. The assembly has 3 springs, a shift lock out plate, 4 c-clips, 2 rods, a top bushing and a spring seat, along with the shifter-shaft and the housing. In finding the final slop in my gearshift assembly, the spring seat was broken and the top bushing was worn. Some of these parts are only available through a Porsche dealer, although I did find the upper bushing and the spring at a major Pelican competitor (Are you listening Wayne?). The spring seats are available only direct from Porsche!
Upper Bushing: 914 424 131/00
Spring: 901 424 132/00
Spring seat (70-72) 901 424 135/00
Spring seat (73-76) 914 424 343/00
The lockout plate can also get damaged/worn out. If it doesn’t look like this, you need to replace it.

Reassemble with some good grease.
#2. I can’t speak for the side shifter, yet, but my tail shifter shift rod and the rear shift bushing, were not the same size. I ended up buying some MAPP gas and a couple of brazing rods from my local hardware store. I heated up the rod to way red hot and melted brazing material onto the rod. I to smoothed it out as much as possible while still molten. After cooling, I used a grinder to rough round it, then strips of emery cloth to smooth and round out the rod. It now is a much tighter fitting rod in the bushings. Brass brazing compound works fine. It’s riding in a plastic bushing! You probably could do this with copper pipe solder as well. And the smoothing would be easier (Softer material). You could weld it, but the smoothing will be much more difficult. You might want to check the rod in all places it rides in a bushing.
As in the first article on helping the tail shifter, make sure the final links do not have much slop in them. If they do, use the brazing material to repair them and a file and emery cloth to smooth them out. You do not want any slop in the linkage!
#3. Aligning the shift rod. I spent a great deal of time aligning my shift rod on my 914/6, which is an original tail shifter. What I’ve found is that the best way to align the shifter is to put the car in 3rd gear, then align the shifter so that 3rd gear is selected when shifter is riding up against the lockout plate with no pressure. This gives you a "slot" for 2nd and 3rd. 1st and reverse will then require a significant effort against the lockout springs to select.
Adjust the forward/backward position of 3rd so that it is in a comfortable spot, but not too far back. Lock the shaft down by tightening the locking collar nut. Shift it into 2nd. If it’s too far forward, loosen and slide the shift selector back. Repeat the 3rd and 2nd alignment until it where you want it forward and back.
A note on the locking nut/bolt. On the side shifter, this is a no-brainer! It’s right under the shifter with easy access. On the tail shifter, it’s under the center armrest, under the access plate. There is a hole in the center tunnel on the driver side (move the driver seat all the way forward for access) big enough for the 13 mm box end wrench (an open end will not fit!). I had to change the position of my locking collar so that the bolt was on the passenger side of the shift rod and the nut is on top. You can then fit a box end wrench through the access hole to the bolt head and a ratchet to the top. And you are holding all of these while holding the gear selector steady and turning the ratchet. No one said owning a Porsche was easy!
Also, use a high temp grease (I prefer synthetic) on all the working parts and plastic bushings. Get the covers and put them in place. Dirt/grit in the grease will help ruin the bushing and/or the shift rods!
QUOTE
It's still rough around the edges, but take a look!
James
Full on Synchro change!
So yer gears are a grinding…I feel your pain. You too can rebuild the 901. It’s not that hard. Really! If all of the oil seals are in decent shape (no leaks!!!), then you can change the synchro’s while leaving the tranny in the car and attached!
Tools - You’ll need a few tools. Most of them ya got, but there 2 special ones which really help
Synchro hub removal tool - This puppy helps you remove the dogteeth from the actual gear. There are ways to get around buying this one. I’ll address those later.
http://www.pelicanparts.com/catalog/shopca...y_pg1.htm#item5
Shift fork alignment tool - There is no substitute for this. If you want to rebuild the tranny, ya need it!
http://www.pelicanparts.com/catalog/shopca..._pg2.htm#item17
Other Tools:
30 mm deep socket (I found one at Autozone for $6.99)
3 and 4 mm pin punches
13 mm socket wrench with extension
17 mm socket
17 mm Allen for the drain plugs
19 mm deep socket (you can substitute a ¾ inch)
"Big Ass" Crescent wrench
Plastic and brass hammers
A thin file
Gasket scraper (or a single edged razor blade)
Some sort of cleaning fluid (I like to use diesel fuel)
Lint free rags
A couple of brass brushes
3 jack stands
2 drive up ramps
A couple of big plastic boxes.
A plastic in-sink washtub.
Parts: 4 gaskets - Intermediate plate to transmission housing, End cover to intermediate plate, the fork gasket and rear cover plate gasket. The factory manuals don’t show the 3rd or 4th gaskets for side shifters, which use an o-ring with the side shifter and no rear cover plate on the rear cover.
Up to 5 synchro bands.
http://www.pelicanparts.com/catalog/shopca...y_pg1.htm#item3
Up to 5 sets of dogteeth
http://www.pelicanparts.com/catalog/shopca...y_pg1.htm#item4
Up to 3 sliders
2nd/3rd and 4th/5th are one type and Rev/1st is different.
http://www.pelicanparts.com/catalog/shopca...y_pg1.htm#item6
A bearing or 2
What will you need? It depends on what is actually wrong and how many gears grind. If it only grinds in 1st or 2nd, you may only need parts for those areas. I’ll show you good and bad parts. If the grinding just started, you may be able to get away with just a few synchro-bands. As a bare minimum, you need to get 2 brand new synchro-bands, for 1st and 2nd. These get the most wear and you might as well replace them while you’re in here!
2 Muffler gaskets
http://www.pelicanparts.com/catalog/shopca...s_pg2.htm#item9
Clean - Clean - Clean
Youze about to get into the inner workings of the transmission. You do not want to get dirt inside. We all get oil leaks and some of this oil ends up on the transmission. Clean the dirt and grime off the transmission. You might try one of those pressure washer engine degreasers at the u-spray it car wash places before starting this job. Besides, no one likes working on a greasy mess. Clean at least the end cover and the intermediate plate on the outside.
At home, back the car up onto the ramps. For safety sake, disconnect the battery. You don’t want someone accidentally starting the car while this is all going on.
You might try a hand held garden sprayer filled with diesel and a catch tub underneath. You can filter and reuse the liquid.
I also tried a personal steam cleaner. It worked well, but not the way I had envisioned, i.e. the grease and grime just dripping off. It loosens the dirt, oil and grease and seems to infuse water into it. This makes it fairly easy to wipe off. A screwdriver wrapped with a cloth helps get into the many crevices. I also have found that deep buildup just needs to be scraped out with an old screwdriver first.
A home pressure washer works well too, up to a point. Nothing alone seems to work. I think a combination of the three, steam, pressure washing and plain old elbow grease will get it clean. You might also consider having the case, side-cover and intermediate plate cleaned by a machine shop, if you pull the tranny off the car.
While you’re under there, take a look at the CV joints and check the boots. Squeeze them while holding a strong light on them. Cracks? Dry rot? Replace them! And don’t forget to repack them with grease!
While you’re cleaning, pay special attention to the nuts that hold the transmission cover on. Clean the threads as best as you can. Small brass brushes help here, along with solvent. Afterwards, spray them liberally with penetrating oil. While they’re soaking in it, remove both drain plugs and drain the tranny oil. Remove the shift-rod cover. Clean the shift rod area and soak it’s nuts with penetrating oil. Spray the exhaust nuts as well. You might consider doing all of this a few days before and doing periodic penetrating oil sprays. Tapping the studs and nuts with a soft brass hammer will help as well.
Support the heat exchangers with wire or jack stands. Remove the muffler and the muffler hanger from the transmission. Disconnect the transmission ground strap from the end cover.
Remove the shift rod:
Tail shift: You disconnect the two 13mm nuts which hold the shift rod support bracket. Then push back on the shift rod or shift the car towards the "odd" gears. You may want to go ahead and completely remove the shift rod from the car and renew all the shift bushings (See the tech article on shifting improvements). Highly recommended.
Side Shifter. Using an Allen wrench, remove the shift rod set screw and separate the shift-rod from the shifter arm. Remove the 2 nuts that hold the shift console to the transmission. Pull the shifter assembly out of the transmission. Disconnect from the shift rod. Soak it in your favorite cleaning fluid.
Remove the speedo cable and speedo drive. On a tail shifter, remove the lower cover plate on the rear cover.
Place a jack stand underneath the transmission, raise the tranny with the jack Remove the transmission support nuts and washers. These are attached to through bolts and you’ll need to place a wrench on top as well as the ratchet on the nut. Now lower the transmission. It will catch on the bolts. Use a punch to push one support bolt up as far as it will go. Do the same to the other side. Lower the tranny. Keep doing this until you get one side free from the bolts, then get the other. Lower the tranny a bit. Support the tranny (and engine!) with the jack stand, near the front of the bell housing. You should have the tranny tail cover low enough now that you can access all the 13mm end cover nuts.
Remove the Tail cover. All of the tail cover nuts should be 13 mm. Don’t worry if the nut is rusted on and the stud backs out. We’ll take care of that later. Remove the nuts and the washers. Put them into a jar with some cleaning solution. On a tail shifter, remove the rear cover nuts washers and cover. Place a large cloth or old towel underneath the transmission, because you are about to have reverse drop out on the ground! Using a plastic and/or brass hammer, tap the cover off. Tap lightly on the "ears", the rear transmission supports. Collect all of the pieces that fell on the ground and remove any loose pieces from the inside of the end cover. Put them back in the end cover and place in a clean plastic box labeled reverse. Make sure all loose pieces are there.
Tail shifter: remove the fork. It is in the same spot the side shifter uses for the shift selector. It’s just behind the backup switch. Use a big screwdriver to pry it out, but only at the "pointy" ends, not in the middle. Note which way the "toes" are pointing (Upwards!)
914/6 Tail shifter! Before you can remove the intermediate plate, remove the accelerator linkage from the intermediate plate.
End Cover coming off – Who the hell painted the tranny Blue? Sheesh!
End cover off
Before we remove the intermediate plate, we need to loosen/remove a couple of things.
There is a rod on the left side that is connected to a brass ½ moon thing. This is you 1st/rev gear selector. The ½ moon thing is a shift fork. It is sitting on the 1st/rev slider. Push the rod and the slider into the transmission (Towards the front of the car) and engage it to 1st gear (get the slider to engage the teeth). Now look at the same level as the first shift rod on the intermediate plate. You’ll see the protrusions of the other 2 shift rods. Using a ratchet extension and a hammer, tap both of these rods into the intermediate plate. This engages all gears, locking up the entire transmission so it can’t turn. Use the 30mm socket and a breaker bar and loosen the rear bolt with the speedo worm drive (Yeah! THE BIG BOLT). Just make sure you can turn it by hand, but don’t remove it yet.
Take the pin punch and remove the roll pin from the castle nut on the right side of the transmission. Use a 19mm Socket wrench (I like a ¾" deep socket…) and a breaker bar to loosen (but not remove) the castle nut.
Using a 13mm ratchet, remove the little bolt from the shift fork. Slide the shift fork and the slider off the transmission. You may need to use a large screw drive to pry the slider out of engagement with first gear, depending on the condition of first gear. Label this 1st gear shift-fork.
Remove the intermediate plate and the gears: Using a brass hammer, lightly tap the intermediate plate towards yourself. Once it’s loose, hold tightly (It’s heavy!) and pull the intermediate plate and gear stacks out of the transmission.
Intermediate Plate starting to come out. Note the reverse switch on the left side of the picture and the access point for the tail shifter support fork or the side shifter shift console.
Other side, the gear stack is almost out!
The Gutless Tranny! Notice that the CV joints, the starter, etc are still in place. The backup switch hasn’t even been disconnected. Notice that only 4 of the studs that hold the intermediate plate and the end cover on are still there. This seems to be a common situation. Many of the studs will come out. Go buy some new nuts. Get an 8 mm 1.25 pitch die and tap. Use the die to clean the threads on the studs. Use the tap to clean the nuts and the stud holes. Remove the rusted on nuts with a couple of nuts jammed together on the threads at the other end. If you have only 4 remaining stud, go a head and remove them. Use a gasket scraper to remove any remaining gasket on the machined case surface. Re-install the studs into the transmission with some red-locktight.
Now the fun begins!
Part 2: Rebuilding the gear stack
Gear Stacks with the Shift-forks removed
I hope you cleared a good work space cause this is going to be fun. Get yourself 2 nice clean plastic boxes. Label them (If you’re into that) Pinion and Drive shaft. If you’re only replacing the 1st and 2nd gear synchros, you only need one box, and you don’t need to remove the shift fork from the drive shaft
If all you want to do is fix 1st & 2nd gear, just remove the pinion shaft by removing the large 30 mm bolt and pulling 1st gear off. Place all of the 1st gear stuff into the pinion shaft box. You should be able to get down to the big washer, slightly angled washer. Put a label on this washer, as 1st gear.
Tap. And I mean TAP, the drive shaft with the brass hammer. The fit of the bearing runner is very tight. You are not driving a nail! You are tapping. Tap tap tap. Tap tap tap. Once there is a little room, you could use a gear puller, but lightly taping will work. Once the collar is off, put it in "the box". Push the shaft away from the shift fork and remove it from the intermediate plate.
Now, you have a couple of choices… The gear-puller is the best solution. But all you need is another tool. I hear you cry. My gear puller also helps on pulling the CV joints apart, among other things. And it’s a cool looking tool. If ya got it, use it to remove 2nd gear. That will pull the other collar and the other washer off. If you don’t have one, you can use the BRASS hammer to whack the gear stack down. It does work, just be gentle, but not too gentle. The brass hammer takes the abuse; the gears do not. Just turn the stack as you whack it.
If you are repairing/inspecting 4th and or 5th gear, do the same with the drive shaft. You might want to do this anyway, since the drive shaft bearing is a weak point and ½ of them have been bad that I’ve seen. Be very careful. The shaft is hollow and the extra holes for the castle nut retaining pin make this end of the shaft weak and hitting too hard may bend the end of the shaft. Putting a couple of nuts on the threads will help strengthen the area.
Once you get it apart, if the ball bearings fall out of the pinion bearing, you have a bad one. If the brass cage is shattered, you have a very bad one! If the cage is missing or the balls are missing, the shaft may unusable.
If the driveshaft bearing runners will not separate at the intermediate plate, first choice is using a liberal amount of carb cleaner and letting it soak for a while. Keep attempting. If it still won't come loose, look at the bearing. If the balls are missing, the journal may be so bunged up that it will never separate.
To get the gears off the driveshaft, use a BIG ASS crescent wrench. Scratch a match mark on the nut and the washer. Pry the anti-rotation washer and flatten it. I’ve used a couple of vise grips on the splined part of the shaft to hold it in place. Sometimes, it is very well torqued and a hammer is not so gently applied to the crescent wrench. Anger management at it’s finest!
Once you have the nut off, remove the washer. Flatten the washer, then fatigue and break the used side of the washer. Use a file to clean up this edge.
This is an ugly shattered cage surrounding a good one. Notice the discoloration of the shattered one. I expect it was run dry. The bearing on the left is located on the upper shaft and will lose oil first, when the transmission is running low on oil.
Keep those trannies filled! You can check your oil level by removing the fill plug and trying to dip your finger into the oil filled case. If you feel no oil, fill it up until it runs out of the fill hole. Of course, don’t do it now with the gear stack out.
Once 2nd gear is off, everything should be easy to access and should slide right off. Now is the time to look at the parts.
The gears themselves are always in mesh between the 2 shafts and spin on those needle-bearing collars. So, one part of the gear set is NOT connected to a shaft, except when the slider engages them.
Take the slider, and place it over the synch band and press down. That is what happens when you engage a gear. The synchband compresses, and the slider slides over it and engages the dogteeth. If the synch band is worn out, it should be fairly easy to put the slider into the dogteeth. Try this on 4th or 5th gear. You feel a lot more resistance.
First lets look at the slider. It is a ring, with lots of little internal slots, in 3 groupings, and 3 large slots. The slider slides over the triangle member on these 3 large slots.
Look at the slider itself. The small slots should have a point at each end (Except 1st gear, which should have a point only on one side). Once the synchro band wears out, this is when you start to hear grinding, the slider is no longer engaging the synch band. It then engages the dogteeth at a different speed and uses the pounding of the dogteeth to get them to the same speed. Not good!
The slider and the dogteeth are pointed this way to help engagement. After they reach the same speed with the synchband, the slider is allowed to continue moving towards the dogteeth. When they encounter each other, the gear will rotate slightly relative to each other. If the points become worn, you may find yourself unable to get the shifter into that gear every time.
2nd gear on my 914/6, at higher RPMs, would synch, but not lower RPMS. This is because the rapidly spinning shaft forces the synchband outward and allows it to engage the slider a bit, less or no grinding. Sliding the gear shift slowly into a grinding gear also helps. But these are temporary solutions at best….
The slider can get some wear from the contact with the synch band, but the majority will come from moving contact with the dogteeth. 3 things happen.
#1. The Slider loses some (or all) of it’s pointiness
#2. The Dogteeth lose some (or all) of it’s pointiness
#3. As the slider wears, the metal is pushed back and mushrooms a little bit, making the slot uneven. This makes it hard to shift into a gear and may prevent the slider from fully engaging the dogteeth, allowing it to "pop" out of gear.
This is a slider with normal wear is could be put right back in (It’s a 4th/5th gear slider, but it is exactly the same as 2nd/3rd). Use a file to make the small slots are straight. Also, use a brass brush and some solvent to remove any gunk in the slots.
The little circumferential scratches come from synchro contact and are normal.
If the points are a little blunted, it’s OK. Clean up the ring as best you can. Make the side of each slot straight. If the points are gone and flat, It’s done. Time for a new one. Using a dremel tool to repoint the sliders works very well. It can save a bunch of money, especially on 1st gear. Usually, it's a lot easier to just replace 2nd/3rd with a used 4th/5th.
The 1st gear slider is different from the other two. It has points only in one direction. It also has gear teeth (reverse!) extending radially out from the edge, which makes its OD bigger. It costs about twice what a 2nd-3rd/4th-5th slider costs.
Removing the Synchband from the gear
Remove the synch bands from the gear by removing the circlip with a pair of snap ring pliers. The synchband sits just inside of the dogteeth.
You need expanding snap ring pliers and I had to modify the pair I own to get the expansion enough. Once the ring is slightly expanded, you let once end slip "upwards" so it's off. Then use a screwdriver under the ring to pry it the rest of the way around.
Once the snap ring is off, the synch band comes out quite easily.
Synch bands:
Take a look at these synch bands:
The bad one here is really bad. If you look at any synchband, the side towards the slider will usually wear more than the side towards the dogteeth. In the picture, the synch band has become so loose, it is sliding around in the dogteeth and a slot has been machined. Porsche factory manual suggests that anytime you have a synchband out, if it is still good, turn it around so the better surface will be towards the slider. And I thought this was just a mechanics trick. Nope. Porsche approved!
Looking edge on, the side with more metal (thicker) is the "good" side, if you lost track. Notice the "good one" has a less even surface with a molybdenum coating. Bad ones the coating is gone and they are usually a bit shiny. Usually the "good side" is harder to install back onto the gear.
If the bad side is so bad it will fit loosely into the dogteeth, it is absolutely done. Pay the $60 and get a new one. If it falls out, it’s too loose. It should compress slightly when going in. If one side sticks in well and the other side slips out, it is somewhat worn but reusable. This is a candidate for "flipping around". Put the looser (worn) side inwards towards the dogteeth.
Dog Teeth.
The dogteeth are press fit into the gear. The Porsche/VW removal tool is a 2-piece plate that locks onto the dogteeth. You then use either a press or a hammer to separate the gear from the dogteeth with the cylinder. (The tool pushes the gear). If you are replacing the dogteeth with new ones, it makes little difference how you remove them. If you are using a donor tranny, get this tool. This is cheaper than 1 set of dogteeth.
(Insert remover pictures here)
The "teeth" biting into the synchband here are the dogteeth. These are the part that engages the slider.
All Dogteeth are the same for all gears. All Synchro bands are the same for all gears. So, why do 1st gear dogteeth cost less in the catalog? The dogteeth come with brake bands, the little guys that sit under the circlip. 2nd-5th gears need to be synchronized in both directions (Spinning the gear faster and spinning the gear slower – i.e. up-shifting and downshifting). 1st gear only needs to be synchronized in one direction, down shifting. So only the down shift brake band is installed. The only time you would you would need to synch the other way would be if you were moving backwards and tried to synch 1st, which is a no-no. Don’t do it.
Good position brake bands. The Little bands between synchroband and the inside lip of the dogteeth, are the brake bands.
This gear the brake bad wasn’t assembled right. The brake band slipped under the stop block, eventually leading to a broken stop block and bent brake band.
2nd/3rd gear slider –2nd gear side is "up"
2nd gear side, notice the blunting of the points. This is actually still useable. But I’d replace it. Also notice the "mushrooming" between the slots.
2nd/3rd gear slider, 3rd gear side. Notice how much more pointed the 3rd gear side is compared to 2nd gear.
Again, notice how much more pointed the 3rd gear side is compared to 2nd gear.
This slider could be cleaned up and installed with the better side towards 2nd, to even out the wear. Replacing the dogteeth will help too.
Part 2B – "Re-assemble the stack".
Clean the intermediate plate of all gasket material.
Drive shaft
Flatten the anti rotation washer with a hammer. Use some vise grips to "work" the previously bent side until it fatigues and falls off. Use a file to clean up the washer.
Reassemble up to and including #6. 1-5 install on the other side of the intermediate plate and done afterwards. You are supposed to torque nut #7. You would either need to weld an old socket to a pipe and weld a 32mm socket to the pipe and create a very long deep socket. I used my BIG ASS crescent wrench to both get it apart and put it back together. I tighten it as much as I can, and line up the match marks. The anti-rotation washer (#8) has an inner tab which fits into a slot on the shaft, so it always lines up the same way. Bend a different side up against the flat of the nut (#7).
Pinion Shaft
Reassemble up to #11. 1 through 10 install on the other side of the intermediate plate and are done afterwards. Make sure you get all of the shims (#26) in place.
Slide both shafts into the intermediate plate and then assemble the rest onto each shaft. Don’t torque anything down yet. You may need to tap bearing collars back into place.
Using your fingers, snap the sliders for 2nd/3rd into 2nd and the 4th/5th into 4th. The gear shafts are locked together. Torque the castle nut on the driveshaft to 80 ft-lbs and put its retainer roll pin back in. I keep turning it, a little at a time, until the slots line up with the hole.
Torque the pinion shaft bolt with the deep 30mm socket (80 ft-lbs). Snap the sliders back to the central position. You may need a screwdriver to pry them off of new synchrobands.
Slide the shift-fork alignment tool onto the gear stack. The shift rods can rotate slightly. Make sure that all three shift-rod slots match up position wise. Lock down the shift rods.
Center each slider into the middle of between each gear set. Tighten the shift-fork nut. 1st gear, adjust the shift fork so the slider is just off of the synchband for 1st. Tighten its nut.
The gear stack is back together!
Part 3, putting it all back together –
Clean all of the gasket material from the sealing surfaces on the transmission case and the end cover. You want to save a few bits of the gasket, so you can match it up to the kit. Different colors are a little different thickness. I know, old oil soaked gaskets are not easy to tell apart. Hold it up to a light and you’ll be able to figure it out. Sometimes 2 gaskets were used. There are not just sealing gaskets. These are paper shims. Do not use any gasket sealant on the surfaces, except either non-hardening or very high temp silicone grease (Mobil 1, etc).
Studs that pulled out need to be either replaced or you need to pull the old nut off by jamming 2 nuts together on the stud threads. When you remove the rusted on nut, if you find the threads damaged, you’ll need to replace the stud. If the threads look ok, but dirty, use the die to clean the threads. Dies fit nicely inside a 1 inch deep socket and the ratchet action makes this go much faster. It might be easiest to remove all the studs and clean the gasket surface and then re-install all the studs with red locktite.
Clean up the threads on the transmission housing with a tap. Reinstall the studs. Place the gasket on the transmission housing.
The gear stack should slide in with little or no problem. One "trick" is to engage 4th gear, which helps position the stack to slide in. You may have to turn the gears a little bit (kind of like putting in a distributor). Uh, a hammer helps. Seriously! You lightly tap the intermediate plate to move the gear stack in, the last inch or so. I found that the 2 dowel points to be good positions to tap.
For a tail shifter, Once the gear stack is in place you need to make sure the shift selector rod is inserted in its hole properly in the transmission case. Access this through the side hole in the transmission. Then tap the intermediate plate home.
The hard part: Putting the cover on. Make sure you've removed the speedo drive. Side shifter, it's a breeze. Reassemble reverse onto the reverse shaft. Keeping the cover tilted back a little bit (having the engine and tranny tilted down helps a little bit here. Slide the cover home and get the reserve shaft into it's home. The final "washer" on the reserve stack has to be aligned. Make sure it is in the correct position. The cutout faces the intermediate plate and lines up with the "hump" on the intermediate plate. Adjust it into the correct position with your fingers while the cover is about 1 inch from closure. Once everything is all set, tap it into place with the hammer (Damn thing sure comes in handy, but, don't get wild with it!)
For a tail shifter, it's a bit tougher. You have to do everything on your back! The shift selector fits into a recess in the tail of the cover. I expect this is where the 911 shift-shaft used to go. You have to position it with your fingers from inside the cover, until it's in the correct place, all the while not letting reverse fall off. Point the finger of the end cover rod downwards to keep it out of the way.
When reverse falls out, yell a bit, curse some more, then find the bits that rolled away. Clean 'em off and try again. Follow the rest of the directions as a side shifter.
Once the cover is on, I put a couple of nuts into place.
Use a screwdriver to reach in through the access port on the side of the tranny and disengage 4th/5th.
On the tail shifter, through the access port, slide the gear selector rod toward the front of the car. You should be able to turn the end cover rod and get the finger into the rod slot. Once this is done. Through the side access hole, center the shift selector finger and center the shift rod so that the finger is straight. Make sure that the finger is in the line of the three shift fork rod slots. Now you can put the support fork in.
You need to tap it home. Put the nuts on but don’t torque them. Using a vise grip to grab the external shift rod. Make sure you can select all gear. If it seems hopelessly locked, pull the support out and try again! (Been there, done that…). Once you can select all gears, tighten up the nuts and torque to 18-20 ft-lbs.
For a side shifter, install the gear selector console. Test out the gear selection with the external selector. Don't worry if it's a little stiff. If everything seems ok (being able to select each gear), then go ahead and close up the cover and torque the nuts. Be careful, they only need about 18-20 foot-lbs.
Reconnect the main shifting shaft. Check the gearshift and make sure you can shift into every gear. All set, go ahead and reconnected the tranny ground strap, install all the end cover nuts and torque the nuts on the cover and the side access port. Remember to use only 18-20 ft lbs.
Reinstall the speedo drive. Line up the speedo drive set screw hole with the hole in the end cover. Install the set screw being very careful not to over tighten the screw. The threads are usually an insert and they pull out fairly easily.
Reinstall the gear selector cover. Fill the tranny with 80-90W gear oil and replace the plugs. If you’re going to use really good gear oil (Synthetic or Swepco), wait until you reach the first change. Re-install the muffler.
Reinstall the battery!
While you are at it…You should change at least the tranny end shift rod bushings. My personal feeling is you should change them all (They are cheap), all the way up through to the gearshift in the car. Look at the shift rod tech articles on this web site.
I want to add a few things to those articles:
#1. You should remove the entire shifter assemble and clean and disassemble it. The assembly has 3 springs, a shift lock out plate, 4 c-clips, 2 rods, a top bushing and a spring seat, along with the shifter-shaft and the housing. In finding the final slop in my gearshift assembly, the spring seat was broken and the top bushing was worn. Some of these parts are only available through a Porsche dealer, although I did find the upper bushing and the spring at a major Pelican competitor (Are you listening Wayne?). The spring seats are available only direct from Porsche!
Upper Bushing: 914 424 131/00
Spring: 901 424 132/00
Spring seat (70-72) 901 424 135/00
Spring seat (73-76) 914 424 343/00
The lockout plate can also get damaged/worn out. If it doesn’t look like this, you need to replace it.
Reassemble with some good grease.
#2. I can’t speak for the side shifter, yet, but my tail shifter shift rod and the rear shift bushing, were not the same size. I ended up buying some MAPP gas and a couple of brazing rods from my local hardware store. I heated up the rod to way red hot and melted brazing material onto the rod. I to smoothed it out as much as possible while still molten. After cooling, I used a grinder to rough round it, then strips of emery cloth to smooth and round out the rod. It now is a much tighter fitting rod in the bushings. Brass brazing compound works fine. It’s riding in a plastic bushing! You probably could do this with copper pipe solder as well. And the smoothing would be easier (Softer material). You could weld it, but the smoothing will be much more difficult. You might want to check the rod in all places it rides in a bushing.
As in the first article on helping the tail shifter, make sure the final links do not have much slop in them. If they do, use the brazing material to repair them and a file and emery cloth to smooth them out. You do not want any slop in the linkage!
#3. Aligning the shift rod. I spent a great deal of time aligning my shift rod on my 914/6, which is an original tail shifter. What I’ve found is that the best way to align the shifter is to put the car in 3rd gear, then align the shifter so that 3rd gear is selected when shifter is riding up against the lockout plate with no pressure. This gives you a "slot" for 2nd and 3rd. 1st and reverse will then require a significant effort against the lockout springs to select.
Adjust the forward/backward position of 3rd so that it is in a comfortable spot, but not too far back. Lock the shaft down by tightening the locking collar nut. Shift it into 2nd. If it’s too far forward, loosen and slide the shift selector back. Repeat the 3rd and 2nd alignment until it where you want it forward and back.
A note on the locking nut/bolt. On the side shifter, this is a no-brainer! It’s right under the shifter with easy access. On the tail shifter, it’s under the center armrest, under the access plate. There is a hole in the center tunnel on the driver side (move the driver seat all the way forward for access) big enough for the 13 mm box end wrench (an open end will not fit!). I had to change the position of my locking collar so that the bolt was on the passenger side of the shift rod and the nut is on top. You can then fit a box end wrench through the access hole to the bolt head and a ratchet to the top. And you are holding all of these while holding the gear selector steady and turning the ratchet. No one said owning a Porsche was easy!
Also, use a high temp grease (I prefer synthetic) on all the working parts and plastic bushings. Get the covers and put them in place. Dirt/grit in the grease will help ruin the bushing and/or the shift rods!
The only thing I worry about when pulling the stack while the rest stays in the car is that when you are re-inserting the stack, you MUST be careful not to snag the input shaft seal or else you will get a leak. It is hard to do with a 40# gear stack in your hands and doing small maneuvers to seat it. Also, if you do not remove the whole tranz, you can not replace the input shaft seal.
But you save 15 minutes of unbolting the axles, clutch and starter. 
This is a "lo-fi" version of our main content. To view the full version with more information, formatting and images, please click here.