Full Version: New rear trunk seal holding entire lid up 1/8-3/16"
old factory seal kept the lid at or below fender line. This is a good reproduction part
QUOTE(Krieger @ Dec 15 2010, 07:06 AM) 
old factory seal kept the lid at or below fender line. This is a good reproduction part
if it is held up that high with the trunk latched, i doubt it will settle down anytime soon. defective part maybe?
photos????
Are you certain you have it seated all the way. I put a new seal in and it sits the way it should, out of the box.
Here's with the lid on:
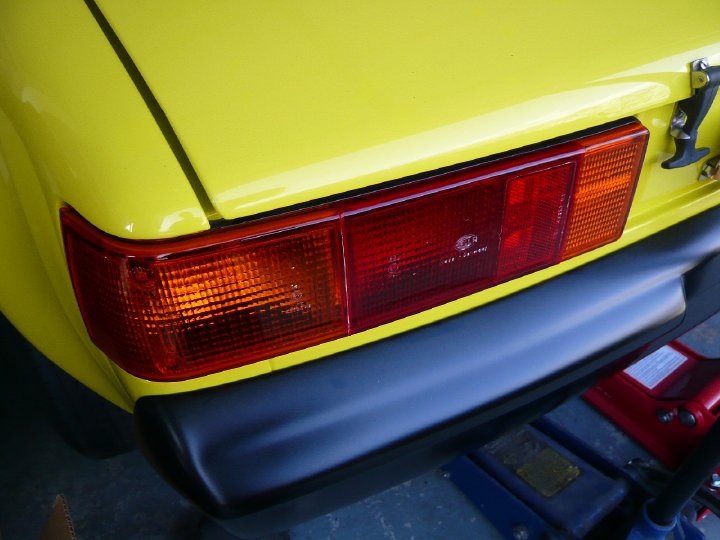
Here's the seal going on. I remember it had to be pressed down to get the final fit:
Here's with the lid on:
Here's the seal going on. I remember it had to be pressed down to get the final fit:
The metal clip on mine was tight. I used a rubber mallet and down it went ok.
Man that little car looks fast and nice. Reminds me of my 63 jeep j200 I painted 77 jeep sunshine yellow in 77.
QUOTE(bandjoey @ Dec 15 2010, 11:38 AM)
The metal clip on mine was tight. I used a rubber mallet and down it went ok.


Put a little arm into it. The top part is hollow and the c clip part of the seal should sit all the way down...
If it lasts more than 4 hours call your doctor... 
Is your trunk latch adjusted correctly? 
I thought I pushed it down enough with my hand. FWIW the latch is not on the lid or body. I'm gonna try pushin a little more, but no pullin. It's starting to hurt though. My hand. Maybe I should see a doctor.  The paint on the underside of the lid is a flat. Maybe a little lube of sorts to help the seal slide home.
The paint on the underside of the lid is a flat. Maybe a little lube of sorts to help the seal slide home.
"put de lime in de coconut, mix 'em bod together.....call me in the morning"
Gotta have the latch in place.
Use a screw driver to open the gap alittle on the bottom of the seal. Should be easier to push on then.
If this is one of mine, make sure you have it seated all the way. New rubber tends to not want to compress as much, but it should not hold it up that high. Can you get any pictures of the seal and how it interacts with the corners?
These should address the problem. I put aluminum in the clip to make it easier to fit (softer metal), but I suspect the problem is in the corners, but only pictures will tell us for sure.
These should address the problem. I put aluminum in the clip to make it easier to fit (softer metal), but I suspect the problem is in the corners, but only pictures will tell us for sure.
Mark D I will only have the rear latch because my lid has the hinges in the rear. There is some interfence fit at the front of the lid that I can work with. Mark it is one of yours but I didn't want to bother you any more. You have been very helpfull. I did go out and put some shoulder into it and the seal did make a crunching sound like it was squishing down. Ahh that was part of it and my hinges are tight on the sides making contact with the seal and pulling it up further.
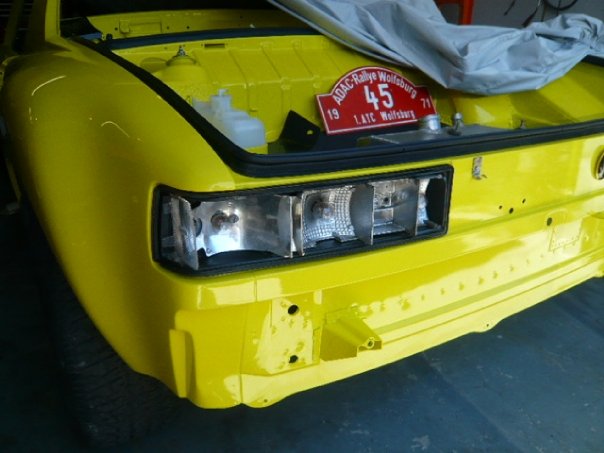
This section is hitting the seal and pulling it up. Time to grind! I thought I was done making a freakin mess! I may need to notch the seal for the bolts too.
its' the connection point on the "hinge" that's holding it up
its' the connection point on the "hinge" that's holding it up. The good news is the metal is aluminum so it will not rust after you cut into it.
Thats right 
QUOTE(Krieger @ Dec 15 2010, 06:58 PM)
Mark D I will only have the rear latch because my lid has the hinges in the rear. There is some interfence fit at the front of the lid that I can work with. Mark it is one of yours but I didn't want to bother you any more. You have been very helpfull. I did go out and put some shoulder into it and the seal did make a crunching sound like it was squishing down. Ahh that was part of it and my hinges are tight on the sides making contact with the seal and pulling it up further.
cool trunk, it is a bit different, why you do it, and what else in neato modifications have you done on that car (looks like it might be full of them!!!!)
I did this so I can have the best possible engine access. Check out the 2nd thread in the build threads project F-914
This is a "lo-fi" version of our main content. To view the full version with more information, formatting and images, please click here.