OK I got my Maddog mount and it looks like I am still having to do more than just weld it in!
What did you guys do with the Brake Proportioning Valve? Also, how high do I mount this? It looks like it will have to be high to clear the heater pulls?
Full Version: Bulkhead 6 Motor Mount!
70-74 cars have the P-valve mounted on this rib.
So what should I do for my 75? 
Maddog advertizes that it works on "early & late cars"! So I guess I have to make some brake line extensions to move everything over???
Maddog advertizes that it works on "early & late cars"! So I guess I have to make some brake line extensions to move everything over???
Depending upon what you are going to run ....
Carbed or MFI engines .... center the mount to the centerline of the car and set the shelf 7" above the lower body seam.
CIS engines .... same procedure, but set the shelf height at 6.5"
You need to move the valve or use a "t" fitting and remove it. However, if you remove the valve, Admin Eric and a couple of others will tell you you are going to die as the rear brakes will lock up before the fronts and send you spinning wildly into the oncoming traffic or somewhere.
I run a "t" so don't listen to me as I will probably be dead before you read this.
I'm already dead once from that. I was a nice guy last time around, after the resurrection I thought I'd try something different.
QUOTE
Depending upon what you are going to run ....
Carbed or MFI engines .... center the mount to the centerline of the car and set the shelf 7" above the lower body seam.
CIS engines .... same procedure, but set the shelf height at 6.5"
You need to move the valve or use a "t" fitting and remove it. However, if you remove the valve, Admin Eric and a couple of others will tell you you are going to die as the rear brakes will lock up before the fronts and send you spinning wildly into the oncoming traffic or somewhere.
I run a "t" so don't listen to me as I will probably be dead before you read this.
Carbed or MFI engines .... center the mount to the centerline of the car and set the shelf 7" above the lower body seam.
CIS engines .... same procedure, but set the shelf height at 6.5"
You need to move the valve or use a "t" fitting and remove it. However, if you remove the valve, Admin Eric and a couple of others will tell you you are going to die as the rear brakes will lock up before the fronts and send you spinning wildly into the oncoming traffic or somewhere.
I run a "t" so don't listen to me as I will probably be dead before you read this.
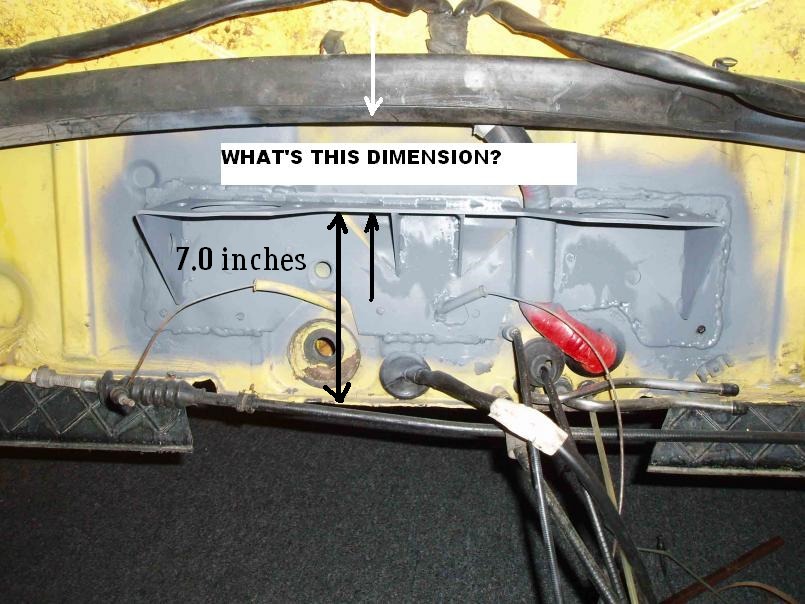
7" would put the lower part of the mount below the lower body seam!?? It is a CIS motor but I am modifing the injection to fit without cutting or lowering!
I read the coments about the rear brakes locking up and I may have to join you in death
 unless someone else has any other ideas! I will be upgrading to larger fronts later but not right away!
Here is a photo with the tape messure!
QUOTE(Jeffs9146 @ Feb 28 2011, 07:35 PM) 
So what should I do for my 75?
Maddog advertizes that it works on "early & late cars"! So I guess I have to make so brake line extensions to move everything over???
On my '76 conversion I moved it over to the same location as on my '73 - the area Mark shows in that pic. It wasn't hard at all. I changed the hard lines accordingly. You can get new hard lines from a VW dealership with the proper flares. I measured exactly how long I needed, gave them the measurements and two days later picked them up and bent as required. Just get a good tube bender.
I'm doing this too. Eric sent me these for placement of the regulator. You'll need an early regulator or valve and the hardlines.
Kev
Click to view attachment
Click to view attachment
Kev
Click to view attachment
Click to view attachment
QUOTE(Jeffs9146 @ Feb 28 2011, 04:51 PM)
QUOTE
Depending upon what you are going to run ....
Carbed or MFI engines .... center the mount to the centerline of the car and set the shelf 7" above the lower body seam.
CIS engines .... same procedure, but set the shelf height at 6.5"
You need to move the valve or use a "t" fitting and remove it. However, if you remove the valve, Admin Eric and a couple of others will tell you you are going to die as the rear brakes will lock up before the fronts and send you spinning wildly into the oncoming traffic or somewhere.
I run a "t" so don't listen to me as I will probably be dead before you read this.
Carbed or MFI engines .... center the mount to the centerline of the car and set the shelf 7" above the lower body seam.
CIS engines .... same procedure, but set the shelf height at 6.5"
You need to move the valve or use a "t" fitting and remove it. However, if you remove the valve, Admin Eric and a couple of others will tell you you are going to die as the rear brakes will lock up before the fronts and send you spinning wildly into the oncoming traffic or somewhere.
I run a "t" so don't listen to me as I will probably be dead before you read this.
7" would put the lower part of the mount below the lower body seam!?? It is a CIS motor but I am modifing the injection to fit without cutting or lowering!
I read the coments about the rear brakes locking up and I may have to join you in death
unless someone else has any other ideas! I will be upgrading to larger fronts later but not right away!Here is a photo with the tape messure!
That's what a grinder is for. I cut that "tab" so that the bottom rested on the seam and welded it in. I also welded all around the mount ... no bolts ... just welds.
Unless he modified the mount, you may have to open up the cutout for the main loom gooseneck to go through. I had to on a '70 conversion ... didn't have to on the '74 conversion.
K. Conway has a Rich Johnson mount, not Maddog.
QUOTE(9146986 @ Feb 28 2011, 05:24 PM)
K. Conway has a Rich Johnson mount, not Maddog.
Yes, sorry I wasn't paying attention.
 I thought they were the same until I saw the photo posted above. Photos are of Eric Shea's mount but I am using a RJ also.
Kev
I don't have a Maddog mount and I am running a T in the rear .... sure death. I'm going with a bias adjuster somewhere in the cabin.
Click to view attachment
Click to view attachment
QUOTE
I thought they were the same
They are basically. All copies of the Vellious (sic) mount.
Get an early style "PRESSURE REGULATOR" (it's not a proportioning valve as it doesn't proportion anything) and get the early lines too. Do not follow my picture, do what McMark says and mount it on that rib. Here's how:
1. Mock install the lines. There are two clips that should be on the firewall, one for each side. These (if they're still there) should help hold the lines in place.
2. Hold the pressure regulator up to where the lines would meet it and mark the loaction on that rib.
3. While you are in there welding the motor mount in, weld two 8x1.25x20 fasteners on that rib in the proper location (take said valve under there with you to ensure they are in the proper location.
Then sit back... have a
 and revel in the fact that you did it right.
QUOTE
70-74 cars have the P-valve mounted on this rib.
The switch was made in 74 so... a lot of 74 cars have the late model location.
QUOTE
They are basically. All copies of the Vellious (sic) mount.
Get an early style "PRESSURE REGULATOR" (it's not a proportioning valve as it doesn't proportion anything) and get the early lines too. Do not follow my picture, do what McMark says and mount it on that rib. Here's how:
1. Mock install the lines. There are two clips that should be on the firewall, one for each side. These (if they're still there) should help hold the lines in place.
2. Hold the pressure regulator up to where the lines would meet it and mark the loaction on that rib.
3. While you are in there welding the motor mount in, weld two 8x1.25x20 fasteners on that rib in the proper location (take said valve under there with you to ensure they are in the proper location.
Then sit back... have a and revel in the fact that you did it right.
Lennie and I just decided that we have everything on his parts car to convert the "regulator" and lines to earlier stuff!
As long as 7" is the location for the mount then I can work with what I have, cutting and grinding around everything!
Any other coments on the hight above the lower body seam are welcome!!!
QUOTE
I'm going with a bias adjuster somewhere in the cabin.
This isn't about bias on a 914. It's about saftey. That valve has nothing to do with bias.
A mid engine car has polar moment inertia (think spinning top). It's tough to get it to spin but, when it does... you're screwed. This valve prevents your rears from locking, causing spin in a panic stop.
A "Bias Valve" can only "restrict" fluid movement to the rears (you can't really hook it up backward).
Our rear brakes are small (matched perfectly to the fronts by those dumb guys at the Porsche factory). You want your rears working 100%... 99.9% of the time. The only time you don't want them working is in a panic stop. This is when your pressure regulator kicks in.Another way to look at it is: 70 + 30 = 100%
Now... add a bias control valve and give it a turn: 70 + 20 = 90% Give it another turn: 70 + 10 = 80%
I'd rather have 100% of my brakes being used when I come into a corner. Especially these brakes. Just say'n.

QUOTE
Any other coments on the hight above the lower body seam are welcome!!!
Mock install the lines and let them be your guide... or, check on the parts car.
QUOTE
Mock install the lines and let them be your guide... or, check on the parts car.
Thanks Eric!


I ment the motor mount!
QUOTE
I ment the motor mount!
Hmmmmmmmm... hard to say with that one. As you can see in the yellow pics above, my RJ mount is against the floor pan. It measured out that way using the instructions (something like the shelf 7" up from the floor pan if I recall??)

QUOTE(Eric_Shea @ Feb 28 2011, 06:14 PM)
QUOTE
Any other coments on the hight above the lower body seam are welcome!!!
Mock install the lines and let them be your guide... or, check on the parts car.
Jeff,
I think Eric is refering to the pre-drilled holes in the mount for the brake line. Check the shelf height with that hole lined up and see if you get the 7" Slits mentioned.
QUOTE(Lennies914 @ Feb 28 2011, 06:24 PM)
QUOTE(Eric_Shea @ Feb 28 2011, 06:14 PM)
QUOTE
Any other coments on the hight above the lower body seam are welcome!!!
Mock install the lines and let them be your guide... or, check on the parts car.
Jeff,
I think Eric is refering to the pre-drilled holes in the mount for the brake line. Check the shelf height with that hole lined up and see if you get the 7" Slits mentioned.
I held up the mount and the holes don't mean anything on the 75 so it won't help in establishing the proper engine hight to weld the mount!
I've had both the RJ and the Maddog .... nothing changes in what I said.
My current conversion is a '74 with an RJ.
My current conversion is a '74 with an RJ.
I made my own bulkhead mount. It's easy especially after fabricating all the difficult pieces for these cars.....
Click to view attachment
Click to view attachment
Click to view attachment
Click to view attachment
Click to view attachment
Click to view attachment
Click to view attachment
Click to view attachment
Click to view attachment
Click to view attachment
Interesting!!
I guess I could cut the Maddog mount in two and add some extra welds and bracing and have what you have!
I don't see any motor mounts??? Are you just going solid??
I guess I could cut the Maddog mount in two and add some extra welds and bracing and have what you have!
I don't see any motor mounts??? Are you just going solid??
If you wanna move your P-valve, I'm happy to post all the measurements you need. I've got a 914 chassis or two lying around the shop. 
QUOTE(Jeffs9146 @ Feb 28 2011, 09:15 PM)
Interesting!!
I guess I could cut the Maddog mount in two and add some extra welds and bracing and have what you have!
I don't see any motor mounts??? Are you just going solid??
You might be able to.
However, I use solid mounts not the 911 sport mounts. You would need to bolt it all together to make sure everything aligns correctly and weld it in place.
It makes the wiring harness fit and can allow the proportioning valve to fit correctly. I designed my mount after I did my first 3.2 conversion in 1993.
QUOTE(McMark @ Feb 28 2011, 09:19 PM)
If you wanna move your P-valve, I'm happy to post all the measurements you need. I've got a 914 chassis or two lying around the shop.
Lennie has the one I may get the parts from! I am sure others will have these challanges and love the info!
Jeff,
You are correct, you will have to re-locate the brake p-valve and have to cut a slit or hole for the heater pull. I have to update my product description because the 75-76 year models have to have these mods in order to be installed.
If you don't want to do those mods I would be willing to give you a refund.
I also appreciate feedback so that I can make my products better and easier to install.
thanks,
Dave
-maddog
The top mounting hole is about 1.5" down from the engine shelf. They are 8mm x 1.25 nuts welded in. I like to use flanged nuts for this sort of thing because they're easier to weld in.
QUOTE(McMark @ Mar 1 2011, 09:05 AM)
The top mounting hole is about 1.5" down from the engine shelf. They are 8mm x 1.25 nuts welded in. I like to use flanged nuts for this sort of thing because they're easier to weld in.
Can you expand on that!
By the top mounting hole do you mean the top of the bulkhead mount being 1.5" down from the metal of the engine shelf? That can't be what you mean!
What bolts are you talking about welding in? Are you are talking about the mounts for the p-regulator?? If so that makes more sense!

QUOTE
Are you are talking about the mounts for the p-regulator?
Dave, for your documentaion, a lot of 74 cars have this as well. Just an FYI. The switch was sometime in that model year.
After spending some time test fitting and cutting this is what I ended up with!
It was way to much work and I should have just purchased the one made by a914guy.
It would have much easier and it would be done by now.
It was way to much work and I should have just purchased the one made by a914guy.
It would have much easier and it would be done by now.
Here is a914guys for comparison!
Maddogs would be fine for 70-74, If you added the instructions on drilling the new holes and cutting off the bottom it would probably be OK. I would also say that a little wider on the wire bracket would allow you to replace the harness if need be! The way it is now the harness will not be able to be removed if there is a problem!
Maddogs would be fine for 70-74, If you added the instructions on drilling the new holes and cutting off the bottom it would probably be OK. I would also say that a little wider on the wire bracket would allow you to replace the harness if need be! The way it is now the harness will not be able to be removed if there is a problem!
Well, here it is installed with the first coat of primer!! 
All in all it seems to fit fine. It is a bit tight around the harness and could cause some chaifing over time and I did some significant modification to make it fit but I think it will work fine!
All in all it seems to fit fine. It is a bit tight around the harness and could cause some chaifing over time and I did some significant modification to make it fit but I think it will work fine!
Todays progress!
I have now installed the early brake lines and I am trying to find the right rivet-nuts to move the Pressure Regulator!
I have now installed the early brake lines and I am trying to find the right rivet-nuts to move the Pressure Regulator!
Damn Jeff, You sure get alot done when I'm not there drinking your beer.
Can anybody provide the dimension from the top of the bracket to the engine shelf?
Kev
Click to view attachment
Kev
Click to view attachment
Everyone told me to mount it 7" from the bottom or 6.5" if lowering it for a FI engine!
I mounted it at 6 15/16ths and figured I could space it up if needed!
I mounted it at 6 15/16ths and figured I could space it up if needed!
QUOTE(kconway @ Mar 7 2011, 07:58 PM)
Can anybody provide the dimension from the top of the bracket to the engine shelf?
Kev
Click to view attachment
QUOTE(moparrob @ Mar 7 2011, 08:42 PM)
QUOTE(kconway @ Mar 7 2011, 07:58 PM)
Can anybody provide the dimension from the top of the bracket to the engine shelf?
Kev
Click to view attachment
Not what I was looking for but I guess that'll work...
I know, I had to trust those who posted the 7" figure and thought it was better to have it a bit to low than a bit to high!!
QUOTE(Jeffs9146 @ Mar 7 2011, 10:35 PM)
I know, I had to trust those who posted the 7" figure and thought it was better to have it a bit to low than a bit to high!!
How close was that 7 inch recommendation? Anyone test fit yet, I'm trying to tackle this in the next few days or so
This is a "lo-fi" version of our main content. To view the full version with more information, formatting and images, please click here.