Help - Search - Members - Calendar
Full Version: Engine bar/mounting for V6 or V8
914World.com > The 914 Forums > 914World Garage
3d914
Doing work in the engine bay for the 914-SHO (V6) and was thinking about the engine bar and mounting. Have a few questions for those that BTDT.
  1. The engine bar carriage bracket in the engine bay looks like it would need to be reinforced for the 6's & 8's - True?
  2. Can the stock engine bar be the starting point for a welded up bar or is that forged steel unsuitable for the weight or the welds?
  3. If building from scratch, what size/types of steel are others using?

Include pics of examples please.

TIA
Mike Bellis
I used 1-1/2", 0.120 wall square tubing when I fabbed mine. I'm not sure you can affectivly weld the stock bar for engine mounts.
scotty b
Chevy V8 homemade bar made from box on top. Renegade bar made from rect. tubing on bottom. Nothing fancy, just some box tubing is all you need. 1/2" 1/8 wall min. box or rect tubing and the stock mounting bracket is plenty strong.
clow
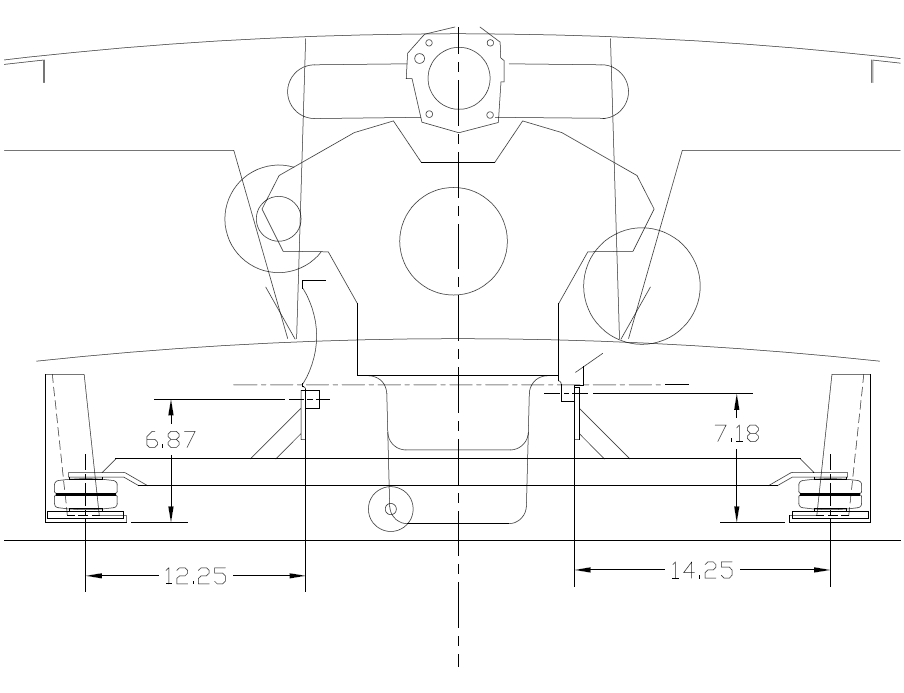
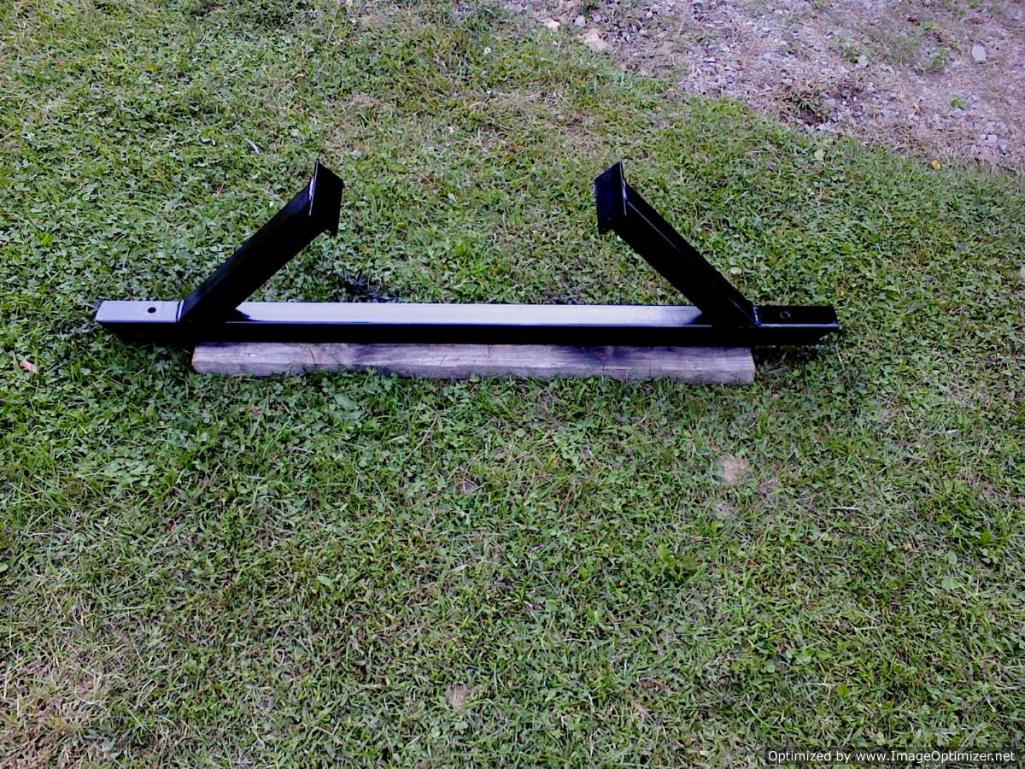
Here is mine. Kinda thee same deal as above. I opted for 2" tubing with 1/8 wall. I was worried about the holes where it will bolt to the body so I cut the hole 1" diameter on both ends. I then got 1" diameter x 2" round stock and drilled a 5/8 hole on a lathe and welded it in.


On top of the inside engine mount of the body I took 1/4" 5"x5" plate and shaped it to fit inside. The 2 bolt holes were the old engine mount plate is I transferred them to the plate and bolted that in.

The mount will be rubber mounted between the engine bar and engine plate on the car.

Might be over kill but I hope to be pumping some sweet HP aktion035.gif

If you needed some pictures to clarify let me know!

IPB Image

Cheers,

Clow

Edit: About $25 worth of material total.
bulitt
would appreciate some measurements if possible (V8). thanks.
3d914
Looks great guys thanks.

I too would like at least a center-to-center dimension since I don't have a stock bar and the mounting tabs are gone from my frame.

While we're at it let's also talk about motor mounts. Scotty, are those mounts shown on your top bar? They seem thin for the kind of torque thrown off by V8's.
scotty b
QUOTE(3d914 @ Nov 15 2011, 11:49 AM) *

Looks great guys thanks.

I too would like at least a center-to-center dimension since I don't have a stock bar and the mounting tabs are gone from my frame.

While we're at it let's also talk about motor mounts. Scotty, are those mounts shown on your top bar? They seem thin for the kind of torque thrown off by V8's.


Factory chevy V8 mounts same for all small blocks. You Am. seem to think bigger is better. sheesh rolleyes.gif .............
3d914
OK, for reference I came up with a couple of configurations for the engine bar. The first is here.

The second one below it here.

Both configurations allow the shift bar to be located in the stock position, as the engine bar sits just above it. Instead of mounting to the underside of the stock receivers, I'm adding a 1/4" plate and using a biscuit style mount sandwiched between the plate and the engine bar.

IPB Image
bulitt
What engine is this for?
Mike Bellis
Here is an early pic of the mounting point of mine to the body. Above the poly bushing is welded solid with 12ga steel. Below the poly, I welded 2, 12ga steel plates together as a large washer. Then the cradle bolts below. The poly bushings are from a 91 Mitsubishi Eclipase motor mount. The diameter is a perfect fit to the 914 stamping. Big ass washer not shown here...


Click to view attachment
3d914
bulitt, for a 95 SHO 3.2L V6.

Mike, nice setup. How did you deal with the shift rod?
Mike Bellis
I bent the shift rod around it and used two U joints on it. I then added kick outs to my oil pan and the rod would not fit anymore. I switched to a cable shift. If you click on my link below you can see it in my build thread.

Click to view attachment

Click to view attachment
This is a "lo-fi" version of our main content. To view the full version with more information, formatting and images, please click here.
Invision Power Board © 2001-2024 Invision Power Services, Inc.