Help - Search - Members - Calendar
Full Version: what did you do to your 914 today
914World.com > The 914 Forums > 914World Garage
Pages: 1, 2, 3, 4, 5, 6, 7, 8, 9, 10, 11, 12, 13, 14, 15, 16, 17, 18, 19, 20, 21, 22, 23, 24, 25, 26, 27, 28, 29, 30, 31, 32, 33, 34, 35, 36, 37, 38, 39, 40, 41, 42, 43, 44, 45, 46, 47, 48, 49, 50, 51, 52, 53, 54, 55, 56, 57, 58, 59, 60, 61, 62, 63, 64, 65, 66, 67, 68, 69, 70, 71, 72, 73, 74, 75, 76, 77, 78, 79, 80, 81, 82, 83, 84, 85, 86, 87, 88, 89, 90, 91, 92, 93, 94, 95, 96, 97, 98, 99, 100, 101, 102, 103, 104, 105, 106, 107, 108, 109, 110, 111, 112, 113, 114, 115, 116, 117, 118, 119, 120, 121, 122, 123, 124, 125, 126, 127, 128, 129, 130, 131, 132, 133, 134, 135, 136, 137, 138, 139, 140, 141, 142, 143, 144, 145, 146, 147, 148, 149, 150, 151, 152, 153, 154, 155, 156, 157, 158, 159, 160, 161, 162, 163, 164, 165, 166, 167, 168, 169, 170, 171, 172, 173, 174, 175, 176, 177, 178, 179, 180, 181, 182, 183, 184, 185, 186, 187, 188, 189, 190, 191, 192, 193, 194, 195, 196, 197, 198, 199, 200, 201, 202, 203, 204, 205, 206, 207, 208, 209, 210, 211, 212, 213, 214, 215, 216, 217, 218, 219, 220, 221, 222, 223, 224, 225, 226, 227, 228, 229, 230, 231, 232, 233, 234, 235, 236, 237, 238, 239, 240, 241, 242, 243, 244, 245, 246, 247, 248, 249, 250, 251, 252, 253, 254, 255, 256, 257, 258, 259, 260, 261, 262, 263, 264, 265, 266, 267, 268, 269, 270, 271, 272, 273, 274, 275, 276, 277, 278, 279, 280, 281, 282, 283, 284, 285, 286, 287, 288, 289, 290, 291, 292, 293, 294, 295, 296, 297, 298, 299, 300, 301, 302, 303, 304, 305, 306, 307, 308, 309, 310, 311, 312, 313, 314, 315, 316, 317, 318, 319, 320, 321, 322, 323, 324, 325, 326, 327, 328, 329, 330, 331, 332, 333, 334, 335, 336
euro911
QUOTE(porbmw @ Jan 5 2017, 10:19 PM) *
I didn't know there were flaps of rubber...I guess the PO took care of those years ago.
Would very much appreciate if you could sketch out the dimensions and thickness of the rubber...or...as you say (and better yet) if 914rubber added this to it's repertoire.
Yeah, I'll measure it, make a template, and post it when I do type.gif
Coondog
Dropped my 914 off at PMS.....see you in 90 days... smile.gif
mgp4591
Finished drilling out the spot welds on the floor in anticipation of prepping and welding in the new one. Also have some 3x3 tubing with punched holes in them that I'm thinking of running down the center (my console is rotted up about 2 inches from the floor in most places) for additional strength. Wondering about how easy running the fuel lines and trans cables will be with those installed.... idea.gif sawzall-smiley.gif welder.gif
euro911
Here's the dimensions of the headlight actuating arm seal. It appears the thickness is 1/64" or so (quite thin). I think 1/32" would work fine and hold up longer.

Click to view attachment
forrestkhaag
As I am down with the flu, I couldn't make it to the shop to do anything productive so I opted for a repeat disassembly of my Weber 40 triples for the 3.0 build to check specs on jets, tubes, idles, etc.

The way they are now (and I am at sea level), I have 30 mm venturi's, 55 Idles, 125 mains,180 air corrections, and F1 Emulsions. This is the way they were sold to me. My 2.2L is running dual throat (Empi) 40's and have totally different jetting etc. confused24.gif

Does anyone out there have a set of Weber internals specs for a similar engine build / a 3.0 SC w/ Webcam 20/21 grind running a recurved dizzy?
Michael N
Picked up another steering wheel for the car. I think this makes #4. I am very excited to get the car out and channel some vintage vibes through this 1960's MoMo wheel. Early LeMans flat wheel at 380mm. driving.gif I think I'll leave the top on the next drive and pretend I am driving a 904 gts.

Click to view attachment


raynekat
QUOTE(Michael N @ Jan 9 2017, 04:33 PM) *

Picked up another steering wheel for the car. I think this makes #4. I am very excited to get the car out and channel some vintage vibes through this 1960's MoMo wheel. Early LeMans flat wheel at 380mm. driving.gif I think I'll leave the top on the next drive and pretend I am driving a 904 gts.

Click to view attachment


Easy to see your gauges with that baby. Nice!
kid914
I like the center cap as a horn button.. first.gif
GaroldShaffer
Started sawzall-smiley.gif the parts car. happy11.gif
euro911
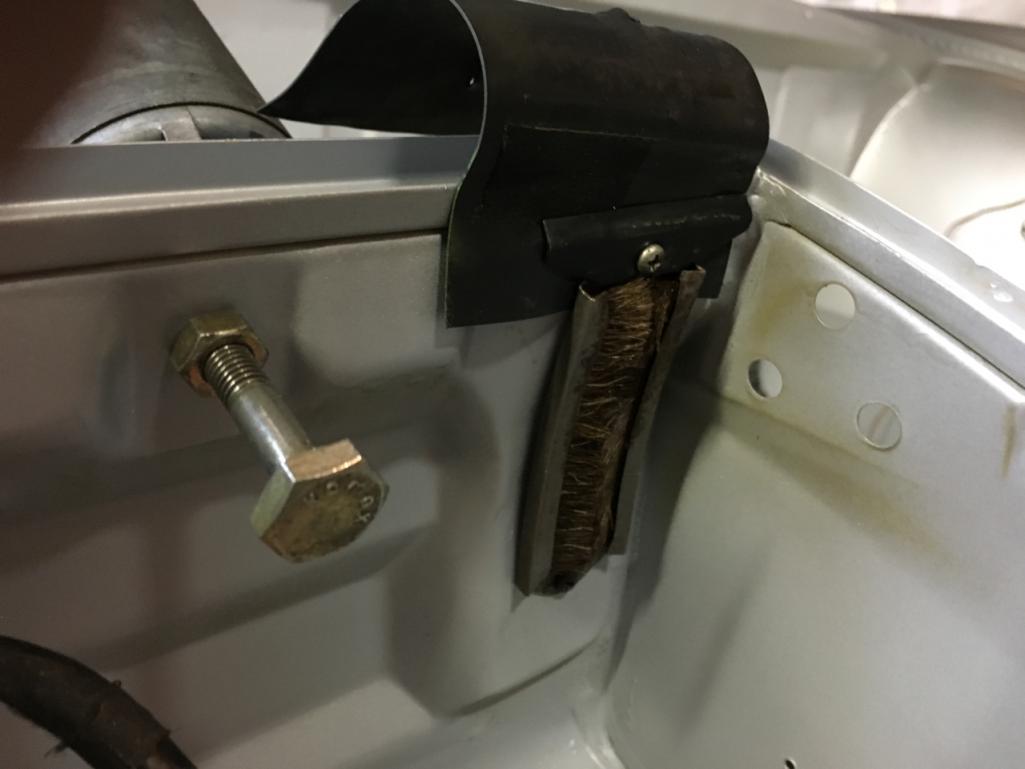
Garold, I know you salvage a lot of small items before you scrap the main carcasses, but have you run across and saved any of these brush assemblies from the headlight bucket area?

IPB Image
Steve
QUOTE(forrestkhaag @ Jan 6 2017, 03:58 PM) *

As I am down with the flu, I couldn't make it to the shop to do anything productive so I opted for a repeat disassembly of my Weber 40 triples for the 3.0 build to check specs on jets, tubes, idles, etc.

The way they are now (and I am at sea level), I have 30 mm venturi's, 55 Idles, 125 mains,180 air corrections, and F1 Emulsions. This is the way they were sold to me. My 2.2L is running dual throat (Empi) 40's and have totally different jetting etc. confused24.gif

Does anyone out there have a set of Weber internals specs for a similar engine build / a 3.0 SC w/ Webcam 20/21 grind running a recurved dizzy?

Try googling it.
I'm seeing 34mm venturi's, 160 main, 180 air and 60 idling jets.
http://members.rennlist.com/webercarbs/
You might also want to give PMO a call.
GaroldShaffer
QUOTE(euro911 @ Jan 9 2017, 10:04 PM) *

Garold, I know you salvage a lot of small items before you scrap the main carcasses, but have you run across and saved any of these brush assemblies from the headlight bucket area?

IPB Image


Yes, I have a set or two. I will see what I can dig up tomorrow afternoon. PM me to remind me.
euro911
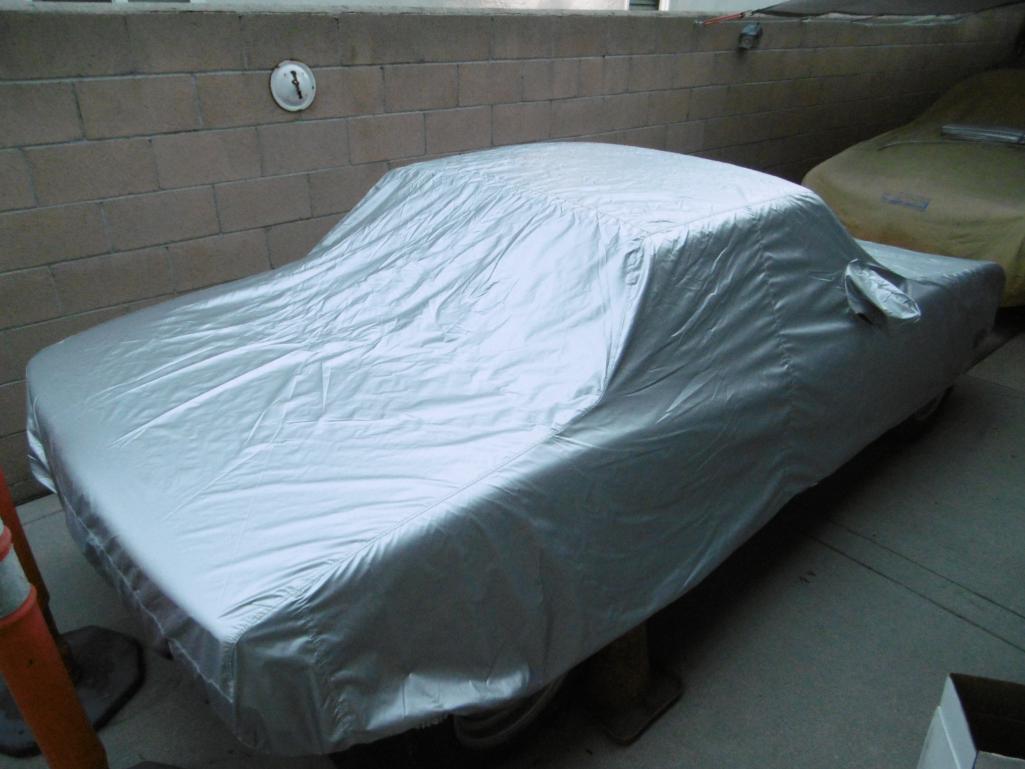
I really like the new CoverCraft cover I got for Christmas, it's performing nicely during this abnormal rainy season pat.gif

IPB Image


So much so, that I decided to order one for the 'BB' today type.gif

I ordered it from etrailer.com, where I typically buy my trailer parts ... $168. shipped to my door biggrin.gif ... (model# C15134RS).

There's about a 1 ~ 2-week delivery wait as they're custom made upon order and shipped from the CoverCraft factory.
mgp4591
Did some more cutting, finishing up getting rid of the floor except for one spot but exposing the soft white underbelly... sawzall-smiley.gif
Click to view attachment
And mounted up the rear meats to the new wheels. biggrin.gif
Click to view attachment
campbellcj
I'm preparing for a VARA event at Buttonwillow next weekend, woohoo!

- Did a "10 foot" rattle-can touch-up of some old tire failure damage on the left rear fender
- Finally figured-out (I think) a better way to quiet-down the custom targa roof skin, which has always squeaked and rattled
- Ordered some new Hoosier slicks (!!!! and $$$$)
- Test drove around the neighborhood with open pipes smile.gif
SKL1
Stored the two toys in AZ while the garage floor got a new epoxy paint job... brought them home tonight. First time I'd driven the 914 after dark with the new LED headlights. They need a MAJOR adjustment (doubt the person in front of me appreciated the driver's side light into their mirrors!) but da*n they're bright, epecially on hi-beam!!

Click to view attachment
Cairo94507
That's cool how the lift and cars are tucked into that nice spot leaving the main floor open for more cars....
Shadowfax
Completed the interior swap. New carpet and seat kits from 914rubber, used backpad, door panels and padded center armrest. The seat kits went on a spare set of seats so was able to save the old stuff. Still need to do a few adjustments on the headrests but I think it looks much better than before.
Any suggestions on some good floor mats?

Click to view attachment Click to view attachment
matthepcat
^^ https://www.cocomats.com. ^^
Shadowfax
QUOTE(matthepcat @ Jan 14 2017, 10:24 AM) *

Thank you. Was thinking of them or Lloyd. beerchug.gif
JFG
I fitted the windshield today using 3m 08611. Not too bad a fit just a shame it's picked up a chip whilst stored away.

Does this butyl rope set or does it stay soft and allow the screen to sag? I'm fitting a rubber surround not replacing the chrome trim.
Steve
I rebuilt the drivers side door with some new seals and installed the 914rubber front windshield top seal. All went well until I put the top back on and noticed there was a 1/4" gap between the door window and the top. After a little bit of research, I realized I have an early top and my spare top is any early top. WTH!!!!!! How did this happen? I've had this car since 86.
euro911
QUOTE(JFG @ Jan 15 2017, 05:42 AM) *
I fitted the windshield today using 3m 08611. Not too bad a fit just a shame it's picked up a chip whilst stored away.

Does this butyl rope set or does it stay soft and allow the screen to sag? I'm fitting a rubber surround not replacing the chrome trim.
I've never replaced a windshield in a 914 yet. I was under the impression that if using a rubber seal, the butyl 'rope' wasn't needed confused24.gif

What is the process for installing a windshield? ... (I may need to do this in the future) ...
lonewolfe
QUOTE(Steve @ Jan 15 2017, 07:12 AM) *

I rebuilt the drivers side door with some new seals and installed the 914rubber front windshield top seal. All went well until I put the top back on and noticed there was a 1/4" gap between the door window and the top. After a little bit of research, I realized I have an early top and my spare top is any early top. WTH!!!!!! How did this happen? I've had this car since 86.


Does your car have early or late doors? I believe the fit is different with the glass. The early tops fit early doors & late doors fit late tops. The seals are different if I'm not mistaken. I am going to fit late doors on an early car and also have a late top which should fit. I wanted the late window regulators which I understand can be updated to early doors but the window tracks are different. Also, my passenger early door had been replaced & the bottom of the door is rusted through in the channel where the rubber seal fits. The late doors are much heavier because they have a steal impact beam added that the early doors don't have. My late doors are also rust free and have tinted glass which matches my new windshield. My early doors have clear glass. As for the different seals for the top, ask Mark at 914rubber. I think he has both early and late styles. Please post what your solution is as you are ahead of me and I'm not 100% sure about what matches to what. I believe there is also a difference in the window channels and the felt pieces the glass slides up & down in the front of the door.
JFG
QUOTE(euro911 @ Jan 15 2017, 07:41 PM) *

QUOTE(JFG @ Jan 15 2017, 05:42 AM) *
I fitted the windshield today using 3m 08611. Not too bad a fit just a shame it's picked up a chip whilst stored away.

Does this butyl rope set or does it stay soft and allow the screen to sag? I'm fitting a rubber surround not replacing the chrome trim.
I've never replaced a windshield in a 914 yet. I was under the impression that if using a rubber seal, the butyl 'rope' wasn't needed confused24.gif

What is the process for installing a windshield? ... (I may need to do this in the future) ...


As standard the glass is held in with the butyl bead, the glass sits in a number of plastic spacers which in turn hold the chrome trim in place.

The rubber trim is just that, a trim. I too thought it was a full rubber glass mounting seal.
Steve
QUOTE(lonewolfe @ Jan 15 2017, 12:34 PM) *

QUOTE(Steve @ Jan 15 2017, 07:12 AM) *

I rebuilt the drivers side door with some new seals and installed the 914rubber front windshield top seal. All went well until I put the top back on and noticed there was a 1/4" gap between the door window and the top. After a little bit of research, I realized I have an early top and my spare top is any early top. WTH!!!!!! How did this happen? I've had this car since 86.


Does your car have early or late doors? I believe the fit is different with the glass. The early tops fit early doors & late doors fit late tops. The seals are different if I'm not mistaken. I am going to fit late doors on an early car and also have a late top which should fit. I wanted the late window regulators which I understand can be updated to early doors but the window tracks are different. Also, my passenger early door had been replaced & the bottom of the door is rusted through in the channel where the rubber seal fits. The late doors are much heavier because they have a steal impact beam added that the early doors don't have. My late doors are also rust free and have tinted glass which matches my new windshield. My early doors have clear glass. As for the different seals for the top, ask Mark at 914rubber. I think he has both early and late styles. Please post what your solution is as you are ahead of me and I'm not 100% sure about what matches to what. I believe there is also a difference in the window channels and the felt pieces the glass slides up & down in the front of the door.

I have late doors. I think back in the late 80's, I went to EASY and bought the nicest top they had which turned out to be an early top. Dummy me... live and learn. I just bought two late tops from Bruce on the board. I have all new late seals from 914rubber. I will build a new top tomorrow.
euro911
QUOTE(JFG @ Jan 15 2017, 01:45 PM) *
QUOTE(euro911 @ Jan 15 2017, 07:41 PM) *
QUOTE(JFG @ Jan 15 2017, 05:42 AM) *
I fitted the windshield today using 3m 08611. Not too bad a fit just a shame it's picked up a chip whilst stored away.

Does this butyl rope set or does it stay soft and allow the screen to sag? I'm fitting a rubber surround not replacing the chrome trim.
I've never replaced a windshield in a 914 yet. I was under the impression that if using a rubber seal, the butyl 'rope' wasn't needed confused24.gif

What is the process for installing a windshield? ... (I may need to do this in the future) ...
As standard the glass is held in with the butyl bead, the glass sits in a number of plastic spacers which in turn hold the chrome trim in place.

The rubber trim is just that, a trim. I too thought it was a full rubber glass mounting seal.
Interesting. I thought the rubber windshield seals were just like the ones for the 911/912 windshields.

Thanks for the clarification thumb3d.gif
iankarr
Finally got the transaxle clean enough to shoot with alumi-blast. Very light coat of course!

Click to view attachment
euro911
Looks sharp drooley.gif
iankarr
QUOTE(euro911 @ Jan 15 2017, 07:37 PM) *

Looks sharp drooley.gif


Thanks man. i decided to clean and coat when I noticed the mag alloy unprotected and pitted in spots. Surprising how little paint was needed. A dusting did the trick. Good stuff. Here's an in progress pic.... the case is clean. The black color looks to be an attempt at paint from a PO

Click to view attachment
JFG
Now I'm jobless I have some unexpected free 914 time.

Today I replaced the burnt wiring in the headlight loom. I refitted, loosely, the light motor while I wait for the paint to dry on the black discs.

Next job is to mop & polish the fenders so that I can wire up & fit the turn signal buckets.
forrestkhaag
Delivered another 914-6 hatch cover kit w/ hardware and illustrated instructions. Then produced another one for another day.. piratenanner.gif

Also bead blasted my Bishoff SC muffler being converted to a twin pipe sport version at some point... and modified the bracket hanger for the tranny to accept it and the two straps as in stock early 911.
radhof
Pedals sand blasting
maf914
QUOTE(cuddyk @ Jan 15 2017, 04:05 PM) *

Finally got the transaxle clean enough to shoot with alumi-blast. Very light coat of course!

Click to view attachment


Ian, The tranny looks good. Could you describe your cleaning and degreasing method? Thanks.
iankarr
QUOTE(maf914 @ Jan 16 2017, 05:29 PM) *

QUOTE(cuddyk @ Jan 15 2017, 04:05 PM) *

Finally got the transaxle clean enough to shoot with alumi-blast. Very light coat of course!

Click to view attachment


Ian, The tranny looks good. Could you describe your cleaning and degreasing method? Thanks.

Thanks.

When I dropped the motor this winter I noticed some pitting and areas where the alloy was exposed and unprotected. Dr Evil rebuilt my box last year and I wasn't about to pull it apart, so....

I read a bunch of threads (just googling 914world cleaning transmission) and the main takeaway was not to blast or power wash. Time for hand-to-hand combat!

First I used a small putty knife and a small screwdriver to dig out all the baked-on grease. Then I went over the whole transmission with a toothbrush dipped in mineral spirits. This got most of the grease off.

I covered up the vent hole with paper towel wrapped by electrical tape and used sandwich bags and zip ties to protect the hubs. I also took some 2 x 4's and screwed them to a dolly close together enough to support the transmission on its front end (all fluid was previously drained).

I wheeled the trans outside and sprayed two cans of brakleen on it, which got a lot more residue off. It also made it easy to see spots I missed with the screwdriver. More toothbrush and mineral spirits and then as a final "cleanse" I used marine-clean mixed 1:1 with hot water in a 1 gallon garden sprayer. A light rinse with plain water after that, being careful of the seals.

I dried it all off with compressed air, waited a day and masked off the stainless nuts and hubs with blue tape. Then sprayed a light coat of alumi-blast.

I'm really happy with how it came out. The only suggestion I'd make if you're gonna use this method is to put a tarp down when you shoot the brakleen...or better yet, suspend the dolly/transmission over a large plastic bin to catch the greasy mess. Brakleen isn't great for driveways either wink.gif.

Enjoy!
Steve
QUOTE(forrestkhaag @ Jan 16 2017, 11:46 AM) *

Delivered another 914-6 hatch cover kit w/ hardware and illustrated instructions. Then produced another one for another day.. piratenanner.gif

Also bead blasted my Bishoff SC muffler being converted to a twin pipe sport version at some point... and modified the bracket hanger for the tranny to accept it and the two straps as in stock early 911.

Click to view attachment
Here's the instructions.
Chris914n6
Got the Corrado radiator and hoses un-installed from the original 2001 build. Good thing I decided to jump on the Celica swap early as it looks like a bad road trip in the making huh.gif
Things just don't last like they used to stirthepot.gif


Click to view attachment

Also took some pics for the build thread.
North Coast Jim
QUOTE(mrbubblehead @ Dec 17 2011, 09:07 PM) *

i just wanted to start a thread to see what you guys do day to day on your cars.

i'll start,

about a month ago, i pulled my engine and trans to put in a new clutch. had the flywheel lightened and resurfaced. but what i didnt know is that i had to shim the little ball that the clutch arm rides on, after a resurfacing. so guess what i did today?

yup, pulled the trans and put an extra washer under the ball. you have to goop up both washers to get it to seal because the threaded hole goes all the way thru to the inside of the trans. i also replaced the plastic cup that the ball rides in. the throwout bearing and its little plastic blocks were fine so i buttoned every thing back up. 5 hours total. i think this has been the cheapest repair yet on my car. $2.75 for the little plastic cup.

what did you do to your 914 today?


Realigned and assembled the driver's side door glass bringing this chapter to a close. All new Rubber makes this job a bit challenging. Fit's great now. Also sorted out the last of the electrical gremlins, that being no power to the interior lights. Traced all runs and found 1) "power" taken from the wrong circuit by PO and 2) both the door switches had a large amount of corrosion on them. Pulled them and cleaned them extensively especially the little pyramidal shapes that are to make high pressure contact with the base. What a pain. Had to use some emery cloth and scratch awl but they now work.
Buttoned everything up including putting the interior back in. Washed and covered Her up for the winter. See Her in the Spring
matthepcat
Installed a narrow body GT valence.
Click to view attachment
Also had to post on page 420 smoke.gif
mb911
QUOTE(Steve @ Jan 16 2017, 06:23 PM) *

QUOTE(forrestkhaag @ Jan 16 2017, 11:46 AM) *

Delivered another 914-6 hatch cover kit w/ hardware and illustrated instructions. Then produced another one for another day.. piratenanner.gif

Also bead blasted my Bishoff SC muffler being converted to a twin pipe sport version at some point... and modified the bracket hanger for the tranny to accept it and the two straps as in stock early 911.

Click to view attachment
Here's the instructions.


That is for a 2in 1out muffler to a sport conversion.. Never converted an sc muffler (1inlet) to a dual inlet.. That is a new one and I am not new to that business..
forrestkhaag
I am going to scope the innards of my SC muffler to see if it will work. As for what the heck did I do last night until 11pm... see progress pix

Also, as we were bolting up the headers that Larmo gave me such a good deal on, I discovered they will not fit a 914-6 but rather a 911 in standard backaswards motor config only. sheeplove.gif AhhhGin!
forrestkhaag
I am going to scope the innards of my SC muffler to see if it will work. As for what the heck did I do last night until 11pm... see progress pix

Also, as we were bolting up the headers that Larmo gave me such a good deal on, I discovered they will not fit a 914-6 engine orientation but rather a 911 in standard backaswards motor config only. sheeplove.gif ed AhhhGin!
JFG
I mopped and polished the front fenders around the turn signal buckets so that I can fit, wire & test them.

I caught one part with the side of the mop head and cut the paint headbang.gif

I moved on with the passenger side wiring and fitting the light motors. I moved into the tank area wiring loom section for inspection & repair. This was pretty good compared to the lights areas. Only 1 cut wire on the heater motor socket. Easy fix.
DRPHIL914
driving.gif driving.gif
drove it to work this morning - trying to figure out what the heck I have going on with batteries, - 1 month ago I put in a new autozone battery, - now I know I don't drive often, last the car was out was 2 weeks ago, but I have a battery disconnect so it should not draw down, last it was parked was fully charged, disconnected - today almost didn't start, so its weak. I willhave to verify voltage when running , I hope its not the alt. but could be its not doing its job. no way of knowing how old it is or if its original, ive had the car almost 7 years. , still enjoyed driving today since it is 75 today(55 this morning) and supposed to be 80 tomorrow.!!!! ,
euro911
Made sure all the car covers were secured for the impending stormy week end pat.gif

Inside honey-do work ... I spent 9 hours and 14 minutes working on the new kitchen floor rolleyes.gif

BEFORE (sort-of) showing the old painted floor ...

Click to view attachment


AFTER - still have a bit left to do in the kitchen and beyond in the pantry ... hoping to have it all done before the 'eggnogeration' festivities tomorrow evening shades.gif

Click to view attachment

Click to view attachment

Click to view attachment
lonewolfe
QUOTE(euro911 @ Jan 19 2017, 09:14 PM) *

Made sure all the car covers were secured for the impending stormy week end pat.gif

Inside honey-do work ... I spent 9 hours and 14 minutes working on the new kitchen floor rolleyes.gif

BEFORE (sort-of) showing the old painted floor ...

AFTER - still have a bit left to do in the kitchen and beyond in the pantry ... hoping to have it all done before the 'eggnogeration' festivities tomorrow evening shades.gif


The floor looks great. that should earn you some quality 914 time!
Steve
QUOTE(forrestkhaag @ Jan 18 2017, 09:06 AM) *

I am going to scope the innards of my SC muffler to see if it will work. As for what the heck did I do last night until 11pm... see progress pix

Also, as we were bolting up the headers that Larmo gave me such a good deal on, I discovered they will not fit a 914-6 engine orientation but rather a 911 in standard backaswards motor config only. sheeplove.gif ed AhhhGin!

Nice Porsche porn!!! Just converting the SC muffler to a pre 74 911/914-6 muffler, looks like a lot of work. I bought my Modified sport muffler at the Pomona swap meet for $200.00, but that was 15 years ago. Also sold it 15 years ago after all the evil stares from my neighbors.
Steve
Can't beat the price of this muffler.
http://www.automotion.com/exhaust-sebring-...-1965-1973.html
jim_hoyland
QUOTE(Steve @ Jan 20 2017, 07:17 AM) *


That's for a -6 ?
euro911
Yep, look at the inlet flanges
This is a "lo-fi" version of our main content. To view the full version with more information, formatting and images, please click here.
Invision Power Board © 2001-2024 Invision Power Services, Inc.