Help - Search - Members - Calendar
Full Version: engman inner long preparation
914World.com > The 914 Forums > 914World Garage
mrbubblehead
my car is down for the holiday so i am going to install the engman inner long stiffening kit. so today i removed my interior. i also removed the tarboard while i was at it. what a job.......karmann must have got that white caulking on sale because there was tons of it. 14lbs of tarboard and calking mad.gif .

so my question is do/should i remove every bit of the white calking? it seamed almost porous.

my plan is to install the inner long kit, then coat the whole interior in por 15, then put in new carpet. no back panel. it will be carpet right up to the back window....

should i put down "new" seam sealer in all the seams before i coat it with por 15?

or is the idea not to use seam sealer at all?

IPB Image

i also made a little dough for my efforts piratenanner.gif
IPB Image
shoguneagle
I would remove all the sealant to ensure there is not any possible rust underneath it. The interior looks great with surface rust. You will like the Engman inner long kit. I would really check out other rust preventers such as Osphos(??) which a lot of people like; there is a wax rust prevention used in Europe and somewhat here in the states which is used in cavities. Also, think about using the weld-thru primer which can help prevent rust, especially around the welded areas of the longs (welds and underneath between the metals).

Por-15 appears to be good and that is what I used on my car which was rusted in the floor pans, etc. from setting in the California rains for several years. I even used the complete treatment including the wash, water neutralizer, air (drying), and pressure spraying into the cavities. Very messy and took a lot of material (4-5 quarts).

Do a thead search and determine the exact procedure you will use (i mean every step and changing rust prevention systems). Your car looks extremely good and you will want to make sure you are protected as much as possible from rust.

good luck.

Steve Hurt
mrbubblehead
thanks shoguneagle. so the reason for removeing the seam sealer is to check for rust? i had very little rust. and and very little if any of the rust i had was under the sealer.
rjames
Maybe you were already planning to, but I would pull that pedal cluster and rebuild it while you're in there. There will be some more rust under it.
mrbubblehead
ok, after reading a bunch of install threads it seams that everyone does them differently. not the welding, but how the cars are set up to keep the door gaps right. some have the car on all four tires. some set it up on jack stands. some put a floor jack in the middle of one long and then raise the car till the wheels are off the ground. and i think mcmark said he puts a floor jack in the middle of the long then raises it in the middle to take a little pressure off it. (i knew this was gonna happen if i researched to much) confused24.gif

when my car sits on all fours, my door gaps are good. and both doors open and close just fine. so i wont be trying to correct anything while doing the install. with that being the case, would it be best to do the install with it sitting on all fours? im in no hurry, so im going to really take my time welding.....

everything else looks like it should be a piece of cake.

thanks for the tips....i hate to screw this up
ruby914
I just started this job too.
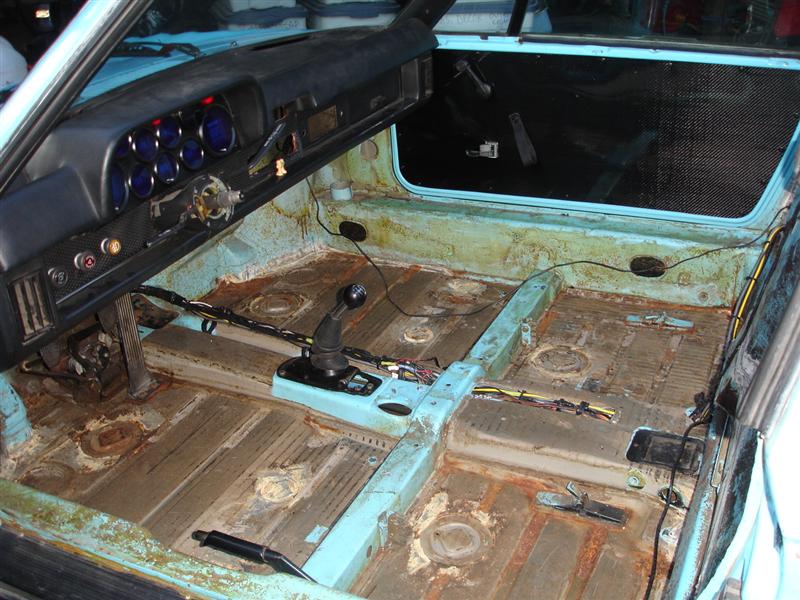
Got my back piece in today.
One reason for removing the seam sealer is so the panels fit all the way down.
I used a special ground, flat bottom, step drill to clean the paint around the panel holes.
I hoped this would clean the paint on the long at the same time but I didn't have luck with that.
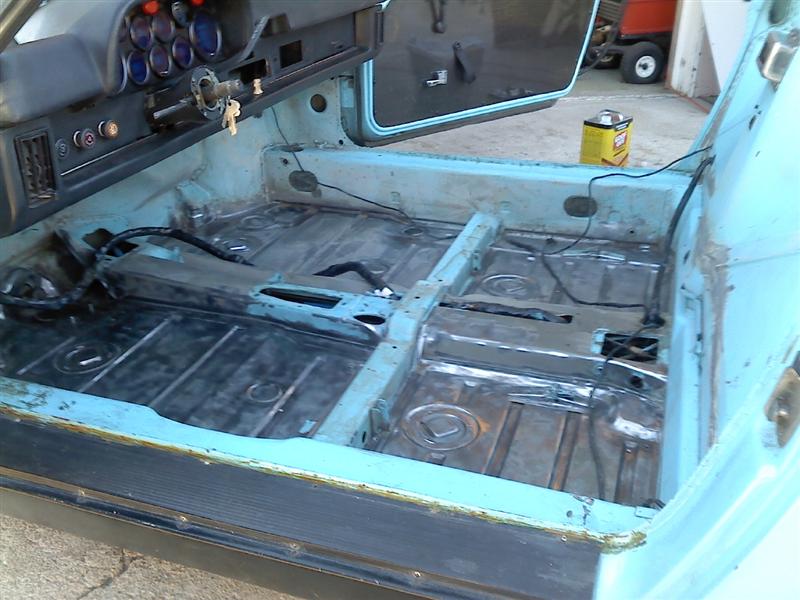
I used a marker and sanded the paint off the bulkhead after removing the panel.
I also hit the sanded spots with weld through primer. Maybe I sprayed too much? Some welds seemed dirty so I started re cleaning the holes with a rotary wire brush.

I am taking a deep breath before I start the longs.
The tops of my longs are, maybe stepped on, dented in. I used a slide hammer to pull dents out.
I trust the Engman panels more than my longs.
If there is too much gap between the long and the panel, where the holes are I will do the same through the hole to reduce the gap.
popcorn[1].gif
mrbubblehead
cool.....are you on jack stands? how are your doors?
ruby914
QUOTE(mrbubblehead @ Dec 21 2011, 08:25 AM) *

cool.....are you on jack stands? how are your doors?

I am not on jack stands yet, I only did the back panel.
I think, I just felt an earthquake. moving on..
The doors are relatively good. The car seems to have had a sail replaced and both front quarters also. I took many measurements, most are W/I 1/8'. One door measurement is 1/4 out and different than the other side but to fix that conflicts with other measurements and world would make a small problem worse.
If I had some heave man getting out of the passenger side , pulling on the a pillar for years, that would make things better but measurements worse.
On one measurement it seemed like I was coming off a factory 1/16 weld bead that made it good.
My conclusion is that some PO did some work that was not perfect but end result was not bad. With that, I am not in a hurry to weld in the long panels.
ruby914
QUOTE(mrbubblehead @ Dec 20 2011, 10:32 PM) *

ok, after reading a bunch of install threads it seams that everyone does them differently. not the welding, but how the cars are set up to keep the door gaps right. some have the car on all four tires. some set it up on jack stands. some put a floor jack in the middle of one long and then raise the car till the wheels are off the ground. and i think mcmark said he puts a floor jack in the middle of the long then raises it in the middle to take a little pressure off it. (i knew this was gonna happen if i researched to much) confused24.gif

when my car sits on all fours, my door gaps are good. and both doors open and close just fine. so i wont be trying to correct anything while doing the install. with that being the case, would it be best to do the install with it sitting on all fours? im in no hurry, so im going to really take my time welding.....

everything else looks like it should be a piece of cake.

thanks for the tips....i hate to screw this up


Did you take measurements and find any deviations from side to side or from the 914 body dimension data?
mrbubblehead
QUOTE(ruby914 @ Dec 21 2011, 10:04 AM) *

QUOTE(mrbubblehead @ Dec 20 2011, 10:32 PM) *

ok, after reading a bunch of install threads it seams that everyone does them differently. not the welding, but how the cars are set up to keep the door gaps right. some have the car on all four tires. some set it up on jack stands. some put a floor jack in the middle of one long and then raise the car till the wheels are off the ground. and i think mcmark said he puts a floor jack in the middle of the long then raises it in the middle to take a little pressure off it. (i knew this was gonna happen if i researched to much) confused24.gif

when my car sits on all fours, my door gaps are good. and both doors open and close just fine. so i wont be trying to correct anything while doing the install. with that being the case, would it be best to do the install with it sitting on all fours? im in no hurry, so im going to really take my time welding.....

everything else looks like it should be a piece of cake.

thanks for the tips....i hate to screw this up


Did you take measurements and find any deviations from side to side or from the 914 body dimension data?
no not yet. im still cleaning....glue and tar.....i will take some dems later and post them up. o think my long kit is sopose to show up today....the tops of my longs are a little bent also. looks like pressure from some one standing on them. ARGH!
dadaDaveed
I'm welding in my Engman kit in now.

I chemically stripped the paint off the longs before I started. I found some surface rust hiding under the paint. After treating that, I sprayed with primer. Then dry fit the engman kit and marked every hole with a sharpy. Took the kit back off and sanded those spots with a dremel so I'd be welding nice clean metal.

Even after plenty of massaging, my kit didn't sit fit perfectly flush, so I used self tapping sheet metal screws to pull it tight to certain holes while I welded the holes around it.

I have 4 wheels on the ground and nothing extra supporting it. No door braces. The doors are on, but open. The body is completely stripped of parts. The only weight on the car is my 170 lbs. Like yours, my longs are in great shape and my doors align fine. I'm taking my time... about 4 welds at a time- then letting it cool completely before moving on so I don't trap any heat expansion.

So far so good. Both longs are finished, my measurements haven't changed at all and my door gaps are the same.

-DB
IronHillRestorations
Remove all paint and seam sealer.
Coat with 3M weld through primer.
Jack/block/support chassis so it's level, square, and door gaps are correct.
Tack inner stiffening kit in place.
Rosette weld stiffening kit in place, removing weld through primer in holes before welding.
Don't weld too much at a time and check the alignment of the chassis throughout the process.
See, it's easy right?
mrbubblehead
well after 3 days of cleaning i have finally finished cleaning. tomorrow im gonna fab up a dead pedal and weld it in while im in there. then im gonna por 15 all the seams and corners. i removed my pedal assembly and luckily there wassnt any rust under it. it looks like there is a unused shifter mount next to my shifter mount. like an early beetle has. sportomatic maybe?any ways. what a job. 3 full days of cleaning. one full day on removing all of the silicone from my rear window. the PO siliconed the rear window in headbang.gif headbang.gif he must have used 3 tubes of the sh*t. woulda been cheaper to do it right.

IPB Image
PRS914-6
The kit worked great in my car. My car was stripped when I did it with minimal weight and supported on the "donuts" with equal length blocks.

In my opinion, the key is to get the new pieces to sit perfectly flat against the original metal before any welding is done. I mean NO GAPS. The more gaps, the more opportunity to shrink and move. This takes some effort since the kit fits almost too good.

I used large C clamps and 2X4's jammed across the inside of the car to hold everything tight. When welding, don't weld the entire length on the edges which is what I believe to be the biggest error made. This just invites shrinkage and more is not better here. Just weld the holes and tack weld the edges. MIG works fast and easily. Start tacking from the center and work your way to the edges until it is held firmly to the body all the way across. Then, move around as you weld avoiding a lot of welding in one area. For instance, move to the other side for awhile. When finished, my doors fit perfect.
This is a "lo-fi" version of our main content. To view the full version with more information, formatting and images, please click here.
Invision Power Board © 2001-2024 Invision Power Services, Inc.