My shift rod coupler bushings fell out in pieces the other day.....wondered why my shifting was getting sloppy.
I got the new bushings and can't seem to find any information on changing them.
I'm guessing you just press the rod out , change the bushings and press it back in.
But it seems to be in there pretty tight and I don't want to break the coupler.
Anyone know of an easy way?
Thanks in advance
Jeff
Full Version: Shift Rod Coupler Bushings
I usually take it out and set it up so I can tap the rod out with a punch. Dont squeeze the coupler in a vice too hard as it my crack. Ask me how I know! 
I just got in from replacing mine, took me about 25 minutes, not too bad of a job. I sprayed it with wd40, then twisted it out with a vise grip, taping it out was not working for some reason.
QUOTE(hwgunner @ Mar 8 2012, 08:36 PM) 
I usually take it out and set it up so I can tap the rod out with a punch. Dont squeeze the coupler in a vice too hard as it my crack. Ask me how I know!
Thanks, that's what I was doing, but the rod wasn't moving at all. Maybe I'll soak it tonight and try it again tomorrow.

Jeff
Got a bench vise? I open the vice just enough to let the pin pass through, then whack it out with a drift. Don't be shy, don't go crazy.
Slide the new bushings into place, then drive the pin back into place.
I've never needed lubricants or heat.
Get 'er done, then we'll see you on Saturday.
Slide the new bushings into place, then drive the pin back into place.
I've never needed lubricants or heat.
Get 'er done, then we'll see you on Saturday.
On the wife's 911 shift coupler, I used a vise as a press. I used a socket against the bushing on one side, and a smaller socket on the pin through the middle on the other side. Tighten the jaws of the vise, the smaller socket pushes the pin out into the recess of the larger one.
I pressed the pin in the same way, except without the small socket. Just the jaw of the vise on the pin, and the larger socket against the bushing on the other side of the coupler.
--DD
I pressed the pin in the same way, except without the small socket. Just the jaw of the vise on the pin, and the larger socket against the bushing on the other side of the coupler.
--DD
QUOTE(Dave_Darling @ Mar 8 2012, 10:26 PM)
On the wife's 911 shift coupler, I used a vise as a press. I used a socket against the bushing on one side, and a smaller socket on the pin through the middle on the other side. Tighten the jaws of the vise, the smaller socket pushes the pin out into the recess of the larger one.
I pressed the pin in the same way, except without the small socket. Just the jaw of the vise on the pin, and the larger socket against the bushing on the other side of the coupler.
--DD
I removed it with the above method and installed it by laying it on the floor side ways and using a rubber mallet to hammer the pin back in. I had a problem installing it with the vise. The vise would make the coupler off center so the pin wouldn't go back in.
Thanks for all the responses, guess I just need a little more force, was kinda going lite with the hammer afraid I might break the coupler. I've got two bench vises and a press, and lots of hammers.... It will get done today.
Maybe I'll try the socket idea with the press, if that doesn't work...
Oh and McMark, if it's raining Saturday the 74 can't leave the garage... It leaks..go figure!
Jeff
Maybe I'll try the socket idea with the press, if that doesn't work...
Oh and McMark, if it's raining Saturday the 74 can't leave the garage... It leaks..go figure!
Jeff
If you break the coupler by mistake (easy to do!), I have spare you can have.
Terry
Thanks for all the responses, guess I just need a little more force, was kinda going lite with the hammer afraid I might break the coupler. I've got two bench vises and a press, and lots of hammers.... It will get done today.
Maybe I'll try the socket idea with the press, if that doesn't work...
Oh and McMark, if it's raining Saturday the 74 can't leave the garage... It leaks..go figure!
Jeff
Terry
QUOTE(jsconst @ Mar 9 2012, 09:59 AM)
Thanks for all the responses, guess I just need a little more force, was kinda going lite with the hammer afraid I might break the coupler. I've got two bench vises and a press, and lots of hammers.... It will get done today.
Maybe I'll try the socket idea with the press, if that doesn't work...
Oh and McMark, if it's raining Saturday the 74 can't leave the garage... It leaks..go figure!
Jeff
Thanks I appreciate the offer, hopefully I won't need to take you up on it. But then I do have two of them to do... Figured if I was doing the 74, might as well do the 75. At least the 75 shift rod isn't installed yet.
Jeff
If you break the coupler by mistake (easy to do!), I have spare you can have.
Terry
Thanks for all the responses, guess I just need a little more force, was kinda going lite with the hammer afraid I might break the coupler. I've got two bench vises and a press, and lots of hammers.... It will get done today.
Maybe I'll try the socket idea with the press, if that doesn't work...
Oh and McMark, if it's raining Saturday the 74 can't leave the garage... It leaks..go figure!
Jeff
Jeff
QUOTE(JawjaPorsche @ Mar 9 2012, 07:25 AM)
If you break the coupler by mistake (easy to do!), I have spare you can have.
Terry
QUOTE(jsconst @ Mar 9 2012, 09:59 AM)
Thanks for all the responses, guess I just need a little more force, was kinda going lite with the hammer afraid I might break the coupler. I've got two bench vises and a press, and lots of hammers.... It will get done today.
Maybe I'll try the socket idea with the press, if that doesn't work...
Oh and McMark, if it's raining Saturday the 74 can't leave the garage... It leaks..go figure!
Jeff
The sockets in the press worked great 
One down one to go.
Checked the weather ... Sunny tommorrow... Looks like I might make it afterall
Won't be racing my car though...still has cracked windshield .... But I'd love to watch.
Jeff
One down one to go.
Checked the weather ... Sunny tommorrow... Looks like I might make it afterall
Won't be racing my car though...still has cracked windshield .... But I'd love to watch.
Jeff
If you are looking for a CSOB fix and shift improvement, here is one that will only cost most 914 owners a little labor.
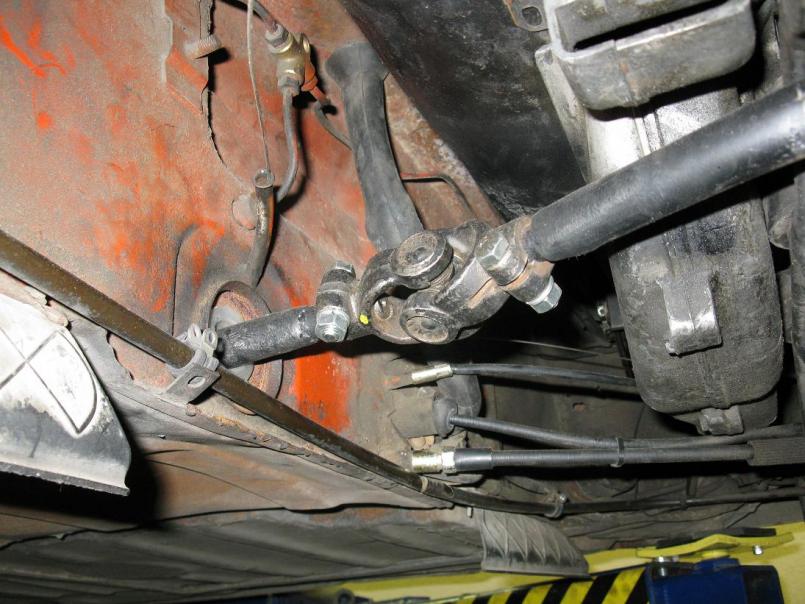
I used the U-joint and shaft out of an old steering linkage. Those U-joints last forever, and most 914 owners have a bunch of them laying around.
This is on Betty's car. It had a stock coupler, but a couple of welds were breaking loose, so I had to take it apart and fix it. I could not get that @#$# cone screw out! So I devised this, inspired by the J-West linkage. It is NOT as good as was James Adams sells, but it is a substantial improvement over the stock nylon bushings.
And best of all it was FREE!!!
QUOTE(jsconst @ Mar 8 2012, 10:02 PM)
My shift rod coupler bushings fell out in pieces the other day.....wondered why my shifting was getting sloppy.
I got the new bushings and can't seem to find any information on changing them.
I'm guessing you just press the rod out , change the bushings and press it back in.
But it seems to be in there pretty tight and I don't want to break the coupler.
Anyone know of an easy way?
Thanks in advance
Jeff
I have to do this soon...any pictures of the process?
QUOTE(Dave_Darling @ Mar 8 2012, 10:26 PM)
On the wife's 911 shift coupler, I used a vise as a press. I used a socket against the bushing on one side, and a smaller socket on the pin through the middle on the other side. Tighten the jaws of the vise, the smaller socket pushes the pin out into the recess of the larger one.
I pressed the pin in the same way, except without the small socket. Just the jaw of the vise on the pin, and the larger socket against the bushing on the other side of the coupler.
--DD
Used this method many times.
QUOTE(ClayPerrine @ Mar 9 2012, 10:07 AM)
If you are looking for a CSOB fix and shift improvement, here is one that will only cost most 914 owners a little labor.
I used the U-joint and shaft out of an old steering linkage. Those U-joints last forever, and most 914 owners have a bunch of them laying around.
This is on Betty's car. It had a stock coupler, but a couple of welds were breaking loose, so I had to take it apart and fix it. I could not get that @#$# cone screw out! So I devised this, inspired by the J-West linkage. It is NOT as good as was James Adams sells, but it is a substantial improvement over the stock nylon bushings.
And best of all it was FREE!!!
I like this idea, might use it some day.
Thanks
Jeff
QUOTE(billh1963 @ Mar 9 2012, 10:47 AM)
QUOTE(jsconst @ Mar 8 2012, 10:02 PM)
My shift rod coupler bushings fell out in pieces the other day.....wondered why my shifting was getting sloppy.
I got the new bushings and can't seem to find any information on changing them.
I'm guessing you just press the rod out , change the bushings and press it back in.
But it seems to be in there pretty tight and I don't want to break the coupler.
Anyone know of an easy way?
Thanks in advance
Jeff
I have to do this soon...any pictures of the process?
Sorry didn't take any pictures, but used the socket method worked great.
Jeff
This is a "lo-fi" version of our main content. To view the full version with more information, formatting and images, please click here.