Chris H.
Dec 27 2012, 11:02 AM
Finally starting the thread. First, I never would have done this if it weren't for several of you helping me out, especially Ian at:
Cold Water ConversionsIan tolerated dozens of questions from me as I decided which way to go. Thanks again!
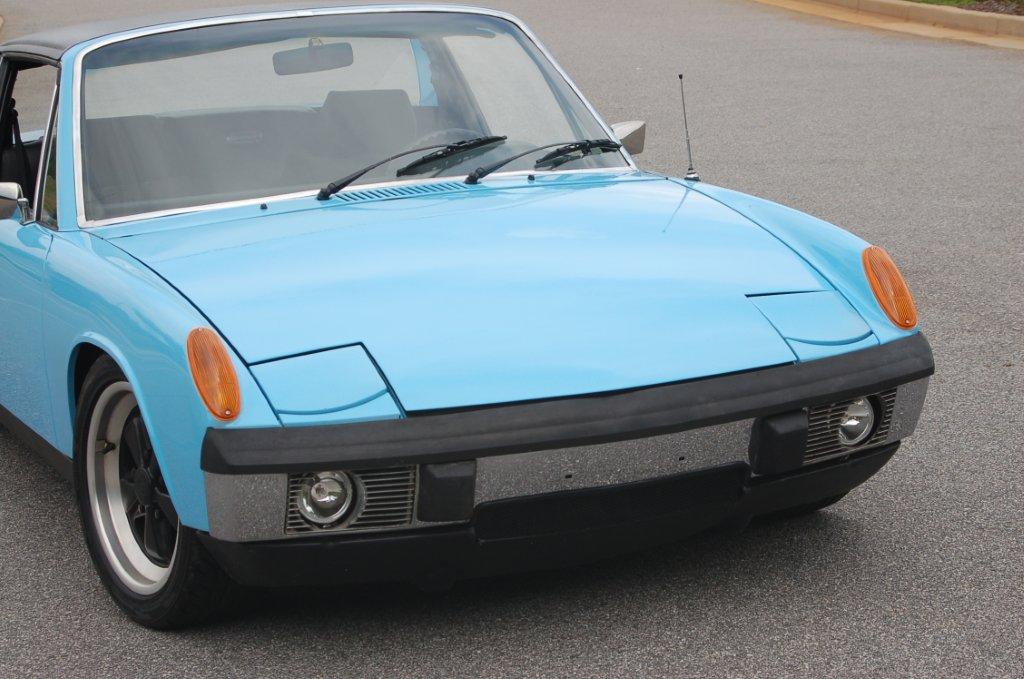
Here is the candidate (or victim, depending on what side of the fence you are on):
Click to view attachment A 1975 1.8L with California Emissions...I've had it for almost 11 years. During that time I have logged about 2800 miles on it. I decided to swap it out for a modern drive train so my daughter could drive it so I started looking for a 2.2L Subie and a 2WD auto trans. This setup CAN be made to work with a custom hanger, but it's not a very exciting trans. Think early '90's Camry or Corolla acceleration. I'm sure it could be re-geared but an Audi trans would probably be a much better option.
Then I found and SVX for cheap and changed directions entirely. Looks like my kid will be learning to drive a 5 speed Subie!
So far I have:
Click to view attachment Strong running SVX engine
Click to view attachment2006 WRX trans purchased from NASIOC
Click to view attachment1990-1992 Honda Accord shifter Update - you cannot use this one unless you design something to reverse the shifter mechanism operation. Since it is designed for the trans in front of the car the mechanism moves in the opposite direction (mirror image) of what is needed. I ended up using an MR2 shifter.
If you don't feel like chasing this stuff down Ian will source it for you.
Next up I'll post the highlights of the SVX strip-down and note some of the pitfalls, valuable parts, and stuff to be careful not to break!
Any feedback, comments, questions, concerns are welcome. I want to do it right.
DBCooper
Dec 27 2012, 03:19 PM
Cool. I have a turbo, but really like that N/A horsepower.
jimkelly
Dec 27 2012, 03:55 PM
keep the pics coming : )
i see you are going with a later hydraulic activated trans - i assume that will be a little morre work and cost than a cable operated trans.
Chris H.
Dec 28 2012, 06:24 PM
Thanks guys. DBCooper I think I have seen yours in videos somewhere. Great setup.
Jim, I'll throw a few pics up every couple of days. Still working through the tear-down of the SVX. Ian and I think that we can get the older cable clutch parts and convert the trans to a push cable trans. If I have to go hydraulic I will since I need a strong trans to handle the HP and torque. This one is pushing it as it is, but I don't plan to race or autocross it.
A few humorous pics:
The DAPO...not just for teeners...
The sunroof leaks...step 1
Click to view attachmentTear out the entire headliner, duct tape leak
Step 2...
Click to view attachmentUse a tube of window caulk to seal sunroof...very subtle. Believe it or not it still leaks.
The SVX's "hell hole" appears to be the doors due to the odd window configuration.
Click to view attachmentIt was like old times when I tried to remove the driver's side lower seat-belt bolt. How many of us in the rust belt have had a huge chunk of rusty metal come off when you turn the bolt?
Click to view attachmentAnother head-scratcher....these are the fuel lines...right underneath a plastic shield running up the drivers side long INSIDE the cabin.
Click to view attachment If you part one of these be careful...there are electronics everywhere.
Under passenger seat:
Click to view attachment Behind dash:
Click to view attachment I plan to (try) to use some of the modern electronics.
Climate control:
Click to view attachment Cruise control:
Click to view attachment
a914622
Dec 28 2012, 10:37 PM
If our going to use the stock ecu (i recomend) the hole dash has to come out to get the wire harness "liberated". Big pain but just remove all the 10mm 12mm you can see and feel. There are bolts behind the ac vent covers.
Funny when the masive 8 foot wire bundle is cut down its almost as small as the teener.
You should check the engine wires harness for britleness, and plan on getting new vaccuum lines. I found most all the seals were hard or cracked on both of mine.
jcl
Dr Evil
Dec 28 2012, 10:51 PM
![popcorn[1].gif](http://www.914world.com/bbs2/style_emoticons/default/popcorn[1].gif)
Dont let Scotty B see this

Chris H.
Dec 28 2012, 11:18 PM
QUOTE(a914622 @ Dec 28 2012, 10:37 PM)

If our going to use the stock ecu (i recommend) the hole dash has to come out to get the wire harness "liberated". Big pain but just remove all the 10mm 12mm you can see and feel. There are bolts behind the ac vent covers.
Funny when the massive 8 foot wire bundle is cut down its almost as small as the teener.
You should check the engine wires harness for brittleness, and plan on getting new vacuum lines. I found most all the seals were hard or cracked on both of mine.
jcl
Funny you should say that...I just came in from the garage. Wow there are a LOT of bolts in that dash. Will post pics in the am when I pull that wire bundle out. Couldn't take another minute of it for today. Definitely using the stock ECU and a good portion of the overall harness. Seems easiest.
This car is starting to remind me of the old days when I had VWs. Tools required:
10mm socket
12mm socket
14mm socket once in a while
screwdriver
I'll definitely replace all of the rubber lines and re seal the engine as well since it's out. More to come...
brant
Dec 29 2012, 08:34 AM
thank you for documenting this
Mike Bellis
Dec 29 2012, 09:52 AM
Enjoy the striping! DO YOURSELF A FAVOR AND LABEL EVERYTHING!!! Label all the stuff you know. Label all the stuff you don't know. The electrical system and devices will look a lot different once it's removed.
Don't cut anything until you identify both ends of the circuit. Label everything!!!
Looks like fun!
Chris H.
Dec 29 2012, 03:34 PM
Thanks guys. Got the harness out...
Empty basket:
Click to view attachment Overflowing basket:
Click to view attachment Looks like it weighs about 40 lbs.
So far what I have tried to do is keep everything connected to everything else where possible, so the only things that are disconnected are the few things in the engine bay, which I color coded with several different shades of my daughter's nail polish.

904svo
Dec 29 2012, 05:25 PM
Heres my WRX harness before and after. Label all the connectors and cut the wires from the main harness., Power and Grounds leads are shared in the harness.
Click to view attachmentClick to view attachment
speed metal army
Dec 30 2012, 12:00 AM
Holy Moley!
Waaayy too much of the scary stuff for me!(wiring that is)
Awesome project.

76-914
Dec 30 2012, 09:19 AM
Subscribed. Looks like your a couple month's ahead of me. I plan on doing the exact same thing so this is a good thing.
Just stay ahead of me so I don't have to do too much head scratching.

Are you going to stay R-134 or convert it also? Talk about being wet behind the ears; I must have passed on 10 SVX's before I found out they only came with automatics. Duh!

I hope you sort out the tranny/clutch set up before I get there.

nsyr
Dec 30 2012, 10:54 AM
Three quaters of that wire will be eliminated.
Chris H.
Dec 30 2012, 08:48 PM
QUOTE(76-914 @ Dec 30 2012, 09:19 AM)
Subscribed. Looks like your a couple month's ahead of me. I plan on doing the exact same thing so this is a good thing.
Just stay ahead of me so I don't have to do too much head scratching.
Are you going to stay R-134 or convert it also? Talk about being wet behind the ears; I must have passed on 10 SVX's before I found out they only came with automatics. Duh!
I hope you sort out the tranny/clutch set up before I get there.
Haven't thought about the R134 conversion. Might have to...not sure. I had no idea that the US spec versions of the SVX were auto only either until I started asking folks if theirs was stick or auto....got the old

It's really the weak link in the car. Tempted to find another SVX in better shape and do a 5 speed convert on it. With the right gearing it would be very fun. The AWD is really good without being too "controlling" if that makes sense.
Andrew, glad to hear the wiring is going to be pared way down. I may need your help when I get to the tricky part where I should STOP cutting so that I don't have any CEL or "limp home" problems. Hoping the wiring design is old enough to where it's not so finicky... and when it looks like I am messing up along the way please don't be afraid to tell me...
ruby914
Dec 31 2012, 10:42 AM
It's nice to see all the Suby conversions in work these days.
I would do my best to not cut any wires. I found myself reusing, unused wires, to extend used wires.
You may find something like a yellow / red wire in the A/T loom that you want to use on locating some thing like the FP regulator.
It is nice to find that extra Y/R wire in one peace.
I used a dental pick to unlock the connectors and to unlock each wire in the connectors.
Label everything (used and unused). A label maker would be a good investment.
Good luck.
DBCooper
Dec 31 2012, 10:55 AM
I was lazy, bought a plug and play engine harness and aftermarket ECU from Outfront and plugged it in. Well, not quite that simple, but pretty simple.
a914622
Dec 31 2012, 11:05 AM
All the wires get trimed down to look like this
Click to view attachment The svx is straight forward. The to engine side and the to 914 side. There are 2 o2's and the speed sensor need to be pluged into the subaru tranny. The svx ecu can also be upgraded to the "duel mode" stock/sport. but thats down the road.
jcl
3d914
Dec 31 2012, 03:41 PM
Great 3.3 conversion thread. Keep it coming and good luck on the project.
BIGKAT_83
Dec 31 2012, 08:05 PM
QUOTE(a914622 @ Dec 31 2012, 12:05 PM)
All the wires get trimed down to look like this
Click to view attachment The svx is straight forward. The to engine side and the to 914 side. There are 2 o2's and the speed sensor need to be pluged into the subaru tranny. The svx ecu can also be upgraded to the "duel mode" stock/sport. but thats down the road.
jcl
Nice job on the wiring harness. Thats more than one night of work there.
When I did mine I had a mistake in the cop wiring and burnt up 2 coils and the ignitor.
Chris H.
Jan 1 2013, 04:38 PM
Happy New Year everyone!
Just a bit more progress to report. Should drop the drive train today or tomorrow. A few pics...
Click to view attachmentClick to view attachment So here's the cause of the "slight" exhaust leak. This is the pipe coming off of the main cat... man that thing was loud... check out those welds!
Click to view attachmentIn case you are looking for an SVX to drive (not part out), the areas to check for rust are the doors as well as the whole belt line of the car. Like Honda Civics of that era and others, the SVX has a plastic lower panel. Water can get trapped under the plastic and cause rust. Other than that it seems OK aside from the leaky sunroof issues.
Click to view attachment Oh no rust in the long! not really...just surface.
Click to view attachment The windows are a PAIN to get out...Step 1 is to undo all of the bolts you can reach with the windows UP. Then roll them down and do the rest. The windows will not come out if they are rolled up. Best to leave the battery hooked up or close by in case you have to roll them up or down again.
Click to view attachmentDon't wrestle with the shifter from the top. You can take off the trim but it's almost impossible to remove that way due to the position of the cable bolts. Get it from underneath.
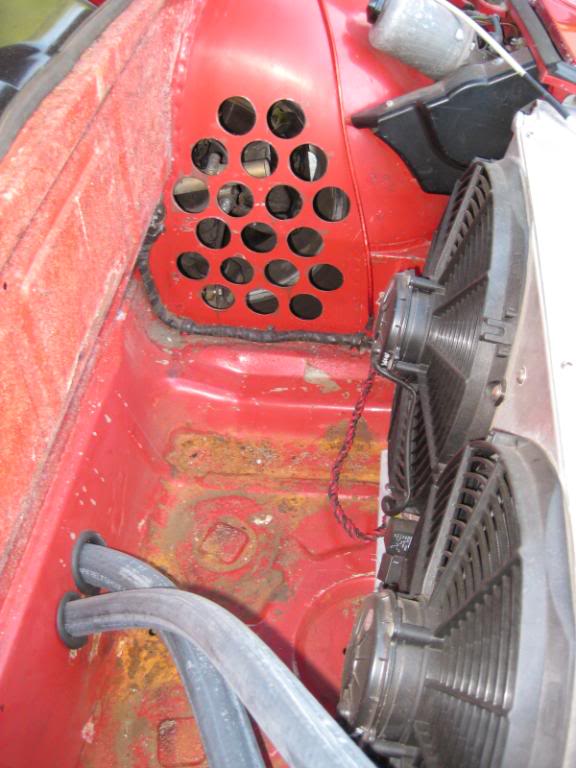
Click to view attachment To disconnect the engine fuse box/wiring harness you do not need to cut a section of fender like I did. Just follow the wiring into the cabin and they are connected to the back of the main fuse panel. Pull the engine panel out and connect it RIGHT BACK.
Click to view attachment Click to view attachment Conversely the best way to remove the SRS sensors from the fenders without cutting the wires is to cut a slightly larger hole and push them through so they end up in the interior of the car. Don't wrestle with trying to remove the wires from the main control module. There is something more to that process that is not worth wasting time figuring out...
Click to view attachment Plenty of room around the engine once you get the peripherals out. My plan is to cut the front area where the radiator was and roll it out the front of the car. We'll see if it works!
Thanks for all of the support and suggestions! We should do a "best practices since these swaps are becoming pretty common. Love the dental pick idea, and ruby914 I followed your build on Club NARP. Awesome work. Your dash is amazing. Wish I could use a WRX gauge cluster...
Chris H.
Jan 2 2013, 06:55 PM
Finally wrestled the engine and trans out...
First I cut the front section out where the radiator was so I could (hopefully) slide it out the front.
Click to view attachment Pre-cut look
Click to view attachmentTop bar cut
Click to view attachment Bottom bar cut
There are 6 17mm bolts on either side of the front suspension. It's fairly obvious that they are the front sub section. Then undo the struts, jack the car way up and the engine, trans, etc will allow you to wrestle it out and forward.
Click to view attachmentThe engine naturally leans forward a bit due to the weight but it IS NOT resting on the accessories/drive belt. The oil pan is a roundish shape.
Click to view attachment As the saying goes...the sawzall always wins. Godspeed Mr SVX...
Click to view attachment By the way make sure to duct tape any sawzall cuts or you will very likely cut yourself badly or at least tear your clothing.
Still have to take out the gas tank and rear diff, but that's not too bad.
euro911
Jan 8 2013, 02:47 AM
Chris H.
Jan 8 2013, 07:34 AM
Parts are en route! Lots of parts! Some I don't even need yet!
charliew
Jan 8 2013, 08:26 PM
Nice thread, I have great respect for guys that take the time to take pictures and do the write ups under them. I don't have that skill yet. I can barely send pictures in a email.
Most of the connectors I have removed wires from were done with a very small allen wrench. It's flat on the end but still worked great for me or the little flat blade micro screwdrivers that you get in little sets from hf.
I bought more than one suby motor just to get the fasteners so keep all the boltsand clips/fasteners that you can remove. I also have lots of vw bolts but very seldom are the threads the same pitch.
cwpeden
Jan 8 2013, 10:46 PM
Had an offer to co-buy an SVX today. An aquaintance has a 240 and wants the rear end of the SVX. That may a market for your rearend if you dont have a buyer.
He and I are both autocrossers and i was telling him about my suby plans. They dont include SVX.
Chris H.
Jan 8 2013, 11:11 PM
Thanks Charlie. Been coming here 10 years so it's about time I did something constructive! Figure I've saved $5k or so by fixing everything myself using the search function here and advice from members.
Conrad, thanks for the info. Would never have guessed you could use an SVX rear end for a 240 (Z I assume). Probably a good match, and if you blow it up just buy another one for cheap.
One thing I learned from BIGKAT_83 is that the seals for the SVX engines are not too cheap...so even though the car was like $500, I'll need about $500 in seals as well. Might want to check that when shopping around... That's OK...have to do the timing belt anyway so why not do it all at once. I'll just pretend its a 911 engine for a while... $500 is a GREAT deal then.
Should get some parts this week but first I will throw the engine on a stand and change the seals. Looks pretty easy but I'll post some pics anyway.
a914622
Jan 8 2013, 11:47 PM
Subaru parts . com is the best pricing you will find on your seal kit. If i remember it was 260.00 for the complete kit. It comes with every thing. It is an internet only site run out of a subaru dealer in Tacoma. Super good peaple to work with. I would only use a subaru timing belt!
Head bolts are reusable no need for new ones. ACL racing bearings for the 2.2 fit but you have to buy 2 sets to get a 6 back together. No kit for svx. Hoses should be converted to silicon if possible.
the engine under the wire harness pic was just rebuilt. Amazing motors! I have an extra one that i may have to add boost, lots of boost. Have 2 engine cradles , street and STI killer. Hummm..
PM me if you want detailed pics of the harness cut down. I can probably save you a week of BS.
jcl
Chris H.
Jan 9 2013, 07:16 AM
Thanks jcl! Wow that is very helpful.
BIGKAT_83
Jan 9 2013, 04:29 PM
Chris here is a picture of my fuel tank with the intank pump.
You can see the AC evaporater behind the tank fits like a glove. Im working on venting this to the dash vents.
Click to view attachmentBob
Chris H.
Jan 9 2013, 09:08 PM
Very nice Bob! Thanks! I finally got the fuel pump out of the tank and got the gas drained. Tomorrow I'll be calling the tow truck!
BTW I also see your slave cylinder reservoir for the hydraulic clutch. Looks great.
Tilly74
Jan 10 2013, 10:23 AM
QUOTE(BIGKAT_83 @ Jan 9 2013, 04:29 PM)
Chris here is a picture of my fuel tank with the intank pump.
You can see the AC evaporater behind the tank fits like a glove. Im working on venting this to the dash vents.
Click to view attachmentBob
Sorry to "hijack" but is there any more information about this AC evaporator setup? I've searched everywhere for more info on installing an evaporator where the fresh air box is and can't find much of anything. What brand/model is that evaporator? This is exactly what I want to do with my car eventually.
Chris H.
Jan 10 2013, 03:16 PM
QUOTE(Tilly74 @ Jan 10 2013, 10:23 AM)
QUOTE(BIGKAT_83 @ Jan 9 2013, 04:29 PM)
Chris here is a picture of my fuel tank with the intank pump.
You can see the AC evaporater behind the tank fits like a glove. Im working on venting this to the dash vents.
Click to view attachmentBob
Sorry to "hijack" but is there any more information about this AC evaporator setup? I've searched everywhere for more info on installing an evaporator where the fresh air box is and can't find much of anything. What brand/model is that evaporator? This is exactly what I want to do with my car eventually.
Let's transfer you here:
BIGKAT ThreadPost 53. Bob has 2 subie threads...both very helpful.
And now, a moment of silence...
Click to view attachmentOK let's get on with the show! Engine seals ordered....
Chris H.
Jan 23 2013, 06:44 AM
Just some minor updates...the exciting stuff will start next week.
Separating the SVX engine from the trans is not quite as easy as expected. Since it is automatic you have to unbolt the flex plate from the torque converter. If you don't you can tug all day and it's not going to budge. Ask me how I know...
Click to view attachment Under the intake on the snorkel end (rear) you will find a plug just to the passenger side. Take that off and there is a hole that will allow access to the 12mm bolts one at a time. Rotate the engine CLOCKWISE ONLY using a 21mm socket on the crank pulley until all 4 are removed.
Click to view attachmentThe engine and trans won't usually just come loose like a 914's will. Seems like the lower bolts are pointed slightly outward or something because they are TIGHTLY mated. What you have to do is start prying them apart with something slim like a putty knife and gradually and very carefully move up to wider prying tools. At some point it gives up.
Click to view attachment Make sure you have something like a furniture dolly positioned under the trans. It's one heavy SOB. Not something you can normally just lift.
Click to view attachmentOn the stand...this is the part where I usually say "I WIN!" and point at the object I have been wrestling with...crazy but at least I feel better. That sucker is also very heavy compared to a type 4. Might want to remove some of the accessories before you hoist it up there.
Chris H.
Jan 23 2013, 06:44 AM
So the angle of the intake has gotten my attention. Bob and I spoke of flipping it which can be done but might require rearranging of the alternator.
Click to view attachment When you look at it from the top it looks like it will clear since the angle is so steep....
Click to view attachment But under the intake snorkels is this little guy which will probably make it harder. I suppose a spacer could work...we'll see. Otherwise the alternator could be moved...
Chris H.
Jan 23 2013, 06:54 AM
Here's a better shot of the angle...
Click to view attachment And the front again...
Click to view attachment
76-914
Jan 23 2013, 08:11 AM
Chris, what is the issue with the TB and Alt? I didn't understand what you are showing under the intake snorkels, either. Kent
Chris H.
Jan 23 2013, 10:27 AM
Sorry what I was saying is that it appears that I could flip the intake around so it faces the front of the engine, thereby eliminating the need to cut into the rear trunk (or at least lessen the cutting). The angle upwards makes it look like you could just flip it, but right under the air intake holes (snorkel) which are taped off now there is some sort of module (don't know what it is yet) that will probably be in the way. Might have to move the alternator to the end where the power steering pump resides now. I want to retain the A/C as well.
scotty b
Jan 23 2013, 04:51 PM
If you flip it, will you still have enough room to put whatever filter system you plan to use without hitting the firewall ?
wingnut86
Jan 23 2013, 09:12 PM
94' had an EGR valve in the location under the intake.
What year is it again?
Chris H.
Jan 25 2013, 10:10 AM
Sorry guys I was out for a couple of days...
wingnut - It's a 95....could be the EGR...
Scotty - That's a very good question...I think it will fit but we'll find out very soon. The stock breather box adds a couple of inches to the end of the intake and then exits to the left passenger side like this:
Click to view attachmentSorry for the grainy photo. Let me know if you need any measurements when you start your install. I'll keep you posted.
BIGKAT_83
Jan 25 2013, 11:36 AM
Its the Idle Air Control valve.... You need this if your running the stock ECU.
Bob
Chris H.
Jan 25 2013, 12:31 PM
Well there you go...that thing is not going anywhere! In my mind it seems like the alternator should move to where the power steering pump is so that the stock serpentine belt could be used and it's more balanced. Just need to fab a strong bracket.
76-914
Jan 25 2013, 01:59 PM
Just stay 3 month's ahead of me so I don't have to do any thinking, Chris.

scotty b
Jan 26 2013, 09:45 AM
Sorry for the highjack, but it is somewhat related. Do you guys think a GT front valance, with a coulpe of moderate sized cutouts on the front panel ( I'm thinking about cutting the three center factory holes to one large oval hole, and two additional cutouts on either side of the trunk latch ) combined with a puller fan and shroud like Ruby914 made, would cool well enough in the worst of conditions ( idling in town in 95* temps )? My intent is to make this as stock looking as possible. Kind of like Porsche " could have done "
We really need a Sooby forum here

DBCooper
Jan 26 2013, 10:25 AM
That's what BIGKAT did (with just the GT opening), and it apparently worked well:
My radiator opening is just a few square inches larger than what I measure the GT opening to be:

I only have a 2.0 liter turbo in mine, with the Renegade radiator, and it's never been hot in summertime south Texas or the California desert. The fans have come on when I've been thrashing it and then pull into stop and go traffic, but the needle's never moved. Air for both the radiator and intercooler go through that opening.
That radiator opening was cut into a painted bumper to test the size hole I'd need. I cut it small and was going to keep opening it up till it was large enough to cool well, but that's still the original "small" hole because I never had to enlarge it. I just bought a narrow body GT valance and now I'll cut the chrome bumper to match the GT valance, knowing that opening will be large enough. I believe BIGKAT had a big 3.3 liter six in his, so should work for that motor as well. I don't know this for a fact and it seems counter-intuitive, but I think radiator capacity and the air exits from the trunk are more critical than the size of the inlet.
QUOTE(scotty b @ Jan 26 2013, 07:45 AM)
We really need a Sooby forum here
Yup, sure do.
I always feel like I'm offending purists.

.
Chris H.
Jan 26 2013, 02:32 PM
BIGKAT and I were talking radiators last week. Since the stock rad in my car is new I am thinking of doing it PJHAUN style (Brad Mayeur did it as well in his V8 car). In through the front, out the bottom of the car. The stock rad is pretty big, really too big for most temps in this setup. Just hate cutting the fender wells. If I had the skills I would do what Ruby did and then I could live with the cutting.
The inlet only needs to be 1/2 the size of the outlet(s) so your plan should work Scotty. Check out SpeedMetalArmy's. He just has a few holes in the bumper for his LS1.
Hijack any time guys. Seriously...I learn more from every one of them.
scotty b
Jan 26 2013, 03:51 PM
The wheel well cutting is definitely an area to be concerned about. One thing I plan to do that I have yet to see someone do, is cut a clean hole the same size as the duct running to it, then reinforce the perimiter by welding on a piece of 1" wide 16 gauge. I have also considerd cutting the hole, then making a patch panel to fit back in that had been punched with louvers, giving a nice finished look instead of a big hole, but I'm worried the louvers would block/disrupt the flow to much to be effective
DBCooper
Jan 26 2013, 04:42 PM
Give it a go. I think that area works because it's low pressure, and if that's so it should suck hot air out through louvers, lots of small holes (like mine), or one big one.
My outlet, done with a template (so both sides are identical) and a hole saw, so it still retains some strength. I don't drive it in the rain (California) so it works for me.
Dr Evil
Jan 26 2013, 05:03 PM
I would like to make a two radiator system like the 911s. If there was a way to intake behind the doors and exhaust some place aft of that in a way that keeps the looks and functionality, then I would be all over that.
This is a "lo-fi" version of our main content. To view the full version with more information, formatting and images, please
click here.