
Full Version: 914RS4 Tube Chassis 996 Suspension Audi 2.7TT Stage 3
?Qué bola, Pipo? Wow! You don't post very often but when you do..............you put the rest of us to shame. Amazing work. Your killing it Dude. Can't wait to see this again. Hasta fin de semana.
A plasma table, bead roller and mag brake? Where have I seen that set up before? 
Rudy - You're killing it! I love the removable long panels. Very cool design that you brought to life. Great work!
Rudy - You're killing it! I love the removable long panels. Very cool design that you brought to life. Great work!
"This is whats coming next"
Holy wheels batman! Just Damn!
Going for the record tire on a street 914??
Holy wheels batman! Just Damn!
Going for the record tire on a street 914??
Thanks guys, Happy New Year back @ValcoOscar ,
@76-914 see you this weekend.........no more covid. I will have my new AC system by then. I'm going with a RESTOMOD unit Click to view attachment
@horizontally-opposed thanks man....I can't wait either.
@tygaboy I don't know...........where? CNC mill and lathe are on backorder  Bought a Precision Matthews 940 mill with Acorn CNC controls, and a Precision Matthews 16x40 lathe. Got something planned for the mill since it has the ability to do 3d contour mapping. Got a little dirty trick planned up my sleeve. You're going to love it.
@Andyrew I don't know if its the record but it will have a 63.5" front track and a 63.0 rear track. Click to view attachment
I'm going to flare out the fenders next. Fronts are +4 and rears are +5 over and above what the 916 flare is. Click to view attachment Click to view attachment
I'm building a jig to keep the fenders in exact location so that when I expand them, they will keep the exact location as the 916 but just wider. I will also extend the curvature transversely along the rear hood. In order to do this I will have to make the face of the fender shrink by about an inch. Can't wait to see it sitting with the new meats and the lengthened wheelbase.
Ohhhhh and pretty soon I will do a twist test to see if I got this thing much stiffer than stock.
@76-914 see you this weekend.........no more covid. I will have my new AC system by then. I'm going with a RESTOMOD unit Click to view attachment
@horizontally-opposed thanks man....I can't wait either.
@tygaboy
I don't know...........where? CNC mill and lathe are on backorder Bought a Precision Matthews 940 mill with Acorn CNC controls, and a Precision Matthews 16x40 lathe. Got something planned for the mill since it has the ability to do 3d contour mapping. Got a little dirty trick planned up my sleeve. You're going to love it.@Andyrew
I don't know if its the record but it will have a 63.5" front track and a 63.0 rear track. Click to view attachmentI'm going to flare out the fenders next. Fronts are +4 and rears are +5 over and above what the 916 flare is. Click to view attachment Click to view attachment
I'm building a jig to keep the fenders in exact location so that when I expand them, they will keep the exact location as the 916 but just wider. I will also extend the curvature transversely along the rear hood. In order to do this I will have to make the face of the fender shrink by about an inch. Can't wait to see it sitting with the new meats and the lengthened wheelbase.
Ohhhhh and pretty soon I will do a twist test to see if I got this thing much stiffer than stock.
Wow !
That’s looking “rude” can’t wait to see it!
Hope everything’s going great.
That’s looking “rude” can’t wait to see it!
Hope everything’s going great.
One of my fave build threads hadn’t seen it awhile . Just finished a morning coffee in downunder oz and got up to speeeed
I just returned from Rudy's and all I can say is be prepared to be awe stricken. IA very humbling experience I must say. I'm not even sure that the trunk lid will remain stock. The welds are impressive as well. Such small, flat "dimes" on thin metal I thought they were TIG welds but they are MIG. Some upcoming metal work will be quiet involved with compound curvatures but I'll stop there and let Rudy reveal when it's time.
That looks awesome. Can't wait to see the finished product
Incredible.....
This is beautiful work.... but I have a question.
Looking at this picture:
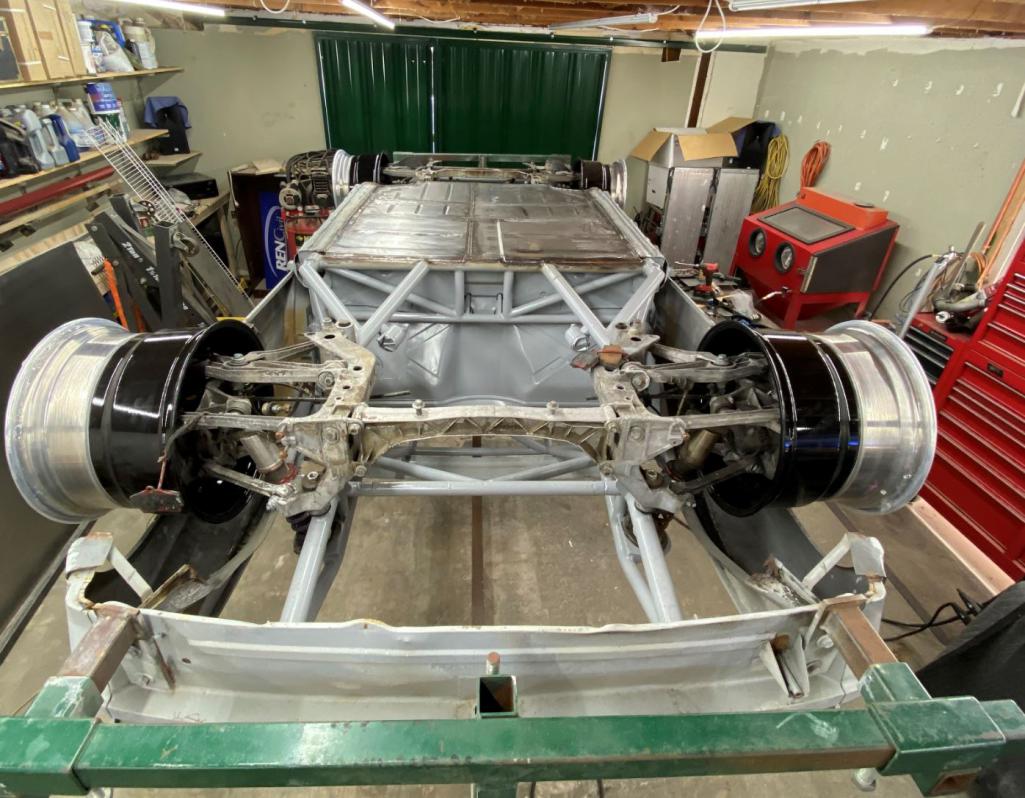
I noticed the diagnoal bars on the bottom of the engine compartment. My question is: How are you going to get the engine in the chassis? The inside diagonal bars are in the way of lifting the engine up in to the engine compartment.
Clay
Looking at this picture:
I noticed the diagnoal bars on the bottom of the engine compartment. My question is: How are you going to get the engine in the chassis? The inside diagonal bars are in the way of lifting the engine up in to the engine compartment.
Clay
QUOTE(ClayPerrine @ Jan 13 2021, 07:21 AM) 
This is beautiful work.... but I have a question.
Looking at this picture:
I noticed the diagnoal bars on the bottom of the engine compartment. My question is: How are you going to get the engine in the chassis? The inside diagonal bars are in the way of lifting the engine up in to the engine compartment.
Clay
The engine drops in from the top. The braces on top are removable, clay.
@76-914  Thanks man.......but you're over selling it.........makes it harder to impress.
  All kidding aside, thanks for the compliment.
I'm moving on to flaring the fenders and making room for intercoolers in the quarter panels. Planning on cutting the 1/4 panel and bending approximately 30 degrees. After I'm done with it, you'll be able to carry luggage in there. It's not going to be a make-believe-vent .
Thanks man.......but you're over selling it.........makes it harder to impress. All kidding aside, thanks for the compliment. I'm moving on to flaring the fenders and making room for intercoolers in the quarter panels. Planning on cutting the 1/4 panel and bending approximately 30 degrees. After I'm done with it, you'll be able to carry luggage in there.
It's not going to be a make-believe-vent .
QUOTE(Curbandgutter @ Jan 14 2021, 12:52 PM)
@76-914
Thanks man.......but you're over selling it.........makes it harder to impress. All kidding aside, thanks for the compliment. I'm moving on to flaring the fenders and making room for intercoolers in the quarter panels. Planning on cutting the 1/4 panel and bending approximately 30 degrees. After I'm done with it, you'll be able to carry luggage in there.
It's not going to be a make-believe-vent .Loading in the luggage into the vent openings??
A little look into what the ac system is going to be like
This is a RESTOMOD unit. Click to view attachmentClick to view attachment
I will be adding aluminum diamond plate in the footwell area. This is my variation of AUTOCardboard.....sometimes I use foamboard.Click to view attachment
This is a RESTOMOD unit. Click to view attachmentClick to view attachment
I will be adding aluminum diamond plate in the footwell area. This is my variation of AUTOCardboard.....sometimes I use foamboard.Click to view attachment
QUOTE(Curbandgutter @ Jan 14 2021, 02:35 PM)
I will be adding aluminum diamond plate in the footwell area. This is my variation of AUTOCardboard.....sometimes I use foamboard.Click to view attachment
Ah.. another proponent of CAD (Cardboard Aided Design).
QUOTE(Curbandgutter @ Jan 14 2021, 12:35 PM)
A little look into what the ac system is going to be like
This is a RESTOMOD unit. Click to view attachmentClick to view attachment
This thing is super cool. (Sorry, couldn't help myself.)
Do you think it might fit into the stock area in a 914 with a standard fuel tank if the expansion tank and factory fresh air box are removed? Does it get under the cowling?
I think it would work. Even if you have to cut the floor of the firewall to lower it say an inch it will fit any 914. Also, it beats anything out there with all the electronics. It's an amazing unit with electric servos. No wires to control air mix. This is infinitely variable mix too. They have the best billet air vents as well. Installed in this fashion it will leave all kinds of legroom. It's the way to go IMHO.
I'm thinking of using this style of vent Click to view attachment
I'm thinking of using this style of vent Click to view attachment
QUOTE(horizontally-opposed @ Jan 14 2021, 06:54 PM)
QUOTE(Curbandgutter @ Jan 14 2021, 12:35 PM)
A little look into what the ac system is going to be like
This is a RESTOMOD unit. Click to view attachmentClick to view attachment
This thing is super cool. (Sorry, couldn't help myself.)
Do you think it might fit into the stock area in a 914 with a standard fuel tank if the expansion tank and factory fresh air box are removed? Does it get under the cowling?
Simple answer is no, mocked one up a while ago. But if you don't mind a bit of cutting on the separator panel then yes it will fit, have to move the cowl support or build a new one, and it gets in there just fine. Added benefit is the floor heat venting actually works, for pure A/C it does not matter that much. And the wiper mechanism is out of the way if your worried. Lots of room there just not a lot of depth, you have to pull it over to the passenger side as you have steering shaft going into that area also. One thing I was messing with was moving the blower off the unit to gain a bit more in the packaging space. Can't remember if you lost the washer bottle or not, not a big deal, plenty of Modern VAG cars have remote washer bottles with electric pumps that would fit under the gas tank and keep the fill high. All about packaging.
This build it will not be an issue at all.
Keep rocking this one
LET THE HAUNCHES BEGIN!
Click to view attachment
made a jig to keep the fender geometry intact when I cut and pull out Click to view attachment Click to view attachment
left and right side are attached and in level and parallel planeClick to view attachment Click to view attachment
mark and cut Click to view attachment
slide out. Notice how much I'm going to drop the top of the fender/ about 3/4" Click to view attachment Click to view attachment
Damn, I wish I had time to see it this week. Maybe next week Pipo. You're moving along quickly. Did you get your lathe yet?
QUOTE(76-914 @ Feb 1 2021, 06:05 PM)
Damn, I wish I had time to see it this week. Maybe next week Pipo. You're moving along quickly. Did you get your lathe yet?
 Maybe even have my 1/4 panel/luggage holder started.
Love that fender sliding jig, very nicely done. This build will bring new meaning to the term "Wide Body!"
This project just makes me smiiiiiile.
So cool, and love seeing the creativity!
So cool, and love seeing the creativity!
The fixtures for the flare surgery is next level stuff...I dig it.
Thanks for all the nice comments. This weekend I plan on owering the fender tops about 1 inch and tying the tops of the fenders together. I plan on using the English wheel to give it that slight arch. Lets see how it goes.  ........oh and mill came in today Looks like I'll be making my own suspension pieces.
........oh and mill came in today Looks like I'll be making my own suspension pieces.
QUOTE(Curbandgutter @ Feb 5 2021, 10:22 AM)
Thanks for all the nice comments. This weekend I plan on owering the fender tops about 1 inch and tying the tops of the fenders together. I plan on using the English wheel to give it that slight arch. Lets see how it goes.
........oh and mill came in today Looks like I'll be making my own suspension pieces. Congrats Rudy-
I see Curbandgutter MotorSports operation in your future

O
UPDATE ON REAR FLARES
Mark to cut and slide downClick to view attachment
cut and slide down 1 inch Click to view attachment
This is how high the edge is prior to lowering 1 inch Click to view attachment
Post loweringClick to view attachment Click to view attachment
fitting the top piece Click to view attachment Click to view attachment
Wow! That is going to look incredible!
I can't wait to see what these humongous STEEL rear fenders look like when completed. You are certainly a professional mad scientist. Very cool.
Tool Whore's the world over say, "Excellent use of the curvy template tool."
And by the way, it took me 531 days between when I started installing my flares until I fired my car for the first time (March 14, 2019 to August 26, 2020). I don't want to wait that long to see your car run so hopefully, you're a faster fabber than me!
Rudy, your car is gonna be wild! Can't wait to see it.
QUOTE(ValcoOscar @ Feb 5 2021, 10:51 AM)
QUOTE(Curbandgutter @ Feb 5 2021, 10:22 AM)
Thanks for all the nice comments. This weekend I plan on owering the fender tops about 1 inch and tying the tops of the fenders together. I plan on using the English wheel to give it that slight arch. Lets see how it goes.
........oh and mill came in today Looks like I'll be making my own suspension pieces. Congrats Rudy-
I see Curbandgutter MotorSports operation in your future
O
I'm just loading up with tools so that I have them when I retire in about 10 years.
Damn, That sectioning of the rear flare is some damn fancy work! I didnt even see it the first time I looked at the pics! I thought it was just mockup!! The English wheel work is also fabulous!
Hey this is what I'm thinking for the rear. I'm open to suggestions.
I'm thinking of something like this. It's hard to illustrate it, but it won't look like horns or cat eyes. I'm thinking of 3d printing the louvers and then dipping in that paint that makes it look like carbon fiber. Where it attaches to the rea by the light will follow the contour of the fender Click to view attachment
do nothing Click to view attachment
QUOTE(Andyrew @ Feb 8 2021, 10:56 AM)
Damn, That sectioning of the rear flare is some damn fancy work! I didnt even see it the first time I looked at the pics! I thought it was just mockup!! The English wheel work is also fabulous!
Thanks Andrew. It's really not that bas once you understand how the metal behaves. It's like thinning out pizza dough.
I say you get the fender done, put a tire under it and see how it looks.
What other things are you doing to the rear that is non standard? Having these vents will help performance wise but its going to look really odd on this car if nothing else "modern" is being done besides wheels (And obviously the whole chassis but thats not visible from the outside).
DO you prefer form or function here?
There is a lot of trapped air in the back of a 914, but if for example you use a diffuser, there likely wont be much at all. And there is so little area behind the 914 rear tire that there wont be much air flowing into it.
If you are putting the vents in the rear of the flares, then put a boxster radiator in each one. That way you don't have to run the plumbing up front.
QUOTE(Andyrew @ Feb 8 2021, 12:17 PM)
I say you get the fender done, put a tire under it and see how it looks.
What other things are you doing to the rear that is non standard? Having these vents will help performance wise but its going to look really odd on this car if nothing else "modern" is being done besides wheels (And obviously the whole chassis but thats not visible from the outside).
DO you prefer form or function here?
There is a lot of trapped air in the back of a 914, but if for example you use a diffuser, there likely wont be much at all. And there is so little area behind the 914 rear tire that there wont be much air flowing into it.
Andrew I'm cutting in a vent opening in the 1/4 panel.......my pseudo luggage rack
 , this will bring air into the intercoolers and so I need an exhaust. So, yes, there will be a lot of air in the wheel well. As for the diffuser yes I'm making one that doubles as the stiffening panel along the entire engine bay bottom. I'm using it to tie everything together structurally along the bottom and then doubling as a diffuser.
 Thinking of going with 1/8" aluminum plate. The diffuser fins will be maybe 20 gauge aluminum that is bolted on to the diffuser with some button head screws. That way they can easily be replaced when needed. I have 6 points of attachment made for that in the cage. I want to modernize the look of the car without going too far........maybe I already did but........I'm planning on using chrome bumpers but modernizing. I've good some ideas ruminating.
QUOTE(ClayPerrine @ Feb 8 2021, 12:22 PM)
If you are putting the vents in the rear of the flares, then put a boxster radiator in each one. That way you don't have to run the plumbing up front.
Clay, I will have radiators in front of the wheel. I have 1/4 cut-outs coming!
QUOTE(tygaboy @ Feb 8 2021, 07:30 AM)
Tool Whore's the world over say, "Excellent use of the curvy template tool."
And by the way, it took me 531 days between when I started installing my flares until I fired my car for the first time (March 14, 2019 to August 26, 2020). I don't want to wait that long to see your car run so hopefully, you're a faster fabber than me!
Rudy, your car is gonna be wild! Can't wait to see it.
Yes......tool whores unite!!!!
I don't know about that 531 days though......We sold our house and I will eventually stop working on project since I'll be building a new house with a real shop.  The escrow is a long 6 month to 1 year process so, Ill try and get most of the work done so that I can get car into roller shape so I can transport. First thing to build on the house is the workshop though.

Rudy: Your car is going to make a Group 5 look tame by comparison...!
QUOTE(Curbandgutter @ Feb 8 2021, 11:43 AM)
Hey this is what I'm thinking for the rear. I'm open to suggestions.
Above bolding added by me.
Rudy - Take it from me: based on my hood vent posts, whatever you do, DO NOT get the Peanut Gallery fired up about design suggestions!

My suggestion is: Do whatever the hell makes you smile and screw the rest of us!
QUOTE(tygaboy @ Feb 8 2021, 05:16 PM)
Rudy - Take it from me: based on my hood vent posts, whatever you do, DO NOT get the Peanut Gallery fired up about design suggestions!

QUOTE(Cracker @ Feb 8 2021, 03:59 PM)
Rudy: Your car is going to make a Group 5 look tame by comparison...!
right on!
QUOTE(tygaboy @ Feb 8 2021, 05:16 PM)
QUOTE(Curbandgutter @ Feb 8 2021, 11:43 AM)
Hey this is what I'm thinking for the rear. I'm open to suggestions.
Above bolding added by me.
Rudy - Take it from me: based on my hood vent posts, whatever you do, DO NOT get the Peanut Gallery fired up about design suggestions!
My suggestion is: Do whatever the hell makes you smile and screw the rest of us!
WILL DO
ON TO THE QUARTER PANEL
This is the direction that I'm going with to cut in the 1/4 panel to couch the air to water intercoolers as well as the cold air intakes. The cut will taper from o" depth at the door to 12" depth at the back. Notice how the top cut line is not level, it actually tapers up to follow that ever so slight rise in the 914 silhouette. The bottom line is parallel with the rocker panel.
By the way does anyone know how tall those Porsche side panel stickers are? The ones that go along the bottom of the door. I need a pair but in the negative. I'm thinking of dark metallic charcoal grey for the entirety of the car and then spraying the Porsche sticker logo in a Carrera silver along the bottom of the doors, like the stickers. I may continue that silver into the intake at the 1/4 panels. The rockers will be in black and they will follow the silhouette of the fenders.
Click to view attachment Click to view attachment
Looking awesome!!
When you say 12" depth at the back is that measured off the OEM quarter panel or from the corresponding point on your flares? Asking since it looks like the heat exchangers will be in the wheel wells.
When you say 12" depth at the back is that measured off the OEM quarter panel or from the corresponding point on your flares? Asking since it looks like the heat exchangers will be in the wheel wells.
QUOTE(jd74914 @ Feb 11 2021, 11:55 AM)
Looking awesome!!
When you say 12" depth at the back is that measured off the OEM quarter panel or from the corresponding point on your flares? Asking since it looks like the heat exchangers will be in the wheel wells.
From the OEM 1/4 panel. The heat exchangers will not be in the wheel wells.
QUOTE(Curbandgutter @ Feb 11 2021, 09:35 AM)
ON TO THE QUARTER PANEL
This is the direction that I'm going with to cut in the 1/4 panel to couch the air to water intercoolers as well as the cold air intakes. The cut will taper from o" depth at the door to 12" depth at the back. Notice how the top cut line is not level, it actually tapers up to follow that ever so slight rise in the 914 silhouette. The bottom line is parallel with the rocker panel.
By the way does anyone know how tall those Porsche side panel stickers are? The ones that go along the bottom of the door. I need a pair but in the negative. I'm thinking of dark metallic charcoal grey for the entirety of the car and then spraying the Porsche sticker logo in a Carrera silver along the bottom of the doors, like the stickers. I may continue that silver into the intake at the 1/4 panels. The rockers will be in black and they will follow the silhouette of the fenders.
Click to view attachment Click to view attachment
Hey Rudy, here are my dark silver side panel decals on Chucky
~ $70 (set)
O
Click to view attachment
<b>@ValcoOscar </b> that's what I'm looking for. But I need the silver part to be open. I would use the sticker to spray the silver portion onto the car then pull the sticker off. How tall is the sticker? I need to know so that I don't cut the 1/4 panel too tall. By the way what is Chucky's. I google it and all I get is the chucky doll. 
QUOTE(Curbandgutter @ Feb 11 2021, 01:38 PM)
Oscar that's what I'm looking for. But I need the silver part to be open. I would use the sticker to spray the silver portion onto the car then pull the sticker off. How tall is the sticker? I need to know so that I don't cut the 1/4 panel to tall. By the way what is Chucky's. I google it and all I get is the chucky doll.
I will get you height later today, Chucky is my latest 914, LSV8 powered.
But next to your car I may have to rename it Barney

O
This is a "lo-fi" version of our main content. To view the full version with more information, formatting and images, please click here.