rgolia
Mar 5 2014, 11:22 AM
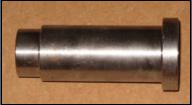
With the help of the good people here i have decided to try and rebuild/upgrade the rear suspension and brakes. PMB is supplying the parts and of course Eric is willing to provide advice. I started this past weekend to take stuff apart and of course hit a couple of early snags......I am not surprised. First I snapped off one of the bolts that holds the trailing arm to the chassis (see photo). Next up is that the castelled hub nut on the passenger side.....I can not get if off (see photo of the stinking nut). I put my full body weight on a 1,5 foot chaeter bar and it will not budge and I tried the air gun too. So I am looking for any and all advice on how to deal with this stuff. I am almost ready to toss the trailing arm, hub, etc in the recycle bin.
 Click to view attachment Click to view attachment
yeahmag
Mar 5 2014, 11:24 AM
Put a big pipe over the breaker bar to get more leverage. A MAP torch may help too. What is your impact gun rated to?
bandjoey
Mar 5 2014, 11:31 AM
It's something like 250 pounds of torque. I've seen posts here to use a small cutting tool to get rid of the nut. Also lots of tech and video's here. Search is a friend. PMBperformance.com and pelicanparts.com have good resources.
Keep us posted on the results.

I used a 1/2 inch breaker bar and a 3 ft. pipe. Broke the breaker bar! Had to borrow a 3/4 inch breaker bar and socket to get them off. Some also use some heat to break that nut loose. Spray it with some sort of penetrate and leaving it overnight also helps.
Tom
rgolia
Mar 5 2014, 11:53 AM
did the socket and breaker bar thing, can't get the axle to hold with the long bar. sprayed wd on it for the last few days. Tried to heat it too. That effing nut is pissing me off. I may try the cutting it off idea before long.
914_teener
Mar 5 2014, 11:57 AM
Dude.......
Stop what you are doing and go buy your self a couple of cans of PB Blaster penetrant spray cans if you haven't already. You will save yourself a lot of effort and grief.
I wrote a thread on this last Summer. Eric was a great help as well.
Good luck......get the PB Blaster though and soak those bolts before you start yanking on them.
nathansnathan
Mar 5 2014, 12:00 PM
Here's how I did it. I used a 3/4" breaker bar with an impact socket on it. and a 6' pipe cheater bar. I used 5/16" bolts to attached it to a 2x12.

malcolm2
Mar 5 2014, 12:06 PM
QUOTE(rgolia @ Mar 5 2014, 11:53 AM)

did the socket and breaker bar thing, can't get the axle to hold with the long bar. sprayed wd on it for the last few days. Tried to heat it too. That effing nut is pissing me off. I may try the cutting it off idea before long.
One thing I did was to put the lug bolts back in.... at least 2 of them. Use a 2nd long pipe or stiff angle to wedge on the floor as you put the other long pipe on the breaker bar and the nut.
Maybe someone can help you hold the socket on as you STAND on the breaker bar and pipe. I used a 4' long angle and a 4' long pipe. Might need to use bungee cords to make sure the angle stays on (across) the lug bolts. Screw the bolts all the way in so you don't bugger up the threads, or buy same threaded bolts.
Heat is your friend here. heat up the nut as best as you can. stay away from the center and just heat the nut.
914_teener
Mar 5 2014, 12:12 PM
It is best to crack that nut when before you take the control arm off the car....that is the first nut to crack....pun intended.
If you can...put the rotor back on.....set the car on the ground....then use the BFBB method.
My 2 cents....or sense.
Elliot Cannon
Mar 5 2014, 01:24 PM
QUOTE(rgolia @ Mar 5 2014, 09:53 AM)
did the socket and breaker bar thing, can't get the axle to hold with the long bar. sprayed wd on it for the last few days. Tried to heat it too. That effing nut is pissing me off. I may try the cutting it off idea before long.
WD is NOT a penetrant. It is a water dispersant. Use PB blaster. And a lot of patience.

ThePaintedMan
Mar 5 2014, 01:24 PM
QUOTE(914_teener @ Mar 5 2014, 01:12 PM)
It is best to crack that nut when before you take the control arm off the car....that is the first nut to crack....pun intended.

I did the same thing, with the wheel on the car and the car on the ground. You take the center cap off and put the socket through the center.
Truth be told I didn't even mess with the breaker bar. I knew I would have to replace the wheel bearings anyway so I took the cotter pin out, drove it up the block to the local tire shop and had them use their massive impact gun to break it free. Then retorqued them to spec and drove back home where I took the nuts off again. Cost me $5. Be aware that if you do this though and don't get them torqued back to spec before you drive that you'll ruin the bearing. But if you're rebuilding the whole thing anyway, you'll be replacing the (likely original) bearings.
DRPHIL914
Mar 5 2014, 02:15 PM
i just went thru the exact senario about a month ago.
i agree with the PB blaster- let it soak good for a day hit it a few times. i took it off and in one piece took it down to my local mechanic and he used a heavy duty impact wrench and that broke it loose. took 30 seconds and it was off.
but the other side i was able to get with a 3/4 breaker bar, and 1" pipe that was 2 ft long for better leverag, and used another long pipe between two of the lugs to hold the hup in place, i felt like i was going to lift the car off the ground when it finally broke loose- i am considering buying a heavy duty impact wrench like my mechanic used could really come in handy.
nathansnathan
Mar 5 2014, 02:43 PM
I actually bought a 1/2" snap-on impact gun on ebay just for this job. Even after soaking it with liquid wrench for days, it din't flinch. That is when I went to plan B pictured above.
rgolia
Mar 5 2014, 03:10 PM
ok a PB blaster soaking followed by putting the wheel back on, followed by a 4 ft or more breaker bar with all six of my kids and me standing on it. I will report back when and if it comes off. Then to the busted bolt on the trailing arm mount and then finally to the rebuild....new brakes, new rotors, new bushings for trailing arms, new bearings, repack cvs, weld mounting bracket for rear sway bar, new starter, powder coat or paint the axles and trailing arms.....anything else I am missing?
Oh, one more question, why do these cv joints look different? Look at the inner piece that goes on the spline, one of them has a lip on it.
Click to view attachment
bulitt
Mar 5 2014, 03:35 PM
The outside bolt tubes have plastic caps on the top (top of the suspension console).
Take the caps off and load them up with PB Blaster. Let this sit for a day. If you break one of these bolts you have several options.
1) drill the bolt and use an extractor. But more than likely this wont work.
2) drill the entire bolt out. this leaves a threadless tube. You can then use a long bolt and nut. but this is not a proper repair.
3) So order a threaded insert from Tangerine racing. Drill the tube out with a hole saw, put the insert in and weld it all up.
This is a major pain in the butt.

barebrad
Mar 5 2014, 03:39 PM
I had a similar problem. I used a 6' long piece of angle iron with 2 holes and bolted to the hub via the lug nuts. That will prevent the axle from rotating. Then, depending on your weight, you may need to get out 6' on your breaker bar. These things are sometimes torqued up to 1000ft/lbs.
PB Plaster for days and then heat on the NUT only.
As for your CV joints, who cares what they look like! Throw them away if they are 40 years old. At least that's my opinion.
Good luck!
rgolia
Mar 5 2014, 04:10 PM
I like the tangerine racing repair part idea...thanks for that. I also like the toss the 40 yr old cv joints idea.....may just go for new cvs and axles from tangerine. If I do, don't tell the wife...she hates my baby already. Gotta start getting the parts boxes sent to the office so I don't have to listen to bitch session. Almost happy hour hump day time here on the right coast...

Spoke
Mar 5 2014, 04:11 PM
You can always use a Dremel to cut the nut and buy a new one.
I used the Dremel to remove the bearing races from my 911. Tried heat, a bearing splitter, and about 4 days of work. Got the dremel out and in 15 had the inner and outer races off.
76-914
Mar 5 2014, 04:16 PM
Rory, put some heat to it. Why wait days to see if a penetrant works. PB is for #1-those that don't have a torch #2- for places that you can't get your torch on and #3- procrastinators.


rgolia
Mar 10 2014, 09:10 AM
It worked, a little PB blaster, some heat and a 4ft bar and bingo, the stinking castellated nut broke free. Then I moved onto the broken bolt in the trailing arm mount..got that too. All rear suspension parts are now removed.
For the rebuild I have decided to have PMB provide the calipers, rotors, etc. and Tangerine will rebuild the trialing arms and axles. Then I will attempt to put it all back together.
One question on the shims....are these little ones typically used?
Click to view attachment
914_teener
Mar 10 2014, 09:47 AM
QUOTE(rgolia @ Mar 10 2014, 07:10 AM)
It worked, a little PB blaster, some heat and a 4ft bar and bingo, the stinking castellated nut broke free. Then I moved onto the broken bolt in the trailing arm mount..got that too. All rear suspension parts are now removed.
For the rebuild I have decided to have PMB provide the calipers, rotors, etc. and Tangerine will rebuild the trialing arms and axles. Then I will attempt to put it all back together.
One question on the shims....are these little ones typically used?
Click to view attachmentYes....
my car had those installed. They are normally added aftermarket however someone on the Board here sells the factory shims which come in different thicknesses. Put a WTB in the classified and someonewill chime in.
ChrisFoley
Mar 10 2014, 11:06 AM
QUOTE(914_teener @ Mar 10 2014, 10:47 AM)
QUOTE
... One question on the shims....are these little ones typically used?
Yes....
... but only by alignment shops which don't have the proper shims.
SirAndy
Mar 10 2014, 11:25 AM
QUOTE(Racer Chris @ Mar 10 2014, 10:06 AM)
QUOTE(914_teener @ Mar 10 2014, 10:47 AM)
QUOTE
... One question on the shims....are these little ones typically used?
Yes....
... but only by alignment shops which don't have the proper shims.
Don't reuse the small shims, the correct ones are available ...

rgolia
Mar 10 2014, 12:48 PM
Thanks guys...that is what I thought when they came raining down on me.
Chris...add some of these to my ever growing list...not sure what I need for size or number. Stock ride height. The was it was set up had the equivalent of four shims on each side.
Eric_Shea
Mar 10 2014, 10:14 PM
Ut oh... 4 per side????
ChrisFoley
Mar 11 2014, 06:38 AM
QUOTE(rgolia @ Mar 10 2014, 01:48 PM)
...not sure what I need for size or number. Stock ride height. The was it was set up had the equivalent of four shims on each side.
Total thickness is more important than number.
The factory made them in 2,3,4 mm thicknesses.
I'm guessing the car isn't at stock ride height anymore, or there would be less shims. The original springs tended to sag over time. Adding shims restores the stock camber without raising the ride height in those circumstances.
rgolia
Mar 12 2014, 01:01 PM
It was lowered when I had the heavy duty shortened springs, but they are gone and now I have 100lb weltmeister springs with the adjustable bilstiens, Here is a side view.
Click to view attachment
rgolia
Apr 7 2014, 09:27 AM
ok, you gotta love this luck. Chris gets everything done for me in time and ships my parts out on Thursday for Friday delivery (great job by Chris). Of course I am not home when they deliver (10am) so they do not leave the box but they leave the door tag. I call them and they will not let me pick it up on Friday, but they promise it will be delivered on Saturday. Saturday comes and I track the package starting at 8am. It left on a truck at 7:56am, so I wait, and wait, and wait....all day. Keep checking tracker, no status change until 6:30 pm, it says that the delivery was tried but no one was home, which was clearly bull, as I was waiting like the kid waiting for the Wells Fargo Wagon on the Music Man (for you old guys). In any event I call fed exp and they say the guy came, I say BS, he did not. They say he went to 2187 and my address is 2167, I say BS. First, they came to my house on Friday and left a door tag, so they have the correct address and second, there is no 2186 on my street. I tell the supervisor lady that she is covering one lie with another. Now I cannot get my parts until Tuesday and they are closed on Monday....I hate fed express. No teener at the swap meet for me.....hope I get my parts period at this point.

ChrisFoley
Apr 7 2014, 11:00 AM
I almost held back and shipped Friday instead.
Guess I should have.
rgolia
Apr 28 2014, 11:34 AM
I started the reassembly this weekend and it is coming along. One question, how does one get the rear stabilizer bar drop link cup on the ball/bolt that holds the shock?
Click to view attachment Once I get the rear done the front is next....but Translog will get to mess with it.....I am too old for this shit. Between the stinkin sink drain line that I had to replace this past week and putting the 914 back together I have no shoulders left.
Click to view attachment
Tom
Apr 28 2014, 11:55 AM
RG,
Yep, that drop link can be a PITA. I ended up using a c-clamp after greasing the cup bushing. A lot of pushing and swearing later, it was done. Some use hot water to soften the cup bushing to make it easier.
That rear suspension is looking nice!!
Tom
rgolia
Apr 28 2014, 04:12 PM
Thanks Tom, I will give it a shot that way.
I better have this thing on the road by the end of next weekend or there is going to be anger management problems here in PA.
okieflyr
Apr 28 2014, 05:44 PM
QUOTE(rgolia @ Apr 28 2014, 06:12 PM)
I better have this thing on the road by the end of next weekend or there is going to be anger management problems here in PA.
When you do let me know, there is another yellow car in the area threatening to be on the road soon as well, and we could put together a yellow car meetup

rgolia
Apr 29 2014, 10:39 AM
QUOTE(okieflyr @ Apr 28 2014, 07:44 PM)
QUOTE(rgolia @ Apr 28 2014, 06:12 PM)
I better have this thing on the road by the end of next weekend or there is going to be anger management problems here in PA.
When you do let me know, there is another yellow car in the area threatening to be on the road soon as well, and we could put together a yellow car meetup
Will do...always looking for a fellow teener to tool around with.
rgolia
May 9 2014, 11:21 AM
Only have break bleeding left to do and the refinished fuchs (by Weidman) have arrived.

They look better than the day dad brought the car home.
Click to view attachment
sfrenck
May 9 2014, 12:01 PM
QUOTE(okieflyr @ Apr 28 2014, 07:44 PM)
QUOTE(rgolia @ Apr 28 2014, 06:12 PM)
I better have this thing on the road by the end of next weekend or there is going to be anger management problems here in PA.
When you do let me know, there is another yellow car in the area threatening to be on the road soon as well, and we could put together a yellow car meetup
Threatening is a strong word...
Down to one rear fender pull and registration - any month now.
okieflyr
May 9 2014, 12:15 PM
Nice!
rgolia
May 12 2014, 10:46 AM
Not sure what I did, but as usual something needs to get busted while you fix other stuff. The starter, which I removed to get the half axle out, does not work. Absolutely no noise when the key is turned. I had the battery disconnected on the positive side, but not the ground side when I removed it.
wndsnd
May 12 2014, 12:32 PM
QUOTE(rgolia @ Mar 5 2014, 06:10 PM)
I like the tangerine racing repair part idea...thanks for that. I also like the toss the 40 yr old cv joints idea.....may just go for new cvs and axles from tangerine. If I do, don't tell the wife...she hates my baby already. Gotta start getting the parts boxes sent to the office so I don't have to listen to bitch session. Almost happy hour hump day time here on the right coast...
Rob,
Go with Tangerines CV Replacements. Chris can have them to you next day when you are ready and they are slick. They are ready to go and you will have brand new peace of mind.
John
This is a "lo-fi" version of our main content. To view the full version with more information, formatting and images, please
click here.