type11969
Nov 3 2014, 08:31 PM
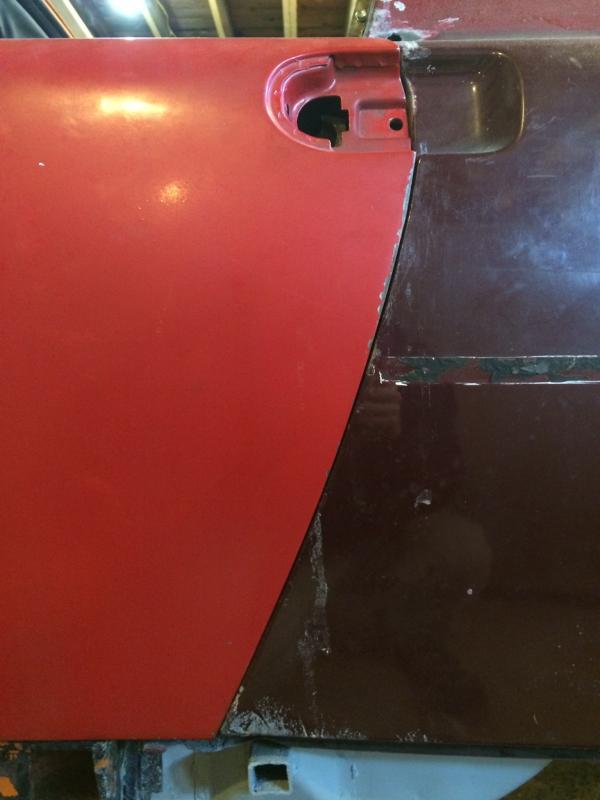
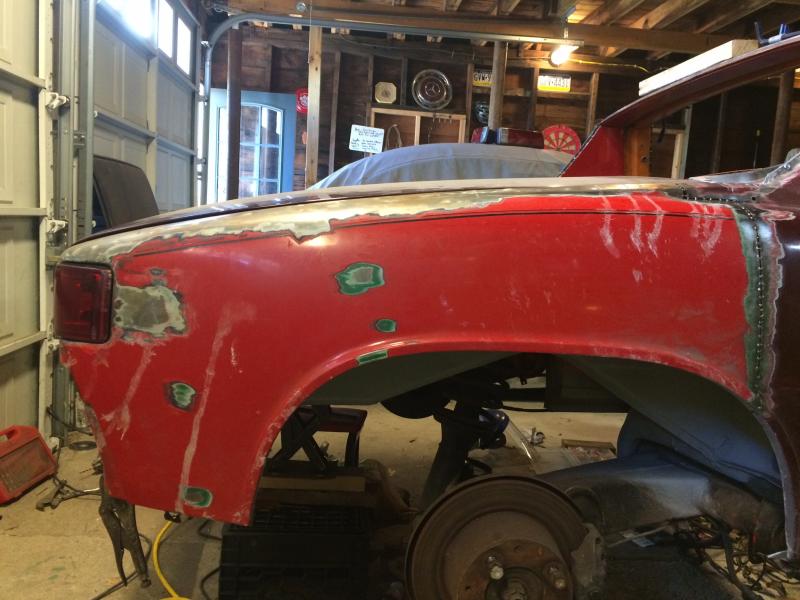
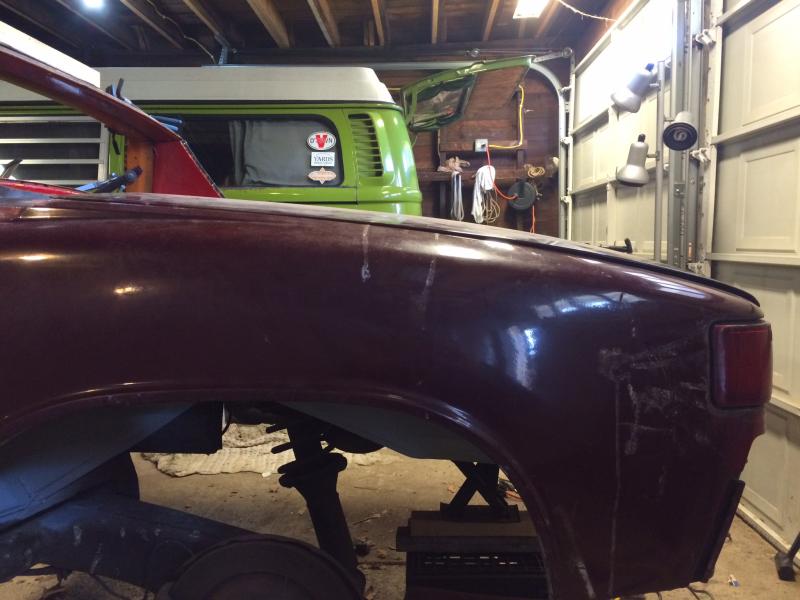
Slowly getting my 914 back together and I'm now in the process of making one good set of fenders out of 3x crappy sets, mounting the fenders, and aligning the fenders with the trunk lid and doors. First question, my driver's side door is really tight to the driver's side fender - but only when I have the fender cinched all the way down to the inner fender in the back.
Shown below is the gap with the fender secured in place (basically binding with the door):
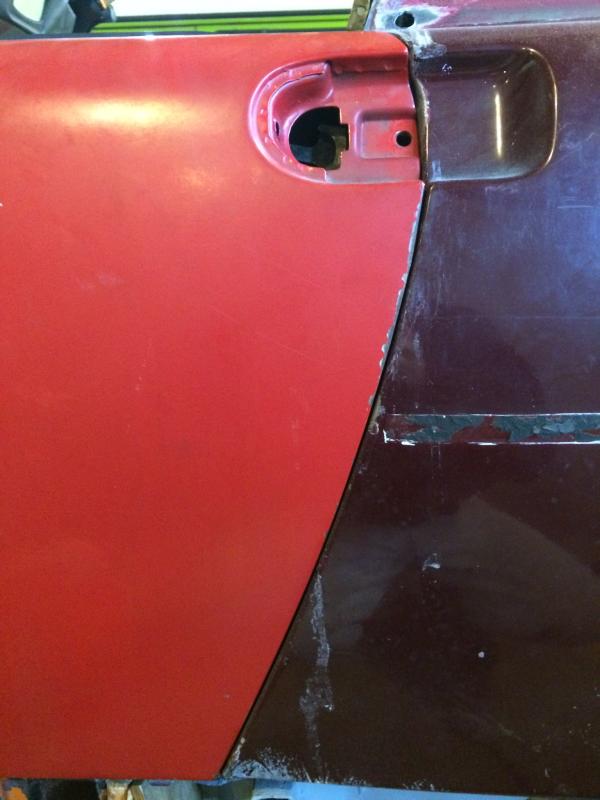
If I leave the fender unsecured in the back:
I get a "workable" gap:
Maybe there isn't a ton of visual difference, but there is a big difference in terms of feel. So, question is, can I somehow shift the driver's door forward? The gap at the front is large, definitely not equally distributed. Shifting the hinges around made no difference - seems like I really need to move the pivot forward but there does not seem to be a way to do that without bending metal.
I can probably force the gap to be wider by shimming the gap when finally welding the fender in, but that seems to just bow out the fender in the middle. Other ideas?
And the second question, trunk alignment. I installed the JWest pivots, aligning my trunk lid to my fenders and equalizing the gap. Everything looked pretty good until I installed the trunk latching pin and tail-lights. The trunk lip hits the pass side tail-light, popping up the pass side of the trunk lid:
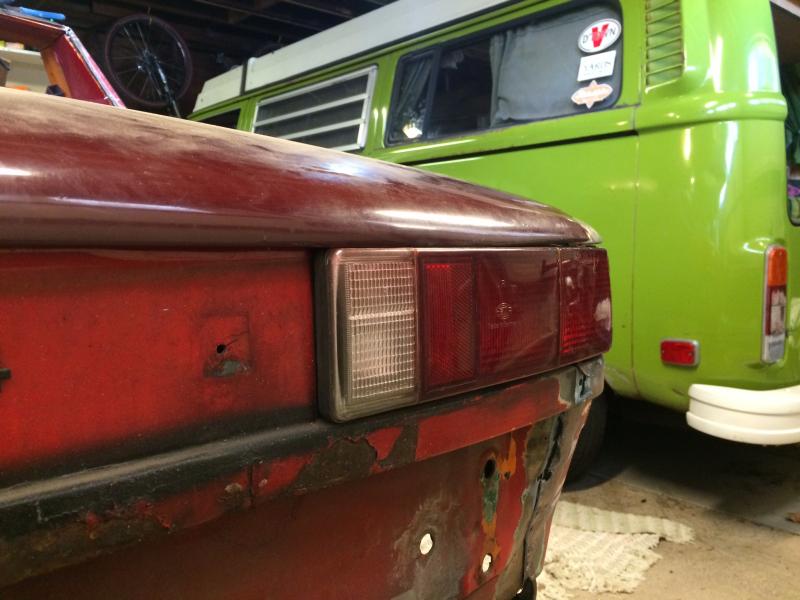
On the driver's side, the latch pin seems to be the cause of it riding up so high, if I remove the pin/assembly, the lid seems to sit fine. Here is the gap with the pin assembly in place:

Note that on both sides, the trunk lid aligns well to the fender by the engine lid and that the rear of the trunk lid aligns well with the end of the fenders. How can I correct this gap? Grind the trunk lip where it is interfering and recess the pin assembly/latch? The latch pin is already as short as it can go. Seems like any changes I make to the trunk pivots will only mess up the alignment to the fenders by the engine lid and/or the trunk lip to fender alignment at the rear. Ideas?
I'm trying to mock up as much as I can now since this car is such a mashup of other cars - and perhaps that is what is doing me in. There does not seem to be much available movement in terms of fender positioning which seems to drive everything else. Oddly enough, the gaps around the pass side door are fine - but that is (of course) where I did all of the rust repair.
Any help will be appreciated.
Thanks,
Chris
r_towle
Nov 3 2014, 08:47 PM
Clamp the fender down in the back and pull on the wheel opening, it will widen that gap enough if it's done right.
type11969
Nov 3 2014, 09:18 PM
Thanks! Pull on the wheel opening at the rear towards the rear? At the front of the wheel opening? Bottom?
-Chris
r_towle
Nov 3 2014, 10:23 PM
Pull center of fender away from centerline of car.
Also, raise the door UP
Just a hair, gap widens.
Go aright up with the door, pull fender, you can see the gap move when you pull.
rick 918-S
Nov 3 2014, 10:24 PM
You have a lot of stuff going on there.
First why are you changing the quarter panel? I suspect a rear hit?
Let's not get the cart before the horse. Let's start with that question.
http://www.914world.com/specs/bodydims.phpq, r, s measurements, check for twist by setting the car up level on the pinch welds and check the ass for level. A twist in the rear body will mess with everything your trying to achieve. Don't eyeball the job us a tape measure and spend a week straightening the chassis and fitting panels. Build the car from the center out.
Rockers parallel, cockpit square. All measurements within 3mm max. Fixture and brace the cockpit and check the ass and nose for twist, sag and lift.
If everything checks out the doors will fit unless the hinge pillars are damaged giving false readings.
r_towle
Nov 3 2014, 10:27 PM
Now Rick shows up to tell you how to do it right....

rick 918-S
Nov 3 2014, 10:39 PM
QUOTE(r_towle @ Nov 3 2014, 10:27 PM)

Now Rick shows up to tell you how to do it right....
Got a real job now so I'm busy.

r_towle
Nov 3 2014, 10:43 PM
QUOTE(rick 918-S @ Nov 3 2014, 11:39 PM)
QUOTE(r_towle @ Nov 3 2014, 10:27 PM)
Now Rick shows up to tell you how to do it right....
Got a real job now so I'm busy.
Figures, I finally have some spare cash.....
type11969
Nov 4 2014, 07:54 PM
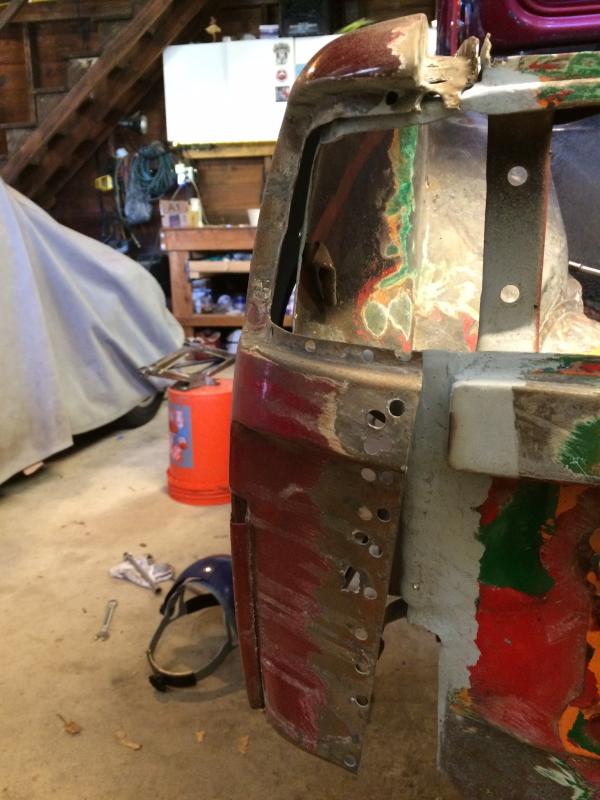
Interesting, I've never considered a rear hit. The po poorly replaced both fenders below the sail using pop rivets and tons of bondo along with part of the inner fender on the drivers side. Oh, they also used plenty of braze to attach the panels, total mess. Figured this was all rust repair. Now looking at the trunk area through this new lens, the inner fender could have been an accident fix. And I now realize that the rear clip (panel with the tail light cutouts) has been replaced at one point, before the brazing fool, based on the "paint rings". The brazing fool did replace the back trunk floor as well using his usual methods. What a mess.
It would seem like the drivers rear corner needs to come up 10mm or so based on the gap issue - also forgot to add that the trunk lid on the drivers side basically hits the bulkhead with no seal right now - again indicating that the rear is too low, at least on the drivers side. Moving the drivers rear corner up also seems like it might help with the drivers door gap issue. Hmm.
I'll take a swing with those measurements and report back - I hate how crappy those pics are and the measurements always seem a bit subjective to me, but I'll give it a shot.
Thanks for the help - does seem like I should consider scrapping this disaster but ehh, it's already in my garage.
Chris
r_towle
Nov 4 2014, 08:01 PM
If you are dedicated to this one, it might help a lot to put two large steel beam under the car, front to back to help you measure and pull the car down in places and up in others using short steel tubing welded to the beams.
type11969
Nov 4 2014, 08:08 PM
Good idea, it can't get much worse than this, right?
Right?
scotty b
Nov 4 2014, 08:11 PM
how's the floor / longs ? Like Rick and Rich said, get the sides braced and true before doing anything. Preferably I beam or 4x4's on jack stands running the length of the car. MEASURE !! Invest in several sets of GOOD vise grips, not the shit HF sells, and start clamping the rears of the quarters in place using the lid and lights to get gaps set. Clamp from the tail end first and that will pull it back as far as it needs to be, work your way forward with clamps and see where the door gaps go then. If the gaps don't turn out good something is off. You can remove a bit of metal from the backside of the hinges if need be, but you really shouldn't have to if all else is correct
type11969
Nov 4 2014, 08:23 PM
Floors are good, pass side was replaced poorly at one point but I cleaned that up. Drivers side floor and long needed a bit of patchwork. Pass long needed a ton of work, I have a thread somewhere on here covering that effort but I didn't want these questions to get buried in the thread, plus it would reveal how long I haven't been working on it!
The fenders are held in place right now with self tapping sheet metal screws to hold the decent alignment with the tail lights, poor alignment with the drivers door, but good alignment with the pass door (nice considering the long repair).
The whole car is up on 2x4s, but I like the idea of 4x4s or I beams running the length as a reference.
Chris
r_towle
Nov 4 2014, 08:36 PM
If you use ibeams, you can put a few posts up front from the front end all the way to the firewall, then measure both sides at the rear and push up one side at the rear, or pull down the other.....to pull down, use a scissor jack, and wood to push down from the ceiling until you weld in the post.
r_towle
Nov 4 2014, 08:38 PM
I would also suggest you measure from the rear trunk , light panel, to the rear firewall at the window.
See if it was put together correctly
type11969
Nov 4 2014, 08:40 PM
Yup, was already considering building something down from the ceiling to be a reference to pull up against. Not sure where to get steel I beams around here . . .
r_towle
Nov 4 2014, 08:45 PM
You are in PA......should not have to look too hard, geez
Scrap steel places...
type11969
Nov 4 2014, 09:25 PM
Sure, but will a scrap steel place have 2x ~10' I beams of the same size that aren't twisted to shit? I've made scrap deposits, never bought, so I really don't know.
r_towle
Nov 4 2014, 09:40 PM
Yes, they do.
Buildings get to down....
Make a few calls.
6 or 8 is all you really need.
sfrenck
Nov 5 2014, 06:18 AM
RE: the trunk lid - sure it isn't tweaked? I've always thought they deform into this shape by the PO closing the trunk with too much in it (resulting in the back corners being "bent" upwards since the only attachment is in the middle where it is pushed down)
type11969
Nov 5 2014, 08:39 PM
So I was thinking about the hit in the rear idea and I was thinking it didn't add up because if my 914 was hit in the rear, I should see a crease or fold or something in the inner fender.
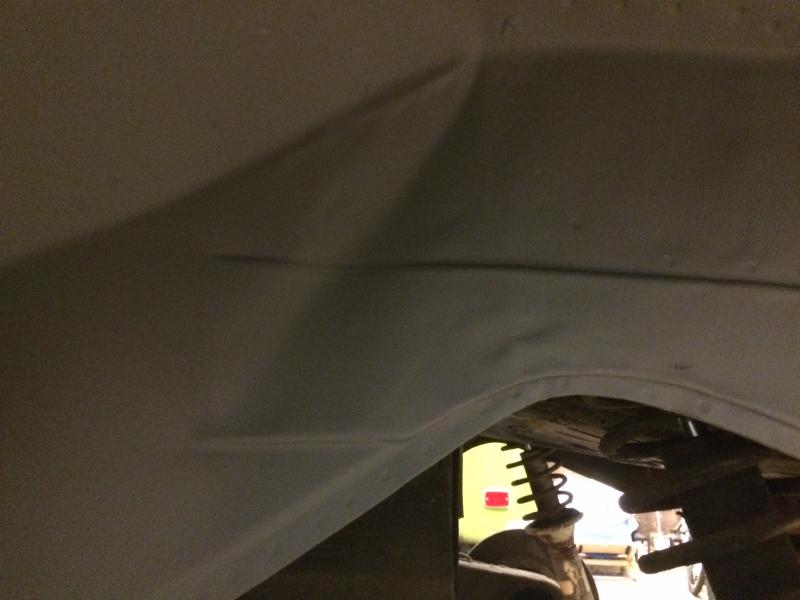
Oh. And I even stripped that panel. Forest from the trees, jeez. I'm trying to think of the best way to oppose the force that caused that dent, open to suggestions.
Chris
scotty b
Nov 5 2014, 09:43 PM
Bad spot for a DIY fix. It really needs to be pulled on a frame bench, or cut out, repositioned and replaced. You could try cutting straight through the bend, tying the back end to a tree and pulling from the front end with another car, but you're walking a VERY fine line of creating new issues if you're not very careful, and exacting, with your tying and pulling points

rick 918-S
Nov 5 2014, 10:11 PM
QUOTE(type11969 @ Nov 5 2014, 08:39 PM)
So I was thinking about the hit in the rear idea and I was thinking it didn't add up because if my 914 was hit in the rear, I should see a crease or fold or something in the inner fender.
Oh. And I even stripped that panel. Forest from the trees, jeez. I'm trying to think of the best way to oppose the force that caused that dent, open to suggestions.
Chris
I freakin knew it!
That is not really a DYI project. That area of the chassis does not respond well to pulling. The effect of over pulling to compensate for spring back can cause serious issues with the center chassis.
sixnotfour
Nov 5 2014, 10:30 PM
That was a big hit usually they deform behind the shock towers...
It was hit hard enough to hinge the whole rear clip..
r_towle
Nov 5 2014, 10:32 PM
Look at the bright side.
It's not rusty.

type11969
Nov 6 2014, 06:57 AM
Well crap. We can all probably agree that this car is not worth the cost of a frame bench repair. Considering that my time is "free", I'll give it a shot, trying to limit the applied force and opposing force to within the rear clip area.
The car did track straight when I drove it waaay back when - for whatever that is worth.
Oh, and for full disclosure, there is accident damage on the front drivers quarter in to the truck area - I did know about this. Looks like the car was pinched between something it hit up front, and something that hit it from the rear. Lovely.
Hmm, I don't really want to give up on this car considering all of the time I've already put in to it.
charliew
Nov 6 2014, 11:05 AM
I promise you, you will be much happier with yourself if you can find a better body to use your parts on. I have done some unitized body repairs and without a frame machine it will never be as good as one that hasn't been bent. The rewelding also will cause redos in later life when the little rust bubbles keep coming back from the welding. Lately I have had at least two bodies come available from associates that I didn't look at but might have been great candidates for a parts tub. You really don't know as you have found out till a real close look and a lot of examination is done. when I bought my 75 I thought I had a rust free car but I now know that is a impossibility for any 914 that has not been well kept out of the weather.
This is a "lo-fi" version of our main content. To view the full version with more information, formatting and images, please
click here.


