Help - Search - Members - Calendar
Full Version: BUILD-OFF CHALLENGE: New 914 owner...what have I gone and done!
914World.com > The 914 Forums > 914World Garage
Pages: 1, 2, 3
Darren C
Hi everyone,

I have been looking for a 914 on and off for a couple of years now and late one evening I bid on ebay for a car in Desert Hot Springs CA. A real leap of faith for me as I live in Chichester UK!
My first car was a VW Beetle and I’ve owned quite a few air cooled VWs and always wanted a 914, so now almost 25 years later I finally took the plunge and with sweat on my brow placed a last minute bid on ebay on a car I’d only seen in 4 small photo’s on line.
To my surprise I won the 914.
Problem was it lay 8000 miles away from me here in UK. I got hold of the sellers phone number and gave them a call. The car is a 1974 2.0L one owner from new sold in Palm Springs 914. The seller was the owners daughter. The gentleman passed away several years ago and she’d had it parked up on her driveway for 5 or 6 years. From the description in the listing it had a Salvage title due to sand storm damage on the paintwork. It looked reasonably solid in the few pictures I saw, but very sorry for itself with flat tires and bad paint. It was a gamble, but sometimes these things pay off.
I got the car picked up by a shipping agent and taken to Long Beach for shipping.

IPB Image

2 months later it arrived in Southampton UK

IPB Image

IPB Image

Last week I went down to Southampton and collected my new project just in time for Christmas.
I was recommended this site from another 914 owner and it's a great relief to find such a large active community. 914's were never sold in the UK, so all are personal imports and a rare thing to see on our roads.
I’m pleased to now join you guy’s and post my restoration progress in getting this little car back on the road.

Regards
Darren
pilothyer
welcome.png Congratulations
JStroud
welcome.png

Looks like a good start to a nice car. Glad it all worked out, have fun getting it going.
JeffBowlsby
Looks like you scored a good one Darren, welcome to 914s. The funs begins!

Post more photos of the car when you get it cleaned up.
green914
Let the fun begin! welcome.png
shoguneagle
Congratulations. Looks like a good project and there are some members from UK here on the site. NOW, for the sickness - you will catch the 914 fever and there is not any cure for it. Congratulations.

Steve Hurt
JawjaPorsche
Welcome to the Madness, Darren!

You have came to the right place!

I have received numerous help for needed repairs from members on 914World!

Terry
EdwardBlume


welcome.png :

Looks like a winner!
Cuda911
Great! And, Desert Hot Springs is a perfect place to score a 914 from. Lots of affluent retirees, very low humidity, very sparse rain.

Congrats!
Gustl
welcome.png ... from far, far away biggrin.gif
76-914
welcome.png You shouldn't be too long with it. It likely has very little rust and should be an easy turn around. Cheers beerchug.gif Kent
porbmw
Looks like a nice car!

They are rare to see on the road here in North America....so I can't imagine the odds of seeing one on the road in England....I was in London this summer for a couple of weeks, didn't see ANY vintage/classic cars of the road.

You will have fun with the car....be patient with the resto process, but not too patient, or your car will be sitting on stands or a hoist.

Don't know if you have driven one yet....you will have fun with it, but become accustomed to it. There are a fun car to drive, but very primitive in comparison to today/s products.

And welcome.png
Darren C
Thanks for the kind words of encouragement. I got a look over the car last weekend and hope to work on it tomorrow. From what I have seen it’s a very solid little car. Having not run for 6 years or so the car was laid up with the presence of mind to overfill the motor with fresh oil, so once drained and set to the correct level the internals should be free from rust. That said I haven’t found anything much at all on the car. The sound proofing pad had fallen off the bulkhead onto the engine so I carefully lifted it out and had a good look in what you guy’s call the “Hell Holes” in both bottom forward corners of the engine bay. They were full of desert sand (almost 2" deep) so I gave them a good vacuum out and the rest of the bay. The good news is ZERO rust in these area’s, only a tiny amount on the corner of the battery tray about the size of a UK penny or a US dime. The metal is really solid so after a good clean I plan to repaint it before the sound proofing pad gets put back in. The paint seems really thin and white primer is showing through on the raised surfaces, bends and edges, plus it looks like they never lacquer clear coated the engine bay when built as its very matt finish. Maybe someone with more knowledge than me can confirm this?

Having a look around the motor it looks like the previous owner removed the thermostat, cable, flaps and linkages from the fan housing (possibly an attempt to give more cooling in Palm Springs?)
In UK it’s much colder so I plan to strip out the Fuel injection, remove the tin ware and re fit the flap assembly back to stock. I started to take off some rubber breather and fuel hoses and they are very brittle and snap clean in two if you try and bend them so these will all need replacing. I suppose that’s the price you pay in return for no rust in a Desert car!
The shopping list gets bigger each day, but I was prepared for it and the car was real cheap in the scheme of things.
Apart from the paint which I knew from the start needed a full respray, the rubber trims running along the top of both front and rear bumpers are completely shot, as are all the window and roof seals. What’s puzzling is the seats, console, and dash are all in real good shape compared to some I looked at on ebay that all seemed to have splits and tears? They just need a good clean. I think I’m gonna have a fair few more vacuum cleaner bags full of Desert sand to come!
No; I've never driven a 914, plenty of air cooled VW's but nothing mid engined. I expect its going to be a well balanced little go-kart.
SixerJ
QUOTE(Gustl @ Dec 26 2014, 05:08 PM) *

welcome.png ... from far, far away biggrin.gif


welcome.png .....from not quite so far away

As you said, your now part of an exclusive UK club w00t.gif

bandjoey
Congratulation on a great looking car. Most everything you need can be found here from members and vendors. Enjoy your new Teener.
Bleyseng
Nice car and change out all of the fuel lines including the ones at the injectors.
oldschool
welcome.png You'll have have a ton of fun with her.
Mblizzard
You will be happier in the long run if you keep the FI.
messix
most of what you will need you can order from here http://914rubber.com/
JRust
welcome.png & congrats on the new ride! Look forward to hearing about your progress getting it road worthy again. aktion035.gif welcome to the madness
Beeliner
welcome.png

If I had a choice, I'd take replacing all the rubber around and in the car over rust.

When you do the painting, protect everything against the moisture you have in the UK. I bought several of these new cars in the seventies and drove them in the NYC area. Rust comes fast and is the enemy. Defense is the best way to handle it. All kinds of advice on this site as to how to do it right.

The advice about the fuel lines, etc. has to do with fire. Fire degrades a car much faster than rust. Buy an extinguisher. Don't put it in the trunk, you may not be able to get it when/if you need it!!

All kinds of parts are available in and around this site.... Buy from the US east coast and ship by air... figure four days...

Most of all, stay off of the jack stands as much as possible. If you can drive the car for a couple of months before laying it up, do so. You will be so impatient to get back behind the wheel you will keep working on it steadily...

Also, post pictures as you go along!! There is a thread for that...

Tom_T
welcome.png

Don't let the salvage title worry you, since the US insurance companies will total a car at as low as 25% of actual value & don't know how to value classic cars - or refuse to do so purposely. It just means that they felt the sandstorm damage was more than they wanted to pay full ticket for & tried to get the car from the owner on the cheap.

If it's a solid low/no rust mostly/all original 74 914-2L car, then the repaint (full or partial - depending on overall condition & whether the paint was original or a respray by the PO/OO) & addressing any issues may get it's values to the mid-to-upper levels of values shown at Hagerty (high-teens to mid-20's $'s or better & appreciating again).

http://www.hagerty.com/valuationtools/hvt/vehiclesearch

Cheers! beerchug.gif
Tom
///////
OllieG
beerchug.gif Nice one Darren! Well done for taking the 914 plunge - especially without looking at the car in person. I've just done a similar thing myself, shipped to Southampton - collected last week, and it's worked out well for me too.

You've been over to DDK haven't you? We need more 914s in the UK!

Looking forward to seeing the progress..
Ian Stott
You are gonna have a blast with this car! Great advice on this site, I think you will be taking your first test drive soon, and get used to people coming over to talk to you when fuelling or anything else! If you don't have the fog lights, I highly recommend you get the pilot lights from camp 914, there is a kit, you will appreciate the extra lighting and it makes you more visible as well, it is something I did and really feel better about being seen. Welcome to a great club.

Ian Stott
Moncton
Canada
dw914six
QUOTE(Mblizzard @ Dec 26 2014, 11:17 AM) *

You will be happier in the long run if you keep the FI.

Words of wisdom....FI is the best setup for the 914.
welcome.png
Hine62
welcome.png
saigon71
welcome.png from across the pond!

Great group of helpful folks here and a wealth of knowledge.

Nice car...you will love it!

One word of advice, take the time to sort out and keep the factory fuel injection - it really is a good system, especially in your climate. This web site is a great tool:

http://members.rennlist.com/pbanders/DJetParts.htm

Keep us posted on your progress.

Darren C
Thanks for the advice guy's.

So much talk of keeping the FI system? Are carbs that bad? I'm a hardened VW aircooled man and I've had may cars with twin carbs (mostly type 1 & 3's but I did convert a type 4 years ago) granted they take a lot of setting up and maintenance, but run just fine when you know what you're doing.
Don't panic, I'm not jumping in just yet with carbs, but I have to say the FI does look in a real sorry state.

Today I spent another 12 hours in the engine bay. Finally got the top tinware off. The cooling flaps are completely missing as suspected.

I got the rear tin over the gearbox off and the two side tins over the cylinders off, but can't see how to get the front tin off. The motor is in the car still as I have no easy way of getting it out of the car where its currently stored.
Can the front tinware come off while the motor is in the car? I'd like to get them cleaned up and re-painted while I sort out the cooling flaps.

I also drilled out the spot welds on the battery tray this afternoon and took it out. It has a small hole in the corner so I plan on replacing it. The metal below was fine and I got yet another bucket of sand out of it when the tray was out!

When I was under the car for the first time; I took a good look around. There's plenty of dirt underneath but with a rub of the hand, blue factory paint is revealed. It's going to need a very good clean, possibly getting it on an outside ramp with a steam cleaner, but I need to get it running first.
Unfortunately I found another previous owner patch up job, on the starter motor. There's a second solenoid (non standard) screwed up under the trunk floor. Looks like the original failed and this was a cheap fix compared to replacing it properly.
Hey-ho, that parts wanted list gets a little longer.

Getting the tinware out was interesting. There are so many cables and stuff passing through it that caused me trouble. Particularly the reverse/back up light switch. It looks like the loom is fitted permanently into the switch with no plug, just a rubber boot? This cant be right can it?

Over to you guys.......
messix
the F/I is a very good system for it's era and still provides very good economy and power in stock form.

there are some guys on here that can help you trouble shoot the system and there are sources for replacement parts for it too.

is the car a 2.0l or a 1.8l?

the 1.8 L-jet will be easier to get parts for and maintain.

this is for the 912E but is pretty much identical to the 914 l-jet http://www.bowlsby.net/914/Classic/zTN_Man08.pdf
SirAndy
QUOTE(Darren C @ Dec 27 2014, 11:49 AM) *
Particularly the reverse/back up light switch. It looks like the loom is fitted permanently into the switch with no plug, just a rubber boot? This cant be right can it?

The two wires have bullet connectors and should come out of the switch with a bit of persuasion.

Did you drop the engine? It's easy and quick and makes working on the engine and inside the engine bay much easier.
Here's a link to McMark's excellent tech article:
http://www.914world.com/specs/tech_engdrop1.php

As far as FI goes, for a stock engine (and even a slightly modified engine) the stock FI (if in good working order) is by far the best choice in terms of power and fuel mileage.

Also, regarding the cooling flaps, completely removing them was a bad idea by the PO because without them you get very limited air flow over the engine oil cooler.
You really want those back in there ...

bye1.gif

PS: welcome.png
Darren C
Thanks Andy, I'll take a closer look at the two wires and switch tomorrow.

No, the motor is still in the car. I'm keeping it in a friends yard (currently outside) and he needs access so I cant pull it easily. I have my name down on a waiting list for a council garage. They promised me one 3 months ago. many are sitting empty but they need to change the locks before they can rent it out. Trouble is they are so incredibly slow at getting things fixed its beyond a joke. I offered to do it for them but they said I dont have insurance to work on their properties so I have to sit tight and wait.
Darren C
The car is a 2.0l Messix

One other job I've noticed is the rubber seal at the base of the rear window that runs along the top of the bulkhead is rock hard and cracked every 2" or 3" and shrunk.
Does the glass have to come out to replace it?
SirAndy
QUOTE(Darren C @ Dec 27 2014, 01:45 PM) *
One other job I've noticed is the rubber seal at the base of the rear window that runs along the top of the bulkhead is rock hard and cracked every 2" or 3" and shrunk.
Does the glass have to come out to replace it?

No, but you probably should take the glass out anyways and re-seal it. They tend to leak and cause rust in the floorpans under the rear of the seats.
And don't be fooled by the nice "rust free" floorpans you see under the carpet when you move the seats forward.
That's the painted tar they glued onto the floors.

The rust is hiding underneath the tar. And yes, they all have rust there ...
popcorn[1].gif
Darren C
QUOTE(SirAndy @ Dec 27 2014, 09:56 PM) *

No, but you probably should take the glass out anyways and re-seal it.


Thanks Andy,

I kinda get the feeling you're smiling at me learning minute by minute on these 914 problems. ;-)

How's the rear window itself and the lower seal held in?
Dave_Darling
Lower seal: Pressed into the channel along the bottom of the window on the engine bay side of the firewall.

Rear window: Held in by butyl tape.

--DD
KELTY360
QUOTE(Darren C @ Dec 27 2014, 11:49 AM) *

Unfortunately I found another previous owner patch up job, on the starter motor. There's a second solenoid (non standard) screwed up under the trunk floor. Looks like the original failed and this was a cheap fix compared to replacing it properly.
Hey-ho, that parts wanted list gets a little longer.


This may be an additional relay placed in-line to the ignition to prevent intermittent non-start situations. If you search hot-start-relay or ford-solenoid you'll find more info than you want to read.

Great looking project btw.

welcome.png
Darren C
Thanks Dave & Marc I'll check out the "Hot Start" modification. On first look I thought I might need a new starter solenoid, it's possible when I get hold of a battery it may work ok for now then. I will probably take the second solenoid off anyway as its very crudely fitted and the cabling looks poor.

Today I spent another 10 hours in the engine bay. Welded in a new battery tray and cleaned up some surface rust in the "hell holes" fortunately there are no holes, just some minor pitting in the steel. My fingers are raw from sanding down!
I then gave it all a good rust encapsulator paint coat.
The original battery tray had a small metal tab on the corner to hold the cabling, but my new pressed replacement didn't, so I made a new tab and spot welded it on to the side of the new tray for that perfect stock look.
VG-914
QUOTE(Darren C @ Dec 26 2014, 08:15 AM) *

Hi everyone,

I have been looking for a 914 on and off for a couple of years now and late one evening I bid on ebay for a car in Desert Hot Springs CA. A real leap of faith for me as I live in Chichester UK!
My first car was a VW Beetle and I’ve owned quite a few air cooled VWs and always wanted a 914, so now almost 25 years later I finally took the plunge and with sweat on my brow placed a last minute bid on ebay on a car I’d only seen in 4 small photo’s on line.
To my surprise I won the 914.
Problem was it lay 8000 miles away from me here in UK. I got hold of the sellers phone number and gave them a call. The car is a 1974 2.0L one owner from new sold in Palm Springs 914. The seller was the owners daughter. The gentleman passed away several years ago and she’d had it parked up on her driveway for 5 or 6 years. From the description in the listing it had a Salvage title due to sand storm damage on the paintwork. It looked reasonably solid in the few pictures I saw, but very sorry for itself with flat tires and bad paint. It was a gamble, but sometimes these things pay off.
I got the car picked up by a shipping agent and taken to Long Beach for shipping.

2 months later it arrived in Southampton UK

Last week I went down to Southampton and collected my new project just in time for Christmas.

Regards
Darren


It looks great. Not sure what you paid, but the Fuchs wheels alone can get you close to $4G's these days...

I think I remember seeing the car around on a few drives out that way... More than 5 years ago. It was running well then...
boxsterfan
QUOTE(VG-914 @ Dec 28 2014, 03:24 PM) *


It looks great. Not sure what you paid, but the Fuchs wheels alone can get you close to $4G's these days...

I think I remember seeing the car around on a few drives out that way... More than 5 years ago. It was running well then...


$4K for Fuchs? I've got a full set of 5 Fuch's. I think I am going to part out my car.
Darren C
START OF BUILD-OFF CHALLENGE

I decided last month to enter the Build off Challenge. I’ve had a rollercoaster of a year with my little 914, my health and thought I’d share the story with you.

IPB Image

My names Darren Collins and I live in Chichester UK.
I spent 18 years in the Armed Forces as an engineer and lived and worked in the US for a good proportion of my time on various Services exchange programs. I worked with the US Coastguard out of Port Everglades & Patrick USAF base with the search and recovery operation of the Challenger Shuttle wreckage, had a tour at Gitmo and served in the first Gulf War, “Operation Desert Storm” helping provide air cover for the USS Eisenhower in the Persian Gulf.
Unfortunately I was invalided out of the services due to injuries sustained in the conflict.
Throughout my life I have always been interested in cars, and in particular VW’s. It was natural progression to move over to Porsche and after going through the range fixing them up, I decided the time was right to go back to grass roots and buy my first little 914.
Like most participants in the Build off, I have started before October, but I have genuinely tried to complete the restoration within 12 months. I’ve been working on the car pretty much everyday apart from a period in Hospital, which turned my life upside down last month.
Like most UK tv shown in the US and visa-versa I thought it would be cool to post in real time (but slightly back dated) by month number. In this way it should play out over the Build off in time with everyone else.
The only exception is the photo of me above which was taken today and jumps ahead with the condition of the car as I have it up to now.
So if you guy’s are ready, I suggest you buckle up and get ready for the ride!

Month 1

The car arrived in UK looking very sorry for itself.

IPB Image

IPB Image

IPB Image

My first task was to try and turn it over. Having not run for 6 years the seller had over filled right to the top, yep until level with the filler spout, with about 15 litres of oil to put the car into hibernation!!!!
This stopped all the seals and internals drying out but it had got everywhere, I took the plugs out and yes, oil came out the plug holes.
I then noticed all the crusty bone dry hoses and wires. A bit like the Skittles advert where everything the guy touches turns to Skittles; that was the state of all the rubber hoses. One touch and you had a 1000 little fragments. Totally sun baked.
There was nothing for it but to strip it all down.
My next nemesis was SAND….buckets and BUCKETS of the damn stuff. The relay board cover was cracked and when I lifted it off, a perfect sand castle the shape of the cover buried the relays entirely! I got 3 x Hoovers FULL of Desert sand just out the engine bay alone. The “hell holes” in the forward corners were 6 inches deep in sand alone. Surfice to say it took all of a Saturday and a Sunday just cleaning it out of the engine bay.
I could then see that the cooling flap link bar from 1&2 to 3&4 cooling flaps was missing???? Obviously removed in some foolish attempt to get more cooling when the Thermostat had failed.
Hey ho, that meant the engine had to come out.
This gave me a chance to drop all the tinware off for bead blasting and powder coating. Whilst I tracked down a new Flap assembly and thermostat. This was found at Mega Bug (a UK breakers), who sold me all the parts, flaps, rods, spring, pulley wheel & shouldered bolt, plus brand new thermostat, wire and bracket.
While working in that area I dropped all the oil, fitted a new filter, and dropped and cleaned the strainer and plate. Next a new fan belt went on. The old one simply snapped in two when I pressed on it so was very easy to get off. Especially with the tinware out of the way. Again when under the car I found some interesting wiring and a second starter solenoid self tapping screwed up under the boot floor. Twisted nasty extra wires just had to go. A new starter sourced from VW heritage and the wiring left to tidy up should hopefully make it reliable.
Poking around underneath my list gets bigger of stupid stuff required. Handrake cable boots, rubber boot on starter main feed etc etc.

Next the Battery tray. The only real rust I found and to be fair was told about buy the seller was the battery tray. The two funnel rain water ducts from the boot lid had long lost there tubes having gone brittle as you like, and the battery side one was missing completely so any rain in the desert, plus battery leakage had eaten the corner out of the battery tray. I roughly sanded the tray to reveal the spot welds and drilled them out.
Old battery tray
IPB Image

Tinware

IPB Image

A new tray was found on ebay.de for about £40, and duly arrived in the post. During the 3 days it took to arrive I got another hoover full of sand out from under the tray and started to clean up everything ready for welding back in.
A very small job that quickly turned into a MONSTER TASK.

The original soundproofing pad had fallen off the bulkhead onto the engine where it had draped in the intense desert heat until it was transformed into a rock solid shape the profile of the engine (never to be fitted again). This was stripped out and some new material obtained. Cut to shape with a combination of Stanley knife, tin snips, my best scissors and a gasket punch set; I made a new one. 10mm thick I sealed the fibrous back and edges with black engine paint, followed by Tiger PU bond (squeezed into an old margarine tub & applied with a filler spreader) to replicate the tar type finish on the edges of the original. This took a few evenings to make, was very messy, but well worth it I think.
Next I stripped out the wiring loom so it was hung vertical over the rear window onto the roof and cleaned ALL wires with cellulose thinners to remove years of grime.
Followed by taking off all the cable clip protective vinyl sleeves and cleaning them too, followed by all grommets and clips.
I stripped the engine bay bare while the motor was out, and then set about sanding it all down. The paint was very thin and white primmer showed through from old scratches and battle scars. The Hell holes had surface rust as did the battery tray frame support, so all had to be cleaned off with rotary wire brush, sand paper and scotchbrite.
4 days work solid, back breaking. I took the boot lid off too, and spent two days sitting in the boot leaning over sanding and cleaning up until my fingers bled.
Once clean to bare metal I spot welded in the new battery tray and painted everything with rust encapsulating primer. Next I got some Alaska Blue base coat mixed up and sprayed the entire bay. Two coats over two days followed by a light clear (fuel resistant) lacquer.
Only then could I start the nice grand assembly, starting with lifting the motor back in.

IPB Image

IPB Image

High heat resistant adhesive and new retaining plugs (still available from Porsche) hold the soundproofing on, along with freshly painted tabs (rock hard rear window seal removed to aid painting properly). New grommets from Porsche & VW Heritage. Freshly powder coated tinware with stainless slotted screws.

IPB Image

Engine lid lock was removed, soaked to removed sand jamming it up, cleaned and replaced with a new grommet where the wire pokes through the tube. Boot light, stripped, cleaned and replaced as are the two bowl cups each side. New engine seal around the tinware (the old one was torn and perished badly on the drivers side)
The list goes on & on.

But this is not even the first month of the cars new ownership and I’m only just beginning the long journey ahead to right the wrongs and I hope to share it with you in this thread.

The following weekend I managed to get a few more jobs done.
I repaired the cabling to the starter and got a new rubber boot from Porsche Centre Portsmouth to go over the main starter feed.
Next I replaced the feed cable to the fuel pump as it had been cut out and badly joined by the PO. All the spade connections I cleaned up on the engine loom (top tip, I use a spray can lid with “Wonder Wheels” alloy wheel cleaner in it. Dip in any spades or bare wire and after 5 mins it’s as clean as new) Ready to take solder, new crimps or just connect up!
The last bit of tinware was fitted (rear hoop) what a fiddly job trying to line up the lower tinware threaded holes. Tries the patience of a saint…
Next I fitted a new fuel pump and new hoses up to the engine bay with some nice proper fuel hose clamps (found some stainless ones on ebay) not jubilees. All with new genuine Porsche grommets into the engine bay and new rubber feet on the pump.
I cleaned up the area under the car before fitting the pump & a new filter, then gave it a nice clear waxoil so you can just see the Alaska Blue beneath.
Took the dizzy out (had a good clean up under it) and fitted new points, condenser rotor and cap.
After the one step forward I had two back…my nice new leads from VW Heritage for a type 4 were too SHORT… what a pain. I’ll have to get them changed over next week.
Also had a new original ATE brake master cylinder turn up. It’s hanging on a wire over my radiator in the kitchen, after a nice coat of paint. Hopefully this’ll keep it looking good in comparison to bare cast iron when its fitted.
My relay box in the engine bay had a smashed up cover.(or should I say "what was left of it") I managed to get a brand new replica one (quality a bit suspect) and the knurled retaining nut plus the two horse shoe cable retaining clips from Auto Atlanta, but I'm missing the post that screws into the relay board, passes through the cover and the knurled nut attaches to.
I turned one down from some stainless bar on my lathe, since I cant find one for sale anywhere I kinda invented what I thought it looked like. I made two soft rubber washers to go under and over the cover where the knurled nut fits to hopefully stop the new cover cracking.
Next I managed to google a good Beru part number x-ref for the ignition leads and called in at my local Motor Factors during my lunch break and ordered a set. 2 hours later a phone call to say they were in so picked them up after work.
I also had a nice stainless coil clamp arrive in the post along with a “battery mat” from Frosts. (£9.14 made me smile at the apt price) Ready to slip under my new 063 Battery to protect that new tray. Cut it to size and added 4 slots about 2” long on each side towards the centre. The battery tray has a lower pressed section in the middle with a drain hole, should the mat not have slots any level of rain water couldn’t get to that drain hole, so sit ¼” deep in the tray.
The blower fan in the engine bay, like most of the car, was full of sand when I took it off. After emptying it out, it made a god awful grinding noise and was hard to turn. I stripped it down tonight and found that after taking the 3 nuts off that hold the motor and fan into the housing, it was obvious the impellor was rubbing the motor base. When I pulled on the impellor it came away about 3mm, so it looked like an end float issue. Once the impellor was off, I could see that there was a small wire circlip that limits the taper fan fit to the shaft and a worn thrust washer that the circlip runs against, plus yes more sand!
The only solution I could think of was to make a new thrust washer about 2mm thick to “shim” the impellor away from the motor mount. This I did on my lathe to the exact sizes (very fiddly making a washer 2mm thick with a 1.5mm difference between id and od) Anyhow, I cleaned out the motor casing (washed it through with electrical cleaner to remove yet more sand) and re assembled it with a smear of grease in the bearings. Hey presto spins silently. Next I cleaned up the terminals and bench tested it on my new battery. It surprised me as its more powerful than you’d think; but it ran well.
I treated the motor to a buff polish with a brass wire wheel, and T cut the dull black fan casing. The whole blower motor came up like new and still retains the white printed 914 part number!
I took off what was left of the paper/ali air hose a few weeks back when I removed the fan for the engine bay paint. It was a hard task trying to find a new bit of hose, but last week half a metre came in the post that was a perfect fit. I’m still not 100% happy as I couldn’t find it with a paper outer finish, only ali/paper/ali sandwich rather than visa versa. (its an odd size id to find also) Anyhow it’s a bit shiny ali-bling bling looking but will be functional at last. I finished off tonight cleaning up the original hose clips and under the gunk, found they are engraved with VW badges that made me smile. They’ll certainly be going back on in all their new found clean glory.
Heres a picture of turning down some stainless bar on my lathe to make the missing relay board cover post. Not having one to copy, I just used Imagineering, and made a support collar (threaded and locked onto the shaft) at the height of the cover. From an old car inner tube I used my punch set to make a rubber cushion (water seal) washer to go on the collar (shown on top of the regulator)

IPB Image

As I said earlier in this thread, the new Auto Atlanta relay board cover quality is not good. The originals weren’t that clever anyway. However the problem I have with the new one is that in places its wafer thin. If you hold it up to the light you can see clean through the crucifix crossed top part. If you pressed more than very lightly in this area you’d push a hole in it. It’s almost as if someone poured the resin into a mould, swished it around a little and let it set. All the resin flowed into the low parts and the raised parts got barely coated more than the thickness of a coat of paint!
Anyway, to resolve this I have spread a layer of Tiger PU bond on the inside to strengthen it all up. Hopefully this will do the trick.
Outwardly though it does look far better than the old broken one that came with the car.

IPB Image

While I was waiting for the PU bond to cure I fitted my new water drain hose to the new funnels I got from Porsche Centre. The hose I found is quite a good visual match to the no longer available original and has a spiral re-enforcement and yet is smooth on the inside so wont hold water.
The clips I got are a perfect match, if a little tough to fit. ( I used mole grips to pinch and lock them open, screwed the tube into them then pushed in the funnel ends before letting go) Also I have the clip ends facing outwards, since there is little room in the engine bay I didn’t want them to scratch or cut the back of my hands when working in there.
My second set of HT leads (the 1st were too short) were a perfect length but the rubber grommets on the plug end were moulded on to the leads in a set position. This gave me a right old struggle. In the end I had to turn them inside out and very, very carefully (with a scalpel type craft knife) cut the grommet free from the lead without damaging the plug sheath. 2 hours later I had the leads finally fitted to the car with the grommets seated correctly in the tinware. It’s important to take time to get a good seal as it allows better cooling over the barrels without leakage around the plugs.
The three clips for the leads neatly were clipped in. I had one original and two missing so these were sourced from VW heritage.
I then fitted the new coil and connected the wiring loom to it and the head temp sensor and Oil switch. Not happy that the loom just laid across the engine I fitted some nice stainless steel rubber lined P clips to various original bolt & tinware screws along the route. I’d had the distributor (undid the nut to block NOT the clamp so that I could lift it out and put it back without messing up the timing) to replace the points and condenser. Its much easier to work on and get at the condenser plug clamp screw where it goes through the dizzy body.
One point of note is that the new set of Bosch points was difficult to fit. The vertical pin that the points hinge on extends down by about 1mm and locates in the vacuum advance plate. I tried twice to fit them before I realised (only because I had the dizzy out and it was easy to see) that the base of the new points was about 2mm wider than the old one. The vacuum advance diaphragm has two screws holding it onto the dizzy. The tip of the righthand screw extended about 1.5mm into the dizzy when tight. Because the replacement points were marginally wider on its base than the old set, the vertical hinge pin of the points wouldn’t locate properly in the hole. They were being pushed into the centre by the screw end. This if I hadn’t of noticed would have also stopped the vacuum advance working! The solution was to remove the diaphragm screw and put a second washer on it (or file it down so it was shorter) I opted for the latter. With this done I could locate the new points correctly and set them up before refitting the distributor.
I also fitted back
The Blower Fan and hose.
New Oil Breather pipes (with stainless hose clips)
The New Battery
And the relay board.
I cleaned up every pin/connection and the fuse holder on the board and used a loose Stanley blade to gently push down in the cross slots in each and every pin on the relay board connections just to carefully “open” up the pin diameter to make it a tight fit in the wiring loom plugs.
I then found out why my old relay board cover was all smashed at the front end….you cant get the bloomin thing on and off very easily. It hits the bulkhead before you can get it over the regulator….great design eh!
For fear of breaking the new cover I had to take off the regulator (two screws) fit the cover then put the regulator back on afterwards.
Having finished working in the engine bay now, I decided to take the fuel tank out. Several people had recommended replacing the fuel hoses on the bottom of it. Boy were they right.
I took the cover plate off under the car and reaching through the hole underneath “snap” the hose broke clean in two. Baked rock hard. No need to struggle with the pipe clamps I could simply lift the tank out, no pipes attached!
Once out I took this picture…Both hoses snapped into about 4 pieces each, these weren’t cut.
IPB Image
I then noticed that the “T” shaped drain tubes from the vent box were shattered and lying in pieces beneath the tank, all brittle again. Good job I found both these issues as come the first time out in the rain, the water would have just filled up the boot.
Adding this to my list of things to do, I began to vacuum up even more sand from inside the boot that had built up 2” deep under the fuel tank. Plus a whole load of California Spider nests.

Once out it was clear that there was zero rust under there so I was very pleased. Next I turned my attention to the Master Cylinder. The reservoir was empty! So obviously there’s a leak somewhere from the car standing. Everything looked dry under the car, so at the moment it’s a bit of a mystery.

I took off the old Master Cylinder and cleaned the bulkhead before fitting my nice new shiny ATE one. I purchased some new blue hose to go on the bottom of the reservoir. It is very important to get the right hose here as brake fluid will dissolve normal hose.

I refitted all the brake pipes with new copper washers on the banjo pipe, and had a right old run around with the two tubes that push in from the reservoir. Jeez they don’t half make it tight to get in there!

After putting it all back together I cleaned out the air inlet box drains. What is it with California cars and pine needles? The bloomin thing was full up with needles and sand. (It’s my second Californian car and my first was full of pine needles too)
Anyhow, once cleaned up I fitted my new drain hose and fed it correctly through the hole in the very bottom of the car. Fortunately it was the same hose and wire hose clips as used on the engine bay funnels so I had over 2m left spare and a bag of clips to use.
Next I gave it all a good second clean then turned my attention to the Fuel tank.

I fitted new hose to the pipes in the car with stainless hose clips and even managed to find some new unused fuel hose in my shed at 9.5mm that was just long enough to fit.

I took off the fuel vapour expansion tank and gave everything a good clean up. Again all the vent/breather 4mm hoses just snapped off when you touched them, so I’ll have to buy another metre of that. The metal plate around the filler cap with the 8 x M5 bolts was a bit scabby, so I stripped and sanded it down, painted it and its hanging on a wire currently over my hall radiator!
Next I shone a flash light inside the tank and saw bits of an old level sender gasket down in there, so after a bit of a large cocktail shaking exercise I managed to get all the bits out. (Must have been changed by PO at some time as the sender has a new one on it)
Another shine with the flash light and….hold on a minute, that doesn’t look good.
The Fuel pump suction pipe copper mesh suction strainer looked like someone had reached inside the tank and painted it with underseal???
I quickly whipped it out for a look and found this.

IPB Image

Completely blocked!

This was bizarre as the tank inside looked very clean, just the strainer seemed to be covered. Presumably since it’s the pump suction it just drew 40 years of muck onto it.
Any how, it needed a good soak in cellulose thinners to soften it, followed by a very soft paint brush to lightly agitate it to clean it all off. Finally a wash through from inside out to clean it all off.
I wonder how it ever managed to suck fuel in that condition?
I then refitted it to the tank and finished cleaning off all the spiders webs and sand with a damp cloth.
When I lifted the tank out a couple of the felt pads fell out, so these were cleaned and glued back in with the remains of the glue I got for the rear bulkhead soundproofing.
The tank had a rub mark on it, above the passengers feet, on the vertical plane, and another rub mark on the car, so I got some new felt pad and glued a bit there too.
Finally I cleaned up the clamps and blocks, gave it all a damn good WD40 under there (since there was no rust I didn’t want any starting) and dropped the tank back in place.

So that was month 1 of my build…….

Darren C
Build off month 2

I managed to put a second coat of paint on the fuel expansion tank securing ring, and a final coat of fuel resistant lacquer (for those few occasions at the petrol station when the fuel pump doesn’t cut out soon enough or the angle causes flood back in the filler neck). I used an engine enamel black paint which should be fuel resistant, the lacquer is belt & braces.
Then in my bloomin cold shed I did a bit of tin bashing on the cover plate that I took off to access the master cylinder. There were a few scrapes and dents in it from contact with road debris over the years. I got it reasonably presentable and hope to drop it off at the powder coaters for a bead blast and re paint. Just need to source some new lip seal to go on it afterwards.
I called the local Porsche Centre and ordered a new cap to replace the hairline cracked one on the brake reservoir. Still available and only a shade over £6! I also ordered a new seal as I’m not sure if it comes with the cap or not. The guy was ok about it and said if the cap has a seal then he’ll hang onto the extra one.
As always I’m building up a series of parts for a weekend assembly (in daylight) and traced some small fuel breather pipe for the fuel expansion tank too.
The first tube I got over the counter and some stuff I had from old in my shed turned out to be the correct id but too large od. The problem is that where the pipe connects to the filler neck (just under the cap) it has to pass through the moulded plastic tank and the hole is only about 8mm. Most standard vacuum or fuel hose this size is just over 9mm so it wont fit through. I tracked a supplier on line tonight and ordered a metre with correct id and an od at 7.5mm so it should fit and pretty much be the same as the Porsche original. £2.59p another result and a bargain too.
Next I tracked down some new seal for the cover plate under the car that conceals the steering rack and master cylinder. I actually had 2 metres in one of my other sheds, left over from a previous restoration. It came from Woolies and is called "mudflap seal" It's within 5mm or so the same width overall as the original (a bit wider on the flappy bit) but is a nice match. I cut it to length using my original sun baked seal as a guide.
I also ordered new brake discs with new front wheel bearing kits from Berlyn Services.
I already have the new brake hoses to fit, to go with the new Master Cylinder.
The fuel expansion tank was refitted and took my two gas cans down the local station and put £15 of fuel in the car. No leaks so far!
I then decided to change all 4 rubber brake hoses. The rear ones are great fun trying to get at the top union, and just pulling off the retaining clip was a struggle. Theres not enough room to swing a spanner under there. Anyway with a little time and patience I got both hoses off. I gave it a good clean and waxoiled all around the area before fitting nice new hoses with new retaining clips.
The fronts got the same treatment. On opening the box and taking out the new front hoses I saw they had two short sleeves around them about an inch in from each end to stop them rubbing. I’m not a fan of this design as the fronts have to sit in an “S” shape and the sleeves make the bends tighter. We’ll have to see how they go.
Next I took off all 4 brake callipers. Since the cars been sitting many years and there was no fluid left in the system I don’t want to mess around or compromise on the brakes. There going off for a complete refurb. However during removal, there was a right mixed bag of pad retaining pins and clips. One pin and one spring clip completely missing on different callipers. The PO must have just fitted what he could find rather than going for a complete set. I’ll have to track these items down with some nice new pads too before they go back on.
The discs to are looking a little sorry for themselves, but I knew that before I bought the car so no surprises there. I hope to get them changed soon.

After a productive time I released whole load of Gremlins

For the first time in many years I put the battery on the car……
I’d tested a few odd items off the car with jump leads and meters but never put the terminals onto the battery until now
So this is what I now have to contend with:

1. Constant VERY loud buzzing/tick from the time clock in the centre console (so loud I thought the fan was on high)
2. As soon as the battery is on the Hazard relay ticks and centre top red light in gauge flashes (not the direction arrows). NO lights flash front or rear of the car and the Hazard switch is pushed in OFF. Pull the switch out and the ticking relay stops, no lights then either???
3. Ignition on, turn indicator to right (arm up) Oil and generator light flash. Relay ticks and no lights on outside of car?
4. Turn indicator left (arm down) and nothing at all.
5. NO power to relay board in engine bay with ignition on or off?
6. Brake lights stuck on permanently

Checked all fuses ok.

One consolation is that the horn works and the headlights pop up and down, and I have only one side light on RH front.

To be fair since I started work on this little car, it’s fought me all along. With the battery connected for the first time all I could do was laugh and laugh some more at the blessed thing.

I took the old brake pads down to the local motor factors and tracked a new front and rear set. ( I think the guy said the rears cross ref to a Talbot Samba)
When I picked up the brake pads. They look a perfect match (albeit I need to file open one hole on the rear pads).

Made by TRW (a quality pad with anti squeak backing at reasonable cost) they cross-ref as 356 & 912, Saab 900 and NSU RO80!
Fronts Part No GDB101 £7.17 ex vat
Rears Part No GDB102 £12.24 ex vat

Full set for the car only £23.29 all in. Result!
Will try and match the pins and spring clips next.

Mid Month & one step forward, two steps back.

I started by taking out the pedal board to investigate the brake light switch.
Lo and behold a broken switch was found, brittle as anything, one side of it was completely missing!
So I now need to source a new one.
While rummaging around in there I notice a lot of free play in the pedal spindles. Yep you guessed it, the bushes were completely shot.
I wrestled with the assembly but just couldn’t get the clutch cable out enough to free the clevis.
Under the car I went and found the clutch cable pivot wheel seized solid and packed tightly with grease impregnated sand. I had to unscrew the adjusting nuts and take the cable off the release arm. Then the nut off the pivot pulley wheel and struggle to get the pulley and cable off. It was so jam packed with rock hard sand mix, it would have been easier if it had been mortared in place. After a good few curses I managed to get it off.
This then revealed that the very fine sand mix had gone down the cable and sheath and seized the cable solid in the car.
I had never pressed the clutch pedal since buying the car, but it must have been solid. There was no way I could budge the cable so slightly defeated I got back under the dash and after a good two hours faffing around with the help of a good friend I managed to get the clutch clevis pin and clip off working blind inside the tunnel. Not an easy task.
I could then lift out the whole pedal assembly.
There was practically NO BUSHINGS left in it at all. Totally crumbled and fell out or turned to granules inside the tubes.
Again, more parts to add to the list.
I looked on line and see a few vendors have Bronze bush kits instead of the plastic.
While working in the footwell I took off the accelerator pedal. That was seized too! The bloomin hinge part at the floor was solid. I had to carryout surgery with a Stanley knife from the back of it to reveal the hinge as its encased in rubber. Working it back and forth in the vice with penetrating oil I managed to free it off. Left it to soak for a few hours and “blew” it out with the tube nozzle of WD40 and spray grease.
It’s nice and free now so at least I feel I achieved something.

Next I plan on taking off the clutch cable clevis and lock nut (while still up inside the tunnel) and then trying to pull it backwards out the car. I reckon its only jammed for a short length by the pulley wheel under the car. Enough to stop it pulling forwards, but if I tug it rearwards I think it may come out. Well that’s the plan anyway.

The following day
I wrestled the clutch cable out the car. The inner wire was seized solid in the sheath, but once unclipped under the car it pulled cleanly out complete. On closer inspection it looks like the PO sprayed it with some sort of underseal/waxoil that got all the desert sand stuck into it then set like rock.
It took me a good two hours to clean up the pulley and shroud, but all done now, nice and clean ready for a new cable. As the clutch and speedo cable run side by side under the car I had a good look at that. Guess what….I need a new one of them too.
The sheath is split and damaged (possible grounding on some road obstacle) and the spiral spring is bare and full of dirt.
Two more parts to order!
Next I took a meter to the electrics and ended up under the passenger seat. Seat removed I tested the safety belt relay and plugs. I opted to make a 6mm yellow cable link wire between pins 50 and C.
The relay was actually working but the solenoid was not happy. I suspect that the contacts inside the relay are burnt/dirty with age or the pull from the coil inside is weak causing a bad current flow & voltage to the starter solenoid.
Ignition on (I took the brake light switch off and taped the wires to stop the brake lights being on constantly until I get a new switch, and isolated the brake pressure warning to stop the constant light and sound effects) Eureka the engine spun over freely, no more “rurr…..rurr…..click…..rurr”. Result!
I then checked power on the relay board in the engine. Very strange? I kept getting some dodgy readings a few volts then 13V then nothing? Trying again I found that if I put pressure on the meter probes while testing the fuse pins the voltage varied.
I popped the fuse out and the end cap fell off!
When it was in the holder the wire looked fine, but in reality there was a break. (So Battery off yet again)
New fuse fitted, battery back on and I tried the ignition again.

Just by chance I heard the blower fan in the engine bay run. (I must have knocked the heating lever when I was working on the pedals or under the seat).
But no fuel pump?
Ok I figured that if the heater fan ran then the power relay was good, and the blower relay was good. I’d tested the relays earlier, but maybe I had a dodgy relay? I swapped the blower relay with the fuel pump and turned the ignition on.

Fuel EVERYWHERE in the engine bay, half an injection system missing!!!!

I wasn’t bothered, as I’d finally solved the problem that had given me the run around for a couple of weeks.
Fuel mopped up (I’d put £8 from a can in the tank to check for hose leakage last week) and a celebratory cup of Tea was had.

Next I put the brake pad pins in my lathe and spun them with a strip of emery paper to clean them up followed by a silver zinc spray. I managed to match up new spring clips but the aftermarket pins were no where close. To be fair now the pins are cleaned up they look good as new. Afterwards I carefully opened up the size of one pin hole in the replacement rear pads with a file. Cleaned it up and painted the filed area with some heat resistant black paint to give a nice OEM look.

The following day I picked up the undertray/cover for the mastercylinder & steering rack from the Powder Coaters. Looks lovely after a blast and coat in satin black. I fitted the new lip seals to each side of it and put it safe in my shed ready to go back on when the braking system is re-filled with fluid and leak checked.
I also called in at my local motor factors and tracked down the spring clips for the front brake pads.
The original design has a rivet in the centre of the cross that can fail, the clip falls apart and if you’re unlucky is lost forever. The modern design is stamped/pressed out of a single piece of metal so has no rivet.

Here’s what I found:

The rear clips x-ref to:

Quick Brake Part No 109-0905
VW Part 311-698-151 & 01D-07L08L (available from VW Heritage) for Beetle 1302
Saab 99 & 900 all models
BMW 500 series 1973-81

Front clips x-ref to:

Mintex MBA949 & MBA980 (MBA949 are made a bit better from thicker steel, but both the correct size)

Non of the above have matching pins, but they are a good source of the clips at £3.50 a pair, you can throw away the pins they come with.

When I arrived home I had a nice new set of Original Porsche pedal rubbers waiting (ebay purchase) ready for the pedal assembly rebuild. Having thought about the pedal assembly I opted to go for a bronze bush set to replace the missing/failed ones in my car.
While waiting for them to turn up, I spent a couple of hours rubbing down the pedal mounting bracket and gave it a coat of primer. Hanging on a wire hook over my hall radiator it was good to topcoat the following evening. I also cleaned up the front brake pad pins in the lathe again like I did the rears and gave them a zinc spray. I was hoping to x-ref new ones but they seem to be too long to match all those at my local motor factors. The rear pins are particularly unique to the 914 caliper with the two diameters and the shouldered sections.
To be fair my originals have cleaned up really well, so it was just the spring clips that were urgent since some were completely missing.
I also spoke to Lee at the Caliper refurbishers. All going well, he hopes to get them ready to send back to me next month.

Still waiting for my new discs to arrive, its been a week and a half. I contacted Berlyn Services and have found out that they don’t hold stock….they order them in from Germany when you buy them. I’m a bit disappointed as the website does not tell you this and makes you think they’re in stock. I’d rather they had been honest from the start. Had I known I’d have bought them direct from Mittelmotor myself and got them quicker as they’d be sent direct to me, not them, then me.
Hey ho, these things are sent to try us.
After the pedal mounting bracket primer was dry I gave it a wet & dry key and a coat of black satin engine enamel. (engine enamel resists oil so any greasing of the pedal assembly wont attack my nice new paint job).
After hanging the bracket back in front of the radiator again (too cold in my shed for paint) I started sanding down the pedals and shafts themselves. As my original bushes were non-existent the pedals had “fallen” over to the sides and rubbed on the wooden floor cover plate. So much so that there was a whole load of sawdust under it on the floor and the slots in the wood had a nice worn bow in them.
Anyhow I sanded them all down and gave them a coat of primer in my shed and brought them into the warm to dry once they’d gone tacky to stop them stinking the house out.
I also tracked down a nice new Dansk rear exhaust box on ebay. While under the car at the 1st weekend of the month working on getting the clutch cable out I found a hole in the backbox opposite the RH heat exchanger connection point at the bottom of the box. Most probably where the hot gasses enter and any water from combustion would collect.
I also found that the rear exchanger gaskets to back box are no longer available from Porsche, but the exchanger to cylinder head are!
Managed to track some down from Roger Bray who still has stock of both gaskets, but no exhausts.
Hopefully it’ll all arrive for next month and I'll take some photos of progress
Next I put a clear coat on the pedal assembly bracket, rubbing down the primer on the pedals themselves and giving them a coat of black. Wire hooks over the hall radiator and it was a bit whiffy again in the house!
I also sorted out some nice new split pins for the accelerator & brake pedal shafts and put another zinc coat on the brake calliper pins.
A parcel arrived with my new clutch and accelerator cable and exhaust gaskets from Roger Bray. I’d also called into Porsche Centre Portsmouth and picked up the two handbrake cables (for info, they were cheaper than anywhere else I tried and the longer cable was the same price as the short cable, everyone else wanted more for it?) I also got some new round relays as I had to play musical relays on the relay board at the beginning of the month. A new flasher relay (I think that’s what’s wrong with the hazards and indicators and at £12 it’s worth a punt, plus changing it after so long sitting is a good idea)
Looking through Porsche PET parts catalogue before I ordered anything I worked out that the handbrake cables come with the concertina gator where the cable goes into the car (in front of engine) but not the gator/bellows at the calliper? Why this is I don’t know? But anyway I got a pair of these from Porsche centre £3 each. Well worth it as my old ones are completely shot and they stop all the dirt getting into the cable, so a no brainer to change them.
Next I have given the pedals a coat of clear lacquer and hung them back over the radiator. I also cleaned up the pedal springs and fittings. The coils were full of 40 years of grit from the soles of shoes so needed a good sorting out before they went back on.
The floor where the pedal bracket was removed was very dirty full of sawdust, sand, grit and general gunk. I gave it all a good clean with the intention of painting it before the pedals went back, but once I vacuumed it and wiped it with a damp cloth, blue paint was revealed. No rust at all, just the original factory primer with a dusting of blue exactly as it left the factory. I’m a sucker for keeping stuff original so instead of painting over the floor I gave it a coat of clear waxoil just under the area where the wood panel covers. I was careful not to apply too much and keep it off where the carpet goes as it never really dries. It was just basically applied where the bulkhead meets the floor and under the pedal bracket itself.
As promised I took a few photos, so you can see how rust free this little car is. I was in two minds whether to post them or not as I haven't had chance to clean up underneath yet. This is pretty much how it came off the boat.
Floor with pedal box removed

IPB Image

The other side showing new Master Cylinder

IPB Image

The rear of the hell hole from underneath

IPB Image

The Floor pan

IPB Image

Behind bumper

IPB Image

With a few parts turned up I fitted the new clutch cable. I need to get some new nuts for the end of it. The thread is an odd size M7, so I clean the old ones up for now.
I also fitted the two new hand brake cables, and the new gators on the end. Boy were they a fiddle to feed the clevis through. The hole in the end is about 4mm, the clevis is about 8mm square (square peg round hole syndrome) After a grease up they stretched over neatly.
I also took out the drivers seat and after cleaning up all the usual stuff, coins, straws, packets of sugar, business cards and general debris I took a look at the handbrake lever. As suspected once the seat was out you could see it was bent and slightly twisted. So much so the part that presses the handbrake switch missed it completely! The handle was rubbing on the carpet of the sill, so much so you couldn’t get your hand around it. It had to come out. After another fiddly 10 minutes it was in the vice and I straightened it out, cleaned under it and after greasing the hinge pins it was put back. Next the new cables were attached to the balance arm and the cover plate refitted. No rust was found underneath it so I was well pleased too.
After a cuppa (cup of tea) I then fitted the new relays to the engine bay relay board so I have all new relays now.
I then dropped the fuse box to fit my new hazard/indicator relay. But guess what…I’d been sold the wrong one! Hey ho, I’ll have to sort it. The old one has 4 pins, the new had 3. I’ve taken the part number directly off the old one so should be able to sort it without too much fuss.
Finally before I ran out of daylight that day I changed the square cork gasket under the oil filler breather.
This next day I started by very, very carefully removing the sleeves on the front brake hoses. The new ones came with large “rub” sleeves (basically two bits of rubber tube over each hose). As I’d noticed before this stops the hose bending smoothly in an S shape and really looks uncomfortable left on. With a very steady hand and a Stanley knife I cut them along their length. I locked the blade so only the tip protruded out the knife and was less than the wall thickness of the rub tube. In this way I removed the risk of accidentally nicking the brake hose beneath. A small screwdriver levered the rest off and the tube tore the last amount to come off neatly.

The underside of the engine required a damn good clean, so dressed up with goggles on and 5 litres of brake cleaner/degreaser, an array of wire brushes and elastic bands on my sleeves I started the messy task.
I got a bit carried away and in the end spent 5 hours on it. Boy was it messy, I had a right old job getting the baked on oil off, even the detailing wire brushes wouldn’t touch it! With the heat exchangers removed I could get in just about everywhere, almost as easy as it would have been taking the engine out. I then progressed to the sides of the engine bay and around the trailing arm suspension mounts and the engine cross member mount.
After a well deserved cuppa, I set about waxoiling the areas of body work and suspension mounts I’d cleaned up.
My plan is to carryout a thorough restoration/recommission and preserve the car along the way and protect it as best I can from the British weather without going mad with a million hour, concours, see your face in the paintwork under the car resto. Having been down that road before, as nice as it is to look at, you just can’t use, enjoy the car and relax with it. Space is also an issue, its amazing how much room it all takes up when you start taking things apart. At the moment I have the car in the corner of a friends Industrial Unit and he runs a business from there so I have to push it outside into the gated compound every evening after working on it and back in each morning. Not ideal but with 9 cars at home currently, the plan is to get the 914 running and stopping, then bring it home. In that way its much easier for me to move cars around to get others in & out.
Next while there was “plenty” of access I took off the rocker covers and set the tappets. They weren’t too bad, the exhausts had closed up a little and the inlets were only a tad out. It was obvious the covers hadn’t been off in ages as the gaskets were like baked rock. I had a bit of a struggle prying them off. I have new supple cork gaskets to go back on, but since I’m taking the heat exchangers down to be bead blasted tomorrow I thought I’d stick the rocker covers in with them and get them painted up nicely. I also took off the large wire retaining clips, to clean and paint them too. With new gaskets I hope they’ll be leak free.
Next I took off the two heater flap boxes (the bits that open and close when you pull the console lever). In my shed as it got dark I gave them a good degrease.. Too delicate to bead blast I’ll refurbish them by hand.
Late the other night I was online searching and managed to find a supplier of the red silicone canvas wire bound heater hose in the right size. Ordered some up so when everything goes back I can replace the hose, particularly as one side has collapsed and the wire reinforcement looks like a birds nest inside it.
I also tracked down some new manifold nuts (shouldered copper) and some special header paint.
Week 3 of Month 2 was a very early start. Before sunrise I was up and at my friends Unit to do a bit on the car and then push it out into the compound so he could start work at 7am. It was reining heavily the day before so I decided to leave it until this morning to avoid getting too wet.
The NOS rear exhaust box arrived from SVP Porsche that I saw on ebay. Very well packed and in perfect condition. Weighs an absolute ton, they don’t make them like that anymore!
I dropped off the heat exchangers and some other odd bits at the bead blasters and also ordered some heat resistant paint. The manifolds will get too hot for powdercoat so paint is my best option.

Next after work I started to clean up the heater flap boxes. One was coated in oil so barely rusted at all, the other was bone dry, so a lot of surface rust. I spent a good 3 hours cleaning them with a combination of emery, sand paper and various wire brushes before soaking them in phosphoric acid to get the bits other methods can’t reach. After a good wash off, they are currently in my oven at 100C to dry out completely. I hope to paint them black, to match the remaining original colour.

The RH Heater flap box has the dome "mushroom" cap missing and had some open ended hose connected to it? We seems to think it was a California Modification to take heat away from the fuel pump possibly. But here in UK it shouldn't be needed.

I posted on a UK forum for an old knackered heater flap box that I can rob the mushroom cap off to replace mine.

While they were soaking I set about stripping all grime, rust and paint off the spring wires that hold the rocker covers on. Rubbed down to bare metal I degreased and gave them a coat of primer.
I’m going to have to get things put back on the car soon as parts are now in 3 rooms at home, my summer house, the car mats are on the garage floor and slowly but surely the 914 is taking over.

I got home the following evening to find 6 tins of VHT grey paint, some new M7 nuts, and another packet of slotted stainless cheese head M6’s (I’d ran out when putting the engine tinware back on and thought I’d order more for the plates and ducting around the heat exchangers).
After checking all my deliveries I started to clean up more parts. I started with the “Hoop” shaped clamps that hold the ducts onto the fan housing under the car. I gave them all a good degrease, sand and wire brush up before coating with a silver zinc paint. (to match the original finish on these parts) I was also very careful to retain the cork gaskets that sit in these brackets as they were in good condition.
Next I cleaned up the clamps that hold the heater lever operating wire onto the Flap Boxes. I spun them in my lathe to clean, re tapped and then a coat of zinc silver. I got some new M5 bolts, cut them to length and faced the ends off neatly with a chamfer in the lathe.
The heater flap boxes were bone dry after last nights baking exercise after washing off the acid. I gave them a prime with some VHT primer. Apart from the missing “mushroom” cap that I fellow owner is mailing over, they came up great. I’ll let them dry overnight and paint them black tomorrow.
While still in the mood for painting I gave the spring wires (for the rocker covers) a nice coat of engine enamel black over the primer. Hanging over the radiator (yet again with other stuff) they’ve come out like new.
I’ve left the 4 x legs that hold the mushroom cap bare metal for now and cleaned them all up. Hopefully as soon as the cap arrives I can weld it on and finish the paint job on it.
The following day I was up early and put a coat of black paint on the heater boxes, then cleaned up and went to wait outside the Post Office Depo before they opened at 7am. Time was tight as I have to be at work for 7:30, but I just made it in the nick of time.
The sign for delivery was my 8 x M8 copper Heat Exchanger nuts!

Next I picked up the indicator relay (looks good) and I plan to fit it this weekend to see if it works. I also took a call from the calliper refurbishers and they are ready to dispatch. It’ll be good to see how they turned out.
Finally on the way home that day I called in and picked up my blasted heat exchangers and a few bits and bobs. They were absolutely soaked in oil, tar and sand when I took them off, so to see them blasted clean was nice. They look absolutely great.
When I got home that evening I spotted a small box in the dark left by my shed. It was the secondhand Heater box. Arrived already!

IPB Image

After a combination of emery and sand paper it was obvious the rust pits had really gotten hold of it, so I ended up turning it down in my lathe to get as clean a surface as I could without going too thin.

IPB Image

My original cap (judging by the one that’s left and the mess that is my other one) has the 4 tabs that pass through it with two spot welded. Since the PO removed it and clamped on some hose, he must have ground the spot welds and the other 2 tabs completely off! My only option was to very carefully file the tabs back onto the remaining legs. This meant that the cap sits closer to the flap housing by about 3mm, but it shouldn’t make any difference. Once fitted I bent over the 4 new tabs and spot welded two to match my un-molested one. I then used a small blob of seam sealer over the spot weld so that when its painted it’ll be a perfect match to the other. (That’s OCD for you)

IPB Image

Afterwards I gave it a coat of heat resistant primer and hope to paint it black in the morning.
With a whole box of heat resistant primer in my shed (in grey) I decided to get some on my blasted parts before rust could set in. I gave them two light coats and again plan to flip them over in the morning and paint the other side before I go off to work. I also gave my NOS rear box a coat to cover a range of storage handling marks and also to make sure everything looks fresh and colour matched ready to fit at the weekend.

IPB Image

The following morning I got another coat of heat resistant grey paint on the exhaust parts and a coat of black over the primer on the heater flap box cap.
Here’s how they look. Came out well.

IPB Image

When I got home that evening there was a small parcel waiting. It was the bronze bush kit for the pedal assembly.
First though, I turned over all the exhaust parts and gave them another coat of grey paint. Whilst they dried the new bushes were fitted to complete the pedal box.

IPB Image

I gave the exhaust parts a final coat of VHT satin lacquer to seal in the grey and left them to dry during the day.

I cut and shortened some M6 bolts for the short rear heater tubes and matched the washers. (Fortunately I have a few draws of stainless bits and bobs collected over the years which include M6 washers in all sizes from 10mm od to 30mm od, plus the same for M4, 5, 8, 10 & 12.) Where ever possible I try to match the washer overall size, both for OEM look and also because it was designed that way usually for a reason.
The majority of the old slot cheese headed M6 sets that hold all the tin ware together were particularly chewed up and simply looked awful, so for a couple of quid off ebay its always worth changing them.

The following day I thought I was going to get the exhaust back on……

I started first thing cleaning the gearbox. I figured while the exhaust was off it would give me better access.
10 hours later I was shattered and my hands are rough as sandpaper from being in white spirit all day.
The PO decided to spray what can only be described as black tar all over the gearbox. What a nightmare it was to get off, scrapers, old wood chisels, miniature wire brushes, hard nylon brushes and cloths soaked in white spirit hardly touched it. Pretty soul destroying I can tell you.
Plenty of tea got me through it. Only a small amount is left to do over the top of the gearbox and is very hard to get at.
Its jet black and seems to run into every nook and cranny, not good when there are so many webs in the gearbox casting. I know each and every one very well now!
While cleaning up I noticed the speedo angle drive seems a bit wobbly into the gearbox. Need to look at that now!
Andyrew
Thats a solid looking chassis you got there! Its every bit as solid as my rust free California car! Great looking progress!
FourBlades

Great build and great story. piratenanner.gif

John
jacquot
Darren, Enjoyed reading every word. Can hardly wait for more. Cheers!
914forme
Nice build, your making some great progress.
Darren C
Build off Challenge Month 3,
Day 60 of build.

I finally got the heat exchangers on today. What a bloomin fiddle. I got 4 new copper washer seals and 2 rear box gaskets. The copper washers wouldn’t stay in the heads as gravity was not my friend (I’m sure they must have built them upside down at the factory!) I ended up putting a couple of small blobs of exhaust paste on them to hold them in the head recess.
The next issue was getting exchanger “hoops” around the studs. Something was out of line and they both fought me, but in the end after a struggle then went on. I’d previously cleaned up the threads and put a smear of copper grease on them. Then I could only get 3 out of the 4 copper nuts on. The 4th one on both heads (would be the hardest one to get to) wouldn’t go on?
After a bit of head scratching I needed to lower the exchangers until the other 3 nuts were only just on by a couple of threads to get the 4th nut on, then pull them all up together. It was the bend in the pipe that was stopping the last nuts going on (due to the integral moulded washers) when the stud is poking fully down and the exchanger is fully up.
Next I shone a flash light up around the copper washer gaskets to check the heat exchangers had located properly in the small counterbore (where the copper washer sits). I then fitted the rear box with new gaskets, stainless nuts & bolts and left them finger tight to avoid pull on the exchangers. Once everything was in place I tightened the exchangers to head and finally the 6 rear box bolts.
Again it was one of those jobs that took 3 times longer than anticipated. Looks good though with its nice shiny paint finish!

Day 61

Today I have mostly been sewing.

I got up at 5am this morning and washed and scrubbed the 4 car mats I took out yesterday.
I used 1001 carpet cleaner. After years of cleaning cars and having kids, I haven’t found anything that works as well.
I did away with the spray and just poured it onto the mats and worked it in with a soft brush and let them soak about ½ an hour (only because the mats were out and it didn’t matter how wet I got them.)
I used about 6 buckets of water on each mat, submerging them while scrubbing until the water was clear. They were absolutely minging, 4 buckets in and the water was still jet black. 40+ years of dirt!
Anyway I hung them on the radiators in the house (held with clothes pegs) to dry them out before going to work.

In my lunch break I called Roger Bray a UK Porsche specialist and chased up my new speedo cable which is on a 10 day lead time (hopefully in tomorrow and out to me for the end of the week). Then I spoke to Ash the parts man at Porsche Centre Portsmouth to see if Stuttgart had gotten back to him on the indicator relay. Not yet, so I decided to order a few more bits and bobs including the 3 seals for my very wobbly angle drive and also two rollers for my boot spring wires. I noticed in several pictures on-line that there are white looking roller wheels on the hinges on either side of the engine bay, and my car has none? (You can just see in my photos early in this thread)

When I got home this evening with carpets dry I got my needle and thread (strong upholsterers thread, not cotton) and started to re-attach the edging and do a little darning repairs. I repaired around the heel mat and one of the hold down eyelets. With my pedal bushes worn the clutch pedal had rubbed the wooden board slot oval and split the plastic mounded edge of the slot in the carpet in several places. I carefully super glued the cracks and melted it carefully back together with a soldering iron. Just one tiny triangle about 4mm wide is missing, but the rest was split and curled up so still there to work with. All back into shape now.
Unfortunately the passenger mat has one circular ferrule/eyelet missing.
Interestingly all the edging and eyelets are dark grey, yet the stitching on my drivers mats (front and behind seat) is in black thread from the factory, yet my passenger (front and behind seat) is stitched in dark grey thread?
Both sets of mats look as old as each other and you could possibly say that maybe the drivers mat was replaced at some time, but the one under the seat wouldn’t get any wear or sunlight, so why replace that? Maybe it left the factory this way then, if so I wonder if this is common.
Anyway, I’m seeing double now as I write this from 4 hours of close up sewing by hand!

Day 62

Today was a real disappointment.

Since buying my car way back in September I’ve been looking for a secure place to keep it when it arrived a week before Christmas in UK. I have garaging and a big carport at home where I can keep 8 cars securely, one on the drive and space on the drive for visitors. Nearby is a block of ex council garages now privately managed, of which I have 2. I applied for a 3rd to keep the 914 in and was told there was one available back in September but needed the lock changed as the previous tenant had vacated with the keys. No problem you would think…..
Well, week after week I called by to ask if it was ready until November when I called by fortnightly (so not to pester) to the “management (not my choice of description) company”. Each time they palmed me off with how busy they were and it would be done next week. Anyhow, when my car arrived the urgency increased and I offered to supply and fit a new lock myself; surely they’d agree? After all they were losing income on it being empty.
Nope “you're not insured to work on our properties” was the reply!
Anyway this has gone on and on until yesterday I saw a new handle on the door of my new 914 home when I went over to fetch some stuff out of one of my other cars.
Today in my lunch break I rushed over to the management company, drew the key, signed a contract and paid a few months in advance.
The first thing I did tonight was call in at the new garage and unlock it to see what was inside…a bit like that US show “Storage Hunters”. Unfortunately as I tried to open the door I suddenly found it was very heavy and not lifting easily at all.
Then I saw why…

The bottom 3 ft of door frame had completely rotted away and the door spring mechanism just coiled and wrapped itself up in free air.
IPB Image

(apologies for photo quality, it was off my work phone)

What complete bunch of morons would fit a new door lock, return to their office, hand over the keys and say “there you go, ready to rent out”
I’ll have to wait until they open tomorrow now to see what they say. The door barely opens, wont stay open and even if you lock the nice new lock, the rods that latch the door shut have nothing to latch against so you can simply open the door with it “locked”
This weeks Darwin Award for hindering my 914 restoration goes to the anonymous maintenance man that took 6 months to fit a new lock to a useless door!

Anyhow rant over, I retired to my shed to look through a big plastic storage tub of stuff I’d previously taken off the engine.

It then occurred to me that I’d not taken any pictures of the engine bay to show how it arrived. I wish I’d done so because people I’ve spoken to so far can’t quite grasp how much sand and dirt was in there. So here’s a picture of the throttle body as it came off.

IPB Image

This was slightly shielded by the air filter and carbon filter, so hopefully you’ll get the idea.
I spent two hours tonight carefully taking it apart and starting the big clean up. Hopefully tomorrow I’ll have a better day.

Day 63

Today at Lunchtime I went back to the garage agents and I have 3 options.
1. Give 4 weeks notice to cancel the contract I signed and walk away £65 lighter for the experience and no hope of finding a short term local home for the 914.
2. Fill in a defect form and wait 28 days for an acknowledgement and be put on a waiting list for repair, while paying for a garage I can’t use, with no idea how long it will take to get fixed. “The garages are low priority” so I kept getting told. (I felt like saying, “paying the rent is low priority for me then”)
3. Break their rules and fix it myself at my cost, without refund, while paying a rental agreement that covers cost of repairs but forbids me from carrying them out!

To say I’m not very pleased is an understatement. I put my name down again on a waiting list for an exchange garage while I decide what to do.

Anyway after getting nowhere with them I went to the local motor factors and picked up some more PU adhesive, before going back to work.

This evening when I got home a small parcel was waiting. New heater hose (brownish red 60mm id heat resistant rubberised canvas with internal wire spring) Looks a perfect match to the old stuff!

After cleaning last night and 10 hours at the weekend my hands are as rough as sandpaper so I thought I’d give them a rest and go back to the floor mats. After sewing the damaged edge trims back on the other night and melt/welding the plastic bits around the pedals I needed to sort out the heel mat.
The pile on the carpets came up like new. I was really surprised and pleased as they had 40 years of muck, oil, road tar, chewing gum and desert sand on them. All the colour is back as is the grey fleck that was'nt at all visible before!
The PU adhesive was “injected” under the lifted heel mat and used to glue it back down. The area at the base of the accelerator pedal was all split and a section missing. It had a hole worn completely through the mat. The heel pad is a particular texture size with heat mounded ridges. I could simple sew in a new pad but it wouldn’t be the same, so I thought I’d try a low cost repair first.
I used the PU adhesive to mould the tiny missing triangle back in the mat around the pedals and then I masked up the hole in the mat from the underside.
Rested on a flat surface (bit of 4” x ¾” timber) I filled in the hole with some plasterers scrim tape and more PU adhesive. A second flat surface on top (wrapped in cling film for easy release) was clamped on.
When the PU adhesive is dry tomorrow morning I should have a strong flexible hard-wearing hole repair under the original broken vinyl heel mat. This should give it some support for repairing the damaged surface vinyl tomorrow.

IPB Image

Day 64

This morning I released the clamp of the heel mat and had a good luck at the hole repair in the mat. All looked good. I put a final layer of PU adhesive on the rear of the mat just to tidy all the frayed ends and left for work while it dried.

IPB Image

During lunch I visited the car in storage and picked up a few bits and bobs I had taken off and put in the boot, plus arranged times to work on it at the weekend.

This evening when I got home I started on the heel mat part of the hole repair that will be seen. The mat has a very specific texture/moulding finish to it which I needed to replicate if the hole repair was going to be invisible. I decided to take a cast of the heel mat in a position where it was in good condition.
I made a small contained area about 2” x 3” (just bigger than the hole repair) using masking tape and then coated the heel mat in the middle with a little liquid soap using a modellers paint brush working it into the pattern. Next I cut some more small squares of scrim tape and lit a large candle. Carefully dripping candle wax into the contained area and adding scrim tape in layers I made a cast of the heel mat textured surface.

IPB Image

Once cool it easily lifted out. I put it in the fridge to set solid while I had dinner.
Next I mixed up some light grey and black PU adhesive to as close a match as I could to the original dark grey. More liquid soap was brushed into the wax cast and the PU carefully applied to the top part of the hole repair.
Pressing in the wax casting as I went along creating the exact pattern in to my repair area. I was careful to line up the pattern for a matching repair.

IPB Image

The PU adhesive dries to a tough flexible rubber so should be long lasting. I intend to get some aftermarket tailored overmats for the car and the originals will be protected. I just feel better that whenever the new overmats will be lifted out for cleaning I’m not met with a gaping hole

Day 65

The PU on the mats had set solid this morning and the gloss had faded to a satin matt sheen which made it blend in even more to the original.

Today was a typical manic Friday at work and I had to work through lunch and stay back a couple of hours this evening. I did manage to call Porsche Centre to check if my angle drive seals were in and left a message with the reception but no one got back to me? I’ll try them again in the morning.

This evening I started to strip down the FI throttle body. There is quite a bit of wear in the butterfly spindle so I need to see if just a new shaft will sort it or whether I need a new shaft and sleeve the body. Looks like it’s 40+ years of fine desert sand again getting into the gap between body and shaft and grinding it away. All made worse by grease or oil put on by the PO helping stick the sand in place to make what can only be described as grinding paste.

Day 66

Today was a wonderful sunny day, blue skies not a cloud in sight so I just had to get some of my cars out and blow off the winter cobwebs.
I called Porsche Centre just as they opened and was told all the parts I had ordered were in.
I juggled a few cars around and took one out to pick up the parts. After clearing out the building into the car park I had a good chat with everyone and discussed my passion for cars and Porsche and 914’s in general. Ash the parts chap knew I had a Delorean back home but NO-ONE at Portsmouth Porsche Centre knew that Porsche actually built the first "Delorean design" prototype on a 914/6 platform, so I just had to tell them the whole story!

Back in the late 1960’s Giorgetto Giugiaro had designed a sports car for the future. Following talks with Porsche & BMW, Porsche built the first incarnation of Giugiaro’s design on a 914/6 platform. This was in 1970 and was part of a plan to replace the 912. It wasn’t until 1976 that John Z Delorean signed up to the design and it was reworked to be built on a Lotus chassis (modified prototype Esprit) and became the Delorean DMC 12. Ironically Giugiaro was then employed to design the Esprit body too.
I think the history is truly amazing and the connection to the 914 should not be forgotten. Porsche kept a lot of Giugiaro’s style cues and they evolved into the 928. Just look at a 928 in side profile and compare it to a Delorean.
Giugiaro’s Porsche version was called the Porsche Tapiro.

IPB Image

And John Delorean with the prototype DMC 12 (with even the same tan interior as the Tapiro).

IPB Image

I thought I’d share that with you too.

Anyway, after picking up the parts this morning I got home and started moving a few cars around and took another one out to Machine Mart and bought some car skates, got back home and spent an hour putting them together before lunch so that I could spin yet another car around.
A van then pulled up and delivered these…..

IPB Image

Ooooooo they do look nice, absolutely fantastic refurbishment can’t wait to get them back on the car. Problem is that Berlyn Services STILL haven’t got my new discs and wheel bearings yet. I did call them last week, but was told they are on transit from Germany. I can only presume they are being delivered by tortoises not hares.
I found a set of NOS front calliper piston retaining plates (the ones that sit behind the pads) calliper bolts and new lock tabs on US ebay in a kit for £6 a few evenings back so hopefully they’ll arrive next week. New pads and refurbished pins waiting, new handbrake cables fitted, it’s just the discs now that’s holding me up.
This evening I loaded my V70 up with tools and parts ready for a full day under the 914 tomorrow.

Day 67
Today I have mostly been underneath the car.
With the callipers done, pads and pins done, I thought they look so good that I simply couldn’t leave the disc backing stone covers looking their age. So the first job this morning was to take off all 4 original discs and remove the backing plates (and tie bar from the rears). I’ll drop them off tomorrow with the bead blasters and get them cleaned up and powder coated ready for when my new discs arrive.
I had to put the old discs back on again afterwards so that the car is still mobile.
Next I finished off putting on the tinware under the engine and replacing all the slot head screws with stainless steel.
I then took off the old damaged heater hoses, cleaned up around where they attach to the car and cut my nice new hose to length. These were then fitted with new stainless steel jubilee clips.

IPB Image

Next I sorted out the heater flap box cables and fitted them to the operating levers. After a bit of a fiddle, I managed to adjust them correctly so that the lever in the car opens and closes smoothly and fully.

IPB Image

I’m still waiting for my new speedo cable from Roger Bray, 10 days lead time has turned into 3 weeks and still no sign of it. The old one is still in the car and shown in the photo’s but will be changed as the sheath is very badly damaged.

Next the gearbox oil was drained out. (Top tip…always make sure you can get the fill plug out before you take the drain plug out). The oil was a little dirty but nothing to worry about. There was a small amount of sludge on the drain plug, but nothing metallic so hopefully the gear change won’t give me any issues just yet.
While the oil was out I decided to change the angle drive seals. Since cleaning the gearbox off the other weekend I could now see that it was the source of a leak as expected. I got the “O” seal, aluminium washer and lip seal from Porsche all for a tenner so set about changing them.

IPB Image

(don’t panic, the vice is lightly holding the drive while I hooked the old lip seal out, not squashing it)

Once cleaned up I rebuilt the angle drive a fitted it back into the car. The retaining bolt was inserted by hand so that I could feel it locate correctly before a spanner was used. Nipped up and as said before “the wobble is standard” but at least it’s not leaking now and wobbles far less. All in all it looks a lot cleaner under there now (compared to even the picture on page 6 of this thread when I had already cleaned for several weekends)
Finally I topped up the gearbox with nice new oil before I called it a day

Day 68

This morning before work I did a little tin bashing in my shed on the removed brake backing plates. They were a little out of shape and the edges were battered flat in places. I had a rummage around in one of my sheds and found some old discs off one of my other cars that were a perfect diameter (just a little larger than the 914 ones). I clamped one in the vice and used it as a former to get the backing plates back into shape using a range of panel beating hammers (so as not to get half crowns in them).
I then went to my friends unit and moved the car out into the compound so that he could start work at 7am.
During lunch I went over to the powder coaters and dropped off the backing plates for blasting.
Tonight when I got home (after mentioning it yesterday) there was a packet waiting…New Speedo cable….if it had only arrived on Saturday I could have fitted it yesterday! Hey ho, that’s how it goes sometimes.
Anyway; tonight I needed to do a bit of work on one of my other projects so I ended up siphoning very nasty old fuel out of a fuel tank. Boy did the fumes burn and inevitably I ended up with a mouth full a couple of times. I’d tried to run the car on Saturday and it wasn’t happy on 2 year + old fuel, so it had to go.
Back on track with the 914 after a cup of tea (for mouthwash) I went online and ordered a few bits ready for next weekend. I really hope the Discs turn up this week as I’m itching to get them on so that I can fit the callipers and finally get some long awaited fluid back in the system.

Day 69

Today I have mostly been collecting more shiny parts

I had a card in the post yesterday when I got home (another parcel that required a signature). I was waiting at the sorting office door again this morning to collect when they opened.
It was my Front Calliper service kits from US ebay.
During lunch I called in at the nut & bolt specialist and got some new M8 x 10mm bolts to hold the disc backing plates on when they are back from the powdercoaters.
Tonight I started on fitting out the callipers with my nice new bits.

Here’s the old refurbished Pins and the new clips I sourced earlier.

IPB Image

Following the superb refurbishment of my Calipers I still needed to find new calliper piston locking plates for the front (the ones that stop the pistons turning and sit behind the pads) and the long locking tab washers for the calliper mounting bolts.
Both parts no longer available I eventually found them on US ebay using a Porsche Part number search.
As said before they were NOS and contained all seals, clips and rubber gaiters to rebuild the front callipers. Having just had mine done I only needed the missing parts below.

IPB Image

The rest of the parts (calliper piston seals, dust gaiters & clips) I’ll keep for the future. Not a bad kit for just over £7 a side, even comes with new High Tensile mounting bolts!
Tonight I assembled them into the front callipers using a light smear of Mintex Cera Tec special brake anti corrosion grease.
Still no sign of the new discs and bearings…..can’t understand how I can get parts “no longer available from Porsche” from a chap in Indiana, USA within a week and after 3 weeks still can’t get "in stock" parts from Germany via Berlyn Services in UK?

Day 70

Today I have mostly been….cleaning up stuff.
Despite a manic day at work in my lunch break I managed to pick up a new pair of Track rod ends from my local Motor factor, some more replacement nuts & bolts and speak to Berlyn Services about my brake disc order. It transpires that after FIVE weeks the discs are “lost in transit” from Germany? All I can do now is sit and wait while they are either located or another set is sourced. So I don’t think with all the will in the world I’ll get them in time to fit this weekend.
Resigned to this fact, I decided to look at what other stuff I can get done, hence getting the track rod ends.
This evening I started cleaning up more FI bits. Still have a major problem with the FI wiring loom and throttle body, I priced up replacement parts (hoses, injectors etc) and tonight I have to admit I got my Weber Carbs out of storage and had a good look at them.
In between all this I had to put a few hours in on other car club stuff. I’m event organiser on one club and on the committee of another, so have plenty of tasks needing completing, plus I’m also involved in the BBC Children in Need Carfest events. I try to organise all my outings for the various clubs in a way that supports one charity or another and between them all I average £5-10K per year in money donated.
My next event is a private workshop visit to Spellbound Cars of Farnham. Again the majority of the event fee, once food is covered, will go to charity.
The remainder of this evening I sorted out some spare cardboard boxes and loaded up all parts refurbished & newly acquired into “everything needed to change specific parts” on the car that I’ve started to date. Since I’m limited to working on the car at weekends only, I’m trying to be organised to make best use of that time. This involves counting out bolts, washers, nuts, split pins etc and bagging them up so everything is there. I created brake backing plate sets tonight with everything needed to fit them, minus the plates which should be ready tomorrow.

Day 71

More running around today tracking down a few more bits and bobs.
I’m looking for a single air deflector plate? So far I’ve had no joy finding one. Part No 914.559.163.10. It’s one of the little black plastic flaps that hang down under the car at the base of the rear bulkhead (in front of the engine).
Today I picked up some new spring washers for the rear calliper bolts and spent this evening painting the new track rod ends.
They arrive in bare metal and would corrode in time so I mixed up some black & silver in an old spray can lid to match the cast steel colour and gave them a coat of paint. You’d never know they were painted to look at them but hopefully it’ll slow down the rusting process.

Day 72

This morning before work I gave the Track rod ends a coat of clear lacquer over yesterdays paint.
During lunch I picked up the disc backing plates. Tonight is food shop night so after getting home later than normal and filing up the cupboards I went off to the shed.
As soon as stuff comes back from the powder coaters I tap out any threaded holes. With all the will in the world masking stuff up, the powder coat process is electrostatic so it creeps into the smallest gap.
Threads cleaned out and a little copper grease applied, they’re good to go for assembly over the weekend. Considering what the backing plates looked like beforehand(rusty dented and bent out of shape) they are flawless and BETTER than new now.
The discs still haven’t turned up, so I may have to take the old ones off and back on yet again just to fit the backing plates.

IPB Image

Day 73

This Morning I checked the new Gemo speedo cable against the old one before fitting to make sure it was the correct length.
Only then did I notice the two grommets on the new cable were on backwards!
I had to do a double take; but yes they were fitted backwards. What a bloomin struggle it was to get them off the cable. I opted for sliding them down to the gauge end where the securing nut was smaller. Even so it was a real battle stretching the large grommet with a 6mm hole over a 20mm nut!
Once off it was another battle in reverse to fit them back on the right way around.
It was also another Desert Sand nightmare day. Getting the old speedo cable out meant getting under the centre console. I took the seats out for more space and after finding where the console securing screws were I lifted out the two insert panels and found the whole inside of the console had about ¼” of fine sand inside it.
Another ½ hour hovering and I could lift the carpet to reveal the cable and the bent over securing tabs.

IPB Image

Seats out there was more sand in all the creases and gaps around the centre tunnel. The ridges in the vinyl were ½” deep in sand! More hovering up.
Anyways, after getting the cable out I could see the age related damage more clearly.

IPB Image

It really did need changing.
What a pig it is trying to hook the cable end out of the tunnel void and into the car on your own. I ended up bending a coat hanger in a U shape to fish it out. I also noted the route it takes over the steering UJ and found metal bend over tabs to hold it clear of the steering. Not obvious first of all but there for a good reason.
Next I set up the new clutch cable. After reading the Haynes manual I was concerned about the instruction to extend the cable 10mm into the clevis as I thought it would foul the lever. I’d been advised to cut it down before fitting as new cables are too long. So after cutting 10mm off the end I fitted it with 5mm into the Clevis. Adjusting the cable under the car I found to get the required ½-3/4” free play I pretty much used up all the cable adjustment; even with it cut down.
I reckon you need to cut at least 15mm off the pedal end of the cable to give you some adjustment over the years as the cable stretches.
With still time left this afternoon I fitted the two nylon rollers to the boot hinge. Again this was another wrestle with the spring bars to hold them down enough to slip on the Roller. I used a deep 10mm socket with a 8” extension bar, slipped over the end and levered down while holding the boot up. Scary at times but I just managed to get them on.
After a cuppa I then took all the wheels and discs off again to fit the disc backing plates.
Lastly I replaced the two new track rod ends.
All I need now is those blessed discs and bearings to turn up, so that I can get the callipers back on!

Day 74

Sunday was a quiet day. I’d not got access to the car as my friend had to be with his mum for some reason.
Anyhow I still got up at the crack of dawn and started cleaning a few more bits up before breakfast. Afterwards I spend 6 hours polishing the coachwork of one of my other cars, but started to get a little bored so will do the other half of the car over some of the evenings next week, and maybe the brightwork the week after. 40 hours cleaning on average for 1 hours use…that’s vintage cars for you!
Anyway after cleanathon part 1 of 2015 , I started part “whatever it is now 2015”on more 914 parts from my removed FI parts tub of doom. I only managed 3 hours before I’d had enough for the day, so retired to my PC to convert some ideas/sketches I have on a new door hinge design (for yet another car) into CAD so I can do a feasibility study on manufacture (long story for another time).

Day 75

I sorted out some materials in my shed to make up some brackets I’ve come up with and as expected I’m short on some 3mm stainless plate so made a note of sizes before leaving for work so that I could sort it out over lunch.
I contacted Roger Bray about the incorrectly assembled Gemo Speedo cables they sell, and got a “not really interested” response as it’s a low volume sale. So if your thinking of buying one Caveat Emptor.
I also chased Berlyn Services again on my Brake discs. We’re in week 6 now since taking my money and still NO news on where they are or when to expect them.
At least I managed to pick up some clear plastic 6mm hose before the end of lunch. I plan to cut it into 2ft lengths and connect to all the bleed nipples on the callipers and into an array of jam jars for when I eventually fill the brake system with fluid. I found in the past that gravity is your best friend when first filling a completely empty braking system. Open all bleeds slightly and fill reservoir. When you see fluid in the clear tubes close off in turn until all callipers are full with fluid. Only then pump and bleed the system in the order recommended. Makes it a far less messy job when you can see and capture the fluid. Well that’s my plan anyway, if the discs ever turn up of course.
Tonight was a little busy. Just got back from a car club committee meeting at 11pm, that started at 6pm (we have managed to secure the Battle of Britain Spitfire & Hurricane to do a flypast over one of our events which is a good result!), so it was a long one tonight, and apart from taking time out to update this thread I’d didn’t get chance to do anything on the car tonight. Bit frustrating but that’s how it goes some days.

Day 76

Today I had some good news…I got an email from Berlyn Services who say I should see my new brake discs tomorrow. We’ll have to see what happens.
During lunch today I visited the paintshop. My tame painter came over a few weekends ago to look at the 914, and we have agreed a glass out, panels & doors off bare metal two-pack job. It’s booked in for next month so I need to start prepping & stripping the car once the brakes are done.
I think I’ve pretty much decided to weld up the front side marker lights for a Euro look (plus I think they look hideous) The jury’s out on the overriders but as they are rubber and like everything else rubber on the car they are very badly perished, it would be simpler to weld up the holes (as the bumpers black not chrome) before they are repainted.
I picked up a few more stainless fixings on the way back to work from the painters and tonight I did some more on the engine lid.
I stripped it down to its component parts including taking out the spring wires and hinge rubber stops ready for painting. I notice a bit of deformation in the black plastic water tray, so tomorrow I plan on getting a heat gun on it to straighten it out. There’s also a crack in it that I’ll need to “plastic weld” too. I took out a few bends in the engine lid frame above the hinges. It looks like the PO bent the steel up with pliers when the rubber limit stops had worn down, instead of replacing the stops? To be fair what’s left of the bump stops are perished, so I need to track some down.
I used a fork trim clip tool to get all the mesh securing rubber washers off (so they can be re-used) and the mesh lifted off cleanly.
There were a few dents in the mesh, and half the Porsche script letters were missing or broken, so I took the rest off and gently got all the dents out ready for repainting.
Tonight I’ve been on-line and ordered some new infill trim, and after, plan on going through the Parts catalogue to get some part numbers ready for a visit to Porsche Centre tomorrow lunchtime.

Day 77

So on to todays escapades…..

Guess what?………

NO DISCS to be seen despite Berlyn’s assurances yesterday.
I phoned them today and things had gotten out of hand yet again. I was told that they had the rear discs (and had sent them out) but had NO fronts! After a long discussion with David at Berlyn it was revealed that they had, had no joy from their supplier, and had tried Roger Bray who had told them he had a pair then sent only ONE and that was rusty! David tried German & Swedish, and they only had the early front version so had come to a blank.
Now, as you can imagine I was not best pleased, but here’s why it pays to keep calm and carry on communicating. I just happened to discuss the difference between the early & late discs when I happened to mention my fronts had a boss on them so you can mount the wheel and spin it to align the bolts rather than try and lift and hold the weight of the wheel to line up the bolt holes like you do on the rears. David paused and then said he thought I wanted front discs without the boss? “No?” then he sent me an email photo of new discs he has in stock with the boss on them.
DOH!
He had the right ones all along, but never communicated that? So he assures me they will be with me tomorrow. (Hmmm, I’ll have to wait and see again, particularly as the rears seem to be lost in transit now)

Last night after updating my 914 Diary I sorted out some part numbers and spoke to Porsche Centre at lunchtime.
Only 1 part in 4 was still available (the rubber bump stops that fit under the engine lid hinges, so I ordered a pair. Mine are worn off at 45 degrees and broke off when I tried to remove them yesterday. The other parts were piping and seals that fit around the mesh grille inserts. Not too big a deal as I know 914rubber do them. That said I have sourced the U trim off ebay, and I think I might have found a suitable T piping. Having owned and restored a few 911’s, the impact bumpers have a small T trim between them and the rear quarters. You can buy it by the foot from Porscheshop in Birmingham for a few quid. It’s probably good for the scuttle to front wing too. I’ll order some up and let you know how I get on.
This morning before work I did a couple of hours on one of my other cars, and tonight I started on the engine lid parts.
First I cleaned up everything; more SAND, I’m getting a Herbert Lom twitch now at the sight of the damn stuff!
Next I cleaned up the spring rods which were caked in sand and surface rust. Rubbed them down with wet & dry and gave them a zinc prime.
After washing out the water trough earlier it was now dry so I got my heat gun and started to straighten out the bow and distortion in it.

IPB Image

And straightened out.

IPB Image

Finally I melt/welded the two cracks up on it.
It’s very sun bleached, so tomorrow morning I plan on trying a little rubbing compound on it to see if it takes off the milky surface back to black. Last resort is to paint it with some satin black bumper paint, but I’d prefer not too.

Day 78

This morning started off well, I got a coat of silver onto the spring rods for the engine lid and started on the drain trough with some rubbing paste before going to work.
I was away from my desk this morning looking at a few projects and when I got back my colleague had a message from Kay at Berlyn Services.
No Discs turned up yesterday (as I had been told by David three times, both verbally and by email, would) because Kay’s message was to say NOTHING had been sent!
To say I was astonished is an understatement!
I immediately emailed a reply on to end of David’s “sincere” email from 2 days ago assuring me he’d sent the rear discs and that the fronts would follow, simply asking if Kay’s message was correct. Since it was mid morning I couldn’t phone at work until lunchtime.
The answer came back a couple of hours later in a long protracted email from Kay, that went on and on but really didn’t answer my question as why no discs at all had been sent out as David had said. Finding it hard to keep calm, I thanked Kay and asked again why am I being mislead and when can I expect to see my discs as now we are at the end of week 6 from ordering “in stock” parts.
So folks, guess what. The reply is they will be with me tomorrow……déjà vu anyone?
As you can imagine I was quite grumpy this lunchtime. No fear, I thought. Lets phone Porscheshop and see about the small T piping they’re advertising on their website that might just do for the engine lid.
“Err, let me check it out and get back to you straight away” said the chap at Porscheshop.
Guess what at 10 to 5 they still hadn’t called me back, so I called them.
“Oh yeah, I was going to call you back….it’s out of stock and no longer available”
Here we go again!
“So why is it on your shop website as in stock with a price by it per foot, and why when I phoned you earlier wouldn’t it have been easier to tell me there and then, rather than keeping me hanging?”
The response was another “not really interested” “yeah we’ll have to change that”

So all in all a very disappointing and frustrating day on the parts front delaying progress on the car.

This evening I got home and spent a couple of hours rubbing pasting then T cutting the engine lid trough back to nice shiny black plastic from the grey dry thing it was.
I then got the two small grill sections that go either side of the engine lid out of a storage tub (took them off at the start of the restoration) and gave them a once over. The edges were bent badly and one side was dented. I can only presume that when the car was re-sprayed badly (that’s the surface that’s now peeling off all over) they must have wrenched the small grilles off with a screwdriver as a lever instead of removing the rubber grip washers! They obviously mangled the drivers one first, then were careful with the passenger side, but gave up and left the engine lid one on. (The evidence being the black piping I’m trying to find having a masking tape line with blue paint on it, on the engine lid but not the two side grilles which have no blue paint on)
Anyhow, last of all this evening, it took a little tin bashing with my planishing hammers and I managed to straighten them both out

Day 79

This morning started off well, I got another coat of silver on the engine lid rods and left for work. After the anti climatic eclipse we had a parcel delivery.
To my surprise it was the discs and bearings. Halleluiah !
At lunchtime I called in at Porsche Centre to collect the engine lid hinge rubber stops.
“no longer available” here we go again! So to make a mends I thought I’d try them for the 911 wing beading that Porsche shop said they could no longer get. It transpires its all still available, but unfortunately cut to the correct length by Porsche. So to use it on the 914 engine cover I’d have to have 3 sections instead of one continuous length. After a bit of thought I remembered the sill trim on a 968 had a full length tiny T trim, maybe that will do as a substitute? So I’ve ordered one and I’ll keep you posted on the outcome.
It’s Friday again which is food shop evening so I got home an hour later than normal, but after putting food away in the cupboards, I opened my mail. The new U trim was here, perfect match. Great!
Next I opened the box from Berlyn services and checked the discs, all looked good.
Now I am able to fit them to the car tomorrow and finally get the callipers on I decided to fit the bearing races into the front discs this evening to save time.
On opening the first bearing box, The races were in torn open bags with dirty grease fingerprints all over them?????
They looked new but obviously someone had opened them before me with dirty hands presumably about to fit them to their car….
After double checking them for any damage and cleaning them off, I offered the outer race up first.
Then my heart sank..
It was TOO BIG , they’d sent me bearings in a box marked Mercedes!

IPB Image

To say I’m having a bad day again with Berlyn Services is an understatement.

All I can do now to recover the situation is try and cross ref the numbers at my local Motor Factors to stand a chance of getting them on the car this weekend.

Desperate to make some progress today I have spent the last 2 hours de-greasing and painting the new disc hubs and outer edges. If one thing annoys me its taking off wheels to see flaky rusty disc hubs.

Day 80

This morning I was waiting outside the local Motor Factors for them to open at 7:30, hoping to resolve the bearing issue.
Unfortunately they only had the outer bearings and could get the inners, but not until Monday. They were very good and phoned around but only found one supplier about 30 miles away who had a single bearing, but one would not be good as I’d prefer two of the same make.
I called all the usual factors. German & Swedish (out of stock), Pro parts, (don’t keep)
Euro car parts (on the shelf in stock). Great I thought, I asked the chap if he could just check physically they were there rather than relying on the computer. After about 10 seconds he said “yep” in stock.
Fantastic, I thought and drove 12 miles to pick them up. However when I got to the counter the chap said “sorry, not in stock, we can get them for Wednesday!”
When I explained that I’d phoned and spoke to someone there only ½ hour ago before I set off, they denied all knowledge!
So again to recover what was left of the morning I decided to go up to the unit and get the rear discs fitted.

I managed to get both sides on, fit the callipers & pads and connect and adjust the handbrake.
The pad clearance adjusting screws vexed me for a short while, then the penny dropped. The outer adjusters are LH thread. I’d adjusted the inners to get a pad clearance of 0.2mm easily as they are RH thread. I’d gone to do the outers and they just turned and turned with nothing happening (clockwise) so initially I was stumped
Anyways I managed to get the rear all assembled and adjusted, even if I didn’t get the fronts done. I’ve ordered a set of bearings for Monday and I’ve emailed Berlyn Services some pictures so will have to see what resolution they come up with on Monday too.

IPB Image

IPB Image

This evening when I got home I put a second coat of very high temp grey on the front discs and clear lacquer over the silver on the engine lid spring rods.

Day 81

Today I spent the majority of the day attending a charity car show, but this afternoon Kev the UK Porsche club GB 914 registrar (who was in the area) called in to visit.
We chatted all things 914 and he took a look at the parts I have off the car and we identified a few discrepancies and problems that I need to address.
All in all it was an afternoon & evening well spent. Many thanks Kev, I hope you enjoyed looking at my other projects too.
So tomorrow I will hopefully pick up the correct front bearings and move things forward again.

Day 82

Last week I emailed Berlyn Services pictures of the incorrect bearings and this afternoon I’d not had a reply so I phoned them and got the ansa machine. Left a message but no-one phoned me back today?
Hey ho, lets hope they respond tomorrow, I just want to get my money back that’s all.

Well, at least my trustworth local Motor factors came up trumps today and at lunchtime I picked up two correct bearing sets. Should have gone there first really, they were half the price of the wrong Berlyn ones!
So tonight I finally got to fit them to my new front discs.
Because the old discs and bearings are still on my car which is a few miles away from home I couldn’t use the old outer races to drift in the new bearings as I would have normally done. Not wanting to do this on Saturday (as it would waste weekend valuable assembly time) I decided to see what I had to hand to make new bearing drifts. The inner race sits quite deep into the back of the disc so using an old outer race here to drift it in could end up with it getting stuck.
I had a rummage in my metal bar off-cut storage and the nearest bar I had would need a good 20mm turning down off the diameter which to be fair is a waste of the bar. I then looked in my big socket drawer and found two that were just about 1mm too big. I stuck them in my lathe and took a skim off them to get a perfect size and used them to nicely drift the new bearings home.
Inner drift

IPB Image

Outer drift

IPB Image

For info the bearing set is made by:
Premier Bearing Components
Part ref BRT333
Comes with inner & outer bearing and the oil seal for £7.47 +Vat

Day 83

This morning I emailed Berlyn Services again and they called me this afternoon. I’m posting the wrong bearings back tomorrow and getting a refund, so that’s the end of the saga as far as I’m concerned.
Today at lunchtime I picked up a bit of steel bar from the local engineering supplies and tonight I’ve been turning on my lathe for a couple of hours. I’m part way through making a little 914 gadget that if it works out ok, I’ll share it with you all.
Kev emailed the Porsche Authenticity Certificate application form today so I’ll get that filled in and sent off to aid registering the car here in UK with DVLA and getting the tax fee status (pre 1975 manufacture).

Day 84

This morning I started off by sanding smooth the plastic weld repair of the split in the engine lid water tray and boxed up those wrong bearings to post back to Berlyn, then left for work.
During lunch I filled in and emailed off the form Kev sent me for the Certificate of Authenticity. About 20 minutes later I got a call from a lady at Porsche. She asked if I needed the certificate to register my car (as I had put “not registered yet in UK” in the box for registration). I said yes, it was part of the paperwork I intend to submit to DVLA. Mainly because of the date of manufacture to qualify for tax free status. She said that the Certificate of Authenticity is NOT VALID for DVLA, it needs to be a “Certificate of Origin” for DVLA.
Apart from the header on the top of the piece of paper they are basically one and the same. The only problem is Porsche want £65 for the “Origin” and as a PCGB member the “Authenticity” is free.
So what to do?
I said send the free “Authenticity” document and I’ll submit it and take a chance. DVLA are a strange lot, they won’t accept a VIN plate on a car as its chassis ID or date of manufacture (since they can be tampered with) and a US Title (their V5) just has a year of manufacture, not date. I had this with my Delorean. The VIN said car No 4532 and August 81. They rejected that and registered it as Jan 1st 1981, I argued that the factory didn’t start making cars until March/April 81 and mine is the 4532nd, so it can’t be 1st January. They wouldn’t budge without a letter from The Delorean Motor Company (but that wrapped up in 1983) so even a club historian letter wouldn’t do. I gave up in the end as it was just plain red tape and no-one I spoke to at DVLA could use basic common sense.
Hopefully this time around I might get an easier ride when I come to register the car. It’s all rubbish really as a friend of mine registered his kit car with a frame chassis and BMW engine as a Lamborghini Replica and the logbook came back as Manufacturer Lamborghini, no mention of replica…how does that work then when they are so pedantic over a less important day & date?

Anyway I posted the bearings back during what was left of my lunch break and when I got home tonight I spent an hour on my lathe and another in the attic rubbing down the engine lid water tray. Despite several hours trying to rubbing paste it to bring back the colour its returned to a sort of milky grey. I’m resigned to the fact if I want it black I’ll have to paint it with a flexible plastic bumper paint.

Day 85

Today I’ve been doing a bit more turning on the lathe and also put a light coat of plastic paint on the engine lid water tray and to be fair it looks much better than I was expecting.
During lunch I picked up a litre of brake fluid from the Motor Factors ready for the weekend rebuilding and this evening after an hour on the lathe I gave the new high tensile front calliper bolt heads a coat of satin black paint to prolong that “new” look when they’re fitted.
Tomorrow hopefully Porsche Centre will have the 968 sill piping in so I can see if it’s a good substitute for the no longer available engine lid mesh T trim

Day 86

Today I finished off turning my proto-type press tool (that I didn't want to mention until I knew it worked) and picked up a nice M16 bolt for the centre this lunchtime. No news on the trim part from Porsche so hopefully Monday it’ll be in?

I have been thinking on a good way of blanking the front wing marker lights. To do this well would require swageing a recess in the wing and welding in a disc of steel to blank it off. The idea is to dress off the weld and hopefully little or no filler will be required.
Last weekend I removed a light and took a set of measurements. The main issue is not only the large hole but the smaller fixing holes around it. To do this right I need to include the small fixing holes behind the new covering disc. The panel looked to be completely flat in the local area of the light, but tomorrow I will take along my new press tool and just check if there is any contour in the wing.

After work & Tescos tonight I got a piece of 1mm scrap steel and cut two test holes in it, the same size as those in the front wings. Next I located the press tool and simply tightened the nut and bolt to press a trial recess.

IPB Image

I repeated this in the second test hole and they both came out perfect with no distortion in the surrounding sheet.

IPB Image

The plan tomorrow is to get the front discs, callipers, pads etc and fluid into the car, afterwards I can tinker with checking the tool and wing contours before I jump in and press them.

Day 87

Today shall be known as BLACK Saturday!

Question: When is a 914 front brake disc not a 914 front brake disc?

Answer: When you buy it from Porsche Specialists Berlyn Services and wait 6 weeks for it to turn up

IPB Image

What on earth have Berlyn Services sent me?

It certainly IS NOT 914, its VW Beetle!

Day 88

After a wasted day yesterday and a sleepless night I can’t wait for the phone call tomorrow to Berlyn Services.

Today I needed to move forward regardless of the disc issue. The car is booked in the paintshop on the 20th of next month so today I started to strip stuff off ready for painting.
First I removed the front and rear bumpers. Both have a tiny bit of surface rust which isn’t an issue. They have dents and scrapes which is more of a problem. A bit of gentle tin bashing is required. It was nice to take them off and flip them over and find no rust at all, plus all the nuts bolts and washers were still shiny gold zinc plate.
Next the rear and front valances were taken off.
The rear is reasonably dent & rust free, the front however is pretty sorry for itself.

IPB Image

And the other side

IPB Image

Both pressings around the suspension mounts are dented, torn and generally in a mess. I’ll have to do some serious tin bashing here to revive them.

Again I was pleasantly surprised to find very, very little rust behind both bumpers (just a tiny spot where the valances are attached) and considering the damage to the front valance, the body behind didn’t have a scratch on it! Both bumpers were absolutely full of sand as expected, so after a hoover up and brush and pan, this is how the car behind looks.

IPB Image

And the rear

IPB Image

Just a few tiny bits of rust where the valances were screwed on and that’s it!

So, now came the moment of truth, taking the sill covers off…
Everyone I’d spoken to when saying that I had found no rust (apart from the battery tray) on my car, just smiled and said “wait until you take off the sill covers and reveal the jacking points”
To say they were full of sand was an understatement. I got almost half a bucket full out of each side, plus more Californian spiders nests and webs.
Again I used a soft handbrush (from my brush and pan) then a damp cloth to wipe the final dusty sand residue off and found them like this…

IPB Image

The jack points are a little dirty and I will have to give them a T-cut just to make them factory new again. (The door bottoms are rust free, that's just dirt & water stains showing in the camera flash)

IPB Image

There’s a bit of scratching down the jack tube, but most of the blue paints still in there. As per the rest of the car, I couldn’t find any rust to write about.
The lower vertical spot weld seam on the base of the sill has a few bits of chipped paint on it so I’ll touch them in with a small brush.
Apart from a T-cut I think I’ll get the paint shop just to mask them up and not paint them. I quite like the idea of keeping the original paint on them. Maybe a coat of clear Waxoil would be enough to preserve the surface for UK weather.
At least today was a result and redeemed some of yesterday’s frustration with the brake disc saga!
The thing is, now I have a summerhouse full of Bumpers, Sills & Valances to work on. Hey ho, it’ll give me something to do while the cars away at the painters.

Day 89

So here is where I am at with Berlyn Services and my 914 front brake discs ordered 7 weeks ago.
Their website is still live showing the discs for sale with the correct part number.
Now on the telephone this afternoon Mr David Barker of Berlyn Services said that he can get me the discs from a supplier that isn’t his normal source and I can have them hopefully for the weekend.
So all I need to do is pay him a further £140 on top of the price shown on his website for the discs that I have already paid for 7 weeks ago!
Alternatively I can wait (indefinitely) until his normal source of discs become available again.
Now call me old fashioned but I think that under the sale of goods act Berlyn Services and I have a “contract” at the price advertised and after 7 weeks I feel a bit miffed off to say the least that they now want another £140 from me, whilst they continue to advertise a fixed price on their website, which I paid in good faith.
This is basically holding me to ransom, issues with their supplier is NOT my problem, if they had supply issues way before I placed my order 7 weeks ago, why still advertise 914 discs for sale?
I have been lead a merry dance with them, multiple false hopes, and now being told I can have the discs by the weekend if I pay a further £140 is really the last straw. I am a patient man, but also have principles. Unfortunately I am so wound up by them now that walking away is not going to benefit anyone else in future.
They simply cannot run a reputable business like this and need to sort themselves out. If I let it go they'll just be more inclined to do it again and again to other people and bring more misery on unsuspecting UK customers.
The correct thing for them to do is just send me the discs that I know they can get within 48hrs and take it on the chin. I'm sure they make enough profit to cover any loss in this instance. Then take off sale 914 discs until they have stock and relist them at any revised price as necessary.

I'm sorry if I come across a bit blo*dy minded, but if it's one thing I cannot stand, it's an injustice.
People are truly judged on their actions when things are going wrong, not when they are going right.

Day 90

Moving on from what could become an all consuming legal action…..

Tonight for a couple of hours I took my frustrations out with a bit of tin bashing. The passenger side sill cover had damage around the jacking hole. Not certain how this came about but it’s possible the car slipped off the jack at some point in its history and the tip of the jack caught the hole in the sill cover and folded the top of the aperture in under itself. The metal was rolled up and under so it took a bit of straightening out. Then with a range of hammers and dollies I beat out all the deformation. Draw filing the surface and a little more hammering, finished with 80 grit on a block got it flat and true without the need for any filler. Next I flattened out all the fixing holes which had been dished down by using pop rivets rather than the original fixings. Again a little more straightening out of the sill cover return edges (that were a bit wavy) and its as good as new. Hopefully tomorrow I’ll cast an eye over the drivers side and deal with all the niggles in that one

Month 3

What a roller coaster month this has been!

Thanks for reading.
stevegm
Wow. Great job documenting the build.
Andyrew
Longs look great! Lots of detail in your posts, looks like your able to make some decent progress, sorry to hear about your parts fiasco!!
Darren C
Build off Challenge Month 4

Just to clarify, this is day 91, not only of the build, but day 91 of car ownership (since my car arrived in the UK)

Day 91

Today I had carried on working on the sill (rocker) covers taking out small stone and possibly an old seat belt dents. 3 hours on the passenger side sill cover and they're all gone. I spoke to my bead blaster at lunchtime and it looks like the parts (bumpers, valances & sills) are too big to fit in their small chamber, so I looked at alternatives.
I used another local company a while back for another restoration who sand blasted my old 944 body. They’ve agreed to do the parts for me.
I might get my own back by using sand to my advantage for once on the car!
I may throw in the engine lid as it’s the same as the rest of the body, badly resprayed and peeling. The intricate underside of the engine lid pressing is going to be a pain to clear all the bad paint off. I suspect that the intricacy of the underside was the reason they couldn’t be bothered to prepare it properly before it got resprayed in the past. I don’t want to make that same mistake so sand blasting it free of all paint is probably the best way to ensure a good respray now.

Day 92

This morning before work I did a bit of etch priming over the tin bashing I did last night on the passenger sill cover. Just to stop the bare metal going rusty while I work on the parts so they’ll be ready as a group to send in for sand blasting. Plus with a coat of primer you can see if you’ve missed any small dents much easier.
Tonight I started dent removal of the drivers side sill cover. Not as bad as the passenger one was, just the dishing around the incorrect pop rivet holes and two tiny dents in the side. All sorted now.
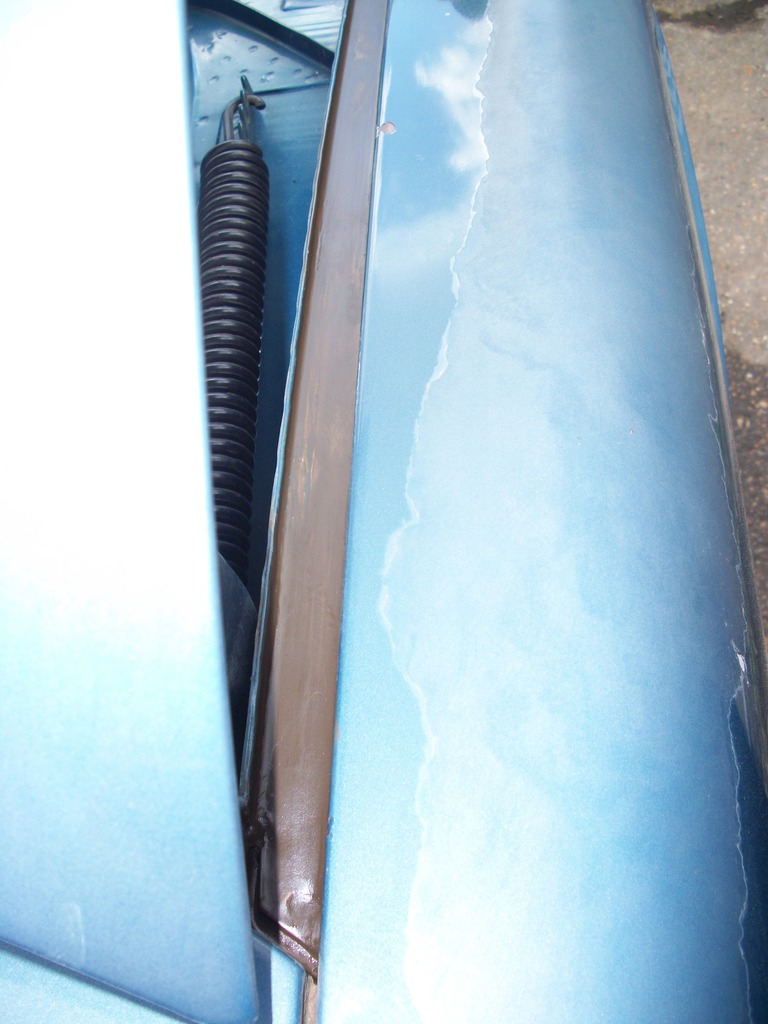
With the welcome light nights starting now I etch primed the second sill and started on the rear bumper. There was a very nasty scrape type dent between the number plate and the over rider. (Looking closely at the pictures the seller sent me when my car got loaded on the transporter - I asked her to take lots 360 degrees around the car before shipping - I can clearly say the rear bumper dent was caused somewhere in transit from California to Southampton). The bumper is much thicker steel than the sills so it did put up a lot of resistance. After an hour I have pretty much got it out.
Anyway I had to wrap up about 8pm, not so much a light issue, more a consideration for my neighbours. It’s not fair on them hammering and banging at 5:30am and 8pm. So the plan tomorrow is to finish the rear bumper defects.

Day 93

After breakfast I waited until 8am to continue hammering out the dents and damage on the bumpers, so to not upset the neighbours too early.
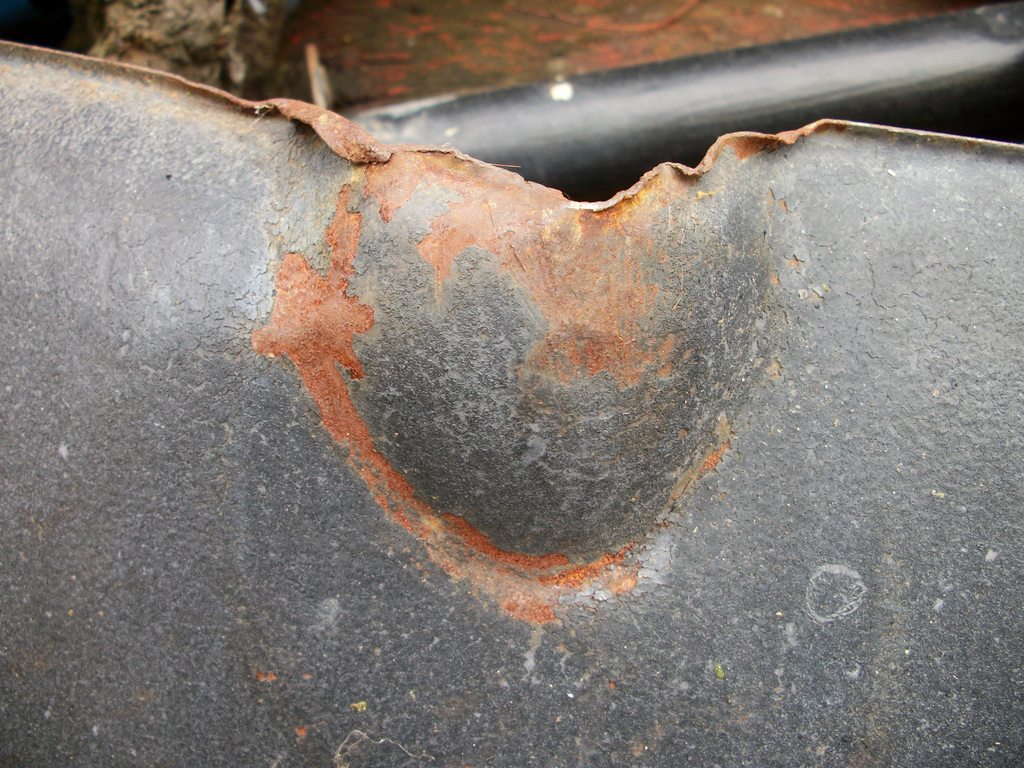
The front valance on passenger side was very badly dented and deformed as per the photo I posted before with it still on the car.

IPB Image

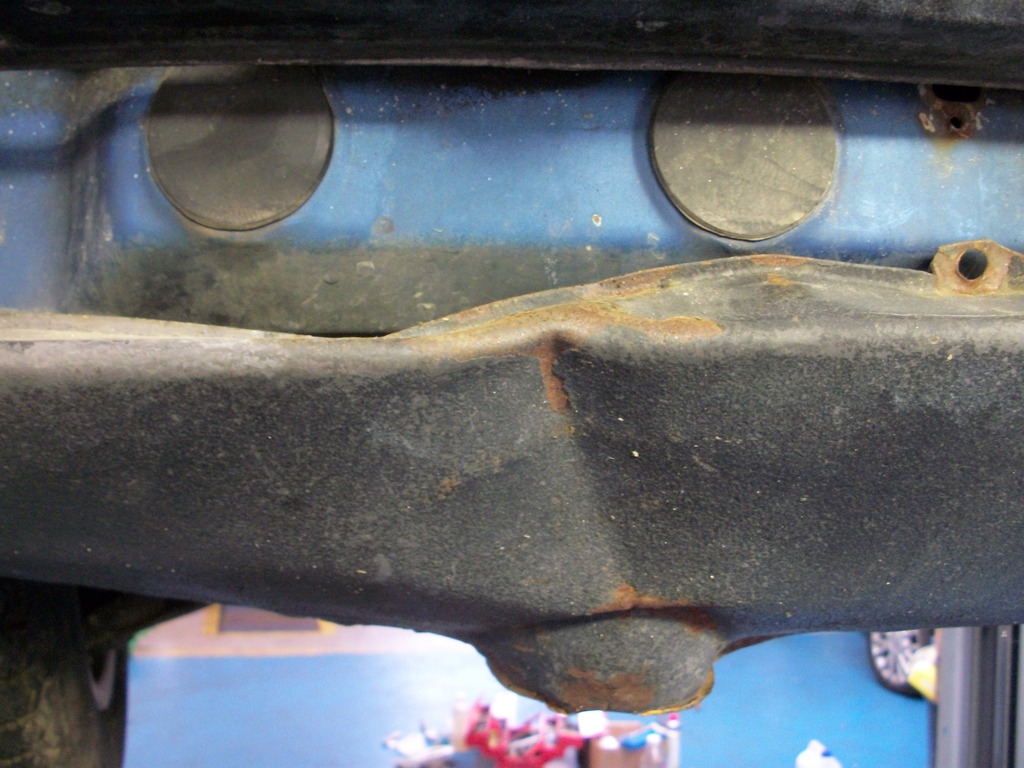
When it was off the car on closer inspection it was pretty mangled on the passenger side

IPB Image

After a couple of hours and some serious metal persuasion I got it reasonably sorted out.

IPB Image

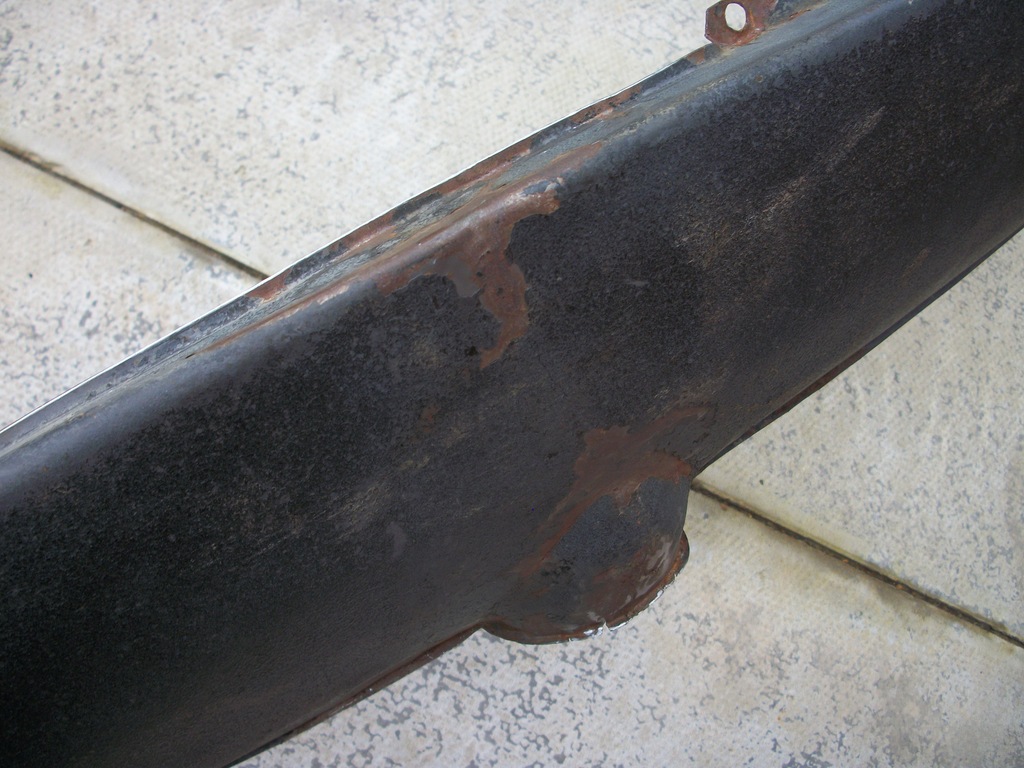
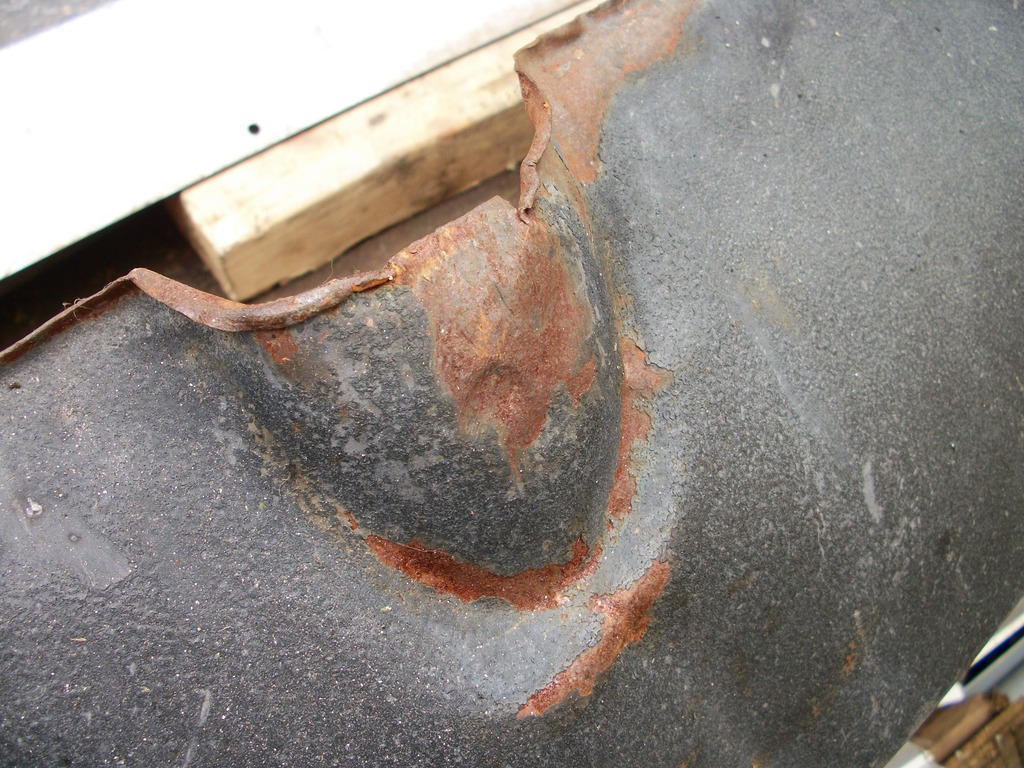
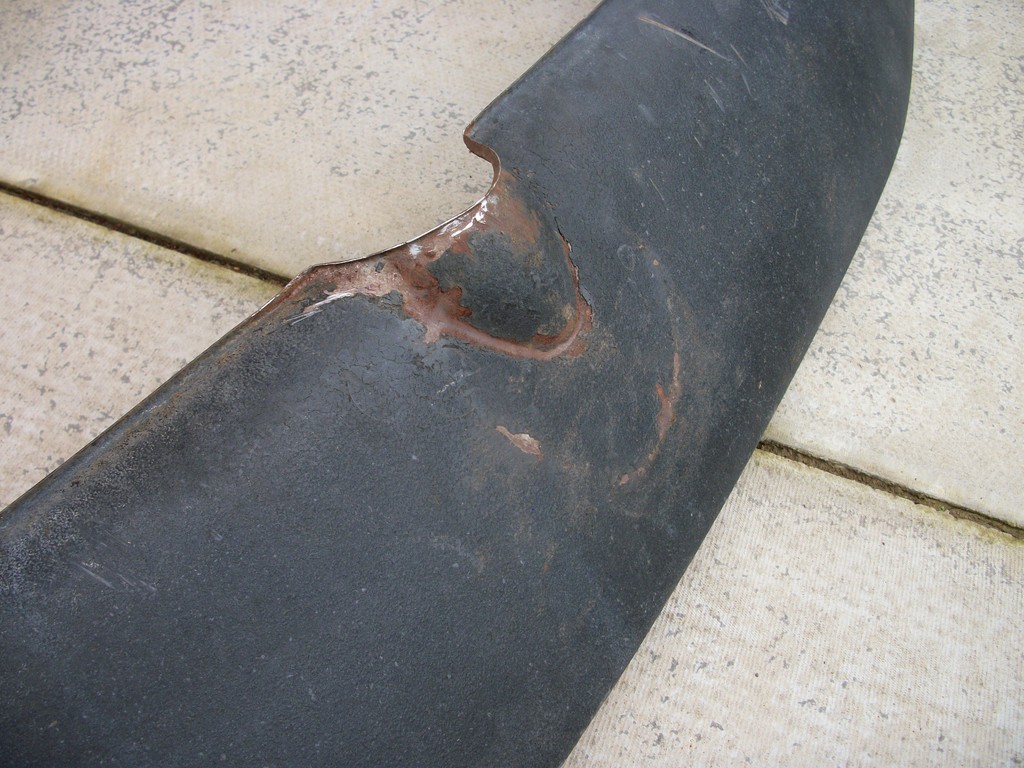
The drivers side of the valance when on the car was also pushed in and bent.

IPB Image

Same as the other side when taken off and flipped over

IPB Image

A few more hours tin bashing and it’s back in shape

IPB Image

I wrapped up that evening at 6pm. I do get bored after 10 hours gently tapping out dents, so need to stop for a change of job so that I don’t get complacent with the dents. It’s far easier to have a “that’ll do” attitude after a day with a hammer. I’ve found if I walk away and return another day I end up doing a better job in the long run. So the valance has been saved for another day and wont need any nasty filler in it

Day 94

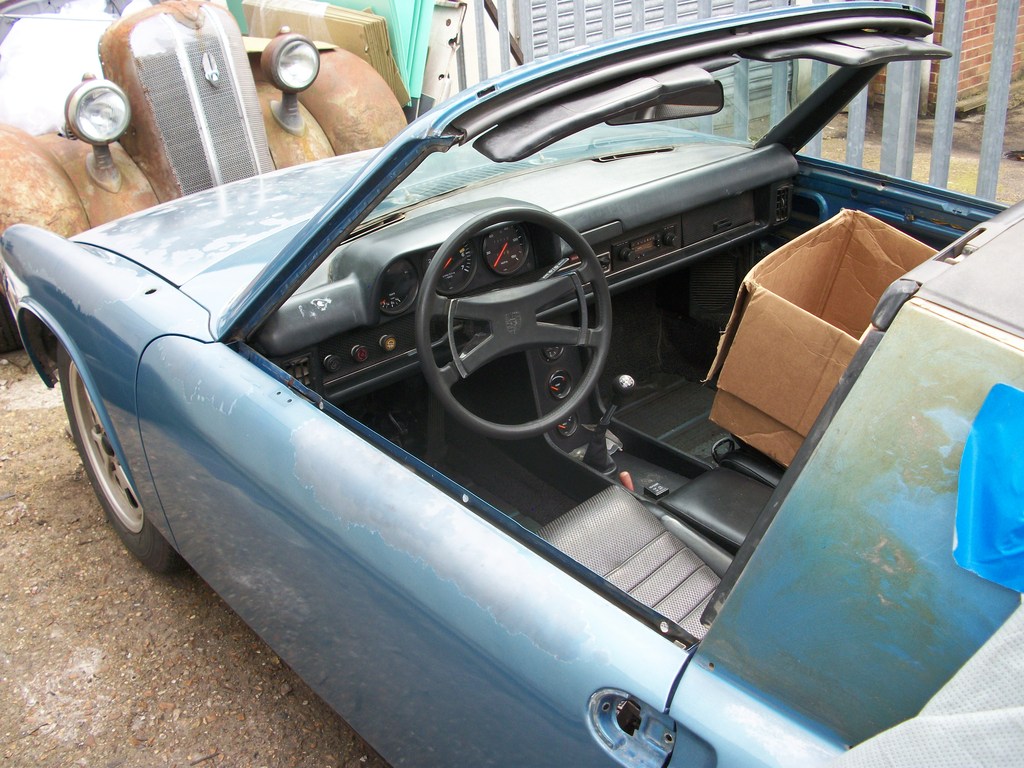
Today I started at 6:30 am taking parts off the car in preparation for the repaint.

Starting at the front of the car I took off…..

Horns
Fog/Driving lights
Row of large rubber caps
Two small rubber stops that the valance rests on (same as the ones on the engine lid hinges)
1 x small grommet in boot floor
2 x small panels in front of pop up lights (then removed the securing grommets
2 x light motors, relays & bases
2 x pop up light covers (the painted tops)
2 x pop up light assemblies complete
2 x bonnet rubber rests
Bonnet seals
Bulkhead seal
Front carpet
Spare wheel, and cover
Little sticker for fuel (saved to put back on after paint)
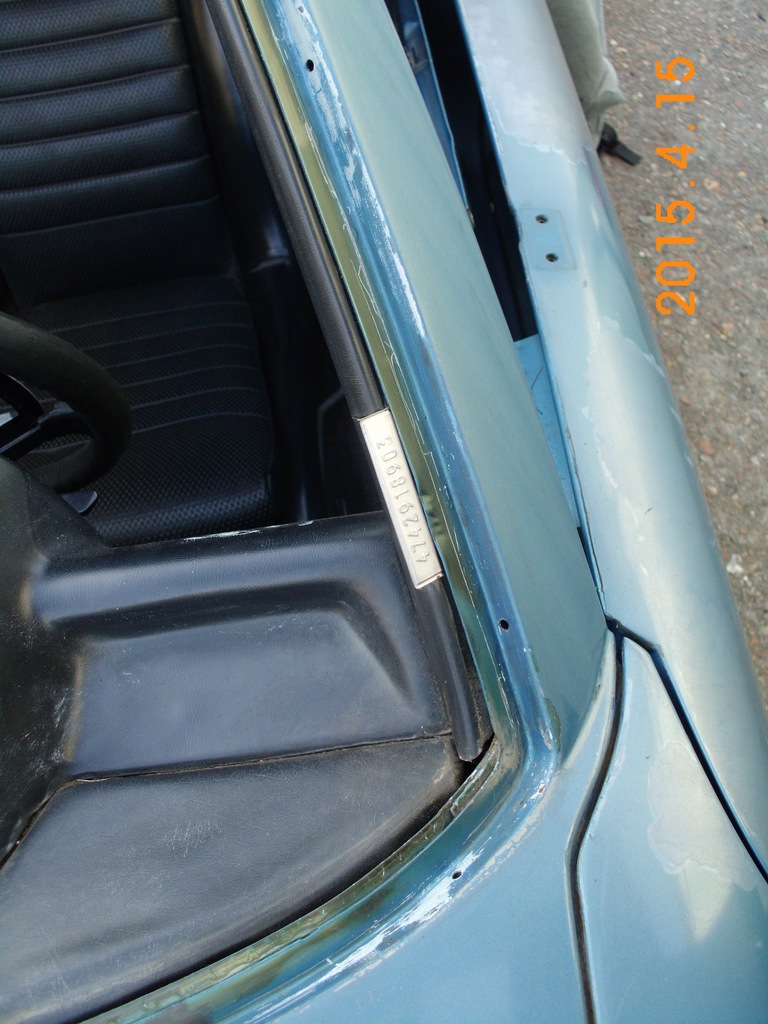
Drilled out rivets and removed ali VIN plate
Drilled out rivets and removed small id plate in spare wheel well
Removed side markers and what was left of the perished rubber cable sheath under the wings.
2 x front light assemblies (indicator/sidelights)
Undid all the bent metal tab wiring loom retainers, straightened flat and took of plastic tube covers.
Removed numerous through bulkhead wire grommets
Pulled back whole front wiring loom and coiled up out of the way to allow painting inside whole bonnet.
2 x wiper arms, and spindle nuts washers and seal rings to scuttle.
2 x windscreen washer jets
Complete windscreen aluminium surround trim (uber carefully)
Radio aerial
Door mirror
2 x rear tail light assemblies
All wiring tabs and sleeves in boot
Pulled back whole rear wiring loom and coiled into engine bay
2 x white large cup plugs buy rear strut tops
2 x strut top large rubber covers
2 x targa roof white clips (had to drill out very large pop rivets)
2 x targa black clips over rear lights
1 x boot light.
Boot & bulkhead rubber edge seal
2 x polished ali trims (curved facing backwards) either side of rear window
2 x thin polished ali trims running at the base of the vinyl covered quarters
2 x ali trims and door seals up the rear of the door opening
1 x rubber trim up windscreen pillars and across targa top front. (Boy was that rock hard and shattered into 1000 bits)
2 x ali trims up back of windscreen pillars that the rubber sits in.
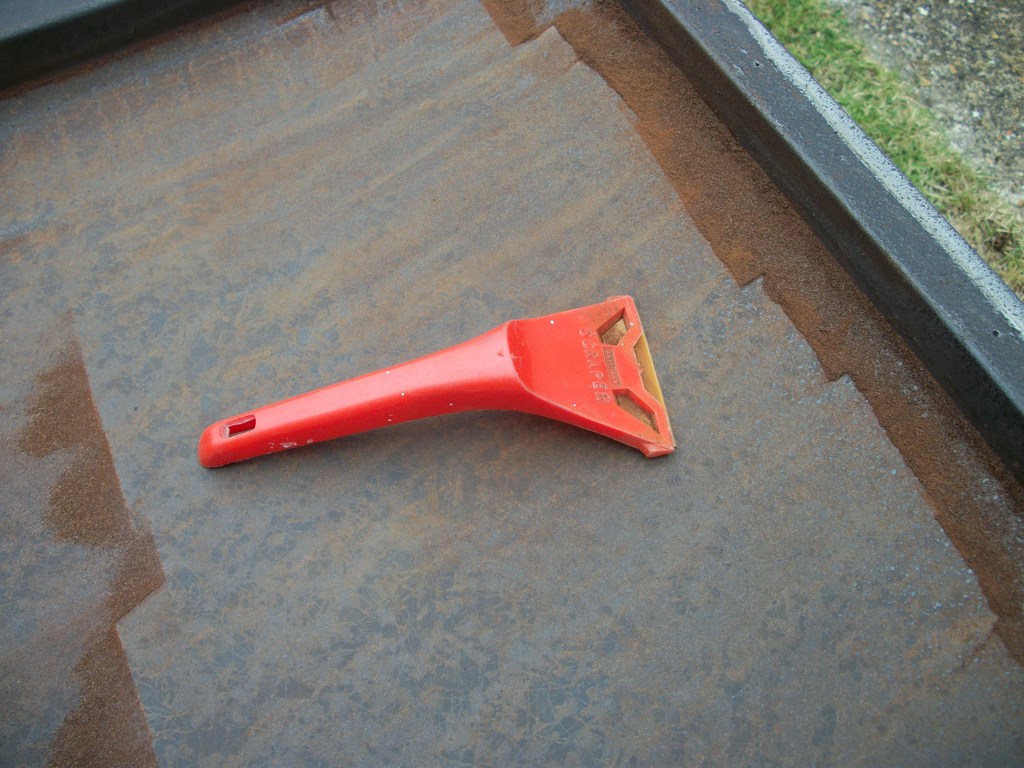
And finally with a very flat wallpaper scraper I took what was left of the vinyl off the sides of the rear quarter panels.

All in all not a bad days progress, everything labelled (especially wiring) and all parts and fixings bagged and labelled too.

Again my Nemesis SAND was found every where, under, behind, over and in any nook and cranny.

I took the bonnet seal out and threw sand everywhere!

IPB Image

The recess in the aperture was full of Californian Desert sand

IPB Image

I took the pop up lights out and found the deep funnel shaped body on both sides about 1 ½” deep and flush with sand and Californian pine needles. What a quality spray job they did in the past, even the top of the sand got oversprayed Alaska blue!

IPB Image

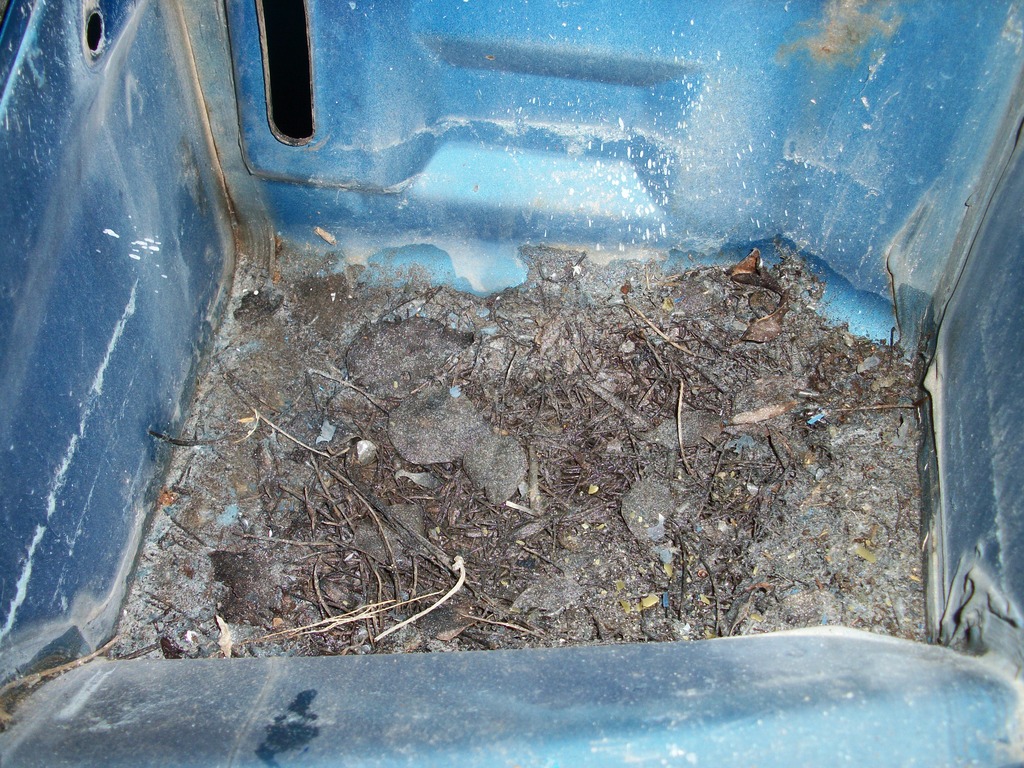
Sand everywhere in the boot and bonnet, even the spare wheel was buried in the stuff.
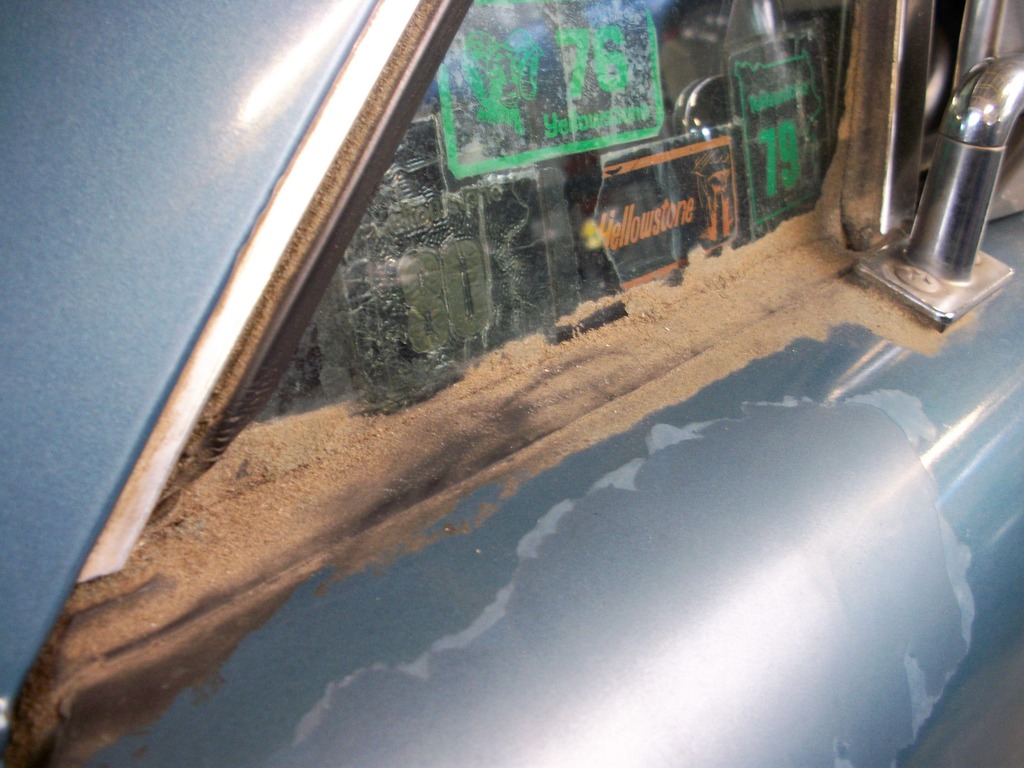
When I took the seal off around the windscreen it was full up with sand.
Pulling the roof seal off across the top of the windscreen threw sand all over my multiple times hovered interior!
As I said before if you’d buried this car on the beach and dug it back up there’d be less sand in it.
Even the exterior has mini sand dunes forming in every corner!

IPB Image

I cannot even begin to tell you how much sand this car has in and on it. One thing’s for certain….it’ll be half the weight when I’ve got the last bit off of it.

Day 95

Today I started early this morning making good use of a dry day. I took the targa top off to remove the rear aliuminium trim and knocked sand all into the car.
Over the last few weeks I kept cleaning the car and each time I returned to it it was covered inside with a light dusting of sand??
This morning I found the source when I lifted the targa top and accidentally knocked it.

IPB Image
Half brushed down, half full of sand!
Once the roof was cleaned off I pulled the ali trim off cleanly.
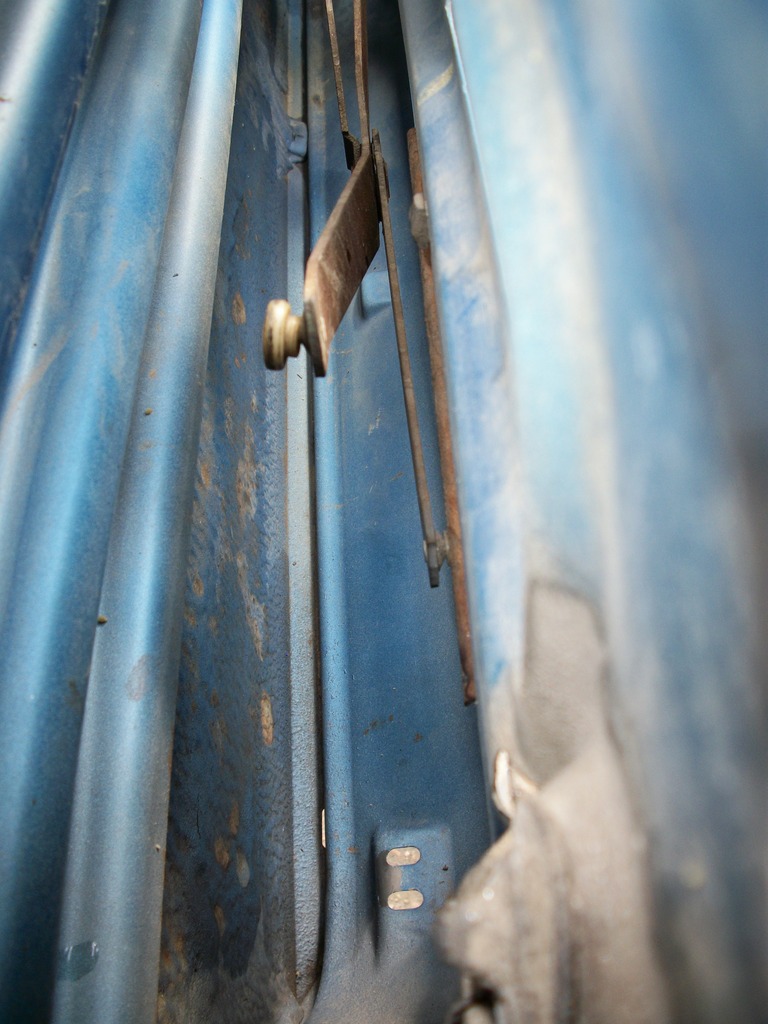
After a good clean I set about taking the doors apart. Door cards, handles, quarterlights, main glass, runners, locks, window mechanism, door seals and weatherstrips. As with the rest of the car, all the fixings even the tiny Philips screws holding the outer weatherstrip came out easily. Just the slot head screw adjusters on the bottom of the window frame gave me a struggle, but after a quick squirt of WD40 they freed off. Looking inside the doors they are absolutely rust free. Full of sand, but not a spot of rust!
I did find a broken plastic roller for the drivers check strap mechanism, so I'll have to add that to my parts list. Hope they're still available.
The cars looking very sorry for itself now, but hopefully it’ll ensure a decent paint job without any nasty masking up edges on stuff left on the car.

IPB Image

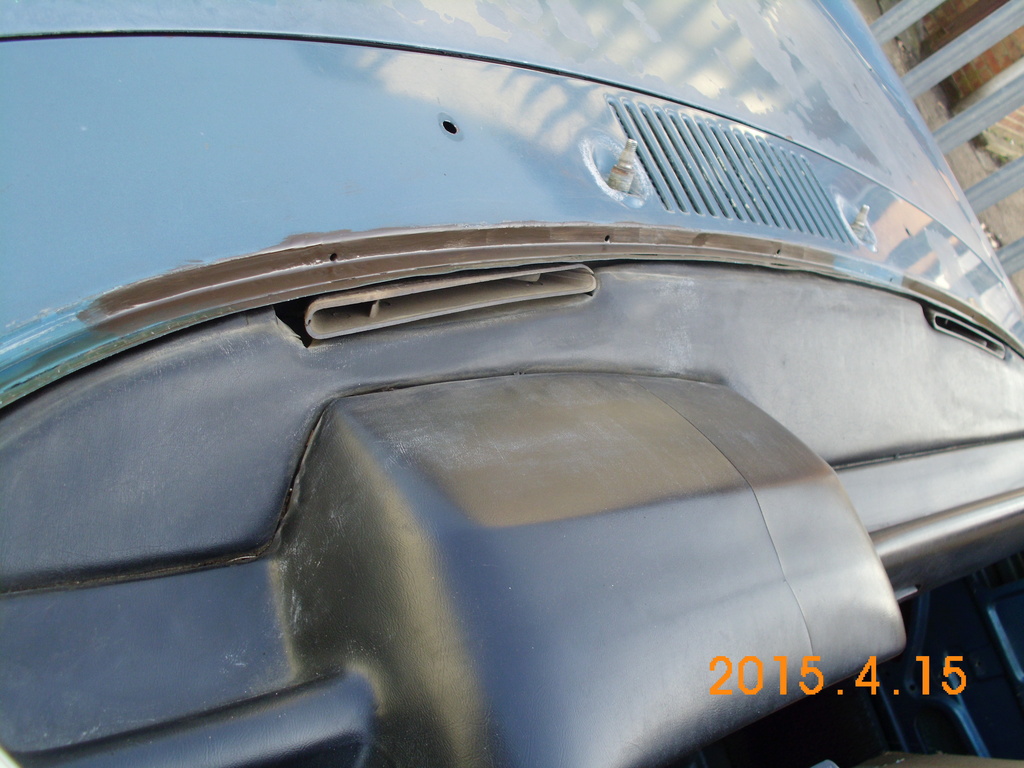
After the doors I put the tools away and got out the bucket for some serious sand removal cleaning from the bonnet.
Phew..3 hours later and it looked like this.

IPB Image

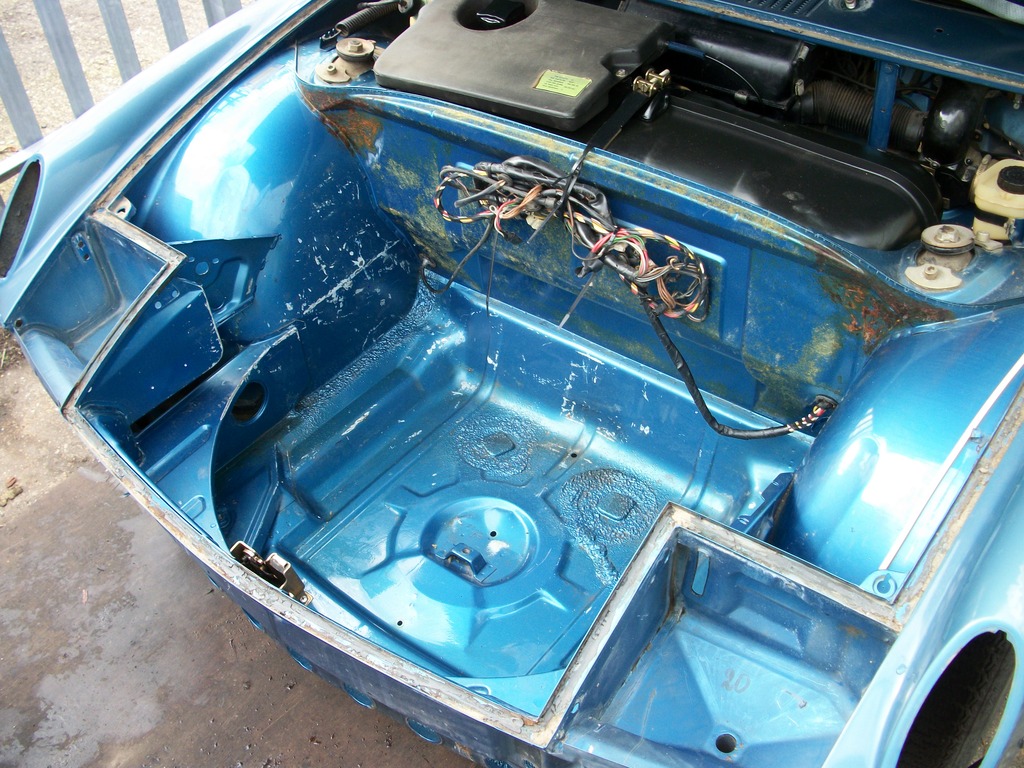
I was very surprised to clean out the headlamp wells and the wheel well, and find zero rust. (The brown on the bulkhead is glue where I pulled off the carpet) Considering all the cr*p in there I expected the worst. Just a little flaky seam sealer in the passenger headlight bucket but underneath it was spotless grey primer.
I spent another hour and a half cleaning around the fuel tank area having thrown sand all in there yesterday when the bonnet seal came out before I finally called it a day.

Day 96

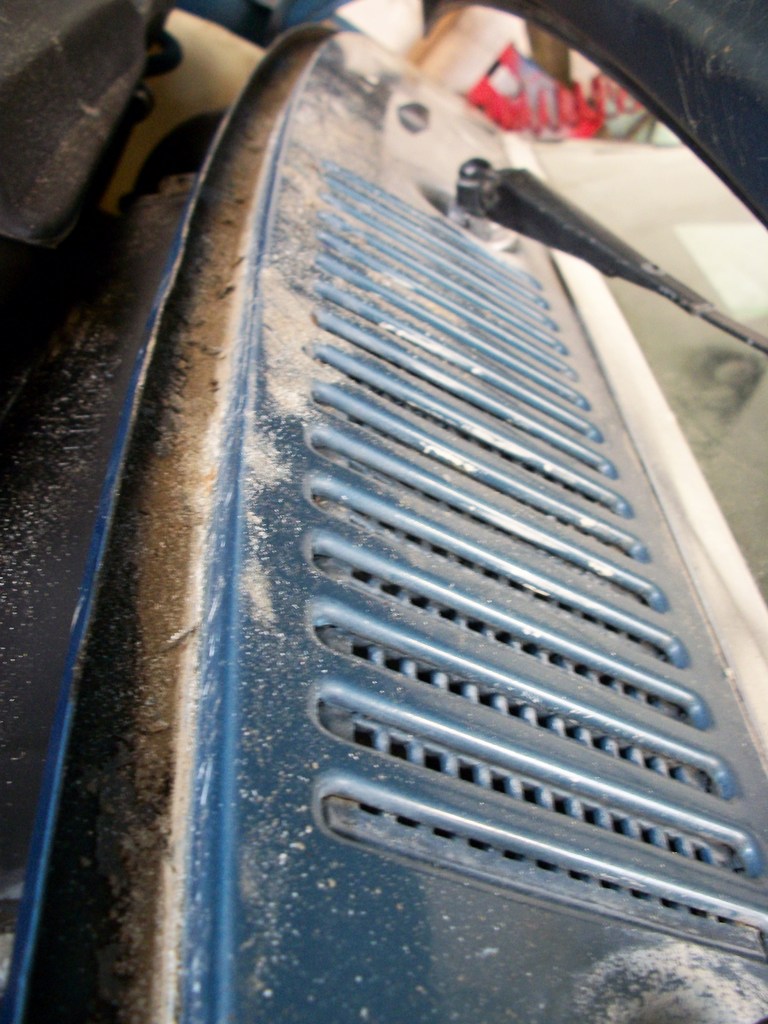
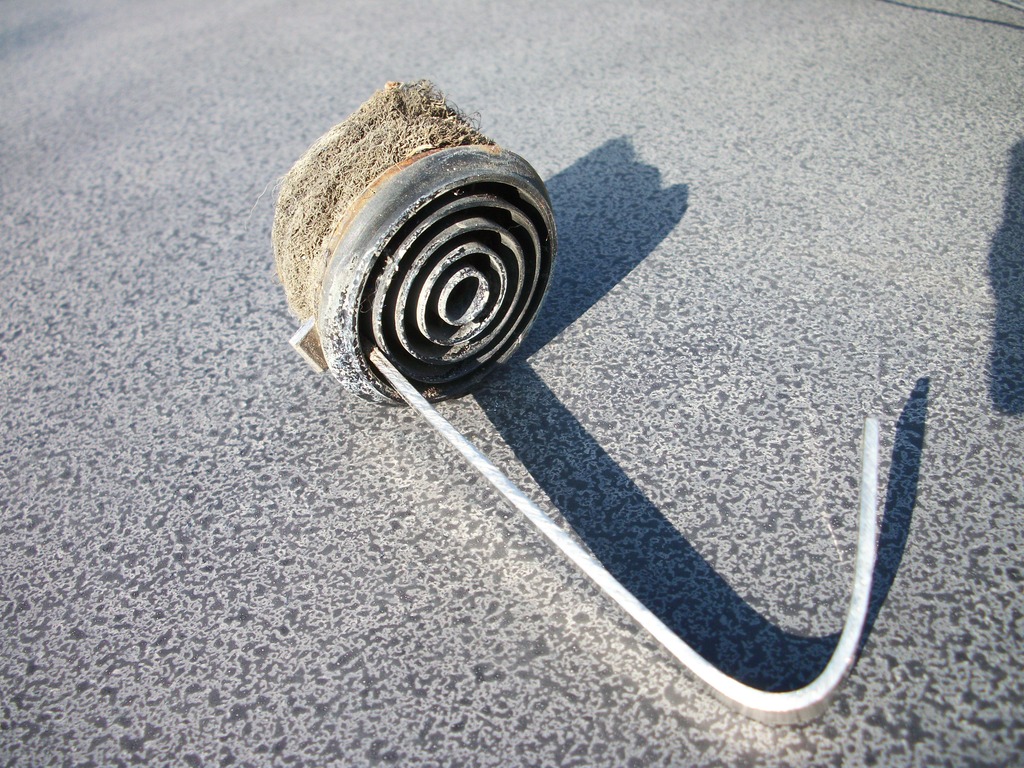
Today I got up at first light and cut some spare sheet steel up to make a hook tool. One of the jobs I wanted to do yesterday was take out the circular vents in the rear door shuts, I ended up making the hook tool. Inserted at 12 o’clock (tiny tug) and 6 o’clock, tiny tug and they both popped out followed by another egg cup full of sand into my lap.

IPB Image

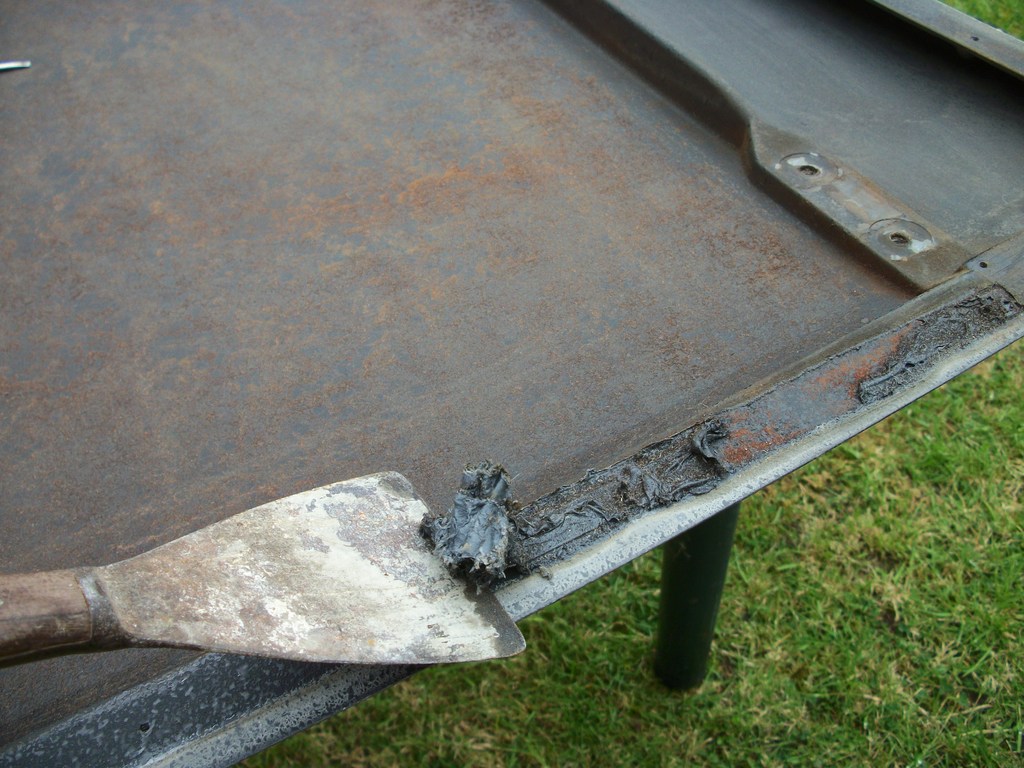
After cleaning up yet again I started on the bonnet seal channel. It looked like the PO must have had a new seal at some point or re-glued the old one as there was a mix of old impact adhesive, silicone and polyurethane bond in the channel. What a mess it was. Certainly couldn’t just paint over it or glue another seal on top, so I started the thankless task of scraping it out with an old blunt (slightly rounded to take the edge off it) wood chisel come scraper. Followed by miniature wire brushes (tooth brush size that fit nicely in the channel) then 180 grit followed by 240 grit. Not a nice job, but after 6 hours at it, it was time to give it a quick coat of encapsulating primer to stop any rust starting on the areas where it was bare.

IPB Image

IPB Image

Fingers aching and locking up, it was time to move to another job.
Having taken the doors apart yesterday they were absolutely full of sand. 2” in the bottom and a good dusting on every surface inside them. The only way I could get it out was to cut the handle off a 3” paintbrush and get in side each door by hand with several buckets of water. Slowly working from the top down inside each door, into the ridges of the side impact bars, and back on myself onto the rear of the inside door pressing. Working with a big water soaked sponge and the brush I managed to get both doors clear of sand in about an hour and a half each.

Drivers door (taken through window slot looking down).

IPB Image

Passenger door through the bottom opening.

IPB Image

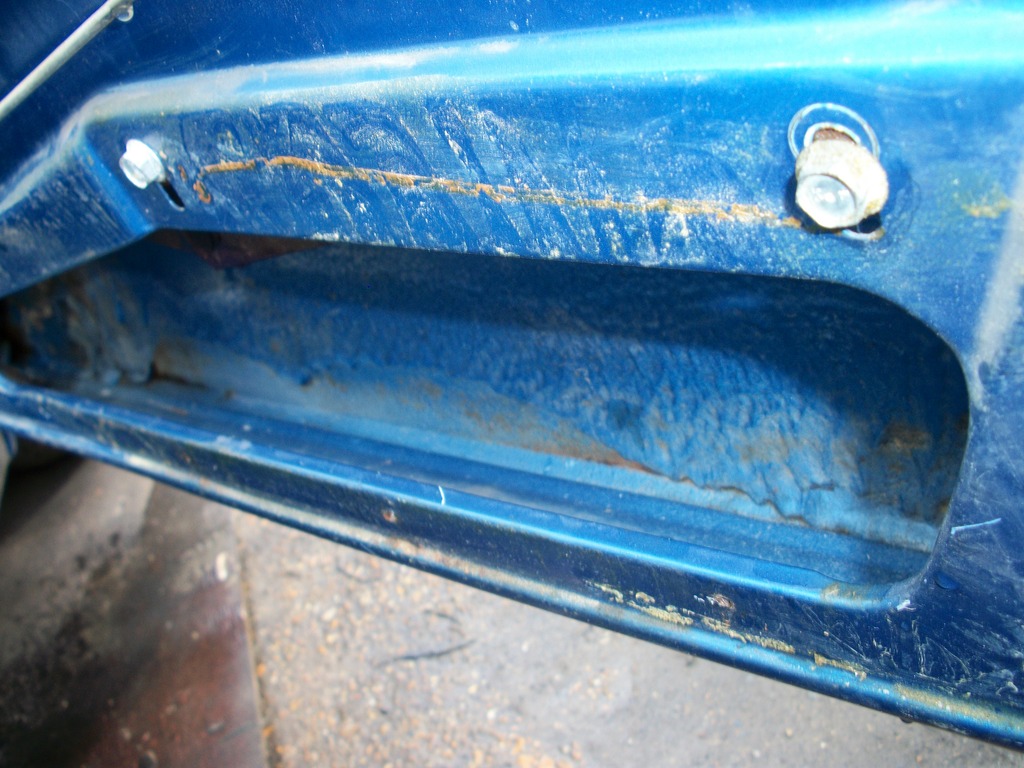
Afterwards I needed two buckets to swill the floor beneath the car to get rid of the sand that came out. (if you look at the floor you can see the strips of old broken window channel rubber mixed with heaps of sand)

The weather was kind today and I propped both doors open and the bonnet to allow things to dry nicely.
Not to be one for sitting around, I took off the sill kick plates (with the little plastic rivet clips) and the lower inner door seals and threshold plates while everything dried.
After which I packed up and put the car back under its cover.

Day 97

This morning before work I went through the PET catalogue and made a list of parts I need and then went on line and made another list of rubber seals from 914 rubber and also saw they did the check strap rollers so added that to an ever growing list and emailed it over to them. I spent ½ an hour searching ebay both UK & USA and found some parts so did a price comparison check with Auto Atlanta, Pelican and Mittel. I luckily came across a new windscreen surround and clip set on ebay.de for a good price so went for the buy now on that one. My old surround is fair condition but with a few scratches and tiny stone chips I just know that after my new paint job it will bug me if I don’t fit a new one. I then loaded the bumpers, valances and sill panels into my car and went up to the garage where my car is for 6:50am to drop the compound key off that I borrowed this weekend so that I could work on the car while my friend was on holiday. Popped in and picked up some bacon butties on route as a thankyou. Then it was off to work.
At lunch time I took the bumpers and parts into the sand blasters. All 6 items blasted and etch primed for about £10 each. Not a bad deal as it will be certain to eek out any rust to ensure no nasty paint bubbling for many years ahead. They reckon they’ll be ready for the end of the week. Next I spoke with Porsche Centre Portsmouth and rattled off my parts list I’d drawn up before breakfast. Surprisingly they tell me some parts that I thought “no chance” are still available and not bad prices either. These being the plastic rivets that hold on the sill plates and sill trim, the 3 metal clips that hold on the ali trim across the rear of the roll bar, the main rubber seal that runs up the windscreen pillars and across the roof and the small L shape seals that hold the quarterlights. One part though that I haven’t tracked down just yet is the padded trim that runs in front of the roll bar (has the two cut-outs in it for the targa clips) mines sun damaged like a bad dashboard and vertically split into about 7 pieces. I did think about recovering it but the splits are swollen up to mountains and valleys so you’ll see it under any over coat of vinyl.

This evening when I got home I began the mammoth “cleanathon” of all the parts I took off this weekend. Starting with the glass, I used a brand new Stanley blade as a scraper to get off all the old stickers (multiple visits to Yellowstone Park in the 1970’s & 80’s….wonder if they met Yogi Bear?) then scraped all the calcium lines off around where the windows sat in the rubbers. This is damn hard stuff to get off and is caused when you wash a car with tap water over the years it calcifies where it sits between glass and rubber. Finally I scrubbed the window runner brackets to remove yet more sand before I washed it all off with soapy water. I then moved onto some of the plastic parts, headlight surrounds, headlight motor covers and the rubber headlight linkage covers.
Looking at the small round vents that came out the door shuts, after much sand removal from the filter media on the back of them, there was again more calcium white deposits deep into the ever decreasing circles. Since it was made of plastic I opted for a soak in neat toilet limescale remover. (Be careful if you use it on anything plated or aluminium as it will eat into it ) Plastics are fine, and after a few minutes the calcium was gone and they look like new.

Day 98

Today I got an email back from 914 rubber and we agreed a good shipping rate etc on my large list of parts, so I went ahead and placed the order.(Unfortunately the order was placed at a time I was unable to qualify for any Build-Off Challenge discount, so I have had to pay full price)
I’ve heard mixed reviews on some of the parts so chose wisely (a mix of 914 rubber parts and others I got direct from Porsche) and I’ll update you on the quality and fit of what turns up.
At lunch today I sorted out some zintec sheet for blanking the side markers and went over to the car to see about access to the compound this evening.
Good to go, when I finished work I managed to get a couple of hours taking a few more parts off before I had to leave and lock up.
During the day I called a local windscreen company and asked how much they’d charge to run their cheese wire around my screen to pop it out (bearing in mind I’ve already taken out the chrome trim)…as soon as I said 914 they declined? I called two others and no one wants to know. What’s wrong with these people, it’s their sole business yet they are scared to touch a 914! Pathetic really. The last 3 or 4 cars I’ve restored I’ve had the same issue and ended up taking the glass in and out myself. It seems that if your car is older than 10 years old then the windscreen people don’t want to know. To be fair they are so poorly skilled these days they haven’t got a clue. I had a new screen in my Volvo V70 a couple of years ago on insurance, and they made a right bodge of it, broke all the clips that hold the wiper motor cover, drilled awful self tappers into it to hold it back on and got the black sealant all over the cream interior A pillar trims. I went ballistic at them, it cost more for all the new parts they damaged than the screen cost. Put me right off a certain mainstream “automobile…glass” company.
I’ll just have to do it myself, so cheese wire is on my shopping list for tomorrow.

When I got home this evening I spent another 1 ½ hours cleaning sand out of the window winder mechanism, cleaning up the securing bolts and the tracks the nylon rollers run in. I then started to clean the whole assembly with brass bristled detailing wire brushes to get that just oxidised coating off the whole assembly. The two pull rods from the interior door handles had started to go furry too, so they got a good going over.
When I stripped the doors down over the weekend I found part of a broken spring clip that holds the rod into the door lock mechanism in the bottom of the door. Part No 113.837.199. I’ve seen them many times before in my VW youth so just checked and found them from UK based VW Heritage for £2.50 so bought a pair. Although I only need one I thought for the sake of £2.50 I’ll just replace both clips that are inside the door. The ones behind the pull handle can be re-used as if they do ever break, they’re far easier to swap over than the ones on the lock itself.
I ran out of daylight again so called it a day.

Day 99

This morning before breakfast I started to sort boxes and bags of parts out in my shed into “clean”, “refurbish” or “replace”. One item that certainly needs replacing is the rubber sleeve that the wiring loom passes through from inside bonnet to the sidelights. Mine just crumbled into 1000 pieces when I took the lights out and pulled back the loom. It was a sod to find in the PET illustrations as the picture of it looks more like the boot on the side marker than the long tube with 90 deg boot one end and grommet the other. By shear chance this morning I googled the part number for what looked wrong in the PET and sure enough it came up as the part I needed.
The part number for them is 91463121710 I found a couple for sale on line and opted for a pair from Auto Atlanta, placing an order this morning before work.
As I was away over lunch I couldn’t get much done in the way of chasing parts which was pretty frustrating.
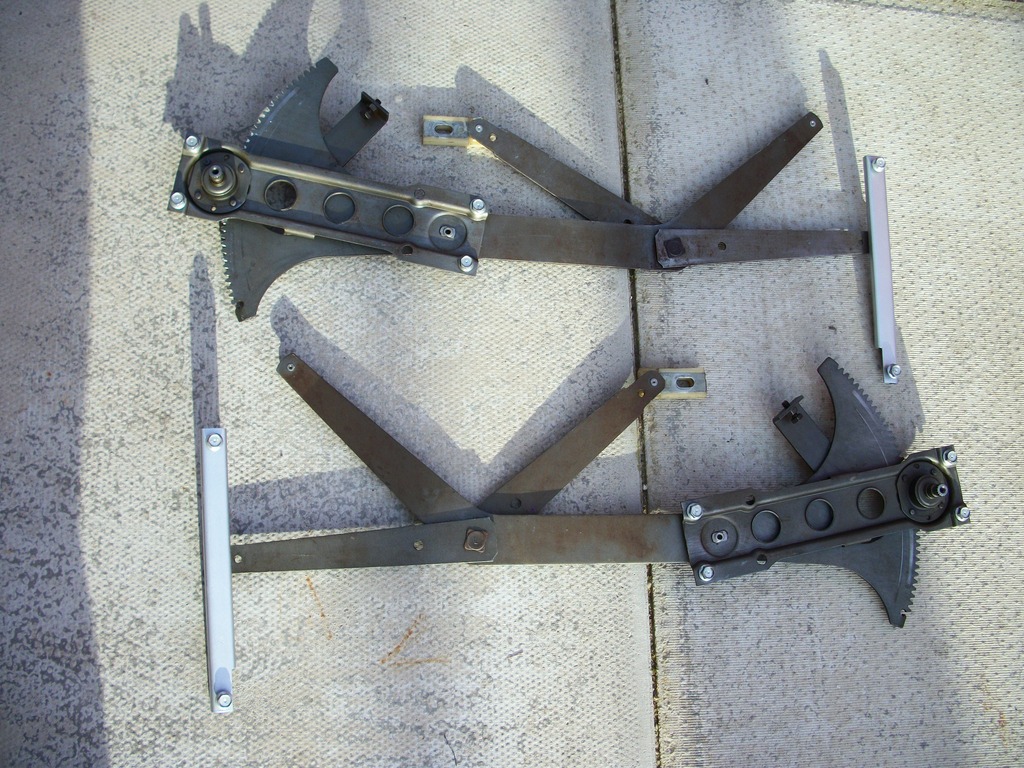
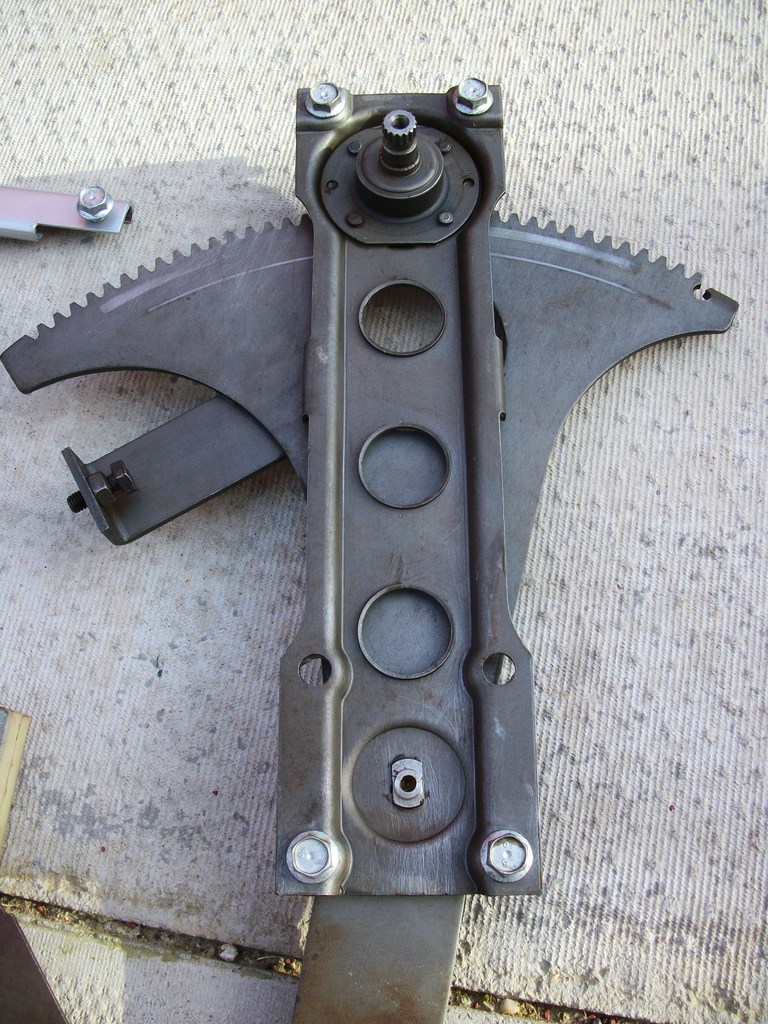
To make up for it tonight when I got home I finished off cleaning the window regulators by a giving the pinion, rack and pivots a good wash through with white spirit to clear out all the sandy grease. I worked it all in with a paintbrush until it operated nicely without any gritty noises. While they dried off I cleaned the same sandy grease out of the interior door pull handles too and left them to dry.
There is a small (about 8” long C channel that one of the legs of the regulator runs in (bolted to the door closest to the rear). These couldn’t have been galvanised like the rest of the regulator is as they were quite rusty. I gave them a good going over with emery paper and small wire brushes to clean them up before giving them a coat of Galv silver spray paint. (avoiding painting inside the runners as these will be eventually greased and any paint in there could jam them up).
After finishing the painting, the regulators were dry and I poured some waxoil straight from the tin into a spray can lid and with a small ¼ brush I gave the whole regulator assemblies a light coating inside and out to keep them from rusting and seizing in the British climate.
Running out of light again I moved inside and finished off by cleaning sand and dirt with an old toothbrush and Cif cream (magic stuff) off the 4 (2 each side) little rubber hoop guides that interior pull handle rod runs in to stop it rattling.
So that was today’s escapades.

Day 100

Wow has it really been 100 days since this little car arrived in the UK? The time has flown by!

Looking at the dismantled parts I need to replace all the fuzzies. The vertical track ones were rock solid, and shattered into several bits in the bottom of the doors! The ali strip horizontal internal and external were shot too, as was the very outer rubber weatherstrip, so all ordered and on their way.
Today was a manic day at work, typical Friday issues (why the hell do things go wrong on a Friday at 5 to 5) Suffice to say I have just got home at 10:15pm

Before the gloom and doom this afternoon I did manage to get out at lunch time and pick up the nicely sand blasted and etch primed bumpers, valances and sill sections. They came out really well. Trouble is now they have no heavy textured stone chip on them I’ve spotted a few more dents. More tin bashing required!
This morning the postman delivered the new windscreen surround from Germany…that was quick.
Also this evening on the door mat were the two lock rod clips turned up in a jiffy bag and some engine lid rubber trim.
I placed all the parts in my shed this evening and with everything else in there it’s getting a bit crowded now. Roll on when the car goes in for paint and I can think about starting to put it all back together.

Day 101

On the way home today I called in at a chandlers. I live a by the sea and we have multiple boat yards and Marina’s within spitting distance. They always have some interesting stainless fixings, braketry and general stainless nuts & bolts. This afternoon I was after some waterproof grease, the type the Yachties use on the winches and mechanicals at sea. I picked up a small tube and went home to work it into the joints and runners of my window regulator mechanisms. It’s great stuff, and perfect for this application.
I finished off painting the short runners with a coat of oil/grease resistant paint that I’d galv silvered yesterday and when they dried I put them all back together.

IPB Image

I’m pleased how they came out.

IPB Image

I then greased up the interior pull handle lever assemblies with some more waterproof grease before bagging everything up to keep them clean ready for putting back on the car after it’s painted.
The other week I turned down on my lathe a press for blanking the side markers. At the weekend I took further measurements and found a gentle curve in the wing (about 4mm off centre top and bottom) Having had a re-think for a week, I decided to reverse the infill plate. In other words instead of pressing the wing I will press the blank plate.
So this afternoon and into the evening I spent several hours making a new press tool and cutting discs out of the zintec sheet I picked up in the week. Pressing and testing until I got it right. Finally I made several and cleaned up two for welding after putting the wing curvature into them.

IPB Image

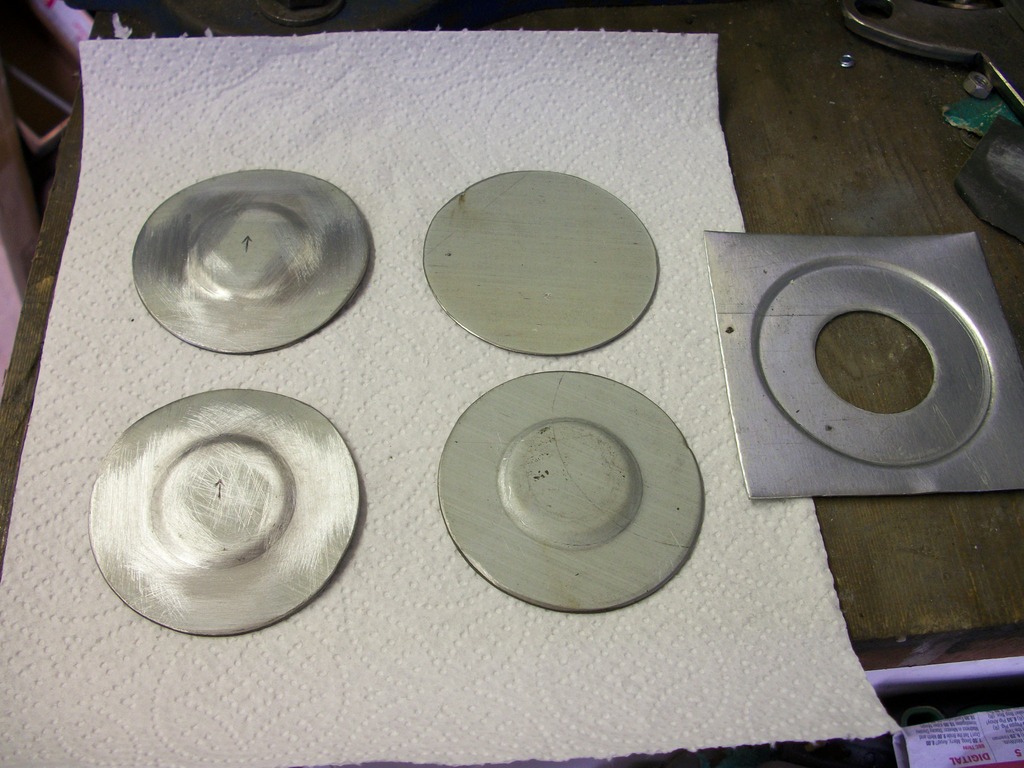
The top right is a plain disc, far right was the old tool pressed first attempt, bottom right is the flat pressed reverse wing infill and finally the two on the left (top & bottom) are the finished ones with wing curvature. Running out of evening I finished off by down loading today’s photographs, writing an article about the visit for another club magazine and website and posting my update here.
Dependent on how I get on tomorrow I plan on welding the side marker holes up.

Day 102

Today was a dawn start, I had access to the unit so loaded Victor “the wonder bus” (my V70, so called because each time I go out, I wonder what’s not going to work today on it). Today it was the central locking, but to be fair the car has a special system that works on an algorithm shift rota. Today it was the rear door on the drivers side that wouldn’t unlock, last week it was the petrol flap. All random stuff that fixes itself the next time I drive it.

I cooked my speciality Panini’s first thing while loading up and delivered them at 7am to a hungry team at the unit (a 59 Chevy in need of clutch adjustment, a Seat Leon with leaking manifold and my friend who's unit it was) before starting work on the 914.
The weather was really kind again and I cleaned up back to bare metal around the side markers on BOTH sides of the wings. Scraping off some PO underseal first. With the sidelights removed I could get in easily and see what I was doing easily. Using a half round file and a rat tail I cleaned up the large hole and three smaller holes so all was clean and good to go for welding.
A dry run on the plates I made yesterday showed they needed a tiny tweek with pliers before the fitted perfectly.
Both discs were welded in and the three holes welded up, before finishing off with a flap disc to take the weld down flush.
Since it’ll be a week before the car goes into the paintshop I gave both sides a good coat of encapsulating primer, working the paint into the rear of the wing. After a few days to dry I plan to seam sealer it all up to protect the plate from corrosion from the inside.
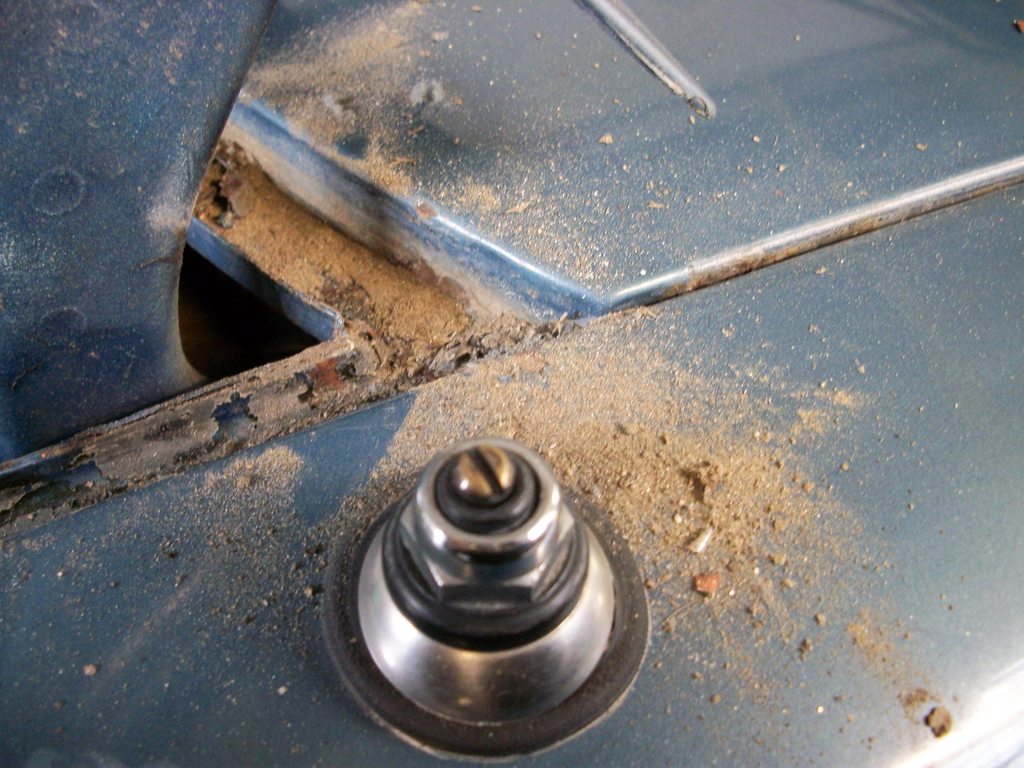
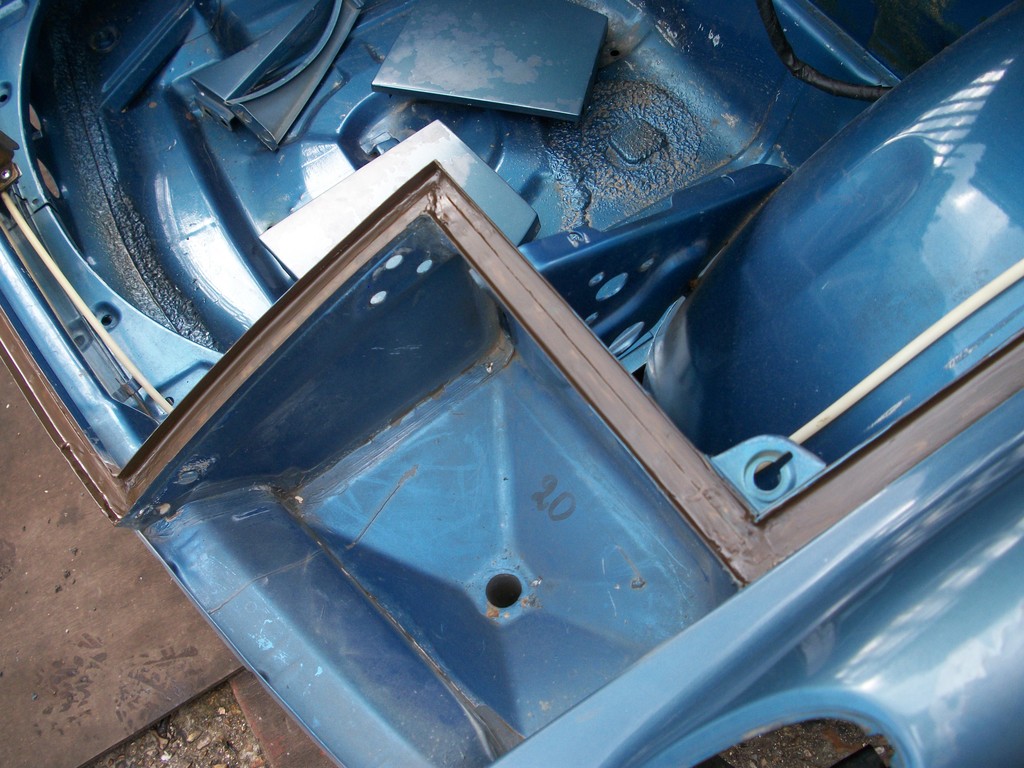
While the paint dried I started to clean up inside the boot. Again like everything else it was full of sand. Unfortunately the PO sealed up the rear lights with caulking (a black tar like blu-tack) and mastic. Suffice to say it was a nightmare to get off with plenty of sand stuck in it.
There was a question about rear badges on the car, or lack of. During cleaning I found the rear of the badge holes (the ones to the right of the boot lock) had been filled and painted over ???. I quite like the car having the 914 and 2.0 badges so I dug out the filler and revealed the holes. Running a drill bit down them by hand to fully clean them out.
The parts I had collected from the sand blasters had revealed many more dents and scrapes now that all the textured stone chip was removed, so I set about them again with a planishing hammer.
I finished the two sill trims off and started again (stage 2) of the front valance. I’d had them etch primed so I could see a few new dents, that took an hour or so to get out before I moved on to a bucket of water with a squirt of washing up liquid. Dip in a cloth and wring out and wipe over the part (to apply a soapy water gloss) and lo and behold a whole new series of dents showed themselves. More hammering required and I called it a day at 8pm after hearing a few slamming doors from the neighbours!

Day 103

After yesterdays revealing of the rear badge holes, this morning I set about an availability and price comparison on-line for the rear 914 & 2.0 badge. While I was at it I checked out the P O R S C H E script for the engine lid grille. After an hour I’d found the best deals and snapped them up (including the securing nuts which annoyingly are extra) before leaving for work.
Today I was back in Central London, all went well until this afternoon with a signal failure at Clapham Junction most trains were cancelled or delayed. Instead of a straight through train I ended up changing 3 times and getting home 2 hours late!
I started again on the front valance with more tin bashing on the final dents. This was followed by draw filing to remove any high spots and after a few hours another coat of etch primer to finish off. I’m determined to get it back to shape without using any filler. In such a vulnerable position, at the slightest stone impact any filler would simply be dislodged and make a right mess. Since I have plenty of time while the cars away for painting it’s worth doing properly, even it it’s a real painstaking job.
Day 104

This morning before work I went through more parts that I’d taken off and added the chrome on plastic Fog/driving light surround grilles that fit into the front bumper to the replace pile. (The chrome is starting to fall off mine)
I googled the part number (from PET) and did a price comparison on-line and was at first shocked at the price new. In the end I found a good deal from a company in France and ordered a new pair before leaving for work.
During lunchtime I visited Porsche Centre Portsmouth and collected the front up & over seal, the quarterlight seals and a few clips. Curiously the little black plastic rivet clips that hold the sill threshold plates and sill covers on, turned up clear plastic?
I suppose I’ll paint the heads black if that’s how they come now.
I also called another windscreen company (recommended by Porsche Centre) and they said they’ll come take a look and let me know if they would be prepared to remove the screen which is more than any of the others have said so far.
On another note, today was the last day of my 14 days notice for Berlyn to change the Beetle discs for 914 ones. Total time now is 11 weeks since I placed the order and paid. Guess what….not a word, so off to small claims Court it will unfortunately have to go. Since now I am completely entitled to claim consequential losses too, I have ordered another set of discs now from another supplier. It’s really disappointing that it has come to this but I simply cannot rely upon Berlyn and my restoration moves on even if I have to pay twice for the right part.
Anyway, this evening I visited the car and worked until dusk. After welding the side markers up at the weekend and painting the metal inside & out, it had had 48 hours to dry so I sealed it all up on the reverse with 3M Drip-check sealer.
Next I finished off getting all the visible sealant off around the windscreen with a Stanley knife to make it a little easier for the windscreen chap tomorrow.
Moving on to the boot that I’d cleaned out on Sunday there was some strange stuff going on across the floor in the middle below the boot lock. The floor had been repainted at some point (presumably when they did the poor respray) There was a paint tape line just back from the first set of corrugations so only the first rear 12” of floor had been painted? The surface had skinned and drawn. A bit like crinkled cling film? It was soft to the touch and with pressure it left a fingerprint!
So out with my scraper and old wood chisel and it simply stripped off like butter to reveal a substance that can only be described as sticky tar? Anyway it all had to come off. After about two hours I’d scraped most of it off from the rear panel seam to the end of the first set of corrugations. It revealed the original blue painted floor, but showed signs of rubbing down. There was some small bits of surface pitting from old rust, but with 80 grit this came out. All I can imagine is the previous owner coated it when he saw the first signs of rust with the black tar substance. When it went in for paint I guess they just sprayed over it, but as it never really set the paint just dragged.
There’s more work to be done to get it all off but it dissolves in white spirit so with more scraping and a soaked rag it should eventually come off.
Before dark I worked on the area closest to the back of the car and the back panel seam getting it all clean before I put a nice bead of Drip check along the rear panel joint to re-seal it.

Day 105

Today I did this….
IPB Image

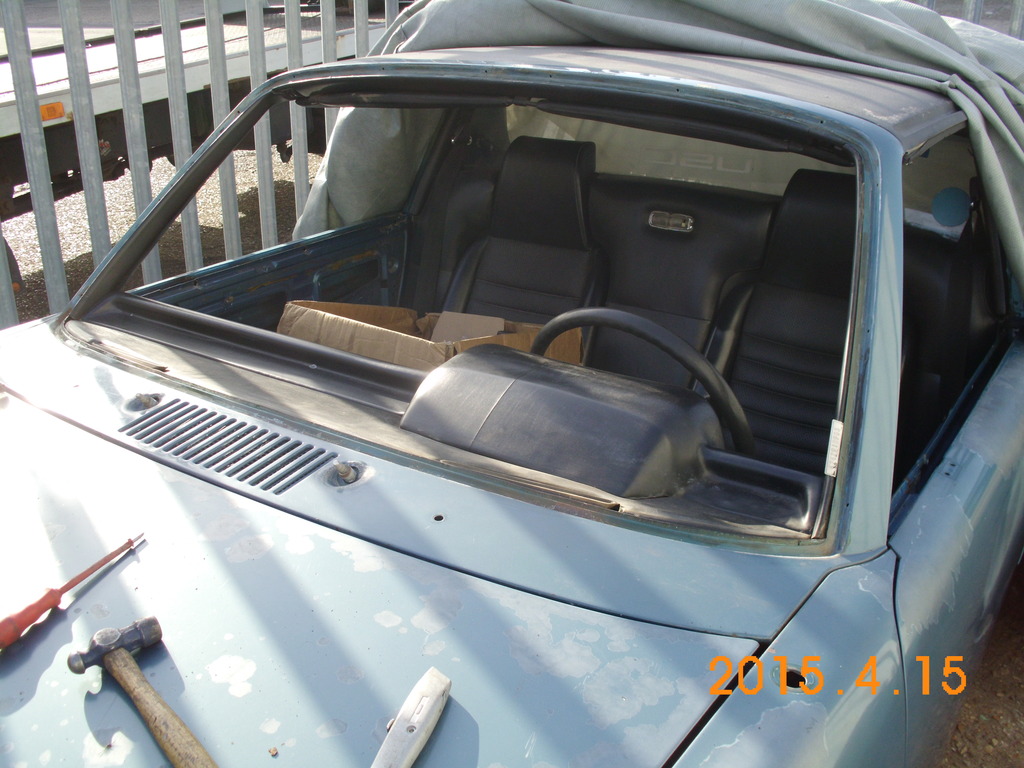
It’s out in one piece

The work late into the evening last night cutting out as much sealant with Stanley blades paid off. The guy turned up this morning with his cutting wire and it was out in about 30 seconds. To be fair there was only about 15% of bonding left around the trim clips that I couldn’t get to with the knife, so it was a case of dot to dot with the wire and job done. In addition there was a good 30% that had come unstuck itself already over the years which helped no end.
Not to scare monger anyone who hasn’t checked theirs but I was very pleased to get the screen out as without a doubt it would have leaked like a sieve if I’d left it untouched.
Timed with an early lunch it was 30 seconds well spent.
Getting back to work earlier than anticipated I did a quick search for more parts but got very side-tracked by logging on 914World... Fatal…you simply can’t restrict yourself to only 5 minutes on here, so much good stuff and deeds to be done.
Anyway this evening I returned to the car and started to clean up the aperture
The majority of the surround was in perfect condition with zero rust (even in the corners) which was very welcome. With the glass out I could properly remove the surround trim clips. I have a new set with the new surround, but saved the old ones non the less. (just in case I break a new one)
Nearly all the trim clip holes were thankfully rust free too!

IPB Image

With the exception of 4 trim clip holes in the centre of the bottom of the aperture that had some small evidence of bubbling around them.
Two hours later I’d stripped the bottom of the aperture down to bare metal and sanded down a tiny amount of rusting about the size of a little fingernail until it was all gone.
A final coat of encapsulating primer and it was getting dark. A quick deserved cuppa was had while the primer dried before the cover went back on.

IPB Image

Yep I know.....the dash replacement is next on my list
Finally I loaded the windscreen carefully into my car and took it home for safe storage. Driving Miss Daisy all the way home with the precious cargo.

Day 106

Last night it was getting dark when I got home so when I unloaded the windscreen and a few bits and bobs I just placed them inside the front of the garage. This morning before work I sorted out some old underlay and made a nice nest in the rear of the garage to keep the screen safe while the car gets painted.
Over lunch I read up on how to remove the rear window and ordered some 3M Butyl 1/4" tape to put the glass back in with.
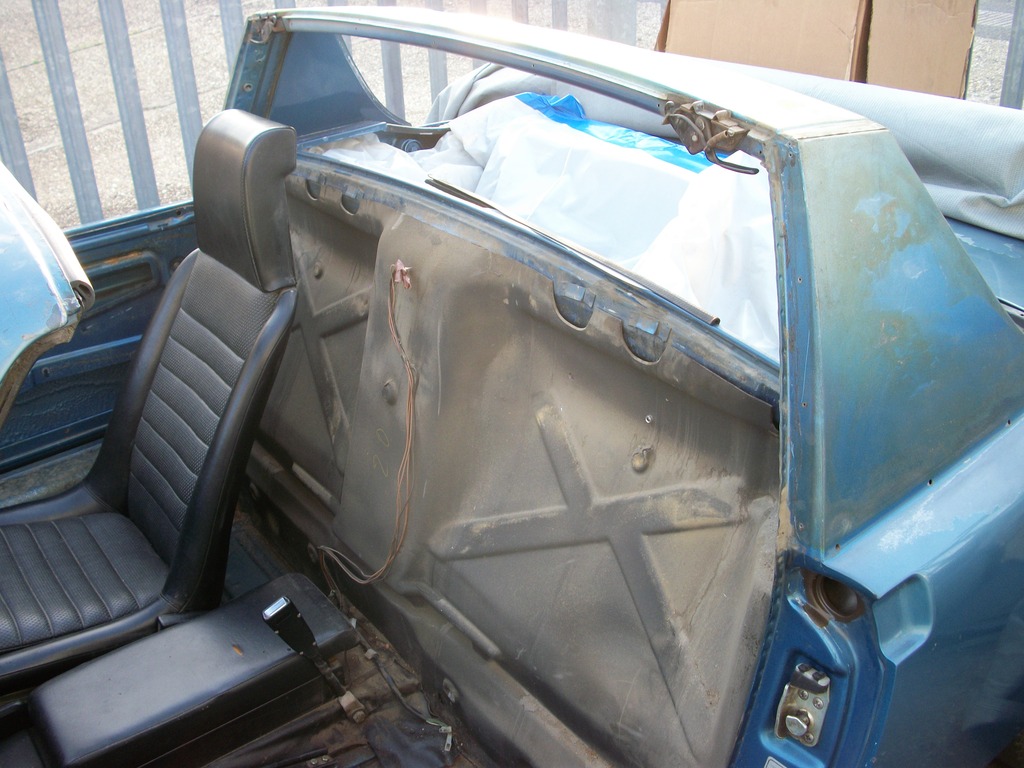
After work I went up to the car and started to dismantle the interior to get at the rear window. Everything came out as planned and the reverse of the glass was all revealed. While working on the engine bay repaint I knew it was rattling around but I wasn’t prepared for how lose it was.
Reaching in from outside I gently tried the window and it literally fell out into my hands!
I lifted it out and placed it to the side to take stock.
The old butyl tape was completely sand logged, it must of worked its way into the gap between glass and seal and stuck in there. Fortunately it just gently peeled out leaving a nice clean window aperture, no rust to be found.
Unfortunately everything was covered in sand behind the panel (no surprise) the seat belt reels were choked full of sand, so they had to come out for strip and clean. Most of the pieces of vinyl that were stuck here and there to cover gaps around the rear padded bulkhead had curled up and were extremely crispy, so they all came off too.
Thinking ahead and to really get the sand out I decided to take off both sill carpets. Drivers seat was still out from the glass removal so I took out the runners and handbrake to free the carpet. Passenger side was much easier, the seat stayed and just the seatbelt bolt and a screw in the front speaker cover held it in.
Lifting the carpets out poured more sand everywhere.
I then gently removed the last of the roll bar vinyl off the top centre section, loosening off the latches to free it from behind them.
After bagging up and labelling all the fixings I loaded them up to take home and returned to off load at home as it got dark.
I did manage to take a picture before the sun set of today’s escapades.

IPB Image

Day 107

Today was a bit Groundhog day. This morning I sorted out the glass and interior bits out into safe storage that I brought home last night and at lunch I searched out a few more parts.
The clear cover is missing from the fuse box and I found one on-line for a few £’s so ordered it up.
The two buffer stops I’ve been searching for that fit inside the engine lid hinge were finally tracked down. Part number 914 559 253 10 is no longer available, but having searched a bit deeper it seems like the part number has changed to 901 423 528 00
These are still available, so I ordered some this lunchtime. I also called in at the letting agents and checked out what was happening with the garage that they are taking rent for that I can't use because the door is broken. The bad news is that they aren't allocating any funds to low priority defects but gave me numbers of two other garages in the block that are empty to see if they are serviceable. Call me old fashioned but shouldn't they be doing that, then contacting me? It just seems that with everything in life you cannot rely upon anyone these days, if you want something done you've got to do it yourself. I'll post an update on the garages when I've had time to check them out.
This evening after work I visited the car and made a fitted cover from some thick polythene sheet and some old U channel edge trim to cover the engine between rear window and boot to help stop dust/dirt ingress while the car is at the painters. I’d had some sheet over it for a while now, but cut it all to size tonight instead of the sticky duct tape it's had on for a few weeks.
I then spent another 2 hours sanding down the boot floor to feather the edges of the paint and scratches ready for spraying before running out of light again.

Day 108

I had a good day working on the car today. As its booked in on Monday at the paintshop I needed to get the brake system closed up, so ended up fitting the new callipers over the old discs. Not what I initially wanted to do, but since my second set are still in transit I had no option. Anyway I got it all buttoned up and bled. First time in many years that it’s held fluid.
During bleeding I noticed excessive pedal free play. The result of a pedal assembly rebuild and a new master cylinder. I adjusted the rod to give a nice 1mm as per the Haynes data and locked it off with the lock nut, job done.
Next I carried on sanding in the boot floor for a few hours before finally getting a coat of primer on it.
Afterwards I put a good amount of seam sealer over the rear of the side marker blank plates to fully seal them.
Out with the vacuum cleaner and the interior and bulkhead was cleared of more sand from when the rear window came out. I gave everything a good wipe down with a damp cloth and cleaned up the sound deadening pads.
Then on to the rear window surround. I’d peeled off what was left of the butyl tape the other day but on the outside an attempt had been made to seal the glass with silicone sealer, this took a while to pick and scrape off, but it was all removed in the end.
Under the roll bar outside there are 3 blank plugs each side. Mine had been sprayed over during the poor respray in the past, so I had to chip the paint off them to get them out. I certainly will be making sure it gets painted properly this time around and after getting the plugs out I dropped them in a small pot of cellulose thinners for 10 minutes until the paint had crinkled and fell off. Fortunately all 6 are salvageable and will go back in plain black plastic coloured.
Finally I cut up another piece of the polythene sheet and blanked off the fuel tank area under the windscreen held in place with some old off cuts of U trim. The paint around the fuel tank is excellent so I don’t intend to get this re-sprayed, just the boot itself, as far back as, and including the bulkhead. Apart from the engine bay, fuel tank area, underside and interior where it’s fine everything else is getting fresh paint.
Tomorrow I need to do a few more little jobs to do before its loaded up on the transporter.
Finally I returned home this evening to find my "Certificate of Authenticity" from Porsche arrived in the mail.

Day 109

Today was an early start to get all the final jobs sorted out before tomorrows trip to the Paintshop.
Whilst working on the car it was most practical to have all bonnet, boot and door latches on the car, but for paint they needed to be removed.
I started with the boot lock and catch, then the pin on the boot lid followed by the two rubber adjustment stops on each corner. Fortunately the boot stays down by itself so nothing needed there to hold it.
Next I moved on to the front Bonnet, removing the catch and nylon cable sheath. I coiled the wire up and cable tied it, then tucked it beside the petrol tank.
Then came my first hurdle today the latch on the bonnet itself. I took the left bolt out then noticed the right bolt was loose. I put a socket on it but it was solid, yet all the washers and catch were loose. It was as if the bolt was too long and bottomed out?
It was solid so I turned the ratchet and SNAP, the head sheared off. On closer inspection the PO had put a ¼ UNC bolt into an M6 hole and wrenched it as tight as it would go! Now I had to carefully drill out the sheared bolt. Working up in drill sizes I got to 4.5mm and the old UNC bolt (or what was left of it) freed off and came out. I tidied up the thread with an M6 tap but it was completely stripped.
The catch is safety critical so I had to re-tap it to M7 to get a good thread. Just need to order an M7 bolt for it to go back on. (didn’t want to go to M8 as it would look out of place and leave less meat in the backplate. The M7 head will be at a glance the same size as the M6 head, so it will look ok)
I then took off the check straps and interior light switches (taping up and pulling the cables back into the car).
After a trip to Halfords to buy a pack of two 450mm bungy straps, I took off the door lock mechanisms and striker plates. The bungy straps linked together hold the doors firmly shut when stretched behind the seats. Easy to take off for painting and a simple practical solution to aid the car moving around.
Next I started to strip down the targa roof to just a bare GRP panel. Not only did I remove the seals and trim, I stripped off the old headliner material too. It will be painted both sides for a good job.
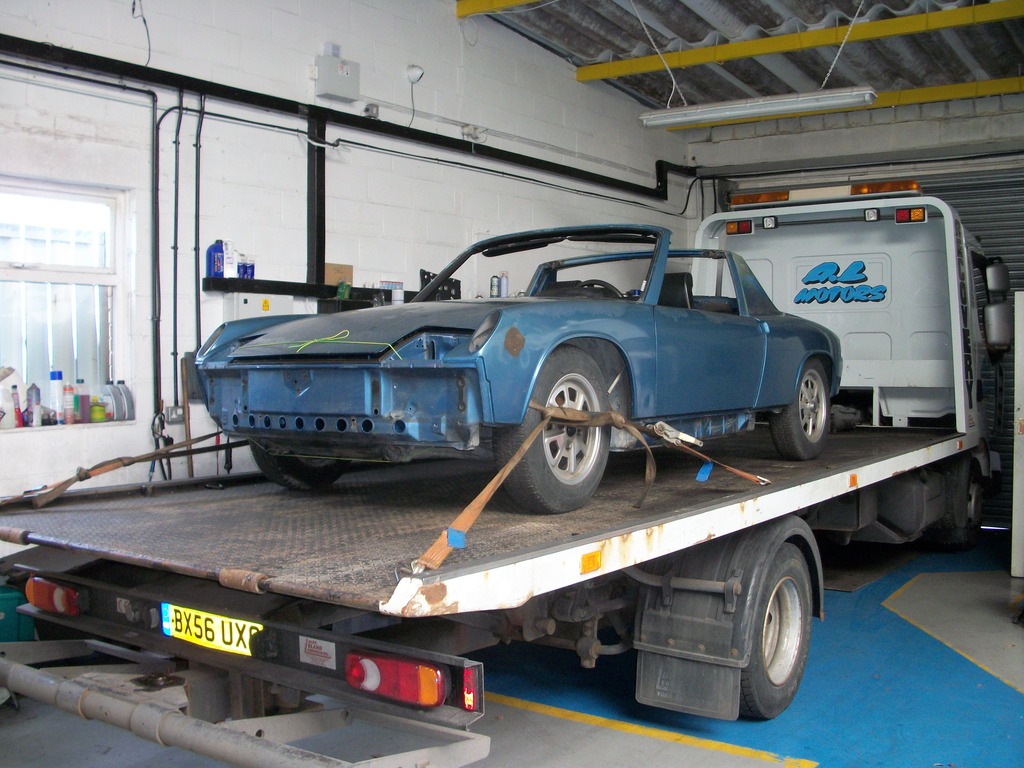
Finally we loaded the car onto my friends transporter ready for a 6:30am set off to the paintshop tomorrow morning before work.

IPB Image

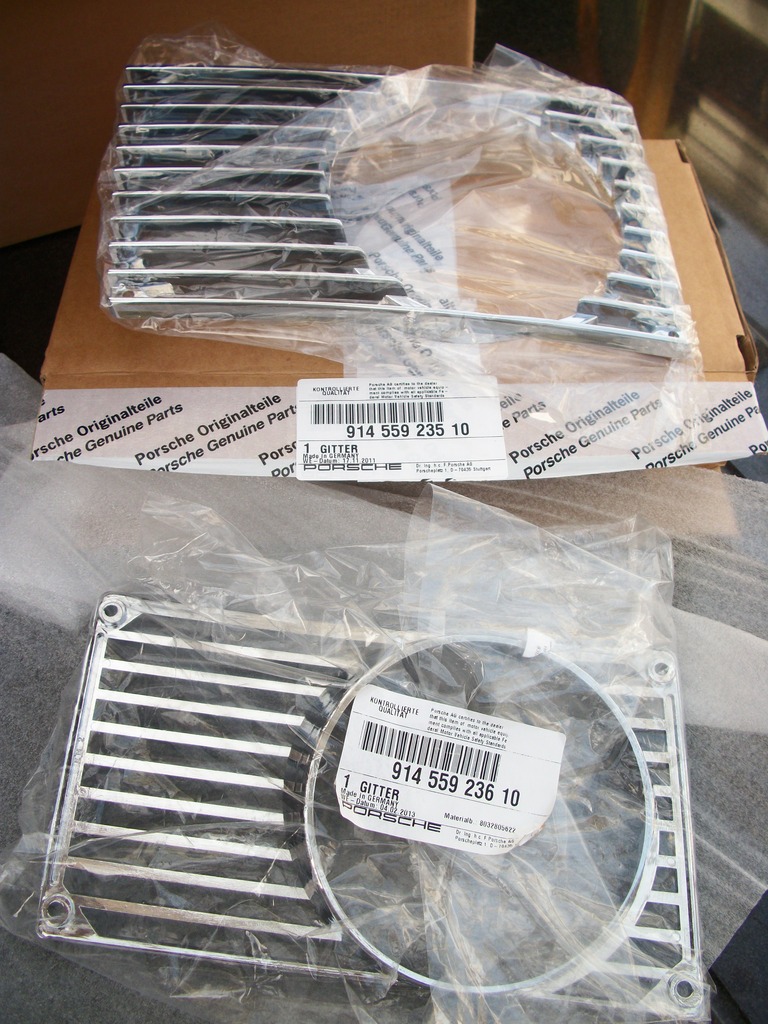
Again this afternoon when I got home (first time in a while it was light) I put all the locks and stuff into my shed ready for refurbishment. Walking back past the side gate I noticed a parcel. Must have arrived yesterday but I’d not noticed in the winter darkness.
Opened it up and found my very nice NOS genuine Porsche Bumper Grilles.

IPB Image

After a whole weekend of 914 work there was just enough time for me to get out another classic car and drive over for the last hour of a car show in Portsmouth this afternoon. All American cars (but no 914’s to be seen).
When I got back this evening I cleaned the other car and my Volvo, then put the 914 door locks into a white spirit soak to loosen all the sand and old grease off them

Day 110

A milestone day….car finally into Paintshop.

This morning I awoke to the dawn chorus of songbirds at 5:15am, today was the day the 914 takes a trip to the paintshop. 4 months of continuous preparation have lead to today.
Before breakfast I loaded up parts into my daily driver that I’d taken off that needed paint (including the engine lid etc) and drove down to the paintshop to await the transporter at 6:45 to help unload.
Like clockwork we got the car off in cold but glorious sunshine and the transporter left while I waited until 7am for the paintshop to open.
Stuart, the owner turned up on time and we spend a good 15 minutes going around the car discussing my requirements. He’d seen it a few weeks ago when it was still together so now had a good look at the detail. We checked his old original VW paint colour chits (that’s the beauty of going to a classic VW specialist, they have a passion for the car plus all the original VW paintshop information to hand). I unloaded the parts out of my boot, handed over the keys and left for work.
Stuart reckons 4 weeks, I bet him it would be 6!
There’s no real deadline I’d rather it took a little longer and was right, after all I’m a fussy bugger when it comes to detail.
Today at lunchtime I paid a customs charge on my Brake discs and they should be here tomorrow. Typical really, as I’d hoped to get them on at the weekend, but never mind, they’ll go on when the car gets back and it’ll give me plenty of time to paint up the hub and edges.
Over the weekend when taking the targa top to pieces I’d noticed lots of screw head cover plugs missing so spent the lunchbreak searching the PET and internet for the missing plugs.
Tonight when I got home, I spent a good couple of hours sorting out the door locks that were full of sand. Since the car arriving in the UK the handles were very, very stiff to operate, almost to the point that I was scared of breaking them. No wonder when found them jammed up with sand.

IPB Image

Last night I put them in a white spirit soak to dissolve all the old grease and loosen the sand. After a couple of hours with an old tooth brush I’d got them back from the dead, no more gritty grinding movement here.

IPB Image

IPB Image

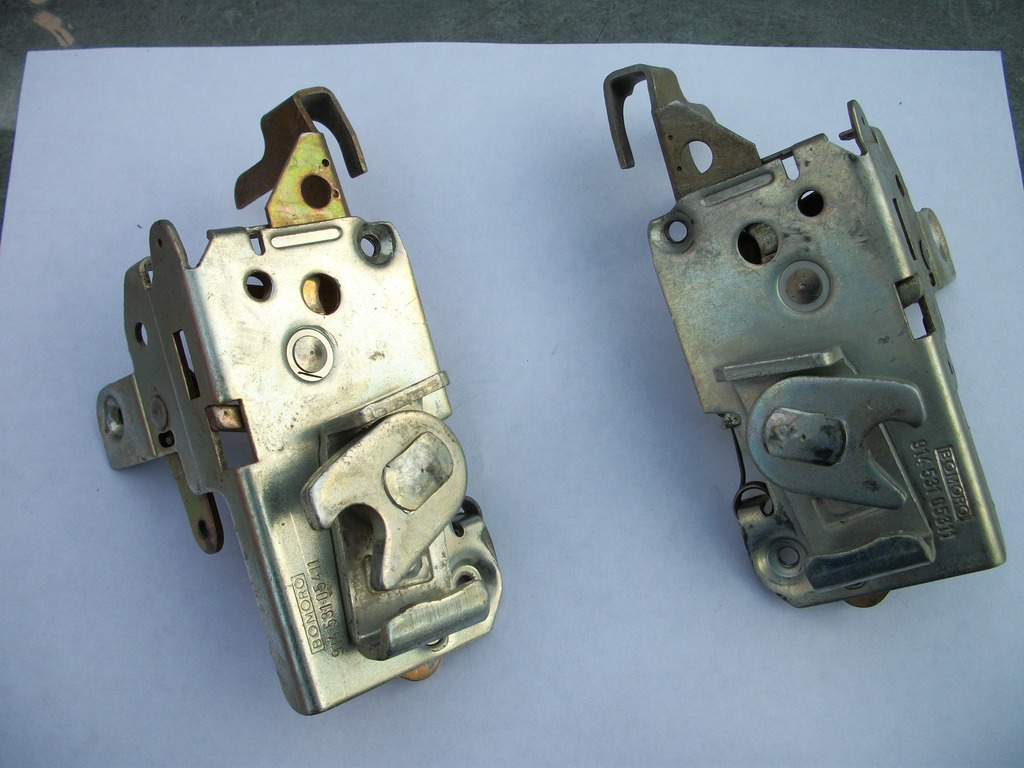
Just before it started to get dark I brushed a very light coat of waxoil on the mechanism (avoiding the pivots which will be greased with waterproof marine grease) just to keep them looking like new in the British weather.
Next I put the check strap mechanism and the bonnet lock in soak, for déjà vu tomorrow night.
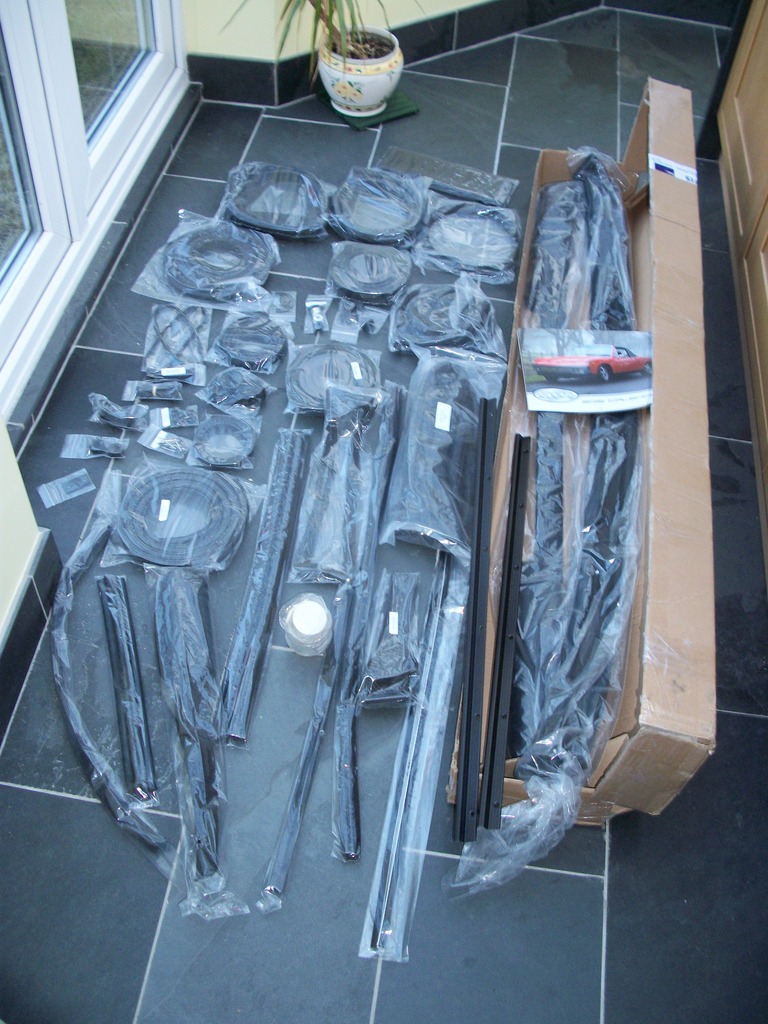
Retiring inside I opened another very large parcel that arrived this afternoon from 914rubber.
All my 914 rubber Christmas’s arrived at once; cant wait to start putting it all back together with all this nice supple new rubber.

IPB Image

Day 111

This morning I got up at the crack of dawn again and changed a starter motor on one of my other cars before leaving for work. I’d been meaning to do it for a while now and with the 914 work, it had been placed on the back burner. This weekend I need to move it to get another car out so it had to be done.

Over lunchtime I searched down a few more bits and bobs.

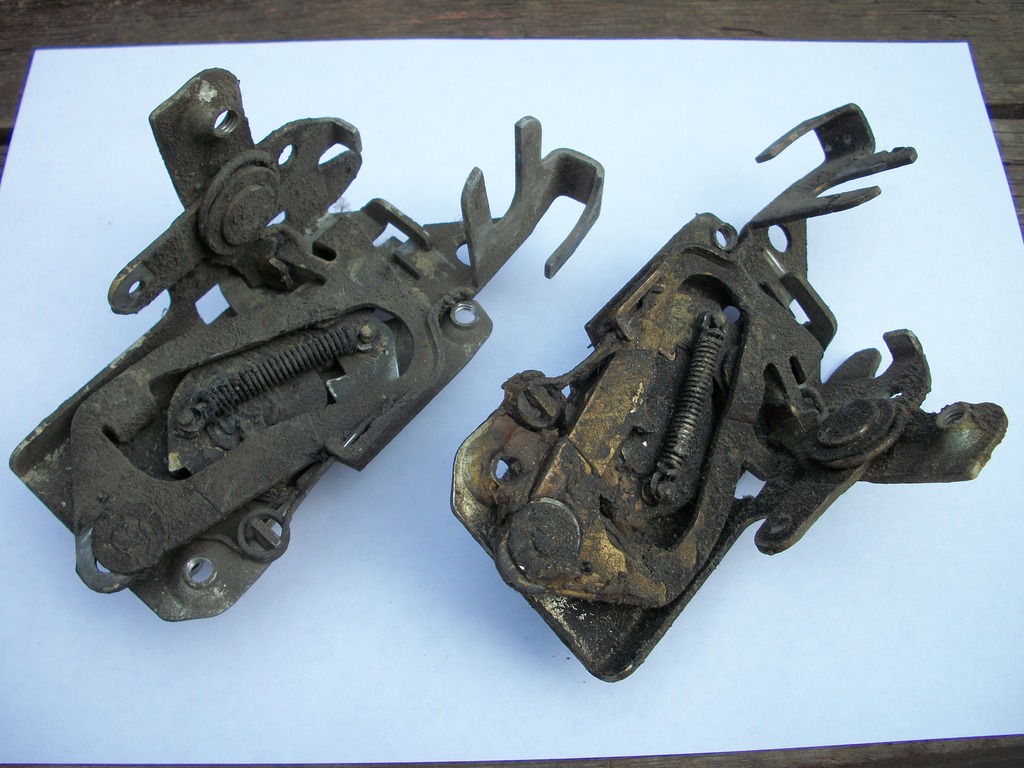
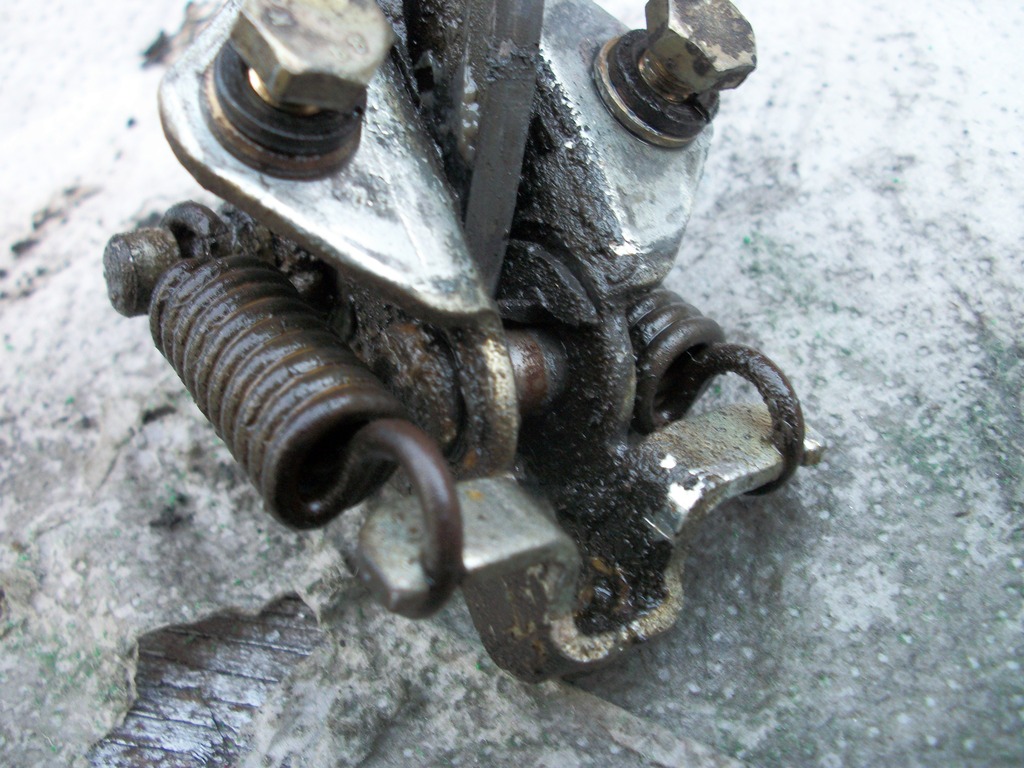
Tonight when I got home I started on the door check straps that had been in soak overnight. As I’d mentioned earlier the drivers door creaked when opening and just didn’t feel smooth. All was revealed when I dismantled the door and found half a roller in the bottom.
The other half was still stuck in the sand logged mechanism. You can just see the half around the pin in the picture.

IPB Image

The passenger door was much smoother (less use maybe) but not quite right either.

I always find that any man-machine interface needs to be a pleasurable one. As a creature we evolved to be tactile and any interaction with a car needs to give us the right signals. From flaky razor sharp chrome on door handles, rough sandpaper dry paint jobs where the gun couldn’t get in, to play in a steering rack they give off repulsive signals that completely destroy a pleasurable experience. It’s the little details that make a big difference when you restore a car.

In my quest to sort out the check straps I found a nice little kit while on the 914rubber website. “914 Door stay roller replacements Rollers Part No 914DSRR $19.99” Contains two nylon & two aluminium rollers.
They came yesterday in my big parcel, so I spent a couple of hours stripping down and cleaning the passenger check strap assembly this evening. The “didn’t feel right” ended up being a very big flat spot on the nylon roller. You can just see it in the photo below.

IPB Image

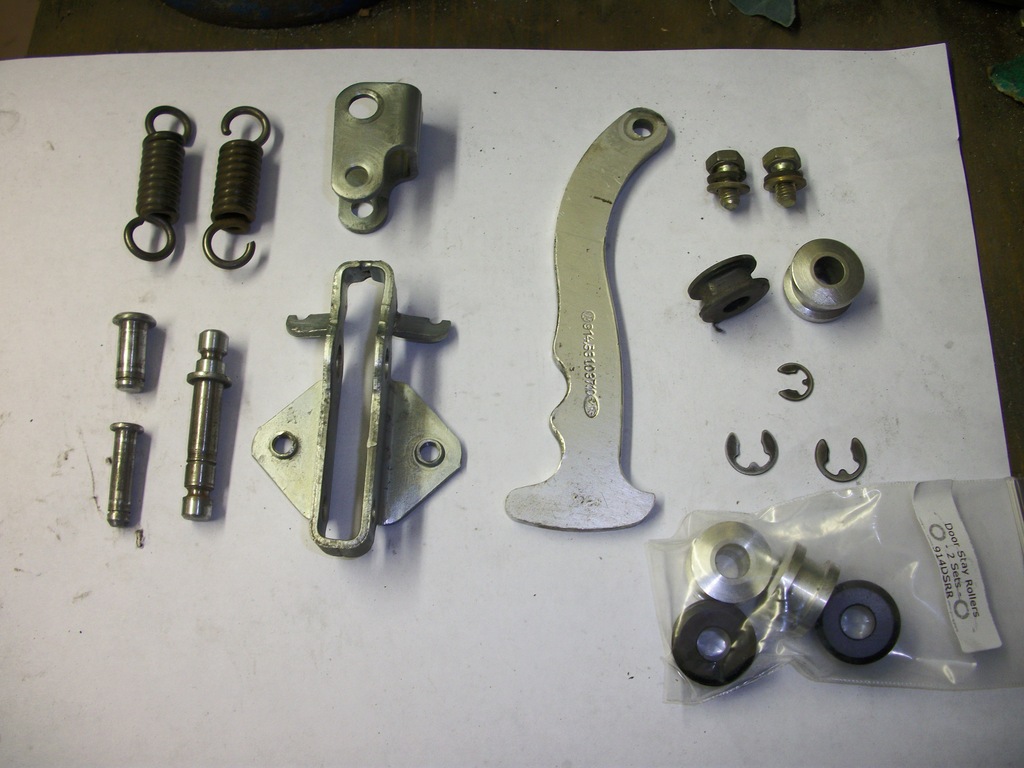
New roller kit shown bottom right in picture above.

Again it got dark too quickly so I finished off with another light coat of waxoil on all the parts ready for assembly tomorrow when I’ve cleaned up the drivers side mechanism.
It’s a real simple fix and makes a big difference.

Day 112

This morning I assembled the passenger check strap with new rollers and waterproof grease before work. I did have to tweak the main frame that holds the nylon roller. The gap between the frame was tight and binding the roller so it needed opening up a mm so that the roller spun freely.
Today at work it was meeting after meeting so I didn’t get chance for lunch today.
Getting home tonight I had two parcels waiting.
Two new RHD H4 headlights that I ordered from David Manners Group.
Part No LUB328LUCAS H/Lamp no pilot H4 Bulbs £34.66 inc VAT the pair
When I took the lights out the car the other week the plug that fits on the back of the lamp (holding 3 spade connections) just crumbled. California heat damage. I got a new pair with the lamps, just need to relocate the spade terminals into them.
The second parcel from Auto-Atlanta contained the rubber grommet/tube assemblies that the wiring to the sidelights and indicators pass through between bonnet tub and front wing.
After checking all parts over, they arrived without damage/defects I placed them into my storage shed to await rebuild.
I then stripped down and cleaned up the drivers check strap assembly. Not only was the nylon roller in pieces, the Aluminium one had two very large wear flats on it at 90 degrees to each other. The strap itself is made of aluminium too which did surprise me. They have a knurl (serrated ridged edge) where they run in the rollers, presumably to encourage them to rotate. It seems that if the rollers seize up the check strap acts like a file and wears them flat until (as with mine) it wears right through the nylon roller cutting it in half. It them runs on the steel pin and wears the aluminium check strap down on the edge which burrs it over along the edge so that it then sticks/jams inside the aluminium roller as its too wide with burrs to run freely.
Most people just put grease on their check straps. On the bits you see when you open the door.
This it seems is not enough for the 914 design, you’ve got to take it out the door to lubricate these rollers and make sure they turn freely for a long serviceable life.
So after cleaning up all the parts of the drivers assembly and filing down and smoothing off the burrs I gave them a light coat of waxoil and left them to dry until tomorrow morning like I did with the passenger one.
There was still enough time this evening to clean up the bonnet lock assembly that was soaking overnight, dry it out and coat with waxoil.
With the waterproof grease still open from this mornings assembly I next turned my attention to the recently cleaned door locks. Taking my time I worked more grease deep into all the pivots, latches and catches to get a nice smooth operation before finally calling it a night.

Day 113

Today during my lunch break at work I collected my new front brake discs from the Parcel Force depo. I bought them and had them in my hands from the Pelican Parts in a little under 2 weeks. It’s been over 12 weeks now and Berlyn Services say they still can’t get any!! Absolute rubbish as I have quite clearly shown.
Next I dropped off the engine lid mesh and the two small mesh pieces off at the bead blasters for cleaning and coating satin black, before returning to work.
Tonight when I got home I assembled the last door check strap mechanism using the new rollers and cut two new stainless steel split pins to length for the locating pins and bagged them up in zip top bags until the grand rebuild. Afterwards I cleaned up the bonnet & boot catch (the parts that fit to the bonnet & boot, not the car) and the two door striker plates that had been in soak. I took the rear catch apart to get inside the spring and nylon bush and while the white spirit dried off I cleaned up all the cross head M6 bolts that hold the door locks and striker plates on with a brass wire brush so they shone like new without damaging the zinc plate.
Finally I coated all the lock parts with a thin waxoil as before and left them to dry for the morning and put more bits into the ice cream tub of white spirit for tomorrows clean fest.

Day 114

This morning I did a little more sorting out of parts, opened the front brake discs and checked them over and ordered a couple of bits on line before work. At lunchtime I called in at the paint shop to see how things were going.
Afterwards I called Porsche Centre Portsmouth and ordered a new pull cable for the bonnet. (Still available from Porsche) My original one had been bent double by the clamp screw and after a struggle drawing out the wire to get the lock off, I have little confidence in it’s strength. The best option is a new cable, and at £12 it’s a cheap item that would cost far more to rectify if it broke with the bonnet shut.
This evening I assembled the boot catch, sorted out and cleaned all the fixing bolts and washers before bagging them all up. My M7 bolts arrived from ebay(to replace the one I had to drill out the bonnet) so I cut one to length, drilled out the M6 washer to 7mm and made sure it fit through the hole in the bonnet catch. Perfect. The only difference is it has a 11mm head, not 10mm, so it will not look out of place and hold the catch firmly.
Next I cleaned up the parts in soak from last night before calling it a day.

Day 115

This morning I got up early to carry on prepping my pre-war car for a friends wedding this afternoon. I’d changed a starter motor on another car on Tuesday so that I could move it out to get at my old car. Having not been out since September last year I needed to give it a good going over. I ended up re-packing the open drive waterpump, lubricating the chassis, draining down the fuel tank and filling with a can relay from the local station, points, plugs etc etc getting scrubbed up, ironing a shirt and all before noon. The weather was kind and the sun shone for the duration of the wedding right until I’d got all the cars put away later this afternoon right on cue the heavens opened as I closed the garage door.
So on to the 914. This afternoon I continued by cleaning up the boot key lock and latch, then started on the bags of nuts and bolts that hold them on. Followed by cleaning up the interior light switches, contacts and connections. Then I individually cleaned up all the black rubber washers that hold on the engine lid grilles and Porsche script with cellulose thinners. Next the engine lid catches. There was a nasty step wear & burr on the lock striker pin which I had to dress out with a smooth file to ensure it doesn’t snag. Once clean I bagged everything up in order of “Doors, boot & engine lid”
Each nut bolt and screw carefully having had its thread & head cleaned out before a light coating of waxoil.
I then carefully drained off the top of the white spirit tub and disposed of the ½” deep layer of sand and dirt in the bottom before refilling and putting more bits in to soak for tomorrow.
In between everything I answered a Pelican Parts Survey, ordered some parts from VW heritage (New interior light, door light switch rubber boots and 4 more screwed rubber buffer stops for the bonnet & boot lids) The old ones had gone rock hard and wouldn’t cushion very well any longer and risked damaging new paint.

Day 116

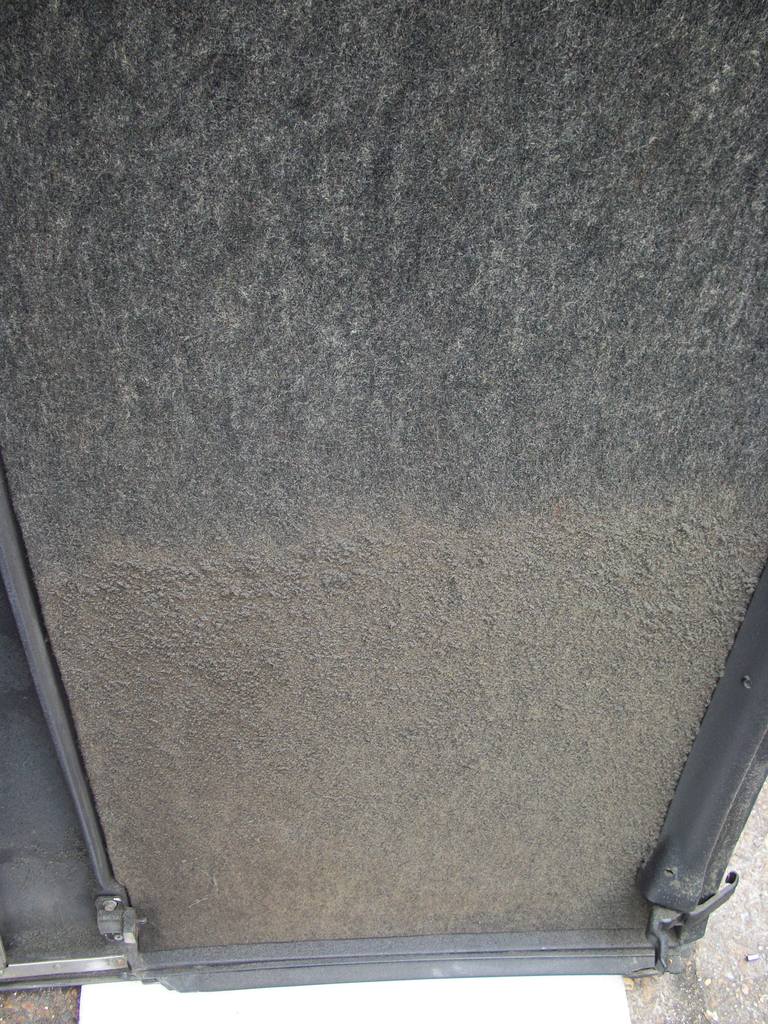
Today I spent my time on the Targa roof. Having quickly taken it apart in a spare hour before the car got loaded up for the paintshop, now was the time to sort it all out.
Firstly I scraped off all the old sticky caulking (like industrial blu-tack). Messy job but needed to be done.

IPB Image

Afterwards all surfaces where it had been got a good scrub with scotchbrite soaked in cellulose thinners to get every little bit off.
I then sorted out the underside of the roof where the headliner material is glued on.
It was covered in old impact glue residue. Not a good base to glue on top of so it had to be cleaned off. Rock hard baked old glue is not easy to remove and I found the best tool was my Stanley blade holding scraper.

IPB Image
Working with the roof curvature (across the car, not front to back) I eventually got it all off after an hour or so.
Next I gave the whole fibreglass roof a damn good scrub wash with hard bristle scrubbing brush and detergent. This took another hour as I washed, dried and washed again until all the sand and grime was gone. Repeating on both sides to make sure it was spotless for repainting.
The top surface of the roof has a textured (splatter) type finish. Over the years this had been damaged and some sections were scraped & knocked so needed repair. With various grades of wet and dry I gently rubbed down and feathered the edges around the numerous patches of damage before re-adding the texture.

IPB Image

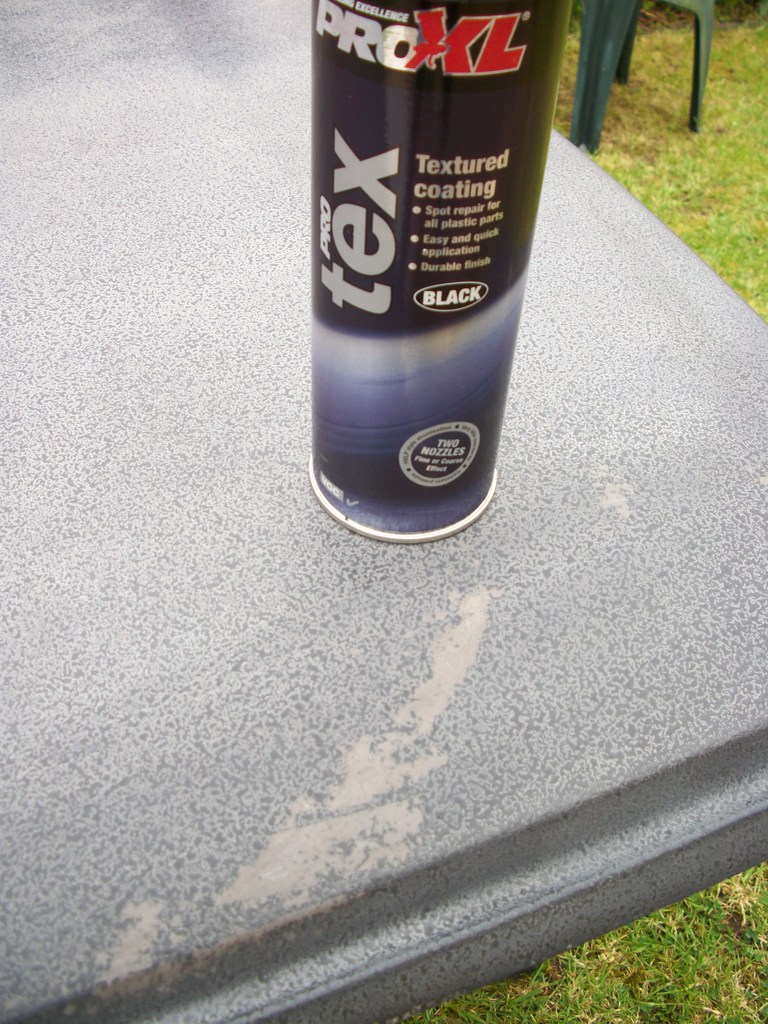
Using a bumper texture paint with a “heavy” grade nozzle in short burst to almost “spit” the paint out to replicate the original finish. The paint is specially formulated to set hard and maintain texture so it’s ideal for the job.
The top is due to go down the painters for a final satin black paint from a gun, no rattle can stripy paint jobs here!
After preparing the top I then started on all the trims and catches.
First washing and cleaning the stainless trims at the rear of the roof that holds the fuzzy “U” shape seal on. Afterwards they were polished up with brasso.
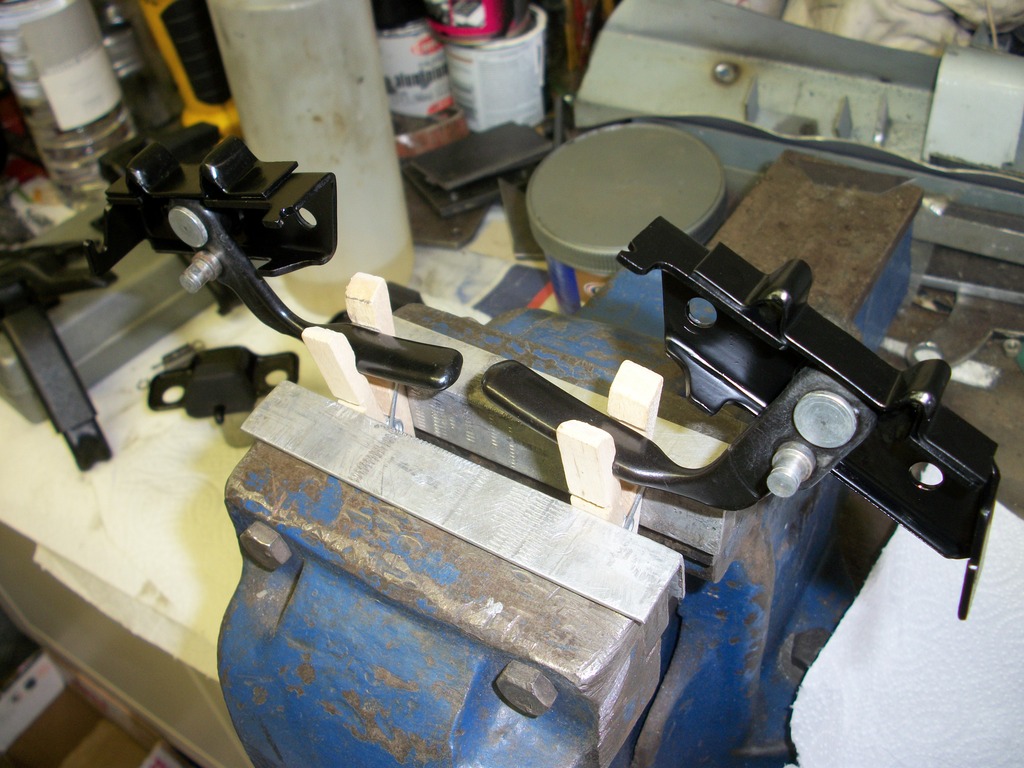
Next I cleaned all the flaky rust off the front and rear catches. The rear catches that fit on the roll bar were quite messy so ended up being stripped down to bare metal and totally repainted. The fronts came partially apart and got a clean & paint too. Finally the rear blocks that fit onto the roof and have the hooks in them that the latches hold got the same treatment.
After a quick cuppa I scraped off the caulking and sanded down the two channels that hold the rubber over the door window glass. I had a small issue when I etch primed them. Not sure what the original black paint was, but the etch just pickled it. There was nothing I could do but get the paint stripper out and remove every bit of old black paint off the two channels. After a coating of stripper the residue was cleaned off in a bucket of water with scotchbrite before hanging up to dry.
Next I got every single bolt washer and screw that holds the targa top together and detail wire brushed each and everyone until they shone. With a modellers brush I gave them all a waxoil coat before bagging up a few hours later.
Last of all this evening I gave the locks and catches a second coat before calling it a day.

IPB Image

Day 117

This morning I decided to sand down and put a coat of etch primer on the two targa roof seal window strips that I’d had in paint stripper yesterday. After half an hour rubbing down with wet & dry and a de grease they were ready for paint. I manage to get a coat of paint on them before breakfast.
Afterwards I loaded the bumpers, sills and valances in the car and left for work
At lunchtime I dropped them off at the paint shop and went through the finish I wanted with the foreman. I’ve opted for a subtle ripple texture stone guard on the valances and sills (for stone chip protection inside and out) and a smooth finish to the bumpers. All in Satin Black.
After preparing the Targa roof panel yesterday I dropped that off for painting too.
With what little lunchtime was left I managed to buy on line some small circlips to hold the levers on the rear targa catches. One was completely missing and the other wasn’t in good shape when I dismantled them at the weekend.
Tonight when I got home I gave the trim strips a first coat of Satin black. After an hour I flipped them over and painted the other side.
I then started cleaning up a collection of more nuts and bolts and the little plastic sleeves that go over the tabs holding the wiring loom in the car. Before painting I’d taken all the little sleeves off. A cloth soaked in cellulose thinners and a quick rub, the sleeves came up like new.

Day 118

This morning I put another coat of paint on the Targa roof catches and latches befor going off to work.
This evening when I eventually got home (after calling in to Halfords on the way to buy more paint then B & Q for more white spirit) I set about sorting more bits out. I drained off and topped up my ice cream tub with fresh white spirit and put my two sand & grease logged exterior door handles into soak. Next I put another coat of Satin black on the targa seal channels.
I had a phone call today to say the engine lid grilles were ready but didn’t get time to pick them up today. This should work out fine as tonight I found the two US license plate brackets and two chunky bumper brackets in a box in my shed which need blasting. I’ll drop them off tomorrow when I pick up the grilles. As for perfect timing there was a small box by my side gate from the postman. Opening it up it was the new chrome PORSCHE script for the engine lid, so ideal for tomorrow night when I get home with the freshly coated grilles.
I then started the brain numbingly boring task of cleaning up a bag of fixings I’d taken off labelled “door shuts” It had all the screws that hold the black threshold plates (the ones that clamp the door seal down to the carpet, plus the tiny screws that hold the door outer weatherstrip trim. Now you may think I’ve gone mad but I individually spent two hours wire brushing all the rust, gunk and glue out of the screws. Next I used a scriber to dig out the dirt in the cross heads before screwing them all in a row into a piece of softwood about an inch apart. Followed by satin black painting of the screws that hold the threshold plates in and silver painting the screws that hold the weatherstrips.

This was followed by a final spray of the roof seal strips that had had a couple of hours to dry and finally the last hour of the evening cleaning up an array of nuts and bolts from the doors, before a lick of waxoil to preserve them.
Just when I thought I’d had enough for tonight I spied a bag of plastic bits. Window winder handles, interior door pull cups, seat belt covers etc and brought them into the house for a good soapy tooth brushing in the morning.
Day 119

More progress today…..
This morning I cleaned up all the plastic door panel furniture with an old toothbrush and Cif cream, rinsed off and left for work.
At lunchtime I collected the engine lid grilles all nice and re coated Satin Black, I’ve got to say they look absolutely superb. I dropped off a box of brackets and stuff for blasting and called in at Porsche Centre on the way back to work. Collected my new bonnet release wire.
Tonight when I got home I had a parcel waiting that contained my new circlip assortment so set about re assembly of the rear targa roof catches. All went together nicely and I wrapped them up in kitchen towel before bagging up all the bits in zip top bags. The painted screws had dried well so I unscrewed them out of the wood block and bagged them up too. The Targa seal channels got a look over and I decided another coat of black was required so gave them another spray.
Next I took the exterior door handles out of soak and using an old toothbrush gave them a going over. Some bits are still baked on so back in soak they go until tomorrow.
I also had good news on the new 914 home; the garage with a new door has a new lock, so I get to finally draw the key in the morning and take possession. This hopefully will give me a couple of weeks to de-spider it and paint it all out inside just in time for the car returning from the paint shop.
I also had a call from my local paintshop regarding the bumpers and sills. They have done some paint swatches for various levels of satin finish (all in black) so I can choose the level of sheen and another set in various grades of ripple stone chip so I can choose that for the front and rear valances. Not strictly OEM, but certainly much improved chip and rust resistance over just paint. I’m hoping to get it a good match to 944 sill texture. In this was at least it has some genuine Porsche family lineage behind my choice of finish.

Day 120

Today I gave the Targa latches and trim strips a coat of satin lacquer (in my loft as the weather had got quite cold & damp again) and left them to dry before work.
At lunchtime I signed for my new garage and took possession of the keys.
First thing tonight I checked it out. It has a new door and frame but true to form it had been fitted by a pair of idiots. The door was twisted in the frame and the lock would not latch as a result on the top left side.
Fed up with the whole situation I went home and fetched my tool box. I took off the new door (which was a nightmare on my own) re drilled and installed it square in the frame. I had to straighten out a battered closing plate that they beat two bells of sh*t out off trying to get the twisted door they’d fitted to close!
I get so frustrated by the lack of basic ability and common sense of folk these days. What makes it worse is they are oblivious to their lack of skills yet still get paid. Anyway rant over, just simmering down now from having to wrestle with a 7ft garage door on my own.
But in the end it’s all worked out well as I now have a new garage for 914!

Lastly today I settled down by sorting out the 914 exterior door handles and came across a few issues and solutions that may help others out.
Despite being full of sand and frighteningly stiff to operate they cleaned up well with a 2 day soak in white spirit.
The drivers handle was obviously more worn than passenger. Once free of sand and rock hard old grease it still jammed half open. That’s to say the pull bit of the handle didn’t spring flat and the plastic fork that slides up and down seemed to be sticking and holding the handle out. I took out the screw in the end of the lock and removed the operating cam. (Beware if you do this the lock barrel and tumblers are free to come out the handle). Next with the cam off the end if you pull on the handle as if to open the door the fork travels off the end of the lock (now the cam is gone) and you can un latch it from the handle. The two pin lugs on the fork have a flat on them so that you can get it apart with ease.
Now I could see what the problem was. The handle itself where the fork slides up and down has two steps on it. The plastic fork has square cross-sectional ends, it gets stuck on the start of the step on the metal handle causing it to jam and the handle not to spring flat. The simple fix was to take a very small file and round off the two inside ends of the fork, so that it cannot lock itself into the corner of the step on the handle. ONLY by a very tiny amount as that’s all that’s needed for it to work smoothly with a tiny bit of grease to keep things happy in there.
Next I’d noticed that when putting the key in the lock it sprung returned when twisted one way but not the other?
I solved this too. Under the cam on the end of the lock barrel is a small coil spring that works in a rotary way not stretch. It has two bent out ends that locate in an open slot in the cam. One side of my slot had worn very slightly rounded, so as the cam turned the end of the spring got stuck under the cam and not rotated by the cam. Since it wasn’t being rotated it didn’t spring back. The solution was to file the rounded slot in the cam flat again with a needle file (or buy a new cam of course) but filing it worked a treat.
While I was in there I took out the lock barrel carefully holding the tumblers in (with key inserted) and cleaned it all out. There I found a crumbled rubber O seal, so found a new one of the right size in my assortment box before re assembling the lock back into the handle. Top tip is the put the spring carefully into the cam and seat both ends in the cam before fitting it. Fiddly but do-able with patience.
Once all back together I then ran an M6 tap down the front threaded fixing hole as the thread wasn’t too clever. I managed to cut 1 new turn of thread at the bottom which should improve the hold as the first two turns appear completely stripped. In total there’s about 4-5 turns in there, so even though it’s a 7mm deep threaded hole I still have a good 5mm of thread now.
Finally I checked over and repeated the fork improvement and greasing trick on the passenger lock and wrapped them up in kitchen towel before bagging them up for the grand assembly.


So this is Month 4’s progress. Despite having to go to work each day I’ve managed to fit quite a lot in and get the car stripped down for the paintshop. I’ll be helping them remove the old layers of paint next month for a complete bare metal respray.

Thank you again for taking time out to read my thread.
Andyrew
Your posts amaze me!

I must say your daily log is really great, I hope you put it in a short book when your done to go with your car in shows.

Someday, someday ill read all of it smile.gif
This is a "lo-fi" version of our main content. To view the full version with more information, formatting and images, please click here.
Invision Power Board © 2001-2024 Invision Power Services, Inc.