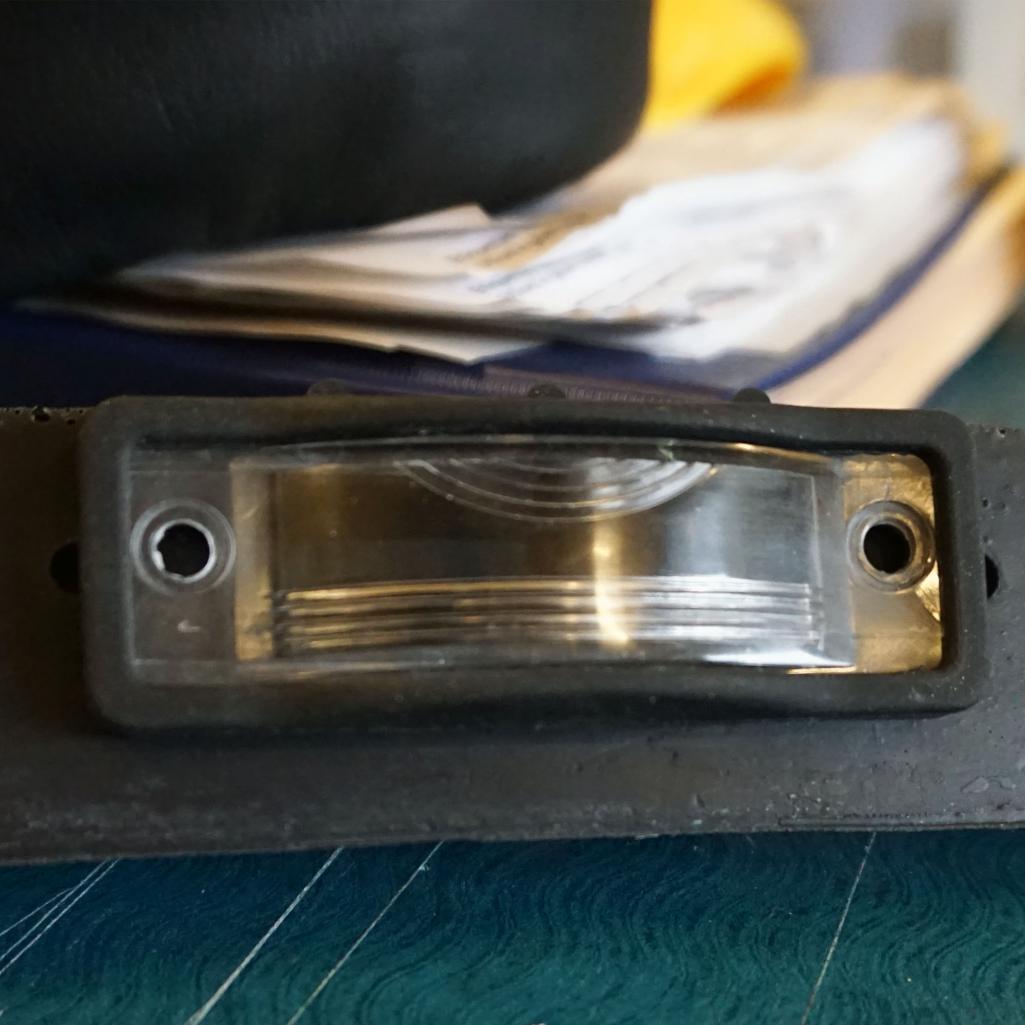
In making the rear license plate lights I use the OEM assembly to work off of. It's the correct part number and should fit an OEM bumper perfectly.
I molded my rear (and front for that matter) bumper tops off OEM parts and they should fit perfectly. To my surprise the holes are not the same. The only plausible explanations I could come up with are
- There was a different slightly larger earlier light the caps were made for. Factory retrofitted with a unit that was also used somewhere else so the new ones work but do not line up perfectly
- They all came like this and none were correctly fitted. Although not as likely.
Any concours nuts know?
Full Version: Early licence plate lights - Holes don't line up
I can make adapter plates for these, but it would be nice to know what the deal is? I never dreamt they wouldn't like up as both parts were OEM. It wasn't until I test fitted these that I discovered the issue. I did have one customer recently ask, but didn't see the issue until I did a check fit.
These still hit rubber and with a larger screw can attach, but WTF? 
QUOTE(Mikey914 @ Feb 11 2015, 08:20 PM) 
I can make adapter plates for these, but it would be nice to know what the deal is? I never dreamt they wouldn't like up as both parts were OEM. It wasn't until I test fitted these that I discovered the issue. I did have one customer recently ask, but didn't see the issue until I did a check fit.
I'm assuming that you're talking about the holes in your bumper top being wider spaced in this pic Mark?
I don't have easy access to my NOS rear top pad & the F+R set of yours to cross check them (& yours were in the early pre-reinforced run of +/- 2009-10), but I do know that everything lined up correctly when I disassembled my rear bumper, top pad, license lights, etc.
So AFAIK the light was the same 70-74 - & so was the top pad & it's mounting points - & they have fit properly on my & all other friends' steel bumpered 914s from that period.
If this screw-hole misalignment is the problem, is there any chance that there was some stretch induced when you molded the top pads?
Or maybe the one you used as a master had the holes mis-placed??
... or maybe re-drilled wider to use a different replacement light base??
Also, the light in you pic is very close to the ones used on my `88 Westy & maybe it's not the same size, but someone tried to use another VW license light on the rear top pad you used for the mold master, & drilled it to fit a different light.
I'd suggest that you try this license light on an actual OEM rear top pad & see if you still have a problem, & the light vs. a known OEM one on an OEM bumper top pad. Someone up in your area must have an all original 914 set-up so you can cross check it.
Good Luck!

Tom
///////
I did check against an OEM, as well as got 2 other lights from different sources.
The OEM matched the top I had. I was thinking the lights were not the correct ones. There is a possibility that there were changes in the tops as I molded off a 73 from the production stamp on the inside.
I think it may be a change in the bumper, but this should mean 2 different lights, I can find no evidence of this. So to be correct If I molded off an early these would be correct for all. I just was lucky to find a 73 in excellent shape.
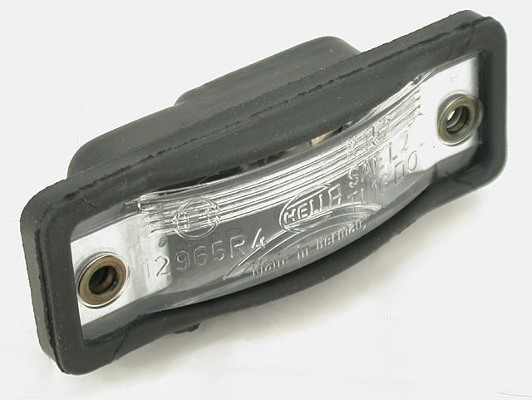
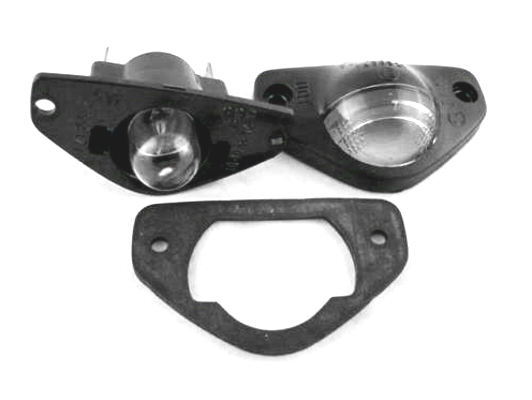
Mark, there were different lights for the late rubber bumper. I think those are the late lights. The lights for the early bumper is more of a triangle shaped base. I'm typing this before my morning cup of Joe, so I might not be thinking clearly.
The late 75-76 lights for the big bumpers were completely different. To my knowledge all 70-74 lights were the same. I have one of your early rear tops. I will see how the holes line up to an original light.
Bruce
Bruce
the holes on my early bumper tops measure 65mm, center to center +/-. I dont have any oem lights in them though. I don't know if mid year bumper tops are different.
I have one of Marks rear bumper covers and two NOS lights, will check the fitment tonight and send pics.
I hope they fit
I hope they fit
Just checked. OE lights, OE bumper top, 65 mm. Verified on NOS bumper top and Hella lamps.
Only one version till change for '75- '76
Only one version till change for '75- '76
Mark,
There was only one size light for the '70-'74 cars as others have stated, and there were no fitment issues with the factory rear bumper tops. Mine also measure 65mm center to center.
There was only one size light for the '70-'74 cars as others have stated, and there were no fitment issues with the factory rear bumper tops. Mine also measure 65mm center to center.
My guess CAD error..........
No CAD used, we made silicon molds of the bumper, so it is an "exact" reproduction.
That's why there's the confusion.
That's why there's the confusion.
Are the holes in your reproductions 65mm apart?
If not, can the mold be easily modified to correct the issue?
If not, can the mold be easily modified to correct the issue?
QUOTE(Steve Snyder @ Feb 12 2015, 03:03 PM)
Mark,
There was only one size light for the '70-'74 cars as others have stated, and there were no fitment issues with the factory rear bumper tops. Mine also measure 65mm center to center.

Steve's site shows them in the pix linked at the middle-right of the page:
http://www.p914.com/p914_lenses_license.htm
FWIW - it's hard to mistake the 75-76 version, for 70-74 ones, although that didn't stop Automotion/PP from sending me the wrong ones a few years back! As you can see below ....
70-74:
75-76:
* pix above are courtesy of Steve's p914.com website, as my new ones (& old originals) are in the box buried in the garage 914 parts storage!

Cheers!
Tom
///////
I finally got around to checking out my new 914rubber bumper tops.
As you can see stock is 65 and Marks is around 83.
Mark my bumper top has two holes on one side and only one hole on the other side. What is the recommended way to make this work? Bigger Screws? Adapter?
No big deal either way.. My car is not a concours car.
Click to view attachment
Click to view attachment
Click to view attachment
So its sort of good, sort of bad. Good news is the lights are correct, bad news is the bumper tops -may- be wrong.
If all the 914rubber bumper tops are the larger size, i wonder why this hasn't been brought up before.
If all the 914rubber bumper tops are the larger size, i wonder why this hasn't been brought up before.
By the time I installed Mark's bumper top the old one was gone so I couldn't check it. My OEM lights didn't fit but I just made them work and promised myself I'd make an adapter when I changed the bulbs to LEDs. Of course that hasn't happened.
Nick
Nick
I'd say if there's enough meat on each side of the depression, just drill some additional small holes 65mm apart.
If the existing holes (that won't be seen unless the car is up on a lift) bother you, fill them with something
If the existing holes (that won't be seen unless the car is up on a lift) bother you, fill them with something
QUOTE(euro911 @ Feb 14 2015, 04:17 PM)
I'd say if there's enough meat on each side of the depression, just drill some additional small holes 65mm apart.
If the existing holes (that won't be seen unless the car is up on a lift) bother you, fill them with something
but is there metal under there or just rubber? The factory one uses sheet metal screws, so I am guessing its metals on the factory one.
I'm currently using a lighted license plate frame on my GT bumper, so I might just continue with that. I bought a couple of trasher bumpers at G&R, that's how I ended up with a stock bumper top and license plate lights for reference.
I will wait to hear from Mark before drilling any holes.
Well,
Not sure why I have this problem as I did model off an OEM, but The solution can be achieved by making an adapter plate. I will do so so that these work. Not the ideal solution, but the most effective. There is not any that you'll be able to tap into. I had to go to 1/4" ss rod when I made this last incarnation as the solid rubber actually was more ridged, and when I went to the expanded foam (like OEM) they were too floppy. Really surprised me.
So when I have it done I'll email all that bought them.
You can use an oversize screw and bore into it, I now suspect may have been what most did. But I will make these to correct this.
I should be able to do so later this week.
-Mark
QUOTE(Steve @ Feb 14 2015, 08:00 PM)
...but is there metal under there or just rubber? The factory one uses sheet metal screws, so I am guessing its metals on the factory one.
I'm currently using a lighted license plate frame on my GT bumper, so I might just continue with that. I bought a couple of trasher bumpers at G&R, that's how I ended up with a stock bumper top and license plate lights for reference.
I will wait to hear from Mark before drilling any holes.
The factory rear bumper tops had a metal core. The license plate lights both attach and (if I recall correctly) ground to this.
If grounding via the mounting holes, I don't think they'd have 2 terminals on the light housings (but I may be wrong).
My license plate lights don't work. Actually, something is amiss with the wiring - because the lights work fine when tested with a 12v power source.
At least Mark is going to fix you guys up with a good solution
My license plate lights don't work. Actually, something is amiss with the wiring - because the lights work fine when tested with a 12v power source.
At least Mark is going to fix you guys up with a good solution
So Mark, was/is this also a fitment problem on your earlier solid rubber first round bumper tops pre-SS-stiffener plates?
Or is it only with the later runs of your "new" foam type ones?
TIA for the clarification.
Tom
///////
Or is it only with the later runs of your "new" foam type ones?
TIA for the clarification.
Tom
///////
Mark, Do your fiberglass bumper tops have this issue? Thanks.
QUOTE(euro911 @ Feb 14 2015, 07:00 PM)
If grounding via the mounting holes, I don't think they'd have 2 terminals on the light housings (but I may be wrong).
No, you are right. The ground was through the second terminal. However, that terminal had continuity to one of the screw holes, which in turn had continuity to the screw and then to the metal core, to the chassis, and then to the battery ground. So if you switch the power and ground to the license plate lights, you pop a fuse and your center console lights go out. (Bet you'll never guess how I found that one out.)
--DD
QUOTE(Mikey914 @ Feb 14 2015, 06:20 PM)
Well,
Not sure why I have this problem as I did model off an OEM, but The solution can be achieved by making an adapter plate. I will do so so that these work. Not the ideal solution, but the most effective. There is not any that you'll be able to tap into. I had to go to 1/4" ss rod when I made this last incarnation as the solid rubber actually was more ridged, and when I went to the expanded foam (like OEM) they were too floppy. Really surprised me.
So when I have it done I'll email all that bought them.
You can use an oversize screw and bore into it, I now suspect may have been what most did. But I will make these to correct this.
I should be able to do so later this week.
-Mark
Mark,
What is the status of the adapter plates?
QUOTE(Steve @ Apr 18 2015, 01:18 PM)
QUOTE(Mikey914 @ Feb 14 2015, 06:20 PM)
Well,
Not sure why I have this problem as I did model off an OEM, but The solution can be achieved by making an adapter plate. I will do so so that these work. Not the ideal solution, but the most effective. There is not any that you'll be able to tap into. I had to go to 1/4" ss rod when I made this last incarnation as the solid rubber actually was more ridged, and when I went to the expanded foam (like OEM) they were too floppy. Really surprised me.
So when I have it done I'll email all that bought them.
You can use an oversize screw and bore into it, I now suspect may have been what most did. But I will make these to correct this.
I should be able to do so later this week.
-Mark
Mark,
What is the status of the adapter plates?
Making these to be ready with lights.
Mark
QUOTE(Mikey914 @ Apr 18 2015, 06:10 PM)
QUOTE(Steve @ Apr 18 2015, 01:18 PM)
QUOTE(Mikey914 @ Feb 14 2015, 06:20 PM)
Well,
Not sure why I have this problem as I did model off an OEM, but The solution can be achieved by making an adapter plate. I will do so so that these work. Not the ideal solution, but the most effective. There is not any that you'll be able to tap into. I had to go to 1/4" ss rod when I made this last incarnation as the solid rubber actually was more ridged, and when I went to the expanded foam (like OEM) they were too floppy. Really surprised me.
So when I have it done I'll email all that bought them.
You can use an oversize screw and bore into it, I now suspect may have been what most did. But I will make these to correct this.
I should be able to do so later this week.
-Mark
Mark,
What is the status of the adapter plates?
Making these to be ready with lights.
Mark
Awesome!! I could use the new lights versus the crusty ones I have now.
This is a "lo-fi" version of our main content. To view the full version with more information, formatting and images, please click here.