altitude411
Apr 6 2015, 04:13 PM
In removing the rear trailing arms on my six I managed to bust off a couple bolts that were in bad shape. (rusted) My question is are the nuts on the topside of the console part of the console or can I break them loose with a drift and a BFH?

Or do I have to drill out the bolts?

SirAndy
Apr 6 2015, 04:18 PM
The top thread is part of the console. You might be able to soak them and get one of them reverse bolt removers.
If that doesn't work, it's drilling time ...

altitude411
Apr 6 2015, 04:23 PM
Damn, I was hoping you weren't going to say that... thanks Andy
r_towle
Apr 6 2015, 04:27 PM
chris foley has a cure for this that is better than a drill
First off, you cannot drill those hardened bolts.
For those who have not done this yet, please us alot of penetrating oil and only use and impact gun air or electric.
Now, Foleys cure is three new tubes.
you drill out the tubes using a hole saw, about 1.25 inch (ask foley)
he has a write up on how to do this.
You need to weld in new tubes when done.
www.tangerineracing.com
Rich
altitude411
Apr 6 2015, 04:33 PM
Thanks Rich I'll check out Foley's method. For the record, They were put on soak cycle (PB) for days and as soon as my impact rattled a couple times.... snap
SirAndy
Apr 6 2015, 04:38 PM
QUOTE(altitude411 @ Apr 6 2015, 03:33 PM)

They were put on soak cycle (PB) for days and as soon as my impact rattled a couple times.... snap
Let me guess, the plastic caps that are supposed to seal off the top of the tubes have been missing for a while?

altitude411
Apr 6 2015, 04:41 PM
Just a thought... how about cutting/grinding off the top threaded portion and welding new nuts to the top of the console? Seems easier than trying to drill out the tubes. I'm sure Chris is much smarter than me though.
altitude411
Apr 6 2015, 04:43 PM
QUOTE(SirAndy @ Apr 6 2015, 04:38 PM)
QUOTE(altitude411 @ Apr 6 2015, 03:33 PM)
They were put on soak cycle (PB) for days and as soon as my impact rattled a couple times.... snap
Let me guess, the plastic caps that are supposed to seal off the top of the tubes have been missing for a while?
No plastic caps anywhere to be seen...

Got a picture of what they are suppose to look like or a source (Vendor)
SirAndy
Apr 6 2015, 04:51 PM
QUOTE(altitude411 @ Apr 6 2015, 03:43 PM)
No plastic caps anywhere to be seen...
Got a picture of what they are suppose to look like or a source (Vendor)
Best pics i could find, they're round plastic plugs in that usual yellowish semi-clear plastic used on the 914.
Supposed to keep water and dirt out of the top of the tubes and threads.

Luke M
Apr 6 2015, 05:13 PM
QUOTE(altitude411 @ Apr 6 2015, 03:41 PM)
Just a thought... how about cutting/grinding off the top threaded portion and welding new nuts to the top of the console? Seems easier than trying to drill out the tubes. I'm sure Chris is much smarter than me though.
I did the same thing on my 6.. I bought the Tangerine part and done.
I only had to do one bolt but it's not too bad if you have some skills.
Yes, I tried to drill them out and hours later it got me nowhere.
I was able to get a good size extractor in there, heat, lots of lube, more heat, but no dice. Like Andy said there was no plug on the top side. Only took about 10 minutes to drill out the old part with a hole saw(make sure it's a good one). I installed the tangerine part, bolted up my outer mount bracket to make sure it was all aligned right, then weld away. Done..
altitude411
Apr 6 2015, 05:18 PM
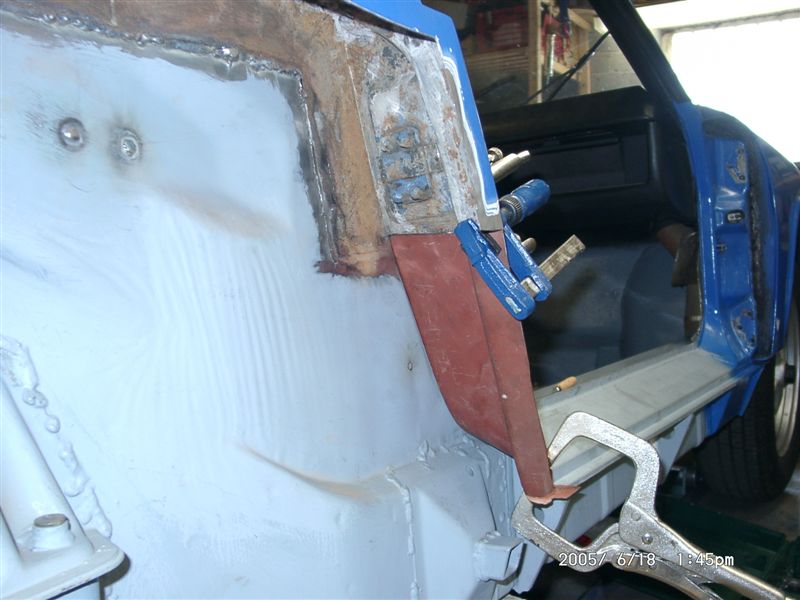
Thanks for the reply... It seems to me that only the upper part is threaded, is there some reason that I can not cut the upper part (above red line) off and just weld a new nut in it's place?
r_towle
Apr 6 2015, 05:27 PM
the whole thing is one tube.
Might want to call Foley...he has tried all the repairs you can imagine...
rich
altitude411
Apr 6 2015, 05:30 PM
This is Chris's part. His looks to be threaded in the tube but from what I can see the stock part is only threaded on the top portion above where I drew the red line. Am I seeing this right? I guess if it all has to come out anyway it's worth a try?
altitude411
Apr 6 2015, 05:31 PM
Rich, I'm sure your right about Chris... I'll just buy from him. Thanks everyone for the responses.

r_towle
Apr 6 2015, 05:36 PM
what i meant was I bet he has tried what you are suggesting and he will be able to give you and idea of how hard it is.
My suspicion is he came up with that tube to make welding it in more achievable...
If you have a magic tiny welder and rubber arms and a tiny head you might be able to get up in there and weld it at the top accurately...
OR, use the tube, weld it really solid at the bottom and pop some tacks around the top....
Again just call Foley, he will talk you through what he has done..
rich
altitude411
Apr 6 2015, 05:41 PM
Well, I've got the tiny head part....
Thanks Rich
r_towle
Apr 6 2015, 06:08 PM
tiny tool to cut them off too....
BTW, I tried to drill them out....its not fun.
Cobalt bits, lots of cutting oil, and a jig to keep you centered....
Chris did not have the tube yet....I would have used it otherwise...
Weld it really good from below, should be good to go.
Rich
TargaToy
Apr 6 2015, 07:30 PM
I drilled one out using cobalt bits. Someone here advised me to use some concentric sleeves (hardware store stuff) to keep the pilot hole centered. It was a long, maddening process and I was drilling down from the top using a 90* drive adapter on my drill.
Presently I have another one broken off despite much soaking and I have been procrastinating drilling it. Maybe I will do the Tangerine repair this time.
r_towle
Apr 6 2015, 07:41 PM
QUOTE(TargaToy @ Apr 6 2015, 09:30 PM)
I drilled one out using cobalt bits. Someone here advised me to use some concentric sleeves (hardware store stuff) to keep the pilot hole centered. It was a long, maddening process and I was drilling down from the top using a 90* drive adapter on my drill.
Presently I have another one broken off despite much soaking and I have been procrastinating drilling it. Maybe I will do the Tangerine repair this time.
I may have told you about using the sleeves, that is what I used...
it still sucked.
This is a "lo-fi" version of our main content. To view the full version with more information, formatting and images, please
click here.