After cleaning and reassembling the entire brake system including the rear proportioning valve on the bulkhead, it seems like I need a little more rear brake. When adjusting the allen screw on the side, do I turn in or out to get more rear brake?
Was told by our resident expert (Eric) not to replace it with one of those lever devices...
Full Version: Adjustment of rear brake "valve" on bulkhead
QUOTE(SKL1 @ Jul 16 2015, 11:10 PM) 
do I turn in or out to get more rear brake?
The factory used permanent thread locker.
The set screws are very hard to turn without breaking.
We replace them with a longer hex head bolt and turn in up to a quarter inch beyond the original setting to increase the rear bias.
I base exactly how far we make the adjustment by pedal feel.
While on this topic:
I am swapping out my rear brake calipers for front calipers.
I will have porterfield pads in the rear and KFP golds in the front which will give me some front bias.
I intend to try out the car like that at first (prop valve still installed), but I also have been looking at the wilwood or tilton brake bias valves.
It seems that there are, at least, two different types of these aftermarket valves.
One (I believe the tilton) works similar to the stock prop-valve in that it gives the same pressure to the front and back up to a point then it reduces the pressure to the rears to 1/3 what the front gets from there on up.
That "point" (or knee) is adjustable up or down the pressure axis.
Another (I believe the wilwood) just gives a reduced pressure to the rears that is constant regardless of pressure.
In this valve the ratio of front to rear is adjustable, but does not change as the pressure varies.
Chris, do you have any comments to add to that?
Which type do you use?
QUOTE(stugray @ Jul 17 2015, 01:46 PM)
...
Chris, do you have any comments to add to that?
Which type do you use?
As far as I know both designs operate the same way. The valve adjustment changes the inflection point of the pressure graph, with a reduced ratio above that point.
The tilton has seven settings whereas the knob style is infinitely adjustable within its range.
I've used both, but I prefer the knob style.
My current setup is dual M/Cs.
Not to hijack, but Chris told me at some point after our Chumpcar race to ditch the stock proportioning valve. Yes, it can be adjusted, but if you're truly using ALL the brake on the track, at some point it's getting diverted from the rears, back to the front, and effectively putting more bias up front than is probably necessary or desired. Putting in a Tilton or knob style is on my list of things to do... eventually.
QUOTE(Racer Chris @ Jul 17 2015, 12:13 PM)
QUOTE(stugray @ Jul 17 2015, 01:46 PM)
...
Chris, do you have any comments to add to that?
Which type do you use?
As far as I know both designs operate the same way. The valve adjustment changes the inflection point of the pressure graph, with a reduced ratio above that point.
The tilton has seven settings whereas the knob style is infinitely adjustable within its range.
I've used both, but I prefer the knob style.
My current setup is dual M/Cs.
Sorry, this seems like a hijack
 , but the OP mentioned after-market prop-valves so it is sort of on topic.
From what I can tell from the online documentation is that the wilwood and the tilton behave differently.
For the Wilwood "adjustable proportioning valve": it states: "The knob rotated all the way out (counter-clockwise) will provide a maximum pressure reduction of 57%. Rotating the knob in (clockwise) will incrementally increase line prressure, up to full pressure."
To me this sounds like a straight up regulator that can be set to have an output that is some fixed % of input pressure.
For the TiltonBrake Proportioning Valve , they show this plot:
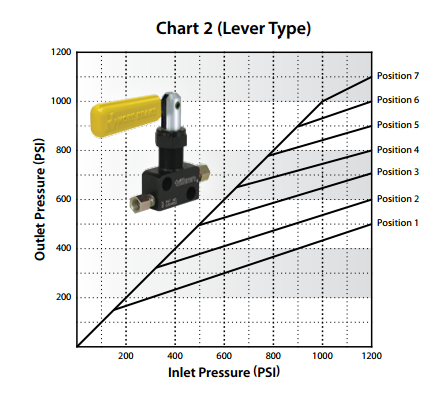
This shows a behavior which is very similar to the stock prop-valve that is in the car except it allows 7 discrete setpoints that move the "knee" on that plot.
I have not used either so I cannot comment on the behavior, but I am confused about which one I need, but I am tending towards the Tilton.
I would love to see pics of your dual MC setup and how much cutting you had to do to mount it (on the floor, or elevated).
QUOTE(stugray @ Jul 17 2015, 02:18 PM)
Sorry, this seems like a hijack
, but the OP mentioned after-market prop-valves so it is sort of on topic.From what I can tell from the online documentation is that the wilwood and the tilton behave differently.
For the Wilwood "adjustable proportioning valve": it states: "The knob rotated all the way out (counter-clockwise) will provide a maximum pressure reduction of 57%. Rotating the knob in (clockwise) will incrementally increase line prressure, up to full pressure."
To me this sounds like a straight up regulator that can be set to have an output that is some fixed % of input pressure.
For the TiltonBrake Proportioning Valve , they show this plot:
This shows a behavior which is very similar to the stock prop-valve that is in the car except it allows 7 discrete setpoints that move the "knee" on that plot.
I have not used either so I cannot comment on the behavior, but I am confused about which one I need, but I am tending towards the Tilton.
My guess would be that the Wilwood and Tilton units operate the same way. I read the Wilwood documentation as if they are only stating the final overall pressure reduction (effectively the right y-axis in the Titon chart). I have a feeling they operate with "infinite" adjustability between positions 3 and 7+.
Tilton makes both lever and knob style. FWIW Tilton quality is much better than Wilwood; after using MCs, bias bars, and proportioning valves from both companies I would highly recommend buying Tilton if you can afford it.
If you've never read them, Stoptech has a series of great articles on brake design. This article is on brake staging and looks into brake balancing with bias bars and pressure regulaating valves.
http://stoptech.com/technical-support/tech...rtioning-valves
I cant seem to edit my post above, but I try a new one:
For the Wilwood "adjustable proportioning valve": it states: "The knob rotated all the way out (counter-clockwise) will provide a maximum pressure reduction of 57%. Rotating the knob in (clockwise) will incrementally increase line prressure, up to full pressure."
To me this sounds like a straight up regulator that can be set to have an output that is some fixed % of input pressure.
I believe that the valve plot would look like this:
With the Y-axis being the input pressure (front), and the X-axis being the output pressure (rear).
That is IF you take the description from the documentation literally.
QUOTE(stugray @ Jul 17 2015, 02:18 PM)
For the Wilwood "adjustable proportioning valve": it states: "The knob rotated all the way out (counter-clockwise) will provide a maximum pressure reduction of 57%. Rotating the knob in (clockwise) will incrementally increase line prressure, up to full pressure."
To me this sounds like a straight up regulator that can be set to have an output that is some fixed % of input pressure.
I believe that the valve plot would look like this:
With the Y-axis being the input pressure (front), and the X-axis being the output pressure (rear).
That is IF you take the description from the documentation literally.
I get what you are saying; that said, I don't think Wilwood is describing the action correctly. I'll have to think about it some more, but I'm not sure you can get perfectly linear response (starting at origin) from a simple spring-type valve due to the required initial force balance.
Jim is right IMO.
The stock valve is not a proportioning valve. It doesn't "proportion" anything. It acts as a "T" fitting, passing fluid normally until you hit a panic stop which the factory deems 525psi.
When you munch your pedal in your quiet garage, you should hear a "click-click" behind your ass on the lower firewall. That is when the internal valve slides over and the micro switch shuts off the flow to the rears. Once the pressure equalizes in the chamber, fluid begins to flow to the rear again.
It is an anti-lock brake device for your rear calipers so your inherently "Polar Moment Inertia" 914 will not go spinning off a curve like a top under panic braking.
Colorado Stu - I would recommend the 911 rear caliper vs. the early 914 front caliper. It is the exact same casting but has a proper 38mm piston for perfect bias.
Iowa Stu - If you have a pressure gauge you can install on the system, that's the best way to do it. If not, start with 10mm of thread exposed beyond the nut and try the panic stop method in the garage. You may also want to fine tune in an empty parking lot. You "never" want your rears locking up.
As Chris mentioned, turning the allen in creates more tension against the large internal spring. This makes it harder for the valve body to move under braking and then require more pedal pressure to shut down the rears.
Why do I get the feeling I'm pissing up a rope?

Valve Bodies. Rebuilt units at the top:
Click to view attachment
ATE Assembly Lube, ready to go back in:
Click to view attachment
Here's a picture of the elusive microswitch in it's lair:
Click to view attachment
All Done...
Click to view attachment
When you munch your pedal in your quiet garage, you should hear a "click-click" behind your ass on the lower firewall. That is when the internal valve slides over and the micro switch shuts off the flow to the rears. Once the pressure equalizes in the chamber, fluid begins to flow to the rear again.
It is an anti-lock brake device for your rear calipers so your inherently "Polar Moment Inertia" 914 will not go spinning off a curve like a top under panic braking.
Colorado Stu - I would recommend the 911 rear caliper vs. the early 914 front caliper. It is the exact same casting but has a proper 38mm piston for perfect bias.
Iowa Stu - If you have a pressure gauge you can install on the system, that's the best way to do it. If not, start with 10mm of thread exposed beyond the nut and try the panic stop method in the garage. You may also want to fine tune in an empty parking lot. You "never" want your rears locking up.
As Chris mentioned, turning the allen in creates more tension against the large internal spring. This makes it harder for the valve body to move under braking and then require more pedal pressure to shut down the rears.
Why do I get the feeling I'm pissing up a rope?
Valve Bodies. Rebuilt units at the top:
Click to view attachment
ATE Assembly Lube, ready to go back in:
Click to view attachment
Here's a picture of the elusive microswitch in it's lair:
Click to view attachment
All Done...
Click to view attachment
QUOTE(Eric_Shea @ Jul 17 2015, 04:35 PM)
E,
Are these available on your website?
911 S calipers in front, 914 6 in the rear. Ya, I know "overkill". I took out the "proportioning" valve a long time ago and threw it away. I have demonstrated more than once, the fronts will lock up waaay sooner than the rears. I love the way my brakes are set up except Eric won't let me paint the calipers red. 
I have demonstrated more than once, the fronts will lock up waaay sooner than the rears. I love the way my brakes are set up except Eric won't let me paint the calipers red.
PM sent Eric- do you have any rebuilt "valves"?? I've got 2 cores sitting in the garage...
There is nothing in them that needs "rebuilding" other than for replating/painting.
The fluid volume is so small they don't need pre-bleeding.
The hydraulic portion doesn't need to be disturbed to work on the spring adjuster.
More than likely the unit will need to be removed from the car to make the adjustment though.
IIRC, I have also increased the spring pressure by installing 1/4" of shims against the spring while I had the cover off - instead of making the set screw adjustable.
QUOTE
There is nothing in them that needs "rebuilding" other than for replating/painting.
 for the most part... the brake "shellac" as we call it should come off the valve body (as seen in that first picture), it may cause sticking and, I have one on the bench now that has a fairly pitted wiper seal. I'm fairly certain that would allow fluid to pass. So Iowa Stu may be having a problem with his bore seal as it doesn't sound like his isn't building up enough pressure to activate, or, it's simply set too high now.
Other than that, most I've seen should be "LEFT ON THE CAR" and left alone.
Took one of mine apart but couldn't get the valve core to come out and didn't want to force it. Took the little plastic piece out by unscrewing the 12mm nut on top but the rest of the valve core wouldn't budge.
Cleaned everything and painted the main pieces. Now it looks nice- hope it works!
What kind of grease to lube it? Something I can get at local O-reilly's etc I hope...
Had to really work to free up the nut and allen though- finally broke loose.
Cleaned everything and painted the main pieces. Now it looks nice- hope it works!
What kind of grease to lube it? Something I can get at local O-reilly's etc I hope...
Had to really work to free up the nut and allen though- finally broke loose.
QUOTE
Now it looks nice- hope it works!
It won't.
What you are describing is the valve stuck in the valve body. Probably because of the brake shellac shown above.
You need to disassemble, take the large nut off (32mm DO NOT USE HEAT or you will melt the microswitch), turn the valve body over and with two of the four body ears perched on top of a vise, tap the section of the valve body with a drift (the end opposite where the switch is). It will tap out and you will then see the bore seal (upper seal on the shaft) and the wiper seal (lower seal on the shaft that looks like a skirt).
Pinch the bore seal and with a 90 degree pick, hula-hoop it off the shaft.
Pinch the wiper seal and with a 90 degree pick, hula-hoop it off the shaft.
Clean the shaft and the bore itself in the valve body with brake cleaner and a brass brush.
Check the integrity of the seals and replace or reinstall.
I'd recommend anyone performing this task simply leave the allen keyed shaft and nut alone. If you "MUST" tinker, those should be removed after the unit has been disassembled.
Use a MAPP or Propane torch to soften the 40+ year old epoxy (AKA JB Weld) and use a pair of Vise-Grips and a 13mm socket with a 7mm hex (I think... 7 or 5). Make sure you have a fluid pressure tester and a hydraulic pump to re-set the cut-off with.
Freed up pretty easily (after 40 years!) and cleaned, used some brake lube and put all back together. Used some long bolts to get the two ends to mate and then used the 4 allens. Have threads out 10mm.
Ready to put back and replace one that is in there. Will do while putting in new 19mm MC from Eric so I only have to get covered in brake fluid once...I hate that stuff!
Wondered about putting the bottom fitting on first and trying to fill with a little fluid from the top before I hook top on and start bleeding to at least get rid of a little air in the system first.

Good idea Eric- especially the gasket and O-rings. Not sure why you'd need nuts for those bolts though as the main piece is threaded where the allen screws go in.
If mine leaks after my rebuild, I'll be getting that!
If mine leaks after my rebuild, I'll be getting that!
This is a "lo-fi" version of our main content. To view the full version with more information, formatting and images, please click here.